
Make 3d printer pdf
Make: 3D Printing Projects - PDF
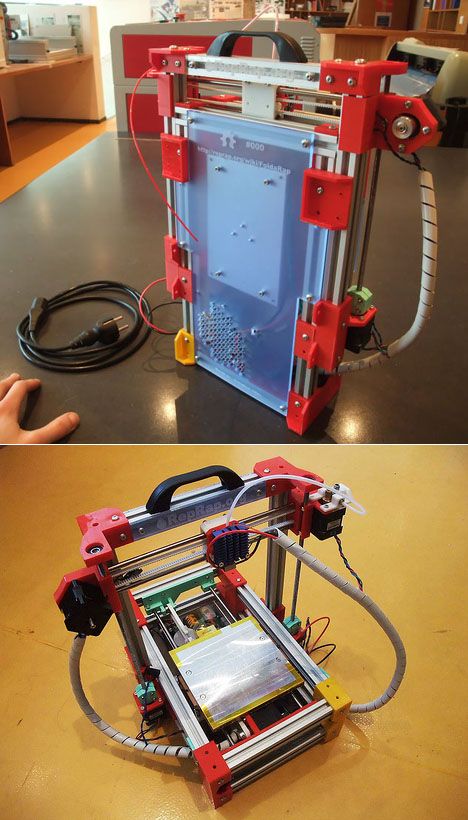
Jam-packed with eight different projects contributed by a roster of experienced Makers, this book uses 3D printers as a starting point for a number of creative challenges.
$14.99 /
Shipping calculated at checkout.
Jam-packed with eight different projects contributed by a roster of experienced Makers, this book uses 3D printers as a starting point for a number of creative challenges. Perfect for the intermediate Maker with some 3D-printing, soldering, and electronics experience, this book utilizes all of the core Maker skills—from electronics to soldering, software to hand assembly—to sharpen your techniques, guarantee success, and get you thinking about the next thing you’d like to build. Some projects you'll build from scratch; others take you through the process of modifying a store-bought item. All have free files for download on Github. Whether you’ve never used a 3D printer or simply let yours gather dust in the workshop, this book will get you Making—and get you thinking about what you’d like to make next!
Projects Included
- A 3D-printed LED lamp
- A '50s-style Raygun pen
- A smart SkyCam
- Animatronic eyes
- An inverted trike RC
- Chauncey the Wrylon Flower Care Robot (first envisioned in 1913!)
- A two-axis camera gimbal
- A BubbleBot
Meet the Authors
Brook Drumm
Brook is the founder and CEO of Printrbot, Inc. Brook is an American maker who set out to start a side business in his garage. After a wildly successful Kickstarter in 2011, Brook was catapulted to the white-hot intersection of crowd funding, 3D printing, and the exploding maker culture. Printrbot is an example of what blood, sweat, and tears can produce if you set your mind and heart on what you are passionate about.
James Floyd Kelly
James is a writer who lives in Atlanta, GA with his wife and two young sons. He has degrees in Industrial Engineering and English and enjoys making things, writing about those things, and training young makers. He has written over 25 books on a variety of subjects from Lego robotics to open source software to building your own CNC machine and 3D printer.
John Edgar Park
John is a producer at Disney Research. He has worked in animation production at Disney for 10 years and has worked in computer graphics since 1994 at various companies, including IBM, Novalogic game studio, and Sony Pictures Imageworks. John was the host and co-writer of the Emmy Award-nominated series Make: Television. He regularly demos his projects at Maker Faires, and builds and writes about technology projects for Make: magazine and other places online and in print.
Brian Roe
Brian is a tinkerer at heart and a Mechanical Designer by trade. His diverse career has led him down many interesting paths. He has worked as a creature creator for Hollywood films, and was part of a successful combat robot team for the show Battlebots. He also assisted with the design of the 3D cameras used for the film Avatar. Currently, he’s an engineer at Printrbot and working on The 10,000 Year Clock project for The Long Now Foundation.
Steven Bolin
Steven is Printrbot’s Production Manager and R&D department assistant. He has always enjoyed working with his hands, from construction to just projects around the house, and finds designing and building 3D printers an absolute joy. As a father of two kids and a former Youth Pastor, he loves making and playing with toys and 3D printing naturally lends itself to this hobby. Steven hopes to continue developing new products that incorporate 3D printing into everyday life.
Rick Winscot
Rick has code in brain, soldering iron in hand, and Art Blakey blaring in the background. He transforms techno-babble into reality… and is strangely fond of the ellipsis.
John Baichtal
John writes books about toys, tools, robots, and hobby electronics. His first book was The Cult of Lego, an exploration of the culture and work of adult Lego builders. He’s also the author of Maker Pro, Robot Builder, and The Locksmith’s Apprentice, a fantasy novel. He lives in Minneapolis with his wife and three children.
Nick Ernst
Nick served in the Marine Corps for eight years, then decided to go back toschool to pursue a career in Electronics Engineering. Before working on electronics at Printrbot Inc. , he spent two years at Parallax Inc. as the lead developer of the Elev-8 multi-rotor platform. He’s a Maker at heart, and enjoys tinkering and hacking on all shapes and sizes of electronics. He believes that if it ain’t broken, you haven’t tinkered enough!
Caleb Cotter
Caleb is an R&D Specialist at Printrbot. He’s a maker with a passion for 3D printing and rapid prototyping, and is fascinated with the opportunities presented by desktop manufacturing. When he’s not in his garage hacking—he’s still in his garage wrenching on his car.
How Do You Make & Create STL Files for 3D Printing – Simple Guide – 3D Printerly
When you are in the field of 3D printing, there are steps you have to follow to be able to actually 3D print your objects. Many steps are done for you but making 3D printer files is one of the most important ones.
This article will show you exactly how 3D printer files are made so read on if you’d like to know.
3D printer files are made by using Computer Aided Model (CAD) software which allows you to create what your model will look like. After your model is complete, you need to ‘slice’ your CAD file in a slicer program, the most popular being Cura. After your model is sliced, it will be ready for 3D printing.
Once you understand the steps of this process and do it for yourself, it all becomes very easy and clear. I will do my best to detail the step-by-step process on how beginners create 3D printer files.
Creating models for 3D printing and learning how to make your own 3D model is a great skill to learn, so let’s get right into it.
- Choose & open a CAD program
- Create a design or model using the tools in your chosen program
- Save & export your completed design to your computer (STL file)
- Choose a slicer program – Cura for beginners
- Open & ‘Slice’ your file with your desired settings into a G-Code File
Choose & Open a CAD Program
There are many CAD programs out there that can be used to create your model, but some are definitely more tiered towards beginners which is what I’ll focus on in this article.
Also, many higher level programs actually need to be purchased, so you’ll be happy to know everything I recommend will be completely free.
The best CAD programs for beginners are:
- TinkerCAD – click and create your own account
- Blender
- Fusion 360
- Sketch Up
- FreeCAD
- Onshape
Check out my article Best Free 3D Printing Software – CAD, Slicers & More.
The one that I will focus on and do recommend is TinkerCAD for beginners because it was definitely designed for you guys in mind. Beginners don’t want a complicated CAD program that takes a while getting used to, they want to be able to put something together in the first 5 minutes and see its capabilities.
One of the great features of TinkerCAD is the fact that it’s browser-based so you don’t have to install some huge program file to get started. Just go to TinkerCAD, create an account, go through the short tutorial on the platform and get to modeling.
Once you get the hang of one CAD program and the way designing a model works, you can move onto other programs, but at first just stick to one simple program.
TinkerCAD has enough capabilities to keep you modeling there for at least a few months, before you think about moving to a software with more features. For now, it will work wonders!
Create A Design Using the Tools in Your Chosen Program
TinkerCAD specializes in ease of use, as you put together blocks and shapes to gradually build a more complex structure that you can be proud of. The video below will show you a quick tutorial on exactly how it looks and how it’s done.
It’s always best to follow a video tutorial when learning how to create designs, while doing the same thing in the program yourself.
Reading a guide of some sort is great when you understand the program and are looking for ways to do cool, new things but when just starting out, get the experience behind you.
Once you’ve created some of your own models by following a tutorial, a good point to go to next is to play around in the program and get creative. One thing I chose to do is find a few household objects and try to model it as best as I could.
This ranged from cups, bottles, small boxes, vitamin containers, anything really. If you want to get really accurate, you can get a sweet pair of Calipers from Amazon.
If you want a quick, cheap but reliable set I’d recommend the Sangabery Digital Caliper.
It has four measuring modes, two unit conversion & zero setting function. You can get very accurate readings with this device, so I do recommend you getting one if you don’t already. Also comes with two spare batteries!
If you want a higher quality Caliper, go for the Rexbeti Stainless Steel Digital Caliper. It is more premium with a polished finish and a case to hold the device. It comes with IP54 water & dust protection, has 0.02mm accuracy and is great for the long-run.
Once you get some good practice creating different items, you’ll be a lot more prepared to start making useful and complex 3D printer files.
At first, it seems like all these simple shapes and holes won’t be able to make much. This is what I thought at first before seeing what people could really create in this software.
The following was made on TinkerCAD by Delta666 found on MyMiniFactory. It would be hard to describe this as a simple design, which just goes to show you the potential you could have with designing your own 3D printer files.
Save & Export Your Completed Design to Your Computer (STL File)
The great thing about TinkerCAD is how it’s made for things to be easy to use. This also includes saving and exporting your STL files straight to your computer.
Unlike some downloaded CAD software, this one auto-saves your work each change you make so you don’t have to worry about losing your work.
As long as you have named your work in the top left, it should continue to save. You’ll see a small message saying ‘All Changes Saved’ so you know if it’s working.
As you can see in the picture, exporting your CAD files into a downloadable STL file is a piece of cake. Simply click the ‘Export’ button in the top right of your TinkerCAD page and a box will pop up with a few options.
When it comes to 3D printing files, the most common ones we see are the .STL files. There are a few things that people say it’s abbreviated from such as Stereolithography, Standard Triangle Language and Standard Tessellation Language. Either way, we just know it works pretty good!
The complex part behind STL files is that they are made up of several tiny triangles, with more detailed parts having more triangles. The reason behind this is 3D printers can better understand this information with this simple geometric shape.
Below is a clear illustration of these triangles making up a model.
Choose a Slicer Program – Cura for Beginners
If you’re in the 3D printing field, you either would have come across Cura by Ultimaker or are already well-versed in the program. Cura is the most popular, cross-platform slicing software that 3D printer hobbyists use to prepare their files for 3D printing.
There isn’t much point trying to go with another slicer because this one works so well and does exactly what you need it to do. It’s very beginner-friendly and doesn’t take long at all to get the hang of it.
There are other slicer programs out there, some even dedicated to specific 3D printers like PrusaSlicer or ChiTuBox. They all essentially do the same thing but Cura is the choice I recommend.
Check out my article Best Slicer for the Ender 3 (Pro/V2/S1), which also goes for other 3D printers as well.
Open & ‘Slice’ Your File With Your Desired Settings Into a G-Code File
The term ‘slice’ your file is one that is widely used in the 3D printing field which means to prepare your CAD model and turn it into a G-code file which 3D printers can make use of.
G-code is basically a series of commands that tell your 3D printer what to do, from movement, to temperatures, to fan speed.
When you slice your file, there is a certain function where you can preview your model in its 3D printing form. This is where you view each layer of your 3D print from the ground, up and you can even see the direction your print head will go while in the printing process.
It really isn’t as complicated as it looks. All it really takes is looking over the settings and hitting the blue ‘Slice’ button on the bottom right of the program. The box to the top right shows a simplified way to change settings without getting into all the specific settings.
It’s a spice rack in case you’re wondering!There are many settings in your slicer you can take control of such as:
- Print speed
- Nozzle temperature
- Bed temperature
- Retraction settings
- Print order prioritization
- Cooling fan settings
- Infill percentage
- Infill pattern
Now just because it isn’t complicated to get started doesn’t it mean it can’t get as complicated as you’d like it. I’m sure there are settings that Cura experts have never thought about touching.
This really is a short list when you have seen just how many settings there are, but luckily, you don’t have to worry about most of the settings. Cura has default ‘profiles’ which give you a list of already done for you settings that you can input.
This profile usually works great by itself, but it can take a little tweaking on the nozzle & bed temperature before you get some great prints.
There is a cool menu which allows users to choose custom setting views for beginners to masters, down to custom so the functionality and ease of use is great.
After you follow all these steps, you’ll have created your 3D printer file which your printer can understand. Once I’ve sliced a model, I simply get my USB drive and micro SD card which came with my Ender 3, plug it into my laptop and select the ‘Save to Removable Device’ button and Voilà!
I hope these steps were easy to follow and help you get started making your own 3D printer files.
It’s an amazing skill being able to design your own objects from start to finish, so try your best to stick with it and become an expert in the future.
If you found this helpful, I have other similar posts like the 25 Best 3D Printer Upgrades/Improvements You Can Get Done & 8 Ways How to Speed Up Your 3D Printer Without Losing Quality so feel free to check them out and happy printing!
Adding 3D Models to PDF Files (Acrobat Pro)
- Acrobat User Guide
- Introduction to Acrobat
- Access Acrobat from desktops, mobile devices, and the web
- What's new in Acrobat
- Key combinations
- System Requirements
- Workspace
- Workspace basics
- Opening and viewing PDF files
- Opening PDF documents
- Navigating PDF document pages
- View settings PDF
- Customizing PDF viewing modes
- Enable thumbnail preview of PDF files
- Display PDF in browser
- Working with online cloud storage accounts
- Accessing files from Box
- Accessing files from Dropbox
- Accessing files from OneDrive
- Accessing files from SharePoint
- Accessing files from Google Drive
- Acrobat and macOS
- Acrobat notifications
- Grids, guides and measurements in PDF
- Use of Asian text, Cyrillic and left-to-right text in PDF documents
- Workspace basics
- Creating PDF documents
- Overview of the procedure for creating PDF documents
- Create PDF files in Acrobat
- Creating PDF documents with PDFMaker
- Using the Adobe PDF Printer
- Converting web pages to PDF
- Create PDF files with Acrobat Distiller
- Adobe PDF conversion settings
- PDF Fonts
- Editing PDF documents
- Editing text in PDF documents
- Editing images and objects in a PDF document
- Rotate, move, delete and renumber pages PDF
- Edit scanned PDF documents
- Enhance document photos taken with a mobile device camera
- Optimizing PDF documents
- PDF document properties and metadata
- Links and attachments in PDF
- Layers of PDF documents
- Thumbnails and bookmarks in PDF documents
- Action Wizard (Acrobat Pro)
- PDF files converted to web pages
- Customize PDF Documents for Use in Presentation
- Articles PDF
- Geospatial PDF files
- Applying actions and scripts to PDF files
- Changing the default font for adding text
- Deleting pages from PDF documents
- Scanning and OCR
- Scanning Documents to PDF
- Document Photo Enhancement
- Troubleshoot scanner problems when using Acrobat to scan
- Forms
- Fundamentals of Working with PDF Forms
- Create forms from scratch in Acrobat
- Create and distribute PDF forms
- Filling out PDF forms
- PDF form field properties
- Filling out and signing PDF forms
- Configuring Buttons to Perform Actions on PDF Forms
- Publish interactive web forms PDF
- Fundamentals of working with PDF form fields
- PDF form fields for barcode
- Collecting and Managing PDF Form Data
- Form Inspector
- Help with PDF forms
- Send PDF forms to recipients using email.
 mail or internal server
- Merge files
- Merge or merge files into one PDF file
- Rotate, move, delete and renumber pages PDF
- Add headers, footers, and Bates numbering to PDF documents
- Crop PDF 9 pages0005
- Adding watermarks to PDF documents
- Adding a background to PDF documents
- Working with PDF Portfolio Files
- Publish and share PDF Portfolio
- PDF portfolio overview
- Creating and customizing a PDF portfolio
- Sharing, editing, and annotating
- Sharing and tracking PDF documents online
- Mark text when editing
- Preparing to edit a PDF document
- Start PDF editing process
- Hosting collaborative reviews on SharePoint or Office 365 sites
- Participation in the editing of a PDF document
- Adding comments to PDF documents
- Adding a stamp to a PDF file
- Approval processes
- Comment management | view, add answer, print
- Import and export of comments
- PDF editing tracking and management
- Saving and exporting PDF documents
- Saving PDF
- Convert PDF files to Word format
- Convert PDF document to JPG file
- Converting and exporting PDF documents to other file formats
- File format options for PDF export
- Reusing PDF content
- Security
- Enhanced security for PDF documents
- Protecting PDF documents with passwords
- Digital ID Management
- Protecting PDF Documents with Certificates
- Opening protected PDF documents
- Removing sensitive data from PDF documents
- Setting security policies for PDF files
- Selecting the protection method for PDF documents
- Security warnings when opening PDF documents
- Protecting PDF files with Adobe Experience Manager
- PDF Protected View
- Overview of security features in Acrobat and PDF files
- JavaScript in PDF files is a security risk
- Attachments as a security risk
- Allow or block links in PDF files
- Electronic signatures
- Signing PDF documents
- Capture a signature on a mobile device and use it in any application
- Sending documents for electronic signatures
- About certificate signing
- Signatures based on certificate
- Confirmation of digital signatures
- Trusted list approved by Adobe
- Proxy Management
- Printing
- Basic tasks for printing PDF files
- PDF Brochure & Portfolio Printing
- PDF advanced print settings
- Print to PDF
- Print color PDF documents (Acrobat Pro)
- Printing PDF files using custom sizes
- Accessibility, tagging, and reflow
- Create and test accessibility tools for PDF documents
- Accessibility features in PDF files
- PDF Reading Order tool
- Reading PDF documents using accessibility and reflow features
- Edit document structure in the Content and Tags panels
- Create Accessible PDF Documents
- Search and indexing
- PDF indexing
- Search in PDF documents
- 3D Models and Media
- Add Audio, Video, and Interactive Objects to PDF Files
- Add 3D models to PDF files (Acrobat Pro)
- Displaying 3D models in PDF files
- Interaction with 3D models
- Measuring 3D objects in PDF files
- Customizing 3D Views in PDF Files
- Enable 3D content in a PDF document
- Adding multimedia content to PDF documents
- Add comments for 3D layouts in PDF files
- Play video, audio and multimedia formats in PDF files
- Adding comments to videos
- Prepress Tools (Acrobat Pro)
- Prepress Tools Overview
- Printing marks and fine lines
- View separation
- Processing transparency
- Color conversion and ink management
- Color Trapping
- Preflight (Acrobat Pro)
- PDF/X-, PDF/A-, and PDF/E compliant files
- Preflight profiles
- Enhanced Preflight
- Preflight reports
- Viewing preflight results, objects, and resources
- PDF output methods
- Fixing problem areas with the Preflight tool
- Automating Document Analysis with Droplets or Preflight Operations
- Analyzing documents with the Preflight tool
- Additional check with the Preflight tool
- Preflight Libraries
- Preprint variables
- Color Management
- Color Consistency
- Color settings
- Document Color Management
- Working with color profiles
- Basic Color Management
You can use the 3D tool (in U3D version 3 or PRC format) to place a 3D file on a PDF document page. Acrobat Pro can create 3D PDF files, but only from U3D ECMA version 1 files.
0419 on canvas where the 3D model will be placed, change the display properties of the toolbar and 3D content, and create additional views.
Adding a 3D model to a page
-
Select Tools > Rich Media > Add 3D .
-
Drag a rectangle on the page to define the canvas area to insert the 3D file.
-
In the Insert 3D dialog, press Browse to select a 3D file, then click Open . Press button OK .
In the Insert 3D dialog box, click Show Advanced Options to set initial 3D properties for the file.
Moving, deleting and resizing the 3D canvas
-
Select Tools > Rich Media > Select object .
Do not confuse the Select Object tool with the standard Selection tool.
 To set up the canvas for the 3D image, use the Select Object tool.
 -
Select the canvas for the 3D image and do the following:
-
To move the canvas, drag it to a new location on the page.
-
To delete the canvas (as well as the 3D model), select it and press the Delete key.
-
To resize the canvas, drag the corners of the frame. Dragging the corners of the frame resizes the 3D content while maintaining aspect ratio.
-
To display the 3D properties, double-click the Select Object tool (Tools > Rich Media > Select Object) on the activated model.
3D tab
The 3D tab options determine how the 3D model is presented. Unlike the options on the other tabs, the options on the 3D tab do not affect the imported file itself.
The 3D tab options are the same as the 3D toolbar options, with the following exceptions:
Lighting scheme
This setting determines the lighting theme for displaying animations in Acrobat.
Render style
Allows you to select a rendering style for the added 3D model.
Animation style
For models created with animation, this option determines how animation is played in Acrobat.
Add Default Views
Allows you to use different views of the model. Orthographic projection (ortho) allows you to remove one dimension while maintaining the ratio of the sizes between objects, but the 3D model becomes less realistic. Orthographic projection is most useful when viewing certain charts, such as graphs of 3D math functions. Perspective projection allows you to achieve a more realistic view, in which objects farther from the viewer appear smaller than objects of the same size but located in the foreground.
Show toolbar
Displays the 3D toolbar along with the image. If this option is not selected, right-click the 3D image to view the 3D toolbar.
Open model tree
Displays the model tree in the Model tree area. The model tree includes three areas. Each area displays specific information.
Scenario
Specifies the JavaScript file to be executed if the 3D model is available. Click the "Browse" button to add the JavaScript file to the PDF.
Startup settings
Enable at
Specifies the conditions for activating the 3D model. When the 3D model is enabled, it can be manipulated, for example, using the "3D" navigation tools.
Disable when
Specifies the conditions for turning off the 3D model. When the 3D model is disabled, a 2D preview or movie postcard appears on the canvas.
Play style
Allows you to display the 3D model in an off-page floating window. When you select Play Content in a Floating Window, you can specify the size of the window (in pixels) in the Height and Width menus.
Frame width
Select to create a frame around a 3D object.
Transparent background
Removes any background color.
Movie postcard image
To override the default view of the 3D model when it is not active, select the movie postcard. Click "Browse" to search for the desired image.
If a separate JavaScript file is associated with a 3D PDF model, it can be activated.
-
Open the PDF document in Acrobat.
-
Turn on the 3D model using the Hand tool, then right-click the model and select Run JavaScript .
-
Select the JavaScript file you want to add, and then click Open .
Related content
- Playing video, audio, and multimedia formats in PDF files
- Adding multimedia content to PDF documents
- Displaying 3D models in PDF files
- Interacting with 3D models in 3D measurements PDF 9 files0005
- Setting up 3D views in PDF files
- Adding comments to 3D layouts in PDF files
Using the Adobe PDF Printer, Acrobat
User Guide Cancel
Search
Last updated Sep 30, 2022 10:49:34 AM GMT | Also applies to Adobe Acrobat 2017, Adobe Acrobat 2020
- Acrobat 9 User Guide0004
- Introduction to Acrobat
- Access Acrobat from desktops, mobile devices, and the web
- What's new in Acrobat
- Key combinations
- System Requirements
- Workspace
- Workspace basics
- Opening and viewing PDF files
- Opening PDF documents
- Navigating PDF document pages
- View PDF 9 settings0005
- Customizing PDF viewing modes
- Enable thumbnail preview of PDF files
- Display PDF in browser
- Working with online cloud storage accounts
- Accessing files from Box
- Accessing files from Dropbox
- Accessing files from OneDrive
- Accessing files from SharePoint
- Accessing files from Google Drive
- Acrobat and macOS
- Acrobat notifications
- Grids, guides and measurements in PDF
- Use of Asian text, Cyrillic and left-to-right text in PDF documents
- Workspace basics
- Creating PDF documents
- Overview of the procedure for creating PDF documents
- Create PDF files in Acrobat
- Creating PDF documents with PDFMaker
- Using the Adobe PDF Printer
- Converting web pages to PDF
- Creating PDF files with Acrobat Distiller
- Adobe PDF conversion settings
- PDF Fonts
- Editing PDF documents
- Editing text in PDF documents
- Editing images and objects in a PDF document
- Rotate, move, delete and renumber pages PDF
- Edit scanned PDF documents
- Enhance document photos taken with a mobile device camera
- PDF document optimization
- PDF document properties and metadata
- Links and attachments in PDF
- Layers of PDF documents
- Thumbnails and bookmarks in PDF documents
- Action Wizard (Acrobat Pro)
- PDF files converted to web pages
- Setting up PDF documents for use in a presentation
- Articles PDF
- Geospatial PDF files
- Applying actions and scripts to PDF files
- Changing the default font for adding text
- Deleting pages from PDF documents
- Scanning and OCR
- Scanning Documents to PDF
- Document Photo Enhancement
- Troubleshoot scanner problems when using Acrobat to scan
- Forms
- Fundamentals of Working with PDF Forms
- Create forms from scratch in Acrobat
- Create and distribute PDF forms
- Filling PDF Forms
- PDF form field properties
- Filling out and signing PDF forms
- Configuring Buttons to Perform Actions on PDF Forms
- Publish interactive web forms PDF
- Fundamentals of working with PDF form fields
- PDF form fields for barcode
- Collecting and Managing PDF Form Data
- Form Inspector
- Help with PDF forms
- Send PDF forms to recipients using email.
 mail or internal server
- Merge files
- Merge or merge files into one PDF file
- Rotate, move, delete and renumber pages PDF
- Add headers, footers, and Bates numbering to PDF documents
- Crop PDF pages
- Adding watermarks to PDF documents
- Adding a background to PDF documents
- Working with PDF Portfolio Files
- Publish PDF Portfolio and Share
- PDF portfolio overview
- Creating and customizing a PDF portfolio
- Sharing, editing, and annotating
- Sharing and tracking PDF documents online
- Mark text when editing
- Preparing to edit a PDF document
- Start PDF editing process
- Hosting collaborative reviews on SharePoint or Office 365 sites
- Participation in editing PDF document
- Adding comments to PDF documents
- Adding a stamp to a PDF file
- Approval processes
- Comment management | view, add answer, print
- Import and export of comments
- PDF editing tracking and management
- Saving and exporting PDF documents
- Saving PDF
- Convert PDF files to Word format
- Convert PDF document to JPG 9 file0005
- Converting and exporting PDF documents to other file formats
- File format options for PDF export
- Reusing PDF content
- Security
- Enhanced security for PDF documents
- Protecting PDF documents with passwords
- Digital ID Management
- Protecting PDF Documents with Certificates
- Opening protected PDF documents
- Remove sensitive data from PDF documents
- Setting security policies for PDF files
- Selecting the protection method for PDF documents
- Security warnings when opening PDF documents
- Protect PDF files with Adobe Experience Manager
- PDF Protected View
- Overview of security features in Acrobat and PDF files
- JavaScript in PDF files is a security risk
- Attachments as a security risk
- Allow or block links in PDF files
- Electronic signatures
- Signing PDF documents
- Capture a signature on a mobile device and use it in any application
- Sending documents for electronic signatures
- About certificate signing
- Signatures based on certificate
- Confirmation of digital signatures
- Adobe 9 Approved Trusted List0005
- Proxy Management
- Printing
- Basic tasks for printing PDF files
- PDF Brochure & Portfolio Printing
- PDF advanced print settings
- Print to PDF
- Print color PDF documents (Acrobat Pro)
- Printing PDF files using custom sizes
- Accessibility, tagging, and reflow
- Create and test accessibility tools for PDF 9 documents0005
- Accessibility features in PDF files
- PDF Reading Order tool
- Reading PDF documents using accessibility and reflow features
- Edit document structure in the Content and Tags panels
- Creating Accessible PDF Documents
- Search and indexing
- PDF indexing
- Search in PDF documents
- 3D models and multimedia
- Add audio, video, and interactive objects to PDF files
- Add 3D models to PDF files (Acrobat Pro)
- Displaying 3D models in PDF files
- Interaction with 3D models
- Measuring 3D objects in PDF files
- Customizing 3D Views in PDF Files
- Enable 3D content in a PDF document
- Adding multimedia content to PDF documents
- Add comments for 3D layouts in PDF 9 files0005
- Play video, audio and multimedia formats in PDF files
- Adding comments to videos
- Prepress Tools (Acrobat Pro)
- Prepress Tools Overview
- Printing marks and fine lines
- View separation
- Processing transparency
- Color conversion and ink management
- Color Trapping
- Preflight (Acrobat Pro)
- PDF/X-, PDF/A-, and PDF/E compliant files
- Preflight profiles
- Enhanced Preflight
- Preflight reports
- Viewing preflight results, objects, and resources
- PDF output methods
- Fixing problem areas with the Preflight tool
- Automate Document Analysis with Droplets or Preflight
- Analyzing documents with the Preflight tool
- Additional check with the Preflight tool
- Preflight Libraries
- Preprint variables
- Color Management
- Color Consistency
- Color settings
- Document Color Management
- Working with color profiles
- Basic Color Management
In many source applications, you can use the Print command with an Adobe PDF printer to convert a file to PDF. The original document is converted to PostScript and loaded directly into Distiller to be converted to PDF without manually launching Distiller. The current Distiller settings and Adobe PDF settings are used to convert the file. When working with custom page sizes, you must create a custom page size.
(Windows) Some features available in PDFMaker for Microsoft Office documents are not supported by the Adobe PDF printer. For example, when using the Adobe PDF printer, you cannot create bookmarks and hyperlinks. To take advantage of these features, use PDFMaker to create a PDF from a Microsoft Office document.
Adobe PDF Printer creates untagged PDF files. The tagged structure is essential for reflowing content for a portable device and is recommended for correct, reliable results in screen readers.
Create a PDF using the Print command (Windows)
-
Open the file in the source application and choose File > Print.
-
Select Adobe PDF from the list of printers.
-
Click the Properties (or Preferences) button to set Adobe PDF printer options. (Some applications require you to click the "Settings" button in the "Print" dialog box to open a list of printers, and then click "Properties" or "Preferences").
-
In the Print dialog box, click OK.
The PDF file is saved in the folder specified in the Adobe PDF Document Folder options in the Preferences dialog box; the default location is "My Documents". If "Prompt for Adobe PDF File Name" is selected, the Save As dialog box will open during printing.
Creating PDFs with the Print command (macOS X)
The way PDFs are created with the Print command has changed in macOS 10.6 Snow Leopard for Acrobat 9.1 and later. The following procedure describes the method for Snow Leopard and earlier versions of macOS X.
-
Open the file in the source application and choose File > Print.
-
Select Save as Adobe PDF from the PDF menu at the bottom of the dialog box.
-
To customize Adobe PDF, select one of the default options, or set options using Distiller. All user defined options are listed here.
Most users will be fine with the default Adobe PDF settings.
-
For "After creating PDF", choose whether to open the PDF file or not.
-
Click Continue.
-
Enter a name, specify a location for the PDF file, and click the Save button.
By default, the PDF file is saved with the same file name and extension .pdf.
Print settings apply to all applications that use the Adobe PDF Printer until you change the settings in the source application in Page Setup, Document Setup, or Print.
The printer preferences dialog box is named Adobe PDF Printing Preferences, Adobe PDF Default Printing, or Adobe PDF Document Properties, depending on how you access it.
To access print settings:
-
Open the Printers window from the Start menu.
 Right-click Adobe PDF Printer and select Printing Preferences.
 -
In a source application such as Adobe InDesign, choose File > Print. Select the Adobe PDF printer and click the Properties (or Preferences) button. (Some applications require you to click the Settings button in the Print window to open a list of printers, and then click Properties or Preferences to change Adobe PDF settings.)
The PDF properties are on the Adobe PDF Options tab. The Paper/Quality tab and the Layout tab contain other common options for paper source, printer ink, page orientation, and pages per sheet.
"Printer Settings" is different from "Properties" of the printer. The settings include Adobe PDF properties for the conversion process; The Properties dialog box contains tabs with options that are available for any type of printer.
Adobe PDF Conversion Options
Select a built-in set of options from the Standard Options menu, or click Edit to view or change options on the PDF Creation Options tab.
Protect Adobe PDF
To secure the PDF, select one of the following options, or click Edit to view or change security settings.
- Confirm for every job . Opens the Adobe PDF - Protect dialog every time you create a PDF using the Adobe PDF Printer. Specify the desired settings in the dialog box.
- Use the latest known security settings . Use the same security settings that were last used when creating a PDF using an Adobe PDF printer on a computer.
Folder of finished documents
Select the output folder of the converted PDF or click Browse to add or change the output folder. Select Prompt for Adobe PDF filename to specify the location and filename during conversion.
Paper Size menu
Select the specified custom page size.
Replace existing PDF
Choose whether you want to replace an existing PDF file: Always , Ask every time or Never .
View Adobe PDF results
Automatically launches Acrobat and displays the converted document.
Add document details
Contains information such as the file name, creation date, and time.
Use only system fonts; do not use document fonts
Deselect this option to download all fonts when creating a PDF. All fonts will be available in the PDF document, but it will take more time to create it. Select this option if you want to work with documents in Asian languages.
Delete completed job report files
Automatically removes completed job report files.
On Windows, you can generally leave the Adobe PDF printer properties unchanged unless printer sharing or security settings are configured.
"Printer Settings" is different from "Properties" of the printer. The Properties dialog box contains tabs with options that apply to any type of printer, Preferences includes conversion options specific to the Adobe PDF printer.
Setting Adobe PDF Printer Properties
-
From the Start menu, open the Devices and Printers folder and right-click on the Adobe PDF Printer.
-
Select Properties.
-
Click the tabs and select the options you want.
-
Exit Distiller if it is running and wait for all queued jobs in the Adobe PDF Printer to complete.
-
From the Start menu, open the Devices and Printers folder.
-
Right-click the Adobe PDF printer and select Printer Properties.
-
Click the Ports tab and then click Add Port.
-
Select Adobe PDF Port (Windows XP) or Adobe PDF Port Monitor (Vista/Windows 7) from the list of available port types, then click New Port.
-
Select a local folder for PDF output and click OK. Then click "Close" to exit the "Printer Ports" dialog box.
-
In the Adobe PDF Properties dialog box, click Apply, then click OK.
It is recommended to select a folder on the same system where Distiller is installed. Although remote or network folders are supported, user access to them is limited, and certain security restrictions apply.
-
Exit Distiller if it is running and wait a few minutes for all jobs in the Adobe PDF printer queue to complete.
-
From the Start menu, open the Devices and Printers folder.
-
Right-click the Adobe PDF printer and select Printer Properties.
-
Click the Ports tab.
-
Select the default port (Documents) and click Apply.
-
Select the port you want to delete, click Delete Port, then click OK to confirm the deletion.
-
Select the Documents port again and click Close.
It is important to distinguish between page size (defined in the Document Settings dialog box for a given document in the source application) and paper size (sheet of paper, film, or area of the printing plate on which to print). The page size can be set to U.S. Letter (8.5 x 11 inches or 21.59x 27.94 cm), but you need to print on a larger sheet of paper or transparencies to accommodate the printer's marks or bleed areas. To ensure that the document prints correctly, set the page size in the application and on the printer.
The list of paper sizes available in Acrobat is determined by the PPD file (PostScript printers) or the printer driver (other printers). If the printer and the PPD selected for PostScript printing support custom paper sizes, the Paper Size menu will display the Custom option. For printers designed for very large print sizes, Acrobat supports a page size of 15,000,000 inches (38,100,000 cm) by 15,000,000 inches (38,100,000 cm).
Creating a custom page size (Windows)
-
Do one of the following.
-
From the Start menu, open the Devices and Printers or Printers and Faxes folder. Right-click Adobe PDF Printer and select Printing Preferences.

-
In a source application such as Adobe InDesign, choose File > Print. Select Adobe PDF as the printer and click the Properties button (Some applications require you to click the Settings button in the Print window to open a list of printers, and then click Properties or Preferences to change Adobe PDF settings) .
-
-
On the PDF Creation Options tab, click the Add button next to the Adobe PDF Paper Size menu.
-
Specify the name, width, height, and units. Click Add/Change to enter a name for the new size in the Adobe PDF Paper Size menu.
Creating a custom page size (macOS)
-
In a source application such as Adobe InDesign, choose File > Page Setup.
-
From the Paper Size pop-up menu, select Custom Sizes.
-
Press the Plus (+) button.
-
Specify a name, width, height, and margins. The units of measure depend on the system language.
Learn more


