3D printer pla not sticking to bed
PLA Not Sticking to the Bed? Fix It With These Tips!
PLA is a 3D printing filament made from renewable resources such as corn starch. It has many advantages over other materials, but it can sometimes be a challenge to get it to stick to the 3D printer's bed. If your PLA is not sticking, don't worry! You can fix the problem and bring your 3D prints back on track by following the tips below.
1. Ensure That the Build Plate Is Level Enough
The PLA won't stick correctly if the build plate isn't level enough. To check if your build plate is level, use a feeler gauge to measure the gap between the nozzle and the bed; it should be less than 0.1 mm. You can also use a sheet of paper to test the level of the bed. The bed isn't level enough if the piece of paper can slip underneath the nozzle, and you'll need to adjust the leveling screws until the gap is less than 0.1 mm, or the paper can't slip underneath the nozzle anymore.
In addition to ensuring that the build plate is level, ensure that it’s clean. If your build plate isn't clean enough or has debris, your PLA may not stick to the bed correctly. So make sure that you clean your build plate before each print. You can use isopropyl alcohol or another cleaning solution to remove any dirt from the surface of the build plate.
2. Check the Temperature and Speed of Your 3D Printer
Image credit: Fabrikasimf/FreepikThe ideal range for PLA filaments is between 185-210 degrees Fahrenheit. If the bed is too cold, the PLA will not stick. You can also use a heated build platform to promote better adhesion. In addition to checking the temperature of your 3D printer and the bed, it's important to adjust the printing speed. PLA is a strong material, so you don't have to worry about it breaking if you print too fast.
If you print too slowly, the PLA may start to sag before it has cooled enough to solidify, and this can cause your 3D prints to be deformed or even break apart. The best way to cool PLA is with a high-speed fan. You can increase the speed of this fan by going into your printer's settings menu. The best printing speed for this filament is around 60-90 mm/s.
3. Ensure That You Use the Correct Build Plate Material
One of the essential factors in getting PLA to stick to the build plate is choosing the suitable material. Glass and aluminum are two common build plate materials. Still, they can make it harder for PLA to adhere as it relies on surface tension to attach itself to the build plate. However, both glass and aluminum have very low surface tension, which makes it more difficult for the PLA to form a strong bond.
When choosing the build plate of the material to 3D print with PLA, ensure that you select the ones with higher surface tension, such as polycarbonate or NinjaFlex, which will always result in cleaner designs.
Also, ensure that the Z-height of your 3D printer is adjusted well. Z-height is the distance between the build plate and the tip of the nozzle. If this distance is too great, the filament may not be able to adhere to the plate correctly.
4. Use a Brim on Your Prints To Help the PLA Stick Better
When printing PLA, it is vital to ensure the first layer sticks well to the build plate. A brim is a layer of extruded plastic surrounding the printed part. The brim helps keep PLA from curling up at the edges and falling off the build plate. In addition, the brim provides a larger surface area for the hot end to heat, which can improve bed adhesion.
To add a brim to your print, go to the Advanced settings in your 3D printer slicer software and adjust the Brim Width and Brim Distance as shown in the image below. How wide you make the brim will depend on how large your part is and how well it sticks to the build plate. Experiment with different values until you find a setting that works well for your printer and filament.
5. Try Using a Different PLA Filament
There are different types of PLA, each with its own properties. If you find that the filament you are using is not sticking to the bed properly, it may be due to the type of PLA you are using. For example, some PLA filaments are more heat-resistant than others, so they will require a higher bed temperature to stick correctly.
Alternatively, you may need to increase the glue or hairspray you use. Whatever the case, it is always worth trying a different type of PLA if the one you use is not giving you the desired results.
Other Tips for 3D Printing With PLA
Here are some tips to get the best results when printing with PLA:
- Use blue painter's tape or a glass bed: PLA sticks well to smooth surfaces like blue painter's tape or a glass bed covered in hairspray. If you are having trouble getting your PLA to stick, try one of these surfaces.
- Print in a well-ventilated area: When PLA is heated, it gives off slight fumes that can be irritating if you breathe them in. For this reason, it's best to print in a well-ventilated area.
 If you don't have good ventilation, you can try printing with the door open or using a fan to blow the fumes away from your face.
 - Store PLA in an airtight container: PLA is hygroscopic, which means it absorbs moisture from the air. If PLA absorbs too much water, it can become brittle and difficult to print. To prevent this, store your PLA in an airtight container with desiccant packets.
- Keep your nozzle clean: A dirty nozzle can cause problems with your 3D prints. The filament may even jam during 3D printing, causing your 3D prints to be deformed or have gaps. You can use a brass brush or needle to remove any build-up on the tip to clean your nozzle, or you can even try soaking the nozzle in acetone overnight.
- Store PLA properly: PLA can be difficult to work with if it's not stored correctly and tends to become brittle if exposed to too much moisture.
Change the Build Plate if the PLA Still Doesn’t Stick to the Bed
If you are still experiencing issues with sticking, it may be time to change the build plate. You can find a new build plate at your local hardware store or online. To replace the build plate, you can simply loosen the screws that hold it. Once the screws are loose, you should be able to lift the build plate off of the bed.
To install the new one, you will begin by aligning the new build plate with the four mounting holes on the heated bed. Once the build plate is in place, start threading in the screws. Be sure not to over-tighten the screws, or you could damage the heated bed. Once everything is tight and secure, turn off the heated bed and allow it to cool down completely. Once it's cooled down, it should be ready to start printing again!
PLA Not Sticking to the Bed? Fixed
It can prove a challenge to get PLA to stick to your 3D printer's bed. By following the tips in this guide, you should be able to fix the issue and enjoy more successful 3D printing with this common type of filament. The build plate level, material, and printer temperature are all important, while using a brim may also help, or a different type of PLA.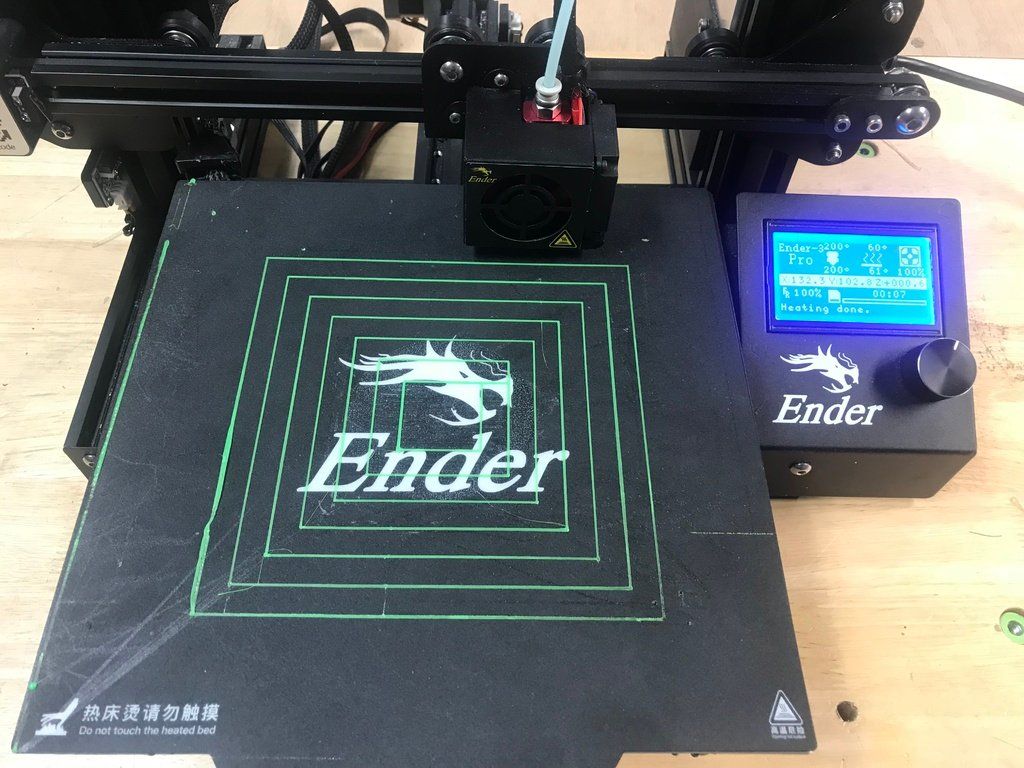
14 Ways How to Fix PLA Not Sticking to Bed – Glass & More – 3D Printerly
PLA is the most popular 3D printing filament and is usually easy to print but sometimes people have trouble with PLA not sticking to the bed, whether it’s glass, PEI, or magnetic surface. I decided to write an article helping people get PLA to stick nicely.
The best method to get PLA to stick to the print bed is to level your bed properly and use a good bed & printing temperature so the filament is soft enough to adhere nicely. You can also use a raft/brim to provide a stronger foundation for your model. Check your nozzle isn’t clogged or damaged and clean your print bed.
This is the basic answer but there’s more important information that you’ll want to know, so keep reading through this article.
Why Does PLA Not Stick to My Build Surface?
Having a good first layer in any 3D print is the most important and essential factor because any minor issue at this point can disturb the strength and success of the whole print model.
If you want a successful 3D print that has all the points ticked properly, you need to make sure that the first layer is sticking to the print bed in an effective manner. This is the factor that is mainly known as a 3D printer’s bed adhesion.
Although PLA is the most common and easiest 3D filament to use for printing purposes, it can still cause sticking issues sometimes. Below are the most prominent reasons behind PLA not sticking to the bed surface issue:
- The Bed is Not Leveled Properly
- Bed Temperature is Too Low
- Printing Temperature is Too Low
- Wrong Z-Offset Value
- Not Using a Raft or Brim
- Bed is Warped
- Nozzle Clogged or Damaged
- Print Bed is Not Clean
- Not Using Bed Adhesives
- Build Plate Material Lacks Adhesion
- Filament Absorbed Moisture
- Cooling is Too High
- First Layer Printing Speed is Too High
- Initial Layer Flow Rate Low
How to Fix PLA Not Sticking to Bed?
Although there are various factors that can be a cause of this issue, you don’t have to be worried as each cause has its own solution as well. Just stay relaxed, find the issue with your 3D printer and go with the best suitable solution.
- Level the Print Bed
- Increase Your Bed Temperature
- Increase Your Printing Temperature
- Set Your Z-Offset Value Correctly
- Use a Raft or Brim
- Check Your Bed Isn’t Warped
- Unclog Your Nozzle or Change to a New Nozzle
- Clean Your Print Bed
- Use Bed Adhesives
- Change Your Print Bed
- Dry Your Filament
- Reduce Your Cooling Settings
- Decrease Your First Layer Printing Speed
- Increase Your Initial Layer Flow Rate
1. Level the Print Bed
The first thing you should do when PLA is not sticking to the print bed is to level your bed. The reason this works is because you want the extruded filament to have an optimal distance between the bed surface and the nozzle so it has some pressure on the build plate.
The usual distance is known to be around 0.1mm or the thickness of an A4 piece of paper.
When your bed is uneven, the extruded filament will adhere to the bed in some places and not in others, leading to print failures.
There are two main ways to level your bed, either with manual leveling or automatic leveling.
Manual Bed Leveling
- Use the four bed leveling knobs usually equipped right below the print bed to raise or lower the bed
- Start by positioning the nozzle at its default or best suitable position by auto-homing the printer.
- The nozzle shouldn’t be too far from the bed when you home to the printer. You may need to adjust the screws on the aluminum bed or move the Z-endstop
- It’s a good idea to heat up your bed to the usual print temperature (around 50°C).
- You can start with the bottom-left corner and adjust the leveling knob until the nozzle is close
- Get your piece of paper and place it underneath the nozzle, then lower the bed leveling knob until there is just enough space to wiggle the paper.
- Once the paper is showing signs of friction at one angle, move to next corner and test the distance in the same way.
- Once the distance is the same on all corners and the middle, you may test print to see if the problem has been solved as desired.
Using Automatic Bed Leveling Feature
- Auto bed leveling features usually take help from a bed leveling sensor that has a predefined scenario of working.
- Simply go into the printer’s menu using its small screen.
- There should be a Bed Leveling option on your printer’s control screen.
- Press this then it should do the usual automatic bed leveling and automatically adjust distances based on the measurements.
An example of an automatic bed leveler would be the ANTCLABS BLTouch Auto Bed Leveling Sensor from Amazon. It works with all sorts of bed materials and has a precision of around 0.005mm. It comes with a 1M connector extension cable too.
Pro Tip: If you go with the Automatic Bed Leveling feature, it is essential to set the value of Z-offset perfectly for proper balance.
After this, you should ideally put a medium-sized object into a slicer like Cura, apply 5 Skirts so you can level your bed while the filament is being extruded around the model. You can easily tell how well your bed is leveled when the Skirt is printing.
2. Increase Your Bed Temperature
The next thing you want to look at is your bed temperature since it can help the PLA adhere to the bed better. When you print with PLA, use a bed temperature between 40-60°C.
Once you do this, try printing a test model to see how the filament adheres.
One user who 3D prints with PLA said he tested adhesion of PLA on a glass print bed and found that 50°C worked for him, while another user did 60°C.
3. Increase Your Printing Temperature
Similar to your bed temperature, increasing the printing temperature can make your filament softer, which enables it to stick to the bed better. When your filament isn’t softened up enough, adhesion to the bed can be difficult.
Calibrating your printing temperature is important for the best quality, but if you are having trouble with adhesion, try increasing your printing temperature by around 5-10°C and see if that helps.
4. Set Your Z-Offset Value Correctly
Your Z-Offset is basically an adjustment that your 3D printer makes to the nozzle height during the printing process. Usually, leveling your print bed should put your nozzle is a good enough location to not need a Z-Offset, but it’s an extra option for you to use to get that extra accurate leveling.
If you notice your nozzle is still to far from the build plate, try inputting a Z-Offset value in your 3D printer or slicer.
A positive Z-Offset value will raise the nozzle while a negative value will lower the nozzle.
5. Use a Raft or Brim
A raft of brim is a great method to increasing adhesion with PLA 3D prints. I use it for most of my larger 3D prints to ensure it sticks to the build plate throughout the whole printing process.
A raft/brim is basically an extra supporting print added below your model to help build a stronger foundation. A raft is the larger and more secure form of this build plate adhesion technique, while a brim is a thinner print that prints around the model.
Check out my article Skirts Vs Brims Vs Rafts – A Quick 3D Printing Guide for more details.
6. Check Your Bed Isn’t Warped
A warped 3D print bed is a less common but still possible issue that makes it harder for PLA to adhere to the print bed. Some users tried absolutely everything to get their models to stick to the print bed and nothing worked.
They ended up getting a ruler and testing how flat the actual build plate was and found that it was bending after being heated up.
If you figure out that your bed is warped, that is most likely the cause to your PLA 3D prints not sticking down properly. Your best option here is to replace the build surface.
The flattest build surface is usually borosilicate or tempered glass. People have a lot of success with PEI or spring steel print beds.
7. Unclog Your Nozzle or Change to a New Nozzle
A nozzle that’s clogged or damaged can also contribute to PLA prints not sticking properly. Ideally, a 3D printer needs to extrude filament smoothly to get a good grip on the bed, so if the nozzle is clogged up or damaged, it will negatively affect extrusion.
Do the “Cold Pull” method to unclog your filament or use a cleaning filament to clean out the nozzle.
8. Clean Your Print Bed
A print bed that has dirt and grime can negatively affect the adhesion of PLA 3D prints, especially when you touch the build plate too much with oily hands.
Many people have mentioned that after touching their bed multiple times, they couldn’t get PLA to stick, but after cleaning the print bed and touching the bed less, they finally got some good adhesion.
In addition to that, sometimes the leftover residues from previous prints can reduce adhesion, so make sure to clean that off also.
Even after applying many other fixes, if you don’t clean the print bed, it can be an issue for PLA filament to stick, so go through the cleaning process:
- Get a paper towel or clean cloth with at least 70% isopropyl alcohol or acetone
- Apply the cleaning solution to the paper towel or cloth and wipe the bed gently
- Let the print bed air dry so the liquid evaporates, then you should have a nice clean bed
- You can also do this when the bed is warmed up to around 40°C to help with the cleaning and evaporation process.
9. Use Bed Adhesives
Bed adhesives such as hairspray, glue sticks, or even different tapes like Painter’s tape or Kapton tape can significantly help you with getting PLA prints to stick.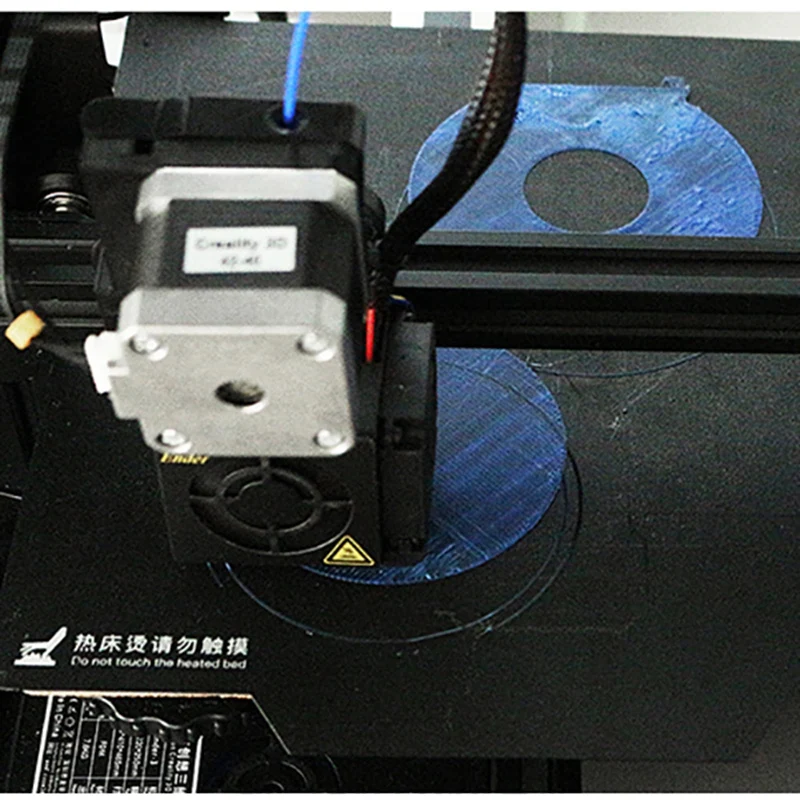
It’s a good idea to use these adhesives on surfaces like a glass bed, and they can even help to prolong the life of some print bed materials. Once the first layer sticks down nicely to the bed adhesive, the rest of your print should be stable.
Try not to go overboard with the amount of adhesive you use on the bed.
- Glue Stick
- Hair Spray
- Blue Painter’s Tape
10. Change Your Print Bed
If many of these fixes don’t work, you can try changing your print to a material that is more adhesive-friendly. I recently got a 3D printer that uses a PC spring steel sheet and the adhesion is really good.
One of the best things about this build surface is that after the bed temperature cools down, the print actually loosens by itself and doesn’t even need any spatula or flex to remove.
I’d highly recommend going for either a magnetic bed, a PEI bed or a PC spring steel sheet for your 3D printer.
The HICTOP Flexible Steel Platform with PEI Surface & Magnetic Bottom Sheet is the perfect combination for your 3D printer. It comes in a range of sizes and you can even choose the double-sided surface with smooth and textured sides.
.
11. Dry Your Filament
3D printing filament are known to be hygroscopic which means they are prone to absorbing moisture from the environment. When your PLA absorbs moisture, it can affect the way it’s extruded, as well as the adhesion.
In addition to reducing adhesion, moisture within your PLA filament can cause imperfections such as blobbing and zits on your models, so you want to fix this problem quickly.
The simple way to dry your filament is to use a filament dryer like the SUNLU Upgraded Filament Dryer Box from Amazon. You can place your spool of filament in the machine and input the temperature settings & time to dry out the moisture.
Check out my article Filament Moisture Guide: Which Filament Absorbs Water? How to Fix It for more information.
12. Reduce Your Cooling Settings
Your slicer should turn off the cooling fan for the first few layers to help with adhesion, but you want to double-check that this is set up properly. You may want to increase the height of layer that your fan comes on to help with adhesion if you get warping past those layers.
PLA usually prints best when the cooling fan is at 100% so I’d advise against turning down the percentage.
Make sure the Initial Fan Speed is at 0% and the Regular Fan Speed is at 100%, but consider changing the Regular Fan Speed at Layer. If you have a Raft, this shouldn’t be too much of an issue for getting good adhesion since it acts as a wide foundation for your print to adhere.
For more info about cooling, check out my article How to Get the Perfect Print Cooling & Fan Settings.
13. Decrease Your Initial Layer Printing Speed
The speed at which your first layer prints or the Initial Layer Speed shouldn’t be too high, so your first layer has the ability to adhere to the bed nicely. Cura should have a default value of 20mm/s which works really well.
Check that your Initial Layer Speed is low enough to give your prints the best chance to stick to the build surface.
Regardless of how you change your print speed, the Initial Layer Speed is not affected by any other settings, so it should stay the same. One user who tried many fixes for getting PLA to stick, found that after reducing his Initial Layer Speed, he finally solved the problem.
I wrote a pretty useful article called What is the Best Print Speed for 3D Printing? Perfect Settings, so feel free to check that out.
14. Increase Your Initial Layer Flow Rate
This setting is a nice little trick that you can use to extrude more material just for the first layer, called the Initial Layer Flow in Cura. It’s a percentage which defaults to 100% to push your PLA harder into the build plate to improve bed adhesion.
You’ll probably have to search for the settings as shown in the picture above since it doesn’t show by default.
It’s usually used if you have a badly leveled bed, so if the bed is too close, you would reduce the flow, while increasing the flow if the bed was too far. You shouldn’t have to use this setting if you have a properly leveled bed though.
How to Fix PLA Not Sticking to Bed – Glass, PEI, Magnetic
Below are some tips and tricks that are for different kinds of print beds so that you can utilize them if you are facing adhesion issues while printing PLA. Most of these can be applied to all three kinds of print bed surfaces.
- Clean the surface every so often with 70% or 99% IPA solution, or a similar cleaning product
- PEI sheets are considered the best suitable solution to this issue as they have been appreciated by plenty of users.
- One of the users also claimed in his Amazon review that PEI sheets allow the PLA to stick to the bed even if the bed has a slight flaw in its balance or level.
- Some people recommend to make your glass bed slightly rough by using sandpaper, though it might affect the smooth finish you usually get.
- I’ve heard of users having success with normal picture frame glass for PLA 3D prints.

A user claimed that he used a mixture of water and salt for cleaning purposes. Then he let the plate dry out completely.
This factor allowed the water to evaporate while leaving the salt residues on the glass surface. This practice increased the bed adhesion and worked for him almost always.
Another user suggested the same procedure with sugar water as he believes that any crystalline substances will have the same results on the print bed.
The first layer does not stick when printing on a 3D printer?
Home » Articles » Problems with 3D Printing » First layer not sticking when printing on a 3D printer?
First coat not sticking?
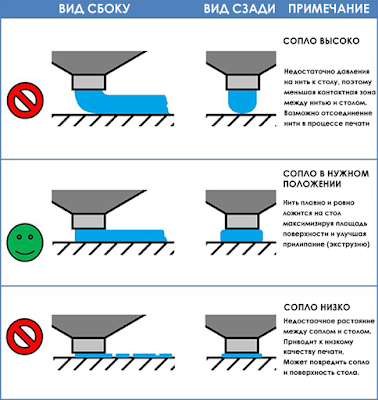
This problem needs to be urgently solved, since the quality of the model construction depends on the first layer serving as the basis, or rather on the reliability of its fastening to the desktop. There are several reasons for its appearance, consider the most common of them.![]() nine0003
nine0003
1. Skewed print bed.
The print platform must be in an absolutely flat horizontal position before starting the 3D printer, otherwise the distance between the nozzle and it will be uneven. To align it with the design of the printer, screws and handles are provided, as well as a special function - the "Bed leveling wizard". It can be found in the "Tools" menu and can be used to step-by-step configure the platform by setting the required parameters. nine0003
2. Wrong working distance calibration.
Leveling the worktable is only half the battle, it is important to place the extruder nozzle over it correctly so that there is enough free space for the filament to exit, but at the same time the filament seems to be pressed into it. To do this, you need to use the calibration function of the working platform, which most modern models have. If your 3D printer does not have this feature, then you will have to manually calibrate the desktop - fix the print head in a static position and stop the motors, and then adjust the distance by moving the print unit.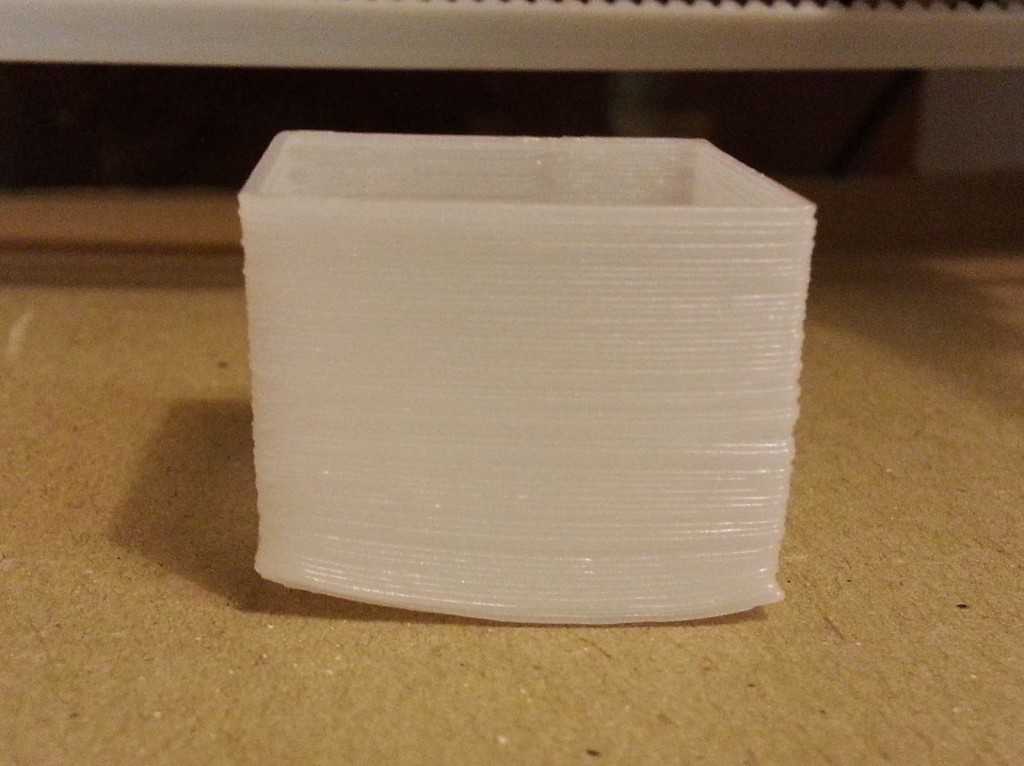 nine0003
Another way to calibrate the 3D printer desktop is software adjustment, which is highly accurate and easy to use. You will find all the necessary parameters for it in the menu. All you need to do is to correct the indicators in the slicer G-Code. Initially, it is better to set small distance values, and then control them by test printing and, if necessary, make changes to them.
When calibrating the 3D printer desktop, please note the following:
- If the nozzle is at a considerable distance from the build platform, there will always be a risk of the filament coming off during printing due to insufficient pressure on it.
- Insufficient clearance between the build table and the nozzle can cause damage to them and poor print quality due to lack of space for the filament to exit and form a 3D model.
- A normal distance between the nozzle and the work table will ensure that the layers are formed correctly over the entire surface area and that they adhere well to each other.
 nine0032
Consider the above recommendations and do not ignore the need for calibration.
3. Print speed selected incorrectly.
An incorrectly selected print speed can break the adhesion between the layers of the model being grown. This is especially true for the output of the first layer. Its insufficient adhesion to the working surface indicates too high a print speed. The output of the filament thread can and should be slowed down using the corresponding First Layer Speed function from the Edit Process Settings menu. When printing the first layer, reduce the speed settings set by the program by half. nine0003
4. Wrong operating temperature setting.
A 3D model may warp if it cools quickly. High-temperature ABS plastics “sin” with this, which need to be given more time to cool than other materials. Cooling models provide special fans. They have their own operating parameters, which users can change on their own. With rapid cooling, there is a risk of plastic peeling off the desktop, which provokes deformation of the 3D model. Switching off the fan is usually enough to prevent this. This will allow the first layers of the model to cool slowly and reduce the risk of deformation to zero. To turn off the fans, the Cooling function is provided from the Edit Process Settings menu. Some models even allow users to specify a different fan speed for the first layer and each subsequent layer. When printing a 3D model with high-temperature ABS plastics, the fan can be completely turned off and the platform heating turned on, which eliminates the risk of deformation of the first layer. This feature is found in the Edit Process SettingsTemperature menu. To turn on the platform heating, you need to specify the temperature parameters of the first layer of the future model. In order not to make a mistake with them, we recommend using the established material heating standards that are used for 3D printing. In the presence of drafts, additional protection of the working platform from cooling is required.
 nine0003
5. Incorrect material selection for platform protection.
For both professional and amateur 3D printing, different filaments are used, so their reaction to the consumables used - tape, glue, etc. difficult to predict. To avoid poor quality printing, you should use a material that is ideal for covering the work surface, which can be purchased at a specialized store. It is allowed to perform 3D printing directly on the desktop without auxiliary materials, provided that it is perfectly clean. To enhance the adhesion of 3D plastic to the desktop, it is allowed to use pieces of tape, glues, sprays, hair sprays and other similar materials. nine0003
6. Printing a model with a small bottom surface.
If you want to grow a 3D model with a small bottom surface, use the brim function from the Additions ---> Use skirt/brim menu, which will allow you to artificially enlarge it by printing a "hat" around it. An alternative would be to use a previously printed substrate, which will serve as the basis for a future 3D model.
The model does not stick to the 3D printer table: What should I do?
Adhesion of the model to the working surface of the 3D printer table - ways to increase it
FDM 3D printing technology involves the fulfillment of a number of conditions to obtain the best printing result. One of these necessary conditions is a high adhesion rate, that is, reliable fastening of the lower printed layer of the product to the working platform of the device. In the case where the first layer does not adhere securely to the table, there is a high probability of occurrence of such troubles as deformation of the product. This is especially true of ABS plastic, in relation to the protruding parts of the product and corners. nine0003
Every 3D printer needs to be calibrated before printing. In this case, the height of the printed layer along the Z axis will be adjusted. Everyone knows that there should be a gap of about 50-75% of the thickness of the selected layer from the nozzle to the hot layer. Implementing this is very simple. You need to take a regular sheet of A4 office paper. The leaf density index should be 80 mg/m 3 . The nozzle should fit snugly against the table, but the sheet should pass with little effort. In this case, the calibration is considered correct. For those new to 3D printing, there are also videos illustrating proper desktop setup. nine0003
3D printers can be supplied with an aluminum or glass work platform, depending on the model. Some 3D printers prefer to print directly on the platform without using any additional tools. But in any case, there are some rules that must be followed.
Rule #1: A smooth surface must be free of dust and grease before printing. For this, isopropyl alcohol is used. If this rule is neglected, then you will definitely encounter deformation of the first printed layer, and, accordingly, the entire product will be of lower quality. nine0003
Rule #2: To improve adhesive performance, special products must be used: kapton tape, heat resistant tape, heat mat, ABS solution, garolite, borosilicate glass, 3D printing adhesive, PEI film.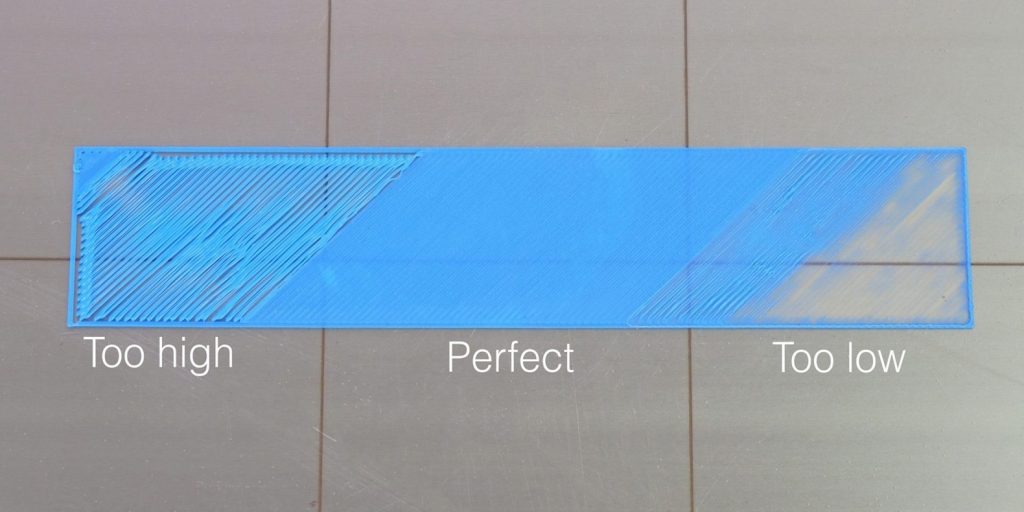 The choice is quite wide and you can choose the best option.
Let's take a look at the most popular options for these products in more detail ...
Blue 3D printing tape or heat resistant tape
This is one of the popular options for increasing adhesion. The advantages of this material are convenience, low cost, ease of application, ease of removal of the finished product. The disadvantages include the disposability of this material, although this is not always the case. nine0003
The most popular type of heat resistant tape is blue 3D printing tape. Masking tape can be attributed to this category with a stretch.
Method of application: Degrease and clean the surface of the platform before using the adhesive material. The tape is glued back to back so that there are no defects on the finished product. It is necessary to make pasting the platform as evenly as possible.
Applicability: Heat Resistant Tape is recommended to improve adhesive performance when printing with filaments such as PLA, ABS, Nylon, PETG. nine0003
3D Printing Adhesive
This adhesive is a bottle of clear liquid. The material can be used on both glass and aluminum platforms. It can also be used over masking tape or kapton.
The advantages of 3D printing adhesive are ease of application, low cost, compatibility with most 3D printed materials.
Method of application: The adhesive was evenly applied to the degreased platform or material with a foam sponge. nine0003
Applicability: 3D printing adhesive is compatible with almost all materials. It is recommended to use it when printing with ABS plastic, ABS+, FLEX, RUBBER, PC, as well as PLA and other materials.
ABS solution
This adhesive is a solution of ABS plastic in acetone or ethyl acetate. To prepare such a solution, 15-20 cm of ABS plastic thread and 60-90 ml of ethyl acetate are used. The viscosity of the solution should be intermediate between milk and water, and the mixture should not resemble a resin or paste. This option is the most reliable, allowing to prevent deformation and bending of the corners of the product. But it will be important to maintain the correct consistency of the solution. nine0003
How to use: The prepared mortar is applied in a thin and even layer on a degreased working platform.
Applicability: This adhesive will be most effective on ABS plastics, it is also applicable to ABS.
Kapton tape or Kapton
This material is similar to tape in many ways. Kapton tape is a golden translucent material with an adhesive layer. Kapton is made on the basis of a heat-resistant polymer. Thanks to the use of this material, the lower part of the finished product has a smooth and even glossy appearance. nine0003
Method of application: Similar to blue adhesive tape - it is necessary to paste over the working platform as evenly and end-to-end as possible, having previously degreased it.
Applicability: It is recommended to use kapton tape when working with the following types of plastics: ABS, PLA
Thermal mat
This material is one of the most popular to increase adhesion. Its advantage is reusability and versatility. The use of a thermal mat allows you to achieve maximum adhesiveness of the printed product, as well as to protect the working platform itself, its surface from scratches and other damage. Thermal mat is a sheet of polymer. It can be magnetic or sticky. nine0003
Method of application: If the mat has an adhesive base, the platform must be degreased before applying it. The protective film is removed from the mat, and it is evenly glued to the platform. To improve adhesion, the platform can be preheated to about 50 degrees. Calibration of the platform is carried out after gluing the thermal mat.
Applicability: Thermal mats are universal, that is compatible with all types of filaments.
Garolith
Garolith, also known as LE sheet, is a coating based on glass fiber or epoxy resin. There are several varieties of harolith.
How to use: The sheet is applied to the printing platform.