3D printed guitar for sale
3d Printed Guitar - Etsy.de
Etsy is no longer supporting older versions of your web browser in order to ensure that user data remains secure. Please update to the latest version.
Take full advantage of our site features by enabling JavaScript.
Find something memorable, join a community doing good.
(380 relevant results)
|
Home Guitars Videos Gallery Buying an ODD About Contact
ODD Blog
|
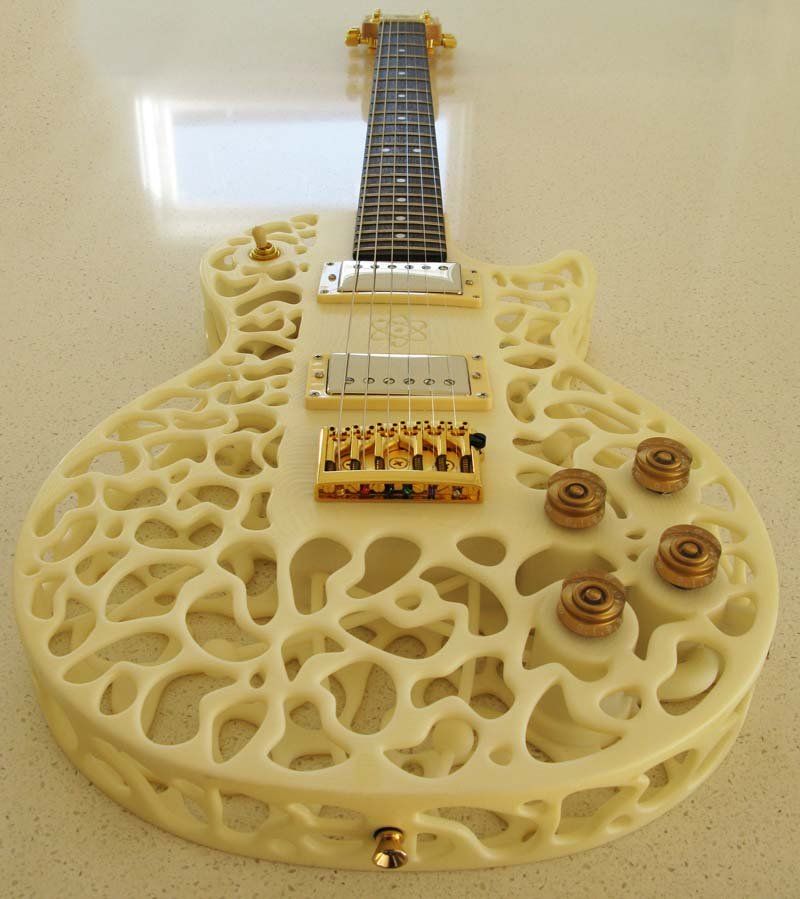
Atom 3D Printed Bass Guitar
| ||||||||||||||||||||||||||||||||||||||||||
|
copyright 2011, olaf diegel | |||||||||||||||||||||||||||||||||||||||||||


 The bodies are printed, using Selective Laser Sintering, by 3D Systems in the USA, on an sPro 230 SLS system. The material being used for these guitars is Duraform PA which is a very strong form of Nylon. The resolution for the prints was 0.1mm (which means that each layer that makes up the guitar body is 0.1mm thick). The guitars feature a wooden inner core (choices of Mahogany or Maple, etc.) that links the neck to the bridge, which allows us to customize the sustain and tone of the instrument to suit the musician, and a number of options for hardware, etc.
  Active pickups available as option
A guitar on a 3D printer or a summer project
Good afternoon, dear readers. Today's article will no longer be an overview, but a creative and practical one, dedicated to hobbies and hobbies.
Introductory lyrics.
In my student years, I happened to play the rhythm guitar in a musical group whose work was in the style of Heavy / Speed Metal (in a simple way - they played ROCK).
Every year, I and probably many of you think that life flies by, accelerating and accelerating, and somewhere far away there are dreams and there is absolutely no time for their fulfillment. But nostalgia and the desire not to give in to despair sometimes help make dreams come true or return to a long-forgotten hobby. This happened to me as well. I managed to escape from the working routine, and pick up the guitar again. Having acquired a tool, I began to restore long-forgotten skills.
At one fine moment, the instrument became "not enough" and I wanted to buy something else that sounded different. I considered various options, and at some point the thought came - why not assemble the guitar myself. There is a 3D printer, there are filaments, examples of manufacturing are in plain sight. So the idea of a 3D printed guitar slowly began to flicker, until an interesting project caught my eye:
Why not, I said to myself. Found the description of the project on thingiverse. The body of this instrument was based on the design of guitars from the "state" manufacturer Strandberg guitar. Exactly what is needed! But without backlight - it's superfluous.
Preparation
"Wishlist" is not enough to make wishes come true, so a rough list of everything needed for manufacturing was compiled:
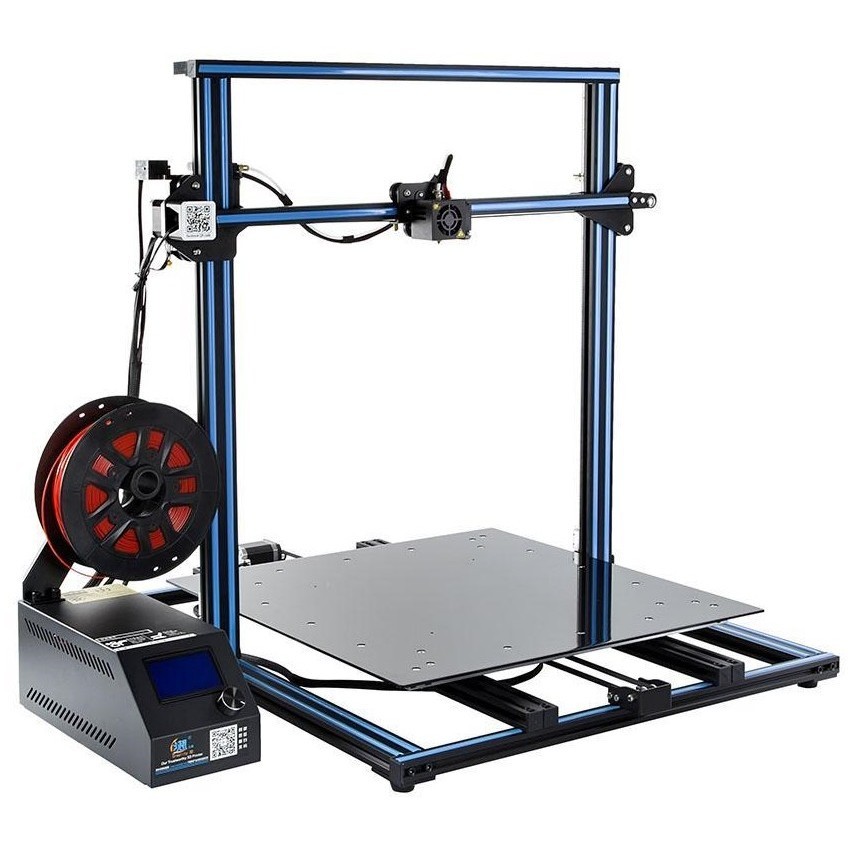
3D printer
Picaso Designer Classic. None of them were suitable for the project, because did not have enough printable area for those models that are hosted on Thingiverse. There was no desire to break / saw the finished models, especially the central part of the guitar, to which the neck was to be attached, the pickups were to be placed, and also where the tremolo was installed.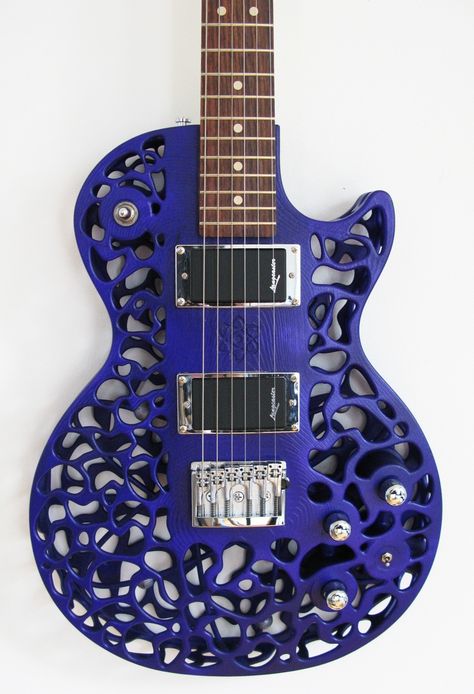 This is the most loaded part of the case and should have been printed in its entirety without breakdown.
As a result, after turning and twisting the models in slicers, it was decided to print on Picaso, because in principle, everything was placed at an angle, except for the central part, and the quality of the printed wall on this machine was quite suitable for my tasks. It was decided to print the central part at a printing studio or ask friends with larger printers.
Printable plastic
The author of the project on Thingiverse made a guitar from PLA plastic, but I did not like this option at all, since in this case the guitar would have to be primed and painted. My task was to make a tool without post-processing and painting, so that it could be seen that it was made using 3D printing, but at the same time, it did not have a completely collective-farm look. After looking through the reviews of plastics on 3Dtoday, I decided to focus on composites, especially since I had a shareware promo reel of FormaX composite from REC3D.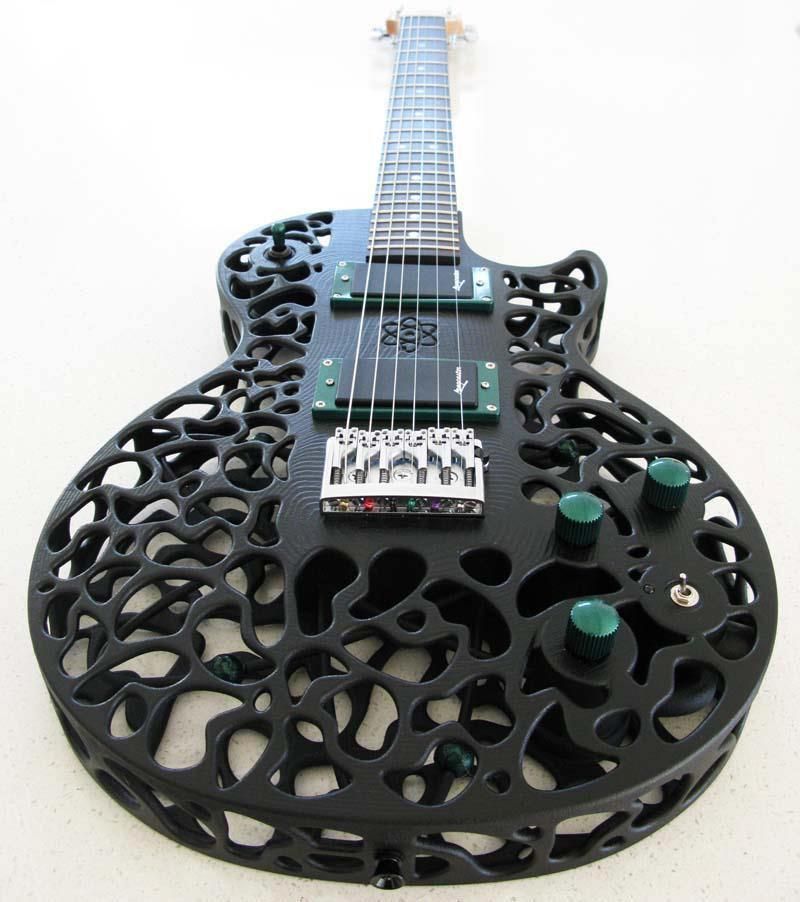 Once, at one of the 3D printing exhibitions, I happened to turn a part made of this material in my hands, and then I also noticed an interesting visual effect that hides layers and makes the surface of products pleasant to the touch. An additional plus in this solution was the presence of carbon fiber additives in the filament, which should create additional shielding (so that the guitar does not "start" when played).
Donor guitar
Inventing a printed neck is, of course, beyond the bounds, so only the body should be printed, but let's look for the neck, and at the same time all the electronics from the donor guitar will come in handy. There were a lot of options on avito, and in the end, Jackson, who had seen life, was purchased as a donor:
At home, the guitar was immediately dismantled, the neck was washed, polished and put in order. (guitars need to be looked after, of course).
Electronics from the guitar was also included in the project.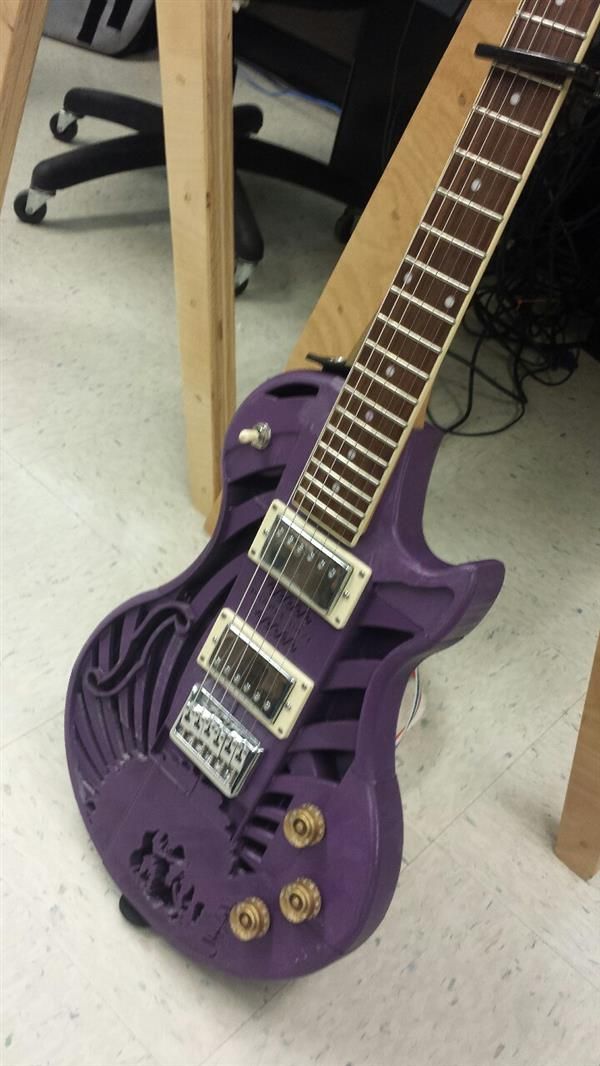 I really liked the black and white combination of pickups. Yes, and FormaX is also black. The only thing that didn't fit the project from the donor was the tremolo bridge - "that iron thing with twists on the body, to which the strings are attached."
In a music store I picked up an inexpensive option + they also gave me cheap Olympia strings as a gift:
Test printing and fitting of the model x). This thermoblock allows you to work at high temperatures with most materials with a working temperature up to 410°C. We install it according to the instructions from the PICASO 3D website - it takes no more than five minutes, calibrate the printer, refill the plastic, get the instruction from REC3D technical support on FormaX printing and run it for test printing - a piece of the rec company symbol. At the same time, we evaluate the wall of the model.
Pleasant enough structure.
Another test - printing a piece of the central part of the guitar to assess the strength with a given infill.
Print settings:
- Nozzle temperature: 280°C.
- Table temperature: 95 °C.
- No airflow
- Table adhesive: PICASO 3D printing adhesive.
- Supports strictly from the table (otherwise the internal communication channels will be flooded)
Nozzle in thermoblock steel: 0.5 mm.
The model shows a defect on the wall. Most likely the reason is in the feed - the material is abrasive and can get stuck in the nozzle. Therefore, we will play with temperatures and retracts during further printing.
Also during the test prints with "formax" it became clear that in order to obtain a better surface, it is better to place the part at an angle. In this case, the top, covering layers (which are the front side of the case) will be just as perfect as the side ones.
Running a little ahead of the story , I show a photo with examples of printing the same part printed at an angle (left) and just on a table (right). The question of further orientation of the model on the table immediately disappeared.
The right part was printed by the PICASO 3D 3D printer farm on the PICASO Designer XL PRO printer at my request. By my mistake in the TOR - the location of the part was flat on the platform and using supports not only from the surface, which led to the fact that the internal cavities for laying communications were filled with plastic, and the surface itself had an unpresentable appearance. I will write about the left part a little later - but I managed to fit it into PICASO Classic and it was printed at an angle.
As a result of all the trials and tests, it was decided to print all parts at an angle and spend plastic on supports (walk, walk) - I didn’t want to stop the project. To celebrate, another FormaX coil was purchased.
The first quality print result met all expectations:
From different angles, the plastic plays with both color and texture.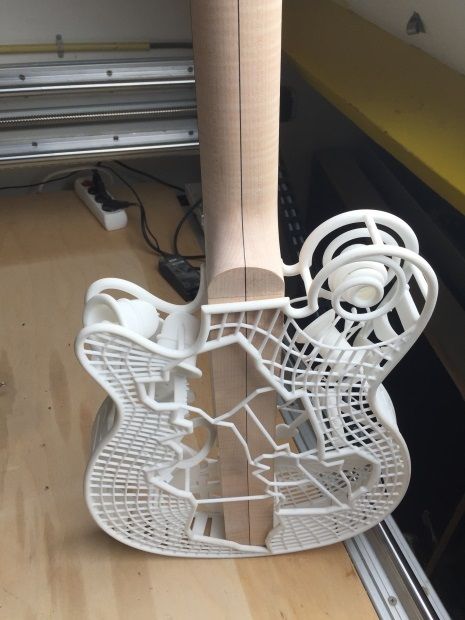
Here are some photos of the rest of the print:
All photos are attached in the original size - you can click the mouse and look closer. The material is absolutely fantastic. After it, I don’t want to look in the direction of PLA and ABS.
I had to stop printing several times due to problems:
As a result, I got parts for assembling as many as two guitars. In the photo below, parts rejected for various reasons.
As for the central part of the guitar - I still managed to fit it on the table in the slicer at a certain angle, but when printing, the corner of the model was "eaten", although everything should have fit.
The problem was found during communication with the representative of PICASO, Kapiton (very competent specialist) . It turned out that with the declared height of the print area, in fact, almost half a centimeter is missing. As it turned out, there was a special revision of the part that protects the coupling under the table screw, and the one that was installed on my printer was larger. They promptly sent me an STL model, I printed it from ABS and replaced it - everything immediately began to fit in height)
Such a stunning surface of parts made from this material. Without post-processing:
While the parts were printed and reprinted, I gutted the donor:
Everything was neatly disassembled, cleaned and set aside for further assembly of the printed version.
During the work, a problem was found in the central part - the neck did not fit into place. He crawled onto the body and covered the part of the pickup with an overlay:
I did not want to cut the neck and it was decided to increase the size of the platform on which it is attached. Since I'm not good at editing STL, I asked Ivan (Plastmaska) for help.
Thanks to Ivan, the printing of the third version of the central part of the body was launched on the same day and the next I had the opportunity to join the parts and evaluate what happened:
Next, the parts were fastened together with using 7 screws M3x10 and 2 screws M3x20 and followed by the assembly of electronics, wiring, installation of the tremolo bridge and neck:
Here I ran into the problem that the power of my "children's" soldering iron for soldering electronics is not enough.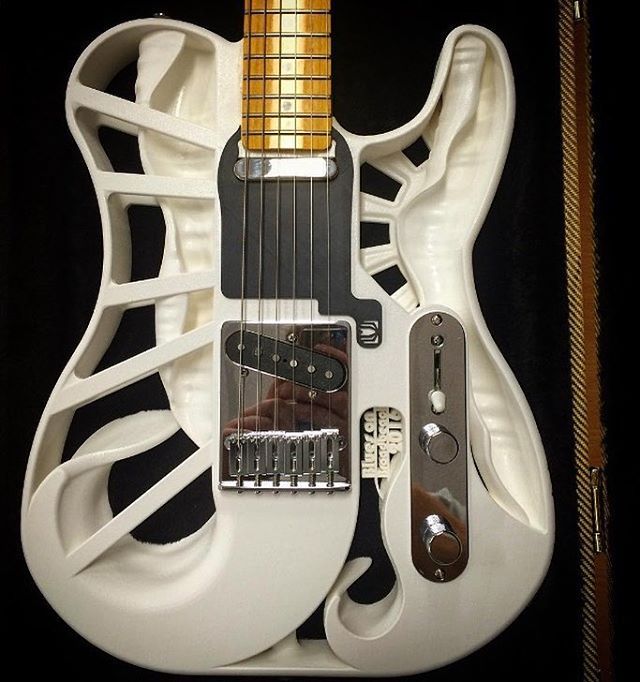 I had to call out in 3D chats and Ivan Kashirin (known to many printers in St. Petersburg) came to the rescue. The guitar was carefully transported to Vanya's office and all the electronics were carefully soldered:
After assembly and soldering, it remained to put the strings, set their height, adjust the scale and install printed covers that cover the technological connectors on the back of the case.
Tuning and maintenance of the guitar was handled by Mikhail Marchenko, a professional in his field. I highly recommend those. who needs to put the instrument in order - https://vk.com/marchenko_mikhail.
A few photos:
Surely many people have a question - why did the project take the whole summer. In general, everything could be done slowly in 3-4 days, but summer is vacations, summer cottages, a lot of work for yourself and that guy, and there wasn’t much time to get down to business.
Well, a quick video. Happy listening everyone.
World's first guitar printed on 3D printer! 3D printed guitar!
May62016
3D printed guitar!
3D printed guitar!
Aluminum is the most abundant metal on earth and the third most abundant element after oxygen and silicon. Due to its low density, corrosion resistance and ability to easily combine with other metallic substances, aluminum is one of the most valuable industrial metals and is an indispensable material in the production of components for the aerospace and automotive markets. In addition, it has found application in the field of 3D printing, being one of the materials suitable for use in a 3D printer using selective laser sintering technology.
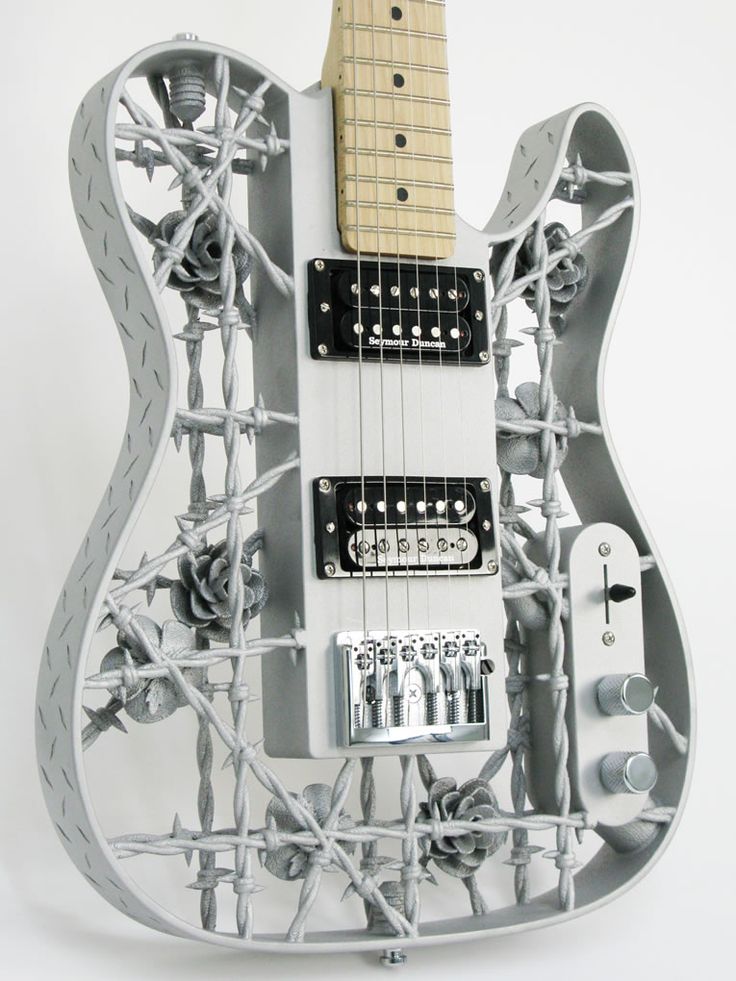
Aluminum is able to recreate almost any geometry of a product, which makes it an invaluable material for the manufacture of some advanced metal parts. However, no one could have imagined that someday he would be involved in such an unusual project as 3D printing of a guitar.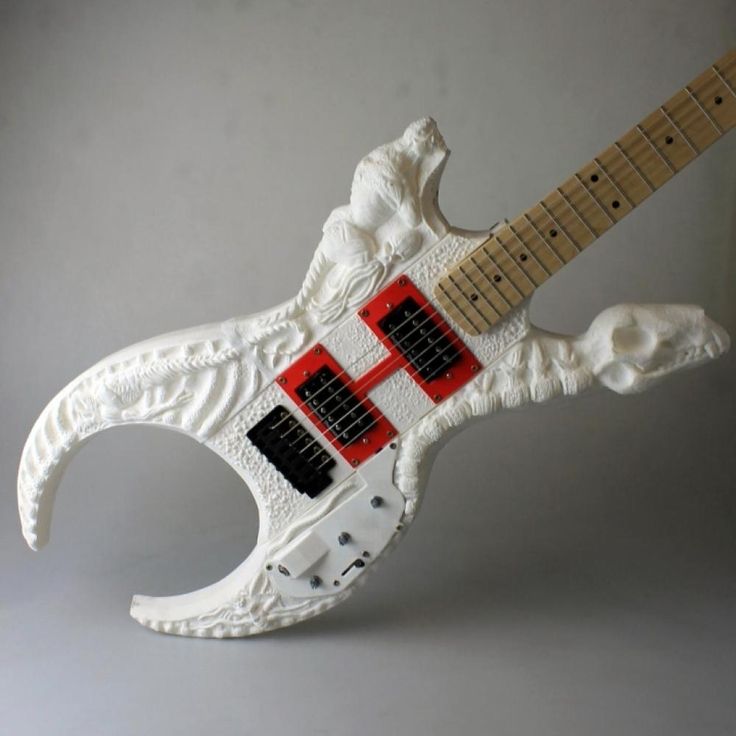 Yes, yes, it was from aluminum that the Swedish artist and designer Olaf Digel decided to create his next exclusive musical instrument. Digel is known worldwide primarily for a range of original design guitars made using a 3D printer. Almost all 3D printed guitars that can be found on the web today are the creation of his hands.
The designer's new project was inspired by the massive possibilities of 3D printing: Olaf was interested in what additive manufacturing technology with metal as the active material can do. In addition, Digel wanted to better understand the intricacies of the process itself, from design and 3D modeling to 3D printing itself. I didn’t have to think long about the name of this product, it suggested itself. Heavy Metal is the name of Olaf Diegel's new creation, inspired by the body shape of the legendary Fender Telecaster electric guitar.
3D printed guitar!
The front and back plates of the body are replaced by imitations of barbed wire, all pointed parts of which are directed away from the performer. 3D modeling of the product was carried out in CAD Solidworks, and the Dutch 3D printing service Xilloc helped the designer to reproduce the model in three dimensions. The aluminum body of the guitar was created on the basis of the EOS M400 additive manufacturing machine using preformed material melting technology.
3D printed guitar!
Due to the extreme heat during printing, the product needs additional supports which must then be removed. Upon completion of 3D printing, the elimination of all auxiliary materials occurs using various devices suitable for this purpose. However, in this case, Diegel wished to clean the sample himself from excess elements, which took him about four days, which is largely due to the complexity of the design of the artistic product.
A lot of effort was put into getting a smooth, beautiful surface that is pleasant to the touch, which further enhances the value of this product. After four days of polishing the guitar, it took another day to install the electronics.