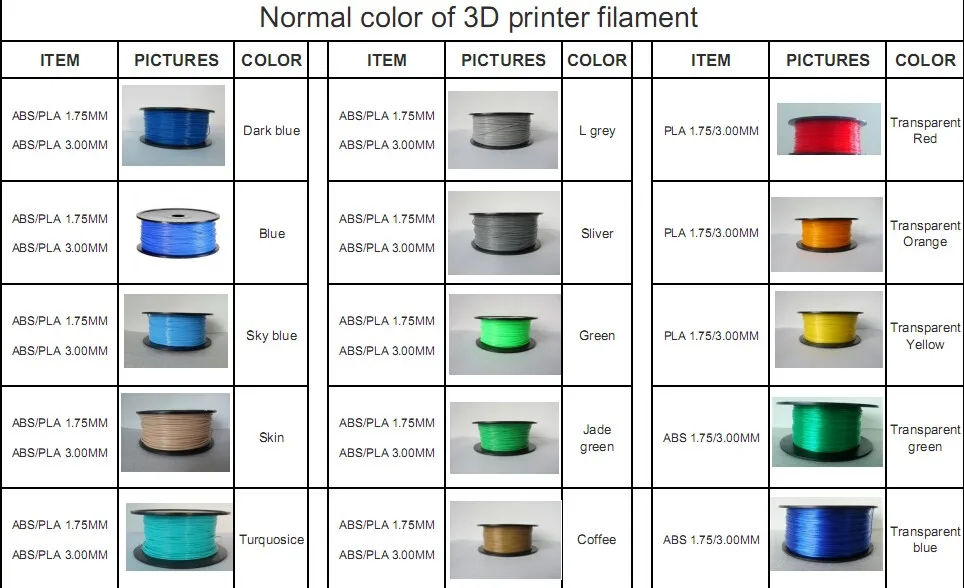
What are shells in 3d printing
What are the optimal shell and infill parameters for FDM 3D printing?
How do shell and infill properties impact the performance and cost of FDM 3D printing? It turns out these parameters have more of an effect than you may realize, so learning to optimize these features will improve the performance of your FDM custom parts while reducing manufacturing costs.
The majority of FDM 3D-printed parts are not printed solid. Printing solid parts requires high amounts of material and longer print times, resulting in high costs. To optimize the printing process most parts are printed with solid shells and filled with infill. Shells and infill play an important role on the quality, appearance and function of FDM printed parts.
This article will discuss the difference between shells and infill and how shells and infill can be employed to optimize a design. To level up your design skills for 3D printing, check out this comprehensive one-pager with all of Hubs' top design rules .
What are the major components of an FDM 3D print?
A standard FDM print can be broken down into 4 sections: shells, bottom layers, top layers and infill.
-
Shells: The walls of the print that are exposed to the outside of the model
-
Bottom layers (a type of shell): The part of the print that is exposed to the outside of the model, facing the build plate
-
Top layers (a type of shell): The parts of the print that is exposed to the outside of the model, facing upwards, towards the nozzle. Typically this surface will have the best surface finish
-
Infill: The internal structure of the print
The parameters of these sections can each be altered to optimize a design.
These are the four sections of an FDM print that designers can alter if need be.What are shells in FDM 3D printing?
Shells are the number of layers on the outside of a print. For FDM printing, shells are always the first areas to be printed per layer. Let’s unpack several key design considerations for optimizing shells.
-
Strength can be added by increasing the shell thickness. This allows for a slightly more robust print without having to increase the amount of material used for infill. Most slicer programs allow shell thickness to be adjusted even allowing areas of high stress to be customized with a high shell density offering localized areas of high strength.
-
If you plan on finishing a print by using sanding or chemical smoothing, increasing shell thickness is often necessary. This is because post-processing methods reduce the thickness of the surface of the model.
-
Any increase in the number of shells also increases the amount of time and material required to print the model. This will augment the overall cost of your custom parts.
Shells typically consist of a specified number of nozzle diameters. It’s always good to design shells with multiple nozzle diameters to prevent forming voids in the print. Most shells are printed with a thickness of 2 nozzle diameters (usually this corresponds to 0.8 mm).
Designing walls with multiple nozzle diameters eliminate spacing in wall features, which makes your custom parts stronger.
What is infill for FDM 3D printing?
Objects printed with prototyping FDM technology are rarely completely solid. Typically, the inside of an FDM print is composed of infill, which have varying structures and shapes that can affect the print time, weight, strength and flexibility of 3D-printed components.
By default, most FDM slicer programs will produce parts with 18% to 20% infill, which is perfectly adequate for most 3D printing applications (using FDM). This infill percentage generally allows for faster and more affordable print runs.
Infill percentage
The strength of a design is directly related to a 3D-printed part’s infill percentage. A part with 50% infill compared to 25% is typically 25% stronger while a shift from 50% to 75% increases part strength by around 10%.
Infill percentages for FDM 3D printing can range from 18% and 20% (left) to 50% (middle) and 75% (right).Understanding the application of a final printed part allows a designer to specify the optimal infill percentage. A prototype where the form is important can be printed with very low infill, which results in significant cost and time savings, whereas a bracket that will experience loading will need a higher infill percentage.
As mentioned above, the standard 18% to 20% that most FDM printers use as a default should be acceptable for most applications, though feel free to speak with a Hubs engineer for other potentially more robust infill options.
Feature strength
Infill also plays a critical role in how extended/protruding features are connected to a model. Snap-fit connections are a good example of this. The base of a snap-fit connection is often a weak point.
With a low infill density (20%), the cantilever is much more likely to break as the short extruded clip is only connected to the body of the print by a small cross-sectional area. Increasing the infill percentage means that more of the body of the print is connected to the cantilever, thereby increasing the strength of this connection.
Inspect these two broken snap-fit connectors. The white one has 20% infill and the grey one has 100% infill. The higher infill percentage results in a much stronger connection to the body of the print.Screwing, tapping or bolting
An important factor to remember when choosing the infill percentage of your 3D-printed parts is whether you’ll need to drill holes or place screws into the component.
Consider a print with low infill that is going to be drilled and then screwed to another surface. Often the drill holes will go through the top and bottom layers of the print and miss the infill of the model, creating a very weak connection. For these applications, a higher infill is desirable (50% minimum).
Connections that utilize clearance holes and bolts are better suited to parts with a low infill percentage. The shells, walls, and infill offer good compressive strength providing better anchoring of the part.
Compare these three illustrations. A represents poor anchoring for a screw. B shows that increased infill allows for better anchoring. C shows that increasing the outer shell is a cheaper solution and offers improved anchoring.Infill geometry
For a standard FDM print, the machine will add the infill structure as an angled hatch or a honeycomb shape. Let's look at the four most common infill geometries and their optimal uses.
Rectangular - This is the standard infill pattern for FDM 3D prints. It's strong in all directions and is reasonably fast to print, and requires the printer to do the least amount of bridging across the infill pattern.
Triangular or diagonal - This geometry is used when strength is needed in the direction of the walls. Triangles take a little longer to print.
Wiggle - This geometry allows the model to twist or compress, as well as be softer. It can be a good choice, particularly with a soft rubbery material or softer nylon.
Honeycomb - This is one of the more popular infills. It's quick to print and is very strong, providing strength in all directions.
New to 3D printing or need a comprehensive refresher?
Get our guide to 3D printing
What are the best practices for setting shell and infill parameters?
Designing parts for FDM 3D printing involves a lot of steps, and it's easy to forget certain factors and features. Choosing the right infill percentages and geometries, and optimizing the use of shells, will definitely improve how your custom parts turn out.
-
Remember to take into account the application of the parts you're sourcing. This will affect the shell thickness and infill percentage you need to set. Increases in shell thickness and infill percentages lead to higher strength but also longer print times and augmented costs.
-
Design shells with multiple nozzle diameters.
-
If you need to place screws in a part, increase the shell thickness or infill percentage to improve anchoring. If this isn't feasible (or possible), consider using clearance holes and bolting with washers.
-
For cheaper rapid prints, rectangular infill is optimal thanks to its swifter print speed. Honeycomb or triangular infills boost part strength compared to rectangular geometries, so use either of these two if higher strength is critical to your part's functionality.
Curious about the cost of FDM 3D printing?
Our online FDM 3D printing service Upload a CAD file for a free, instant quote
Ready to transform your CAD file into a custom part? Upload your designs for a free, instant quote.
Get an instant quoteWhat are 3D printing shells and infills?
Category Engineering
Additive manufacturing is slowly gaining prominence in the manufacturing sector, thanks to the invention of commercialized 3D printers. The usage of 3D printers in industrial manufacturing has certainly made greater progress towards smart and efficient manufacturing.
Generally, FDM printing operation 3D printers won’t print the part as a whole solid. Printing solid parts as a whole is time-consuming and at the same time costs more. On closely taking a look at the printing process, have you ever wondered what are those patterns and the borders that the printer makes before printing the part?
FDM 3D printing operations don’t print the part as a whole solid rather print in sections of layers. By doing so, the print speed is increased and the material wastages are reduced without compensating for the mechanical strength of the end product. So, what are these layers? Let’s find them out.
3D Print Sections
In FDM printing, the print is done sequentially in four different sections. To begin with, the printer doesn’t start printing the part directly as it is placed on the slicing software. In fact in the slicing software, after slicing the model, you can notice the layer division indicated by various colors.
The first section of the 3D print is the shell. Shells are the walls of the print, which is printed as a boundary parameter. They are print parameters that help in determining the perimeter of the print. In layman's terms, shells are outlines that define the shape of the layer, which is done per pass of the print.
Shells are again divided into two sections namely the bottom layer and the top layer. The bottom layer is the print layer that is printed facing the printing build plate.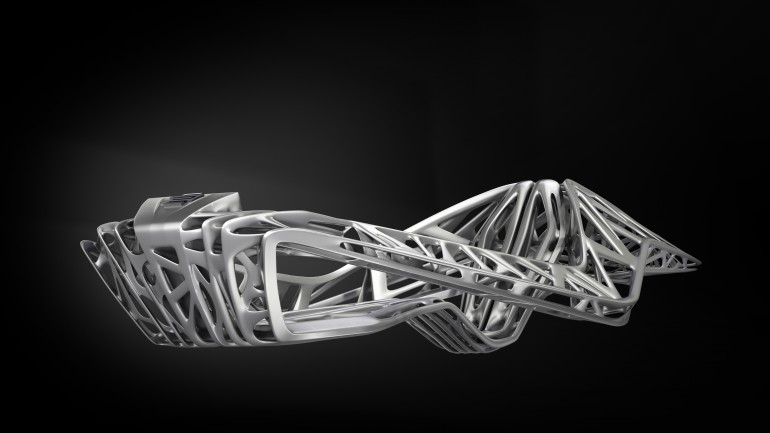 This is the initial layer done for the printing process. The top layer is the topmost or the final layer of the print, that is printed facing the nozzle.
What confides between the shells, the bottom layer, and the top layer are the infills. Infills are the internal structure of the print that helps in increasing the mechanical stability of the printed part. Infil patters are crucial for every p[rint as it directly determines the strength of the part. Infills are generally done in honeycomb structure in the case of FDM prints, but it is easily customizable according to our needs and requirements.
Let us now take a deeper look at what are shells and infills and how it can determine the strength of the object along with the preset that is being followed in common FDM printers.
Shells
As discussed earlier, shells are outside the border or the perimeter of every layer. Shells determine the number of layers printed for a part and are the first to be printed on a layer. Shell dimensions are heavily dependant on the model boundary constraints and dimensions, which indeed determine the quality of the print.
Shell thickness arguably varies in proportion to the layer height. Greater the layer heigh, the greater the shell thickness. Having a thick shell protects the infill well and provides good support to the structures, however printing a thick shell has its drawbacks.
Shells are required to be high in thickness when it comes to SLA and SLS printing due to the post-processing technique, where the surface thickness is reduced. Shells are needed to be at least in the standard thickness levels so that the strength of the component isn’t compensated.
If the shell thickness is increased over its specified range for a part, there are high chances that shells might get printed as a solid block, which is completely out of the specified interior dimensions. But when you’re creating a part that focused on interior finesse, how will you obtain the finish without compensating for its strength? For these purposes, 3D printers use something called infills.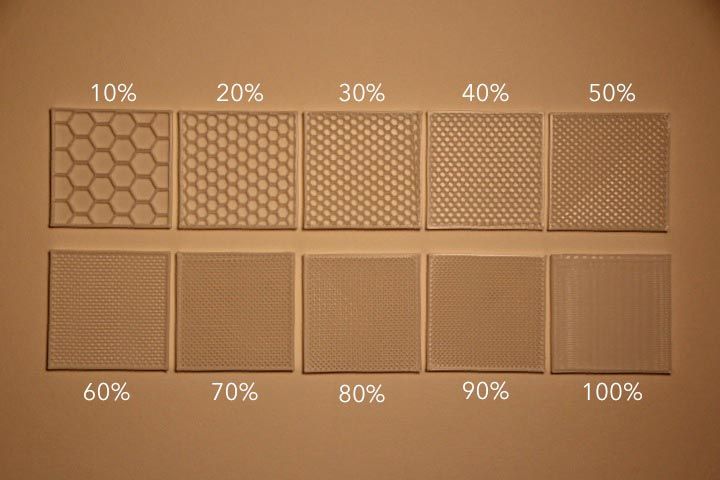 Let us discuss infills in detail.
Infills
Infills are the print material that is used to print support structure in the interior of the object to increase its mechanical strength. Infills directly correspond to the density of the objects as it fills the voids in shells of the object. Infills are generally spoken in terms of volume density percentage. The greater the infills percentile, the greater the mechanical stability and strength of the part, the greater the time it takes to print.
It is quite essential to maintain a considerable level of infill percentile for a fully functioning mechanical part since the part requires strength to withstand a considerable amount of stress and strains. The best case is to opt for an infill percentage between 25%-80% for fully functioning parts, as it requires greater durability than light and test parts.
The infill percentage plays a crucial part in determining the drilling and screwing of printed parts. A printed part with less infill percentile will have a lesser number of inter filling spaces, thus having large gaps in between, which is not suitable enough to get hold of the bolt tightly. So, it is necessary to understand the usage of proper infill percentage in the case of screwing and bolting operations.
Infill Patterns
Generally, the infill pattern for FDM printers will be of modular hexagonal, honeycomb-like structure. However, the pattern isn’t fixed and can be altered. The popular infill patterns used in some of the 3D printers include Rectangular pattern, a triangular pattern, wiggle patterns, and the standard honeycomb pattern.
The rectangular pattern is one of the simpler patterns to print using FDM printers. This pattern focuses on applying equal strength throughout the shell, thus making the part durable. The rectangular pattern doesn’t require any sort of additional infill bridging.
The triangular pattern is deployed whenever the strength is required towards the shells of the part. This pattern is used to distribute the stress towards the walls, thus making the print bit vulnerable in the middle portions. Triangular infill pattern often consumes high print time due to the shape complexity.
The wiggle pattern is, however, slightly different from the conventional shaped patterns. The wiggle pattern is generally deployed, when the model is needed to be compressed a little and soft. This pattern allows the model to be flexible and twist when a twisting force is applied on the surface without any breakage. This pattern also requires higher print time than the other above-mentioned methods.
The standard honeycomb pattern or the hexagonal pattern is one of the most used techniques in the latest version of FDM printers. The honeycomb pattern possesses similar characteristics to that of rectangular infill pattern and offers more robustness to the end product. It is easier to print and takes a lesser estimate print time.
Now, that we know what are shells and infills, is there a way to customize the dynamics on our own? If so, how can we do that? To answer this, let us understand more about the setting we require for shell and infill modification.
Shell Settings
Shell settings can be altered using the slicing software, which is used to convert the CAD model into defined G-codes based on which the printer operations are commenced. Now, there are some nuances of shells that we need to understand before we alter the settings that suit our model the best.
First and foremost, the shell thickness can be kept a little higher than the required amount, which provides greater mechanical strength and robustness to the product. If your part is said to be directly deployed in a mechanism, it is highly advised to give a few additional mm of thickness, so that the part can withstand the load quite comfortably. It is advisable to keep shell thickness as a multiple of nozzle diameter for easy configuration.
Another advantage of additional shell thickness is that the mechanical strength of the product won’t be compensated especially during post-manufacturing processing. Post-manufacturing processing is used to obtain a good surface finish. Rubbing a layer of the part using sandpaper can cause some layer disturbances, which will take a hit on the durability of the product. So it is better safe to opt for the additional layer thickness.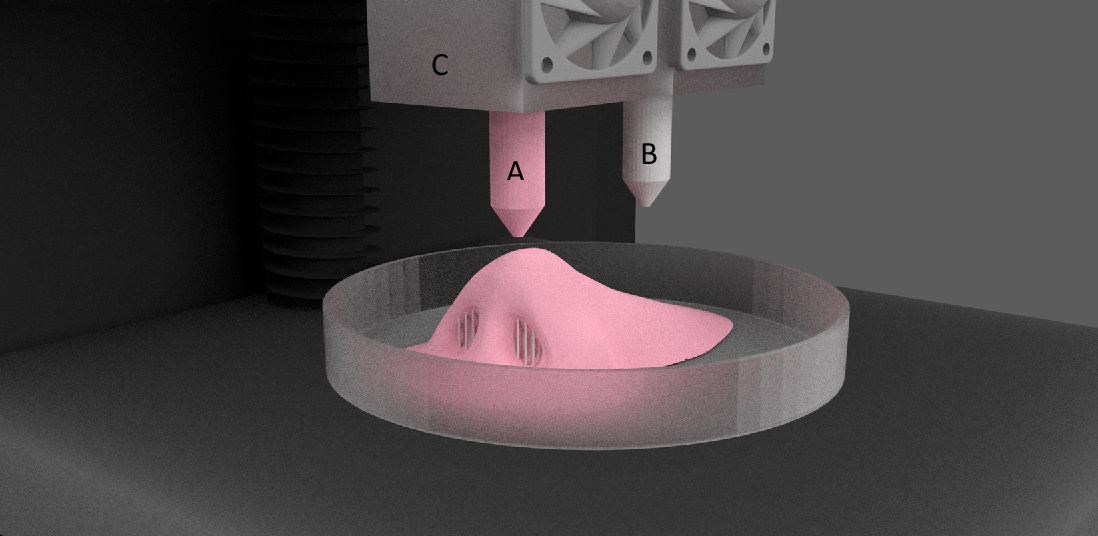
Coming to the setup part, you can increase the number of shells or shell thickness in the custom settings of your slicer software. There you can find a print setup, where you have options to change the metric of wall thickness, base thickness, and Top thickness. Consider your model and provide changes accordingly.
Now, it is a Himalayan task to achieve perfection in terms of setting up perfect shell thickness levels and the number of shells. If you’re inexperienced in this, you can approach online 3D printing services platforms, to get your print done as you expect it to be. There are quite a lot in the market, and it is highly advised to opt for professional ones rather than individuals.
Makenica is one of the top 3D printing online service platforms that offer top-notch 3D printing services at affordable rates. One of the most trusted organizations in the country, Makenica has tied up with Seimens, Mercedes Benz, and much more globally recognized clients.
You can get an industrial standard 3D print with highly qualified professionals helping you to get your customized shell and infill levels for your design starting from rs. 8/gram, which sounds affordable in the given market scenario. Check them out for more information.
Infill settings:
Similar to that of shell settings, infills can also be modified using the slicing software used for the particular printer. Infill setting also has some pre-requisites that are needed to be applied while configuring the numbers in the slicing software.
The user or the technician must have a clear understanding of what type of product he needs in terms of strength, flexibility, and durability. For more durable prints, technicians should opt for a high infill percentile with either a standard infill pattern or a rectangular infill pattern, which provides greater stability to the product.
Low infill percentage can be given for selective layers where you don’t require much mechanical strength such as top layers and outer surfaces. This can save material and hence reduce significant print time.
In standard slicing software, you can find infill setup under the custom settings. Here, you can alter the infill pattern, infill line distance, infill overlapping, infill thickness, and infill wipe distance. It is quite difficult for beginners to get the insights of these settings, but with experience, it can be easily controlled and configured.
How Shells and Infills affect product finish?
Shells and Infills are important aspects of a 3D print. Shells and infills define the mechanical stability of the part and the durability of the part when stress or strain is applied to it in a live mechanism.
One of the major drawbacks of additive manufacturing is slow manufacturing time. 3D printers have not yet attained their fullest potential, which makes them constantly evolving. However, you can alter your print time by customizing your settings according to the product configurations.
Setting higher shell thickness and infill density at selective layers that are prone to continuous stress and modifying the rest with the lesser density of infill and shell thickness will considerably reduce the print time and also contribute to high-efficiency manufacturing.
Altering infill density at multiple levels can improve product finish in terms of finesse. Manually we can trim down heavy edges and vertices and provide much lighter infill density that can procure sharp edges and vertices.
The altering process requires a lot of work as the user is required to scale through every layer and apply the settings, which is time consuming but is deemed to be the most efficient method to date.
As the world is progressing towards the pinnacle of technical development, we can soon expect printing software that enables the user to scale through the layers and apply multiple gradient infills and multiple densities infill automatically based on the design. We are not far from the proposed technology as several research works are going behind the screens of reality. All we require is patience to slowly adopt the pathway technology leads us.
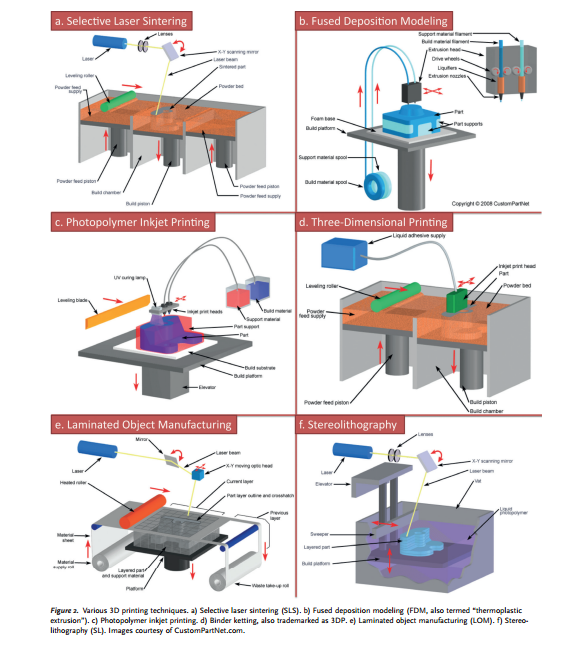
What types of 3D printers are there? 3D printing technologies
This article does not pretend to be scientific, but rather a small introduction to 3D printing "for dummies".
What exactly do we mean by the concept of 3D printing?
In the early 1980s, new methods for the production of parts began to develop, based not on the removal of material, as in traditional machining technologies, but on the layer-by-layer production of a product according to a three-dimensional model obtained in CAD by adding materials in the form of plastic, ceramic, metal powders. and their bundles by thermal, diffusion or adhesive methods. And what does this mean in practice? That it became possible to create physical objects in a completely new way.
The first to patent this technology back in 1984 was Chuck Hull, who also created 3D Systems in 1986, which is still one of the industry leaders. The first commercial 3D printer, the 3D Systems SLA-1, was introduced in 1987.
Thus, we smoothly approach the story of the first and perhaps the most promising 3D printing technology today, namely photopolymer resin printing.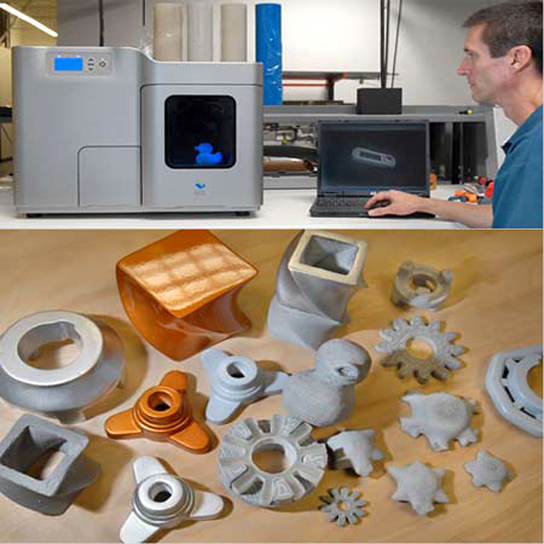.jpg) Initially, this technology was called SLA, but over time, this name has become not entirely correct.
Initially, this technology was called SLA, but over time, this name has become not entirely correct.
Photopolymer printing
The essence of photopolymer 3D printing is that a liquid photopolymer resin solidifies under the influence of light and forms a 3D model. Initially, a laser acted as a light source, and the technology was called SLA or stereolithography.
Despite the apparent simplicity, 3D Systems has spent more than 10 years to bring to market the first full-fledged commercial product. This required a shift in other technological products, such as solid-state lasers, which use a solid-state substance as an active medium.
Without going deep into the technological wilds, we can say that about 25 years of gradual development of this technology passed until 2013-2014, when SLA 3D printers cost hundreds of thousands of dollars and were available only to large companies, where they were also used very limitedly due to the high cost as equipment and materials.
Created in 2011, a startup called FormLabs reimagined Chuck Hull's ideas and developed the first desktop SLA 3D printer, which began selling for up to $3,000. Thus, it made it possible for a wide range of users to get involved in 3D printing. Over the years, FormLabs has delivered tens of thousands of its printers to market, avoided being taken over by larger players, and became the first 3D printing unicorn to be worth over $1 billion. This story was one of two turning points in the breakthrough made by 3D printing technology in recent years. But other companies also did not stand still and very soon realized that a laser as a light source for illuminating a photopolymer resin is not the only solution, and they proposed another way to form a model, which was called DLP (Digital Light Processing) .
Without going into technical details, it is important to note that the advantage of this technology lies in higher productivity due to the illumination of the entire layer at once, in contrast to the laser, which must physically illuminate the entire model, so it must be constantly moved. With a simple example, it is very easy to explain what this means. Suppose you need to print a ring, this task on printers of both technologies will take about the same time, but if you need to print 10 rings at once, DLP technology will take advantage. That is, with a DLP printer, you will print 10 rings in the same time as one, while an SLA printer will spend a certain time drawing each of the rings, although this will make it possible to achieve better quality.
A few numbers...
The Form2 SLA printer takes 11 hours and 22 minutes to print 55 models.
As a result, 12.4 minutes for one ring .
And the Uniz Slash Plus 3D printer, which is based on DLP technology, will spend only 3 hours 51 minutes printing 6 rings, it turns out one ring in 3.8 minutes .
DLP technology gained some popularity and began to compete with traditional SLA, but did not become a breakthrough, when suddenly a new revolution happened - LCD 3D printers appeared on the scene.
The principle of formation is even simpler, a powerful LED lamp, enhanced by a lens system, shines on an LCD matrix, which projects the desired image onto a polymer bath, where a 3D model is formed.
The creation of this technology in 2016 made it possible to reduce the price of a 3D printer by 10 times compared to the FormLabs Form 2 printer that was the hit of that time, the price for budget LCD 3D printers started from $300. This drastic cost reduction has greatly expanded the customer base and has given home users and small print studios the opportunity to try this technology for their needs.
What is its advantage over others, besides the price itself?
LCD, as well as DLP printers, illuminate the layer immediately, this gives them an advantage in performance, although at first users were faced with not very high quality of the models themselves. But with the advent of 3D printers with a 2K LCD matrix in 2019, and then a little later 4K, this problem was solved, and LCD printers today are superior both in speed and in the minimum layer thickness of their older brothers.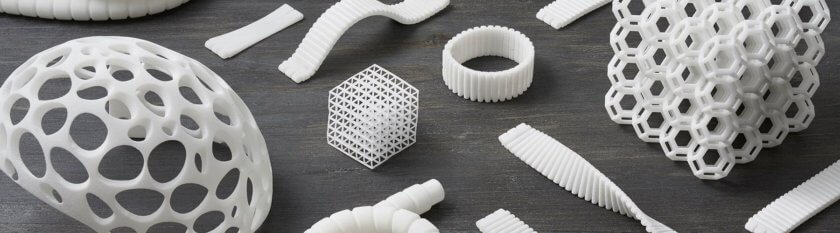
Vivid examples of 2K resolution printers are models - Elegoo Mars, Anycubic Photon S, Wanhao GR1, Phrozen Shuffle Lite, Phrozen Shuffle 2019, Phrozen Shuffle XL 2019, Phrozen Sonic, 4K - Phrozen Shuffle 4K, Phrozen Transform.
The introduction of 8K sensors in the near future, as well as the use of special monochrome sensors that increase print speed, will make this technology dominant in the 3D printer market.
PHOTOPOLYMER 3D PRINTING TECHNOLOGIES:
I hope I was able to convey to you the essence of the differences between these technologies, but now, in fact, I want to tell you why SLA / DLP / LCD 3D printing is most often chosen. Here it is immediately worth dividing printers into industrial and desktop.
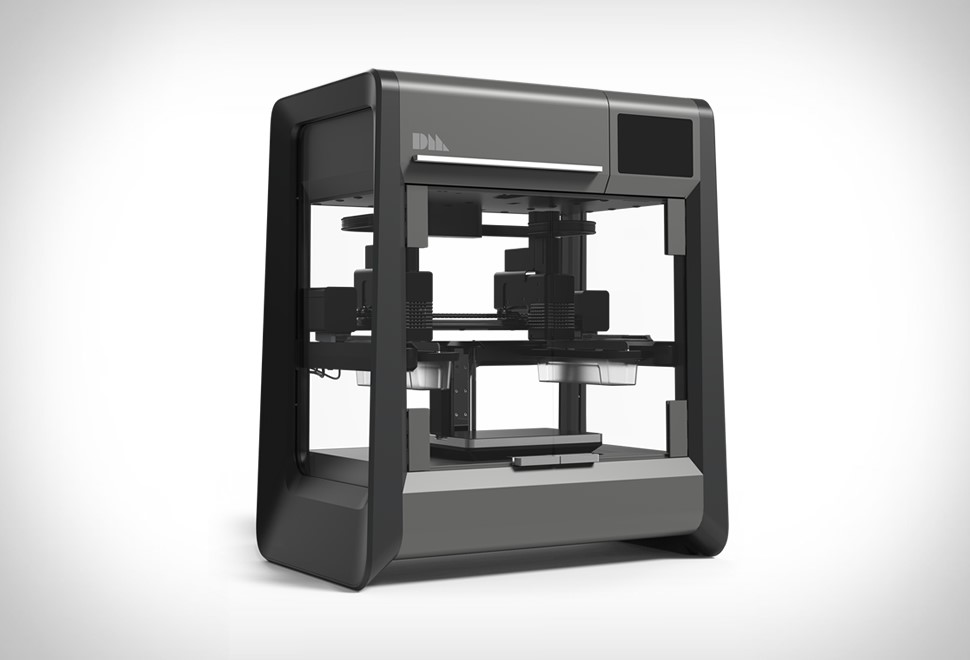
industrial 3D printers are mainly used for large-scale prototyping, as well as small-scale production and mold making. With a sufficiently high productivity and good quality of the final products, this equipment is used in the automotive industry, aerospace industry, and also for printing massive objects, such as this mammoth bone, printed by Materialize in cooperation with the Belgian Royal Institute of Natural Sciences in Brussels.
Desktop SLA/DLP/LCD printers are widely used, primarily in such areas as dentistry, jewelry, ship and aircraft modeling, as well as the manufacture of unique gifts and souvenirs. You can read more about this in our articles on these topics.
The use of a 3D printer in dentistry
3D printing in prototyping
The use of a 3D printer in jewelry
3D printing in small-scale production
High detail and high-quality finish makes this 3D printing technology an excellent tool for solving numerous problems that previously had to be solved in much more time-consuming and expensive ways in the areas of activity that I mentioned above.
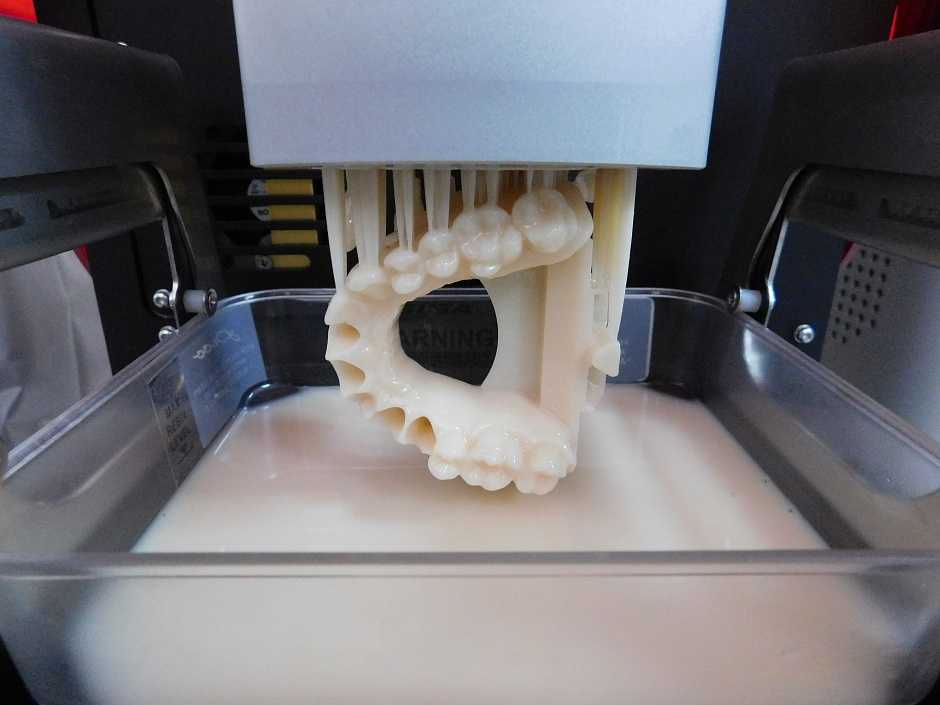
Photopolymer printing on a 3D printer in dentistry.
Photopolymer 3D printing in jewelry. On the right is a 3D printed master model of the bracelet.
Photopolymer printing for prototyping
3D Resin Printing Souvenirs
FDM 3D Printing Development Path
The second father of 3D printing can be safely called S. Scott Crump, who at 19In 1988, he patented FDM (Fused Deposition Modeling) technology, and in 1989, together with his wife, he created Stratasys, which is still one of the main companies in the industry.
The abbreviation FFF (Fused Filament Fabrication) is also often used for this technology, but this should not mislead you. The essence of the technologies is the same, but the names are different in order to avoid patent disputes.
So, what, in fact, was invented. The essence of the idea was that a plastic thread is fed into an extruder, where it melts at a high temperature and forms a model in layers through a small nozzle.
Based on this invention, Stratasys began to produce industrial 3D printers, which were mainly used as well as the first SLA machines in the automotive industry, aerospace industry, and with the advent of various durable plastics such as polycarbonate (PC), polyetheretherketone (PEEK), polyetherimide (PEI, Ultem), polyphenylsulfone (PPSF/PPSU), and for functional prototyping. This technology did not become widespread until more than 20 years later, the RepRap (Replicating Rapid Prototyper) project, a self-replicating mechanism for rapid prototyping, appeared.
The original idea was to create a 3D printer that another 3D printer could print, in this photo all the plastic parts of the "child" are printed on the "parent". In fact, something completely different happened - a group of enthusiasts were able to create a budget 3D printer for home or office use. The idea was quickly picked up by three geeks from New York, who created the MakerBot company and began commercial production of desktop FDM 3D printers. This was the second turning point in the modern history of 3D printing.
The cost of printers was about $1000, and this price became quite acceptable for many enthusiasts, technologists, engineers and students who are passionate about the idea of 3D printing.
In 2013, MakerBot was taken over by Stratasys for a record $400 million. The result of all this was that the world received a very interesting technology for creating physical objects. A huge advantage of FDM technology is its cheapness and a large selection of printing materials, which began to appear in large quantities after the start of the spread of 3D printing. FDM printers primarily spread among home users, who began numerous experiments with printing at home, you can read more about this in the article 3D printing as a hobby.
In addition, FDM printing has found its main professional application - prototyping. With the introduction of 3D printing into this process, it will never be the same again. Prototyping has become significantly cheaper and faster, and this made it possible to try many more ideas from engineers to create the highest quality and thoughtful products, more about this can also be found in the article 3D printing in prototyping. There are also active efforts to introduce FDM 3D printing into small-scale production, and this story took an unexpected turn during the COVID-19 epidemic.when doctors urgently needed to produce parts for ventilators, as well as mask holders for doctors who are forced to wear them all day.
FDM 3D printing was able to fully demonstrate its main advantages compared to classical production, namely the speed of modeling a new model and launching it into series in the shortest possible time, less than one day.
Another major advantage of FDM printing is the wide choice of materials, ranging from biodegradable PLA plastic to materials such as PEEK, which can be sterilized at high temperature and pressure.
In the near future, we expect the widespread introduction of so-called "3D printing farms", which will be able to implement the concept of "flexible production", the essence of which is that such a farm can produce any available product, and not specialize in the manufacture of any specific products. , as happens in a classic production. Today it can be spare parts for old models of railway cars, and tomorrow it can be medical mask holders or souvenir cups for competition winners or plastic end caps for furniture.
In the meantime, let's continue our story about the different types of 3D printing that arose in parallel with the development of the two mainstream technologies that I have already talked about. Many engineers and entrepreneurs in different countries and companies have realized that it is possible to start using the principles of 3D printing using other materials and ways of forming models, and this is what they came up with.
Other 3D printing
SLM (Selective Laser Melting) - selective laser melting, also known as DMLM and LPBF.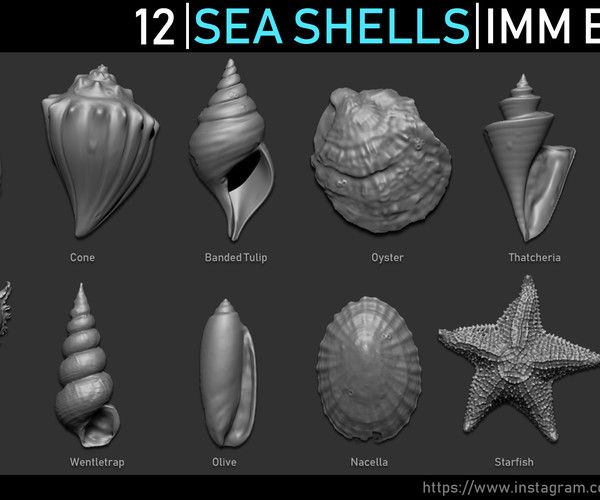 The principle of 3D printing here is that, under the influence of a powerful laser, metal powder melts and forms a 3D model. This allows you to create models of complex shapes and high strength, most of all this technology has been used in aerospace and medicine. A rocket is not a mass product, and some elements are much more convenient and more profitable to print on a 3D printer than to mill or cast.
Pictured above is the world's largest printed rocket engine. It was printed on the SLM 800 printer by SLM Solutions for the British aerospace company Orbex. The engine is manufactured as an all-metal nickel alloy product. SLM 3DSLM 3D printing has reduced time by 90% and costs by 50% compared to CNC machines.
In medicine, metal 3D printing has begun to be used to create individual titanium implants made directly for a particular patient, which significantly increases the chances of recovery.
EBM (Electron Beam Melting) - electron beam melting. This is a technology similar to SLS/DMLS, only here the object is formed by melting a metal powder with an electron beam in a vacuum.
SLS (Selective Laser Sintering) is selective laser sintering, another very interesting technology. The model formation process here is the same as in SLM, but instead of metal powder, polyamide or nylon powder is used. This makes it possible to form very strong, wear-resistant products of complex shapes, which, first of all, can be used as functional prototypes of future metal or durable plastic products.
SLS Printed Engine Manifold
SLS printed furniture
MJF (Multi Jet Fusion) is an original technology developed by HP that essentially repeats the principle of SLS, but does not use a laser. This gives the printer a certain performance advantage over laser technology, as it bakes the layer immediately, just as it does with LCD 3D printers, which we wrote about in detail earlier in this article. Being one of the world's technology giants, HP quickly broke into the small 3D printing market and quickly took a large share in the industrial equipment segment, unfortunately, as of 2020, HP has not started shipping its 3D printers to the Russian market.
Surgical instrument and cylinder block printed on MJF printer
PolyJet is a technology similar to conventional inkjet printing. Liquid polymer is fired through many tiny nozzles onto the surface of the printing platform, after which they are cured using ultraviolet radiation. Using this technology, you can create high-quality full-color layouts and prototypes with the highest level of detail and finish quality comparable to industrial serial samples. Unfortunately, the high cost of equipment and materials does not allow a wider implementation of this technology.
MJM (Multi Jet Modeling) is a multi-jet modeling technology similar to PolyJet, but wax can also be used as a material. The technology was developed by 3D Systems, therefore, for reasons of patent protection, it has a different name. Wax printing is widely used in the jewelry business for making individual models to order and creating master models. There are also specialized printers from SolidScape that print with a two-component wax for subsequent melting of the support material in hot water.
CJP (Color Jet Printing) is a technology, the essence of which is layer-by-layer gluing and coloring of powder based on gypsum or plastic. With this technology, you can create full-color products, and this is most often used for printing architectural models and figures of people. The cost of printing in this case is lower than with PolyJet technology, which gives more opportunities for its wider use.
LOM (Laminated object manufacturing) - a technology similar to CJP, but here the building materials are paper, each sheet of which is glued to the previous one, painted with an inkjet printer and perforated. This gives a full color 3D model and is also well suited for architectural and decorative models.
Another technology with great prospects is the combined technology of metal 3D printing, which combines 3 stages of creating a model: printing on an FDM printer with a special composite thread, where metal and polymer are mixed in certain proportions, melting the polymer and baking the metal model. Based on this technology, the American companies DeskTop Metal and MarkForged have already created their commercial models of 3D printers and started selling them both in America and Europe, but so far the technology is very crude and does not guarantee good quality of finished products. But its huge advantage is the significantly lower price of both printers and finished products. These systems have not yet been delivered to Russia, so we are waiting for the opportunity to independently evaluate their quality and effectiveness. In the next few years, this technology may become the most popular of all possible 3D printing methods.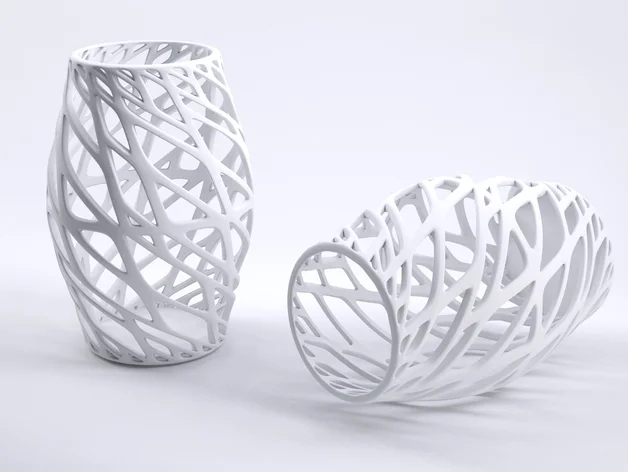
Studio System+ by Desktop Metal
How it works:
3D printing with ceramics is also a promising direction in various industries. There are a number of companies that produce equipment that prints ceramic models. Various manufacturers use the already mentioned DLP and SLA for this, as a slightly adapted multi-jet simulation technology Ceramic binder jetting (CBJ) . This seal is used in dentistry, jewelry, as well as to create high-quality prototypes with the necessary functional properties. Also, on the basis of FDM printers, printers are being created that print with clay to create ceramic products in a new way. For example, the Italian company WASP has been offering such systems for several years based on its delta printers that print with plastic filament.
Construction 3D printers essentially also use the same construction principle as in FDM printers, only liquid concrete is applied instead of a molten filament. This makes it possible to build the walls of a 100 square meter house in about 3 days, which is significantly faster than standard construction methods and, in addition, it makes it possible to create objects of complex shapes. Of course, this direction is promising, but today it has not been widely used, although in China construction 3D printers were used to quickly build autonomous blocks for self-isolation of patients with mild coronavirus, who did not get a place in hospitals, but they were at home dangerous. An interesting fact is that the most promising housing project on Mars is also recognized as a 3D printing method.
House printed by an Irkutsk company in Dubai in 3 days
Coronavirus boxes in China. 15 rooms were made in 1 day.
Food 3D printing is another way to use FDM technology, only here the material is edible raw materials. Chocolate printers are the most widely used. The tempered chocolate enters the extruder and forms a 3D model in layers through the nozzle. Because chocolate, unlike plastic, is a very delicate material, so it is not so easy to print with it, although it makes it possible to quickly create customized culinary masterpieces or desserts of unusual shapes. In addition to chocolate, it is possible to print using puree, dough or jam. This technology is still at an early stage of development, and perhaps in the near future we will see more advanced equipment that can be used more widely. One of the representatives of 3D printers for printing chocolate is Choc Creator.
And last but not least, the kind of 3D printing that has very high hopes for the future is 3D bioprinting . At its core, this is a layer-by-layer printing, where living cells act as a material. This is a relatively new type of 3D printing, the first experiments were carried out in 2000 by bioengineer Thomas Boland, who modified conventional desktop printers to print DNA fragments. For 20 years, this industry has stepped far forward, and now, in addition to prototypes of human organs, implants, vascular tubes, heart valves, auricles, cartilage, bone tissue and skin for subsequent transplantation are successfully printed. This type of printing has been successfully used to create "simulators" for doctors, on which they can rehearse operations or for students for live practice. And, of course, one of the main purposes of bioprinting is to print functioning internal organs for transplantation from the patient's biomaterial. So far, this direction is at the stage of development and testing and is not fully used to treat patients, but a large number of successful experiments have already been carried out. Like the heart seal by Israeli scientists in 2019year, while very tiny in size, but the main thing is that it is able to perform its functions. Also, bioprinting has great prospects in the experimental testing of medicines produced by pharmaceutical companies.
Of course, I did not manage to cover all 3D printing technologies in this article, but even if you are not a technical expert, you can get a first idea of 3D printing, its various technologies and methods of application. If you are interested in the use of 3D printing in your work or hobby, please contact the specialists of our company and we will always be happy to advise you further.
Alexander Kornweitz
3D printing market expert
Eco-friendly use of 3D printers in the home and industry
Vegetarianism, electric cars, green energy. Increasingly, people are beginning to think about the destructive impact of humanity and production on nature.
Global warming (this is especially noticeable in the last decade), pollution of the world's oceans, garbage dumps, the extinction of some animal species or even entire ecosystems. If you do not start to fight this today, then in a hundred years, hardly anything will remain of the former natural greatness.
3D printing, due to its versatility, helps many scientists and enthusiasts in various fields in solving large and global problems, for the conservation and ecosystems of our still green planet.
Sustainable production
First of all, 3D printers help to make production more environmentally friendly. Using 3D printing instead of traditional manufacturing methods helps reduce waste and greenhouse gas emissions.
Air Emission Reduction
Smoke, garbage, gases, toxic fumes are frequent "companions" of traditional production methods. However, they can be significantly reduced or completely eliminated if a 3D printer is working in the workplace or at home.
Mass production vs. 3D printing
At first glance, it seems that mass production is less harmful to nature than piece-by-piece production on a 3D printer. But it turned out that this is not entirely true. Joshua Pierce and colleagues traced the life cycle of three household items - an orange juicer, parts from a children's designer and a drainpipe segment.
Joshua Pierce, Michigan Technological University Scientist USA
It turned out that the production of, at first glance, such ordinary household items consumes a huge amount of resources - the extraction of raw materials and their processing, production, storage and delivery to the final consumer.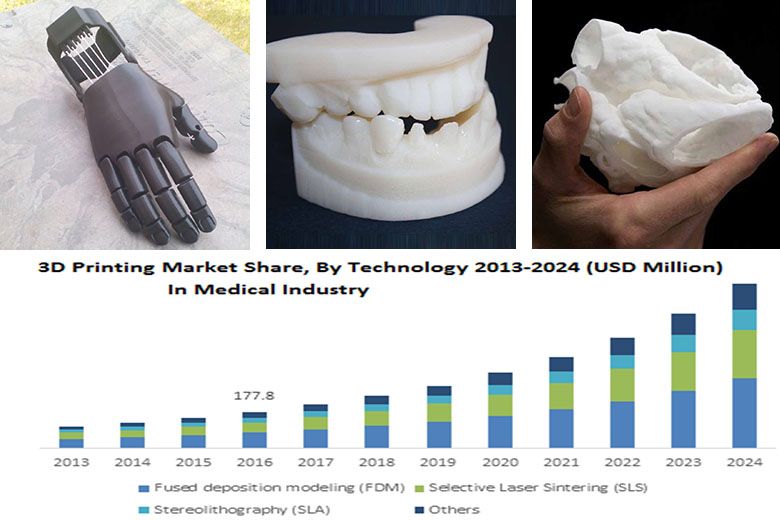 In mass production, stamping or casting is usually used, after which plastic scraps are sure to remain.
3D printing can significantly reduce the production chain, and consequently, energy costs (by about 40-60%). After all, 3D printing (provided that the client has his own printer) does not require delivery - it is enough to send a digital 3D model. Printing can be more accurate and leave less plastic waste behind. A 3D printer can even produce hollow or lattice parts that are technically impossible to mass-produce by injection molding or moulding.
Reduced fuel consumption
In the world, more and more manufacturers of cars and motorcycles are beginning to develop the direction of electric motors. There are new and more affordable electric vehicles, the infrastructure for the maintenance of electrical engineering is developing. Many countries set themselves the goal of reducing the use of fossil fuels as much as possible in the near future.
3D Printed Strati Electric Car0013
But unfortunately, abandoning fossil fuels in the next few decades is a utopia. But 3D printing is already helping to at least reduce the amount of fuel consumed. This is achieved due to the maximum lightening of the weight of both the machine itself and the mechanical components of the internal combustion engine (internal combustion engine).
Engine hood hinge, 3D printed on the left and sheet metal on the right
Sustainable production
3D printing helps not only to reduce industrial emissions into the atmosphere, but also helps to find and implement new ideas. After all, each owner of a 3D printer can himself model and manufacture a device or object that, in his opinion, will help to resist climate change.
Eco glasses
Disposable plastic cups are a headache for environmentalists around the world. According to statistics, the average person uses a plastic cup for 15 minutes, and it will take from 400 to 450 years to decompose in the garbage.
Plastic, due to its properties, is difficult to replace, especially in the food industry, but some enthusiasts are trying to do it. Jun Aizaki thinks he can solve this problem with pumpkins.
HyO-Cups or natural cups
Even prehistoric people adapted to use bottle gourds as reservoirs for water. Thanks to the 3D printed shapes, you can give almost any shape to a growing pumpkin.
gourd in the form of a jug
Animal Rescue
3D printers are actively helping our smaller brothers. In addition to medical uses such as prosthetics, 3D printing helps preserve and restore entire ecosystems.
Animal prostheses
The biggest challenge in animal prosthetics is the creation of an often miniaturized but lightweight and precise prosthesis. Manually or by other methods, this is sometimes impossible. In this case, the only way out is 3D printing.
Curano cat
Curano the cat lived a full life for 9 years, delighting his owners, until he got cancer. Curano's owners did everything possible to save their pet and although the cancer receded, Curano's back left leg was badly damaged.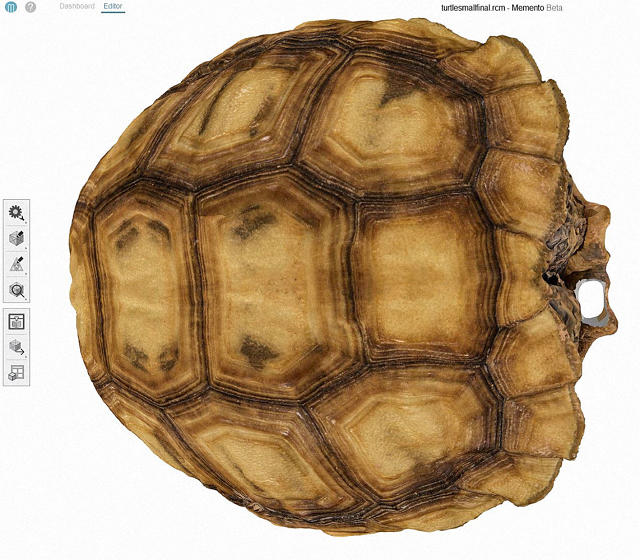 Amputation of the leg could create new problems and it was decided to try to replace the patella with an implant.
The miniature implant was 3D printed from a cobalt-chromium alloy using DMLS (Direct Laser Sintering) technology. It was impossible to manufacture by any other means, because the implant must not only be miniature and durable, but also completely repeat the complex relief for high-quality integration into the bone.
Holly horse
Holly is a ten year old mare who suffered from laminitis.
Laminitis is a disease of artiodactyls resulting from poor circulation of the hoof plates. Due to laminitis, Holly experienced severe pain in her legs, not only when walking, but also when standing.
Veterinarian Luke Wells-Smith heard of successful attempts to make custom titanium horseshoes for racing horses.
3D printed titanium horseshoes
The guys from the Australian National Science Center were imbued with Holly's misfortune and decided to help. In collaboration with a equine orthopedist, special horseshoes were created for Holly. They made it possible to lighten the hoof and more evenly distribute the load on the legs.
Holly's hoof scan
The new shoes helped Holly start not only walking without pain, but also running.
Akut sea turtle
The collision with the propeller of the boat was unfortunate for the Akut-3 sea turtle. Most of the upper and lower jaws were missing. This meant almost guaranteed slow death for the tortoise, but she was lucky.
The Tortoise Research and Rehabilitation Research and Rehabilitation Center, where the turtle ended up, turned to the Turkish company Btech, which specializes in medical 3D printing. Btech was able to scan and fabricate the missing part of the Akut jaw from titanium.
3D model of the prosthesis for Akut on the left and the finished prosthesis on the right
The surgeons succeeded in implanting the turtle's titanium jaw, and after a successful rehabilitation, it can be released into the wild.
Turtle with denture in place
Cleopatra tortoise
Nicola Novelli picked up and left a small land tortoise. But due to malnutrition, the shell of the turtle, Nicola called her Cleopatra, was deformed (had the shape of a pyramid) and thinned. If the shell had cracked, then Cleopatra could have died from an infection.
Cleopatra's deformed, pyramidal shell
Nicola approached Colorado Tech University with a request to make a prosthesis for Cleopatra. Specialists from the university and a 3D printing company in Denver scanned and made a shell overlay from polylactide, a biodegradable, biocompatible polymer. Due to the complex relief of the shell, the model had to be printed in parts.
Cleopatra with escutcheon
Since Cleopatra is still a teenager and will continue to grow with age, the “prosthesis” will have to be changed periodically.
Hermit crab houses
In the wild, it's bad to be small and weak. But hermit crabs were able to adapt and use empty shells of gastropod mollusks as a reliable shelter.
Hermit crabs
Due to the pollution of the beaches, many hermit crabs, in search of a new "house", fell into deadly traps from plastic bags, bottles, canisters and died. And natural shelters are becoming less and less. Hermit crabs have to use plastic garbage, which is not at all suitable for this.
Hermit crabs use rubbish as a home
Some enthusiasts are trying to help the unfortunate crustaceans and are trying to make them a worthy replacement house.
For example, MakerBot employees created the project "Shelter", where they offer anyone who wants to design a 3D model of a shelter for a hermit crab. The best works will be 3D printed and tested by crayfish.
From concept to implementation of 3D printed crayfish houses
But the Japanese artist Aki Yamomata, inspired by the idea of a peaceful exchange of land between countries, implemented a project of printed transparent houses for hermit crabs in the form of small towns.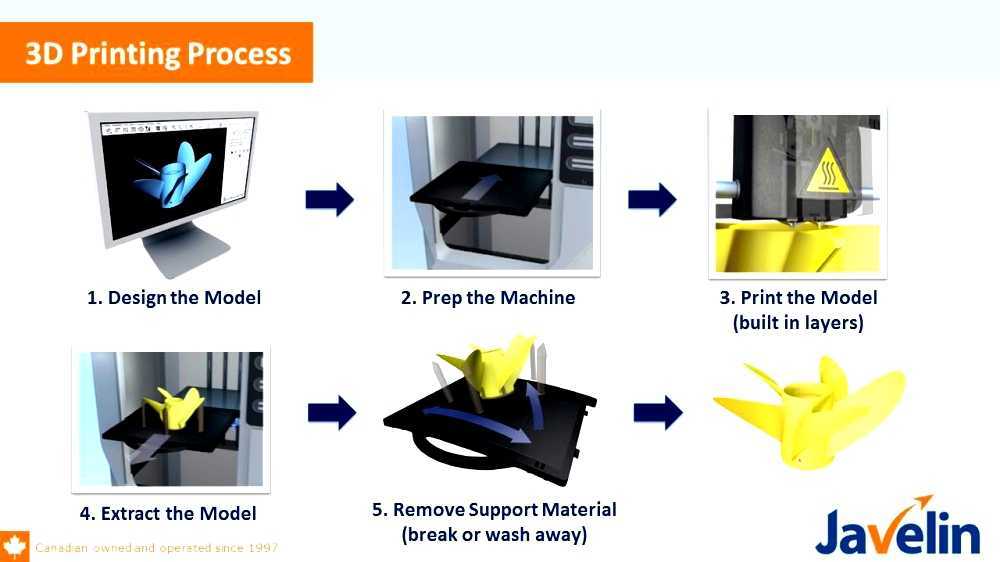
Cancer in a new home made with photopolymer printer
To make sure the new inhabitants liked the houses, they were based on tomographic images of shells, finalized in a 3D editor. Finished models are made of transparent resin on a photopolymer printer.
Conservation and support of ecosystems
In addition to prosthetics, 3D printing helps, although not to avoid some environmental disasters, but at least to slow them down. And this can give scientists more time to figure out the reasons and reach out to people.
Great Barrier Reef
It is the largest and oldest coral reef in the world. It is so huge that it can be seen from space (the area of the Great Barrier Reef is about 344,400 square kilometers). In addition, corals are home to many species of fish and other marine life.
Great Barrier Reef from space
But despite its gigantic size, it is endangered. Due to rising water temperatures, pollution of the world's oceans and climate change, the endosymbiotic algae that give corals their bright color are slowly dying out.
Scientists from the University of Sydney are using 3D scanning and 3D printing to save the Great Barrier Reef. Using 3D scanning, a detailed map of the reef was built. With it, you can track and predict the most vulnerable places.
Using a 3D printer, scientists are making a variety of structures that can support the Great Barrier Reef. For example, sections are printed that serve as a home for algae-eating fish that kill corals. Previously, special blocks or prepared, sunken ships were used for this purpose, but 3D printing makes it possible to imitate the natural structure of the reef much more accurately.
Sandcrete mix artificial reef
Restoring dead ecosystems
Scientists plan to use this technology not only to maintain existing ecosystems, but also to restore those that have disappeared. After all, to date, about a third of the world's coral reefs have been destroyed.
Thanks to 3D printing, there is a chance to at least slightly improve the situation. Using the new Modular Artificial Reef Structures (MARS for short) technology, scientists are trying to introduce 3D printed structures that can become a home for reefs.
Artificial "reef" on the left - recently installed, on the right - after some time
The advantage of such block structures is the ease of installation. Indeed, for their immersion and installation, cranes or other equipment are not required. Several divers can deliver them to the bottom in separate blocks. Each block has hollow sections that are filled with rebar and special concrete for durability.
Modular system installed
One of the largest 3D printed "coral reefs" has already been placed in the Maldives.
Waste reduction
In addition to restoring ecosystems, it is necessary to reduce household waste emissions. And here 3D printing becomes a valuable assistant.
Cora Ball
Cora Ball is a development of the Rozalia Project. The Cora Ball is a small plastic ball that picks up the microfibers that spill from our clothes during the wash. This way, dirt and fibers that may have entered waterways and oceans will remain in the bin. After all, these microparticles can be eaten by fish and other animals.
Prototype Cora Ball
Although mass production was planned to be done by molding, the first batches and prototypes of Cora Ball were made on a 3D printer.
The second life of broken things
Any mechanism wears out and fails over time. Often, to restore the working capacity of the mechanism, it is enough to make a small plastic part. So thanks to 3D printing, many things do not end up in a landfill, further polluting our planet, but get a second life.
RU machine
Radio-controlled cars have long become not only children's toys. Many adults do not mind remembering their childhood and racing on an impromptu track.
RU machine
The weak point of all RC machines is the plastic suspension. For expensive replica models, you can almost always find spare parts, but for rare or Chinese models, they are not.
Instead of throwing away an almost working toy, you can make a broken element on a 3D printer. When modeling, you can even increase the strength of the part by adding stiffeners in weak places.
1/18 scale car rear hub
Some enthusiasts 3D print the entire chassis. This makes it easy to replace broken elements and quickly refine and correct design flaws.
3D printed RC car chassis
The second life of the meat grinder
Even such seemingly eternal things as a metal meat grinder can break. The most annoying thing is that a part that does not have a strong load has broken.
Clamping nut for a meat grinder, made on a 3D printer
A variety of materials allows you to print on a 3D printer a replacement for almost any plastic part. It can be a gear for a blender, a plastic handle for a washing machine and much more.
In some situations, when the model is rare and old, there are no even original used spare parts. 3D printing allows you to give your favorite home appliance many more years of life, instead of rotting in a landfill.
Car seal
Sometimes a small, cheap piece breaks in an important node. But the manufacturer sells the necessary spare part only in the collection. Because of this, you have to not only overpay for the necessary part, but also throw away the unnecessary, albeit almost working, mechanism.
Washer nozzle for Toyota Avensis - 3D printed on the left, original on the right
A 3D printer becomes a “lifesaver” if you need to make a spare part that is already difficult or impossible to get.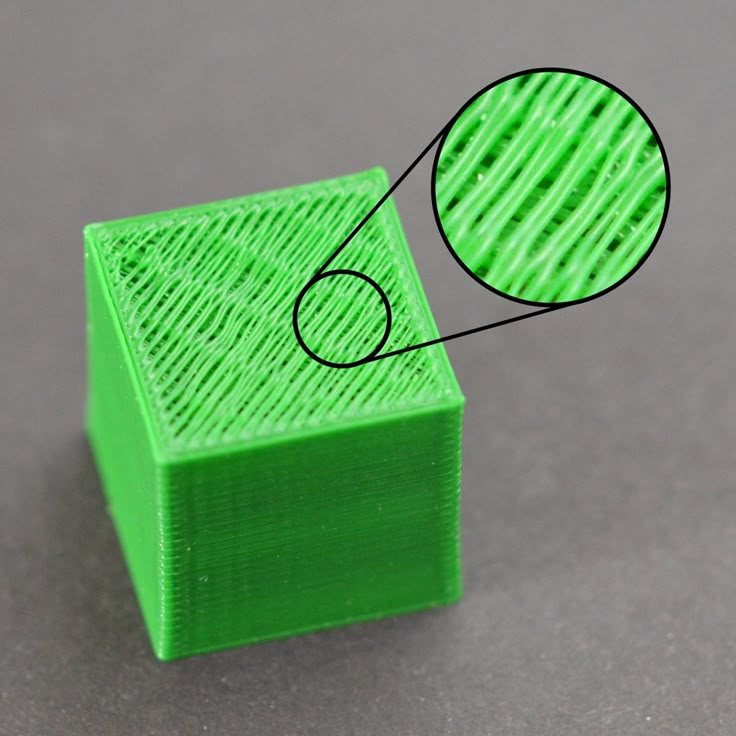 For example, this part is no longer produced, but the BU option could not be found, or delivery will cost more than the part itself.
Green energy
The transition to green energy is an important step in reducing emissions of greenhouse (and not only) gases into the atmosphere.
Wind power
Wind energy is a renewable and “clean” energy source. Despite some disadvantages (variability of wind power and therefore uneven power generation), it is promising for some countries. For example, in Denmark, in 2019, windmills generated 48% of the electricity consumed.
There are several options for wind turbines - with a vertical and horizontal axis of rotation.
Main types of wind turbines
Vertical-axial wind turbines have a lower efficiency compared to horizontal-axial ones, but their use requires that the wind speed be more than 6 m/s. In Russia, the average annual wind speed does not exceed 5 m/s, so wind turbines with a vertical axis are more often used.
Home wind generator
In Russia, "clean" energy sources are not very popular because of their high price. 3D printing helps enthusiasts design and build low-cost models of wind turbines.
3D printed home wind turbine
In an apartment building, there is hardly a place where a wind generator will be effective, but for example, in a country house, it can be a good helper in case of a power outage.
Wind turbine production optimization
An industrial wind generator is a complex mechanism of gigantic size.
Industrial wind turbine blade
Using only 3D modeling techniques, it can be difficult to correctly calculate all parameters. Thanks to 3D printers, it is possible to create a miniature copy of a wind turbine and test it in a wind tunnel. This helps to optimize and refine the design of wind generators, making them more efficient.
Wind Turbine Prototype Being Tested in Wind Tunnel
And some companies offer to print towers for wind turbines on a 3D printer. GE Renewable Energy, 3D printing specialists COBOD and LafargeHolcim (a manufacturer of cement and other building materials) have teamed up to develop the world's tallest wind turbine towers. This will reduce the cost of installing wind turbines and make them higher (200 meters instead of 100) than from other materials.
3D printed wind turbine tower
After all, the higher the wind generator, the more electricity it can generate in a year. For example, a 5 MW turbine at a height of 80 meters will generate approximately 15.1 GWh per year. The same turbine at a height of 160 meters - 20.2 GWh per year, which is 30% more.
Solar energy
Solar energy is obtained using special panels, consisting of photovoltaic cells, in which a series of physical and chemical processes take place under the influence of sunlight. There are several types of solar cells - monocrystalline, polycrystalline, amorphous (flexible, film).
In Russia, solar batteries are not very common due to the unprofitability of their use in high latitudes.
Currently, developments are underway for the production of panels on a 3D printer, but the main use of 3D printing in solar energy is to print prototypes and accessories for panels.
Accessories for solar panels
South Dakota-based Peppermint Energy created FORTY2. FORTY2 is a portable solar panel with enough power to run a laptop, lighting, etc.
For the production of a prototype case, 3D printing was used on an industrial Stratasys printer. Thanks to 3D printing, it was possible to quickly produce several functional prototypes of the case and remove all the flaws.
For example, the first version of FORTY was too bulky and inconvenient to transport. The original design was greatly simplified. The use of a 3D printer has reduced production costs by about $250,000.
Hydropower
Most renewable energy sources (solar, wind) are fickle. Electricity obtained in this way must be “stabilized” - stored in batteries.
Water in this regard is more predictable. Industrial hydroelectric power plants have a number of disadvantages. For example, flood risk, desertification, human migration, etc. Small hydro-generators, in general, are devoid of the shortcomings of their industrial counterparts and do not have such a devastating effect on the environment.
Vortex turbine
The Belgian startup team Turbulent is trying to create a compact hydroelectric generator that is enough to provide electricity to 1-2 private houses. This will help people who are far from the power grid to provide their homes with electricity using the energy of streams or small rivers.
Hydro generator prototype from Turbulent
To make the turbine more accessible and cheaper, 3D printing has been chosen as a manufacturing method. According to statistics, 1.3 billion people do not have access to electricity networks, even more residents have constant power outages and are forced to use other, not environmentally friendly, energy sources (for example, gasoline / diesel generators).
River turbine
Ted Christopher spent several years developing a prototype river turbine capable of generating electricity without impacting the environment. The result of his developments was the Volturn system, named after the god of the river in Greek mythology.
The Volturn has a horizontal design that generates power and deflects river debris such as rocks, plants or logs.
The prototype was 3D printed and tested in local rivers. 5 turbines combined into a single system will be able to provide electricity to about 40 houses.
Plastic recycling
Plastic. Its properties, for the modern world, become both a salvation and a curse for the environment. On the one hand, plastic products are light and durable, you do not need to spend a lot of time on their manufacture. At the same time, not all types of plastic can be recycled. On average, a plastic product can decompose from 400 to 700 years, and unfortunately plastic rots not only in landfills, but also pollutes nature and the oceans.
Filament recycling
During 3D printing, plastic debris is inevitably left behind. These can be model supports or broken products, during the printing of which something went wrong.
3D printing failed
But used plastic can be shredded, mixed with fresh pellets, and reused (as long as the plastic is not biodegradable). In this case, 3D printing becomes almost waste-free.
On the Internet, you can find many options for home machines for the production of plastic thread. It can be a self-assembly machine, partially printed on a 3D printer.
Home self-assembly filament machine
Or a finished machine made at the factory. Pellets for plastic production can be easily ordered online.
Home filament machine
Plastic bottle filament
In addition to recycling used filament, enthusiasts have learned to print even from plastic bottles.