Viper 3d printer
Anycubic Vyper 3D Printer Review: Strong Performance from a Robust Machine
Tom's Hardware Verdict
The Anycubic Vyper is an impressive 3D printer that offers a surprising amount of bang for the buck, but the software experience may deter first-time users.
TODAY'S BEST DEALS
Pros
- +
+ Automatic bed leveling is fast and reliable
- +
+ Flexible, textured bed is easy to remove parts from
- +
+ Part cooling fan designed to enable fast print speeds
- +
+ Silent stepper drivers result in quiet printing
Cons
- -
Kickstarter-style launch may turn off some users
- -
Magnets on part drawer were installed backwards
- -
Included Cura profile needs some work
Why you can trust Tom's Hardware Our expert reviewers spend hours testing and comparing products and services so you can choose the best for you. Find out more about how we test.
The list of features included on the Anycubic Vyper is a long list, and it seems to get longer everytime I look at it. Designed to compete with the best 3D printers, the Vyper is a workhorse machine, with a large build volume and supporting features to make printing as painless as possible. With a retail price of $359 (and a presale price of $299 for the first 3000 buyers at launch), the Vyper is appealing to users looking for a reliable machine and not necessarily users looking for their very first machine.
Anycubic Vyper 3D Printer
(Image credit: Anycubic)Direct Pricing $299.00
The 32-bit board on the Vyper is equipped with silent stepper drivers, so the only noticeable noise generated from the printer comes from the cooling fans mounted to the hot end. These fans are designed for high-volume airflow, which is what enables the printer to deposit and subsequently cool material faster than similar 3D printers, such as the Creality Ender 3 Pro. The dual-gear extruder also provides a solid drive mechanism and reduces the overall chances of filament slipping or stripping out.
- Anycubic Vyper (Black) at Amazon for $339.99
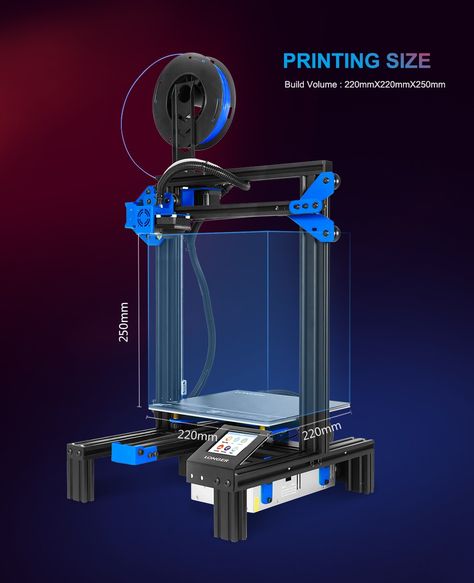
Anycubic Vyper Specifications
Swipe to scroll horizontally
| Machine Footprint | 20 x 18 x 20.3 inches (508mm x 457 x 516mm) |
| Build Volume | 9.6 x 9.6 x 10.2 inches (245mm x 245mm x 260mm) |
| Material | 1.75mm PLA, PLA+, ABS |
| Nozzle | .4mm |
| Build Platform | Heated Textured Flexible Removable Platform |
| Connectivity | USB, SD card |
| Interface | 4.3" Color Touchscreen LCD |
| Bed Leveling | Automatic, Strain-gauge Sensor |
Unpacking and Assembling the Anycubic Vyper
(Image credit: Tom's Hardware)The Anycubic Vyper ships in a semi-assembled state and doesn't require any soldering or complex mechanical assembly to put together. The base and X/Z gantry are pre-assembled and have zip-ties attached at various points to prevent the extruder gantry or build platform from moving around during shipping. In addition to the base, gantry, and LCD touchscreen, the Vyper includes an SD card and USB SD card reader, power and USB cables, a printed assembly guide, two additional nozzles, and a full set of Allen keys for assembling the machine.
Unlike a kit DIY 3D printer like the Creality Ender 3 Pro which requires you to build a 3D printer from a box full of parts, the Vyper provides a beginner-friendly experience that requires only 7 bolts and a handful of electrical connections to get up and running. This is ideal for users without a lot of mechanical experience or advanced users who are willing to spend a little more money on a printer that requires less work to get running.
(Image credit: Tom's Hardware)It took me about 30 minutes to fully assemble the Vyper, and the process can be split into two parts: mechanical assembly and electrical assembly. The mechanical assembly only required that I remove the zip-ties that held the gantries rigid and tighten the included M5x45 bolts to complete the printer frame. The electrical assembly involved hooking up the Z motors and running a latching connector to the X motor gantry. All of the wires have been terminated and are clearly marked, so you shouldn’t run into any trouble here.
With its side-mounted spool holder and large plastic cover covers, the Anycubic Vyper is a very distinctive looking 3D printer. The side-mounted spool and strain-gauge automatic bed leveling process are both similar to those found on the Creality CR-6 SE, a printer that has a similarly distinctive appearance. I was impressed with the overall build quality of the Vyper, and the injection-molded covers on the motion components feel like high quality plastic.
(Image credit: Tom's Hardware)The aluminum extrusions on the Neptune 2 feature V-slots for the rollers on the sides and have a smooth, matte black finish. The frame is unslotted on the front-facing surfaces, which give the machine a very clean and professional appearance. I’ve always thought the typical 2020-style aluminum extrusions used for 3D printer frames looked a little bit like a high school robotics project, which can be off-putting in a professional environment.
The clear housing mounted to the Vyper completely encloses the dual-geared extruder system. This Bowden system pushes the filament from the spool to the hot end, and uses an adjustable level of tension to compensate if the material is stripping out. I like the in-line design of the Vyper, which sends filament through a run-out sensor directly into the extruder module.
If the filament supply runs out, the printer will automatically pause the build and allow you to replace it before continuing. For a printer with a large print volume like the Vyper, this is a critical feature to prevent a part failure on a long print at the last minute.
Image 1 of 2
(Image credit: Tom's Hardware)(Image credit: Tom's Hardware)The X and Y axes are equipped with belt tensioners, which allow you to adjust the tension of the belt without having to fully disassemble the printer. The belts can stretch out over time, so the ability to make adjustments like this is a nice touch for a printer that is designed to be a workhorse like the Vyper.
(Image credit: Tom's Hardware)The Vyper has an integrated drawer on the bottom of the printer which lets you store commonly used tools (filament snips, Allen keys, etc.) unobtrusively and out of sight. I’m a big fan of this style of storage, as quick access to an Allen key or tweezers can help save a print that is failing, and no one likes having to search through drawers to find the right tool. The space under the printer would typically be unused, so this is a clever way to solve the problem without overengineering.
Image 1 of 2
(Image credit: Tom's Hardware)(Image credit: Tom's Hardware)The drawer has two magnets on the back as well as a pair of magnets embedded inside the printer. This is a clever way to pull the drawer snug during printing, but the magnets on my drawer were actually installed backwards. This means instead of closing tight, the drawer is actively repelled from the back of the machine, and there is a permanent gap where the drawer won’t close. This isn’t a huge issue and can be solved by flipping the magnets on the drawer, but I was a little concerned about running into a QC issue so early in the assembly process.
User Interface on Anycubic Vyper
(Image credit: Tom's Hardware)The user interface on the Anycubic Vyper is a 4.3-inch color touchscreen LCD, mounted on the right side of the machine. This location means that it can be easily accessed during printing, and it’s not covered by the moving bed of the printer (like the bottom-mounted screen of the Elegoo Neptune 2). I really liked the matte finish on the Vyper’s LCD; it felt very responsive and looked professional. The backlit LCD is easily readable and the large 4.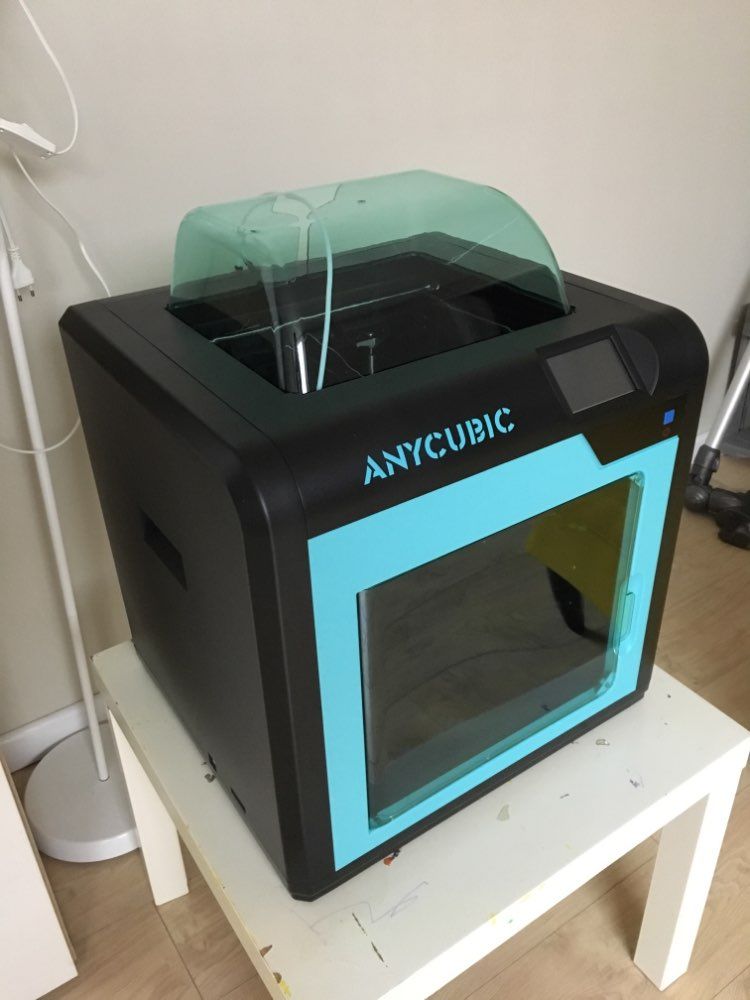 3-inch format is surprisingly large for a 3D printer (for reference, the original iPhone LCD size was only 3.5-inches.)
The housing for the LCD features a geometric pattern embossed on the rear, and this sort of attention to detail is something that I always want to take a moment and appreciate. Once mounted, you’ll likely never see this feature again, so its inclusion is really designed to show a higher level of intentionality in the design of the machine.
Calibrating and Leveling the Anycubic Vyper
(Image credit: Tom's Hardware)The Anycubic Vyper uses an automatic bed leveling process which completely eliminates the need to calibrate the printer manually with thumbscrews and a sheet of paper. In fact, the build platform on the Vyper is mounted directly to the moving gantry, so there aren’t even any thumbscrews to turn. Most automatic bed leveling processes will still require some degree of manual input (such as the hybrid approach of the Flashforge Adventurer 3 Lite), but the Vyper is a one-button operation, and runs completely free of operator input.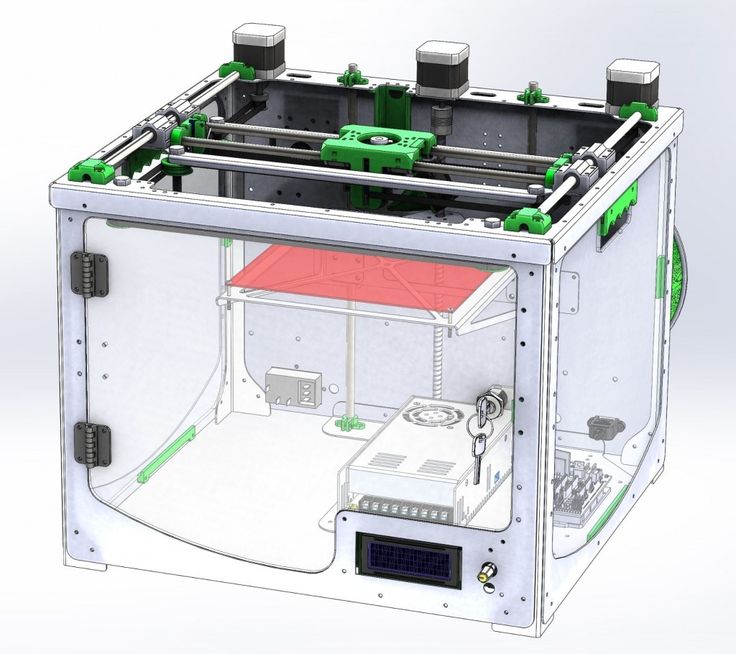
After clicking the “Auto-leveling” button, the Vyper will automatically begin the leveling process. The Vyper uses a 16-point mesh to calculate the offsets for the build surface at any given point, and the nozzle will slowly move down and make contact with the bed at each of these 16 points. I was impressed with the speed of the auto bed-leveling, which only took a few minutes. Unlike printers like the Prusa Mini+ which will run the calibration before every print, the Vyper runs the calibration as needed and I only ran it once in over 70 hours of testing. This saves time and prevents the calibration from running unnecessarily, but it could easily be added into the starting gcode if you did want to run it before each print.
Build Platform on Anycubic Vyper
(Image credit: Tom's Hardware)The build surface on the Anycubic Vyper is a textured flexible spring steel sheet which is held in place by a magnetic base on the build platform. This sheet is very thin and flexible, measuring in at an average thickness of .51mm. Removing parts from this style of build platform is so easy, it almost feels like cheating. The textured surface locks parts down during printing when hot, and after cooling they just slide right off with no tools required. This isn’t a new concept by Anycubic (Prusa has been doing it for years on the Mini+ and their i3 MK3S), but it’s still not a particularly common approach.
It’s hard to overstate the impact a build surface like this can have on the overall experience of using a 3D printer. If a print doesn’t fully stick to a surface, it can delaminate during printing which will cause the print to fail. Printers have all kinds of techniques to combat this (thicker or slower first layer, aftermarket adhesives, etc.), but the surface itself plays a large part in the success of the printer. A textured metal surface like this is easy to use, doesn’t require any hand tools for part removal, and can be cleaned with isopropyl alcohol to prevent any build-up.
Hot End on Anycubic Vyper
(Image credit: Tom's Hardware)A lot of the magic of the Anycubic Vyper comes from the uniquely designed hot end, which contains some interesting features that you won’t see in many other printers. The hot end cover is designed for maximum airflow, and uses three fans to cool both the heat break on the hot end as well as the part as it’s being printed. A cool heat break (the cylindrical part in the above picture) will prevent heat from travelling up the filament during printing, which can cause it to soften, deform, and cause issues with print quality.
(Image credit: Tom's Hardware)The strain gauge (the small black metal bracket above the heat break) is the secret ingredient in the automatic leveling system used by the Vyper. The strain gauge measures deformation of a surface, so it can detect when the nozzle makes contact with the build surface by the force transferred through the heat break. This is an inexpensive way to create a quick and accurate leveling system, and I found this style of leveling system to be reliable and easy to use.
Printing on the Anycubic Vyper
Image 1 of 2
(Image credit: Anycubic)(Image credit: Anycubic)The Anycubic Vyper includes an SD card preloaded with a test print named ‘owl.gcode’. Taking a look at the toolpath of this model, it’s clear that the seam alignment (where each layer starts and stops) has not been optimized, which will lead to a model with small marks spread without. You can see the difference in the above pictures; the owl on the left is the preloaded model, and the owl on the right is the same model with the same settings but with the seam optimized for aesthetics. Anycubic provided a spool of ‘3D Consumables’ brand grey PLA with this printer, which is what I used for all parts in this review.
(Image credit: Tom's Hardware)Because the printer had already calibrated, I started this print without making any adjustments to the bed leveling. The printer heated to temperature quickly and started the print with a skirt around the model, which adhered nicely to the textured build surface. As I was expecting, at some of the start/stop points of each layer, there was a little bit of extra material which can be seen in the picture above. This is easy enough to remove, but a simple settings adjustment at the factory would have provided a far more impressive demonstration print.
The model printed in 1 hour and 19 minutes, and after a quick cooldown, the owl model popped right off of the textured build surface.The model felt solid and well-made, but the small defects caused by the seam added up throughout the print and gave it a messy appearance. I appreciated the quick build speed of this test, as it does verify that the printer is mechanically and electrically functional without using a large amount of material or time. I do wish that Anycubic had spent just a bit more time preparing the model, which would give first-time users a much better first impression of the printer.
(Image credit: Tom's Hardware)The textured build surface gives the model a slightly grainy appearance on the bottom layer, which is a nice touch and makes the print seem a bit more uniform. Similar to the textured sheet found on the Prusa Mini+, this keeps the print from having a mirror-smooth bottom layer which looks a little less consistent overall.
Slicing Software for the Anycubic Vyper
(Image credit: Ultimaker)Instead of developing their own proprietary in-house slicer app, Anycubic has chosen to ship the Vyper with a copy of the Ultimaker Cura slicer app and a profile that they designed specifically for the Vyper. Other manufacturers will sometimes create their own fork, or derivative, of the Cura slicer app as opposed to creating their own app from scratch. An example of this is the version of Elegoo Cura that comes with the Elegoo Neptune 2. These apps are extremely similar in overall functionality and appearance, but the user experience can depend on how easy the manufacturer makes it to get your printer up and running with a built-in profile.
(Image credit: Ultimaker)The Vyper has designed a custom profile designed for the Cura slicer app, and they have included it on the SD card.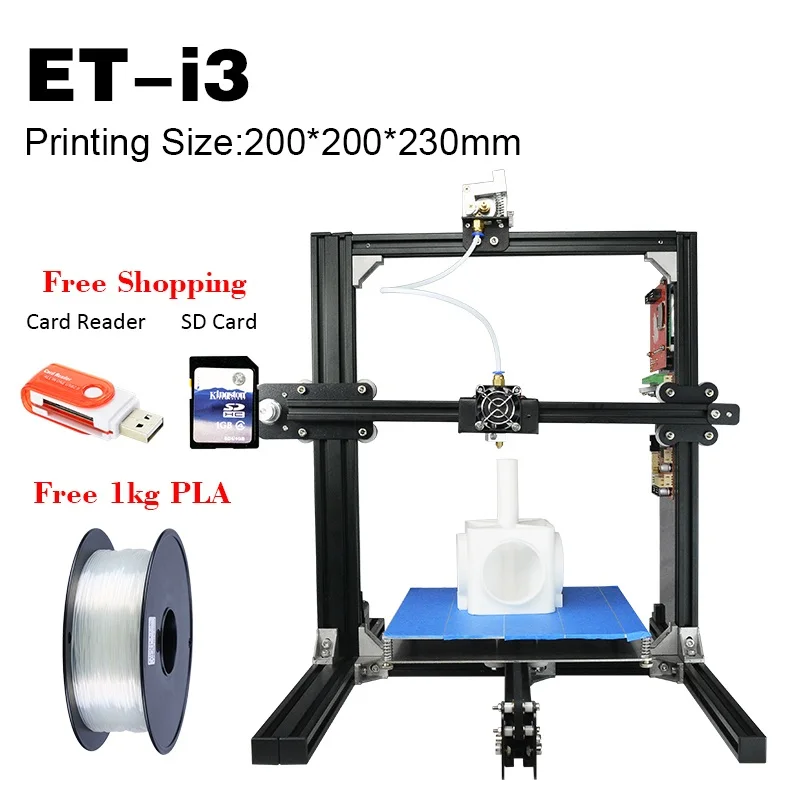 I dug into the profile, and was surprised to see that they had the default print speed set to 80mm/s. For reference, the Creality Ender 3 Pro and Elegoo Neptune 2 typically print around 40 or 50mm/s, so the Vyper’s speed is set considerably faster. There are many small modifications that I had to make to this profile (it’s set to print infill before walls, which almost guarantees a bad looking print with visible infill patterns), so you’ll need to spend a bit of time dialing it in before using it.
Print Size Comparison of the Elegoo Neptune 2 vs. Anycubic Vyper
(Image credit: Tom's Hardware)The Anycubic Vyper is designed for high-throughput 3D printing, and the feature set supports this concept by providing quality-of-life features like a flexible bed, aggressive part cooling, and adjustable belt tension. To give some perspective to this feature set, take a look at the build volume comparison between the Vyper and the Elegoo Neptune 2.
Swipe to scroll horizontally
| Header Cell - Column 0 | Elegoo Neptune 2 | Anycubic Vyper |
|---|---|---|
| Bed Leveling | Manual | Automatic |
| Build Dimensions | 8. 67 x 8.67 x 9.84 inches 67 x 8.67 x 9.84 inches | 9.65 x 9.65 x 10.24 inches |
| Build Volume | 170.63 cubic inches | 197.63 cubic inches |
| Printer Dimensions | 16.93 x 16.77 x 18.11 inches | 20 x 17.99 x 20.32 inches |
| Printer Volume | 5,141.72 cubic inches | 7,311.14 cubic inches |
| Build / Footprint Ratio (higher is better) | 3.30% | 2.70% |
The build volume of the Vyper, while slightly larger than the Neptune 2, comes at the expense of a slightly larger footprint. Given the price difference between the $160 Neptune 2 and the $359 Vyper, you might be wondering where the difference in price is coming from. The Vyper utilizes an automatic bed leveling system, which means you won't spend much time when printing doing calibrations.
The hot end is robustly built, with a total of 3 cooling fans (1 fan for the hot end, two for the part) built in as opposed to the pair (1 fan for the hot end, 1 for the part) found on the Neptune 2. These features (and others) all paint the picture of a printer that is designed for problem-free printing with a minimal amount of tweaking or calibration.
(Image credit: Tom's Hardware)Printing Multiple Parts on the Anycubic Vyper
(Image credit: Tom's Hardware)Swipe to scroll horizontally
| Layer Height | 0.2mm |
| Infill Percentage | 10%, Gyroid |
| Print Speed | 80mm/second |
| Extruder Temperature | 200 degrees Celsius (392 degrees Fahrenheit) |
| Heated Bed Temp | 60 degrees Celsius (140 degrees Fahrenheit) |
| Print Time | 31 Hours, 1 Minute |
Image 1 of 2
(Image credit: Ultimaker)(Image credit: Ultimaker)A printer like the Anycubic Vyper is an appealing machine for anyone making small-to-medium batches of production parts who needs reliable, repeatable performance and a printer capable of high nesting density. To test out this application, I used a knurled nut and bolt combination by Thingiverse user akira3dp0 as a simulation of a part that requires accuracy and repeatability. I placed 42 individual parts on the tray for a total of 21 nut/bolt combinations and used the settings provided by Anycubic on the SD card as my default settings.
The Vyper completed the print on the very first try, an impressive feat considering the ambitious nature of a build like this. Typically, an FDM 3D printer doesn’t have a perfectly flat build surface so it’s possible for a single part to detach mid-print and collide with the other parts, ruining the build. The auto-leveling feature of the Vyper allowed for flawless adhesion across the build surface and the parts all printed successfully.
(Image credit: Tom's Hardware)I did notice that the print estimate was incorrect by a non-trivial margin; the original estimate was 24 hours but the actual print time was just over 31. This incorrect print estimate was the only real issue I noticed; the parts all printed without any part defects or warping and the threads worked perfectly without needing any post-processing.
After the print was completed, I let the build surface cool to room temperature before removing the parts. The nuts and bolts detached almost completely effortlessly; all I had to do was give the platform a slight bend and the parts came tumbling off. This is where the flexible textured spring steel surface really shines, the platform can be cleared and ready for the next build without using any tools and with virtually no downtime.
With a print time of 31 hours to produce 42 individual parts, one single Vyper 3D printer is capable of pumping out 210 of these individual parts per week, an impressive figure that could be further optimized by decreasing print resolution, decreasing infill percentage, or various other parameters.
Printing Large Parts on the Anycubic Vyper
(Image credit: Ultimaker)Swipe to scroll horizontally
| Layer Height | 0. 3mm 3mm |
| Infill Percentage | 10%, Grid |
| Print Speed | 50mm/second |
| Extruder Temperature | 200 degrees Celsius (392 degrees Fahrenheit) |
| Heated Bed Temp | 60 degrees Celsius (140 degrees Fahrenheit) |
| Print Time | 16 Hours, 22 Minutes |
The large build volume of the Anycubic Vyper lends itself to printing large assemblies in a single print, like this Table Clamp from PrusaPrinters. This functional model has a total of seven individual parts and can comfortably fit on the build surface of the Vyper. Printed using the provided profile, this model printed in 16 hours and 22 minutes and stayed locked to the build platform for the duration of the print. After a quick cooldown, the model was easily removed from the build surface and I didn’t need to use any tools or scrapers.
The threads on this model are all functional, and the clamp works as intended. I was impressed with how sturdy it felt, even at a relatively low 10% infill. This print drove home the Vyper’s ability to print functional parts that can see end-use, and the entire build completed without any issues or interruptions.
(Image credit: Tom's Hardware)I was impressed with the overall experience of using the Anycubic Vyper, and I have no doubt that this printer will find its niche among users interested in printing parts for production or simply just printing large volume parts. The solid build construction and fast set up time make it ideal for setting up a fleet of these machines quickly, or just for a fun weekend project.
The Anycubic Vyper is officially launching for sale on June 10th at 7 AM PST. Anycubic is using a hybrid model to launch the printer where the pricing structure is similar to a Kickstarter or other crowdfunding campaign but the machine is available directly from the manufacturer. The first 3,000 units sold will be priced at $299, and the regular retail price of $359 will be charged for all subsequent orders. The Creality CR-6 Kickstarter attracted over 10,000 backers at various levels for a 3D printer with similar specs and pricing, so it’s very likely the first 3,000 units will sell quickly. Given the current $429 price of the Creality CR-6 SE, the Vyper offers a competitively priced alternative with similar features and specs.
Anycubic Vyper: Price Comparison
$359
View
$359
View
$499
$429.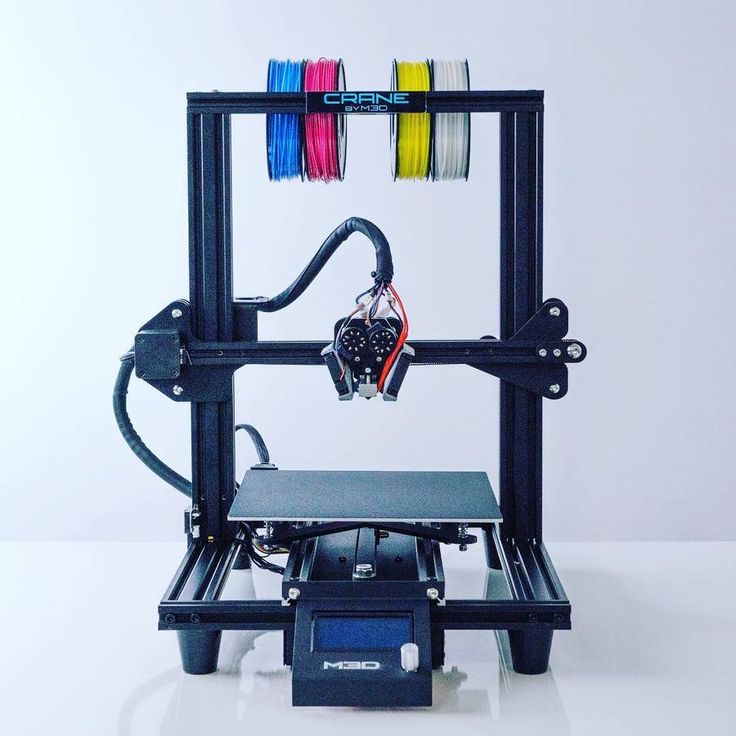 99
99
View
Reduced Price
powered by
Andrew Sink first used a 3D printer in 2012, and has been enthusiastically involved in the 3D printing industry ever since. Having printed everything from a scan of his own brain to a peanut butter and jelly sandwich, he continues to dive ever more deeply into the endless applications of additive technology. He is always working on new experiments, designs, and reviews and sharing his results on Tom's Hardware, YouTube, and more.
Anycubic Vyper - 3DJake International
The Anycubic Vyper is an inexpensive FDM printer for beginners and advanced users.
- Build volume: 245 x 245 x 260 mm
- Max. Nozzle temperature: 260 ° C
- Max. Heating bed temperature: 110 ° C
Brand new processor
Equipped with a new 32-bit mainboard and a high-performance Cortex-M3 CPU, the Vyper offers higher computing power and a smoother system.
The use of very quiet TMC2209 drivers enables very quiet printing as well as precise voltage regulation.
Automatic levelling
The Anycubic Vyper does not require manual bed levelling. The intelligent levelling system adjusts the print bed by itself.
High-precision Z-axis with double screw system
The two-sided Z-axis screws run synchronously and thus guarantee increased stability.
The device automatically compensates for the unevenness in the heating bed and thus increases the accuracy in the Z-axis.
Patented mount to eliminate play in the Z-axis
The device moves more smoothly and evenly in the Z-axis, which reduces the visibility of printed layers and increases the printing accuracy.
Magnetic spring steel build plate
The build plate is made of spring steel and is coated using a new technology, which prevents deformation at high temperatures, prevents scratches and supports easy detachment of the model. It is compatible with a wide variety of filaments, such as PLA, ABS, PETG, TPU, etc.
Double fan system
There is a double fan system on the print head that cools models down quickly and delivers the same print quality at significantly higher printing speeds than conventional 3D printers.
Dual gear extruder
After targeted optimisation of the extrusion force, the extrusion system is able to reduce the risk of filament entanglement and print with a large number of filaments.
Large build volume
With a construction volume of 245 x 245 x 260 mm, the Anycubic Vyper meets almost all creative requirements.
Quick assembly
The modular design allows the printer to be set up quickly in 3 simple steps and ensures easy maintenance.
4.3-inch touch screen
The 4.3-inch touchscreen has a new, attractive user interface and can be operated in English and Chinese.
Resume print & filament sensor features
The device supports both the resumption of printing after a power failure and the detection of missing filament.
Other features:
- Belt tensioner for X and Y axes
- Integrated toolbox
- Illumination of the print model
- Removable filament holder
- Modular printhead
Milky Green Viper Trimeresurus Venom Snake Snake Antivenom Serum Production Stock Photo ©kampwit 226891886
Want to get any 10 photos or vectors for free?
Images
VideosEditorialMusic and Sounds
Tools
Business
Prices
All Images
LoginRegister
Download this image,
by registering an account
Already have an account? Sign in
I accept the terms of the User Agreement Receive news and special offers
Milky green viper (Trimeresurus) snake for venom for the production of snake antivenom serum
— Photo by kampwit
Buy this image for only €1. 4 Get
4 Get Similar royalty-free images:
Show more
Show more
Same series:
Milky green viper (Trimeresurus) snake for venom for the production of snake antivenom serum Milky green viper (Trimeresurus) snake for venom for the production of snake antivenom serum Milky green viper (Trimeresurus) venom snake for the production of snake antivenom serumMilk green viper (Trimeresurus) venom snake for the production of snake antivenom serum viper (Rhodostomy Calloselasma), a very dangerous snake Milky green viper (Trimeresurus) venom snake for the production of snake antivenom serum Milky green viper (Trimeresurus) venom snake for the production of snake antivenom serum Milky green viper (Trimeresurus) venom snake for the production of snake antivenom serum venom snake for the production of snake antivenom serum Milky green viper (Trimeresurus) venom snake for the production of snake antivenom serum ) at the Bangkok Planetarium, Thailand .People catch the Indochinese rat with their bare hands (Ptyas korros).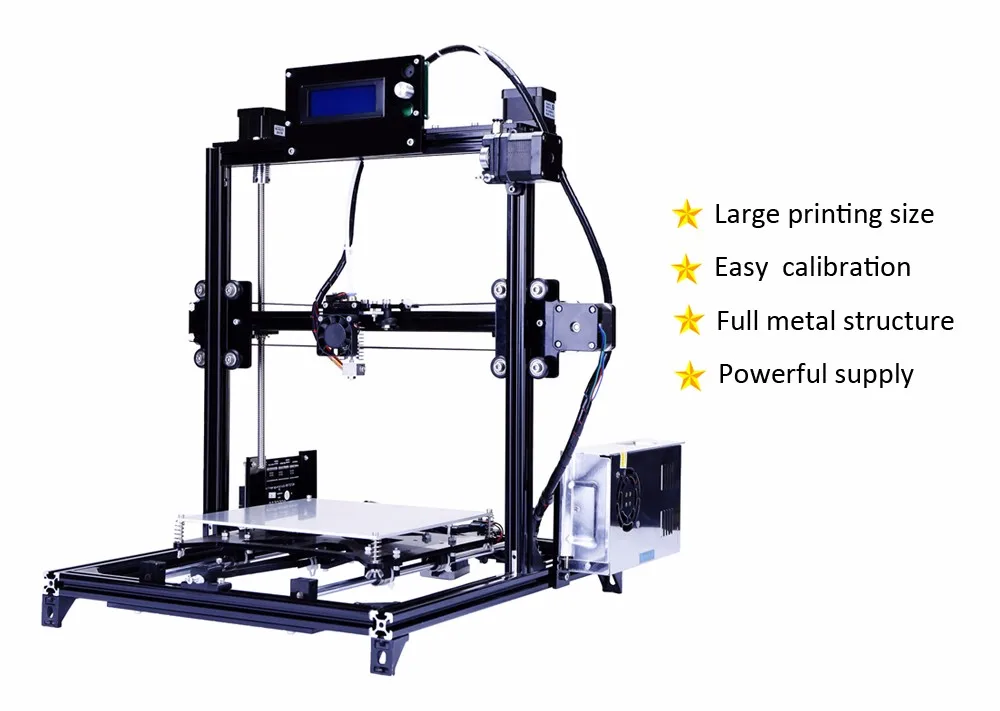 The Chinese rat snake or Indo-Chinese rat snake is a species of colorful snake endemic to Southeast Asia. . nine0002 Show more
 Usage Information
You can use this royalty free stock photo of "Milky green viper (Trimeresurus) venom snake to produce snake antivenom serum" for personal and commercial purposes under a Standard or Extended License. The standard license covers a variety of uses, including advertising, UI design, product packaging, and prints up to 500,000 copies. The Extended License includes all uses as the Standard License, with unlimited printing rights, and the use of downloaded stock images for merchandise, resale, and free distribution. nine0003
You are using an outdated browser. For a faster, safer browsing experience, upgrade for free today.
Viper brand explosives
or Diamond Viper V550 based on Riva TNT
chipset It always happens when you really expect something, and when it happens you get the impression that it didn't turn out exactly what you wanted. Everything somehow burns out during the waiting time. So, we were all looking forward to the appearance of the first boards based on the new chipset from nVidia - Riva TNT. With a share of envy and skepticism, we read foreign reviews. At the same time, the good old rock and roll was constantly spinning in my head, sung by the deceased Bon Scott, behind whom Angus jumped in a school uniform. As a result, when we received a board for Riva TNT, our first desire was simply to write on the first page the words: "We have a board for Riva TNT, finally" and add with a grin: "So what? Whom only in our mountains didn't catch…"
Yes, there is a fee, but you already know everything you need to know about it. One can only confirm or refute some statements of the manufacturer and colleagues who do not speak Russian, but look at the pictures with pleasure. So much was the expectation of the new chipset, so much was said about its revolutionary nature, that all competitors will immediately become history. But there was no feeling of a holiday or a significant event, unfortunately. Moreover, the tendency of some deification is clearly observed. And as you know, you can’t offend the gods. If you are to get involved in jihad, then you need to do this only after thoroughly preparing the rear, i.e. studying the subject. Moreover, normal users are still in the majority, and most of them want a firm answer to the question: "Worth buying or not?" After all, what is happening? It's just some kind of banditry, before a new product appears on the market, the manufacturer or its competitors announce a new product, which, of course, is better than the old one. "We demand stability!" - an ordinary user will say and he will be right, today he bought voodoo 9 for 200 bucks0171 2 , and six months later a new player appears on the market with a statement - pay another 200 bucks and then you will be on top of the world. Is that so? Is it worth spending more and more money on endless upgrades? The question is complex, and most importantly not having a clear answer.
 It is clear that the manufacturer must sell as many new products as possible in order to invest in further developments. But we don't print money either. In general, we always try to give as complete and objective information as possible about a product or technology, while assuming that you yourself will make your own informed choice. How do we do it? You be the judge, we try and learn from our mistakes. nine0003
So, let's move on to the topic of our review. Yes, indeed, a new chipset from nVidia was expected, and very much expected. But the first thing that caught my eye and immediately a little indignant was the already familiar small ridiculous heatsink, which pretends to remove excess heat from the hard-working Riva TNT chipset, while the latter continues to heat up stubbornly, and the heating process threatens to turn into uncontrolled explosion, which fortunately does not happen. Otherwise, it would be funny when practice would justify the name of the chipset. Okay, enough sarcasm, let's turn on Ball Breaker louder, however, already with Brian Johnson, and move on to a consistent review. nine0003
Let's note right away that we will return to this topic later, as we are planning to compare boards based on the Riva TNT chipset from Creative, Canopus and STB. Moreover, the board from Canopus is of particular interest. The fact is that, unlike competitors who made their products based on the design recommended by nVidia, Canopus engineers, as always, went their own way. At least the examples of boards based on Voodoo from Canopus give all the grounds for good expectations. We don't expect to see any significant difference between boards from Creative, Diamond and STB. However, judging by the information coming from colleagues who do not speak Russian, Diamond, whose video cards we tested, made the slowest card based on the Riva TNT chipset. nine0003
Our review is devoted, as always, to the operation of the video card from the point of view of a simple user who is interested in the operation of the card in the "default" modes (for example, in maximum quality mode with the synchronization of the sampling rates of the card and frame scanning of the VSYNC monitor enabled, which reduces quantitative indicators). The principle should be this: turn it on and work, without downloading additional setup guides, and even more so for handling the soldering iron.
Let's first look at the appearance:
The board has 16 megabytes of SDRAM memory. One memory module is shown below:
As you can see, the board is small in size, in the standard form of an AGP card (recently this form has really become standard).
The card comes with a CD with various drivers (Super-CD), including those for Viper v550. Drivers already contain ICD OpenGL. In our memory, this is the first case of a non-professional board being released immediately with full-fledged OpenGL drivers. Information about driver and BIOS versions is below in the screenshot of one of the control panels:
Traditionally, Diamond Multimedia releases drivers for its video adapters with an integrated control panel that allows you to select resolution:
A very interesting demo program from nVidia was placed on the same compact from the delivery, which demonstrates various stages of 3D rendering (building a three-dimensional image), and, in addition to familiarizing yourself with all the stages of this process, the user also has the ability to rotate the object (using mouse), as well as set different lighting. nine0003
Now let's move on to the tests. The following configuration was used for testing: Pentium II - 400 MHz, 128 MB SDRAM, MS Windows 98 with drivers from Diamond version 215. Millennium G200 (4.11 drivers)
400MHz
 9
9 300MHz
 03 with A-Aliasing
 233MHz
 03 with A-Aliasing
 You can evaluate the scalability of a video card using the following diagram as an example (data from 3D Winbench 98):
From this we can make a reasonable conclusion that the card no longer has enough CPU power to realize its potential, since with a decrease in resolution, only a slight increase in performance is observed , unlike, for example, Matrox Millennium G200 (see Review of this video card).
Conclusions:
Riva TNT based cards are by far the fastest among 2D/3D cards released for the gaming sector. The G200 chipset handed over the yellow jersey of the Riva TNT leader with the words: "You deserve it!". nine0003
| Incoming 1024x768x16BPP |
It is worth noting that there were practically no side effects during the implementation of complete smoothing (approximately a harsh smoothness of productivity (approximately, as in MILLELA
Of course, it was necessary to check the operation of the card with programs using the OpenGL interface, especially since Viper V550 drivers include ICD OpenGL. In the Quake2 game, the card showed very good, in my opinion, results in quantitative terms, while the quality was also on top:
| Quake2 1024x768x16bpp |
Of course, we also launched the hit of the season - a great graphics game from Unreal, using the recently released OpenGL patch. Screenshot taken at 1024x768 resolution below:
| The picture from Riva128 doesn't match what can be seen on the screenshot. True, glitches still slipped on Riva TNT. Sometimes, with sudden movements, the textures didn’t seem to have time to move and split in two, when switching resolutions from 800x600 to 1024x768 and back, sometimes horizontal stripes appeared that divided the screen into two parts: on the top there were wireframes of objects without textures, on the bottom - everything is correct. But these problems appeared only occasionally and were easily fixed, so they have little effect on the overall "playability". The fact that Riva TNT is a Voodoo 2 killer will have to wait. However, Riva TNT is quite suitable for the role of a gravedigger. As long as new games for Glide exist and are written, and there are already about 400 of them now, Voodoo 2 boards will be an integral part of a serious gamer's computer. Time will tell what will change. The card is very promising in terms of price / performance, especially considering the presence of 16 MB of memory. But in 2D graphics, this map upset me a little. I don't even give the results of testing on Graphics Winmark 98, since they do not differ much from the results given by cards based on the Riva128 chipset. The difference is only 7-8% in the upper side. Image quality at high resolutions (1280x768 and higher) is better than that of Riva128, but still falls short, for example, of Matrox Millennium G200. |