Print your 3d models
Design, Upload, and 3D Print Your Files
Design, Upload, and 3D Print Your Files
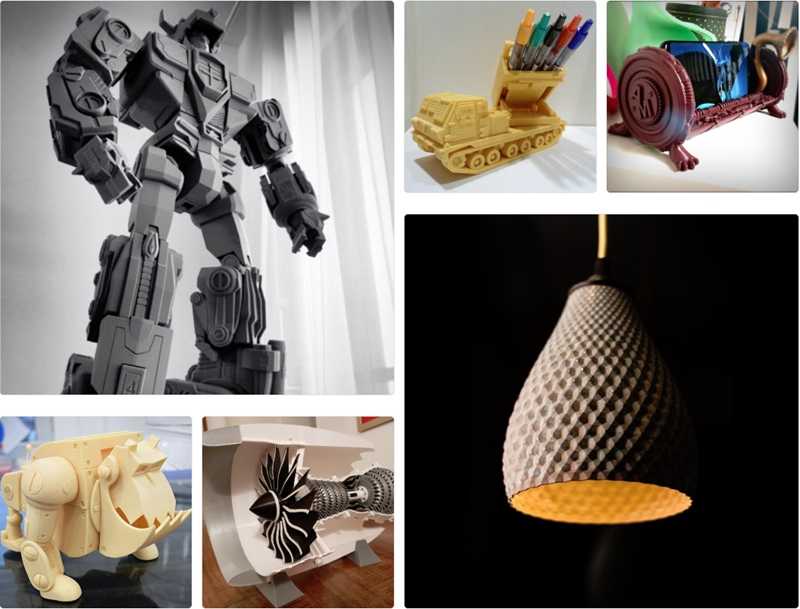
3D print with Shapeways by creating complex products previously impossible with traditional manufacturing. Create sophisticated 3D printed ideas and designs, upload 3D print files, and expedite product development.
From sketch to the final 3D printed product, Shapeways allows you to choose advanced 3D printing materials, technology, and feedback for 3D print files. This ensures quality manufacturing for assembly and fit, functionality, and high-performance parts for applications like aerospace or medical.
Upload a File
Contact Sales
Have a 3D File Ready?
Create your 3D model and upload the 3D print file to Shapeways. Don’t have a 3D file? Shapeways can help.
Shapeways 3D prints and post-process your product.
Your 3D print is shipped expediently and arrives ready to use!
Upload a Model to 3D Print
Whether you are uploading 3D models for jewelry or automotive parts, Shapeways instantly analyzes the 3D file for printability. While most 3D models are uploaded successfully, if an issue arises, Shapeways file fixers can help regenerate the 3D file or provide customized feedback. Inspections, proprietary processes, and expert 3D printing operators lead to exceptional products.
Explore Materials
Proper selection of 3D printing materials is key as they must be compatible with 3D printing technology and optimized for project requirements. From plastics to metal, Shapeways offers over 90 materials and finishes–and additive manufacturing services for any project.
3D Print Design Tips
While excellence in product development depends on optimized modeling, prototyping, and quality management, 3D printing design guidelines play a critical role in the outcome of every 3D printed part. Check out the following resources for assistance in taking your 3D design from concept to market.
Services for Your Business
- Use Shapeways 3D printing services to create complex 3D printed products for you.

- Receive 3D printed parts quickly, print new iterations, or rapid prototypes as needed.
- Rely on expert 3D printing operators and inspections for delivery of quality products.
- Choose from a range of additive manufacturing and traditional manufacturing options, designed to scale any business.
- Drop ship your 3D prints to over 130 countries.
Contact Sales
First Name*
Last Name*
Email*
Phone*
Company
Title
Country*
--None--AfghanistanAlbaniaAlgeriaAndorraAngolaAnguillaAntigua and BarbudaArgentinaArmeniaArubaAustraliaAustriaAzerbaijanBahamas, TheBahrainBangladeshBarbadosBelarusBelgiumBelizeBeninBermudaBhutanBoliviaBosnia and HerzegovinaBotswanaBrazilBruneiBulgariaBurkina FasoBurundiCambodiaCameroonCanadaCape VerdeCentral African RepublicChadChileChinaColombiaComorosCongo, Democratic Republic of theCongo, Republic of theCosta RicaCroatiaCyprusCzech RepublicDenmarkDjiboutiDominicaDominican RepublicEcuadorEgyptEl SalvadorEstoniaEthiopiaFaroe IslandsFijiFinlandFranceFrench GuianaFrench PolynesiaGabonGambia, TheGeorgiaGermanyGhanaGibraltarGreeceGreenlandGrenadaGuadaloupeGuamGuatemalaGuernseyGuineaGuinea-BissauGuyanaHaitiHondurasHong KongHungaryIcelandIndiaIndonesiaIraqIrelandIsraelItalyIvory CoastJamaicaJapanJerseyJordanKazakhstanKenyaKiribatiKorea, SouthKuwaitKyrgyzstanLaosLatviaLebanonLesothoLiberiaLibyaLiechtensteinLithuaniaLuxembourgMacauMacedoniaMadagascarMalawiMalaysiaMaldivesMaliMaltaMarshall IslandsMauritaniaMauritiusMexicoMicronesiaMoldovaMonacoMongoliaMontenegroMontserratMoroccoMozambiqueNamibiaNepalNetherlandsNetherlands AntillesNew CaledoniaNew ZealandNicaraguaNigerNigeriaNorfolk IslandNorthern Mariana IslandsNorth KoreaNorwayOmanPakistanPalauPalestinian TerritoryPanamaPapua New GuineaParaguayPeruPhilippinesPolandPortugalPuerto RicoQatarRomaniaRussiaRwandaSaint Kitts and NevisSaint LuciaSaint Vincent and the GrenadinesSamoaSan MarinoSaudi ArabiaSenegalSerbiaSeychellesSierra LeoneSingaporeSlovakiaSloveniaSolomon IslandsSouth AfricaSpainSri LankaSudanSurinameSvalbard and Jan MayenSwazilandSwedenSwitzerlandTaiwanTajikistanTanzaniaThailandTimor-LesteTogoTongaTrinidad and TobagoTunisiaTurkeyTurks and CaicosTuvaluUgandaUkraineUnited Arab EmiratesUnited KingdomUnited StatesUnited States Minor Outlying IslandsUruguayUzbekistanVanuatuVatican CityVenezuelaVietnamVirgin Islands (British)Virgin Islands (US)Wallis and FutunaYemenZambiaZimbabwe
How can we help?*
Choose an optionI'm interested in repeating ordersI'm interested in batch productionI want to design a one-time prototypeI'm new to 3D printing and need guidanceI’m interested in custom packagingOther/general questions
Description
By entering your email address, you grant Shapeways permission to send you messages about Shapeways and Shapeways services. You may unsubscribe from these messages at any time by using the unsubscribe link. Your information is protected by the Shapeways Privacy Statement.
Please check recaptcha box
Upload 3D Model | 3D Printing Service
Upload 3D Model | 3D Printing Service | i.materialiseOops...Seems your browser is blocking cookies. Please adjust your settings to accept cookies.
drag and drop it like it’s hot
Analyzing your design
Please wait for a few seconds while we update the 3D viewer with the repaired model.
Something went wrong while updating your model. Please try again.
No results found.
Sorry! Something went wrong. Please refresh the page and try again.
Upload 3d model
Share Your Model Recent models
3D model workspace
Materials
Loading...
{{$select.selected.name}} No results found.Colors and Finishes
Loading...
{{$select.selected.name}} No results found.
Scale
Quantity
Price
{{vm.getProductProcessingStateKey() | translate}} Calculating
Discounted price
By clicking ‘Accept Repair’, I understand that the repair may have altered the geometry of my model.
(*) If the model is 3D printable in the requested material
Materials
Analyze
Optimize
3D Printing
- How It Works
- 3D Printing Materials
- 3D Printing Technologies
- Hire a 3D Designer
- Educational Discount
Business
- Manufacturing Partnership
- Referral Partnership
- White Label Integration
- Crowdfunding
- API
Support
- Contact Us
- Shipping Info
- Tutorials
- 3D Design Tools
Shop
- Shops
- Designers
- Open a Shop
Community
- About Us
- Blog
- Forum
Terms and Conditions Privacy Policy Cookie Statement Sitemap
© Copyright 2022 Materialise nv, all rights reserved. “i.materialise” is a registered trademark of Materialise nv.
10 rules for preparing a model for 3D printing / Habr
Download the model, print it, use it - what could be easier!? But, if we talk about FDM 3D printers, then not every model can be printed, and almost every model (not prepared for 3D printing) has to be prepared, and for this it is necessary to imagine how this 3D printing goes.
First, a couple of definitions:
Slicer is a program for converting a 3D model into a control code for a 3D printer. (There are plenty to choose from: Kisslacer, Slic3r, Skineforge, etc.). It is necessary, because the printer will not be able to immediately eat the 3D model (at least not the printer in question).
Slicing (slicing) is the process of translating a 3D model into a control code.
The model is cut (sliced) in layers. Each layer consists of a perimeter and/or fill. The model may have a different percentage of filling with a fill, and there may not be a fill (hollow model).
On each layer, movements occur along the XY axes with the application of a plastic melt. After printing one layer, it moves along the Z axis to the layer above, the next layer is printed, and so on.
1. Mesh
Intersecting faces and edges can lead to funny slicing artifacts. Therefore, if the model consists of several objects, then they must be reduced to one.
But it must be said that not all slicers are sensitive to the grid (for example, Slic3er).
And even if the grid is crooked, and it’s too lazy to fix it manually, then there is an excellent free cloud service cloud.nettfab.com that will help in most cases.
2. Flat base
Desirable, but not mandatory. A flat base will help the model stay on the printer table better. If the model peels off (this process is called delamination), then the geometry of the base of the model will be broken, and this can lead to a shift in the XY coordinates, which is even worse.
If the model does not have a flat base or the base area is small, then it is printed on a raft - a printed substrate. The raft damages the surface of the model it comes into contact with. Therefore, if possible, it is better to do without it.
3. Wall thickness
The walls must be equal to or thicker than the nozzle diameter. Otherwise, the printer simply will not be able to print them. The wall thickness depends on how many perimeters will be printed. So with 3 perimeters and a nozzle of 0.5mm, the wall thickness should be from 0.5, 1, 1.5, 2, 2.5, 3mm, and above it can be any. That is, the wall thickness should be a multiple of the nozzle diameter if it is less than N * d, where N is the number of perimeters, d is the nozzle diameter.
4. Minimum overhangs
Each overhanging element requires a supporting structure - support. The fewer overhanging elements, the less supports you need, the less material and printing time you need to spend on them, and the cheaper the print will be.
In addition, the support spoils the surface in contact with it.
It is allowed to print without wall supports, which have an inclination angle of not more than 70 degrees.
5. Precision
Accuracy along the XY axes depends on backlash, structural rigidity, belts, in general, on the mechanics of the printer. And it is about 0.3 mm for hobby printers.
The Z-axis accuracy is determined by the layer height ( 0.1-0.4 mm). Hence, the height of the model will be a multiple of the height of the layer.
It should also be taken into account that after cooling, the material shrinks, and at the same time the geometry of the object changes.
There is also a software side of the problem - not every slicer correctly processes internal dimensions, so it is better to increase the diameter of the holes by 0.1-0.2 mm.
6. Small parts
Small details are quite difficult to reproduce on an FDM printer. They cannot be reproduced at all if they are smaller than the nozzle diameter. In addition, when processing the surface, small details will become less noticeable or disappear altogether.
7. Bottlenecks
Bottlenecks are very difficult to handle. If possible, it is necessary to avoid such places that require processing, which cannot be approached with a sandpaper or a microdrill. Of course, you can treat the surface in a solvent bath, but then small elements will melt.
8. Large models
When modeling, it is necessary to take into account the maximum possible dimensions of the print. If the model is larger than these dimensions, then it must be cut in order to print in parts. And since these parts will stick together, it would be nice to immediately provide connections, for example, a dovetail.
9. Desktop location
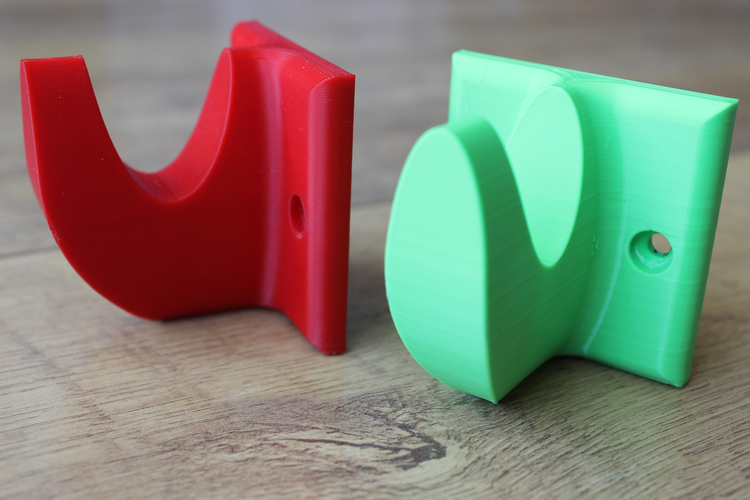
How to place the model on the desktop depends on its strength.
The load should be distributed across the print layers, not lengthwise. Otherwise, the layers may disperse, because. adhesion between layers is not 100%.
To make it clear, let's look at two L-shaped models. The lines show the print layers.
The strength of the printed part depends on how the force is applied relative to the layers. In this case, a small force will be enough for the right "G" to break it.
10. File format
Slicers work with the STL file format. Therefore, you need to save the model for printing in this format. Almost any 3D editor can export to this format on its own or using plugins.
PS:
Now you know the intricacies of modeling for FDM 3D printing and, I hope, they will be useful to you. Happy 3D modeling!
How to print and build your own free, beautifully detailed 3D models
Encouraged by the ever-lowering prices of 3D printers, I was recently checking out the latest models and deciding which one to go for when I had a moment that can only be described as a nostalgic epiphany.
Here I am, wanting to build toy boats, planes and cars with a new 3D printer, when I suddenly realized that I could do all this and more with my existing printer!
As a child, I spent hours building models of jet fighters, tanks, and bridges from cards provided by modeling packages and magazine works, but ignored the fact that I had the tools ready to create similar models today.
What You'll Need
Not everyone will be equipped with the tools to build card models. First of all, you will need a printer that can print on card stock. How will you find this information? Your best bet is to check the manual - for example, HP will provide this information in the Technical Information section, and the same pretty much applies to other manufacturers.
If your printer won't print to the card, you can try printing on paper and then sticking it on the card, although results are rarely good. If you're really daring, you can try to build your project entirely out of paper, although plain printer paper is almost entirely inappropriate. )0009
)0009
Your printer must of course have a full supply of black and color inks.
You will also need a PDF application such as Adobe Reader as most model template downloads are in PDF format.
To create your models, you will need scissors and a craft knife or box cutter, suitable binder glue, pins and paper clips to secure the glue, and a hard and durable surface. You can also have a crafting board on which to do all your cutting to avoid damaging your surface. A metal ruler is also recommended for cutting and notching straight lines.
Download and print your models
The first thing to do is find a website that provides models that you can download and print. Many of them can be found for free - you should certainly start with this - but more complex and impressive models can be purchased if you wish.
Check the list at the end of the manual for a good selection of suggested map modeling resources.
Once you have downloaded the PDF, save it. It might seem obvious, but it's easy for PDF browser plugins these days to lose track of what you have open and where (at least without digging through your Windows profile files). If you make a mistake with the model, you may need to print the template again, so that makes sense.
It is also a good idea to preview the file in your printing software before outputting to get an idea of what it looks like and how many cards are required. When you're happy, press the print button!
Neat Card Modeling
If you're new to card modeling, you really need to start with something simple. This shuttle train is a good example of a low-skill introduction that you should consider.
It may be neck-breaking work, but the results can be amazing.
You will find recognizable shorthand in all map modeling projects. As a general rule, solid lines should be cut, while dotted or dashed lines should be evaluated (the result of a lighter blade action made to allow part of the card to be folded).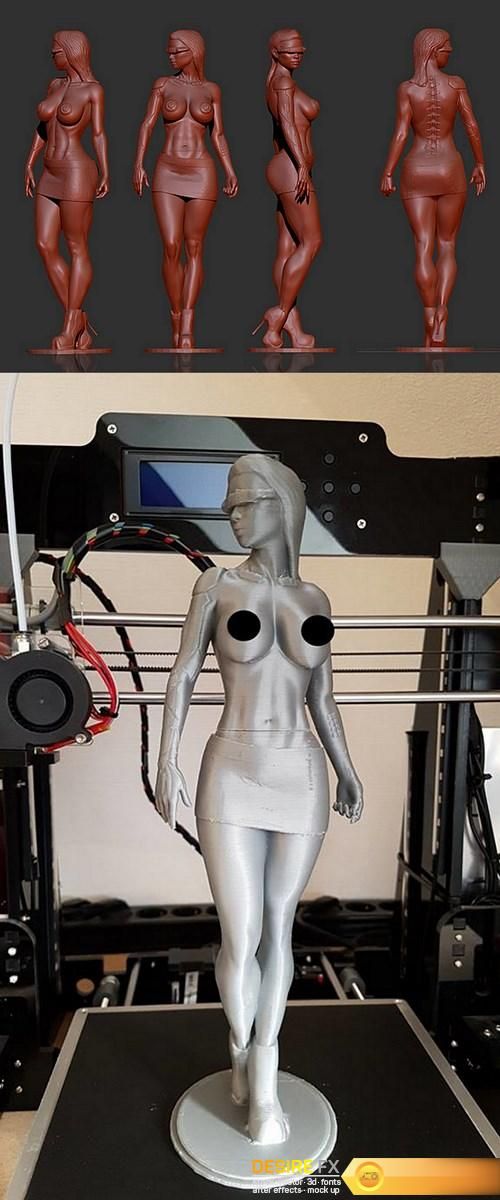 Some written instructions will be provided from time to time, and the best kits will also provide full instructions.
The best approach, of course, is to be methodical. Start by cutting out each of the pieces one by one, taking care to score where necessary and make the necessary notches, and cut the lines and boxes inwardly with your knife. In most cases, curves and circles are best used with scissors.
Then arrange everything as you need. A quick guide will help you do this, as well as familiarize yourself with the general design scheme. Parts and equipment should be distributed over your work surface within reach. You can then proceed to build the item, usually starting with the bones of the model - the structure!
From now on, the instructions will usually take you through the steps of adding a "skin" or outer surface, preparing any additional sections to the model, or just putting together some small parts that add more detail to the model.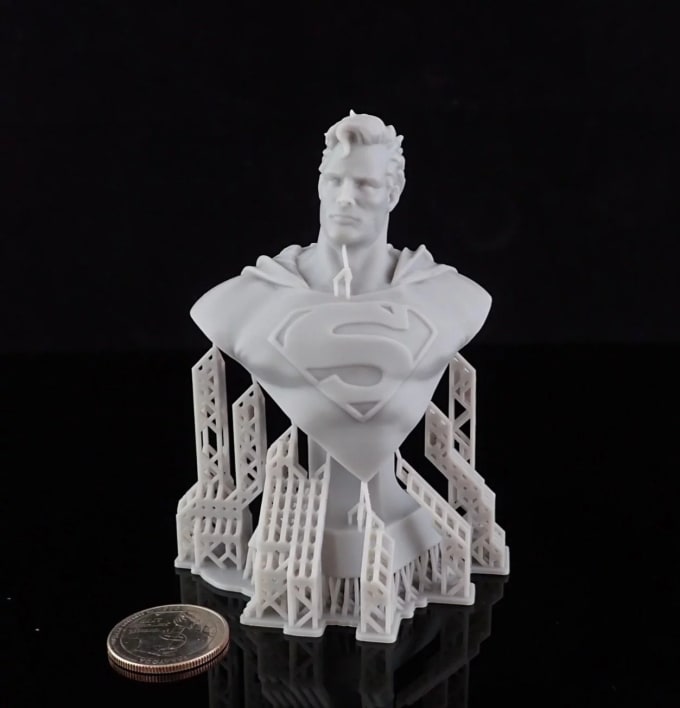
Different models can be built in different ways, depending on your own preferences and project requirements. For example, you can start with tricky details; conversely, you may find it easier to build a two-piece model before gluing it together. Of course, this will depend on the model itself.
Where can you find 3D models to download and build?
Creating your own 3D map models is fun and enjoyable. The only real downside is the chance of you running out of cards or ink!
You will find some good free mods at the following places:
- http://www.currell.net/models/mod_free.htm (free)
- http://jleslie48.com/gallery_models.html (free)
- http://www.ariespapermodels.nl (free)
- http://www.icebergbouwplaten.nl (free)
- http://www.digitalnavy.com (one free option)
This is a fun and exciting pastime, relatively cheap and ideal for keeping bored hands and minds busy during long vacations and summer holidays.