3D printing trimming tools
Tools for 3D Post Processing and Creality 3D Printer Maintenance — Creality Experts
Creality 3D printers like the Ender 3 and CR-10 already include a set of useful tools, but we've found that there are a few other nice-to-have tools that we recommend for an even smoother 3D printing experience. These affordable tools will make it much easier to repair and upgrade your 3D printer, and we use them ourselves on a daily basis as part of our own 3D printing business--so we know you'll get a lot of use out of them.
The tools we recommend fit into two general broad categories: 3D print post-processing and printer maintenance/repair .
Note: Creality Experts receives a commission for items you purchase from this page, at no additional cost to you. For more information, please see our affiliate link policy.
Recommended Tools for 3D Print Post-Processing
Print Removal Tool
Most 3D printers include a putty knife as a tool to remove completed prints from the bed. While this does work, it can be difficult to get the dull blade under your prints to pry them up without marring the edge of the prints in the process. We have also found that it is too short to completely fit under larger prints, which is especially apparent if you own a larger 3D printer such as a Creality Ender 3 Max or CR-10 Max.
This specialized print removal tool available on Amazon addresses both of these problems with a long, sharp, and flexible blade that is much easier to get under your prints and detach them from the bed. There are other similar tools on the market, but this one is our favorite because of the sharper blade.
Note that we only have tried these tools with a glass print bed; these tools can damage other build surfaces such as the textured surface included on the stock Ender 3.
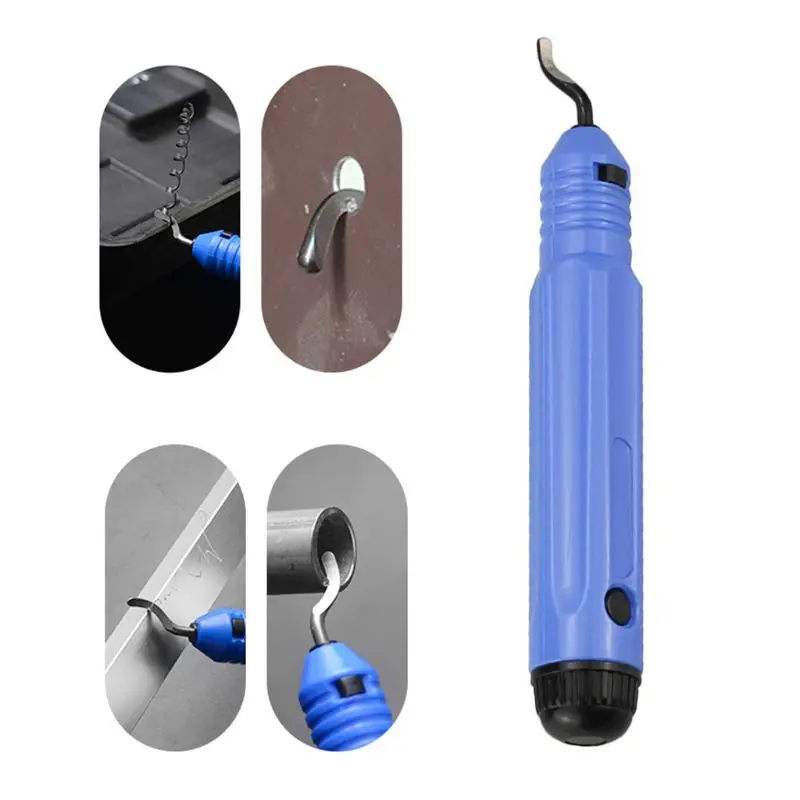
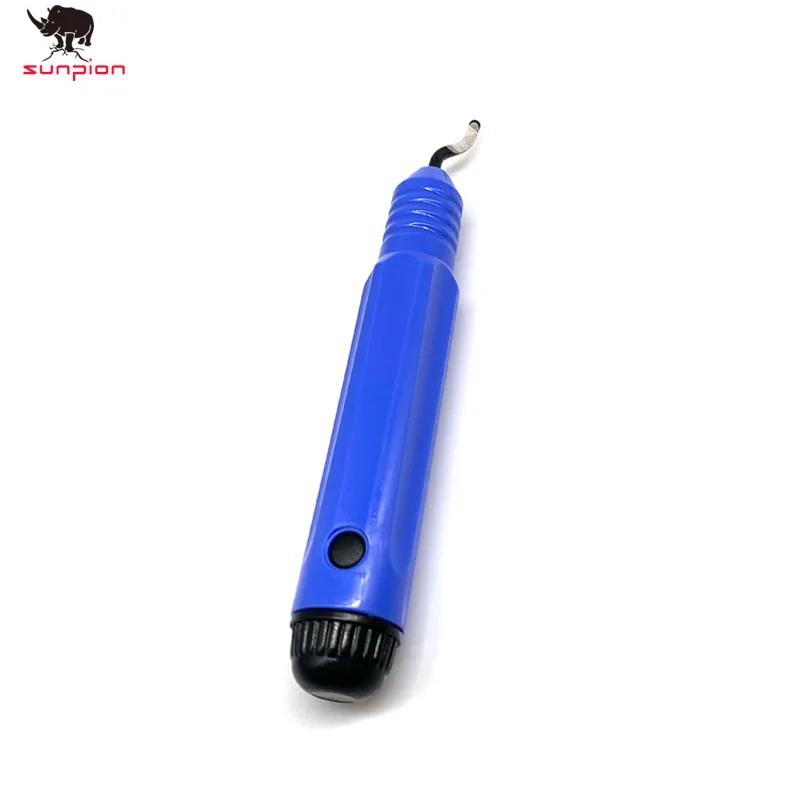
Deburring Tool
You'll often need to trim the edges of your 3D prints, either due to the use of a brim for improved bed adhesion or if your part is slightly wider on the base due to "elephant's foot" (where the base of the print is a bit thicker due to a slightly too flat first layer).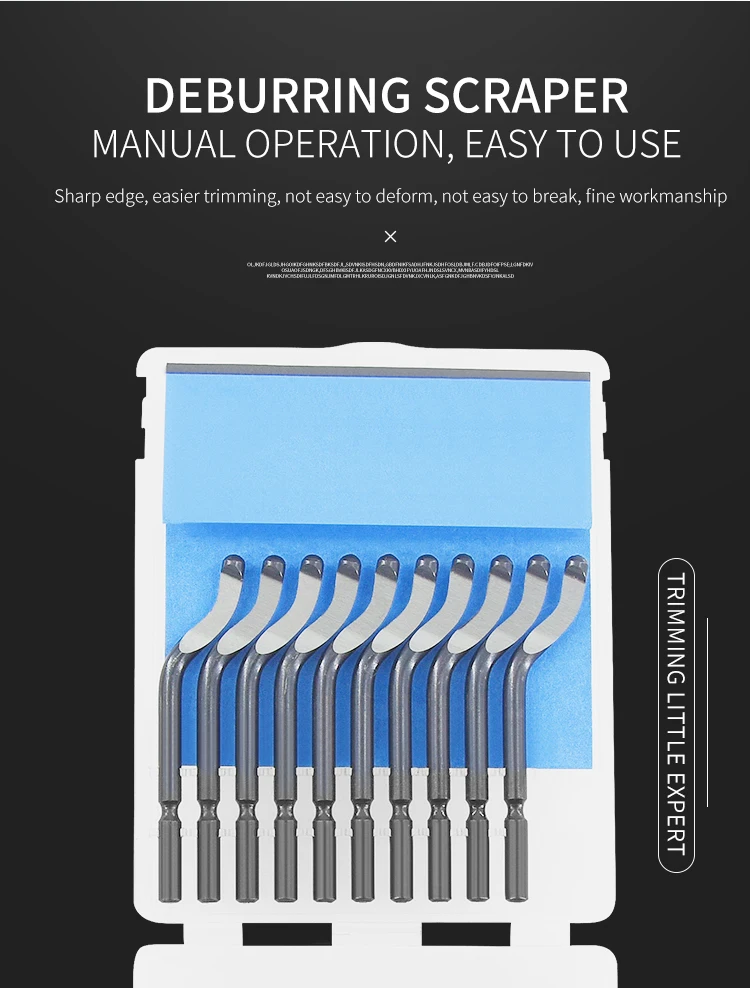
You can use any sharp blade to trim these, but we have found that deburring tools are much better at this job, and are much safer to use due to the curved shape of the blade. With this tool, you can simply move the blade along the edge to cleanly trim material from the print. The tool includes a set of replacement blades as well, so it will last you a long time. We've had ours for multiple years under heavy use and have replaced the blade only 3-4 times.
The deburring tool is a great way to clean off brims for prints that need extra help with bed adhesion.
Chisel Set
When printing parts that need support material, it can be difficult to remove the support with just the blue wire clippers included with your printer. We keep a set of chisels on hand which are helpful both for prying off large chunks of support material as well as scraping off what's left on the model. Used in tandem with the blue clippers, you can easily tackle any support removal.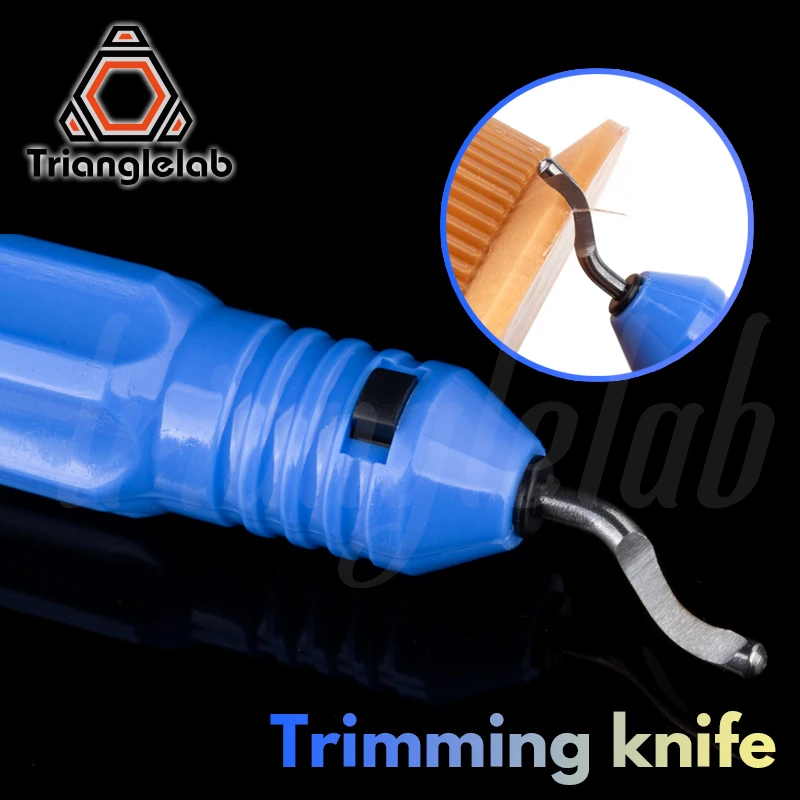
These tools can also be used to remove your 3D prints from the bed if you are using a glass print bed: a light tap on the side of most prints will release it from the bed due to the substantial weight of the chisel. That said, the Print Removal Tool we mentioned earlier is better for prints that are more difficult to remove or have a large contact surface.
Chisels are a great tool for removing support material from your prints
Heat Gun
Even a well-dialed-in 3D printer can sometimes produce small, wispy strings on models, especially in cases where there are a lot of small details the printer must travel between. A heat gun is an easy way to quickly remove these strings for a very clean end result. Just be careful not to heat the model for too long or the material will start to deform, especially if you are printing with PLA. We have found that short bursts all around the print will quickly clean any strings without any warping.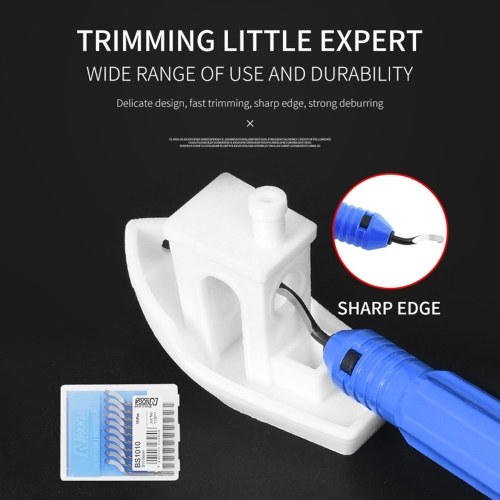
We like the Enertwist heat gun because it offers fine control of the heat, so you can make sure the temperature is hot enough to remove strings but doesn’t start to warp the print itself. It also conveniently can be set on its back to hold pieces above it.
The heat gun is also handy for other uses, such as softening parts that need to press-fit together or for creating fun models such as this Lion with a mane.
[Get the Hairy Lion STL on Thingiverse]
Recommended Tools for 3D Printer Maintenance
We use these tools to maintain and repair our Creality 3D printers.
Nozzle Removal Tool
While your 3D printer includes a small wrench that is sized for removing the nozzle, we have found that using a dedicated nozzle removal tool makes the entire process much easier. The print nozzle will wear out over time and need to be replaced, and you may decide to try out other nozzle sizes to print very large or very high detail objects. This is a frequent maintenance task for our 3D printers, and this dedicated nozzle removal tool makes the process a lot simpler by allowing you to easily remove and replace the nozzle.
We prefer the '“L” tools since they allow you to get good leverage to loosen the nozzle, then can be reversed to quickly remove it. This nozzle wrench kit from Amazon includes both a 6mm and 7mm wrench which will work with any nozzle type.
Wire Strippers & Screw Connectors
When repairing components on the hot end on your 3D printer, you will likely need to replace and rewire components such as the heater cartridge and thermistor which can stop working over time. While you can solder these components to the wires coming from the printer electronics box, we've found it much easier to simply strip the ends of the wires and use screw-on connectors to safely hold them together. You’ll want to have a good pair of wire strippers on hand if you don’t own them already, and you can pick up the screw connectors on Amazon as well.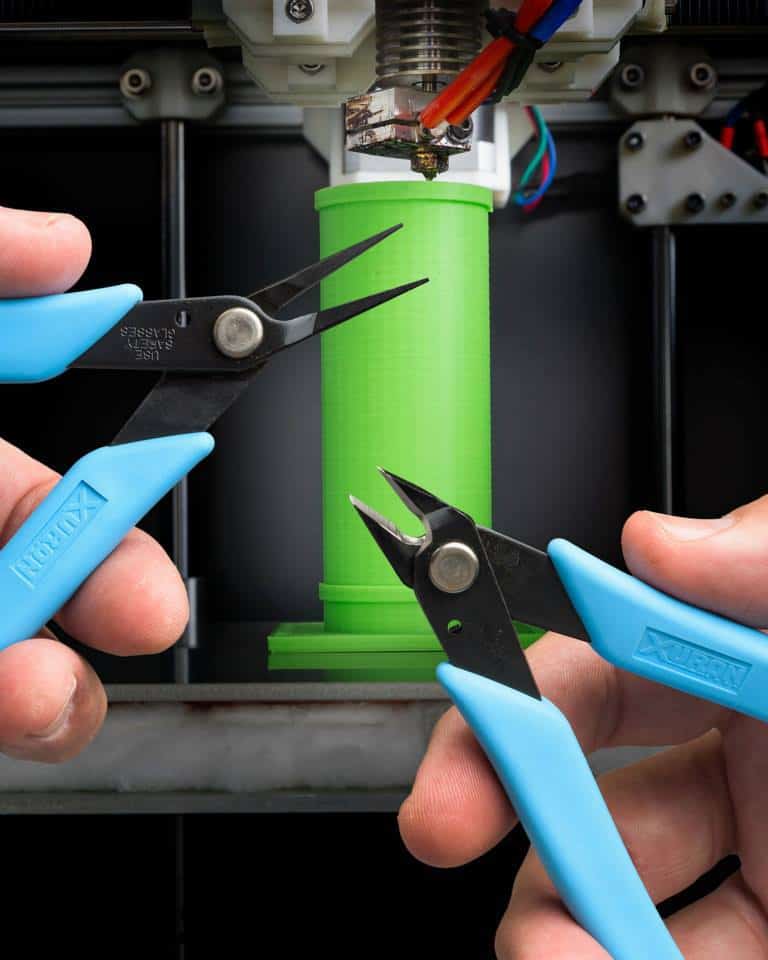
If you are looking for more details on how to perform these repairs and when they are needed, you can find more information in the detailed Hot End Repair Guide.
having wire strippers and screw connectors on hand will make hot end maintenance and repairs much easier
PTFE Tube Cutter
Another common maintenance task is trimming the end of the PTFE tube that connects your 3D printer's extruder to the hot end. Over time, the end of the tube near the hot end can start to deform, so it is a good idea to trim the end of the tube any time you change the nozzle. We always perform a "PTFE push through" as well to clear out any filament residue in the hot end. This procedure is detailed in our Hot End repair guide.
When trimming the PTFE tube, it's important that you cut it as straight as possible to avoid creating a gap where it interfaces with the nozzle, which will eventually collect melted material and cause the 3D printer to jam.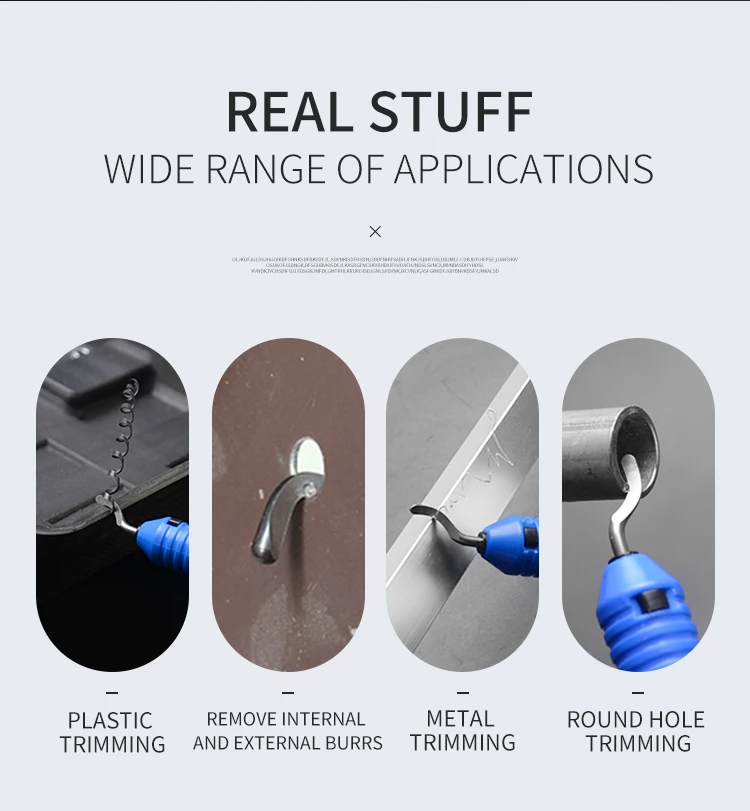 To be sure your cuts are straight every time, we always use a dedicated PTFE tube cutter tool which makes the process much easier and results in a very clean, straight cut as compared to using the blue clippers or scissors. The kit we’ve linked includes some other nice-to-haves: extra heat resistant PTFE tubing and couplers, which we always have on hand since they can fail over time.
Printed Allen Wrench Tops
These are not a tool on their own, but they are a great upgrade to the Allen wrenches that are included with your printer. This upgrade is one that you can 3D print yourself, and makes your wrenches much easier to identify, easier to use, and harder to lose. We suggest printing each size in a different color to make it easy to tell which size is which, since it can be hard to tell just from looking at the Allen wrenches themselves.
Once you've printed these, you can just slide your wrenches into the prints and they are ready to use. . You can find the STLs on Thingiverse here:
https://www.thingiverse.com/thing:4912677
Looking for more?
You might also like our Gift Guide for Makers, which has other items for someone who is into 3D printing or is looking to get started with the hobby.
Essential tools for every 3D printing professional
Lana Lozova15 December 2020
News
To get the best from your 3D printer, you need to be armed with the right tools for the job. From removing support material to improving build plate adhesion, here’s a list of must-have tools, all designed to make your life easier.
The essential 3D printer owner’s toolkit
There are certain tools that most 3D printer users possess. These vital pieces of equipment ensure that your prints run smoothly, and that you get the best results possible. You don’t necessarily need to invest in them all at once – but over time, it’s likely you’ll end up adding them all to your tool collection.
Glue stick
Build plate adhesion is an important part of creating great 3D prints. Glue sticks come in particularly handy when you’re trying to get your print to stick – simply cover your print bed with soluble glue, and the adhesion will improve immediately. Some people favor hair spray, but we’d personally recommend glue, as you can be more precise with the application, plus there’s less risk of accidentally spraying the gantry or moving parts. For material-specific adhesion guidelines, check out this support article.
Spatula or palette knife
On occasion, you might find that your 3D print has stuck a bit too well to your build plate. When this happens, a spatula or palette knife normally solves the problem. All you’ll need to do is ease it gently under the print and carefully lift it up.
Over time, you’ll probably get a collection of different palette knives. To start with, we’d recommend getting a palette knife that’s stiff, and one that’s flexible. Titan’s stainless steel scrapers have a tapered tip, which we find works particularly well.
Deburring tool / knife and cutting mat
A deburring tool is great for cleaning up modeled holes, and for removing small pieces of plastic from your printed parts, especially brim. You’ll also need knives to tidy up your prints, as they seldom turn out completely perfect. A deft flick of the knife can remove unsightly plastic blobs or filament strings, making the end result look smoother and cleaner. We recommend investing in a knife with exchangeable blades (such as an X-Acto knife), and a cutting mat too.
Pliers
Pliers have a variety of uses, from print core maintenance to fixing your 3D printer. Look for a good quality pair of pliers with a rubberized, slip-resistant grip. You’re likely to need more than one type – we’d recommend needle nose and wire-cutting pliers (which are particularly useful for snipping away support material or trimming filament).
Blue tape
Masking tape is one of the most basic tools you’re likely to own, and also one of the most widely used. Adding masking tape to the print bed is a simple, effective way to help your 3D printed object adhere to the print bed. It also makes removing the finished print far easier, and it protects your print bed from scratches.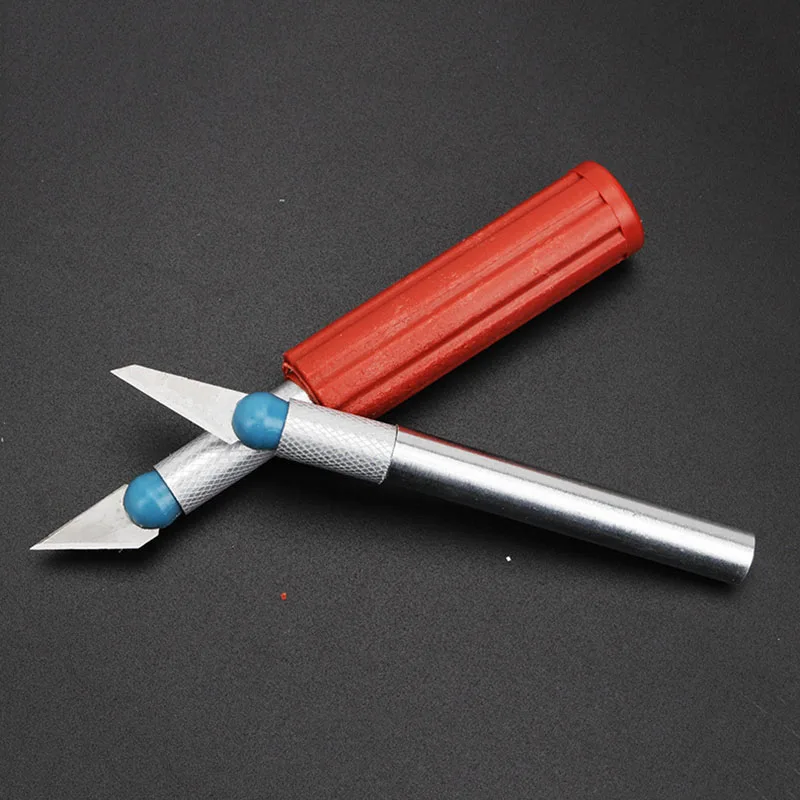
Make sure you choose masking tape with a width of at least 50mm (2 inches). When the tape’s wide, it means you’ll need fewer strips to cover your print bed – something you’ll be grateful for if you need to resurface your print bed on a regular basis!
Magnalube and Unilube
Sometimes, you’ll need to lubricate the X and Y axles, just to ensure they keep running smoothly. The best lubricant to use is Unilube, and all it takes is a single drop to resolve any issues with dryness. For the Z trapezoidal leadscrew, use Magnalube.
It’s important not to use WD40, as this affects the axle coating and can cause damage to your printer. Read more about it here.
Digital caliper
A digital caliper has many applications in 3D printing. It’s useful for checking the precision of your prints, and you can also use it to dimension parts to replicate in CAD software. Calipers are also handy for checking filament measurements – as filaments aren’t often manufactured to exact measurements. Simply measure it at a few different positions, average the readings, then adjust the filament diameter in your slicing software if necessary.
Analogue calipers work too, but don’t offer the same precision.
Tweezers
Tweezers are useful to have to hand whenever you’re printing. They’re great for plucking oozing filament from the extruder nozzle before it starts printing (which means no more burnt fingers). They’re also handy for cleaning up your print afterwards. We’d recommend purchasing a set of tweezers in various shapes and sizes, to ensure you’re covered for every eventuality.
Sandpaper
It’s a good idea to have a selection of sandpaper in a variety of different grits. These will all prove useful when you’re post-processing your 3D prints. Our recommendation? Have a selection from coarse (220 grit) to fine (1000 grit), and invest in well-known brands such as 3M, as they’re likely to last you longer than cheaper, inferior types.
Screwdrivers / hex key screwdrivers
Most people already own a good selection of screwdrivers and hex keys. If you don’t, it’s worthwhile getting some, as you’ll periodically need to re-tighten the gantry screws and the stepper motors of your 3D printer. Hex nuts and bolts are widely used in 3D printer assembly, so it’s also a wise idea to have a set of hex key screwdrivers and wrenches.
Adhesion sheets
Adhesion sheets are compatible with most materials, and boost adhesion to the build plate. They’re a good replacement for a glue stick, as they’re easy to remove and can be used multiple times. Another advantage is that they’ve been specially developed to cope with high temperatures, unlike masking tape. However, it’s important to check that the sheet is applied correctly, as air bubbles mean you won’t have a flat printing surface. You can find out how to apply the sheet here.
Desiccant and re-sealable bags
3D printer filament absorbs water over time. This causes degradation, that eventually leads to complications during printing. To avoid water absorption, simply store your filament in a sealed container or plastic bag, and add some desiccant to ensure all moisture is removed from the environment. Silica gel works perfectly. Here are some more storage recommendations to help you. For a more automated solution, the Ultimaker S5 Material Station was developed to store and deliver material in optimal conditions for 3D printing.
Permanent marker
Permanent markers (such as Sharpies) are useful for marking 3D prints, especially when you’re running multiple prints of the same model, but with different slicer settings. Simply note down the sequence and settings for each print on the finished objects, and you’ll be able to tell them apart later on. Even leading architects do this: The team at Killa Design draw on their models to note where their design can be improved.
Advanced 3D Printing Kit
The Advanced 3D Printing Kit for Ultimaker 2+ contains two 0.4mm nozzles, two TFM couplers, 25 adhesion sheets and a door. These keep your 3D printer running smoothly for longer. The nozzles and TFM couplers are convenient replacements, the adhesion sheets are great for keeping your models in position, and the door keeps warmth inside the printer, which prevents certain materials from warping and delaminating.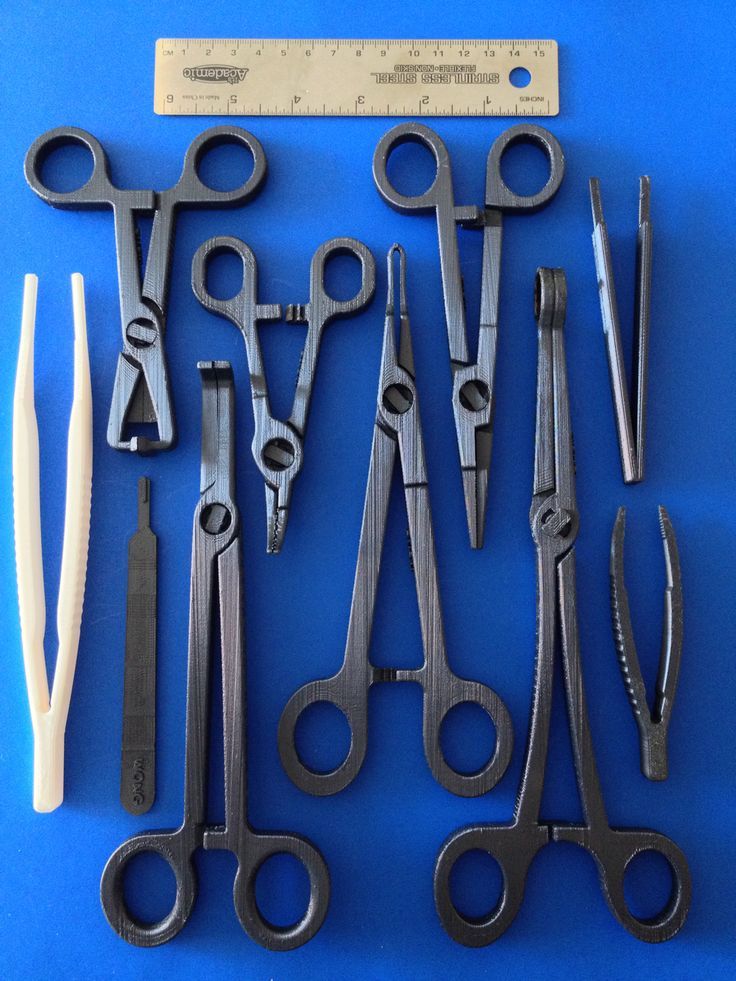 Find out more here.
Other useful tools
The following tools might not be as essential as the list above, but they’re certainly useful to have around. Obviously, it depends on what you’ll be using your 3D printer for, as some are more suited to particular jobs than others.
Flashlight. If your 3D printer already has integrated lighting, you won’t need this. Otherwise, it’s a useful tool to have, even in well-lit areas. The inside of an enclosed 3D printer can be dark, which makes it different to judge print quality on detailed models. A compact LED light works perfectly.
Paper towels. Paper towels are always useful for cleaning and drying your build plate, and best of all, they’re cheap too!
Pencils and paper. You’ll inevitably need to jot down dimensions and make sketches while printing, so it’s a good idea to have paper and pencils to hand at all times.
Wire cutter. Wire cutters are excellent for removing support and creating a cleaner, neater finish.
Dremel. A Dremel is a handheld, high-speed rotary tool, which features a range of accessories. These accessories let you undertake a variety of applications, including cutting, sanding, carving and grinding. When you’re 3D printing, it can be used to remove support material, sand down rough edges, or polish 3D prints made from metal-containing filaments.
Extra filament. It’s always useful to have an additional filament spool to hand. A spool lasts a while, but won’t keep you printing forever! Also, it’s nice to have a variety to choose from, depending on your requirements.
Extra glass plate. If you are printing 24/7, having a spare glass plate could really speed up your workflow. It allows you to quickly swap glass plates when starting a new print, instead of having to wait until the build plate has cooled down to remove the print.
Dissolving kit (bucket of water and pump). You’ll need to be able to remove your water-soluble PVA after printing – and a bucket of water does the job nicely! A pump ensures PVA supports dissolve faster.

With the right tools, the chances of producing a flawless 3D print are greatly increased. A 3D printer and a computer do most of the hard work, but it’s the tools that polish and perfect the models afterwards!
Show off just how powerful 3D printing is at work with this expert guide. Insights include:
• How to get buy-in from everyone in the office
• Important and practical setup considerations
• 3 workflow options that will save development time
• And lots more handy tips and tricks!
3D printing tools. What you need to have on hand.
If you have a 3D printer, then you will have to master the intricacies of 3D printing. And to facilitate this process, you need to acquire some tools (Tools for 3D printing).
Today we will talk about what kits and tools you may need.
Spatula, scraper…
You may need a spatula and scraper to get started. These can be painting or artistic devices that help to remove the finished model from the working platform. They are especially indispensable in cases where you print with difficult-to-separate plastic.
To remove the model with the blunt end of the spatula, try to pry the model from one side. Once you succeed, try to delete the model manually. If this does not work, then try to squeeze the spatula between the table and the model and slightly raise it.
It is important to be very careful not to scratch the surface of the table and injure yourself.
Deburring tool
This tool is the most indispensable tool of all. It really makes it easy to remove supports, clean up the model. At the same time, the tool is safe, and it is much more convenient to use it than to wield a knife. This tool will be especially useful when cleaning round holes.
Utility knife
This is a knife used for cutting appliqués, sometimes called a hobby knife. This tool is ideal for precise cutting of ABS, PLA and other popular plastics. It is important that this knife is very sharp.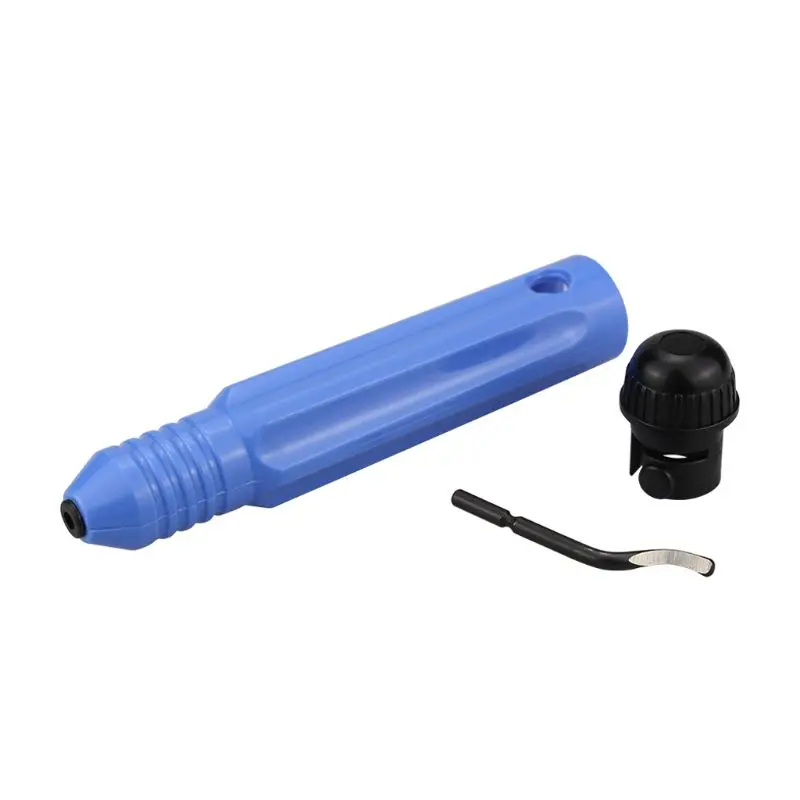 But it is also important to follow safety measures when working with the tool.
Pliers, round nose pliers
These tools are extremely useful when removing supports. At the same time, pliers are also useful for the 3D printer itself and for post-processing. Supports can be cut a little with a sharp knife and then with pliers it will be easy to remove them not one by one, but in blocks.
Wood carving set
This set is very useful for fine cleaning of models. The tips in this set have a variety of shapes, which allows for high-quality cleaning of models of any geometry and even in hard-to-reach places: corners, roundness, etc.
Super Glue
In fact, the choice of adhesives is now simply huge, and their possibilities are almost endless. Be sure to get superglue, as it is suitable not only for repairing or filling gaps, but also for gluing individual printed nodes. Be sure to focus on the viscosity of the composition, and also select the right tool.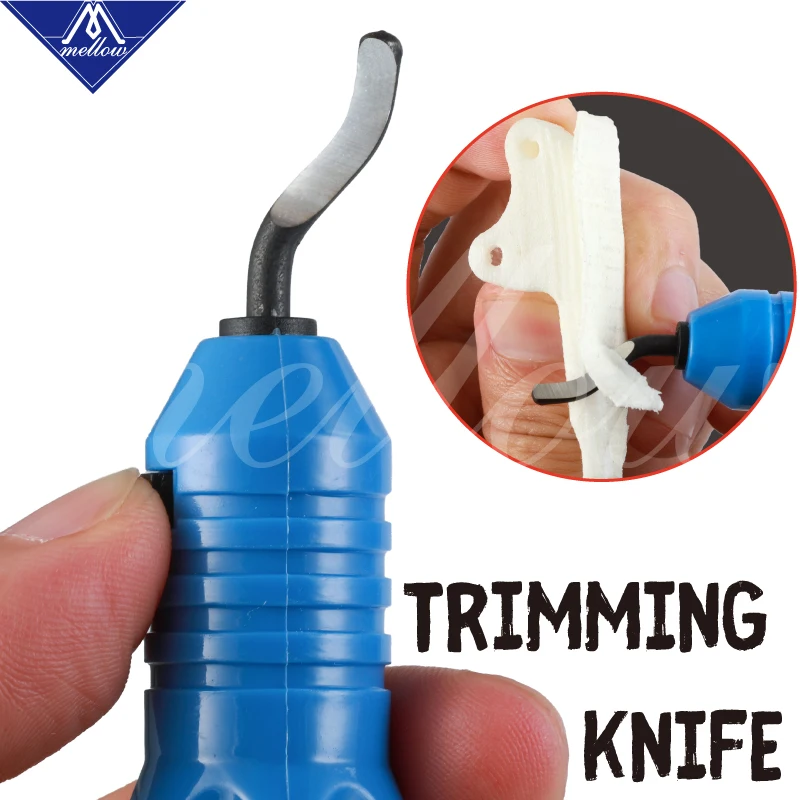 If you need to fill gaps, then we recommend choosing denser compositions than for assembling small parts. An important note - superglue works great with plastics such as ABS and PLA.
Files
A set of mini files will come in handy. Various forms of tools will allow grinding and smoothing of various surfaces.
Sanding (sanding) paper
With the help of grinding, surfaces can be significantly smoothed, achieving the ideal condition of the models. Especially grinding will be relevant if in the future the model will be stained. Sandpaper with a grit size of 120-200 will be the ideal solution for all types of plastics. Models made of ABS are particularly suitable for sanding.
Instead of a conclusion
All the 3D printing tools that we reviewed above will not gather dust on the shelf, waiting in the wings. If you are into 3D printing, then all of them will be in your favor. This is, in fact, the base that any 3D printer should have.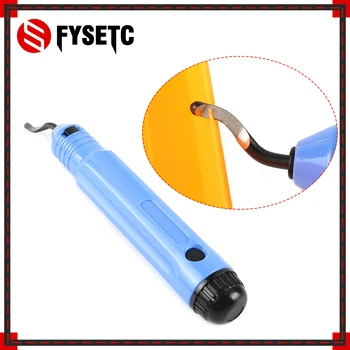 Many manufacturers equip their 3D printers with a set of tools that can help with their work. If your equipment comes with a tool kit, take a close look at it so you don't waste money on what you already have.
Plastic tool
3D printing
I'll tell you about my tool, which is convenient for machining parts printed by a 3D printer...
Everyone who uses 3D printing technology is well aware that post-print finishing is almost always necessary. Many people use all sorts of tools at hand, such as cutters, wire cutters, knives, needle files, and other things that come to hand. I also use wire cutters, knives and medical instruments, in particular a spatula and a probe, this is certainly convenient, but recently I bought, you can guess where, .. - a tool for working with burrs. What can I say, .. it's better to see once, and even better to try.
Now not a single part that comes out from under the extruder passes by this wonderful knife.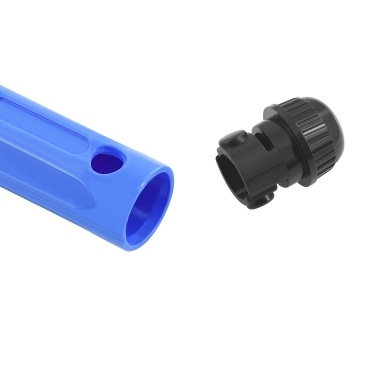 I have only one blade so far, it is universal and suitable for most operations and materials. Working with it only with plastic, it is practically eternal, since it is made of good material, and plastic itself is not an abrasive for it ... But having tried such a miracle, now I am going to try other blades.
On the plate, which I somehow translated from Chinese (last column), most likely not all the blades that are produced, I'm sure there are other forms, but these are of great help to the 3D printer. Particularly interesting are the countersink blades. The other day I also ordered, I'm waiting ...
I bought this tool specifically for deburring parts printed on a printer, but as it turned out, its knives do an excellent job not only with plastic, it is simply irreplaceable when working with metals. These are hole cleaning after drilling, deburring after laser cutting, milling, etc. In general, the tool turned out to be more versatile than I expected.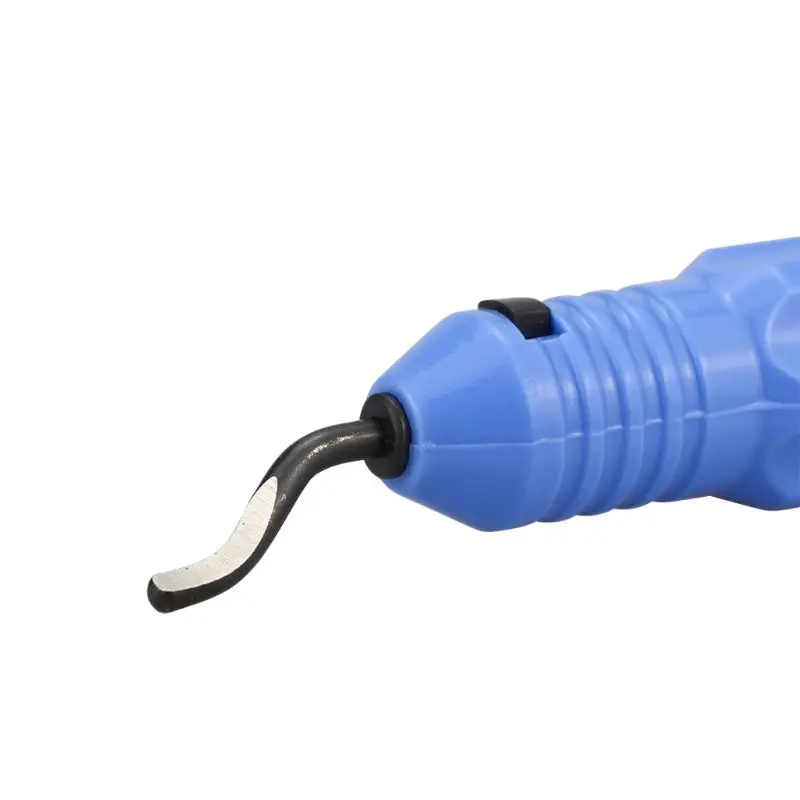 I also ordered other knives, I decided that I should try it. She was also attracted by the ability to store the blades themselves in her inner container. However, there are also quite a lot of pens and different ones, I'm sure everyone can find something to their taste and wallet.
A few words about wire cutters...
I bought them to work with soldering electronics. There they have practically no equal, but it turned out that they are also good at processing printed parts. If you do not bite nails with them, the nippers will last a very long time.
In the video, the tool in operation:
Where you can buy all this:
But first of all, pay attention that you can save on purchases, it really works.
Details here: https://cashback.epn.bz/en/
Pens and knives - https://goo. gl/ASWaOk Nippers - https://goo.gl/yY56G8
And this is the adapter ring itself in the rack for Hilda
http://3dtoday.ru/3d-models/khobbi/sdelay-sam/perekhodnoe_koltso_dlya_sverlilnoy_stoyki_pod_hilda/
Follow author
Follow
Don't want
26
More interesting articles
DrProg
Loading
11/08/2022
1373
9
Subscribe to the author
Subscribe
Don't want
We continue to reveal the incredible opportunities of enterprises from the Middle Kingdom, up to ...
Read more
0
Subscribe to the author
Subscribe
Don't want
Ones Technology is a research and development center under the Ministry of Industry of Turkey.