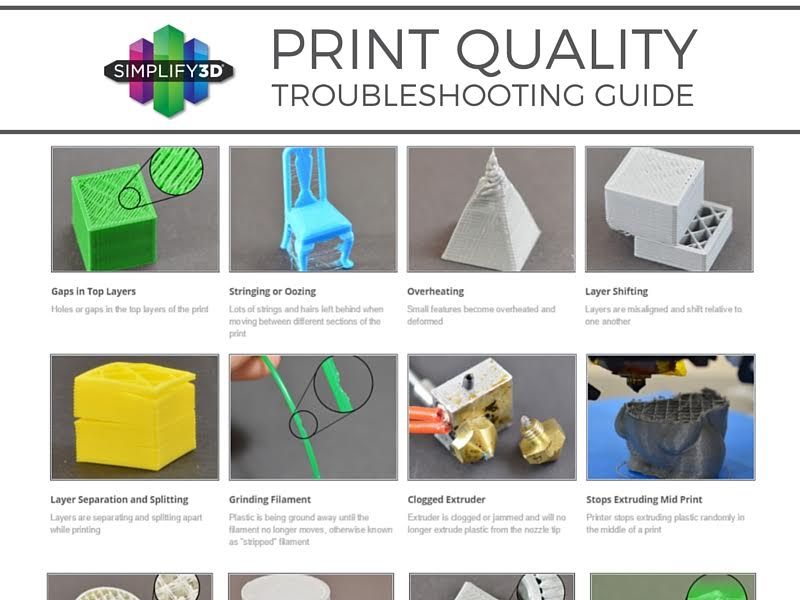
3D printer layer separation
How to Fix Layer Separation and Avoid It?
Among in 3d printing troubleshoot, layer separation could be one of the most disastrous. Not only does a print with separated layers look terrible, but it also has virtually no mechanical strength.
It’s also irreversible – by the time you see layers splitting in your project, you will likely have to start over.
Contents(show)
What Is Print Layer Separation?
Layer separation also called layer splitting or layer delamination is caused by the filament material layer’s inability to bond between layers.
Without anything to latch on to, the material expands as it cools, creating the characteristic appearance of the layer warping upward.
Reasons for 3D Printing Layer Separation
About print separate, there are so many factors that could lead to this problem. such as software setting(cure), types of filament, and printing preparation.
It is not the problem with 3d printer, you don’t need to upgrade special hardware for your printer.
Filament Type
The melting flow rate is different among 3d printer filaments. When coming back to 3d printing, some has better adhesion of layers. ABS and Nylon are two outstanding examples.
If you’re having delamination between layers with ABS or other material which needs high print temperature, switching over to something like PLA or PETG might be the easiest solution.
Nozzle is not Clean
Any residual filament, dust, or dirt in the nozzle can cause extrusion problems because of clogging.
Inconsistent extrusion can lead to poor layer adhesion and eventually, layer separation.
Improper Setting
3D printers can be quite unforgiving when dialing in the proper settings for any given filament.
Improper printer settings can lead to delamination layers. It includes cooling fan speed, layer thickness, printing temperature, and so on.
Want to Fix Layer Separation? Try These Solutions
To develop a comprehensive solution to the layer separation problem, we must look at each possible reason and try to address it.
Reduce Layer Height
When printing with an FDM printer, the rule of thumb sets the layer height at about 80% of the nozzle diameter. Any higher setting and you run the risk of layer separation.
Reducing layer height creates a “squishing” effect when the material is extruding. This action can mechanically aid layer adhesion by pushing the layers together. Adjusting the layer height settings can be one of the most straightforward fixes to layer separation.
Improve Nozzle Temperature
Plastic at a higher temperature will always bond better. You can take advantage of this behavior by increasing your nozzle temperature. If you’re having layer separation problems, try increasing the hot end temperature by 5 °C increments.
You can continue doing this as long as you’re still within the acceptable temperature range of your filament. Also, watch out for stringing or blobs – that’s a sign that your temperature is already too high. Dial down the temperature a bit and look at other possible solutions.
Slow Printing Speed
As with most 3D printing problems, taking it slow and steady is a safe approach to eliminating layer separation. In this case, you may want to reduce the speed of movement of the print head.
Try to reduce your print head movement speed by increments of 10 mm/sec until you can see a marked improvement. Ensures that enough filament extrudes out as the print head moves. It also gives the filament enough time to create strong bonds with the previous layer as it cools down.
Print In Enclosure
One of the most reliable ways to avoid layer separation is to slow down the filament’s cooling.
Allows the material to maintain high temperatures longer, thus bonding better with the preceding layer. It also redistributes thermal stress in the material to avoid the usual warping issues.
A great way to slow down cooling is to print in an enclosure. It can maintain an elevated temperature in the printing chamber and prevents heat loss to the surroundings of the 3D printer. This way is advantageous if you’re printing in a room with an open window and periodic gusts of wind.
If your 3D print does not come with a built-in enclosure, you can buy a third-party product. You can even DIY a 3D printer enclosure using inexpensive materials. Just make sure not to use materials that can melt or catch fire easily.
Check Clogged Nozzle
The clogged nozzle will almost certainly lead to under-extrusion. The layer will have holes or gaps in them and compromising layer adhesion.
Any residual filament, dust, or grime can get burnt inside the nozzle and cause a clog. To avoid this, you can use a brush with brass or steel bristle to clean the inside of the nozzle periodically.
You can also do the “cold pull” method. Insert a piece of Nylon filament inside the nozzle, heat it, cool it down, and pull it out.
If this still doesn’t work, then you can disassemble the nozzle and soak it in acetone. While you’re at it, take the time to clean your entire extruder assembly.
Improve Print Cooling
The cooling fan in your 3D printer is there for a reason. However, that does not mean that you need to use it all the time.
If you’re having problems with layer separation, the best course of action would be to turn your cooling fan off.
Other Tips You Need to Know
The solutions we have listed above all have to do with the actual 3D printing process. Just as crucial as dialing in the correct settings is making sure that you are working with a suitable filament.
Here are a few things to check on the raw material side of 3D printing.
Filament Quality
When you work with cheap and poor-quality filament, you cannot expect it to perform just as well as those coming from reputable brands.
A common characteristic of cheap filament is that they have poor diameter consistency. It will lead to extrusion problems and inconsistent layers.
If you cannot get your layers to print perfectly, you will almost certainly have layer separation problems.
Store 3D Filament Properly
It has been repeated time and time – humidity is the mortal enemy of 3D printing filaments. Filament materials are naturally hygroscopic, which means that they absorb moisture readily from the environment.
The filament that is absorbed with moisture will lead to heavy extrusion problems. Water will expand and evaporate in the hot end, resulting in layers with holes or gaps. These are weak points in layer adhesion and will eventually cause the layers to start splitting.
To make sure your filament stays in good condition, keep it in an airtight container with some desiccant. Silica gel is an inexpensive and easily accessible desiccant option. You can also consider drying your filament in an oven for 4 to 6 hours before 3D printing.
Summary
3d printer layers separate are frustrating because there’s no way to salvage. For this reason, it’s worth the time to double-check your 3D printer and slicer settings to make sure that no layer separation takes place.
It’s also essential to use high-quality filament and kept away from moisture. This may sound like a lot of work, but it is still better than letting all the filament waste.
Need Any Services? Contact Us Now!
3D Printing Layer Separation Fix (Bad Layer Adhesion)! – 3D Solved
When printing, are your models cracking and are the layers separating? This is commonly referred to as layer separation or delamination and it’s essentially caused because of poor layer adhesion.
In this article, I will be going over what layer delamination is, why it happens, and how to solve it.
So, without any further ado, let’s get started!
Table Of Contents
- Layer Delamination or Separation, what is it?
- How to solve Layer Separation
- Conclusion
- Check out our recommended products section
Layer Delamination or Separation, what is it?
Image Source: Prusa Blog.FDM 3D Printing works by building an object layer by layer, where the last layer is printed on top of the previous one.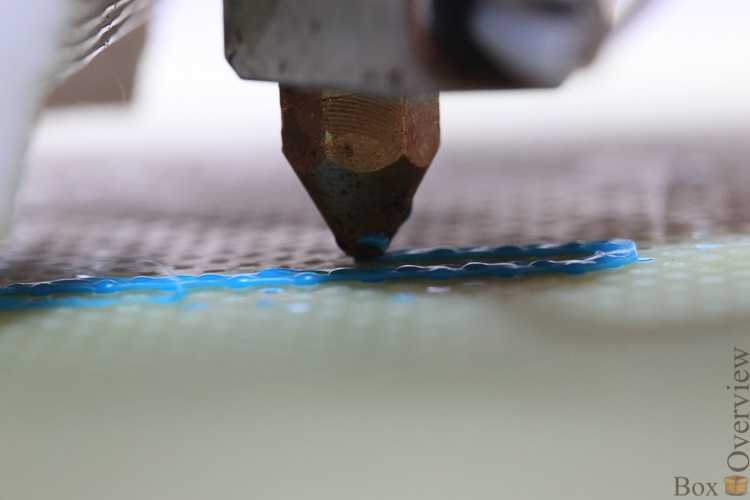 If layer adhesion isn’t strong enough, then the part might split or separate at different spots, which can be seen as cuts or cracks on the outside of the print.
This is often the case with ABS because it contracts when cooling and this can sometimes separate the layers if it’s not printed with an enclosure or a properly heated bed.
Let’s take a closer look at why layer separation happens;
Why does Layer Separation Happen?
Layer separation occurs when the 3D object cracks because of the forces exerted by the plastic when the layers are cooled at different rates, and this creates a force generally referred to as “warping” in the middle of the print, which exceeds the layer adhesion and separates the layers.
While fixing an already cracked print isn’t possible, it’s fairly easy to make sure that it doesn’t happen again with just a few simple steps, so let’s take a quick look at them now.
How to solve Layer Separation
In most cases, it comes down to printing with an enclosure since this will keep the part from cooling unevenly and by setting the bed temperature correctly. This should solve the problem in most situations.
However, here’s a list with all the possible solutions to deal with layer separation and to improve layer adhesion.
Use an enclosure
What an enclosure will do is help stabilize the temperature inside of the 3D printer, and this will keep the parts from cooling down too fast, which will in turn reduce the chance of warping and layers from separating.
Not all printers come with enclosures, but you don’t necessarily have to buy a printer that comes with one or even buy an enclosure since you can make one yourself. Just make sure that the materials used for the enclosure aren’t flammable. You can also go ahead and buy an enclosure with standard dimensions for most printers!
If you want to build an enclosure yourself, then follow this guide which goes extremely in-depth.
Note: Most enclosures are not being actively heated but rather keep the heat that’s being produced by the bed and the nozzle inside of it, and this is generally enough to solve any issue related to heated bed.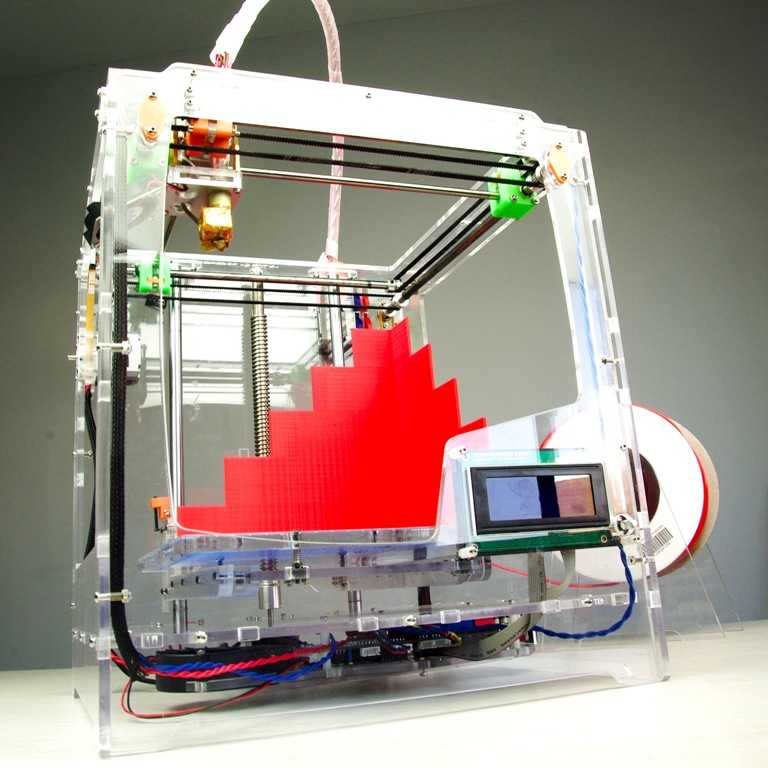
I wrote an entire article on why you might want to consider printing with an enclosure, which you can find here.
Reduce the Layer Height
Study: Strength of PLA Components Fabricated with Fused Deposition Technology Using a Desktop 3D Printer as a Function of Geometrical Parameters of the Process.When printing with a lower layer height there’s a wider contact surface area, which means that the bond between each layer will be much stronger than if you printed it at a larger height. If the layers of your print are adhering poorly, then lowering the layer height will strengthen that bond.
As you can see from the image I linked above, decreasing the layer thickness drastically improves the contact surface area between each layer, and this translates directly into better strength for your prints.
Strongest layer heights: 0.1mm up to 0.15mm.
I wrote an entire article that goes in-depth on what the best layer height is for 3D printing, both in terms of strength as well as detail, so make sure to check it out.
Increase the Printing Temperature
Plastic bonds much better the hotter it gets and if the layers of your print aren’t bonding together properly and breaking apart, then increase the printing temperature. For example; ABS generally prints at around 220-235C which will create a nice bond between the layers, printing below this, say 200C, will most likely yield weak prints.
Always check the instruction on the filament you bought to make sure at what temperature it should be printed at for best results, but if you feel that layer adhesion could be better, try gradually increasing it by 5C and do a couple test prints to see the results.
Here’s a table with the ideal printing temperatures for most filaments as well as their heated bed temperature, glass transition temperature, and more.
| Filament | Nozzle Temperature | Glass Transition Temp Tg (C) | Melting Temp Tm (C) | Heated Bed Temp | Warping Risk | Ease of Use |
| PLA | 180°C – 230°C | 60-65°C | 155°C | 60°C but not required) | Low | Easy |
| ABS | 230°C – 250°C | 105°C | 210°C | Approx. 100°C 100°C | Moderate | Intermediate |
| PETG | 230°C – 250°C | 80-82°C | 200°C | Approx. 100°C | Low | Easy |
| Nylon | 230°C – 260°C | 70-80°C | 217°C | 80°C – 100°C | Moderate | Intermediate |
| ASA | 220°C – 250°C | 100°C | 250-260°C | Approx. 100°C | Low | Intermediate |
| Polycarbonate | 270°C – 310°C | 147°C | 260°C | 90°C – 110°C | High | Difficult |
| HIPS | 230°C – 250°C | 88-92°C | 180 – 270°C | Approx. 100°C | Low | Intermediate |
| TPE | 210°C – 230°C | 60-130°C | 150–210°C | Not required | Low | Easy |
Adjust the Cooling fan
The fan on a 3D printer cools the layer of plastic that has just been laid down, however, if it gets cooled too quickly then the newly added plastic won’t be able to adhere to the previous layer as strongly, so lowering the fan speed could potentially increase layer adhesion and, therefore, the strength of the print. If you don’t
This follows the same concept as the previous point since increasing the printing temperature will result in better bonding of the layers and cooling them down too quickly may also yield the same undesirable result.
Note: Do a couple test prints where you decrease the fan speed by 10% each time until you reach the sweet spot.
Increase the Flow Rate (Extrusion Multiplier)
Even if your printer is not suffering from under extrusion it might help to increase the flow rate slightly if the layers aren’t adhering properly since this will extrude more molten plastic, and the more material there is the better the adhesion.
Under-extrusion can be witnessed as gaps between the layers of plastic, insufficient small layers, missing layers, or even small dots that are present on the print, and under-extrusion definitely plays an important role on your part’s strength as well.
Like everything in 3D printing, when adjusting the flow rate (extrusion multiplier) don’t do it drastically but rather in small steps and test the results.
By default, the flow rate is 100% (or 1.0), but since not all filaments and printers are created equal you may need to adjust this value either down or up.
Recommendation: Increase the flow rate in 5% increments and test the results until you reach the sweet spot.
Lower the Print Speed
Just like increasing the printing temperature will allow the newly extruded plastic to better bond with the previous layer, lowering the print speed will have a similar effect. If the print head is moving too fast, then the extruded plastic may not have enough time to properly bond to the previous layer.
Not only that, but printing at a higher speed can also create another whole host of issues, such as under-extrusion (which also weakens the part), ringing, some visible artifacts, and just poor layer adhesion in general.
Recommendation: Lower the printing speed in 5mm/s or 10mm/s increments and test the results until you reach the sweet spot.
Use a wider Nozzle
The nozzle diameter affects the width of the extruded plastic. Essentially, using a 0.8mm nozzle will lay down a strip of plastic twice as wide as a 0.4mm nozzle and increase the contact surface area, making the adhesion between the layers much stronger.
I already mentioned that using a lower layer height results in a stronger layer adhesion because it increases the surface contact area. Well, if you increase the nozzle size and still use that same low layer height, all the layers will have a lot more contact surface area to create a stronger bond.
It’s worth noting, however, that increasing the nozzle size will yield significantly less detailed prints in the horizontal plane (when looking at them from the top or the bottom) since the layers are much wider.
Recommendation: Increase the nozzle size by 0.2mm and keep the same layer height as before and check the results. You can always change to a wider nozzle if you need the print to be stronger. You can also go ahead and buy this cheap collection of nozzles in all sizes (with some extras tools).
Important Note: Increasing the nozzle size may require you to increase the printing temperature. Example; With a 1.2mm nozzle you may need to print regular PLA at 240C instead of at 200-220C.
Check if the Nozzle is Clogged
The clogging of the nozzle means that the little hole at the end of it gets blocked, be it either because of dust- or any other strange particle buildup, filament impurities, heat creep, and the use of less common filaments, such as carbon fiber, wood-infused plastics, etc., and this clogging will result in under-extrusion (less plastic flowing out of the nozzle) which leads to weaker prints.
The good news is that fixing a clogged nozzle is quite easy to fix, and in most cases, since most of us print with PLA, PETG or ABS anyways, clogging doesn’t really happen all that often.
But, if your print is suffering from poor layer adhesion, it may be because of the nozzle being clogged.
How to clean a clogged nozzle
There’re multiple ways of approaching this issue, but here are two fairly simple ones that shouldn’t take too much time and fix the problem in most cases:
Heat the nozzle and then using a needle:
This one is fairly simple and should solve the problem most of the times.
- Heat the hotend to the printing temperature of the filament.
- Using a needle, usually included with the 3D printer, push the filament through the nozzle hole into the hotend.
- Manually push the filament and see if it comes out the nozzle.
Here you’re not trying to get the particles that are clogging the nozzle out of it, but rather trying to push them back in and breaking them up.
Another way is to do a “cold pull” which goes like this;
- Step 1: Heat the nozzle to 220°C (If you just printed with PLA).
- Step 2: Insert a piece of white or light-colored Abs, Nylon, or any strong filament with good thermal resistance.
- Step 3: Push it manually as hard as possible.
- Step 4: Observe if the filament flowing through the nozzle (if the obstruction is total, it may not extrude anything).
- Step 5: Let the printer cool down to around 90°C for PLA and 160°C for ABS. Keep the pressure during cooling.
- Step 6: When the printer reaches the lowest temperature mentioned in step 5, remove the filament quickly and forcefully from the hotend and inspect the semi-fused part of the filament. This must have a little bit of dirt (black spots). Those black spots were causing the blockage.
- Step 7: Cut the dirty part of the filament and repeat from step 2 until the filament comes out clean.
Source: rigid.ink
Conclusion
Layer delamination isn’t as big of a deal nowadays since 3D printer manufacturers have found ways of addressing it pretty successfully.
However, if it does happen to you (more common with ABS), then try following the steps I laid out in this guide. The best fix would be to use an enclosure or even to cover the entire printer with a garbage bag, but this could be a real fire hazard.
I that doesn’t work, try out all the different options I listed one at a time so that you can properly gauge which setting provides the best results.
We created a recommended products section that will allow you to remove the guesswork and reduce the time spent researching what printer, filament, or upgrades to get, since we know that this can be a very daunting task and which generally leads to a lot of confusion.
We have selected just a handful of 3D printers that we consider to be good for beginners as well as intermediates, and even experts, making the decision easier, and the filaments, as well as the upgrades listed, were all tested by us and carefully selected, so you know that whichever one you choose will work as intended.
An overview of the stages of the SLA printing process
Rapid prototyping
Experts recommend
Author: Semyon Popadyuk
Author: Semyon Popadyuk
1. Importing and editing a 3D model
2. Orienting a part and creating supports
3. Slicing (separating into layers)
4. Preparing a 3D printer
5. 3D printing a product
6. Removing a product from a 3D printer
7. Cleaning the product and removing supports
8. First sanding step
9. UV curing
10. Painting
11. Second sanding
12. Top coat
The 3D printing and prototyping industry has grown at a tremendous pace over the past few years. ProtoFab, a manufacturer of stereolithographic 3D printers and consumables, believes it's time to move beyond just 3D printing services and additive manufacturing.
ProtoFab offers a look behind the scenes of industrial 3D printing to give everyone a deeper and clearer understanding of this process.
The article and video cover all stages of the SLA printing process, from file processing to obtaining the finished product - the steering wheel of a sports car.
1. Import and edit 3D model
The first thing we need to do is import the STL file into an additive manufacturing software like Materialize Magics. This file is usually provided by the client. Specialists of the rapid prototyping center carefully analyze the model and, if necessary, perform its optimization. These changes are usually minor, but they improve the efficiency of the printing process.
Two holes need to be added to the steering wheel to be printed. This is necessary in order to make the interior space hollow and to make the product light and spectacular in appearance. If you print the steering wheel in one piece, it will be too heavy and will cost a lot more.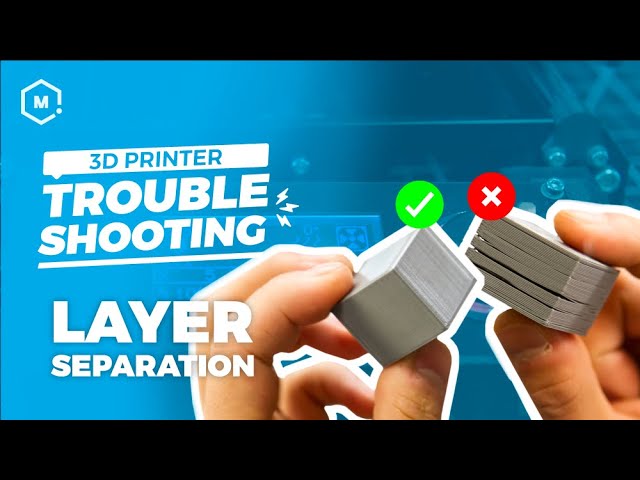 If we don't make these holes, then at the end of the 3D printing, the uncured photopolymer will remain inside the hollow areas.
However, these holes are not needed in the finished product. Therefore, two holes should be cut out, and these round parts should be printed separately as plugs and installed after 3D printing.
2. Part orientation and support creation
It is very important that the part stays absolutely still throughout the printing process, so we need support structures. Most parts are printed at an angle because they are easier to support.
Orienting the part in a steeper or flatter position would require much more support material, which is time consuming and wastes material, and makes post-processing difficult.
You may be wondering why we form a support structure at the front and not at the back of the handlebars. The main reason is that this orientation makes post-processing easier and cleaner.
As a rule, supports are placed on a less visible side, but in this case the back of the handlebar has small indentations, the shape of which will be disturbed by supports. It will take extra time to correct these errors in post-processing, so it's easier to put supports up front. Modern software is very good at calculating exactly where these support structures should be and how many of them will be needed.
However, some manual adjustment is still required and can only be done with a lot of experience. If there is a possibility that certain parts of the product do not have enough support created by the program, the technicians will do it manually in the software. They can also identify areas where the program has "overdone" and overused material.
3. Slicing (layering)
The part is now cut into layers depending on the selected layer thickness. While ProtoFab 3D printers are capable of printing 0.05mm thick, 0.1mm is typically used unless the client's requirements are different. The reason is that 0.1 mm is already a very thin layer. Printing a 0.05 mm thick layer will take twice as long, while the cost of work will also increase significantly. In this case, the entire part with supports and a platform consists of 3385 layers.
4. Preparing the 3D printer
Now that the 3D model is ready, it's time to prepare the 3D printer. Regardless of the size of the part, the resin reservoir must always be at least 95% full or the software will not allow printing. ProtoFab uses in-house developed photopolymers specifically designed to work best with the equipment. The range of materials is quite large, and the choice of a specific photopolymer is an important part of the printing process. In this case, we use an ABS-like Formula L1 material.
The surface of the photopolymer must be absolutely flat, therefore, the formation of bubbles or foam is excluded. Bubbles are removed from the surface manually using a special tool. This process is performed immediately after filling the tank.
After that, the photopolymer is leveled by the passage of the recoater blade. The tank is equipped with sensors that detect any movement or unevenness on the surface of the material, since printing can only be done with absolutely even and stationary photopolymer.
While the tank and resin are being prepared, the operator analyzes the 3D model again. The engineer checks if the part will be stationary at every moment of construction. Of course, it is very important that the finished part is completely immobile in the tank, but it is also necessary to provide it with a sufficient number of supports, even when it is only a few layers high.
If the part deforms even by a fraction of a millimeter at the initial stage of printing, this tiny deviation will increase more and more as the printing progresses, and at the end of the process it will become simply huge. Therefore, it is very important to correctly position the supporting structures. Typically, designers will provide an excellent 3D model, and at this stage, 3D printers simply get a clear idea of what they are printing.
Now that the 3D file is fully validated, it's time to transfer it to the printer using a USB stick. It is at this stage that the final orientation of the part is determined. This step is often overlooked, but it can have a significant impact on print times.
5. 3D printed item
Now we can finally start the 3D printing process.
Each layer is laser cured, then the build platform is lowered to one layer height and the recoater blade makes one pass over the surface. After building all the layers, the platform rises to its original position, and the finished part emerges from the liquid photopolymer. This is perhaps the most exciting part of the whole process, which is so exciting to watch!
6. Removing the product from the 3D printer
Next, we need to remove the part from the surface of the platform with a scraper. Only the support material is in contact with the platform, so no extra care is required in this case. It's not scary if the base gets a little scratched or damaged.
7. Cleaning the product and removing supports
At the end of this step, we remove the part from the printer and take it to the wash.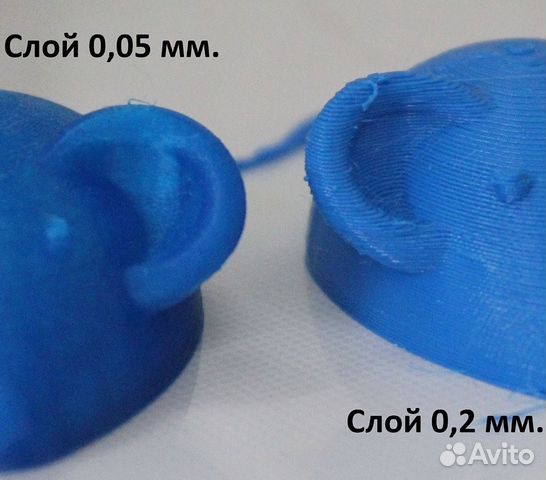 Flushing is carried out in a strictly controlled environment, using all appropriate personal protective equipment.
There are three alcohol baths in total and parts must be cleaned in each of them.
In the first bath, the part is simply soaked in alcohol, which removes most of the excess uncured photopolymer from the surface. It is necessary to ensure that all parts of the part are well soaked.
We can then move on to the second bath, where the part is cleaned with alcohol, which helps remove even more photopolymer residue from the surface. At this stage, the bulk of the support material is torn off by hand. Supports are specially designed to be easy to remove, so they come off quite easily, and the alcohol aids this process. However, it is generally not possible to completely remove all support material by hand, and more thorough cleaning and sanding of the part will be required later.
Now moving on to the third bath, where an additional brushing takes place to get rid of the remaining support material that was not removed in the second bath.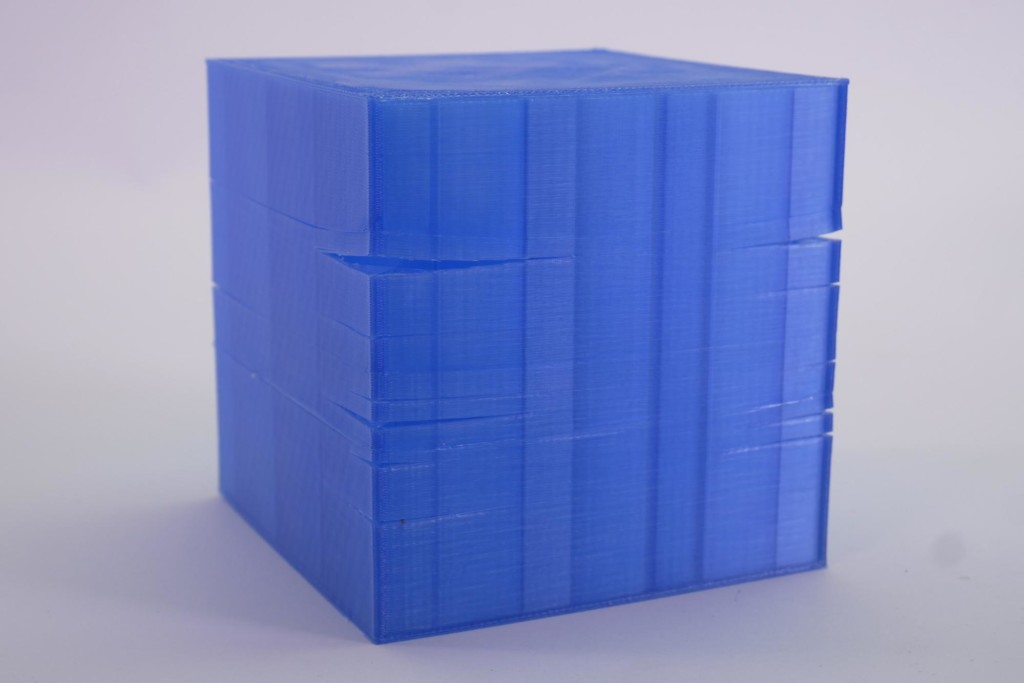 A pneumatic blower can be used to process hard-to-reach places, which displaces the remaining unnecessary material and helps to evaporate the alcohol. The whole part is completely blown in this way. Less pliable support material must be removed by hand. This is done with a chisel and other tools, and sometimes quite a lot of effort is required.
8. First sanding step
This is followed by pre-sanding to smooth out the roughest areas.
There will be a few more sanding steps to follow, but right now the resin is still too soft and needs to be handled carefully so as not to press too hard and damage the part.
This is just a preliminary sanding to prepare the part for post-curing, during which the remaining tiny support particles are removed.
9. Curing in UV oven
SLA prints generally need to be post-cured in a UV oven. This is due to the fact that at this stage the polymerization has not yet been completed, and the alcohol baths, which facilitated the removal of supports, also softened the part itself in the process.
10. Painting
Now it's time to move into the room where the additional sanding and first paint application is done. At this point, the small hole plugs that were printed with the steering wheel are inserted into the corresponding holes. After applying the paint, the seams will not be visible.
Painting is carried out in a laboratory where all necessary personal protective equipment must be used at all times. This is necessary to maintain the health of personnel, as well as to maintain the sterility of the environment so as not to contaminate the painted surface with hair, dust and other foreign objects.
First, the handlebars and plugs are sprayed with a dark primer to prepare the part for sanding. At this stage, the color does not matter.
11. Second sanding step
After applying the primer, additional sanding is carried out. The part is sanded with such care that the first layer is almost completely removed. In our case, the steering wheel was polished for 4 hours.
This process ensures an absolutely smooth surface and prepares it for the second stage of painting. Now you can apply the next layer, but it's still not the outer coat. It serves as the basis for applying subsequent required colors. The paint used is sprayed very thinly, and care must be taken to ensure that no bubbles or bumps appear on the surface. This coating is also applied to the end caps to prepare them for the next painting step.
12. Top coat application
Then comes the stage of final painting. Three different colors are used for this steering wheel: black, silver and brown. When applying silver and brown paint, the remaining areas of the wheel must be covered with adhesive tape. This is not an easy task that requires a lot of patience and precision. A millimeter or two to the side - and the paint will fall into those areas where it should not be, and thereby spoil the appearance of the finish.
Silver paint is applied to the completely closed part. The exposed areas around the edges will also be covered with brown paint to give volume thanks to the three colors.
After all stages of painting are completed, the plugs are installed - and the steering wheel is ready!
The whole process takes 2-3 days, which is much faster than traditional methods.
Material provided by ProtoFab
Want to order a free test print or run a project on ProtoFab equipment? Contact iQB Technologies!
Article published on 06/27/2019, updated on 04/26/2021
10 rules for preparing a model for 3D printing / Habr
Download the model, print it, use it - what could be easier!? But, if we talk about FDM 3D printers, then not every model can be printed, and almost every model (not prepared for 3D printing) has to be prepared, and for this it is necessary to imagine how this 3D printing goes.
First, a couple of definitions:
Slicer is a program for converting a 3D model into a control code for a 3D printer. (There are plenty to choose from: Kisslacer, Slic3r, Skineforge, etc.). It is necessary, because the printer will not be able to immediately eat the 3D model (at least not the printer in question).
Slicing (slicing) is the process of translating a 3D model into a control code.
The model is cut (sliced) in layers. Each layer consists of a perimeter and/or fill. The model may have a different percentage of filling with a fill, and there may not be a fill (hollow model).
On each layer, movements occur along the XY axes with the application of a plastic melt. After printing one layer, it moves along the Z axis to the layer above, the next layer is printed, and so on.
1. Mesh
Intersecting faces and edges can lead to funny slicing artifacts. Therefore, if the model consists of several objects, then they must be reduced to one.
But it must be said that not all slicers are mesh-sensitive (for example, Slic3er).
And even if the grid is crooked, and it’s too lazy to fix it manually, then there is an excellent free cloud service cloud.nettfab.com that will help in most cases.
2. Flat base
Desirable, but not mandatory. A flat base will help the model stay on the printer table better. If the model peels off (this process is called delamination), then the geometry of the base of the model will be broken, and this can lead to a shift in the XY coordinates, which is even worse.
If the model does not have a flat base or the base area is small, then it is printed on a raft - a printed substrate. The raft damages the surface of the model it comes into contact with. Therefore, if possible, it is better to do without it.
3. Wall thickness
The walls must be equal to or thicker than the nozzle diameter. Otherwise, the printer simply will not be able to print them. The wall thickness depends on how many perimeters will be printed. So with 3 perimeters and a nozzle of 0.5mm, the wall thickness should be from 0.5, 1, 1.5, 2, 2.5, 3mm, and above it can be any. That is, the wall thickness should be a multiple of the nozzle diameter if it is less than N * d, where N is the number of perimeters, d is the nozzle diameter.
4. Minimum overhangs
Each overhanging element requires a supporting structure - support. The fewer overhanging elements, the less supports you need, the less material and printing time you need to spend on them, and the cheaper the print will be.
In addition, the support spoils the surface in contact with it.
It is allowed to print without wall supports, which have an inclination angle of not more than 70 degrees.
5. Precision
Accuracy along the XY axes depends on backlash, structural rigidity, belts, in general, on the mechanics of the printer. And it is about 0.3 mm for hobby printers.
The Z-axis accuracy is determined by the layer height ( 0.1-0.4 mm). Hence, the height of the model will be a multiple of the height of the layer.
It should also be taken into account that after cooling, the material shrinks, and at the same time the geometry of the object changes.
There is also a software side of the problem - not every slicer correctly processes internal dimensions, so it is better to increase the diameter of the holes by 0.1-0.2 mm.
6. Small parts
Small details are quite difficult to reproduce on an FDM printer. They cannot be reproduced at all if they are smaller than the nozzle diameter. In addition, when processing the surface, small details will become less noticeable or disappear altogether.
7. Bottlenecks
Bottlenecks are very difficult to handle. If possible, it is necessary to avoid such places that require processing, which cannot be approached with a sandpaper or a microdrill.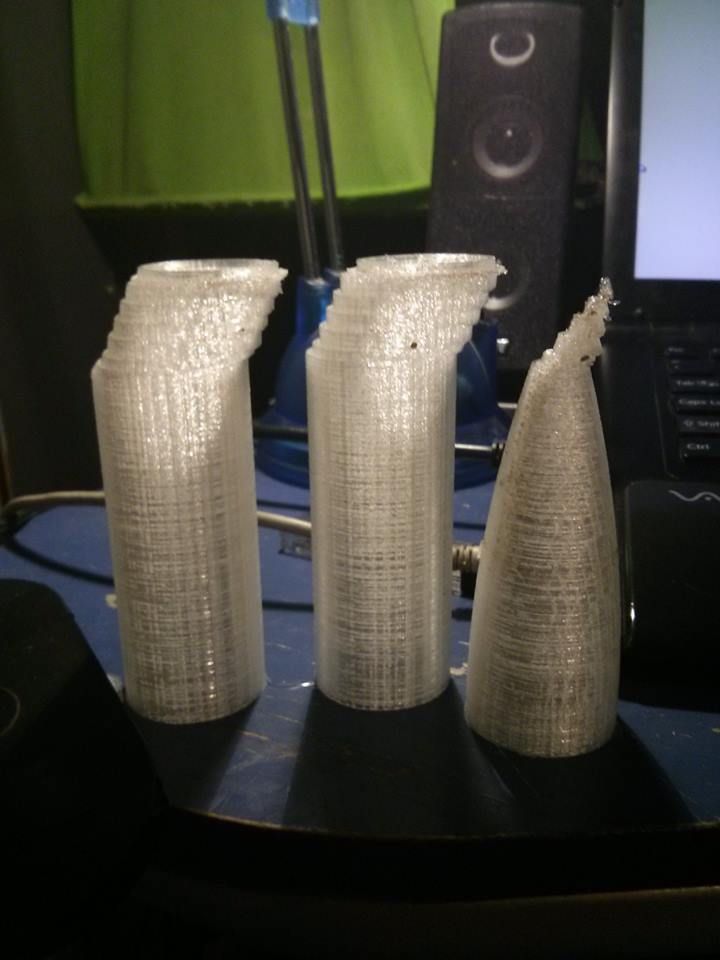 Of course, you can treat the surface in a solvent bath, but then small elements will melt.
8. Large models
When modeling, it is necessary to take into account the maximum possible dimensions of the print. If the model is larger than these dimensions, then it must be cut in order to print in parts. And since these parts will stick together, it would be nice to immediately provide connections, for example, a dovetail.
9. Desktop location
How to place the model on the desktop depends on its strength.
The load should be distributed across the print layers, not lengthwise. Otherwise, the layers may disperse, because. adhesion between layers is not 100%.
To make it clear, let's look at two L-shaped models. The lines show the print layers.
The strength of the printed part depends on how the force is applied relative to the layers. In this case, a small force will be enough for the right "G" to break it.