3D print yourself as a toy
3D Printing Yourself – How to Print a Mini You!
Self-portraiture has been an art form for as long as art has existed. Sketching, painting, and photography have all been used to capture the self from their inception.
This practice eventually came to the modern age with selfies, and the step beyond that is finally here: 3D printing yourself!
Making a 3D model of yourself for printing is a fun and exciting prospect, from making mini tableaus of your friends and family to even making workable 3D action figures of yourself. I guarantee even your best selfie won’t be as cool as having a mini model of you!
There are a few ways to get a little 3D you up and printing, and here we’re going to look over a few of the best ways to make a 3D model of you and your friends.
We’re also going to look at some of the coolest uses and ideas for 3D printing yourself to maximize the fun of being mini!
Why Make a 3D Model of Yourself?
Let’s be honest, all of us are at least a little vain, I know I am. This is why self-portraits have been a staple of just about any art form since time immemorial.
When it comes to 3D printing yourself, there are a few fun and creative uses for having a tiny plastic you.
Making a small scene of you and your family to decorate the mantlepiece is a simple yet novel way to keep treasured memories close. Think of it as a 3D family photo.
Wedding Cake Toppers
An even sweeter way to use a 3D model of yourself is on a wedding day or similar occasion.
Having the figures on top of the cake that are the actual likeness of the newlyweds is a really nice way to make the day a little bit more special.
Action Figures and Toys
For more fun reasons, you can even make 3D printed action figures of yourself. With a little extra work, you can print a 3D model of yourself with posable limbs like a real action figure.
With fun and games in mind, tabletop and board games that use figurines like Monopoly and Arkham Horror will be made all the more fun by using 3D printed models of you and your friends as the game pieces.
Before You Start Printing
There are a couple of ways to make a 3D model of yourself, and which method you choose will depend on both what equipment you have access to as well as just how artistically experienced you are.
The most common, easiest, and most accurate way to get a model of yourself to 3D print is through 3D scanning.
3D Scanning Yourself
We’ve already discussed 3D scanning and its uses, from dental practices to full-body 3D scanners and their uses. In the latter, we’ve even briefly discussed 3D selfies.
3D scanning is the process of using structured light or lasers to scan a 3D object ready for upload to rendering and modeling software. Think of it like scanning a document or photo onto a computer, but in full 3D.
Handheld scanners work great for this, but you will need another person to help you so you can get a good scan of your whole body.
How to Get a Scan of Yourself
The scanning process itself will require preparation.
Like taking a good photo, there are things to keep in mind to ensure top-quality results. Correct lighting, reduced background clutter, and stillness to avoid blurring are all crucial to getting an accurate model of yourself ready for 3D printing.
There are a few routes to take to get yourself 3D scanned.
Some scanners can be printed and made at home. Some are fairly cheap, while professional-grade scanners will set you back a little more.
To really get a sense of which scanner is right for you, you can check out our article on 3D printed scanners in all price ranges. And that’s not even mentioning the different kinds of 3D scanner software out there.
The Revopoint POP 2 is a good low-cost choice for home scanning. You can check out our review of it here.
Ensuring Scan Quality
For a really high-quality 3D model of yourself, your scan will need to be as clear as possible.
While the home-based scanning options mentioned above are handy, there are also professional scanning services that use high-end equipment in studios for the best results.
Which of these services are available to you will naturally depend on your area.
A quick search should get you in touch with professional 3D scanners so you can be confident you’ll end up with a 3D model of you that’s a perfect likeness.
All-in-all, it will take some time, research, and money to know exactly what hardware you’ll want and which software to use, but it will be worth it when you’re holding a tiny you in your hands.
Alternatively, you can always go hard mode and make an entire model of yourself from nothing.
Alternative Option: Model Yourself From Scratch
Of course, the most basic method is to simply make a 3D model of yourself from scratch.
Much like how painters will often have a photo of their subject matter by their easel, you can use differently-angled selfies to make a model of yourself using your preferred 3D modeling software.
Naturally, this requires a deft artistic hand and good experience in 3D modeling. But if you’ve got the skill, you might find it to be a worthwhile project that’s a lot of fun as well as rewarding.
3D Printing Yourself
Now that you’ve got your model, it’s time to 3D print yourself!
There’s not much point in making models of real people if they’re not as accurate and detailed as possible, so you’re going to need to have the right machine for the job.
No matter how good the scan or clear the model is, a lesser 3D printer will make your resulting model look generic.
With your model loaded into your preferred slicer, you’re ready to double-check the accuracy and resolution before sending it to be printed.
You can 3D print yourself in just about any material, but for the best results, we recommend resin.
Resin printers are known for more high-quality prints than their FDM counterparts, so it’s better to use one if you’re really going for accuracy in your models.
Particularly high-end or reliable resin printers are excellent for getting models that really look like a little you!
If you don’t have access to a resin printer, or any printer that you trust to get the results you want, it’s worth noting that many professional scanning services will also offer printing as an extra. These services may even be able to print in ceramic or metal.
After printing, it’s time to post-process.
How you’ll do this will depend on what materials you’ve used and how you want your model to look in the end.
If FDM printing with ABS filament, adding a sheen with acetone or carefully painting the model are both good ways to get your desired results.
Just be sure to have your materials ready. If painting, you’ll need the right colors to get your models exactly right, for example.
If you’re new to 3D printing or just want to make extra sure that your models turn out right, you can check out our guides on improving your finish and post-processing your 3D prints.
Make Yourself as an Action Figure
Making static 3D models of yourself may be cool enough as it is, but you don’t have to stop there if you don’t want to.
With a little extra engineering and time, you can even make yourself into a 3D printed action figure!
Once you’ve got a 3D model of yourself, you can use your preferred slicer or editing software to split the model into individual parts depending on where you want your points of articulation.
By modifying these parts with holes to fit together with hinges or screws, you can print them all separately and then combine them to make an articulated action figure that looks just like you.
Of course, this only needs to be as complicated as you want it to be.
If you only want the head to turn, it’s as easy as printing it separately with enough of a connection to hold steady but with enough space to turn.
Joints on the shoulders and elbows will make it so you can put yourself in different poses like a real action figure, same with joints at the hip and knees.
For the best results, make sure you get a scan of yourself standing straight. Different poses and leaning positions may make for cool 3D selfies, but they will limit how your action figure self can be manipulated.
The most important thing is to make sure the points of connection match.
Having CAD software that can run simulations of moving parts is useful for this, but making careful notes when measuring the holes will do.
If you’re feeling extra zany, you can size up the top of the model and attach it to a small spring to turn yourself into a fun bobblehead!
Hints and Tips
We’ve already gone over some of the more important things to keep in mind when 3D printing yourself as a model or action figure, but here are a few extra hints to make sure you’re satisfied with your tiny you.
Always Scan in an Ideal Environment
There are a lot of ways to make sure your 3D scan comes out as clear as possible. Professional scanning services will know what to do, but if you’re scanning yourself at home you’ll need to be mindful of a few things.
Correct lighting and good background colors will stop your scan from being too ‘noisy’. You should also be mindful of your clothing, posture, and chosen pose. All-in-all, just do what you would when taking a good photo and you should be fine.
Taking photos of yourself in the clothes and poses you have in mind makes for a good test run before scanning so you’ll know what looks and works best.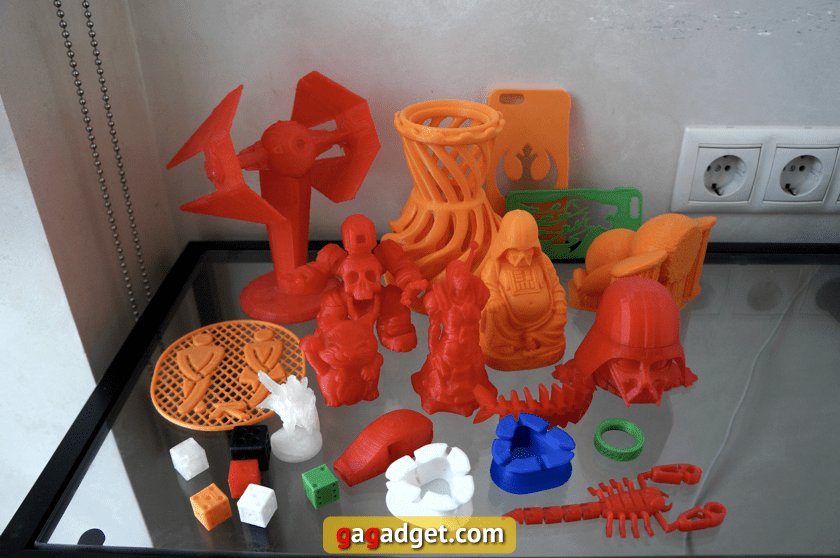
Get More Than One Scan
Again, this is a similar rule to photography. Getting scans of yourself in different poses or in different clothes will give you many more options when it comes to printing.
Even if you’ve got a good one, there’s no harm in getting the same again for safety, it could even end up being a better scan than the first.
Don’t Be Afraid to Experiment
Printing yourself out in different poses or testing out some scans as action figure material can take some trial and error. Considering the time and effort 3D printing yourself can take, you probably won’t want to settle for second-rate.
Experimenting with sizes, infills, materials, and post-processing methods is part of the fun of making a model of yourself.
It will not only help you get a better idea of what to do next time but also make for a good learning experience for getting great 3D printing results in the future.
3D Printing Yourself FAQs
Can I print a 3D model of myself?
Yes.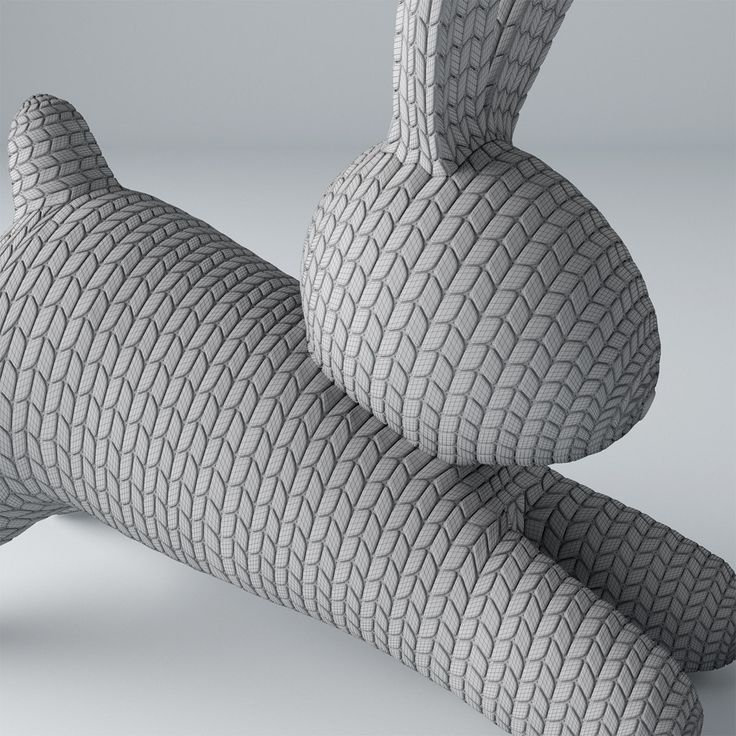 With 3D scanning, you can upload a 3D image of yourself to your preferred slicer and 3D print a model of yourself with ease.
How much does it cost to make a 3D printed figure?
3D printing a figure is fairly cheap if you do it all yourself.
Renting a scanner can cost anywhere between $250 – $500 on average, while professional scanning services generally cost up to $1000, with an added cost for printing that varies depending on size, detail, and materials.
If you like, you can also buy and keep a good low-cost scanner like the Revopoint for around $500 – $700.
How do you 3D print a statue of yourself?
With either an accurate 3D scan of yourself or a model you’ve made from scratch, you can use any high-resolution printer to make a statue of yourself that looks as much like you as possible.
Other articles you may be interested in:
- The 34 coolest & most useful things to 3D print
- 30+ Easy and fun things to 3D print at home
- The 10 best free 3D printer models on Thingiverse
- 8 Big ideas for small 3D prints
- Paper 3D printing
- Top 7 3D printing tips for beginners
- 3D printed items that sell
- 7 Exciting 3D printed food projects
FAQ | Shapify
General
1. Why Artec Shapify Booth?
Artec Shapify Booth features a fully automated process for creating 3D files. Use it to set up an innovative, lucrative and scalable business.
2. What is special about your software?
It’s the only software on the market that can process full body 3D scans automatically and quickly. Just compare the Shapify’s 15 minutes of automated cloud computing to create a 3D printable file with at least 2 hours of highly skilled work spent by a 3D modeller on every file made using photogrammetry or any other scanning solution.
3. I’ve heard of photogrammetry scanning solutions, but how does Shapify Booth work?
Unlike photogrammetry the Shapify Booth uses real 3D scanners. This is what has allowed us to create software which automatically creates printable 3D files.
4. What do I need to do to operate the Booth?
I. Front office
1. Meet the customer, check he or she is wearing appropriate clothes for scanning, recommend removing shiny clothes, jewelry, black shoes and glasses. Explain the process and ask the customer to hold still for 12 seconds while being scanned. Type the customer's name (or e-mail) into the system.
2. The customer stands in the booth. You click on the "Start" button and make sure the customer doesn't move during scanning.
3. After scanning, wait with the customer until the preview picture is ready. (About 5 minutes). Meanwhile discuss delivery options with the customer.
4. Make sure the preview is good and that the customer likes it.
5. Store the customer's name (e-mail), chosen delivery address, size of figurine and number. (This can also be done during step 3)
6. Charge the customer.
7. The printable 3D file will be available to order or download on your Shapify.me online account within 15 minutes.
II. Back office, via the booth operator’s online account at www.shapify.me
1. Log in to your personal account at Shapify. me. If you want to print the figurine yourself, just select the model and press the “download” button.
2. If you want to order printing with Artec, please make sure your printing account has enough credit.
2. Go to Gallery, select the required model(s), enter the delivery address, number and size of figurine(s).
3. Click on the "order" button.
Please see the video for a visual explanation
5. If I install a Shapify Booth, will it carry your brand or mine?
The branding on the booth itself cannot be modified apart from in exceptional circumstances. However, if you decide to use an exterior pod or structure for the booth, you can create your own design or use the Shapify design. In both cases, the design should be harmonized with us for technical and marketing purposes.
6. Is the Shapify Booth portable?
Yes. Shapify Booth it is the most portable and easy to deploy automated 3D scanning solution on the market.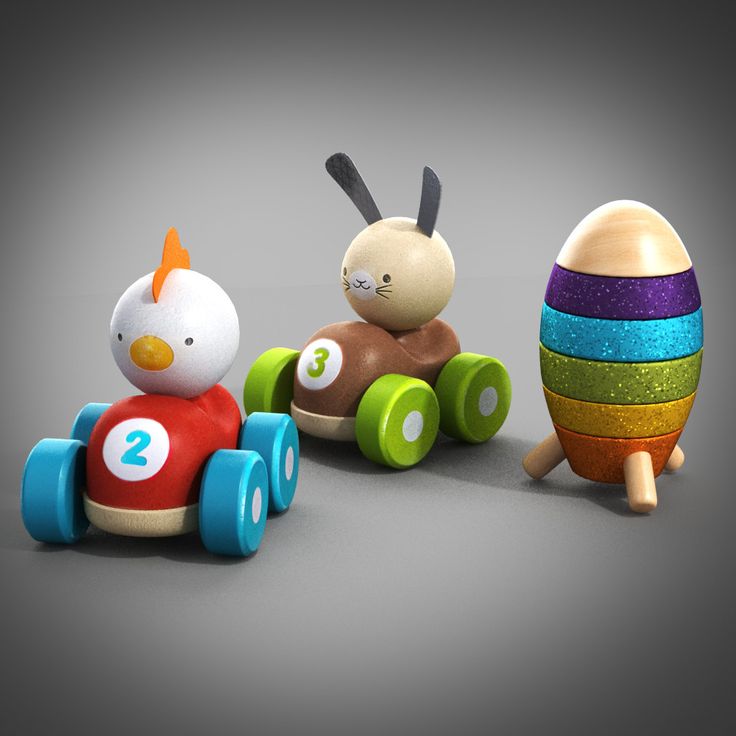 However, the booth should be assembled and calibrated by an authorized maintenance partner; this is about 4-5 hours’ work for a two man job.
7. So there are 3000 3D model files included in the Optimal business model. But what if I just need to re-scan a customer?
We don’t count scans, we count the processed 3D files you choose to print or download. You can scan your customer as many times as necessary, this will be free of charge.
8. What’s in the box? What is included in the price of the booth?
– Hardware, delivered to your address
The whole scanning system - the scanning with 4 hi-res rotating scanners, lighting, and the computer to manage the process.
The first installation by our certified Maintenance Partner
- Software
There are 3 levels of software:
1. The software installed on the Booth PC for managing scanning and modelling a quick (1 min) preview so your customer can decide whether to accept the quality of the scan
2. Cloud software to process your hi-res model (3-5 min) and upload it to your personal account on the Shapify.Me web site.
3. The Shapify website software and interface to help you to store and manage your scans, download your files, order prints, check your scanning and printing accounts and schedules (within certain business-models)
- Warranty
1 year full warranty
With the “Optimal” business model you will also get 3000 automatically processed 3D files.
9. If I use the “optimal” model, how will I know how many files I have “spent” and what will happen afterwards?
You will have a special counter on your personal account at Shapify.me. You will always know how many files you still have left. When you have used them all, you will be able to top up your account on the website by paying $20 per extra scan.
10. Does the booth have to be connected to the internet? Can’t the file be created locally, on the booth computer?
Yes, the booth has to be connected to the internet since all the calculations are done in the cloud.
11. My client’s data will be transferred to the cloud. Is that safe?
A lot of information, from the photos on your iphone to your credit card details, is sent to and processed in the cloud. All data on the Shapify website and in the Shapify cloud is encrypted and safe.
12. Can Shapify Booth scan a couple or 3 persons together?
Yes, it can. Just remember that the more people are scanned together, the more difficult a job it is for the software, since everyone makes some slight movements even if they trying to keep totally still, and if there are several people in the booth, the volume of movements will be higher. So achieving a perfect scan of multiple people will be a little more difficult - although we have plenty of success stories!
13. What is the approximate processing time for one full body scan?
You (and your customer) will see the finished preview in about 5 minutes. Based on that, the customer can decide whether they like the scan and wish to purchase the printed 3D shapie. The hi-res fully processed file should be available in about 15 minutes on your personal account on the Shapify.me website
14. What scanners are used inside the booth?
This is the Artec L2, an enhanced version of Artec Eva, but with a wider view field and longer working distance.
15. Will we get trained to use the software and the hardware
Of course!
16. What are the installation requirements?
You’ll need a space of at least 3.3m x 3.3m, ceiling height at least 2.8 m. For electricity you should have 220V and 2500W. We recommend a fast Internet connection of 8-10M. Don’t forget you should also have a Windows laptop or a desktop to run the Shapify software. It doesn’t need to be powerful, though, all the heavy work is done in the cloud and on the Booth PC.
17. Where I can see the Booth in action?
Take a look at our map here and also keep an eye on our news.
18. Are the prices on your website in USD?
Printing
1. The Shapify Booth creates a ready-to-print 3D file. How do I turn it into a 3D printed figurine?
There are 2 options:
1. You can find your own local printing partner.
2. You own a 3D printer yourself and print the figurines on your own premises.
2. Can I order 3D prints directly from Artec 3D?
Artec 3D doesn’t offer 3D printing services.
3. What 3D file format do you support?
Our files are in .obj format (plus texture in .png) which can be easily transformed into any 3D format you need (like .ply or .stl) with free software (e.g. Meshlab).
4. What material can the figurines be printed in?
Once you have downloaded the file, you can print it out using any material you like – gypsum-based polymer, metal, plastic or even chocolate.
Top 20 3D printed toys
Why 3D print toys? What toys can be 3D printed? 1. Mini monster truck 2. Surprise eggs 3. Gliders with elastic band 4. Folding sword 5. Micro catapult 6. Spinning top 7. Moving animals 8. Spirograph 9. Transformers 10. Toy tool set 11. Castle 12. Lego bricks 13 14. Edible toys 15. Anti-stress keychain 16. Chunky Trucks set 17. Sword rattles 18. Vikings Squigglepeeps 19. Math Spinner 20. Jumping Turtles Results
Today, 3D printing is developing and spreading very rapidly, gaining more and more popularity. And no wonder, because 3D printing is an invaluable tool for prototyping designs, creating mockups, fabricating parts, and more. At the same time, it is no longer difficult to buy a 3D printer at an affordable price even for home use. However, a 3D printer is not only a tool, it is also a kind of toy. A toy capable of creating other toys! Using a 3D printer to make toys gives you control over the material, color, size and other components, so the models you create with 3D printing will be unique!
But what if you don't have your own 3D printer and you need to print a toy or some part of it? It doesn't matter, in this case our 3D printing studio will help you! You only need to place an order by uploading the file of the desired finished model, after which our specialists will contact you to calculate the cost and resolve other possible issues.
Why 3D printed toys?
This is probably the first question that comes to mind, and it is not surprising, because often 3D printing can cost you more than the cost of such a toy in the store. But there are also a number of advantages of 3D printing, as well as cases when it would be more profitable and appropriate to turn to creating models on a 3D printer.
- As already mentioned, a toy printed on a 3D printer can be absolutely unique due to the ability to give it exactly the shapes, sizes and colors that you and your child want.
- Some toys can be difficult to find in the store, and their cost may exceed the cost of their printed copy.
- Sometimes you only need to replace one or a few broken or missing parts of a toy, such as a building toy. In this case, it will be much more profitable and more expedient to use a 3d printer than to buy a whole set for a high price.
- An important factor is, of course, the impressions of the 3d printing process itself, which will captivate both a child and an adult.
 And the positive emotions of your child from the toy you created will be the best reward!
 - And for those who are just getting acquainted with their printer and 3d printing in general, the process of creating toys will be an excellent, exciting simulator to improve their skills and gain experience.
Which toys can be 3D printed?
In the context of constant development and increase in the possibilities of 3D printing technology, you can create almost any toy on a 3D printer, but the result largely depends on the capabilities of your device, your abilities, as well as the time, resources and effort that you are willing to devote to this process. Therefore, more or less simple projects are most often created on a 3D printer. But the relative ease of manufacture does not mean boring finished products! Below we will give you a list of 20 interesting 3D printed toys that are not particularly difficult to create. Among these crafts you will find toys for children of all ages, including the smallest: mechanical products, motion figures, building blocks and even rattles! For each toy from the list, we leave a link to the finished model so that you can try them yourself. So let's get to know them better!
1. Mini monster truck
Two monster trucks. Source: Thingiverse
Not everyone can afford a monster truck, but if you have a 3D printer, you can print yourself a mini copy of it... which is almost as cool. Thanks to the all-printed suspension and removable discs that attach easily and without the aid of glue to the body, this truck is perfect straight from the printed surface.
You can even choose from a variety of body styles and wheels. And for a two-tone tire, stop printing the wheel at 19.8 mm and replace the filament.
Model files for download can be found here.
2. Surprise eggs
Surprise! Source: Twitter
Bigger is not always better. And often the most interesting thing is just a small size, and these 3D printed eggs with a surprise are an example of this.
These tiny cars with moving wheels and other accessories are amazing! Plus, you have plenty to choose from, as you can print surprise eggs with just about anything inside, be it a fire truck or even a fighter plane!
No support required for these models. We advise you to use at least 40% infill to make sure that small elements are both beautiful and durable. Given the number of such tiny parts these machines have, be prepared that printing them can be a real challenge for you, but with good calibration and fine tuning of your machine, everything will work out in the best way!
3. Elastic Gliders
Get ready to take off! Source: Thingiverse
With 3D printed gliders you will be able to “pull out” even more fun from ordinary rubber band ! Just 3 simple steps, and your glider will take off: hook it with an elastic band, pull it towards you and release it.
With this model on Thingiverse, you and your friends can take to the skies a whole fleet of these rubber gliders!
100% infill and a layer height of 0.1 mm are recommended for greater aircraft strength and longer life for thin wings.
4. Folding sword
Telescopic pirate sword. Source: Thingiverse
This toy may not be best given to a child when there are breakable items nearby. But in the right environment, telescopic swords will bring tons of fun and enjoyment to kids! From the designer of this folding pirate sword, you can also find models of telescopic katana, daggers and even lightsabers!
This Telescopic Pirate Sword is designed for printing at low speed using a 0.4mm nozzle. Also, successful printing requires a printer with a good retract and precise settings for Coast (turning off extrusion at the end of the layer print) and Wipe (“wiping” the nozzle at the end of the layer).
5. Micro Catapult
Hit all your enemies (or at least your deskmates). Source: Thingiverse
This little catapult is a great toy for kids and bored office workers alike. She can throw small crumpled pieces of paper and any other small things that will fit in her. Selected ammunition can fly about 2 meters, which is enough to hit unsuspecting victims at another table!
This model is an all-printed prefabricated assembly that does not require any supports or special adjustments.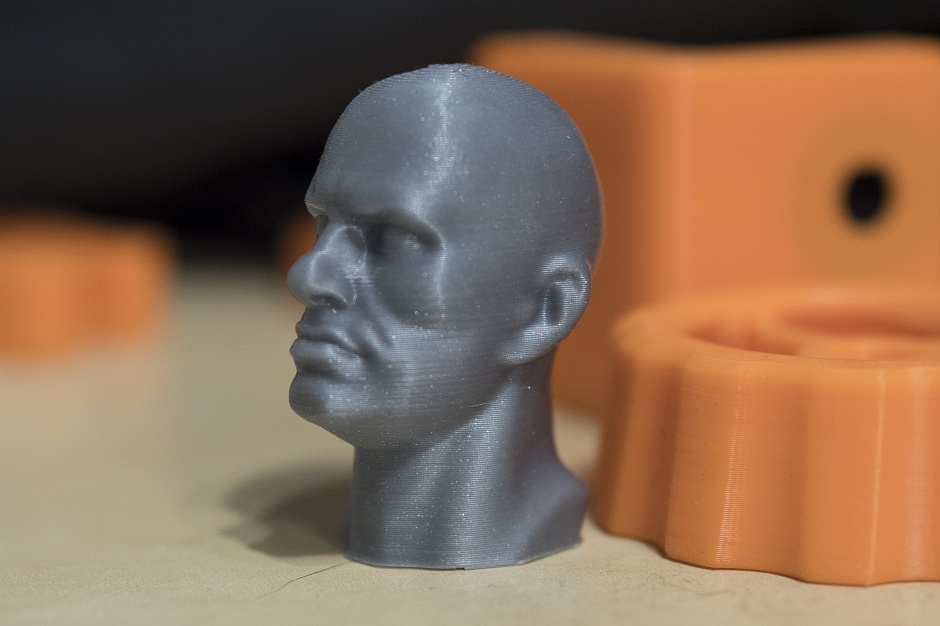 A minimum filling and layer height of 0.25 mm is sufficient.
Despite the fact that many catapults are made from PLA plastic, the author of the design still insists that this model is not for PLA, but for ABS plastic. We can also recommend PETG filament for this printing, which has the best qualities of PLA and ABS.
6. Top
The oldest toy for the whole family. Source: Thingiverse
As far as we know, the spinning top is one of the oldest toys in the world. In ancient times, tops were made from almost any material: from stone and wood to fruits and nuts. And now additive technologies allow you to make your own spinning top using a 3D printer! All you have to do is print this model, glue the pieces together and have fun with this simple yet fun toy!
Offered 0.2 mm layer height and 20% infill.
7. Moveable animals
Cute articulated octopus. Source: Thingiverse
Making flexible prints with a 3D printer has become completely affordable and common practice thanks to special filaments such as TPU.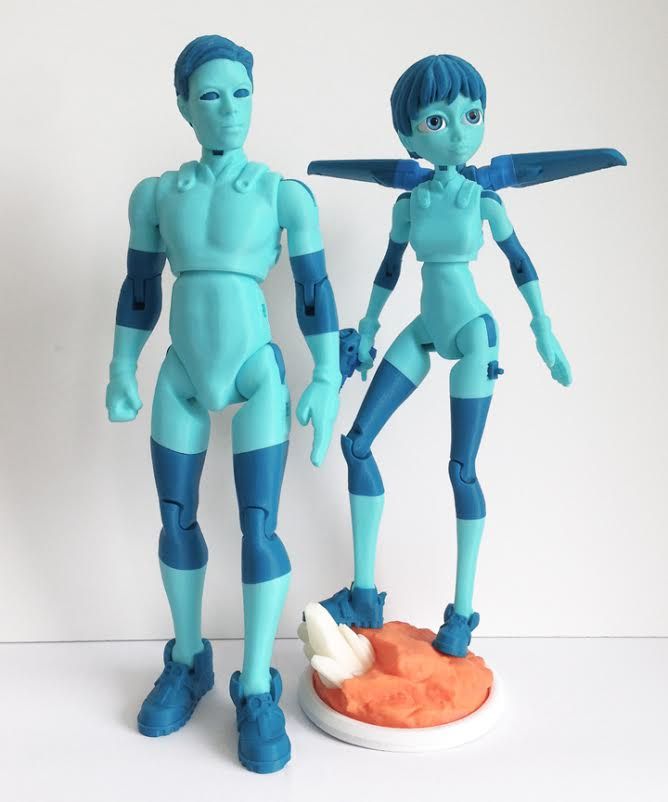 But what if we said that you don't have to use flexible plastics to create flex parts?
Using excellent hinges that are printed in one piece with the entire model, you can create movable flexing toys even from plastics such as PLA, ABS and PETG, without any additional settings and adjustments.
The standard specifies a layer height of 0.2 mm and an infill of at least 15%.
Most popular models:
- Octopus
- T-Rex
- Lizard
8. Spirograph
Convenient case for creativity at any time. Source: Thingiverse
Everyone knows the children's toy spirograph, which allows you to easily draw masterpieces with repeating geometric patterns. But this model has gone a little further and is a whole case containing a platform for drawing and a compartment for storing gears and paper. It fits easily into your pocket, backpack and bag, so you can take it with you and paint whenever you want!
The case has several levels.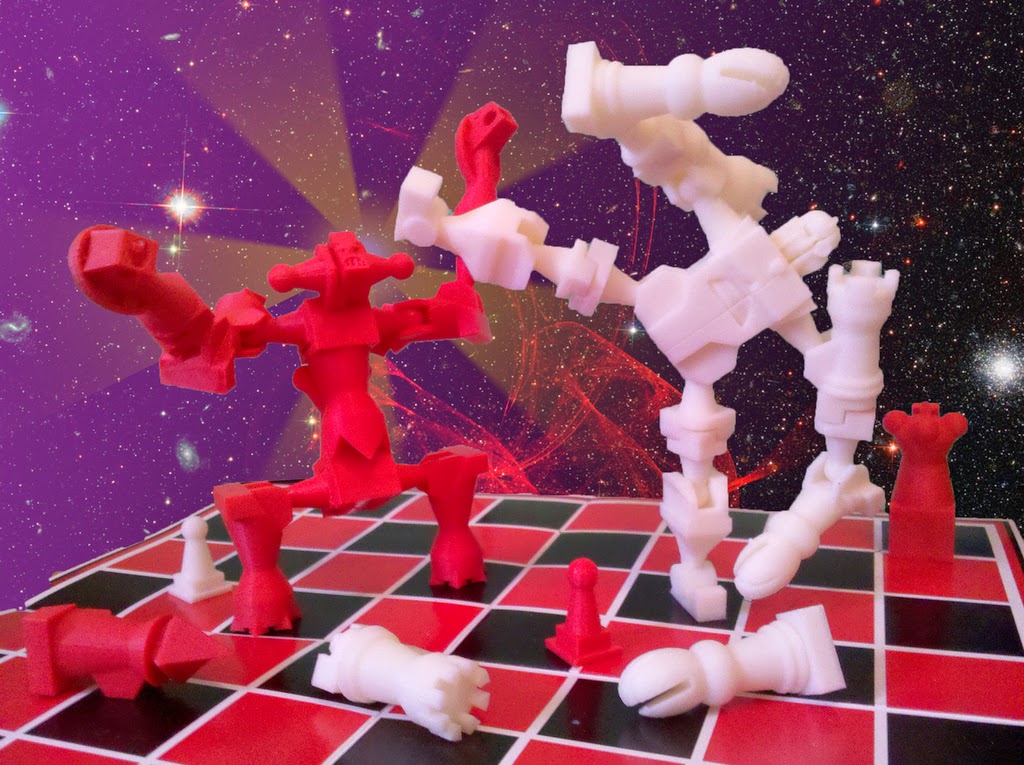 The lower level holds slips of paper for notes, drawing gears and, if desired, a small pencil or pen, if, of course, you can find one. The next level provides a secure, flat drawing surface so you can make art while walking! The top level has fixed gear teeth and holds the piece of paper in place.
A layer height of 0.2 mm and an infill of 20% or more is recommended. As a loop, a regular straightened 1.75 mm filament thread is used.
9. Transformers
Toys from the planet Cybertron. Source: Thingiverse
Transformers are a hugely popular children's toy to this day, so these Optimus Prime and Megatron are sure to please your kids.
This printed Optimus Prime transforms from a classic Optimus truck into a fully functional standing robot. And it's amazing, considering that you immediately get a ready-to-use all-printed model right from the printing platform, which does not even require supports!
But, of course, every Optimus needs an opponent to fight. Therefore, you can also print Megatron, but it should be noted that his model is more difficult to print and consists of two parts.
10. Set of toy tools
The first tools for little craftsmen. Source: Thingiverse
The Toy Tool Set is a great way to introduce kids to basic tools, their appearance, purpose, and how they work. Print your child's first hammer, screwdriver and pliers and he'll feel like a real craftsman!
The hammer is modeled to fit two pieces together with a screw, but some users simply glue them together, which is just as pretty. You can also use a hammer to assemble pliers: just lay the two pieces on a flat surface with the screw down and tap lightly a couple of times.
Model can be found here.
11. Castle
Build your own medieval world! Source: Thingiverse
This medieval castle playset is meticulously designed for 3D printing. Walls and towers are easily attached to each other with a simple connection. You can make as many details as you want to create a large or small original castle layout of your own! The set contains walls, towers, houses, characters, animals and a variety of props to add to the fun of this medieval set.
All parts are small enough to be printed comfortably even on 3D printers with a small printable area: 140x140x140mm. For such purposes, the Flashforge Creator Pro 2 3D printer is perfect, equipped with two independent extruders and has excellent printing accuracy. This printer will cope with the study of small details, and two extruders will help you print several parts at once or one part in two colors!
12. Lego bricks
Your favorite constructor is now more accessible! Source: Pinterest
LEGO is one of the most popular toys for children. At the same time, the cubes of this designer are made of ordinary ABS plastic. So, having your own 3D printer, you can print the missing/lost Lego bricks yourself or even some of your author's design of the details of this amazing designer! At the same time, you can use not only ABS, but also other 3D plastics: PLA and PETG are also great.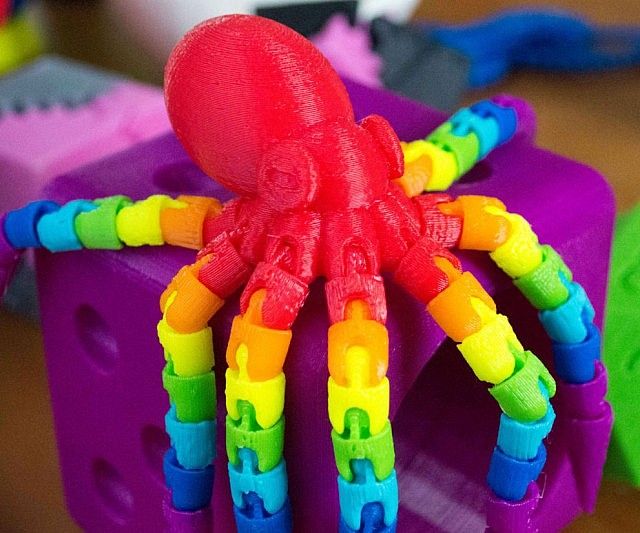
Thingiverse has a lot of Lego models, and we'll take a look at one of them. It's customizable model of several different LEGO and LEGO DUPLO pieces. These bricks are not completely identical to real Lego, but they are compatible in every way.
13. Ballista
Fire! Source: Thingiverse
Introducing a fully printed ballista model, ready to use right out of the box. One has only to set the string and load the projectile, and this ballista will impress you with its simplicity and good range of the arrow. As a bowstring, you can use several layers of thread or ordinary stationery gum.
Recommended to print in PLA or PETG with 90% coverage and 0.2mm layer height.
14. Edible toys
The Open Toys project turns ordinary vegetables into toys. Source: Thingiverse
The project was originally envisioned as a way to turn commonly discarded residual materials such as wood and cork into toys: helicopters, planes, cars and so on. But soon, wood and cork were replaced by more accessible and easily pierced materials: fruits and vegetables. With this project, you can turn ordinary food items into fun personalized toys.
15. Anti-stress keychain
Entertaining keychain. Source: Thingiverse
Add some flair to your keychain with this cool little toy. She will entertain you wherever you are!
This model is not the easiest, but try it and you will definitely succeed! Important print quality settings are "Outer Walls Before Inner Walls" and being extra careful with temperature. It is printed with supports and requires a certain, sometimes lengthy, post-processing. Remove not only supports, but also make sure that the surface of the part is smooth, otherwise it will cling and stutter. A scalpel or a 1 mm drill will do. Periodically rotate the gears to see where it still sticks, which is especially true when using PLA.
16. Chunky Trucks set
Two models from the fun and cute Chunky Trucks set. Source: Thingiverse
The adorable Chunky Trucks collection includes various unique models of small trucks, fun builders and even a movable barrier. The cars are specially designed so that even the smallest children can play with them. Unlike builders, who are not recommended to be printed for toddlers so that they do not try to put them in their mouths, but which will greatly amuse older children.
All models can be printed without supports. And for long truck life, at least 25% infill and three-wall use are recommended.
17. Rattleswords
Arm your warrior! Source: Thingiverse
Rattles are an integral part of all babies. But what if we move away from banal and boring designs and build a rattle in the form of a sword for your little warrior? This fun design will not only amuse your baby, but also you, as this rattle will be a lot of fun to print!
All corners of the model are rounded for safety. There are also two versions of the tip. Initially, a gem was attached to the tip, but after some concern that the stone could slip off the tip and be swallowed by a child, a second version was created that did not include a gem.
Print two sets of peas first. Then, while printing the sword, throw them inside the blade. This will ensure that the peas stay inside the rattle forever. After printing all the elements, simply fasten them with superglue.
As with any printed toy, parental guidance is required. Be sure to throw away the toy if it breaks.
18. Viking Squigglepeeps
Three Viking Squigglepeeps set sail. Source: Thingiverse
Squigglepeeps is another kid-safe toy, this time with absolutely no glue required. These fun chubby Vikings and their boat are too big to choke on, making them suitable for kids of all ages. They look funny even in one color, but they will be even more beautiful if you paint them with child-safe paints! The model also absolutely does not require supports.
19. Math Spinner
A great way to have fun learning math! Source: 3Dtoday
This math spinner is the perfect companion for learning math. Moreover, it is suitable for all ages, because it is never too late to brush up on your arithmetic knowledge! You can print this finished model or customize it for yourself by removing or adding rings. This advanced design contains all the signs of addition, subtraction, multiplication, division, equality and inequality, plus a pointer to the string to be solved! On the central insert there are special grooves for fixing. For this version, you will need to print 2 caps and 8 rings of numbers, the rest of the details are printed in a single copy.
Recommended coverage 25% and layer height 0.2 mm.
20. Jumping turtles
The variety of these turtles is amazing! Source: Thingiverse
Last but not least, jumping turtles! Agree, even the name sounds fun! And a variety of shell design options will give each turtle its own uniqueness. This model uses the same flex concept as the Mini Monster Truck above, making the Turtles bounce when you tap on the body. Also in this turtle, the head can be drawn into the shell.
The model is assembled with printed H-clamps and does not require glue. All parts are printed without supports. Also note that using the raft (rafts) and brim (margins) options can have a negative effect on the results if you don't then take the time to sand and clean the edges at the base.
If you have problems with head slip, you can try to print 1 of the 3 narrower shaft head files that the author has specially uploaded for this case.
Results
We hope you enjoyed this selection of toys for 3D printing, and you will definitely choose some option for yourself, because 3D printing of toys is not only fun and interesting, it is also a new experience and knowledge for both you and and for the child. But we have considered only some entertaining options from the many existing ones. And, of course, you can create your own unique designs and implement them on your 3D printer or contact our 3D printing studio for this. And toys printed by you can serve as a great unique gift, which is also one of the reasons to buy a 3D printer for your home.
10 educational toys that you can 3D print
So, you finally bought a 3D printer. Congratulations, you are now officially manufacturer .
But now what? What can you use your new gadget for? There are many amazing applications of applications - although most users will not be interested in printing blind bones or prosthetics.
Why not put this device to good use and do something educational - for yourself or for your children? There are amazing toys and gadgets to choose from, so in this article we've rounded up the top 10:
Jacks use a mechanical advantage—usually a screw thread—to allow someone to lift a load that is several times heavier than they could reach by hand.
This Seattle platform jack is intentionally 3D printed in one piece despite having several moving parts. Even though it's not strong enough to be used to change tires on your car, it's great to see how the various elements fit together and allow it to function.
After the excitement wears off, you can easily turn it into a unique mobile phone holder or trophy stand.
I'm not going to lie; I have no idea how a car engine works. I don't think it's a stretch to say that most of you reading this don't know either.
Now you can learn, and best of all, you don't have to lie on your back under the car for hours filling up on oil. It's all thanks to car enthusiast Eric Harrell, who has created what is arguably one of the best 3D printing projects we've ever seen.
His Toyota 4 Cylinder Engine 22RE consists of 80 individual 3D printed parts and takes 72 hours to print. He tunes rubber bands and valve springs for non-printing parts.
What do you do when you've finished making a car engine? Make a transmission system to go with it, obviously.
This fully featured product takes 48 hours to print and a few more hours to assemble. Harrell warns that the building process is very complex and you will need to keep a close eye on his diagrams, although he will gladly provide assistance to those in need.
When you are done, you can connect the device to the above motor and get one piece of the printing machine.
Best of all, Harrell is confident it will work in a real car, so all you need now is a chassis and some seats. Self-driving cars Google self-driving cars , eat your heart out.
No matter how old you are, everyone loves dinosaurs. These massive creatures have roamed the earth for about 135 million years; an absolute eon compared to 200,000 years of modern man.
There's something really impressive about seeing a full-sized dinosaur skeleton in a museum, but unfortunately they're too damn big to print out and keep in the living room. However, you can make a miniature copy.
This force is 20 times less than the actual force, but it is 100 percent more accurate. It will take you about 24 hours to print 79 individual parts.
We love the Raspberry Pi here at . You can integrate them into literally thousands of projects using them as media servers. media server about broadcasting their own radio station
Although this case is not educational in itself, it is certainly a device - it can give you a great foundation for programming. and electronics. By making an impressive holding, you will save money at the same time and get extra motivation to open the box and get stuck.
It comes complete with Pi camera access ports, HDMI cables and 75mm VESA mounts.
We also specifically wrote about projects of projects
Along with the tide and the sun, wind energy is one of the holy trinities of renewable energy.
This device is perfect for teaching how it works, but it's also great for classroom use.
It uses a "gravity battery" to store the energy it collects, making it ideal for lifting or lowering heavy objects. Of course, this little replica doesn't have that capability, but it's great for explaining the principle and seeing the process in action.
Pulleys are considered to be one of the first machines known to man. The ancient mathematician Hero of Alexandria, who is credited with the first recorded steam engine, realized his potential as early as 50 AD.
This project allows you to set up the number of wheels you want, allowing you to showcase both simple single loop setups and more complex multi-rope designs.
In addition to 3D printing, you will need a rope and a steel rod.
Do you know anything about vector addition, Newton's laws, gear ratios, balancing torque or pendulum frequency? No, we are too.
That's why you should print this awesome set - you or your kids can learn some of the most fundamental laws of physics from the comfort of your own home. If you buy some magnets (as the developer recommends), you can attach the pieces to a dry erase board or even something like a refrigerator.
LEGO is a truly amazing invention. Obviously this can give kids hours of fun (and adults hours of frustration) but it can also help you better manage your time better manage your time or keep your technical organization
For all its benefits, it has some disadvantages - especially if you are going to use it for its original purpose, which is to create stuff.
One of these annoyances is the types of bricks available. Have you ever created a wonderful sculpture, only to be ripped off because the company didn't make the exact type of brick you need to complete your masterpiece?
Now your own kids won't have that problem - this printable allows you to create your own LEGO bricks that will fit into the official pieces.