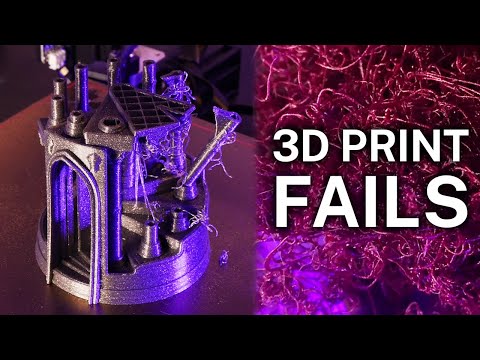
3D print failures
Major 3D Print Failures | Types, Causes, & Their Solutions
When starting with something fresh we are unaware of the failures we will face. A similar thing is true with 3D printing also, as we indulge ourselves more and more in 3D printing at some point in time we will face some common 3D print failures. 3D print failures are common at the initial stages of printing. There are multiple printing failures, like uneven printing beds, incorrect settings, or unusable prints.
What are the most common types of 3D print failures? Some of the most common 3D print failures are bed-adhesion, under extrusion, over extrusion, stringing, and overheating. There are many other 3D print failures that are pretty common but these 5 are the ones that affect our prints the most.
Therefore, we are here to provide you with the causes and best solutions to every 3D printing issue you could experience. A detailed explanation of the subject with its tips and fixes is discussed below. Let’s save you from long hours of frustration. Here, give it a read.
In The Post:-
- Dimensional Inaccuracy
- Under Extrusion
- Over Extrusion
- Stringing & Oozing
- Overheating
- Layer Shifting
- Clogging Of Extruder
- Warping
- Poor Bridging
- Bed Adhesion Failure
- FAQ on Print Failures
- Conclusion
Major 3D Print Failures 01/10
Dimensional Inaccuracy
If you are creating large assemblies or parts that need to precisely fit together, their dimensional accuracy is important. A standard accuracy of the printing methods helps in finding the common reasons behind print failures.
Accuracy varies depending on which material you use to print, and the mechanical properties of those materials.
| Causes | Solutions |
|---|---|
| Dimensional error | Precise dimensional settings and calibration |
Note: Red-colored headings are causes of Failure and green-colored headings are Solutions.
– Dimensional Error
If you notice that the dimensional error tends to extend as you print larger parts, then there’s a special setting you’ll adjust. for instance, if your print was 0.1mm too small for a 20mm wide part, but increased to 0.5mm too small for a 100mm wide print, then it’s likely the matter could also be thanks to thermal contraction. this will be a standard issue for top-temperature materials like ABS since plastic tends to shrink because it cools.
– Precise Dimensional Settings & Calibration
Make sure to precisely offset the edges of your prints. Like, setting the worth to -0.1mm will shrink your model by 0.1mm in the X and Y directions. It works best when the dimensional error is consistent, even when printing models of various sizes. If the part is always 0.1mm too large, regardless of the size of the model, this setting easily accounts for the difference.
Dimensional Inassuracy Example (Correct Dimension 20mm)You can see our blog on Dimension calibration prints settings and download calibration cube for FREE
XYZ Calibration CubeMajor 3D Print Failures 02/10
Under-Extrusion
The 3D printer does not actually provide any observations about how much plastic actually leaves the nozzle, the software may not expect this much less plastic exiting the nozzle, which is also known as under-extrusion. Certain gaps start to appear between adjoining extrusions of each layer.
The best one can do is test whether or not the printer extrudes enough plastic to print a simple 20mm tall cube with at least two perimeter outlines. Check at the highest of the cube, to ascertain if the three perimeters are strongly bonded together or not. you’ll be under-extruding if there are gaps in between.
| Causes | Solutions |
|---|---|
| Inadequate filament diameter | Correct filament diameter. |
| Speed too high | Lower the speed. |
– Inadequate Filament Diameter
A wider filament has more friction in the Bowden tube and in the Teflon insulator. It may cause a bad impact on the quality of the filament, and will have more problems, more failed prints
– Speed Too High
The faster you do it, the sooner it will finish. Well, that’s wrong. People often increase the print speed to have it finish soon. This is also one of the causes of under extrusion.
– Correct Filament Diameter
The accurate values of the filament diameter should be 1.75mm and 2.85mm. Many packages do have the correct diameter settings on their plastics too.
– Lower The Speed
A good quality print takes 20mm/s and 50mm/s. If quality is not an issue for you, then increase the speed to 80mm/s or pay more attention.
Under Extrusion can be seen as gaps between layers.Major 3D Print Failures 03/10
Over-Extrusion
In order to achieve good quality prints, the software should constantly work in order to make sure that the nozzle is extruding the correct amount of plastic. Many a time, most 3D printers have no way of monitoring how much plastic is extruded. This results in over-extrusion, which often ruins the outer dimensions of the parts.
| Causes | Solutions |
|---|---|
| Extrusion multiplier settings being off | Adjust your extrusion multiplier settings |
| Incorrect nozzle size | Determine the correct nozzle size.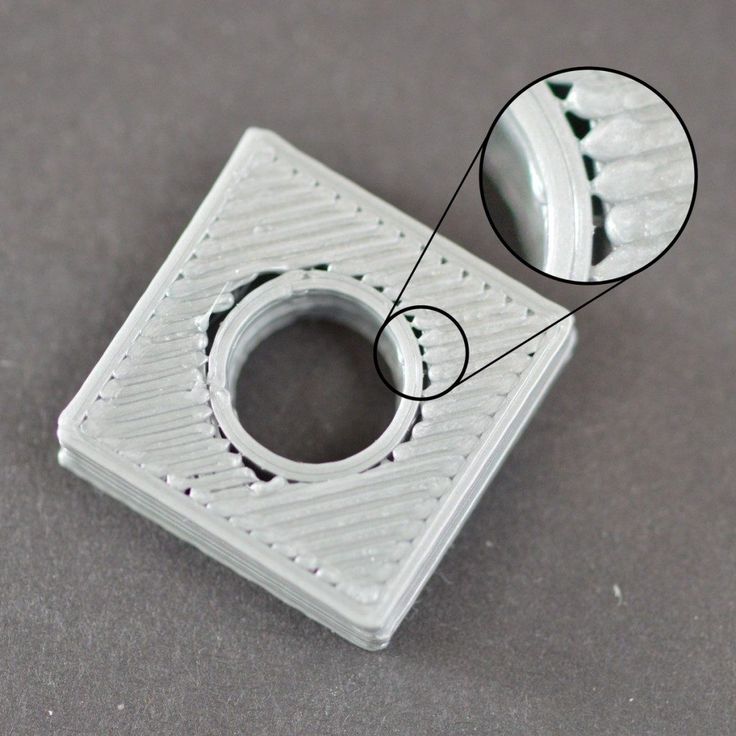 |
– Extrusion Multiplier Settings Being Off
Generally, in over-extrusion, an excess material extrudes than expected and thus leads to nozzle jams or stringing. An immediate need to lower the settings of the slicer software is needed.
– Incorrect Nozzle Size
Due to an incorrect nozzle size, it causes your parts to print with oozing blobs, droopy layers, and strings. Higher nozzle size may lead to any disastrous finish of your print.
– Adjust Your Extrusion Multiplier Settings
An extrusion multiplier controls the amount of filament coming out of the nozzle. If there are frequent nozzle jams or larger layers, you may say that it is due to the extrusion multiplier. The default settings in slicer software are 1, but you can adjust it anywhere between 0.9 and 1.1(depending on your filament type).
The values in the printer menu range from 90 to 100, but you can adjust the value as suits your need.
– Determine The Correct Nozzle Size
Nozzles are easily interchangeable. A size of 0.4mm is considered to be standard and ideal for most projects. You can also try smaller nozzles to help bring out more intricate details of your design without facing any extrusion.
Major 3D Print Failures 04/10
Stringing or Oozing
While printing, a number of the tiny strings of plastic are left behind on a 3D printed model. It happens when the plastic oozes out of the nozzle while the extruder moves to a new location. Such excessive stringing can be removed using a process known as, Retraction.
If retraction is enabled, when the extruder is completed printing one section of your model, the filament is going to be pulled back into the nozzle to act as a countermeasure against oozing. When it’s time to start printing again, the filament is going to be pushed back to the nozzle in order that plastic once more begins extruding from the tip.
| Causes | Solutions |
|---|---|
| Temperature too high | Adjust heat bed temperature |
| Movement speed | Adjust long free travels |
– Temperature Too High
In case of high temperature, the plastic inside the nozzle becomes less viscous and leaks out of the nozzle much more easily. And also affects the print quality.
– Movement Speed
When the extruder moves between two different locations, and at that move, the plastic starts to ooze out of the nozzle. The length of this movement affects how much oozing takes place. Long movements are far more likely to make strings.
– Adjust Heater Temperature
A lower temperature will stop the oozing but may affect the print quality. Just in case, you still encounter extrusion issues, even after the correct retraction settings, decrease your extruder temperature by 5-10 degrees.
– Adjust Long Free Travels
By finding the shortest route to the next deposition point or the travel movements, it can control any crossing of the open-source altogether. It also eliminates the possibility of creating strings.
Stringing or OozingMajor 3D Print Failures 05/10
Overheating
In order to maintain the exact dimensions of your 3D printed parts, a balance should be made between its heating and cooling, so that your plastic can flow freely through the nozzle. Sometimes, you may not achieve the balance, and see some kind of print quality issues where the exterior of your part is not as precise as you would like.
| Causes | Solutions |
|---|---|
| Insufficient cooling | Additional cooling measures. |
| Printing too fast | Adjust printing speed. |
– Insufficient Cooling
When the plastic does not cool down fast, the hot plastic freely changes its shape. It actually deforms the layers. The temperature may be about 250 degrees Celsius depending upon the type of filament.
– Printing Too Fast
Generally, there is less time for the layers to cool down sufficiently. Hence, the layers are printed too quickly, one after the other. It happens in small models, as the layers here get deposited in few seconds. The printing speed then gets delayed.
– Adjust Printing Speed
If you permit the software to regulate the printing speed for layers that take but 15 seconds to print, the program will automatically slow down the printing speed for these small layers. This is a vital feature for combating overheating issues.
– Additional Cooling
Additional cooling may help the plastic to retain its shape. A small handheld fan or an aftermarket fan can be installed or used to cool the layers faster.
Major 3D Print Failures 06/10
Layer Shifting
Most 3D printers use an open-loop system, which may be fancy thanks to saying that they need no feedback about the particular location of the tool head. The printer simply attempts to maneuver the tool head to a selected location and hopes that it gets there.
The stepper motors drive the printers quite powerfully, and there aren’t any significant loads to prevent the tool head from moving. The printer may be unable to detect the issue. The misalignment of layers in a print is usually due to the below-mentioned causes.
Each layer in an object of a 3D print works one layer at a time. The layers are printed on top of the previous layer, thus creating the desired 3D shape in the end. However, for the ultimate part to be strong and reliable, you would like to form sure that every layer adequately bonds to the layer below it. If the layers don’t bond together tolerably, the ultimate part may split or separate.
| Causes | Solutions |
|---|---|
| Toolhead moving too fast. | Control the speeds. |
| Mechanical or electrical issues. | Consult manufacturing company. |
– Toolhead Moving Too Fast
The higher speed of printing often makes the 3D printer struggle to keep up. A clicking sound is heard as soon as you attempt to move the printer faster. It fails to achieve the desired position.
– Mechanical Or Electrical Issues
Once in a while, the misalignment may continue, even after reducing the print speed. It is likely due to mechanical or electrical issues with the printer. The belts are typically made from a rubber material and reinforced with some sort of fiber to supply additional strength.
The belts stretch, and over time tend to lose. And, the belt may slip on top of the drive pulley, which means the pulley is rotating, but the belt is not moving. If the belt was originally installed too tight, this will also cause issues. There also are several other common electrical issues that will cause the motors to lose their position.
For instance, if there’s not enough electrical current going to the motors, they won’t have enough power to spin. It’s also possible that the motor driver electronics could overheat, which causes the motors to prevent spinning temporarily until the electronics calm down.
– Control The Speeds
The default printing speed controls the speed of any movements where the extruder is actively extruding plastic. The X/Y axis movement speed controls the speed of rapid movements where no plastic is being extruded.
If either of those speeds is too high, it can cause shifting to occur. If you’re comfortable adjusting more advanced settings, you’ll also want to believe in lowering the acceleration settings in your printer’s firmware to provide a more gradual speed up and hamper.
– Consult The Manufacturer
An overtightened belt can create excess friction within the bearings which will prevent the motors from spinning. Ideal assembly requires a belt that’s somewhat tight to stop slipping, but not too tight to where the system is unable to rotate.
Verify that your belts all have acceptable tension, and none appear to be too loose or too tight. If you think that there could also be a drag, please consult the printer manufacturer for instructions on the way to adjust the belt tension.
Layer Shift (Best Example)Major 3D Print Failures 07/10
Clogging means the blockage of the nozzle or extruder due to any of the given reasons i.e. over extrusion, moisture in the filament (See our guide on drying filament), Clogging due to unwanted particles, etc.
Here we are going to discuss nozzle-layer height and room temperature as the over extrusion has been already discussed and drying of filament is a separate article which you can access from the above link.
| Causes | Solutions |
|---|---|
| Incorrect nozzle height | Check layer height compared to the nozzle. |
| Incorrect room temperature | Use recommended room temperature settings. |
– Incorrect Nozzle Height
A larger nozzle height makes the print material travel a longer distance to reach the surface. This, in turn, makes it a cooler temperature and the material will likely have trouble adhering.
A very low nozzle height creates more undesirable things, like extruding. That results in smearing the thermoplastic all over the surface.
– Incorrect Room Temperature
A low temperature of the end of your print, will not melt your print material correctly. It adheres to the inside surface of the nozzle, resulting in the 3D printer being clogged.
Printing at a very high temperature causes heat creep. This mainly occurs when the temperature extends back and upwards from the hot end. This causes the “melt area” to increase father back also, softening and melting the print material well before the nozzle end of the extruder.
– Check The Layer Height Compared To Nozzle
Most 3D printing nozzles have a diameter between 0.3-0.5mm. However, these small nozzles may be a limitation for what layer heights can be used. The layer height should be 20% smaller than the nozzle diameter. This will allow the nozzle to take care of a small pressure to the highest of the extruded filament which will increase adhesion while avoiding retrograde extrusion.
– Recommended Temperature Settings
A temperature setting of 180 degrees Celsius for PLA and 225 degrees Celsius for ABS does well. Experiment with the fabric that you’re using and find the “sweet spot” that permits permanent adhesion and layering, but doesn’t cause problems like clogging.
When changing materials, make sure that the previous ones are completely removed and flushed through. Failure to do this causes a clogged nozzle.
Major 3D Print Failures 08/10
Warping
Warping is actually the deformation or curling of the print after the successful completion of one or two layers. This generally happens in larger models, with high-temperature materials such as ABS. The printing failure is so adverse, that may cause the entire model to either fall or separate from the bed.
| Causes | Solutions |
|---|---|
| Build plate adhesion | Lower plate temperature. |
| Build plate temperature post-print errors | Check bed level. |
– Build Plate Adhesion
At times the plastic print sticks to the build plate. In such cases, your prints curl, deform or potentially shift out of the surface.
– Build Plate Temperature
What actually happens is, that while printing very large or long parts with high-temperature materials, it tends to shrink almost 1.5% at room temperature. This may equate to several millimeters of shrinkage. As the print advances, the successive layers deform, leading the entire print to separate from the bed. This can be a challenging issue.
– Lower Plate Temperature
Materials like ABS have a set heated bed temperature of about 100-120 degrees Celsius, which will eventually reduce the amount of plastic shrinkage. Avoid any kind of cooling of the build plate. This is the main reason for the parts to shrink or warp.
– Always Check Your Bed Level
Calibrate the 3D printer bed so that it is leveled properly.
It is important to adhere the filament to the bed. Hence, make sure do not to stick too close to the build plate. Or the prints may rip off the previously printed parts. Keep your build surface clean, and never touch it with bare hands.
Warping in Upper LayerMajor 3D Print Failures 09/10
Poor Bridging
Bridging refers to a plastic that must be extruded from two points with no support below. Some larger bridges do have support structures, but short bridges are often typically printed with none. This supports saving tons of fabric and print time.
The plastic extrudes across the gap, then quickly cools to make a solid connection. The printer should be calibrated with the simplest settings for special segments. If you notice sagging, drooping, or gaps between the extruded segments, you’ll get to adjust your settings for the simplest results.
| Causes | Solutions |
|---|---|
| High temperature | Decrease temperature |
| Flow rates | Adjust flow-rates. |
– High Temperature
The high temperatures heat the filaments (making them too liquid) that tend to sag. In turn, it solidifies as there is less time to cool.
– Flow Rates
A very high flow rate does not have enough time to harden. The large masses of filament solidifies slower and have more time to be deformed by gravitation. High flow rates result in over-extrusion. It is a printing defect that not only destroys our bridges but also the rest of the object’s surface.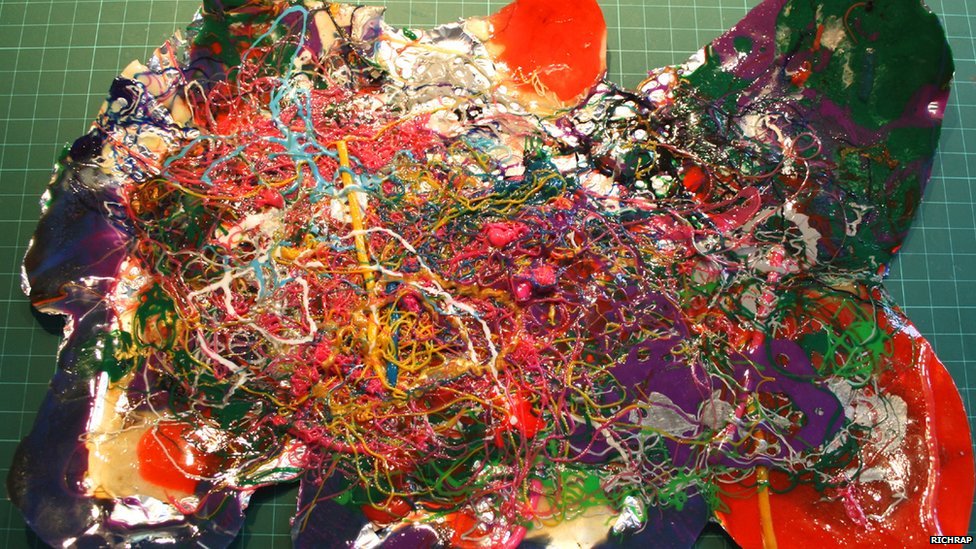 A very low flow rate leads to under-extrusion.
– Decrease Temperature
When printing buildings and overhangs, set the printing temperature as low as possible. Do not reduce the temperature too much, as it may lead to under extrusion. It generally depends on the type of filament you are using. The recommended range of temperatures are :
PLA (180-200 °C), ABS (210-230 °C), PETG (220-230 °C), Nylon (220-240°C), TPU (230-240 °C), PC (265-280 °C).
– Adjust Flow Rate
So the right balance is vital to urge an honest bridging behavior and avoid other extrusion problems. The best approach is to test the values step by step yourself as it is quite different for different 3D printers.
Major 3D Print Failures 10/10
Bed Adhesion Failure
It is recommended that your first layer should always connect to the printer’s build platform so that the substructure can be built strongly on this base. Your print may not stick on the build plate at the very first, which can create problems later on.
| Causes | Solutions |
|---|---|
| Incorrect printing speed | Reduce the printing speed for the primary layer |
| Poor Temperature Settings | Modify incorrect temperature and cooling settings |
– Incorrect Printing Speed
The print speed affects the layer adhesions. Faster the speed, lower the bed adhesion. If the printing speeds are high, there occurs some kind of struggle to position the printhead at the right place at the right time. Your material may not settle at the desired location and layer shifting may occur. Thus, failing the print.
– Poor Temperature Settings
Plastics shrink to a cooler temperature. The temperature and cooling settings are to be blamed for this reason. Say, for example, a 100mm wide part is being printed with ABS plastic. It is very likely to happen that the plastic may cool down quickly after leaving the hot nozzle if the extruder was printing it at a 230 degree Celsius temperature.
The ABS part may cool down to a room temperature of 30 degrees Celsius, and the 100mm part would shrink by almost 1.5mm. Because of this, the plastic may fall off and separate from the build platform as it cools. Hence, the temperature and cooling settings are to be condemned.
– Reduce The Printing Speed For The Primary Layer
It is considered best that your first build print layer should adhere properly. Heat your filaments at a consistently high temperature and in a sufficient quantity. Calculate your layer height and store the appropriate setting options for layer height and print speeds in the slicer.
– Modify Incorrect Temperature And Cooling Settings
Inaccurate temperature settings lead to poor adhesion of the print object to the build plate without any other sources of error. Temperature ranging from 200-250 (for ABS ), 220-245 (for PETG), and 180-230 (for PLA ) are some of the good recommendations. It improves the adhesion conditions on the build plate.
FAQ on Major 3D Printing Failures
How to solve bed adhesion print failure?
Bed adhesion problem mainly occurs due to overheating of the print bed. On should do bedplate temperature adjustment before printing by testing it for a range of values on a test print.
What are the 3 most common 3D print failures?
The 3 most common 3D print failures are under/over-extrusion, oozing, and calibration error.
How to fix calibration errors beforehand?
Calibration error is the most common reason for 3D print failures and it is very easy to fix them. You can use our calibration cube for adjusting your 3D printer’s dimensions.
ConclusionWe hope that the above guide was helpful to you and may save you from the catastrophes of 3D printing. If you have any doubt please use the comment box, and also share this with your friends to save them from headaches.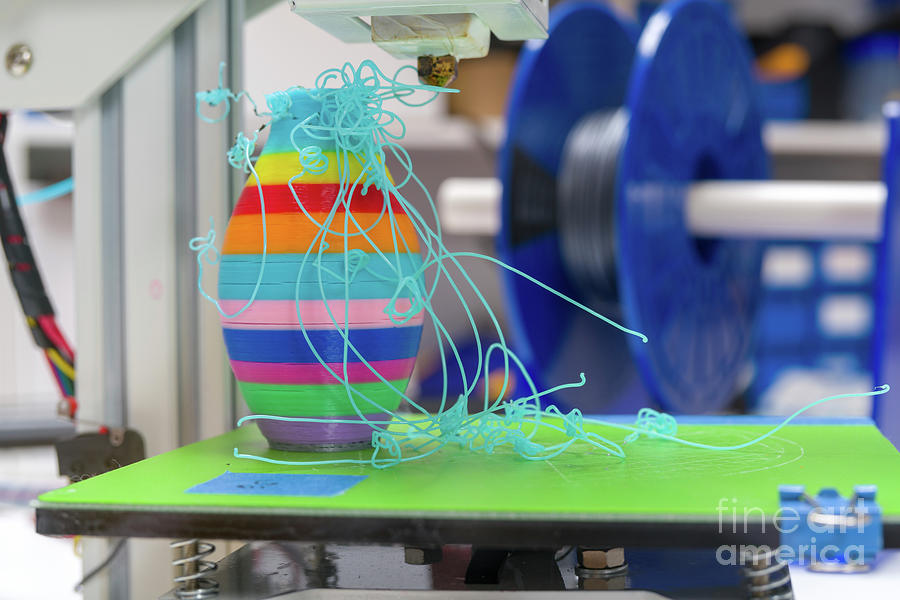
Do not forget to mention your experiences in the comment section below.
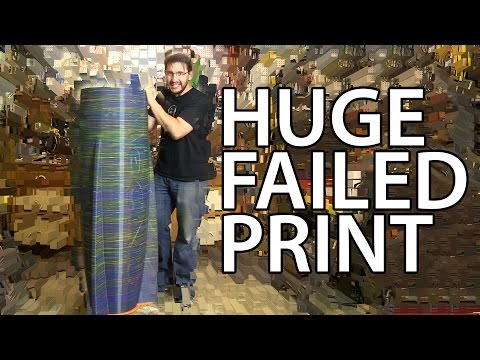
Epic 3D Printing Failures 2022
3D printing is gaining momentum thanks to the wide availability of 3D printers for any pocket. Still, newbies and even experienced hobbyists sometimes run into epic 3D printer fails.
Gambody has compiled a list of failed 3D print results that can motivate you to never give up. Learn why your 3D prints keep failing and fix the problem to create fantastic, highly detailed, and smooth 3D prints.
3D Printer Fails
If, until recently, 3D printing was an activity that few could afford, it is now being used by people with various professional backgrounds. This is mostly due to the increased coverage it receives from online mass media outlets and big companies that specialize in 3D printing.
Additive manufacturing is still relatively new so people are curious to learn how to handle it and what can one do once it gets to the grips. But before that, you might mess up and experience unpleasant 3D printer fails.
However, don’t despair. You are not alone in your ‘misery’. Many have messed up before you as well, and their failed 3D prints can help you learn the lesson virtually and avoid the practical mistakes made by you.
Read also: Best Online 3D Printing Service for Hobbyists 2022
Why do my 3D prints keep failing?
3D print failures happen all the time. There are different factors to consider when someone asks, “Why do my 3D prints keep failing?”
Here are the most common reasons for failed 3D prints:
- Your 3D printer settings;
- Incorrect bed leveling;
- Wrong build material for the 3D model;
- Ignoring the 3D printer specs, and much more.
Every beginner and advanced user who doesn’t want to end up with a failed 3D print should keep in mind several things before turning on their 3D printer.
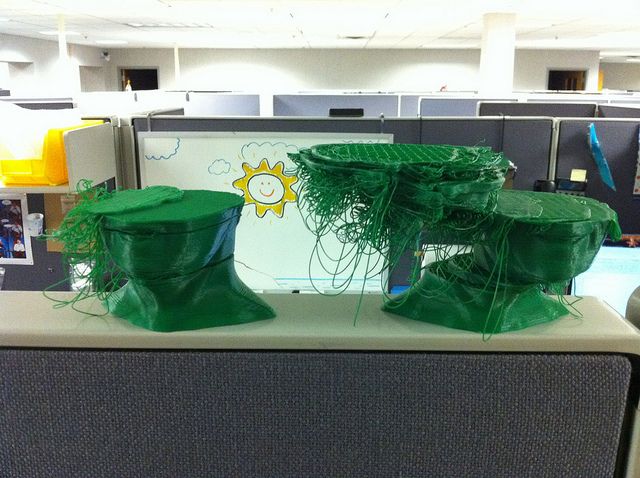
We’ve rummaged through the Internet and found over 20 photos of the funniest and awkward 3D printer fails that you can see below. Take a moment to scroll down and see all of them.
Filament 3D Print Fails
FDM 3D printer fans know the role of filament, which should be of high quality and installed correctly to prevent 3D printing fails.
There can be numerous reasons for catastrophic 3D printer fails because of poor quality filament or incorrect hanging of the spool. See photos below of the destruction caused to 3D prints by the filament issues.
3D Print Fails Halfway
Sometimes your 3D printer fails when you are half done with your 3D printing project. Why can it happen?
The project can require more than one spool of filament. Thus you might have to do the mid-print filament swap and screw up. It is how your 3D print fails halfway, and you share photos of your disaster with your friends.
Image: PinterestWhen you know that you will have to switch filament in the middle of your print, it is best to adjust the settings of your slicer and point to the layer when such a switch is necessary. Using Cura settings or other slicer options, it is simple to follow your printing process and see what layer is being made right now.
Having full control over your 3D printer settings will minimize errors. But it could still be possible that your 3D print fails halfway because of filament run-out or other printer issues.
3D Print Fail During Filament Switch
When you are working on a big or multicolor 3D print you might need to switch filament right in the middle of your project. And if you are not patient enough or make a mistake while manually changing your spool, your 3D print fails halfway and ruins all the fun.
Learn how you can 3D print with two colors using a one-extrusion printer. And see images of 3D printer fails shared by people who either tried to switch colors and failed or who ran out of filament amid their print and unsuccessfully tried to install a new spool.
On your end, you should be very attentive when switching filament. If you are playing with colors to create pretty layers, be sure to switch at the right time. You can use your clock alarm and pause your 3D printer at the same time for each layer. Then switch the 3D printing material and keep printing until you create the desired effect.
Failed 3D Prints: Other Reasons
The filament is not the only thing that can cause problems and lead to failed 3D prints. There can be other issues to consider when you wish to never see how your 3D printer fails and upsets you.
Image: CunicodeExplosions
If you search YouTube for 3D printer fails, you will see many videos with 3D printer accidents and even explosions. And though 3D printers don’t easily explode, you still should learn more about 3D printers on fire and the way to protect them.
Screenshot from a YouTube video by rwg42985One YouTube user by the nickname of rwg42985 showed a video with an exploded spool that caused 3D printing failures. Such things don’t happen every day, but you should be aware of situations when re-spooling your filament can cause real danger to your project and printer.
It is a must to learn how to store filament because when 3D printing material is stored in a room with incorrect humidity, it can easily cause 3D print fails. Ensure your filament is always dry before you begin working on a new project.
Failed Connectors
A failed 3D print can be the result of connectors failing to work correctly. Usually, when you are using an FDM 3D printer with filament, there is a push-fit connector that keeps feeding the plastic 3D printing material into the special PTFE tube.
The printing failures don’t occur when the extruder motor feeds the 3D printing material correctly. But if something goes wrong and connectors stop working, the motor is not doing its job correctly and the filament is not getting into the hot end smoothly.
If you wonder, “Why do my 3D prints keep failing?” and connector cause this issue, you should get a more expensive and high-quality connector that will keep doing its job correctly and won’t lead to a failed 3D print ever again.
Heat Block Issues
Another thing that can happen to a 3D printer running unattended is your hot heater getting loose. If it happens while your device is building your new model, you can expect a 3D printing failure.
Only look at the photo shared by Reddit user OpusMcn who was hoping to do some prints overnight. Something went wrong with the 3D printer, and the hot end heater got loose leading to a heating element falling onto the 3D print.
Image credit: Reddit user OpusMcnIt is great if you use thermal protection to prevent any runaway issues on top of securing the heating block well. Your 3D printer should stop powering your hot end heater if it falls. Otherwise, there are possibilities of fire that could burn your room or house completely.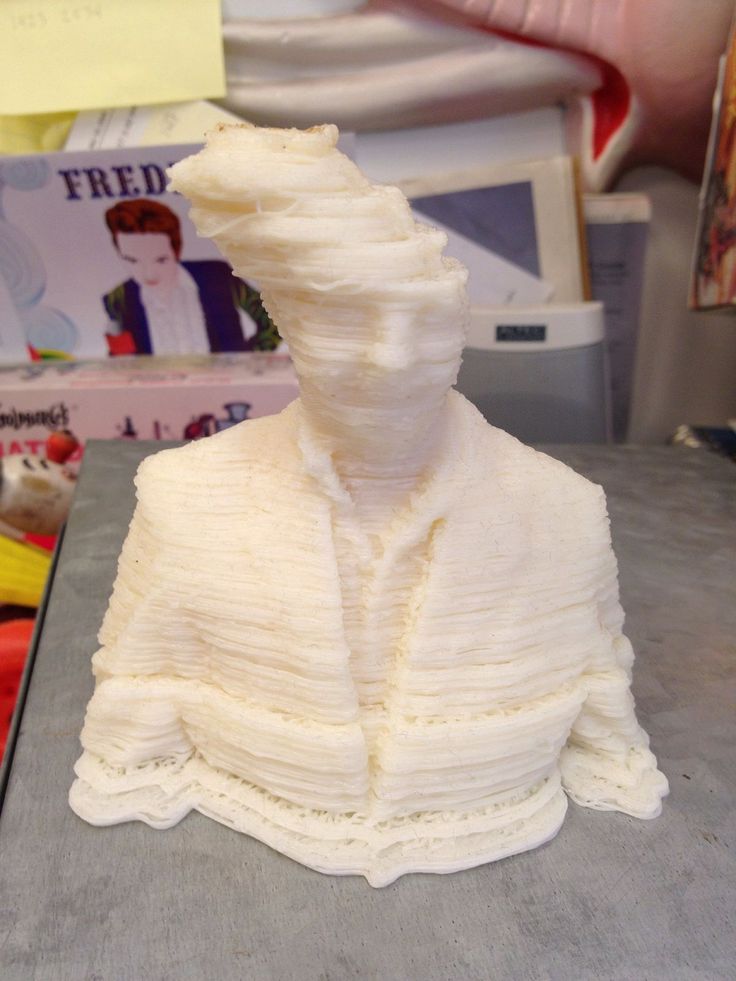
Z-axis, X-axis Fail
Until your 3D printer fails, you will enjoy watching the Z-axis and X-axis working hard to help you turn a 3D printing model into a physical figurine. However, people like Chris Cecil who once faced an unpleasant failed 3D print know that things don’t always go as planned.
Image credit: Chris CecilHis machine chose to jump from the table and whatever it was trying to build became a failed 3D print. Thus, it could be a great idea for you to either secure your 3D printing machine to avoid similar problems or use it on the wide and long table.
Failed Calibration
Sometimes, you can have problems with your 3D printer that repeat every once in a while. Chris Templeman who was making thousands of roosters for a holiday in 2017 experienced many 3D printing failures.
To make the art exhibit called “Make and Take” real, the artist went through the most epic 3D printer fails until he succeeded. And now you can learn how to save your plastic and not waste big amounts of it.
Just stay near your machine and don’t leave it unattended for hours and nights. It is your best way to prevent anything like this 3D printing rooster disaster.
Read also: Best 3D Printing Websites with Free 3D Print Models 2022
3D Resin Print Fails Halfway
Not only FDM printers lead to a failed 3D print. Users who prefer to build 3D printing models in the resin can also get some unpleasant moments that must be fixed.
If you ever see your failed print stuck to your FEP sheet, there is a video that can help you to get it off your resin 3D printer. Thanks to YouTube user Dylan Kowalski, you can now fix the problem if a 3D resin print fails halfway or at the very beginning of your project.
Bed Adhesion Fail
When Reddit user Cheetawolf tries printing PETG on the Creality Ender 3 machine and chooses a 240C temperature setting for PETG plus 70C temperature for PEI sheet, his 3D printer fails to provide a good result. It happens so often that out of 10 attempts about 7 are 3D printing failures.
Is it poor bed adhesion? It is hard to say because some users cannot print PETG well and also end up with various issues.
So, if you wish to work with PETG, search for good advice from users who own the very same printer brand and already tested the material and learned to achieve good results.
Image credit: Chris CecilMore 3D Printing Failures
There are many other 3D printer fails worth looking at. Gambody has gathered many photos of catastrophes some 3D printing enthusiasts experienced.
Image: fakerbots.com Image: fakerbots.com Image credit: Flickr Image: Fred Kahl Photo: Trammel Hudson Picture: Flickr Image: fakerbots.com Photo: Pinterest Image: Pinterest Photo: Pinterest Picture: Chris Cecil Photo: Chris Cecil Photo: Tumblr Picture: Tumblr Photo: Tumblr Image: WatzIf you have 3D printer fails of your own, do share them in the comments below. We’re all eagerly waiting to see some epic stuff. And although your machine cannot apologize for failing you, there is Gambody 3D Printing Community on Facebook that can always support you and share some stunning tips and advice.
(Visited 4,399 times, 1 visits today)
Author
A 3D printing website where users can buy and sell 3D printer files.
Some problems in 3D printing and how to solve them
3D printing is an interesting, but complex and rather lengthy process. But when printing, various failures and emergency situations often occur.
Below we will list the most common 3D printing problems we have encountered, explain the causes and try to draw conclusions on how to avoid them.
The most common problem with 3D printing is, of course, the plastic coming off the table. We will not even consider it, since any 3D printer knows that a high-quality printed first layer is the key to the success of 3D printing, but the secrets in the form of rugs, glue and other means are mentioned many times on the portal.
Slightly less often, but quite regularly, there are errors in reading data from the memory card. Even on super expensive cards, this problem can appear suddenly. Blockages of extruder elements are also not uncommon.
1. Printed with ABS plastic, remember that it shrinks when it cools down and is therefore very sensitive to sudden temperature drops. If you open a window during printing, it will cause a cold air flow, that is, a draft. ABS plastic will immediately shrink and crack in layers. The photo shows that several layers simply did not sinter together, but the printer continued printing.
2. Sometimes 3D printing takes many hours, a lot of plastic is consumed, and when the model is half printed, the printer freezes for a short time at one point.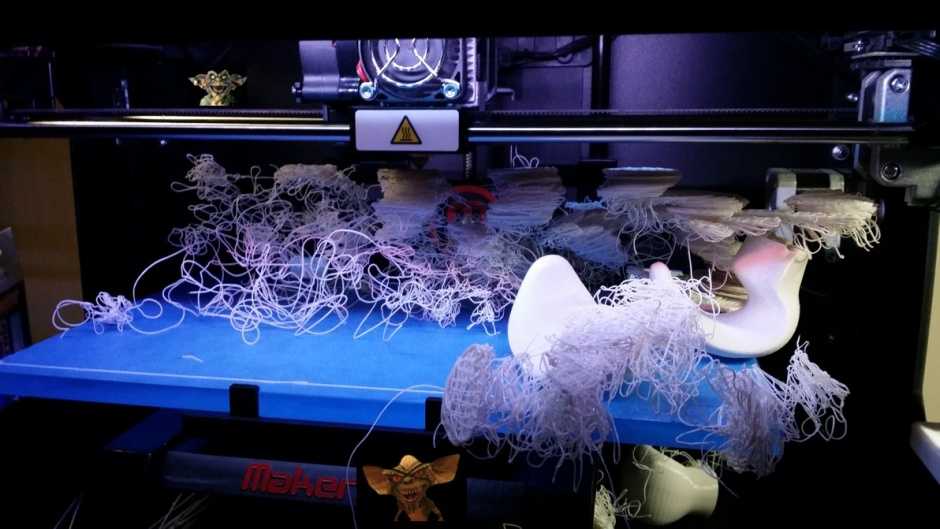 In this place, carbon deposits appear with plastic fusing, which the extruder will cling to in the future, and this will interfere with normal printing. The model may flake. If this happens, do not restart printing using the same file on the same memory card. If the problem is related to an error in reading the memory card, and this happens not infrequently, then the same problem in the same place may repeat.
3. When printing with some fairly fluid plastics, if you mistakenly set the wrong temperature setting, you may encounter hairs ("cobweb" or "hairy print"). Of course, the temperature is not the only reason, it is quite possible that the extrusion parameters are set incorrectly, for example, the retract (pull) is set incorrectly or the retract speed. In this case, you must first increase the retraction by 1 mm, and then change the speed (up or down) and see the result. If hairs appear when moving the nozzle over large open distances and the program was unable to optimize the trajectory for the shortest one, find the Advanced settings and set the parameter to Avoid crossing outline for travel movement, i. e. “avoid going beyond the boundaries of the contour when moving.
4. But don't go overboard with the retract either. If, when printing, for example, with PLA plastic, the printer makes frequent or large rollbacks of hot plastic back, a plug may form in the Teflon tube and the plastic will begin to get stuck in the tube, and then pushing pieces of defective plastic into the nozzle will clog it. Reducing the recoil length by 1-2 millimeters will allow you to print without plastic jamming, but the result may be a “hairy print”. Therefore, here you need to find some optimal solution.
If the extruder is very clogged and the plastic supply has completely stopped, clean the heated nozzle with a needle. But do not forget that the blockage most likely began with a Teflon tube, so we recommend replacing the tube.
5. To print a large model, the working day may not be enough, in some cases it is required to print a day or more. And during the printing process, the supports of some part of the model may come off and this part may move. According to the laws of the genre, this usually happens at night, when no one is in control. Here you can only advise either to monitor the process around the clock and stop printing in case of failure, or to pause the printer when it is impossible to control and resume printing the next day.
Usually, the slicer accurately calculates the amount of resin needed, but it may happen that at the final stage of 3D printing, the resin runs out in the bath. Some 5-10 grams may not be enough. It is very sad when this happens and the marriage turned out. In this case, it can be recommended to add liquid plastic to the bath before leaving the printer alone. It is better to drain the excess back into the bottle than not to print a few millimeters.
Whatever problem arises in 3D printing, the main thing is to recognize it and, if possible, eliminate it, preventing this from happening in the future.
Anycubic photopolymer resins - safe printing with Eco plastics
Elegoo Mars 3D printer - the most budget photopolymer with a 5. 5" matrix with a resolution of 2560x1440
3D printer 3D Artel Zobu - high positioning accuracy at a budget price
3D printer Wanha7o for home and professional use
Wanhao Duplicator 6 Plus MARK II - with an extruder capable of printing up to 300C
The Anycubic Photon S 3D printer is the choice of dentists and jewelers. Now also in black!
Anycubic Photon 3D Printer - Budget Anicubic
Wanhao Duplicator 8 3D Printer - Size Matters!
Wanhao Duplicator i3 mini - the cheapest printer that prints PLA plastic right out of the box
Anycubic 4Max Pro (FORMAX) - safe printing with any type of plastic PLA, ABS, HIPS, TPU, Wood
10 3D PRINT FAULTS - voltNik
Previous Next
Hello friends, 3D printing is a complex and lengthy process. Therefore, when printing, of course, there are various abnormal situations and failures. I present to you a dozen of my fails and errors that arose and got on camera while recording reviews.
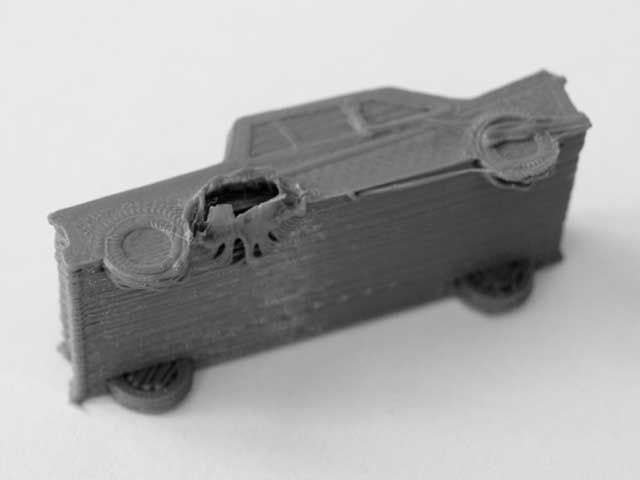
- LEGO Ship: The model was printed with ABS plastic, which shrinks when cooled and is therefore sensitive to sudden temperature drops. During printing, a balcony was opened in the apartment, which caused a strong draft from the cold air, the plastic immediately gave a strong shrinkage and cracked in layers. The model shows that several layers simply did not sinter together, but the printer continued and completed printing. A draft arose during the printing of the mounting bubbles and they turned out to be deformed from above and not suitable, so the boat is safely sent to the scrap, but we continue.
- Ball track: This print was also made with ABS plastic and lasted many hours. Consumption was 300 grams. When the track was already printed by two thirds, the printer hung for a short time at one point, in this place carbon deposits appeared with plastic fusing, which the extruder later began to cling to and this interfered with normal movement.
 The laying was immediately broken and the model was stratified. "Bullshit" - I thought, and restarted printing using the same file on the memory card. But after many hours I got the same problem again in the same place, carbon deposits and plastic fusing. Most likely, the problem is related to an error in reading the memory card. the third time I managed to print the track without problems, but from a new file.
 - Stormtrooper from Star Wars: During the first printing, the outline printing checkbox was mistakenly set in the slicer and it was carried out by laying plastic in one layer - of course, it turned out to be horrible. I removed the checkbox and launched three attack aircraft for printing at once. Printing was carried out with ABS plastic, the wrong temperature was selected, a lot of snot appeared, there was a strong shrinkage of the plastic and the print turned out to be of poor quality at all, mistakenly assumed that in the end the nozzle was partially clogged, blocking the normal supply of plastic.
 Having corrected the settings, I started printing the attack aircraft for the third time, but even here there was a delamination from the side of the legs, and then when printing small fast layers, the plastic ceased to fit normally and began to crack. As a result, we have a set of problems: high temperature of the extruder, insufficient one-sided blowing, high print speed and small size of the model itself. As a result, this did not allow me to print a stormtrooper with this plastic.
 - Eiffel Tower: I printed this tower several times with PLA plastic. As you can see, the model has multiple braces, when printing, the printer makes frequent plastic rollbacks on them, it turned out that due to the large number of hot plastic rollbacks, a cork formed in the Teflon tube and the plastic got stuck. By reducing the rollback length from 6 to 4 millimeters, I managed to print the model normally, but as a result, multiple snot appeared.
- Fire truck: This model is part of a set in an egg.
 During printing, the extruder became very clogged, and the plastic supply completely stopped. I cleaned the nozzle with a needle and the model was successfully printed again from the same file.
 - Action camera mount: Printed both times with ABS plastic. When printing a yellow fixture, the model partially came off the table, then, when the model came off more strongly, the extruder hit the plastic and knocked down the printed model. I started printing again with black ABS, but even then I failed. There was a momentary power failure, the light in the apartment blinked, and the printer just stopped at one point. But on the third try, I got a simple and high-quality camera mount.
- Screw case: When printing this model, the flash card reading failed and the printer freezes at one point, and strange characters are displayed on the bottom line of the screen. The extruder remained in a working heated state. At the same time, pressing the encoder set the Z-axis motor in motion.
 The hot nozzle went down and I had to quickly turn off the power to the printer. Turned on the power again and raised the extruder up. The model turned out to be melted in the place where the nozzle entered it. A second restart almost immediately led to detachment, and the third time I also failed - the model came off again although I used glue.
 - Screw can: Printed in new beautiful yellow PETG plastic, the model consists of a lid and the can itself. When the lid was printed and only one can was printed, the extruder was partially clogged and the plastic stopped fusing normally on the model. The extruder motor appears to scroll clicks, it cannot freely push the plastic further. The nozzle was cleaned without replacement using a special thin needle.
- Hulk: This is a beautiful and large model, it was printed almost a day. In the process, the supports of one of the hands came off the table, and it moved. It happened at night, so the printing continued.
 Further, the hand generally fell, but due to the fact that this did not happen immediately, the structure of the hand was restored. Since the printing was carried out with low-melting PLA plastic, heating it with a hairdryer, I managed to attach my hand back without any problems and with almost no consequences.
 - Beetle (model made to order, not yet published): This model is hollow and printed on a resin printer. The whole printing takes 6 hours and almost at the final stage the resin ran out in the bath, it happened at night, literally 5 or 10 grams were missing. marriage turned out, and resin is expensive. The beetle itself is certainly handsome, so he will experiment with painting from an airbrush.
I want to say that these printing failures are not related to the printer model or errors in its firmware, it does not matter how expensive or cheap the printer printed, or what plastic was used. Failures occur for various reasons: sticking, an error in reading data from the card, or blockages in the extruder.