Iiip 3d printer manual
MONOPRICE MAKER SELECT PLUS IIIP USER MANUAL Pdf Download
Table Of Contents
2-
page of 38
- Contents
- Table of Contents
- Troubleshooting
- Bookmarks
Advertisement
Table of Contents
Table of Contents
Safety Warnings and Guidelines
Introduction
Features
Customer Service
Package Contents
Product Overview
Front View
Rear View
Bed Assembly
Front and Rear Panels
Using the Menu System
Main Menu
System Menu (Main > System)
PID Menu (Main > System > PID)
Motor Menu (Main > System Motor)
Tools Menu (Main > Tools)
Preheat Menu (Main > Tools > Preheat)
Move Menu (Main > Tools > Move)
Print Menu (Main > Print)
Status Menu (Main > Print > Status)
Settings Menu (Main > Print > Status > Settings)
- Unpacking, Assembly, and Setup
Fine Tuning Platform Height
Maintenance
Nozzle Cleaning
Lubricating the Z-Axis
Lubricating the X and y Axes
Motor Connections
Print Mat
Installing Cura
Manual Cura Setup
Creating a Gcode File
Technical Support
Troubleshooting
Specifications
Regulatory Compliance
Notice for FCC
Notice for Industry Canada
EU Conformity with Applicable Directives
Table of Contents
Previous Page
Next Page
Table of Contents
Related Manuals for Monoprice Maker Select Plus IIIP
- 3D Printers Monoprice Select Mini Pro User Manual
(24 pages)
- 3D Printers Monoprice maker architect 13861 User Manual
(32 pages)
- 3D Printers Monoprice 33820 User Manual
Mp voxel 3d printer (42 pages)
- 3D Printers Monoprice MP Education Guider II User Manual
(57 pages)
- 3D Printers Monoprice 30526 User Manual
Mp education invertor 3d printer (67 pages)
- 3D Printers Monoprice extrusion i3 13860 User Manual
(50 pages)
- 3D Printers Monoprice 21711 User Manual
Select mini 3d printer v2 (21 pages)
- 3D Printers Monoprice Maker Ultimate 2 User Manual
(43 pages)
- 3D Printers Monoprice Mini Delta V2 User Manual
(58 pages)
- 3D Printers Monoprice 30994 User Manual
Mini deluxe sla lcd high resolution resin 3d printer (29 pages)
- 3D Printers Monoprice 21824 User Manual
Mp cadet lcd resin printer (34 pages)
- 3D Printers Monoprice MP Delta Pro User Manual
(21 pages)
- 3D Printers Monoprice MP Mini SLA LCD Getting Started Manual
(2 pages)
- 3D Printers Monoprice MP Cadet User Manual
(39 pages)
Summary of Contents for Monoprice Maker Select Plus IIIP
This manual is also suitable for:
157112187124165
MONOPRICE 3D Printer User Guide
MONOPRICE 3D Printer User Guide
- Remove the Printer and Accessory Box from the packaging.
- Open the Accessory Box and verify that you have all the parts listed below:
1x Platform Sticker, 1x 1.5mm Hex Wrench, 1x 2.0mm Hex Wrench
1x 2.5mm Hex Wrench, 1x Phillips Screwdriver, 1x 8mm Wrench
1x M6 Brass Nozzle, 1x MicroSD™ Card, 1x MicroSD Card Reader
1x USB Cable, 1x AC Power Adapter, 1x AC Power Cord
1x Stick of Glue, 1x Package Sample Filament (200g), 1x Quick Start Guide - Remove the eggshell carton and plastic bag from the printer, then place the printer on a table or desk.
- Remove the cardboard block from inside the printer.
- Insert the Filament Guide Tube into the black Pneumatic Connector on top of the Extruder.
- Ensure that the power switch on the inline control on the AC Power Adapter is in the OFF position (O). Plug the DC barrel connector on the AC Power Adapter into the Power Port on the right side of the printer.
 Plug the included AC Power Cord into the AC Power Adapter, then plug the other end into a nearby AC power outlet.
 - Flip the power switch on the inline control to the ON position (I). After the printer finishes booting, you will see the following wizard. Depress the Knob on top of the printer to select Next on the Welcome Screen, then again to select Next on the STEP 1: LOAD FILAMENT Screen.
- Using a pair of scissors or side cutters, cut about an inch off the end of the filament, then gently straighten the end of the filament. Squeeze the lever on the Extruder, insert the filament into the bottom until you encounter resistance, then release the lever.
- Press the Knob to start loading filament. Once filament starts extruding from the Nozzle, press the Knob again to stop extrusion.
 Clean the extruded filament, then press the Knob to select the Continue option.
 - Remove the included microSD™ card from the Accessory Box, then insert it into the microSD card slot to the left of the LCD Screen. Press the Knob to select Next on the wizard.
- Press the Knob to select Print From SD. Rotate the Knob to highlight a .gcode file on the microSD card, then press the Knob to begin printing the highlighted model.
- Once the print is finished, remove the Magnetic Print Bed from the metal print platform, then bend it to remove the model. Replace the Magnetic Print Bed on the metal print platform.
Use the QR code at the right to download the manual or go to the website to download it from the product page (40108).
Documents / Resources
| MONOPRICE 3D Printer [pdf] User Guide 3D Printer, PN 40108 | |
| MONOPRICE 3D Printer [pdf] Instructions MONOPRICE, 3D Printer |
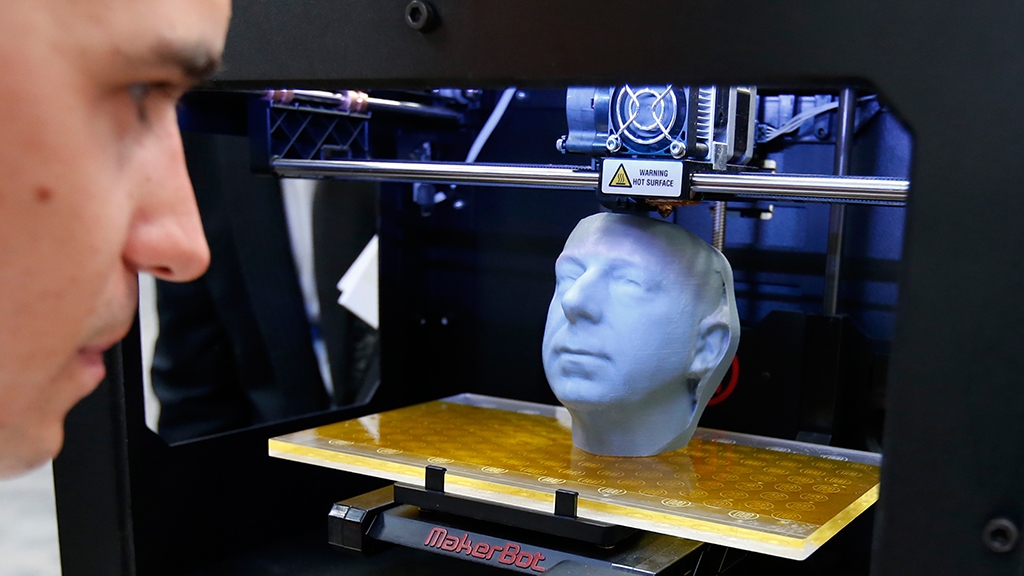
How to work with a 3D printer: explaining the basic principle
How to work with a 3D printer: features
When buying a new functional device, the first thing that comes up is a completely logical question - "How to work with it?". 3D printers are no exception in this case, especially if the user has not previously had to deal with 3D printing devices. Of course, no one has canceled the instruction manual, and you should definitely read it. But in today's article, we want to briefly talk about how to work with a 3D printer and highlight the main points of operation, without going into the specifics of specific models. These rules apply to desktop FDM 3D printers and apply to all standard printers in this class.
Our advice will be useful for both novice users of 3D printers and those wishing to purchase this device in the future. For general development, the article will be useful to everyone who is interested in three-dimensional technologies and the principle of operation of hardware for 3D printing. And for those who have just purchased their own rapid prototyping device, we recommend that you familiarize yourself with the rules for faster mastering of a new device and in order to avoid problems when launching an object for printing. So, let's get down to business.
Preparing the 3D printer for operation
First of all, you should make sure that the 3D printer is working. What to check:
- Whether the printing backing has been applied. Care must be taken to cover the table with a material that improves the adhesion of products and facilitates their removal from the platform. It can be masking tape, kapton, or specialized coatings such as BuildTak. The table needs to be cleaned first.
- Is the table installed at all :) Sometimes it happens that the working platform is not connected, or is missing. In this case, it is necessary to install the table according to the user's instructions.
- Extruder patency. Residual cured plastic in the printer nozzle can block the passage of new resin. Therefore, before starting printing, it is better to make sure that the extruder is clean and clean it if necessary.
- Is the filament loaded. Although this point is obvious, it should not be ignored.
 Make sure that the 3D plastic you need is loaded into the printer in accordance with all the rules, otherwise what kind of printing can we talk about 🙂
And, of course, check the power supply. If desired, at this stage, you can put the device on preheating. This is not required, but will speed up the print launch process.
Preparing the 3D Model
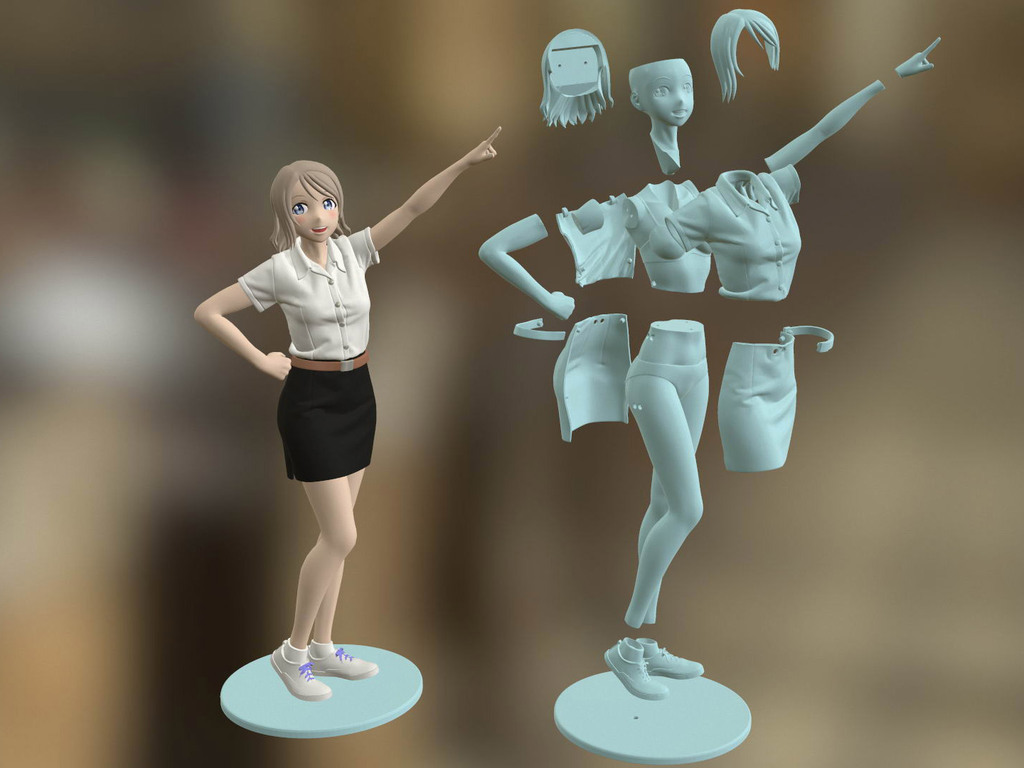
Now that the 3D printer is exactly ready for the printing process, it's time to prepare the 3D model. If you are interested in how to work with a 3D printer, this point cannot be ignored. The model in STL format must be uploaded to the slicer program that generates the control code for the printer. There are different versions of slicers (Cura, slic3r, KISSlicer), and some printers support certain programs by default.
In our case, the Cura slicer is used. After loading the model, we check its readiness for 3D printing. The presence of any errors and inaccuracies will immediately be reflected in the program, which will require correction of the 3D model in accordance with the rules of 3D modeling for printing.
If everything is in order with the digital version of the created product, set the print settings. Remember that competent actions at this stage will affect the quality of the 3D printed sample. The following settings should be checked:
- Table and extruder temperature. These values depend on the type of plastic used, different types of polymers correspond to different temperature conditions.
- Print speed. It should also be adjusted depending on the filament, not forgetting that a high print speed can be detrimental to the quality of the product.
- Support available. It is advisable to print complex structures with overhanging elements with a supporting structure, this will ensure accurate reproduction of the model and prevent possible deformations of the object during cooling.
- Type of sticking to the table. For better adhesion of the product to the platform and protection against detachment of corners, there are several options for setting this parameter.
 Depending on the type of element being created and the type of plastic, they may differ.
- Printing accuracy. Everything is very clear here - the higher the accuracy, the better the detail of the finished sample. The layer height should be chosen depending on the requirements for the product.
Having done these simple steps, the 3D model can be sliced and written to a USB flash drive. Then everything is quite simple: we connect the USB flash drive to the printer, and we start the product for printing.
It is important to control the reproduction of the first layer, because the entire subsequent printing process often depends on it.
How to work with a 3D printer: final
If you still can't avoid problems, you can try restarting the printing of the object. Often this helps. If the restart did not work, you will need to rewrite the model, possibly by changing the settings.
This list of the main stages of launching the product for printing is completed. Now you know how to work with a 3D printer and, on occasion, will be guided by the basic principles of controlling this device. Don't forget that our store has a wide selection of 3D printers, plastics and resins for 3D printing, so you are sure to find exactly what you need. We hope our article was helpful for you! And if any point is not clear, or you want to get more information - please contact us by one of the contact numbers or by e-mail.
Back to the main page
how to work from scratch for beginners and dummies, what it looks like
Three-dimensional printing has become increasingly introduced into our daily lives. Thanks to new technologies, it has become possible to easily print from a small detail to a large building. The range of products is also pleasing - today you can find a lineup that includes both affordable devices and more expensive ones. But how to work with a 3D printer? This is a completely normal question that any beginner will have, it is for this reason that we will try to answer it as simply and accessible as possible.
What is a 3D printer and how does it work?
The 3D device consists of the printer itself and a computer that controls all processes. The principle of operation of such a design is to create 3D models by superimposing layers of liquid material. There are a large number of printer models - from large industrial ones to compact ones, but they all have the same principle of operation and components:
- Extruder - the print head through which the thread passes. The head heats the thread to a semi-liquid state and evenly supplies the material to the working surface.
- Work surface - a printing platform on which a 3D model is formed.
- Motors - mechanisms responsible for the accuracy of movement and speed of printing.
- Sensors are electronic devices that limit moving parts to specified coordinates.
- The frame is the structure that connects all parts of the printer.
How a 3D printer works: features
Work with the aim of building a three-dimensional model begins with a sketch, which is created in a special program. After that, the software independently generates a plan for the movement of the print head and a print sequence. The 3D model is reproduced by strongly heating the plastic and distributing it evenly.
3D printers are used in many areas. Let's list some of them:
- Architecture - creation of models of buildings.
- Medicine - dental prosthetics, making models of organs for study.
- Construction - production of houses using 3D printing technology.
- Education - a visual aid for learning 3D printing.
- Automotive industry - creation of tuning parts, prototype layouts and other products.
This is a small list of industries where 3D printing is actively used. Today, almost every entrepreneur and just an enthusiastic person can afford a printer.
The following printers are distinguished by design features:
- RepRap - self-reproducing printers that can create their own copies.
- DIY-kit - the device comes disassembled with instructions, the assembly of which will take a sufficient amount of time.

- Ready-made models are delivered assembled and ready to use.
- Commercial and Industrial - devices capable of printing metal, concrete, polymers and other materials.
How to use a 3D printer: tips for beginners, where to start
Mastering the technique of 3D printing is not difficult if you follow the recommendations and tips. Especially for those who plan to learn the basics of 3D modeling, an up-to-date list of questions and detailed answers to them has been prepared.
Printer Installation
To begin, you will need to carefully unpack the box and remove any stops. The next step is to install the printer on the surface using the building level. This will allow you to place the device as evenly as possible, which will provide better printing.
Note. Some 3D printers come with a level for installation.
Next, you will need to connect the printer to your computer and install the necessary drivers. The software disc comes with the 3D device.
Preparing for work
To get started, you need to calibrate the working surface - without this, printing quality products is impossible. This process is carried out automatically or manually. The attached instructions have detailed information on how to perform manual calibration.
Extruder patency test
The next important step is setting up the extruder. First of all, you will need to check its nozzle. If the printer has already been used, the nozzle should be cleaned of solidified particles that will interfere with the throughput of the material. Refueling the 3D printer The thread is fed into the extruder directly from the spool. But there is one caveat - for this you must first warm it up. To thread the thread, you will have to make a small effort in order to loosen the presser mechanism.
Working with models
Models can be created using a variety of 3D modeling programs. The process of manufacturing three-dimensional parts is creative, requiring careful preparation. The better and more detailed the model is drawn, the better the 3D layout will be at the output.
Start printing
After creating the model in the program and preparing the printer for work, you need to send the file for printing and wait for the result. The print speed varies depending on the printer model and specifications, as well as the media used.
Processing the finished product
3D printed products usually do not please the user with an ideal appearance: the parts have an uneven surface. But this is typical for models of 3D printers on FDM, SLA and DLP devices, which are distinguished by higher print quality. Owners of FDM printers should not despair - a simple processing of products will give products an attractive appearance and make the surface smooth.
Several powerful ways to post-process 3D printed parts:
- Mechanical - carried out by sanding the surface with sandpaper or a special sponge for grinding.

- Chemical - surface treatment with aggressive solvents such as acetone and dichloroethane.
- Mixed - In this case, the two processing methods listed above are used.
What are the possible errors and how to avoid them?
3D printing technology can be mastered even by a beginner, but despite this, the production of the first products causes excitement for the user. Simple operation, detailed instructions and recommendations on the Internet will allow everyone to deal with almost any printer model. But there are a few useful life hacks, the knowledge of which will help you avoid typical beginner mistakes:
- Calibrate and test the 3D printer before starting work.
- Be sure to use the correct file extension for quality printing.
- Do not remove the finished product from the printer immediately after it has been processed: this may damage the part and cause defects.
- If errors occur during the 3D printing process, try restarting the device - this usually helps.
Learn more