Using freecad for 3d printing
FreeCAD Beginner Tutorial & How-To | 3D Printing Blog
by Fabian | September 13, 2018
Are you thinking about getting started with 3D modeling and 3D printing but don’t know exactly where to start? Then it probably makes sense to take a look at FreeCAD – a free yet powerful 3D design program. This hands-on tutorial by Bram de Vries will enable you to create your first 3D printing project with FreeCAD – all the way from your first sketch to the final product!
In this tutorial you will learn to create a 3D file in FreeCAD:
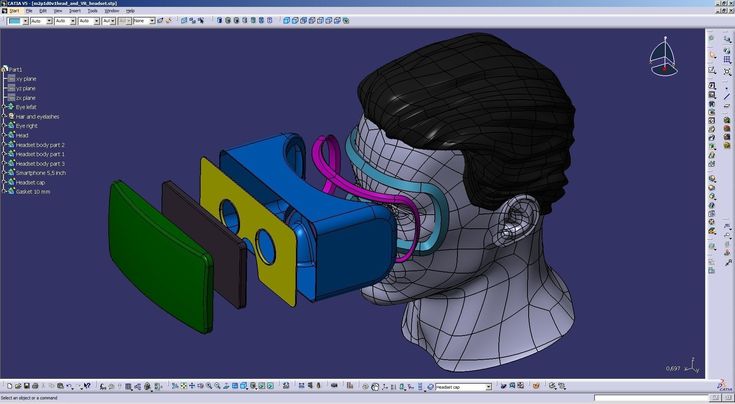
from a sketch (left) to the final 3D model (right).
About the 3D Modeling Software FreeCAD
FreeCAD is a popular open source design software for creating 3D models of real-life objects. Best of all it – but you already know this – it comes for free (just download it from on the FreeCAD website)! The ‘CAD’ in its name simply stands for ‘Computer-Aided Design’.
FreeCAD is a 3D design program that allows you to easily navigate and modify your 3D model by browsing back into the model history and changing its individual elements. It can be used on Windows, Mac and Linux, and reads and writes many open file formats including popular 3D printing formats such as STL, OBJ, and DAE.
This 3D modeling software is most suitable for geometric designs, such as precise technical parts, replacement parts, gadgets, cases, scale models, etc. It’s less suited for creating organic objects such as figurines of humans, animals, or plants.
Enough of the small talk – we’re here to design! Let’s get started with the FreeCAD tutorial!
FreeCAD Tutorial Part 1: Creating and Editing PrimitivesFreeCAD comes with several ‘work benches’. These are basically a pre-defined set of tools that you are going to use. For example, you can create a draft by choosing the ‘Draft’ work bench. However, we will start by using the ‘Part’ work bench – because we are here for creating a real physical object!
In the video below, your instructor Bram will first show you the very basics: how to choose the ‘Part workbench’, how to start your first project, how to navigate (press Alt + left mouse button), how to add basic primitives (a box, a cylinder, etc.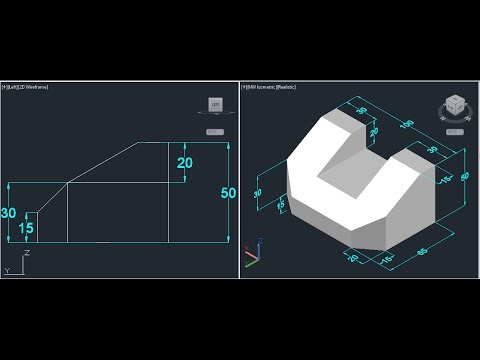 ), and how to change the size, radius, and position of these primitives (under the menu ‘Property’).
FreeCAD Tutorial Part 2: Subtracting and Combining Primitives
In this second video, Bram will teach you some more tricks on how to use primitives. For example, you can rotate them by changing their angle.
You’ll also learn how to subtract different primitives from each other with the ‘cutout’ tool. For example: if you place a cylinder within a box and subtract them, the box will have a cylinder-shaped hole. However, the cylinder can still be edited. Changing the height and radius of it will now affect the height and radius of the hole.
You will also learn the opposite of subtracting two primitives: combining them. You can do this by selecting both elements and clicking on the ‘Make a union of several shapes’ button.
FreeCAD Tutorial Part 3: Creating A 2D Sketch
For creating more complicated designs, Bram prefers to create two-dimensional sketches first. He switches the work bench to ‘Part Design’ and shows you how to set the best sketch orientation (‘XY-Plane’).
FreeCAD lets you draw lines freehand with the ‘polyline’ tool. If you draw straight lines, FreeCAD will notice this and will ‘constrain’ them immediately for your convenience – which means that the line will be perfectly parallel with the horizontal or vertical axis. You can also add or delete these constraints manually.
Furthermore, you need to precisely define the length of each line by selecting it and choosing the ‘Make a dimension’ tool. Once all dimensions are set, FreeCAD will tell you that your sketch is ‘fully constrained’. Sounds complicated? The video below will show you that it’s quite easy!
FreeCAD Tutorial Part 4: From 2D Sketch to 3D Model
Your 2D sketch is ready – it’s about time to turn it into a 3D model! First of all, click the ‘Close the editing of the sketch’ button, then head over to ‘Tasks’ and select ‘Pad’. Choosing the ‘pad’ means that FreeCAD automatically turns your sketch into the third dimension (side remark: choosing ‘pocket’ subtracts a three-dimensional shape).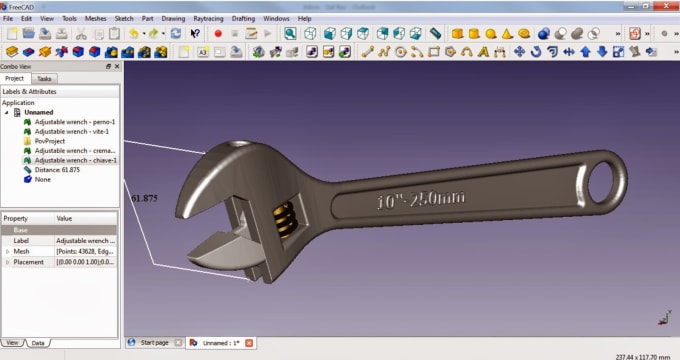
Once you see this 3D object, Bram will show you how to add additional features to it. You can click on any face (surface) of your three-dimensional object and click on ‘create a sketch’. Wait… what?! Yep, that’s going to happen a lot: in FreeCAD you often jump back and forth between sketches and 3D models.
You create a 3D model based on a sketch. Then click on one face (surface) of the 3D model and continue with the next sketch. After that, you turn this sketch in a new 3D shape, etc. This way of working enables you to add (from ‘sketch’ to ‘pad’) or subtract (from ‘sketch’ to ‘pocket’) new features and create more complicated shapes.
The best thing about this: you can always go back. Each and every sketch, pad, and pocket can be re-edited any time.
FreeCAD Tutorial Part 5: Advanced 2D Sketching
In this part of the FreeCAD video tutorial you will learn how to use some advanced tips and tricks to work with 2D sketches. Bram will show you how to logically split up and think about your model and how to use shortcuts to reach the desired results.
FreeCAD Tutorial Part 6: Analyzing a Finished 3D Model
Now we come to one of the most powerful parts of the tutorial. We’ll be looking at a 3D model of an audio knob that Bram created. He’ll go over his design step by step and show you exactly how he created it. This will give you a good understanding of all the working processes needed for creating a design in FreeCAD.
FreeCAD Tutorial Part 7: Hands-on Exercise
It’s time to get our hands dirty! Bram’s downloaded a sketch of a real spare part and wants to create it from sketch. He will go through the design process step by step and repeat everything you learnt in the previous videos. If you can create this file you have successfully mastered this tutorial and are good to go for your own creations now.
FreeCAD Tutorial Part 8: 3D Printing
Now the last thing to do is the most fun part: 3D printing your design! Save your design (best to save it as an STL file), hop over to i.materialise’s 3D printing service, and upload your file. You will instantly see how much your model costs in 19 different materials and 100+ different finishes.
Upload your model to the i.materialise online platform for an instant price quote
If you liked this tutorial you might be interested in learning to use SketchUp as well. Click here for our beginner-friendly SketchUp tutorial. Also make sure to avoid these 5 common mistakes when modeling for 3D printing.
Is FreeCAD good for 3d printing? – 3D Solved
When you first get your hands on a brand new 3d printer, you can spend hours printing objects available on Thingiverse and MyMiniFactory. Sooner or later, there comes a time when you will have to design an entire object by yourself, or at least modify an existing one in order to meet a specific requirement of yours.
There is an extensive list of CAD apps that make it difficult to decide which one is better suited for your needs. Having said that, is FreeCAD good for 3d printing?
FreeCAD is definitely one of the most popular parametric CAD programs available, and it is both suited for hobbyists and professional users. One of its greatest advantages is the fact that it is completely free and that it has a large community of users.
Having said that, the choice of which CAD software to use is a personal one and depends greatly on the specific needs of each individual. In this article, I’ll try to dig deeper into the main features, advantages, and disadvantages of FreeCAD, in order to help you decide if it is a good fit for you.
Let’s get started!
Is FreeCAD easy to learn?
This free open-source parametric 3D modeling software can be easy to learn if you have the basic knowledge of the tools. It is known to be a good entry point for designers new to the modeling world. Being that it is free open-source software you will easily find a lot of tutorials to learn from and get you started with your own projects.
Although it is not as easy to learn as Tinkercad, it definitely is more versatile.
What is parametric modeling?
Parametric modeling is a computer-aided design (CAD) paradigm that focuses on establishing the shapes, constraints, and dimensions of the model being designed. It allows you to automate repetitive changes as it eliminates the need to constantly redraw a design every time the dimension values are modified. So you can modify the entire shape of the model at once, not just individual parts one at a time.
FreeCAD corresponds to this category of CAD software. In contrast to Direct Modeling CAD software, Parametric ones are better suited for cases in which precision is of the essence. Such is the case for example in mechanical engineering-related projects.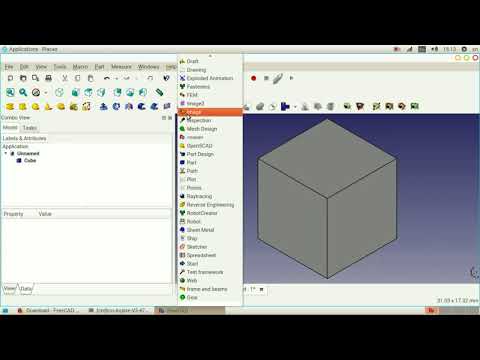
You may be asking yourself if the Parametric or Direct Modelling paradigm is better suited for your specific needs, so I’ll quickly go through the main aspects and differences of each one.
Parametric vs Direct Modelling
Direct modeling lets you quickly create and edit geometries without you needing to worry about defining the features and constraints of the model. You just design until you get the shape you want.
It makes sense to use Direct modeling when you are conceptually exploring different ideas for a model and you don’t want to deal with established shapes and dimensions as you are constantly manipulating the design. Direct Modelling is especially useful when designing organic shapes, such as plants, animals, people, etc.
Once the conceptual design is over, using parametric modeling can help you maintain the original design intent. There are certain situations in which using both types of software is helpful since they can complement each other.
In short, if your main objective is to design technically precise parts, you should go down the Parametric route, and FreeCAD is an excellent choice for this. On the other hand, if you mainly want to create organic shapes, you should focus on learning Direct Modelling CAD software, such as ZBrush or Blender.
Is FreeCAD popular in 3d printing?
FreeCAD is considered to be one of the best CAD software you can use for 3D printing and given the fact that it is free makes it a fairly popular choice for anybody who wants to design objects for 3D printing.
One cool feature of FreeCAD is that it lets you create 2D models that can be later used as a base to create 3D models quickly. Moreover, parametric modeling is very efficient when you are in the process of editing a 3D model. This may seem trivial, but being able to download a file from Thingiverse and edit it according to your needs is a powerful and valuable skill.
Additionally, you can enhance FreeCAD functionality by adding plugins (called Workbenches).
Can you design anything using FreeCAD?
An FDM printer designed on FreeCadFreeCAD is a general-purpose 3D parametric modeler software so it has a wide range of uses.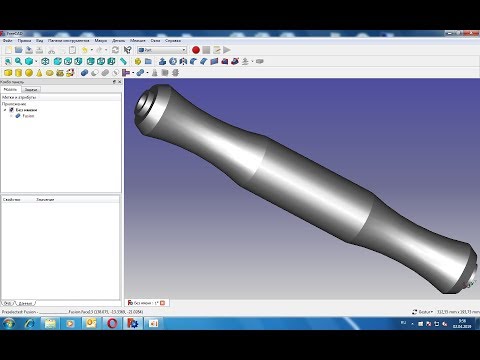 Its main purpose is for designing mechanical engineering, electrical engineering, and architectural objects.
For that reason, it is best used for geometric designs like accurate replacement parts, detailed technological parts, scale models, and edit gadgets.
Although it is technically feasible, FreeCAD is not recommended for modeling biological figures like plants, humans, or animals.
Online resources for learning FreeCAD
With FreeCAD you won’t have any problems finding guides or tutorials to help you learn to use the software since there is a plethora of them. Since it is an open-source free software many people have posted articles and videos to help you solve any problems you might have encountered with FreeCAD. The FreeCAD forums and YouTube videos are good places to start learning.
Back when I was learning to use FreeCAD, I found the tutorial series made by Power Playground incredibly useful, since it is specifically aimed at designing objects for 3d printing.
Popular alternatives to FreeCAD
Although FreeCAD is definitely a powerful CAD program, you should at least be aware of other popular options out there. In the next section, I’ll briefly go through the most common alternatives, and focus on the main differences.
FreeCAD vs Tinkercad
Tinkercad is also a free software but unlike FreeCAD it is a browser-based app. You can make use of Tinkercad with any operating system as long as you have an internet connection. This 3D modeling tool is much easier to learn and use as it is specifically designed for beginners, allowing them to learn the basic concepts of 3D modeling.
Tinkercad’s interface is much more intuitive than FreeCAD’s. Although you can’t create very complex designs with Tinkercad, you can still make some amazing models using the preset objects and shapes offered. Additionally, Tinkercad is a great tool to introduce kids to the wonders of 3D modeling.
FreeCAD vs SketchUp
SketchUp is another browser-based 3D modeling software that has 3 versions: Free, Shop, and Pro. As the name suggests, the Shop and Pro versions are paid and offer more features to the user. The Free version is still a solid choice for both beginners and intermediate users alike.
Sketchup is primarily used in construction and interior design, and although it is not as basic as TinkerCad, it is still easier to use than FreeCAD.
Designing with Sketchup is probably faster than with FreeCAD for small projects but if you are interested in having more technical capabilities for complex projects you should stick to FreeCAD.
FreeCAD vs Fusion 360
Fusion 360 is a desktop-installed and cloud-based professional 3D CAD software.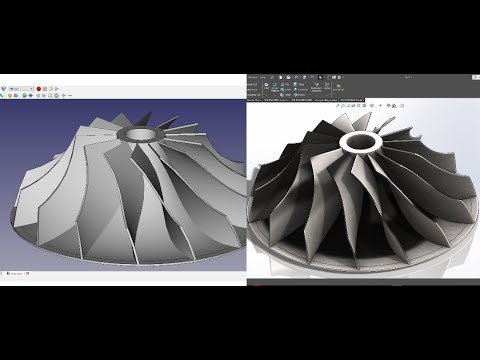 For professional uses, you need to pay a monthly subscription but It also offers free licenses for hobbyists, students and educators, and startups.
Much like FreeCAD, it uses parametric modeling, but it also allows designers to seamlessly switch to direct modeling when it is convenient for the project.
Fusion 360 has a more intuitive and user-friendly interface than FreeCAD while also maintaining the ability to design very precise models. In short, both programs can be used for complex designs.
FreeCAD vs AutoCAD
AutoCAD is a precise 2D and 3D modelling software and was one of the first CAD programs introduced back in 1982. To use AutoCAD you need to pay a monthly subscription and it is best used by experienced professionals for industrial purposes.
While it is ideal for 2D drawing it isn’t the simplest to use in complex 3D modeling as it has a steeper learning curve than most other CAD apps out there and is thus not a very popular option in the 3D printing community.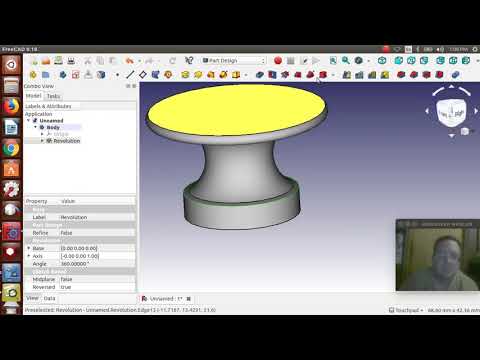 On the other hand, FreeCAD is used for free by a wider range of users in the 3d printing space.
It is worth mentioning that AutoCAD supports both Parametric and Direct Modeling and has spectacular file compatibility which comes in handy when exporting and importing files.
Frequently Asked Questions (FAQ)
Is FreeCAD really free to use?
FreeCAD is a totally free open-source software, whether you want to use it for personal or commercial purposes you won’t need to spend any money to use this remarkable software.
Do I have to download FreeCAD?
You do need to download FreeCAD in order to use the software as it doesn’t have a browser-based version. FreeCAD is compatible with Windows, Mac, and Linux operating systems and you can download it from the FreeCAD webpage.
Can you render objects with FreeCAD?
A scene modeled with FreeCAD and rendered with the BlenderKIT addon.Being an open-source software means there’s constant development of new features for FreeCAD.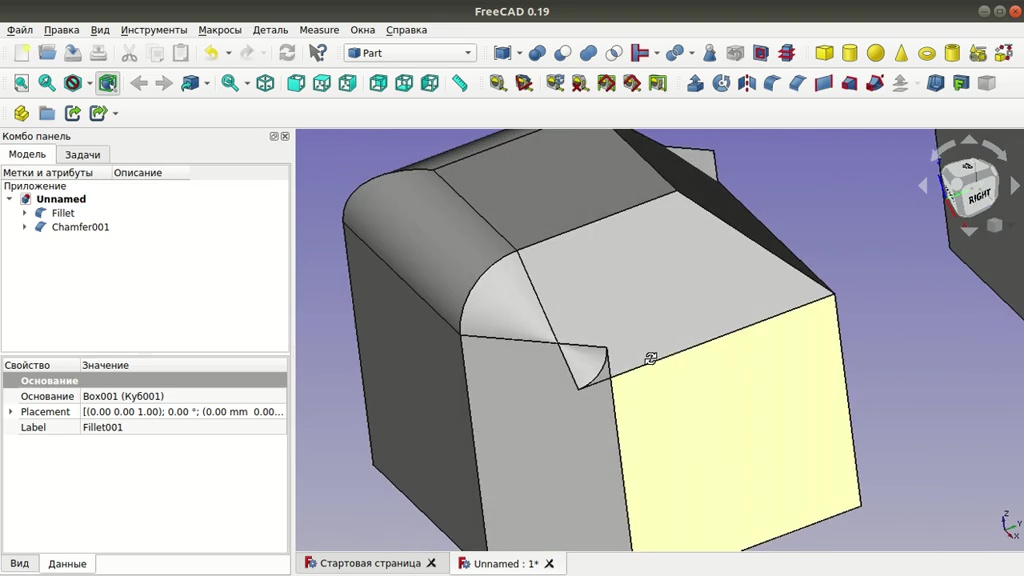 There’s a render workbench for FreeCAD to produce high-quality rendered images from your FreeCAD files using open-source external rendering engines. You can check out the FreeCad-Render project here.
What operating systems does FreeCAD support?
FreeCAD is developed and manained for all major operating systems, i.e.: Windows, Linux and Mac. Currently, there is no mobile version of the software.
Can you export STL files in FreeCAD?
FreeCAD supports the import and export in STL format with quite a considerable amount of settings, making it especially useful for 3D printing as this file extension is the most commonly used one for slicing.
Is FreeCAD open-source?
FreeCAD is free open-source software and the codebase is developed mainly in C++ and Python. In fact, FreeCAD encourages the community to contribute to the repository, which you can check out here.
You can also control FreeCAD with Python code. This is very powerful as it allows yourself and others to extend the software’s functionalities by creating your very own tools and macros.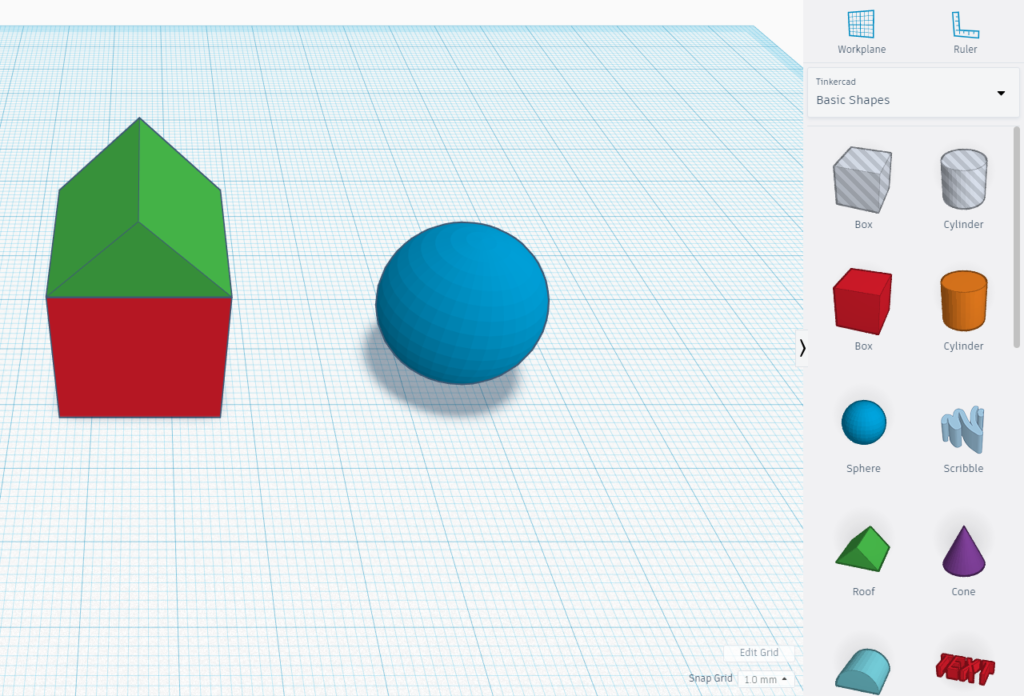 FreeCAD has very detailed and friendly documentation on how to get started with scripting and macros.
Useful FreeCAD plugins (workbench) for 3d printing
Being an open-source project, FreeCAD has an extensive repertoire of plugins that can be installed on an as-needed basis. Since our main focus here is always 3d printing, I recommend at least checking out the 3d Printing Tools Workbench. I would also take a look at this exhaustive catalogue of external Workbenches listed on the project’s wiki.
We created a recommended products section that will allow you to remove the guesswork and reduce the time spent researching what printer, filament, or upgrades to get, since we know that this can be a very daunting task and which generally leads to a lot of confusion.
We have selected just a handful of 3D printers that we consider to be good for beginners as well as intermediates, and even experts, making the decision easier, and the filaments, as well as the upgrades listed, were all tested by us and carefully selected, so you know that whichever one you choose will work as intended.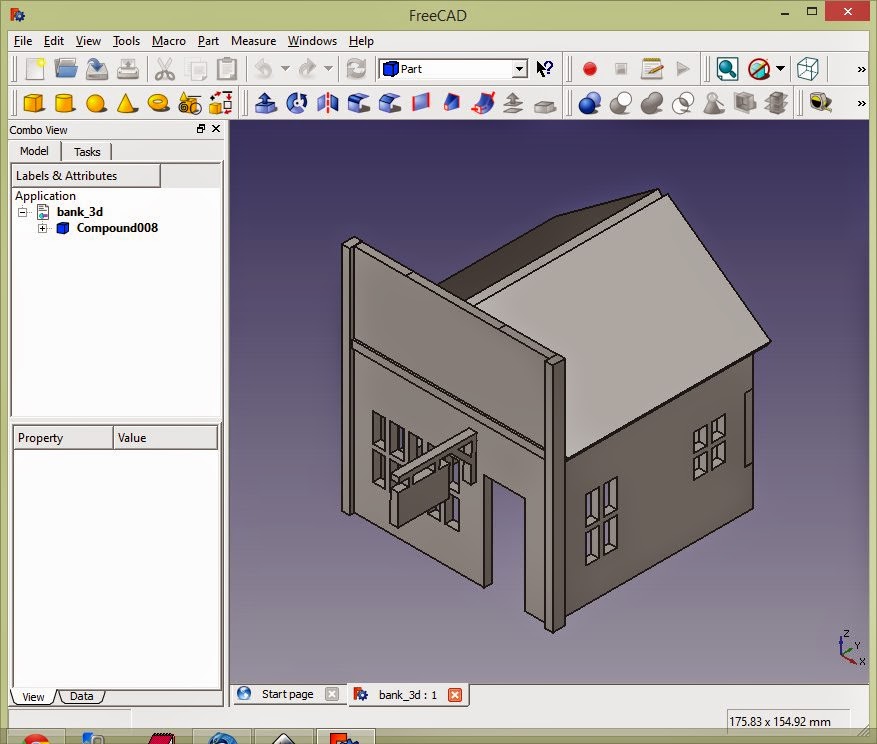
FreeCAD and 3d printing or start modeling for 3D printer
In general, this is how I became the proud owner of a self-built 3D printer (for those who wish, I remind you that the construction was carried out in three parts on this resource: Part One, Part Two, Part Three, and each part is a ready-made and printing printer, but with increasing part more and more modified) I began to print a lot and everything, plastic went nowhere (gifts and trinkets do not count). As soon as I started posting examples of printing on the Internet (in particular, on VK), friends and acquaintances began to contact me with requests to print out some details for them (for example, I printed out simple details and paid back the purchased plastic Parts for motorcyclists).
And here a small, but very intricate problem arose - I do not know how to work in 3D modeling programs. Let me remind you once again that I created the printer in order to create, and did not buy it with the idea of a business and a big income, but the small investments of my clients will only be a plus for both my printer and the family budget.
In general, the question immediately arose of choosing a program for 3D modeling, and then my eyes fled, well, there are a lot of them, I installed and tried a few, but in all I looked like a ram at a new gate. After wandering around the Internet, looking at different programs, I chose FreeCAD - free, fairly unpretentious to a PC, it works with the main 3D formats (there is a whole list of them). In principle, it took a little time for the main development, a part for a motorcycle was even drawn and printed (which, for one reason stated below, had to be modified with a drill and a file)
Started drawing a new detail, again for a motorcycle - a choke handle.
I drew how the sculptor cut off the unnecessary (by making pockets) and in the final stl I got the original part without the cut-off elements. Twisted, picked in different menus and loaded into different programs (Solid, Blender) everywhere a complete detail without cut-off elements.
Help, I probably shouldn't have gotten into FreeCAD.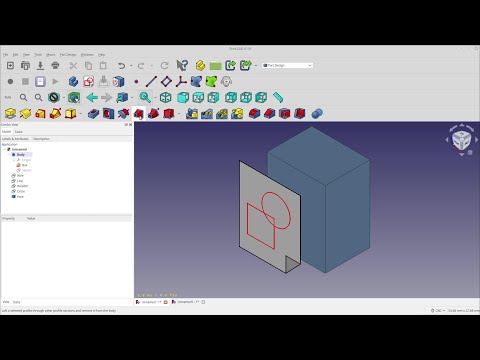 ..
..
Well, the most important question that worries me, as a novice printer and 3D modeler, is:
Where to start? To quickly make simple models and then not relearn by switching to some more advanced programs.
It is desirable to answer like this:
We start with tinkercad, then we install OpenCad, then we master SolidWorks
Thank you very much
FAQ
Alex-S
Loading
10/13/2022
492
Hello everyone! The question is not about printers, but about homemade products. We have smart electronics guys here, I hope someone can help figure it out ....
Read more
Hello everyone, self-assembly printer (Good bot), I just can’t beat the problem with the plastic supply, as if the extruder cannot push the plastic into the ho...
Read more
Tortik
Loading
12/24/2018
22058
Since I assembled the Ultimaker printer of the respected Plastmaski, I cannot get rid of one problem. Already transferred almost 2 kg of plastic for tests. M...
Read more
Top 20 Free 3D Printing and 3D Printing Software
Looking for a 3D printing software? We've rounded up the top 20 software tools for beginners and professionals alike. Most slicers are free.
What is a slicer? This is a program for preparing a digital model for printing. Models for 3D printing are usually distributed in STL files. To turn an STL file into G-code (a language that a 3D printer understands), a slicer program is required. It is called a slicer because it cuts (to slice - English) a 3D model into many flat two-dimensional layers, from which a 3D printer will add a physical object.
Which slicer should I choose? In this article, we will tell you which slicer is best for 3D printing for each stage of your work. Which one is better for preparing a 3D model for printing? But what if you need to create a 3D model from scratch? And if you are only taking the first steps in 3D?
Don't be afraid, we've answered all of these questions, including the required skill level for each program and where you can download it. The great thing is that most of these programs are completely free and open source.
- Cura
- CraftWare
- 123D Catch
- 3D Slash
- TinkerCAD
- 3DTin
- Sculptris
- ViewSTL
- Netfabb Basic
- Repetier
- FreeCAD
- SketchUp
- 3D Tool
- Meshfix
- Simplify3D
- Slic3r
- Blender
- MeshLab
- Meshmixer
- OctoPrint
#1: Cura
For beginners who need a slicer to prepare STL files for 3D printing
Cura is the default slicer software for all Ultimaker 3D printers, but can be used with most others , including RepRap, Makerbot, Printrbot, Lulzbot and Witbox. The program is completely open source, its capabilities can be extended using plugins.
This program is very easy to use and allows you to manage the most important 3D printing settings through a clear interface. Start in Basic mode to quickly get up to speed and change print quality settings. If finer control is required, switch to Expert mode.
Cura can also be used to directly control the printer, but then the printer and computer must be connected to each other.
Download: Cura
Price: Free
Systems: PC, Mac, Linux
#2: CraftWare
For beginners to prepare STL files for 3D printing 3D printers by the Hungarian startup CraftUnique to support their CraftBot crowdfunding machine. However, the program works with other printers.
Like Cura, CraftWare allows you to switch from "Easy" to "Expert" mode, depending on how confident you feel. It's a colorful app that features a visual G-code visualization with each function represented by a different color. But the most outstanding feature is the individual support service. As far as we know, only the paid program Simplify3D has this.
Please note, however, that this program is still in beta, so bugs may occur.
Download: CraftWare
Price: Free
Systems: PC, Mac
#3: 123D Catch
-systems, smartphones and tablets, which allows you to convert images of objects into a 3D model. Pictures can be taken with a smartphone/tablet or digital camera.
You need a lot of photos of the object from different angles - the more the better - after which they will be compiled into a 3D model.
123D Catch is more of a fun app than a professional 3D printing tool, but after some tambourine dancing, you can get good results, especially when paired with an STL editor like MeshLab or Meshmixer.
Price: Free
Systems: PC, Android, iOS, Windows Phone
#4: 3D Slash
and surprisingly simple, and refreshingly new. With 3D Slash, you can design 3D models using your dice skills.
You can start with a large block and, like a virtual sculptor, remove small cups from it with tools such as a hammer or drill, or you can start from empty space and build a model from cubes and other shapes. You can paint with flowers or use template pictures.
Other features worth mentioning are tools for creating logos and 3D text. The Logo Wizard imports an image and creates a 3D model, while the Text Wizard allows you to enter and format text, and then turn it into 3D.
Recommended!
Download: 3dslash.net
Price: Free
Systems: PC, Mac, Linux, browser
#5: TinkerCAD
- A computer-aided design (CAD) system for 3D printing, which is a good starting point for beginners. Since its capabilities are limited compared to Blender, FreeCAD and SketchUp, many users switch to more powerful tools after some time.
As in 3D Slash, here you can build models from basic shapes. At the same time, unlike 3D Slash, TinkerCAD allows you to create vector shapes in 2D and convert them into three-dimensional models.
Come in: Autodesk TinkerCAD
Price: Free
Systems: Browser
No. 6: 3DTin
For beginners who want to create 3D models for printing
online is another easy and intuitive tool choice for beginners in 3D modeling.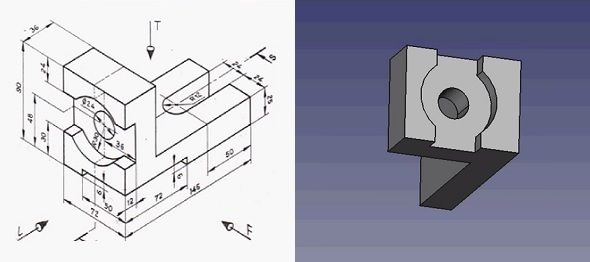 All you need is a Chrome or Firefox browser with WebGL enabled.
Choose from a huge library of 3D shapes and add them to your sketch. All sketches are stored in the cloud, access to them is free if you honor the Creative Commons license. Everything can be exported to STL or OBJ formats.
Enter: 3DTin
Price: Free
Systems: Browser
#7: Sculptris
For beginners who want to create 3D printable models
clay. This is a fantastic 3D modeling program if figurines are your main task. For example, you can make a bust of your favorite video game or comic book character. Sculptris is completely free and bills itself as a stepping stone to the more complex (and expensive) ZBrush tool.
Download: Pixologic Sculptris
Price: Free
Systems: PC, Mac
#8: ViewSTL
For beginners who want to view STL files
Using ViewSTL is the easiest way to view STL files . Simply open a web page and drag the STL onto the dotted box.
The STL online viewer allows you to display the model in one of three views: flat shading (for a quick view), smooth shading (for a high-quality image), and wireframe.
Enter: ViewSTL
Price: Free
Systems: Browser
#9: Netfabb Basic
some nice features that allow you to analyze, "repair" and edit STL files before moving on to the model cutting stage.
A good choice if you need more than just a slicer and want to be able to quickly fix STL files without having to learn programs like MeshLab or Meshmixer.
Don't let the 'Basic' in the title fool you, Netfabb Basic is actually a very powerful 3D printing tool. It's "basic" only in the sense that it doesn't cost €1,500 like Netfabb Professional!
Download: netfabb.de
Price: Free
Systems: PC, Mac, Linux
No. 10: Repetier
For advanced to prepare STL files for 3D printing
9004 If you are ready to upgrade to the next level of 3D printer slicer software, but if you want to stay open source, you should look into Repetier.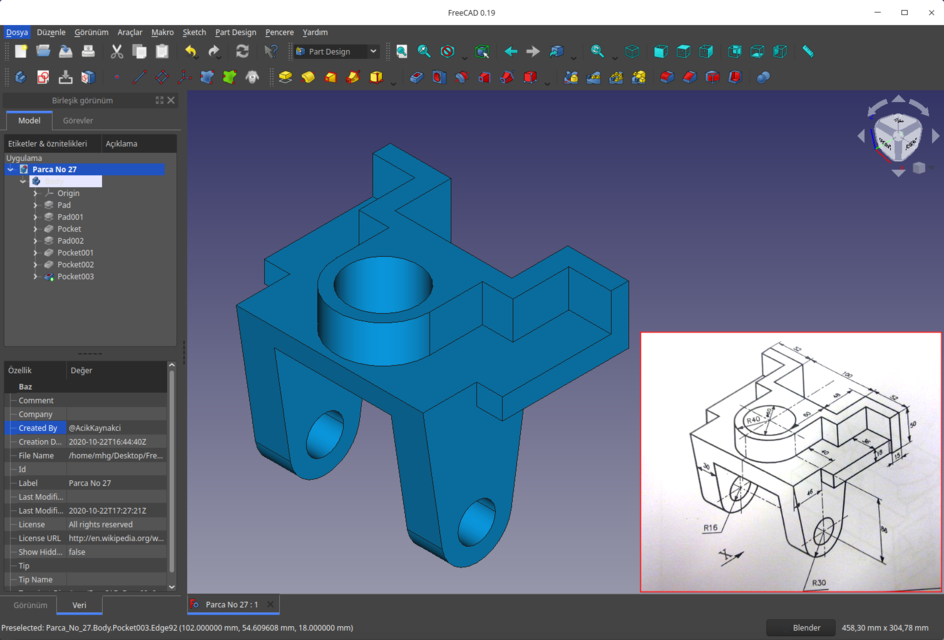 It is the great grandfather of 3D printing software and a favorite of the RepRap community.
 Today the program is moving by leaps and bounds from the level for beginners to advanced users. Packaged in an all-in-one configuration, it supports up to 16 extruders, multi-slicing via plug-ins, and virtually every fusing 3D printer on the market. Get ready to tinker!
What's more, Repetier Host works remotely via Repetier Server, so that the 3D printer can be controlled via a browser, tablet or smartphone.
Download: Repetier
Price: Free
Systems: PC, Mac, Linux
#11: FreeCAD
The program is a great option for developing your design skills. More technically, this parametric 3D modeling program allows you to easily change the project by rolling back through the history of the model and editing the parameters.
3
Download: freecadweb.org
Price: Free
Systems: PC, Mac, Linux
#12: SketchUp
For beginners who want to create 3D printable models
SketchUp is the perfect combination of simplicity and SketchUp functionality, with a user-friendly interface and a relatively flat learning curve (i. e., as experience grows with the time spent), the ideal program for developing three-dimensional models.
The Make SketchUp version is free and includes everything you need for 3D modeling, as long as you download and install the free STL exporter. There is also a professional edition for architects, interior designers and engineers.
Download: sketchup.com
Price: Free (SketchUp Make), $695 (SketchUp Pro)
Systems: PC, Mac, Linux
#13: 3D-Tool Free Viewer
view and check STL files
3D-Tool Free Viewer is a sophisticated tool that, among other things, allows you to check the structural integrity and printability of your file. With the Cross-Section function, for example, you can look at the model from the inside and check the wall thickness. Very useful if you want to check your STL file for killer errors before printing.
Download: 3D-Tool
Price: Free
Systems: PC
#14: Meshfix
your model for errors.
Price: Free
Systems: Browser
#15: Simplify3D
For professionals to prepare STL files for 3D printing print. A flexible algorithm checks the model for problems, fixes them, shows a preview of the printing process (ideal for identifying potential problems), and then slices it.
This slicer offers the best infill pattern options in the competition. For models that require supports, Simplify3D will create the appropriate structures on its own and give you full control over their placement. For printers with a dual extruder, when printing with different materials, the Dual Extrusion wizard will help, as a result of which, for example, it will be easier to remove the dissolving filament.
Simplify3D supports 90% of today's commercially available desktop 3D printers and is compatible with Marlin, Sprinter, Repetier, XYZprinting, FlashForge, Sailfish and MakerBot firmware. Simplify3D can also be used to directly control the printer, but then the printer and computer must be connected to each other.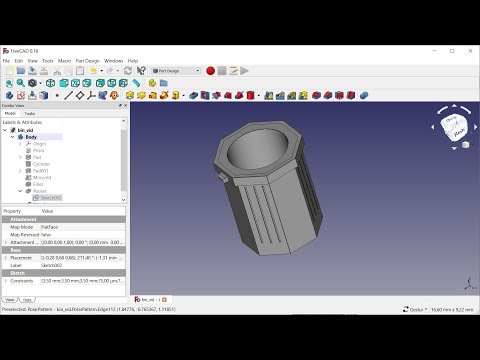
Download: simplify3d.com
Price: $149
Systems: PC, Mac, Linux
#16: Slic3r
source code, which has a reputation as a carrier of super new functionality, which you will not find anywhere else. The current version of the program is able to show the model from multiple angles, so that the user gets a better preview experience.
There's also an incredible 3D honeycomb infill, the first of its kind that can extend over multiple layers rather than repeating itself like a stamp. This significantly increases the strength of the internal filling of the model and the final printout.
Another option is direct integration with Octoprint. Once the files on the user's desktop are sliced, they can be directly uploaded to Octoprint with one click.
Download: Slic3r
Price: Free
Systems: PC, Mac, Linux
#17: Blender
For professionals who want to create 3D printable models
Blender is a popular computer-aided design (CAD) system with a steep learning curve. Not at all the best choice for beginners, but what you need if you are quite experienced and need something more complex for modeling and printing.
In short, Blender is one of the most powerful tools out there. Its community is always ready to help, there are a lot of educational materials. It's also open source, so enthusiasts often write extensions to make it even better and more powerful.
Download: blender.org
Price: Free
Systems: PC, Mac, Linux
#18: MeshLab
For professionals to prepare STL files for 3D printing
MeshLab - advanced editor. It allows you to remove parts of a 3D model, merge two models into one, patch holes. If you need a program to modify models for 3D printing or some kind of "repair" work, MeshLab is the right choice.
Price: Free
Systems: PC, Mac, Linux
#19: Meshmixer
For professionals to prepare STL files for 3D printing files. It's especially good for identifying potential problems and fixing them automatically.