Root 3d printer
Root Cnc – 3D Printed CNC Machine
[email protected]
3D Printed CNC Machine
ROOT CNC – CNC Machine – 3D Printer – Motion ControllerHome to the Root CNC 3D printed CNC machine. This website is the Official Home and Official Forum for the Root CNC project.
3D Printed!
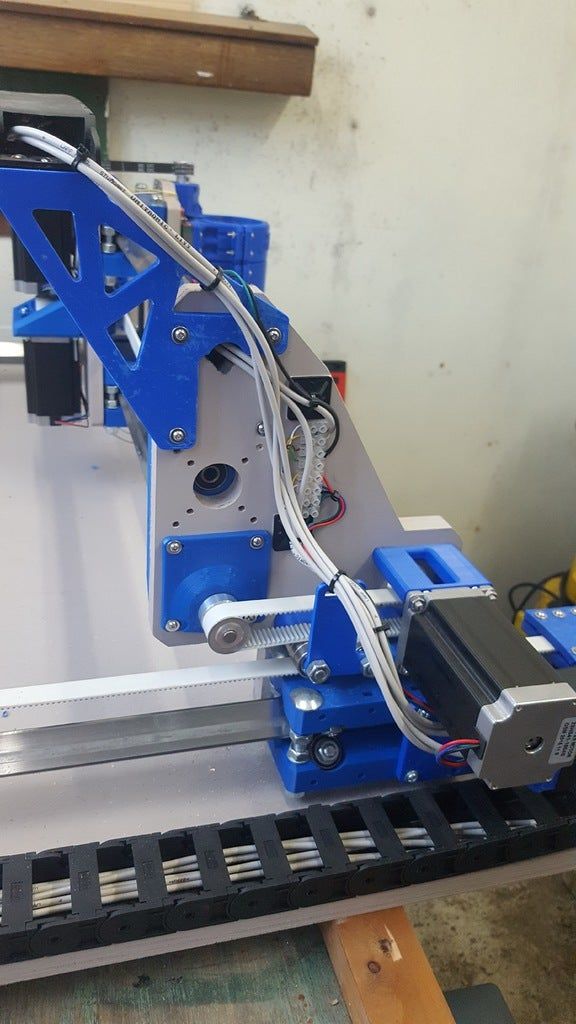
Root CNC used 3D printed parts to provide accurate assembly of the machine and easy the build process
Scalable
It is scalable – make the machine any size you want, to fit your application
Open Source
Its Open Source – built and controlled via open source hardware and software
Social LinksDiscourse
Group
Page
Discord
Github
Thingiverse
YouTube
Where to DownloadRoot CNC shall continue to work and develop its machines across the multiple platforms. For now the following platforms will following this trend:
Github – Shall be used to track and implement any changes/ issues on any of the machine. Use this site for the latest and greatest
Thingiverse – shall continue to receive the core build updates
Project Goals- Create a expandable CNC machine capable to machine aluminium
- Use minimal different 3D printed parts
- Customization (Make it Bigger)
- Cheap
- Simple
- Use parts commonly used in DIY 3D printers
- Easily sourced parts
If you like the work I have been doing in my spare time please let me know, it gives me great pleasure to read the stories this machine produces and keep me motivated to bring new things out. But if you love the project and want help out, please consider hitting the donation button and help keep this server up and running for everyone to enjoy – after all this is my hobby.
March 6, 2016 November 1, 2016 November 3, 2016 May 17, 2017 December 18, 2017 July 19, 2020 ROOT 2 Release
Root 3 Released
Facebook group were created
Website was launched
Root 3 Lite was released
Root 4 was released
| Machine | |||||
| Name | Root 2 | Root 3 | Root 3 Lite | Root 4 | Root 4 Lite |
| Status | Archived | Active | Active | Active | Active |
| Release date | 6 March 2016 | 1 November 2016 | 18 December 2017 | 19 June 2020 | 28 April 2021 |
| Download Location | Thingiverse GitHub | Thingiverse GitHub | Thingiverse GitHub | Thingiverse GitHub | GitHub |
| Motion System | Belts/ leads screw | Belts/ leads screw | Belts/ leads screw | Ballscrew | Ballscrew |
| Axis Type | XY = Root Motion Z = Linear bearing | XY = Root Motion Z = Linear Guilds | XY = Root Motion Z = Linear bearing | XY = Root Motion Z = Linear Guilds A = Rotary | XY = Root Motion Z = Linear Guilds |
| Corordinates | XYZ | XYYZ | XYYZ | XYYZA | XYYZ |
| Supported Controller | Marlin GRBL MACh4 MACh5 LINUXCNC | Marlin GRBL MACh4 MACh5 LINUXCNC | Marlin GRBL MACh4 MACh5 LINUXCNC | Marlin GRBL MACh4 MACh5 LINUXCNC | Marlin GRBL MACh4 MACh5 LINUXCNC |
| Configuration | Milling Drag Knife PCB mill | Milling Drag Knife PCB mill Plasma Cutter | Milling Drag Knife PCB mill | Milling Drag Knife Plasma Cutter PCB mill | Milling Drag Knife PCB mill |
| Materials | Soft & Hard woods Soft metals | Aluminium Soft & Hard woods soft metals | Aluminium Soft & Hard woods Soft metals | Aluminium Soft & Hard woods Soft metals | Aluminium Soft & Hard woods Soft metals |
| Box Section size (Width x Depth x Thickness) | 25x25x3mm | 25x25x3mm | 20x20x2-3mm | 40x40x4mm | 20x20x2-3mm |
| Spindle support | DC quite spindle Trim router VFD spindle 65 – 85mm | DC quite spindle Trim router VFD spindle 65 – 85mm | DC quite spindle *65mm option is planned | DC quite spindle Trim router VFD spindle 65 – 85mm | VFD spindle 65mm |
| Endstops | Yes | Yes | Yes | Yes | Yes |
| Z Probe | Yes | Yes | Yes | Yes | Yes |
| Motor Type | NEMA 17 | NEMA 17 NEMA 23 | NEMA 17 | NEMA 23 | NEMA 17 |
| Dust shoe | No | No | No | Z Axis independent | Z Axis dependent |
| Max working Area -mm (Estimate) | 500×500 | 1000×1000 | 500×500 | 1500×1500 | 500×500 (220×280 as per my build) |
| Z Axis Travel | 70mm | 120mm | 60mm | 160mm | 60mm |
| Filament required | (Unsure) | ~1. 5KG 5KG | ~2.5KG | ~4.3KG | 1.4KG |
GP3D’s Root 3D Printer Re-Launched on Kickstarter, Available to Early Birds at $375 - 3DPrint.com
GP3D is back to Kickstarter with the Root 3D printer after a slight hiccup regarding an issue that seems to have been resolved seamlessly, from what we know. With a campaign ending March 25th, they are already cruising along mighty nicely toward their goal of $50K.
With some misinformation that was given to Kickstarter which resulted in lack of communication to GP3D, and their Kickstarter campaign being pulled, GP3D was able to set the story straight and Kickstarter reinstated the launch. Meant to be a 3D printer for everyone, the second time around should be a charm indeed for their Root 3D printer, as at face value it has all the elements many 3D printing enthusiasts are going to be looking for without breaking the bank at all. Being able to afford a 3D printer and indulge in bringing your 3D designs to life with quality sounds quite simply like an awesome deal — especially for novices. Cost- and user-friendliness should be a good draw for families and schools as well.
For supporters, the Root is available at the earliest bird price of $375 plus shipping. With a standard retail price of $549, the price is still very affordable with a 3D printer featuring quality, a great design, and a compact desktop model that allows for portability. It’s made to be not only reliable, but extremely durable, with nonstop printing of up to 300 hours and a good track record with no errors or problems with it shutting down during long print times.
With a touch screen, it offers not only contemporary aesthetics, but all the features users expect today, allowing for touch control, set-up, and print management with a full-color 3.5″ screen. The upgraded extruder is able to print down to 100 microns. Made of metal, the Root measures at only 11.7” x 8.7” x 15.9” and although the body is fully metal, they stress its portability compared to other 3D printers.
The build plate is unique in that it moves from side to side and up and down. Consideration to the build plate could turn out to be very interesting because it can be such a challenge with many 3D printers in terms of having to come up with creative options regarding adhesion. GP3D’s goal is to eliminate the need for tape, clips, and glue, as they work with Build Tak. Those improvements are still in the works, but could obviously maximize attractiveness for consumers considering purchasing the 3D printer.
GP3D is an experienced producer of 3D filaments, and as the popularity for their materials increased, they were often questioned as to why they didn’t have a 3D printer for their brand as well — thus, their ongoing development for the GP3D 3D printer ensued over the past year with a diverse team of engineers and designers on their team behind the creation of the Root 3D printer.
With the motto that you can “grow your imagination” with the Root 3D printer, it is meant to be user friendly for kids so that they can have the gift of learning about and experimenting with 3D printing.
Parent company Green Project, Inc. is focused on being as environmentally friendly as their name suggests and is very concerned with recycling of ink jet cartridges and being concerned about landfills overflowing with printing materials. GP3D follows their mission with deep commitment and offers a small footprint with the Root, which accepts PLA filament.
The Root 3D printer is fully developed and all Kickstarter funds will be used to buy materials for production and begin fulfilling orders. Is this a 3D printer you are interested in supporting? What do you think of the metal, compact design? Tell us your thoughts in the GP3D’s Root 3D Printer Re-Launched on Kickstarter forum thread over at 3DPB.com.
Stay up-to-date on all the latest news from the 3D printing industry and receive information and offers from third party vendors.
Tagged with: affordable 3d printer • GP3d • Green Project • kickstarter • root 3d printer
Please enable JavaScript to view the comments powered by Disqus.
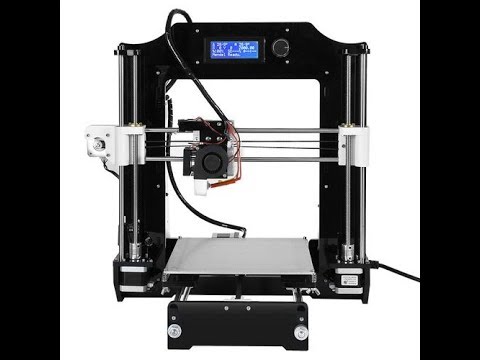
Selpic Star A 3D Printer Review: Inexpensive FDM Device with Kickstarter
Last fall Kickstarter began accepting orders for Star A 3D printers from Selpic . The developers promised an easy-to-use FDM device with the ability to install a laser engraving head and other options such as a 2.4-inch color touch screen or a heated platform to increase adhesion.
In the event of a power outage or accidental shutdown, a Save and Resume function is provided, eliminating the need to start printing again. There is a microSD card reader for offline operation.
The initial amount was announced at $99, but today a minimum of $119 is required. To order options, you will need to pay extra:
- $9 for platform heating kit,
- $15 for color touchscreen,
- $39 for 1.6W laser head.
So it was listed on the project page at the time of writing the review - in the spring of 2021; some bewilderment was caused by the note “Expected delivery: December 2020”.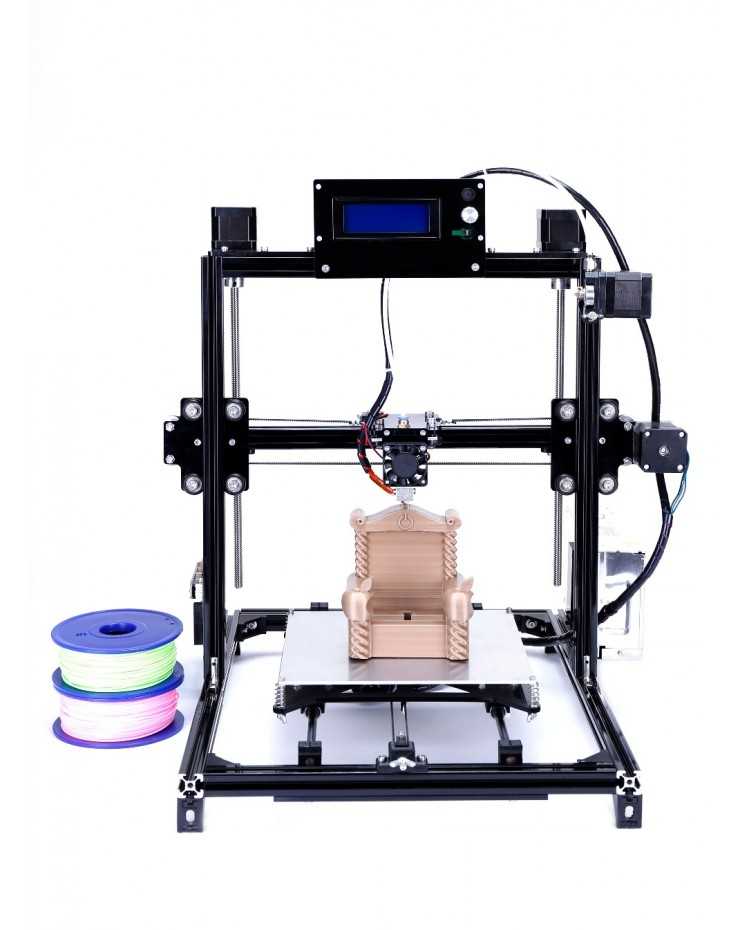
You can buy "right now" on the manufacturer's website for $189(it seems like even at a discount: the price of $ 199 is crossed out) plus delivery, but the package is not specified.
Readers of iXBT Live are already familiar with this printer, but now it has also found its way into the editorial test lab, so we decided to try it out anyway: one more look at the product is unlikely to be completely superfluous, and we will not repeat, unless absolutely necessary, what the author of the material described in the "Blogs". When presenting, we will also take into account the target segment of the model - people taking their first steps in 3D printing, so let us remind you of some points that are well known to more advanced citizens in this matter.
Declared characteristics, complete set
In different sources (manual, website) there are discrepancies for some parameters, in such cases we give two lines - one in italics:
| Technology | FDM (FFF) |
|---|---|
| Maximum printable area | 120×120×120 mm |
| Print nozzle | 0. 4 mm 4 mm |
| Print thickness | 0.05-0.3 mm 0.1-0.2 mm |
| Print Resolution | ±0.1 mm |
| Axis Positioning Accuracy | X, Y - 100 µm Z - 50 µm |
| Maximum print speed | 60 mm/s |
| Recommended print speed | 30-40 mm/s |
| Heater temperature (hot-end) | 180-250°C |
| Printing materials | PLA PLA, TPU, PETG, ABS |
| Thread diameter | 1.75 mm |
| Power input | 48W |
| Noise level | less than 60 dB |
| Operating temperature range | +5 to +35 °C |
| Dimensions, weight | 259×239×249 mm, 2 kg |
| Software | Cura |
| Compatible with OS | Windows, Mac |
| Supported file format | G-code |
| Connection | USB, microSD card possible |
| Description on the manufacturer's website | selpic. com com |
A few comments: of course, the working volume (that is, the maximum print area in three axes) is very, very modest. Thus, the choice of models for printing will be limited, as an option - they will have to be scaled (reduced), which is not always acceptable.
The parameters that determine the accuracy of printing are also not outstanding.
The very light weight immediately attracts attention: a 3D printer is not a smartphone or a laptop, it does not need to be carried around regularly, and for occasional moving from place to place, a few extra pounds do not matter much. But such a modest weight in this case clearly indicates low strength and rigidity of the structure, the insufficiency of which does not have the best effect on print quality. So the manufacturer clearly does not need to mention low weight in the list of advantages of the model; we see the only plus: you don’t have to pay a lot for shipping and delivery, but this pleases only at the stage of purchase.
The printer is claimed to be quiet, the manufacturer's website even has a photo of a girl who sleeps sweetly next to the printer installed on the bedside table. However, a noise limit of 60 dB is indicated; we regularly take measurements for various equipment, and therefore we have a good idea of what sounds are even at 50-55 dB at arm's length - it will not be very comfortable to sleep, to put it mildly. And most importantly: measurements for previously visited 3D printers showed noise within the same limits, but the manufacturers did not declare them quiet.
Proceed to the configuration; we got the following:
- the 3D printer itself disassembled into three parts,
- two pieces of thread spool holder,
- laser head with connection cable,
- AC adapter 100-240V, 50/60Hz, 12V output, load current up to 4A, equipped with 1.45m (18AWG) cable with switch,
- tools: small Phillips screwdriver and long thin steel bar with ring,
- fasteners: two long screws, two wing nuts (with eyelets for hand tightening), three disposable cable ties,
- microSD card (8 GB) with software, PDF manual (in six languages, but without Russian) and two model files (rocket, vase),
- tiny USB card reader,
- USB cable for connecting to a computer, length 45 cm from connector to connector,
- 10-meter skein of white PLA thread (manufacturer warns: random color choice).
There are no paper instructions, but it does not matter - you can use the electronic version. It is much worse that there is no information on the installation and use of the laser head, you will have to look for them yourself; one has only to be surprised at the strange logic of the manufacturer: we put the part and take money for it, but look for how to use it yourself. It’s good that there is such an opportunity, although the corresponding instruction is “buried” quite deeply, but there are no direct links. Whether there is enough information in it to work with a laser head, we will evaluate in a separate article (if, of course, the result is positive).
All packaged in a well-designed box with carrying handle.
Assembly, construction details
As stated, the assembly process should take no more than 2 minutes - perhaps it is, but not taking into account the time required to familiarize yourself with the instructions. We got significantly more for one more reason: we had to record observations in parallel.
There is no platform heating in our example. If necessary, the appropriate kit, capable of heating the table up to 100 °C, is installed by the user himself. You can find the instruction, as for the laser head, with patience and time, and it also contains a very “interesting” warning: you will need to replace the power adapter with a much more powerful one, capable of providing current up to 10 amperes at the same voltage of 12 volts.
Although not explicitly stated, this adapter is not included with the table warmer—it itself costs more than the $9 that the manufacturer priced the heater at. And, by the way, the ability of the power connector used to work with currents close to 10 A is questionable: exactly the same ones are used in laptops, where the limiting currents rarely exceed even half of this value. That is, it is quite possible that you will have to not only look for a more powerful power supply, but also change the way it is connected.
Another warning: a firmware update will be required. It is not very clear how to do this: the instructions for the heater vaguely state “please refer to the firmware upgrade document” , but we could not find such a document or links to download the firmware file.
Design
The base of the printer consists of two plastic sidewalls connected by four steel cylindrical guides with a diameter of 6 millimeters. The platform (Y-axis) moves along two of them with the help of a toothed belt, two more serve to fasten the remaining parts of the printing mechanism. The bending strength of such a base is expectedly low.
The legs are purely conditional - about a millimeter high protrusions on the sidewalls, devoid of any shock-absorbing anti-slip stickers.
The platform consists of two plates 135×135 mm in size, made of plastic: a translucent lower one, it is mounted on axles through linear bearings, and a black matte upper one - a working one, with a slightly rough surface, on which the model will be located during printing.
The solution is strange - to apply the melt of one plastic on another. Of course, a heat-resistant polymer was probably chosen for the top plate, capable of withstanding the temperature of the molten filament when printing the first layers, but the choice is clearly not the best: the author of the material in iXBT Live faced a significant problem - the gcode file for the rocket model, available on the memory card from the kit, formed with a substrate, which turned out to be extremely difficult to separate from the working surface, an unremovable mark remained, which not only immediately spoiled the appearance of the printer, but may well have a negative impact on further printing. The same complaints can be found in the reviews of other owners.
And this is when printing with relatively low temperature PLA - when using materials like ABS, there will certainly be even bigger problems, and you will either have to take additional measures, such as applying various coatings, or refuse to use such threads. That is, here, for the sake of a low price, functionality is sacrificed.
Let's continue the analysis of the design: the platform plates are connected by four spring-loaded screws located at the corners. Below there are round nuts with a diameter of 14 mm with a notch on the side surfaces, allowing you to adjust the position of the upper part of the platform without tools.
The motor is located on the left side of the base and there are protrusions for the thread spool holder, the control unit can be fixed on the right side. Limit sensors are noticeable - ordinary mechanical "mics".
The second part of the design contains mechanisms for moving along the X and Z axes, which include pairs of the same 6 mm cylindrical guides and differ in the drive: in X - a toothed belt, in Z - a threaded shaft.
The X and Z axes form the letter "G", fixed only at the base, and there is a suspicion that when printing tall models and when the head is closer to the front edge of the table, it will tilt down slightly under its own weight, distorting the printed figure. To make this suspicion close to certainty, it is enough to lightly press on the protruding part of the X-axis structure.
24BYJ28-243C is visible on the Z-axis stepper motor. We could not find the parameters of just this, and with the index 24BYJ28 a whole set of modifications is found. It is difficult to get to the markings of other engines, but with a high degree of probability it can be assumed that they are the same - why produce entities beyond what is necessary if buying the same parts will be cheaper?
The printhead is covered with a cover with ventilation slots. A small fan is visible on the side - apparently for cooling the extruder, as well as for supplying air to the print area through an air duct (obviously printed on a 3D printer), the narrow exit slot of which is located near the nozzle. There are no adjustments, and the only thing that the owner of the printer can do is change the nozzle, since it is quite ordinary.
Looking ahead, we note: the casing completely covers the area where the printing is currently being done - it is often difficult to see what happens when applying the first layers (and for small models and not only the first ones).
Assembly
We install the upper part of the printer in the bracket fixed on the two rear rails of the base (you still need to pass the cable from the Z-axis motor into the corresponding hole), insert long screws into the clearly visible holes (outside) and fasten with wing nuts (inside), we connect the Y-axis motor connector - in fact, that's it. Only “cosmetic” procedures remain: lay and fix the cables (there are ears for this, but not very convenient), fix the details of the coil holder on the left and the control unit on the right on the provided ledges.
With all this, you can meet, if not in two minutes, then certainly in five or six, but on the condition that there will be no flaws in the factory assembly units, and the owners also complain about this (although we were lucky: there were no special " adventures").
You can refuse the last two actions: the holder is designed for very small and light spools, or rather even just skeins of thread - it is very dead (the instruction says “load capacity” is only up to 250 g), and it is attached to the base very loosely. The height of the suspension is about 11 cm, and the width of the coil should not exceed 63 mm, that is, the vast majority of those found on sale cannot be fitted to it either in size or in weight.
It will not be possible to beautifully lay the bundles of wires covered with a mesh braid, and a very untidy-looking set of connections with connectors will remain at the back. Of course, for a cheap model, some unaesthetics is forgivable, but there are still doubts about safety: you can accidentally pull something out.
Control unit
Its fastening is rather conditional, if necessary, the unit can be easily removed if the user for some reason finds it convenient to slightly move it away from the printer (the length of the cables allows this).
On the right side surface there is a slot for a microSD card, USB B(f) connectors and for connecting the power adapter. The beveled front with the manufacturer's logo is purely decorative, for some reason it is made glossy, while the rest of the case is matte.
On the top plane, in a rectangular slot, there are four buttons surrounded by another glossy field. Each has a built-in green backlight, which serves as an indicator of the corresponding mode (it can blink or stay on).
The pressing force is quite large, you can not be afraid of accidental touching. Pressing the buttons is accompanied by loud clicks.
We found two versions of the instructions that differ slightly in presentation. The functions of the buttons in them, although described, are different and not very clear, so we will reproduce our observations below.
Recall: the power is turned on/off by the button located on the adapter cable - when the connector is connected, it is next to the control unit. After switching on, with a short delay, the indicator built into the button with the triangle symbol lights up.
The buttons can be replaced with an optional color touch screen for enhanced control and parameter monitoring functionality. Unfortunately, only instructions for installing the LCD panel are available, no details are provided.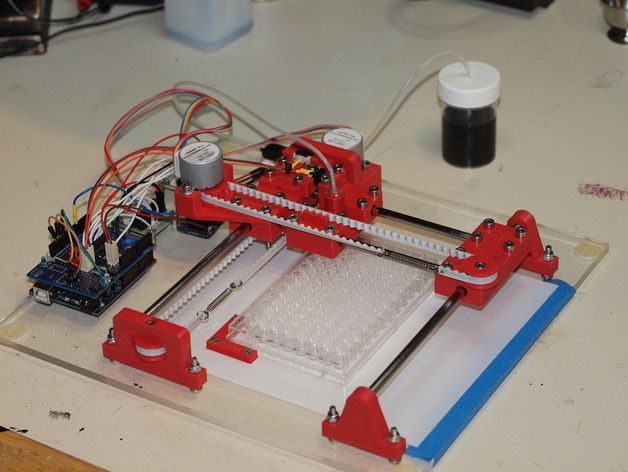 You can evaluate the possibilities from the photo:
Judging by the fact that even for heating the platform, a firmware update is required, we can assume that it will be necessary when installing the LCD panel - the modest set of functions implemented by the buttons and the potential possibilities are very different touch screen. However, we did not find official information on this matter.
We would therefore not recommend ordering the heating and LCD panel until further information is available.
Getting Started
Platform Alignment
The house button moves the print head to its home position, the far right corner of the platform. If you keep it pressed for 3-4 seconds, the indicator will flash, the head will rise, move to another corner and fall again; subsequent short presses will cause the head to move to the other corners, and then to the center of the platform - this is necessary for alignment. At the end of the cycle, the house indicator will turn off, another short press will return the head to its original position.
For adjustment, it is proposed to put a sheet of paper (usual office paper) on the table and try at each of the five points: it should not be pressed, but it cannot hang freely - it should move with little effort. If this is not the case, we adjust the rolling nuts located in each corner; hint: clockwise rotation (when viewed from above) reduces the gap, anti-clockwise increases it. Point number 5 is probably needed only as a control point: there is no separate adjustment for it.
It cannot be said that all this is very convenient, especially in the two far corners, and the adjustments are not unambiguous: apparently, the screw in the hole in the bottom plate sometimes wedges a little, you have to turn the nut back and forth several times. And make sure that during the manipulation of the nuts, your hand does not accidentally press on the table or one of the axles, otherwise the fragility of the structure will affect: even with a little effort, the platform will move down a little, the adjustment will be incorrect.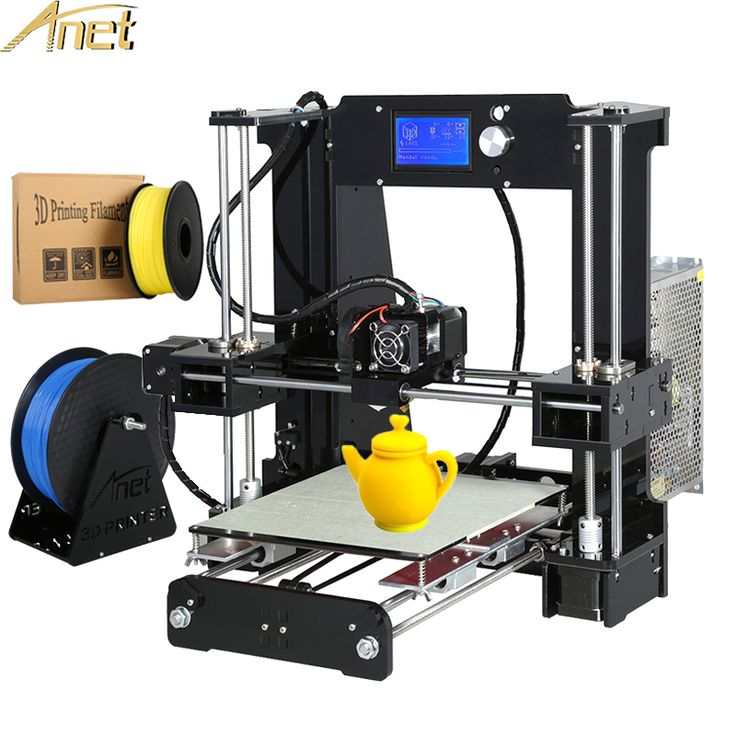
It is advisable to repeat the procedure twice and do it after each print, while making sure that there is not a drop of frozen plastic near the nozzle opening - for this, keep tweezers at hand to remove the excess that has not yet cooled down. And, of course, if some kind of coating is applied to the platform (film, Kapton tape), then the alignment must be done again.
The vertical movement of the print head occurs after a three-second press of the button with a triangle - after each such action there will be a rise of 2 cm. This may be necessary when threading the thread or when some action is required with the platform: clean the traces of the previous print, apply or remove the coating. The head can also be raised from the slicer, and the platform can also be moved from it.
Threading
Threading is also described differently in the two versions of the instructions: either insert the thread first and then initiate the heating, or heat it up first and only then insert the thread. There is not much difference: the extruder will still not supply it until the warm-up is completed.
First, raise the print head using one of the methods described just above.
Heating starts after a short press of the button with the “+” symbol, the indicator built into it will flash rapidly for about three minutes, during which the hot end heats up - we have an increase from 23 ° C (there was so much in the room) to 210 ° C took 2.5 minutes. Probably, the temperature of 210 °C is set in order to be able to charge not only PLA, but also ABS.
When the desired temperature is reached, the indicator flashes slowly, the extruder starts to work - a characteristic sound is heard, now you can insert the tip of the thread (it is better to cut it obliquely) into the loading hole of the head as far as it will go and press lightly down. At some point (perhaps not immediately), the thread will be “picked up”, its supply will begin; as soon as the molten plastic begins to stand out from the nozzle, press the “+” button again, after which the indicator will go out and the heating will stop.
Removing the thread: briefly press the "-" button and wait for warming up, during which the indicator in it blinks quickly. When the temperature reaches 210 °C, the blinking becomes rare, the extruder starts to work, pushing the filament up from the filler hole. As soon as it is completely out, press the button again. The indicator goes out, the head cools down.
It often happens that one thread is replaced by another - a different color or from a different material. Then, when refueling, it is necessary to release a little melt from the nozzle so that the remnants of the previous plastic come out.
Installing software
Most owners will have to abandon the supplied USB cable when connecting to a computer: it is too short, although kickstarter has a photo of the bundle with a cable of quite acceptable length. It is clear that the manufacturer had to save on everything in order to minimize the final price, but then it would be more logical to simply exclude the cable from the package, warning about the need to buy it separately. The same can be said about an inferior screwdriver and not the most convenient card reader: it would be better to put a couple of additional skeins of thread of different colors instead of all this.
The bundled memory card contains installation files for the Cura driver and slicer for Windows and Mac OS X. The proposed version of Cura is fairly recent - 4.7.1 (on the website of the developer, Ultimaker, v.4.8 was offered at the time of testing; also for Linux), but it is designed for 64-bit versions of Windows: our test computer had Windows 10 64 bit, and owners of 32-bit OS will have to download older versions of the slicer (up to 2.4).
The instruction suggests the following printing scenario: we load the model into the slicer, set the print parameters and create a gcode file, write it to the card, which we install in the printer's card reader and initiate printing - offline, without the participation of a computer.
In this case, you only need to install Cura, and you don't even need to connect a USB cable. Note that for the first check, a slicer is not needed either - two gcode files are already on the map, and one is duplicated in the root directory.
But there is another option - "printing online", directly from the slicer, which will require both a USB connection to the computer and driver installation, with which we will start: having prepared a USB A-B cable of sufficient length, run the Ch440_341.EXE file (printer not yet connected).
This is not a driver for the 3D printer itself, but a USB-UART bridge, a device that allows you to transfer data between a PC and an Arduino microcontroller via a USB cable. As a result, when the printer is connected, the following device appears in the “Device Manager”:
Then we install the Cura slicer, and here we had to get nervous: the application was installed, launched, but at one of the initial setup steps it “fell off” without issuing error messages. The same thing happened with version 4.8.0.
The search showed that we were not the only ones with this problem (not about the combination of the slicer with the Star A printer, but about Cura); a number of measures are proposed that did not work in our case, and we had to do something radical - downgrade the version, since the archive of options is available on the site ultimate. com . It was possible to install 4.6.0.
You can select a language for the interface, including Russian, which we did.
A little about the Cura settings
In general, Cura is considered a slicer that is quite suitable even for beginners, since it does not require complex settings. However, there are a number of settings that you definitely need to make - in particular, set the printer settings. The instructions we downloaded for using Cura with the Selpic Star A recommend the following settings:
We will not comment in detail, since this is beyond the scope of the review, we will dwell only on some points.
The recommended settings for width, depth, height are immediately perplexing: the working volume is already small - 120 mm along each of the axes, and here it is set to 100 mm at all, and even a part is marked gray when displayed in Cura, and if you place the model If you enter this gray zone, then slicing into layers will become impossible.
Where did these 100 mm come from - we will not guess, but it is quite possible to put "legitimate" 120 mm on each axis. The gray margins around the perimeter indicate the margin left by the slicer on the skirt, border, or backing (note that the gray margins will be different for the three settings listed), and if you select “None” for the Sticking to Table option, these margins will disappear.
In passing, we recall that the skirt (or edging, “skirt”), that is, the printing of several “threads” at some distance from the future contour of the base of the model, only allows us to assess the absence of problems with the supply of plastic and its adhesion, and the border (“brim”) and the underlay (or raft, "raft") will really help to better attach the first layers of the model to the table. Therefore, it is always better to set the print of a skirt, since the consumption of plastic for it is minimal, and the border and backing - according to the circumstances.
Let's also pay attention to the fields for the start and end G-codes, which determine the behavior of the printer before printing starts and after it is completed: the instructions in both fields contain only one command, as in the left screenshot, but the author of the material in iXBT Live there are more commands - he brought the set offered by the default slicer.
Those who wish can find the decoding of G-codes themselves (such information is quite available on the Internet), see what this or that command means, and evaluate their need.
Another option is to open the gcode files of two models from the supplied memory card (for example, in Notepad): one can hope that they are already optimized for use with this printer. It turns out that the beginning and end of the code are closer to the default settings than to the recommendations of the instructions, although they are also supplemented, and there are comments on each line. Here is a fragment of the beginning of the code for the rocket:
That is, there is no unambiguity with these codes, but no one promised a fish from a pond without difficulty - any question must be studied. And for starters, you can use any of the above recommendations.
But still, we'll give you a hint: it's better to leave what the slicer offers by default. Since there is only one command in the final code that the instruction suggests - turning off the heating of the hot end, the nozzle remains at the last print point and, when cooled, sticks to the model. This is not fatal, but unpleasant, so it is advisable to immediately move the head to the home position, and even pull the thread a little in the opposite direction (retract), so that a thin “snot” from the rest of the melted plastic does not stretch behind the head, for which additional commands are used.
We won't waste time on the description of work in the Cura slicer: the Internet is full of resources that describe possible actions, settings, and techniques with varying degrees of detail. For the very beginners - a few tips.
The model (and working volume of the printer) opened in the program window may not be displayed in the center, you can move it by holding Shift and moving the mouse with the left button pressed. Zoom in and out - by rotating the mouse wheel. Rotation of the view (to look from different sides and at different angles) - by mouse movements with the right button pressed.
Before slicing the selected model into layers, still look at the slicing settings - not everything you see there is not optimal, but even acceptable. In order not to be disappointed, take your time, first study the "materiel", and if you can't wait to print at least something, use the gcode files from the memory card.
For a 0.4 mm nozzle, the optimal layer height is 0.15-0.2 mm, maximum 0.3 mm.
Typical hot end temperatures for different filaments: PLA 190-210 °C , ABS 230-245 °C , PETG 210-230 °C , TPU 210-240 °C. If this is a “branded” plastic, it is better to check the mode with the supplier: for example, on the label of the ABS we used, it was written “220-260 ° C”.
Based on feedback from people who have already worked with the printer, we immediately decided that we would not print directly to the platform, so as not to spoil its surface from the very beginning.
Choice of coating for different types of filament
We had three coating options: Kapton tape and two types of Lomond heat-resistant self-adhesive films designed for laser printing. There were no indications of differences between these films - in any case, they were not on the packaging, the main difference was in color: transparent and white; so we will call them.
The surface of the applied coating was additionally degreased.
A 20x20x10 mm bar was printed, with a "skirt". Print speeds set to 40mm/s and fan speed set to 60% unless otherwise noted.
PLA on white film: 200 °C - adhesion is such that you can’t tear it off: you can print the model, but then it separates either with a piece of coating, or completely collapses at the bottom layer that remains on the film. We did not try ABS plastic with a white film: its stocks ran out.
PLA per Kapton: 190-210 °C - adhesion is very poor, practically none. Turning the fan on and off and changing the print speed do not play a noticeable role. The model could not be printed.
ABS on Kapton: 230°C - Slightly better adhesion than PLA, but pattern buckles at edges and lags behind Kapton surface. If the temperature is lower, then the adhesion is worse; if it is higher, there is more buckling with subsequent detachment of the model. Manipulations with the print speed and the fan did not give a significant improvement, the model could not be printed either.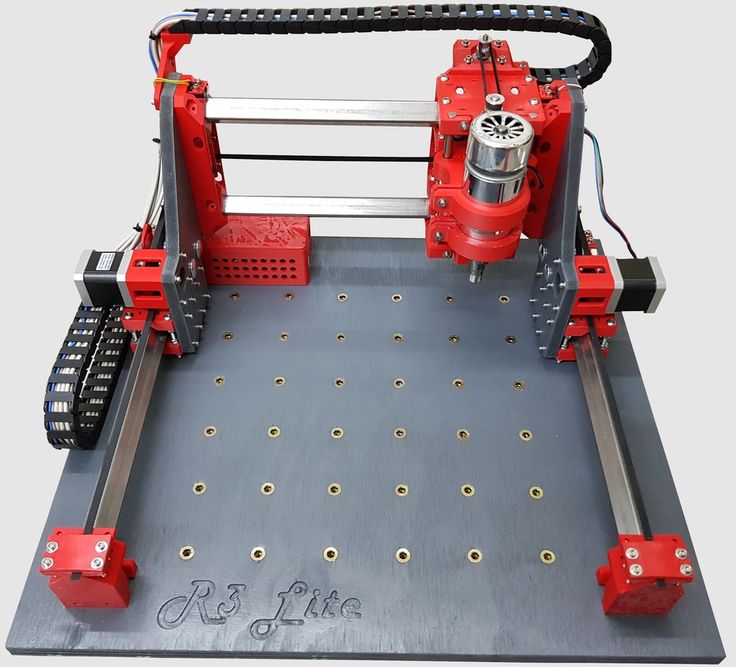
That is, both of these coatings are not suitable for use in this case.
Now with transparencies.
ABS 220-250°C: Very poor adhesion. Turning the fan on and off and changing the print speed do not play a noticeable role. The model could not be printed.
Thus, work with ABS, if possible, is with the use of some other coatings. There is a choice: other films, and "blue tape", and special adhesives, and even various "improvised products" like hairspray, but they also need to be tried. We ourselves did not dare to print with such plastic (and any other) on the Selpic Star A platform without coating, and we do not advise readers: if you spoil the surface, you cannot buy the top table separately - it is not supplied today, it is unlikely that it will come to that in foreseeable future.
PLA 200 °C: Finally the adhesion was good enough for the plastic to stick properly and we were able to print the whole model! Separating it from the film with a palette knife (a flat spatula with a sharp edge) was also not difficult.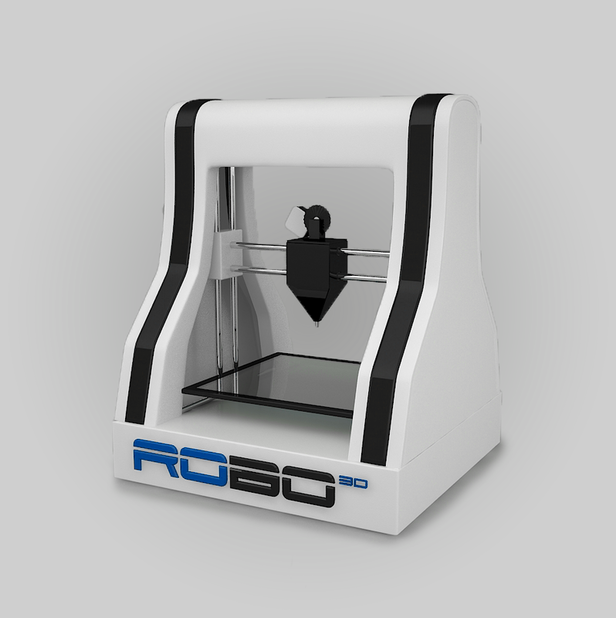 Next, we used just such a coating.
Note that if the extrusion temperature is lowered slightly, the adhesion of PLA deteriorates.
We also tried ASA thread - this material differs from ABS (among other things) in increased adhesion, although table heating is still desirable, and less heat shrinkage. For it, various sources recommend hot-end temperatures from 220 °C to 240-270 °C.
We set 240 °C, set border, 0.15 mm layer, 75% fan. The border was printed almost completely, but then it began to bend and came off, the process was stopped. Repeated with the fan off and 250 °C - about the same.
We also found a Flex thread, but this definition is somewhat arbitrary: the label is not factory, but handwritten. For such material, various sources recommend an extrusion temperature of 210-220 °C to 230-250 °C and table heating.
Tried: 235°C, border, 0.15 mm layer, printing at 50 mm/s, fan off. The adhesion is better than that of ABS and ASA, but still insufficient: one corner of the border soon bent strongly and completely moved away from the table, the first layers of the model began to bend along with it.
At 250 °C, 30 mm/s, 20% mesh infill, with a border and also without airflow, things went more fun - the border remained completely on the table, the model printed normally. Estimated time on the slicer 22 minutes, actually it turned out 44 minutes.
Test models
PLA bridges - four short ones (200 °C, 0.15mm layer, print speed 40mm/s, fan 100%, with a border) are not perfect, but decent enough even with a considerable length of the horizontal part: of course, there are sagging threads on its first layer, but there are relatively few of them.
PLA bridges - two long (195 °C, 0.15mm layer, print speed 60mm/s, fan 100%, infill 20% mesh, bordered), estimated time 19 minutes, actual 1 hour 13 minutes. The longest bridge turned out frankly bad: there are a lot of sagging threads at the bottom, but the one that is a little shorter looks more acceptable.
Upward bollard 10x10mm base x 50mm high (PLA, 200 °C, 0.15mm layer, 60mm/s print speed, fan off, 20% mesh infill, bordered), time estimate 19minutes, actually 1 hour 19 minutes. It turned out quite neatly, if you find fault - the corners are slightly rounded, but this is inevitable for this 3D printing technology.
We couldn’t print a model with very thin walls (square section, a low “cup”), and it was not even the fault of the printer, but the slicer: it cut into layers without error messages, but instead of printing, the head only twitched a little, after which the program signaled the end of the process. This happened with different print settings; we have seen this before with older versions of Cura, while other slicers generated code suitable for normal printing of this sample.
Funnel: large part, but with a small footprint in contact with the platform. That is, the probability of separation, at least partial (and with subsequent distortion of further layers), from the table is very high.
We made our first attempt with the following settings: PLA 200 °C, no border or backing, speed 60mm/s, fan 60%, infill 40% mesh, layer thickness 0. 2mm. After printing 6%-8% of the model, deformation (bending) began, which led to the separation of about a third of the perimeter from the platform; we stopped the process.
Second approach: PLA 200°C, border, speed 60 mm/s, fan off, 35% mesh infill, 0.25 mm layer. The program estimated the printing time at 1 hour 48 minutes, in reality it took much more: 11 hours 46 minutes. Slicers are often too optimistic about timing, but to be wrong by more than six times...
Other printers we have visited for such a model with approximately the same settings required about 4 hours, with less infill and completely within 2.5 hours, which makes us seriously doubt the reality of the maximum speed of 60 mm / s declared for Star A - just such we asked for the funnel. It remains only to be glad that a cheap printer was able to continuously work for so long.
The funnel was printed in such a way that its “sole” (with a border) did not lag behind the platform anywhere, however, the result can only be estimated at a C, and even then with a stretch: instead of a clear cone, a figure was obtained, deformed along the Y axis, first noticeably to the right, and then a little to the left.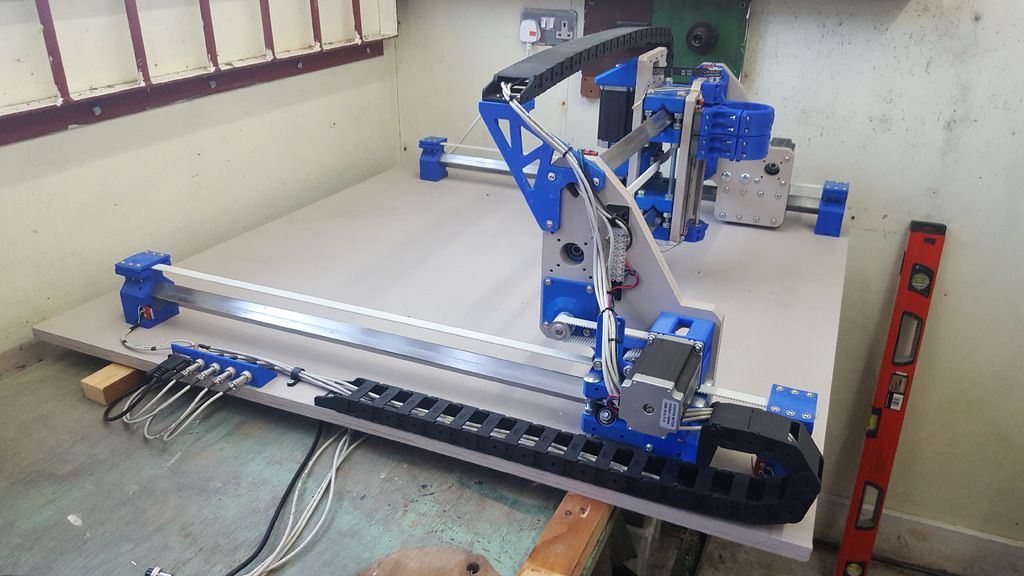
Also, we chose a fairly high layer height, which also affected the unevenness of the walls, but if you reduce this value in the hope of getting higher quality, then the print time will become absolutely insane.
Now a more complex model - a frog, which has a large number of overhanging elements. We tried to print it from FLEX with settings: 255 °C, border, speed 40mm/s, fan off, 25% mesh infill, 0.2mm layer. Estimated time 53 minutes, actually it turned out 4 hours 37 minutes.
We saw above that the extrusion temperature for this plastic should be set higher for better adhesion, so we set it to 255 °C. Although the printer specifications indicate a temperature limit of 250 ° C, the sensor cheerfully reported warming up to the set value.
After some time, the edges of the border nevertheless noticeably arched and for the most part of the perimeter moved away from the platform, but not immediately, but when the printing of the model itself began, which confidently rested on the table on the remains of the border and its own “sole”.
The frog turned out to be quite neat, without noticeable defects on the belly, chin and paws.
In order to have at least some real use from the printer, and not just abstract test figures, we printed round washers from FLEX (they were needed on the farm) - the most common ones, with an outer diameter of 18 mm, with a hole of 8 mm, 2 mm thick, nine pieces per session. To make the products durable, the following parameters were set: 50% filling with lines, 0.15 mm layer, 255 °C, speed 50 mm/s, fan off.
At first they tried to print without a border, but after about 45 minutes of printing, one after another, the washers began to fall off the platform, I had to start again, but with a border. Estimated print time 37 minutes, actual 2 hours 18 minutes.
Despite the large area of contact with the platform - the border turned out to be common for all the pucks, the edges on a significant part of the perimeter still curved, rising above the table (very much in some places), as a result, most of the pucks turned out to be defective. But even in the best specimen, the outer and inner circles turned out to be far from perfectly round, rather they are polyhedrons, and somewhat curved.
We have to admit that the range of materials for printing with the tabletop we have chosen is very limited. We emphasize once again: you can try other coatings, but without any guarantees; you can print uncoated, directly on the table - it is possible that in this case the adhesion of a number of other materials will be sufficient, but even for PLA there are problems with the separation of the finished model, moreover, it is likely that after several printing sessions the surface of the platform becomes unsuitable for further work.
An even more complex figure is a seated lion with straight forepaws, whose belly, chest and muzzle are unsupported; in configuration it looks like a frog, but both the model itself and the overhanging elements are noticeably larger. Trying to print from PLA with settings: 200 °C, border, speed 60mm/s, fan off, 15% hex infill, 0. 2mm layer, no supports. The program estimated the printing time at 1 hour 43 minutes, in reality the process took 11 hours 29 minutes (again, a sixfold error!).
The result turned out to be very poor quality, first of all, the displacement of layers along the Y axis is striking, which was also present on the funnel, but to a lesser extent: the lion looks more like a sphinx, whose limestone figure has been eaten away by erosion over the millennia.
This defect can be caused by various reasons, including excessive friction when moving along the guides or insufficient force generated by the motor, loose drive belt, rocking of the spring-loaded table. Perhaps printing at a slower speed would have given a better result, but even at the maximum setting, the time to make a sample turned out to be very long.
And, of course, there are defects in the overhanging parts, which is quite expected for such a model. Yes, you can select modes, but, unfortunately, the result of any such change will be noticeable only after several hours of printing. A more effective method is to turn on the creation of supports in the settings, however, this will significantly increase the printing time and filament consumption, as well as force you to waste time and effort on finishing the figure associated with the removal of these supports.
Thus, various “little things” on this printer turn out quite decently, and any large figures are much worse. A person with experience with such devices could try to take steps to improve the situation (and even then only to some extent), but the model is clearly intended for beginners, and they are likely to get only disappointment.
Printing noise
During printing, the noise level, measured from a distance of 1 m in a quiet room with a background level of no more than 30 dBA, is mainly in the range of 45-49 dBA, with occasional spikes up to 51-52 dBA. And this is already too much if people are resting (and even more so sleeping) in this room. In addition, the sound constantly changes its tone and has unpleasant low-frequency overtones, sometimes turning into a bounce.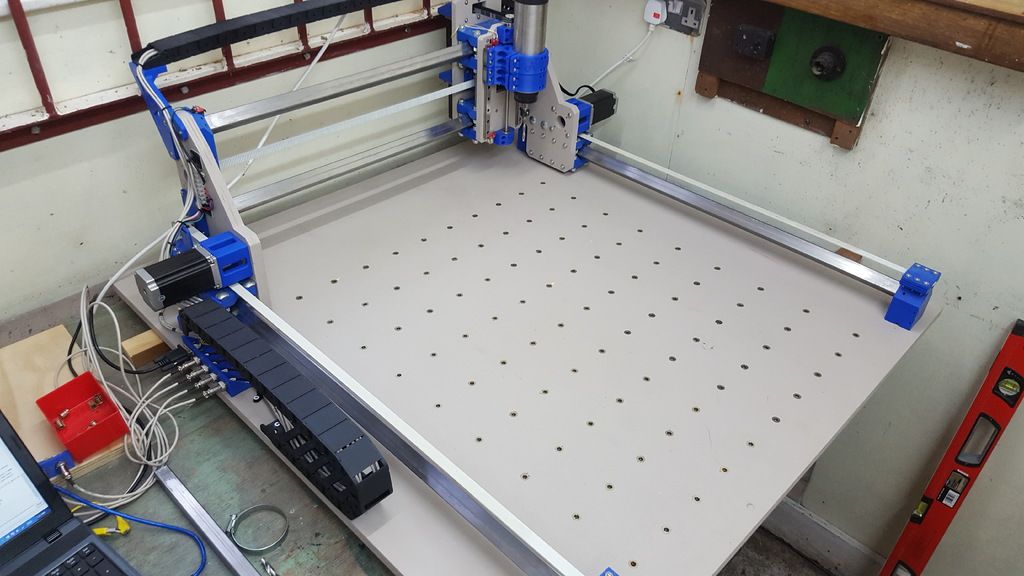
If we are talking about a distance of half a meter - something like this happens when an operator is sitting at a computer next to which a 3D printer is installed, then another 3-4 dBA must be added to the given values. But even these figures will fit well into the declared maximum, but once again we note: the printer cannot be called quiet, and even in an average office space where several people work at computers, its noise is unlikely to be masked by other sounds - very specific “roulades” distributed during printing.
Even in standby mode, when only the fan in the print head is running, the printer is clearly audible: the level is noticeable - 39 dBA from one meter or 42 dBA from 0.5 m, and the sound itself is not just rustling, but with a pronounced high-frequency component.
Other aspects of working with a 3D printer
To start printing the gcode file generated and saved to the microSD card, press the button with the image of a triangle, the indicator built into it will blink, the head will start warming up, after which printing will start, and the LED will be on constantly .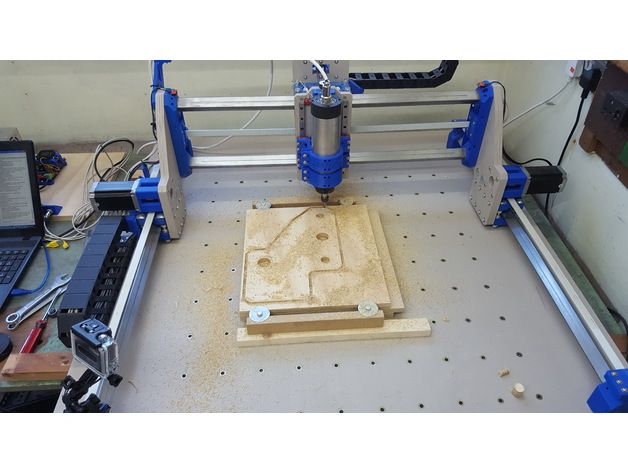 The process can be paused and resumed with short presses of the same button, while a long press will cancel printing.
So far, everything is clear, but upon closer examination, questions arise.
There are no means of displaying the contents of the map and navigating it, so the question immediately arises: if there are several gcode files, which one will be printed? The instruction gives the following information: "The printer will choose the latest G-code file to print automatically" the letter of the name or something else?
We left two files with a rocket and a vase on the map in the Slicer software folder and wrote three more Cura files with the names "box.gcode" (a 20x20x10 mm block located in the center of the platform) into the root directory , “tower.gcode” (10x10x50 mm column, also in the center) and “smalltower.gcode” (the same column, but with a reduced height of 10x10x20 mm and offset from the center of the table). All three files were recorded in the specified sequence in time.
Note: if the card is inserted, pressing the slicer button "Save to external media" will write the code to the root directory without intermediate requests.
We remove the card from the card reader, insert it into the slot of the printer control unit and press the triangle button. The indicator built into it starts blinking frequently - it is warming up, then printing of a smaller column begins; that is, files in folders are ignored, and selections in the root directory seem to be not alphabetical, but file creation time: this code was created last. During printing, the LED in the arrow button lights up permanently.
Trying a pause: a short press on this button pauses printing, the head rises slightly and moves to the side; indicator flashes slowly. But retraction (pulling the thread in the opposite direction) does not occur - a melt thread can come out of the nozzle, which must be removed in time so that it does not then fall on the model and distort it. The subsequent short press of the button resumes printing, however, unpleasant options are possible: several times after a pause everything went fine, but one day the head “forgot” to lower and began to apply layers a centimeter above the already made part of the model.
Now is the time to see how the claimed continuation of printing works after power failures. We wait until about half of the model is made and turn off the power to the printer, the head immediately freezes in place. Then we wait a few minutes for the head to cool down a bit, and turn it on again.
The triangle in the button blinks frequently - warming up is in progress, then printing automatically continues, but not from the place where it stopped, and not immediately: the head first rises and moves back to its home position, and only then returns to the top layer of the model. This takes only a few seconds, but a little melted plastic may also come out of the nozzle, which ideally should be removed in time, for which it is advisable to keep tweezers handy. But in general, the declared function of resuming printing works; it is difficult to say whether it is always correct (remember the failure after a pause noted a little higher).
At the same time, an additional file mks_pft.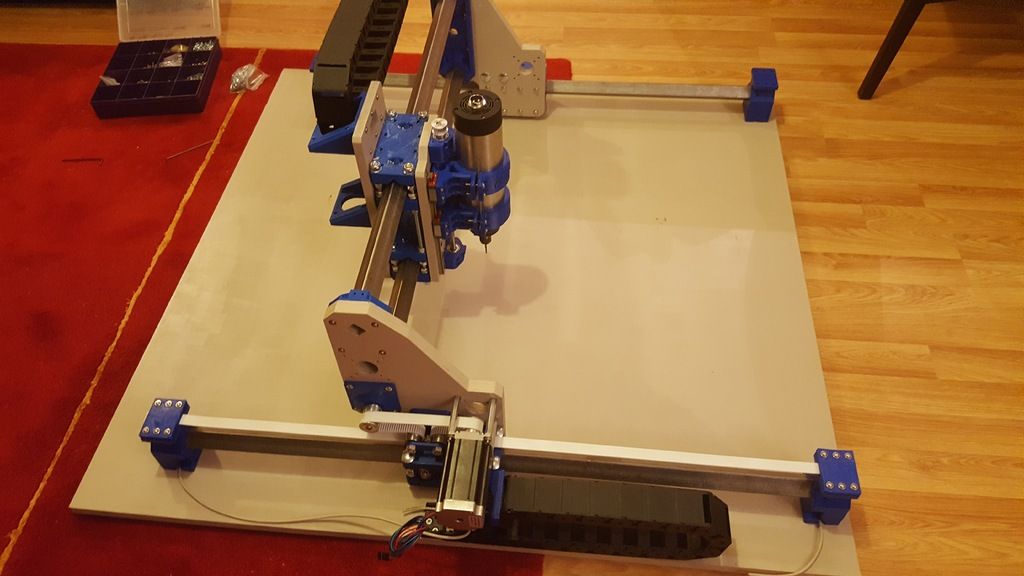 sys is generated on the card - apparently, the information necessary for resuming is written into it. And if you print from a slicer, that is, from a computer via a USB port, such a file is not generated, even if the card is inserted into the printer, and a power failure will force you to start all over again, this is verified by us: although the slicer, when you try to close it, assures that printing is in progress , but the head is cooling down, there is no progress indicator, and the "Pause" and "Cancel printing" buttons in the program window are inactive.
Total
Let's evaluate different aspects of both the product and the project.
The package bundle is contradictory: on the one hand, the designers obviously saved every cent, and on the other hand, they put a screwdriver and a card reader in the box, which will not be superfluous, but you can do without them, especially considering that they are from the “bundle for piglet." The USB cable is generally a joke: it seems to be there, but most users will not be able to use it, it is too short.
About the submission of information: if the device is intended primarily for beginners, then information about it should be both accessible and comprehensive. It cannot be said that everything is always in order with this “branded” models, but in this case the situation is quite sad: the instructions in the kit are far from complete, and besides, sometimes contradictory or even unreliable. You can find something additional in official online sources, but for this you need to try - there are simply no direct links. And on some issues (for example, about updating the firmware) - not a word at all, except for a mention that this should be done. Of course, for large manufacturers of various equipment with the availability and completeness of information, often not everything goes smoothly, but they have the influence of the “bureaucratic machine”: even minor amendments (for example, eliminating typos) in a section in some language are not even decided on level of regional representation, but requires a lot of approvals "at the very top". But in small companies, the ruler has its own hand, and it remains a mystery what prevents Selpic from doing “everything in the right way”, because the costs for this are practically zero.
Options: they are available to order, we even got one of the three claimed - a laser head, but their use is a big question. So, the platform heater will require a firmware update, which is impossible to do, at least today. The laser head just lies in the box, there is no information on its installation and use, not to mention the corresponding software, and it can be difficult to find it on official resources.
We will not enumerate the design features again, we will limit ourselves to a general phrase: there are a lot of moments that cannot be attributed to inspiring not only optimism, but at least hope for the absence of problems.
It is clear that you can turn a blind eye to many things if the “amount in words” is appropriate. Our opinion: for $100-$120 you can buy such a printer - for example, for a teenager to determine whether he is really interested in 3D printing or is it a passing hobby that will simply be forgotten tomorrow. True, even for such money this is far from the only model, although analogues are probably not much better. And at a price of about $200 or a little more, there is a considerable choice of models, and not only those based on FDM technology, so it’s not at all a fact that the consumer will prefer exactly Selpic Star A .
Best STL Files for 3D Printer Root・Cults
Lid for feeding cup-Root-1
Free
Lid for feeding cup 1
Free
Root crop 5 or planter 5
3 €
Feeder 4 or planter 4
3 €
Root crop 3 or planter 3
3 €
Feeder 2 or planter 2
3 €
Feeder 1 or pot 1
3 €
Practice root canal 9 models
€10.17 -fifty% 5. 08 €
08 €
PSY LORD VISION HOLDER
6.99 € -fifteen% 5.94 €
Root ball
Free
ROOT maradeurs dice
Free
Finn's Root Sword
8.14 €
MCP Status Tokens
€2.89 -twenty% 2.31€
ADVENTURE TIME ROOT SWORD
4.06 €
Rootstock for jelly pots
2 €
Beetroot
4.07 €
Dentist's chair
1 €
Root board game token holders
1.44 €
Root - Forest Alliance - Bases
1. 25 €
25 €
Root - Forest Union - Sympathy
1.25 €
Root - Canopy Dynasty - Perch
1.25 €
ROOT maradeurs dice
Free
Wood Elf
Free
Seven chakras PACK, symbols separated, set of 7 chakras together
3.84 €
Keychain with seven chakras 3 models
3.03 €
Root - Marquise de Chas - Recruiting
1.25 €
Root - Marquise de Chas - Tree
1.25 €
Tramp box
3.04 €
Vagabox (root game)
5.09 €
Board game "Roots and Rivers" Organizer box extension
Free
Root - Marquise de Chas - Workshop
1.25 €
Root - Marquise de Chas - Sawmill
1. 25 €
25 €
Root - Marquise Kota - Dungeon
1.25 €
Complete anatomy of upper and lower teeth 1
Free
Hydro Pot Orchid / Hydro Pot Orchid
9 €
Root Board Game Insert (Base/Riverfolk/Underworld)
€19.42
Clamp for Root CNC
Free
JAYCE AND THE CONQUERERS OF THE LIGHT root
5 €
Root growing sphere
Free
plant root growing
0,50 €
Valorant REFLECTION : Act 2 Squires (9x)
1.25 €
7 Chakras
3.71 €
Curved Handled Dibber
1.15 €
Dandlion Digger Garden Tool
1.15 €
Root + Organizer of all extensions
2.