Most 3d printed items
14 Things to 3D Print and Sell in 2022 – Clever Creations
Thinking about starting a 3D printing business? Want to try to sell 3D printed items on the side? You may be wondering where to start.
There are several ways to make money with a 3D printer, for example, you can open an online shop to sell 3D printed items, or offer print-on-demand 3D printing services.
In this article, we’ll cover how and where you can sell 3D printed items. We’ll also show cool (and profitable) ideas for things to 3D print and sell, and explain what you need to know before you turn your passion for the hobby into a business.
What to keep in mind when selling 3D prints
Selling 3D printed items can be a lucrative business. However, you need to consider a few things before opening your shop and taking your first orders.
Profit margins
Before setting a price for your 3D prints, you should calculate your costs and margins. This isn’t unique to 3D printing, since all business owners need to know if their product will make a profit.
You need to consider all costs associated with 3D printing the item and selling it. This includes the 3D printer cost, but also the print materials, shipping supplies, 3D printer power usage, seller platform fees, and wages for your time. The more thorough you are, the more accurate the results of your calculations will be.
Copyright
The issue of copyright when selling 3D prints is twofold. If you are printing and selling a 3D model created by someone else, you must follow the designer’s license. If the designer has listed the model as non-commercial, you cannot sell it. If you still choose to do so, they can take legal action against you or your business for infringing on their copyright.
Another layer of the copyright issue is that you cannot sell prints of copyright or trademarked material. This is true even if the model has a commercial license. For example, Bulbasaur is a trademarked and copyrighted character of Nintendo. Thus, you can’t sell Bulbasaur planters even if the 3D model has a public domain license.
Where to sell 3D prints
You can sell your 3D prints using many different channels. Live events like craft fairs, festivals, and trade shows are a great way to garner in-person sales. Consignment shops and displays in local businesses can give your 3D prints a brick-and-mortar presence without the overhead.
Online eCommerce platforms are by far the easiest and most widespread sales channels to use. You can start your own website and sell directly from there or use an existing marketplace.
Image: crosslink via MyMiniFactory
3D printed vases are a hit on almost any platformThe latter option is much easier for beginners who don’t know much about online retail. By using existing marketplaces, you can leverage their existing audience and make money with a 3D printer in no time.
Etsy
The online marketplace Etsy focuses on handmade, vintage, and handmade supply products. They charge a $0.20 listing fee per item every four months (or until it sells and is relisted). They also take a percentage of the sales revenue when an item sells.
Many 3D printing shops have been very successful in selling items like planters, cookie cutters, and toys on the Etsy platform. Aside from those, there are plenty of other things to 3D print and sell on the platform.
Recommended:
The 5 Best 3D Printers for Making Cookie Cutters
Amazon
The Amazon marketplace is the largest eCommerce platform available. Amazon integrates third-party sellers into their warehouse system. An independent 3D printing shop using the platform can send their prints to the nearest warehouse and Amazon would process them and ship them out as they sell.
eBay
More dated than most of the other platforms on this list, eBay never quite left its days as an auction site behind. It has at least integrated the ‘Buy It Now’ functions that allow it to work more like an eCommerce platform.
New sellers get free listings to get started, then pay a flat fee per listing and a percentage of their revenue.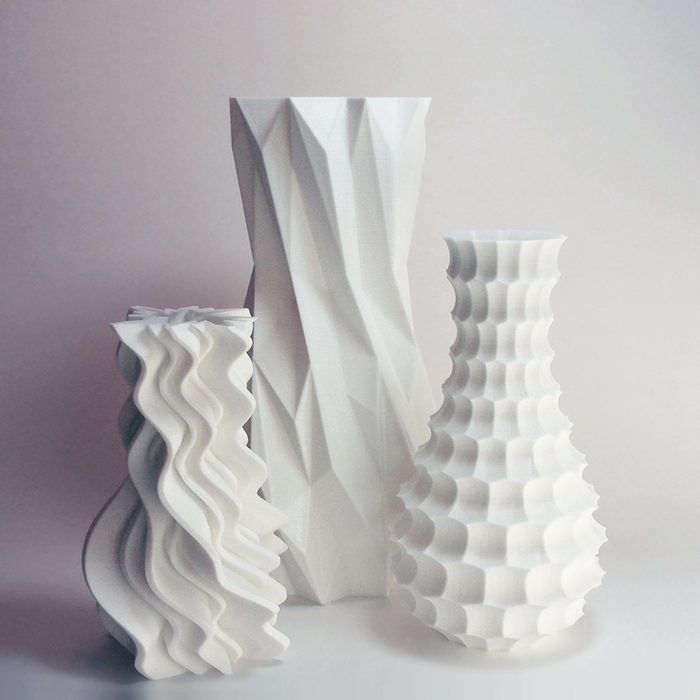
eBay shouldn’t be your main eCommerce platform for making money with your 3D printing business. However, it works well as a supplement to the other services we’ve listed.
Fiverr
Starting as a place to pay people to do menial tasks for $5, Fiverr has grown into a labor outsourcing giant. They are now competing with the likes of Upwork, Freelancer, and so on.
Fiverr’s system pays you for your labor, so you are not listing your product. You are listing your ability to 3D print cool 3D prints for other users.
Best 3D Printed Items That Sell
1. Miniatures (D&D, Warhammer, etc.)
Image: BaconuCrazy via MyMiniFactory
One of the best things to print and sell with your 3D printer is miniatures for tabletop games like D&D and Warhammer.
These figurines are small and highly detailed. This means that if you want to make money by 3D printing miniatures, you are best off with a resin 3D printer. On the other hand, larger terrain pieces are best suited for traditional fused deposition modeling (FDM) 3D printers.
Recommended:
Resin vs Filament 3D Printers: What’s the Difference?
Part of the appeal of miniatures is that they are customizable. They are sold unpainted (similar to some model kits) so the buyer can decorate and paint the miniatures as they see fit. This is excellent news for anyone looking to make money printing by selling 3D printed miniatures. No painting means there is less need for post-processing work.
3D printed miniatures are well-liked among consumers, as customers can buy miniatures that aren’t available to them through traditional manufacturing companies.
Consumers also enjoy commissioning customized minis. These figurines are often original characters in their campaigns or stories. If you have the level of skill needed to model and/or sculpt these personalized minis, that can be a significant upcharge for your 3D printing business.
If you want to go this route, you might want to check out our article on the best 3D printers for miniatures.
2. Cosplay items (helmets, armor, props, etc.)
Image: TieKai via MyMiniFactory
Cosplay items are one of the most labor-intensive options on the list of things to 3D print and make money with. Taking hours or days from start to finish, making cosplay costumes and props to sell is not for the faint of heart. These items (especially 3D printed armor sets and 3D printed helmets) are large parts that take hours to print and post-process.
Most users expect their cosplay items to be finished and painted to a professional level when they buy them. This takes a great deal of time and effort on your part as the seller. The upside to this is that you can charge a premium price for these items to make up for the extra time spent 3D printing and assembling them. Customers are often willing to pay well for these items.
If you want to make money 3D printing and selling cosplay items, it is a good idea to use a 3D printer with a large build volume. That way, you won’t need to spend time splitting parts to fit the build plate and gluing them together when the printing is complete.
Use a large 3D printer for cosplay, and you can simply 3D print full-size pieces in one go.
3. Jewelry
Image: Muttonheid via MyMiniFactory
The jewelry market is a high mark-up market with excellent profitability if approached correctly. Its main problem is that it is oversaturated with artisans and hobbyists. Your designs and marketing both need to be unique and strategic in this space. Otherwise, it is impossible to have any visibility on most of the eCommerce platforms mentioned in this article.
Since jewelry pieces tend to be small, you need negligible amounts of raw material to print each piece. This keeps production costs low and makes it possible to create many at once. Like miniatures, jewelry requires a high level of detail. For the highest-quality pieces, you will need a 4K resin printer or higher (6K/8K).
Recommended:
The 8 Best 4K+ Resin 3D Printers
FDM 3D printers are not entirely ineffective for jewelry making. They can still print forms for silicone molding material.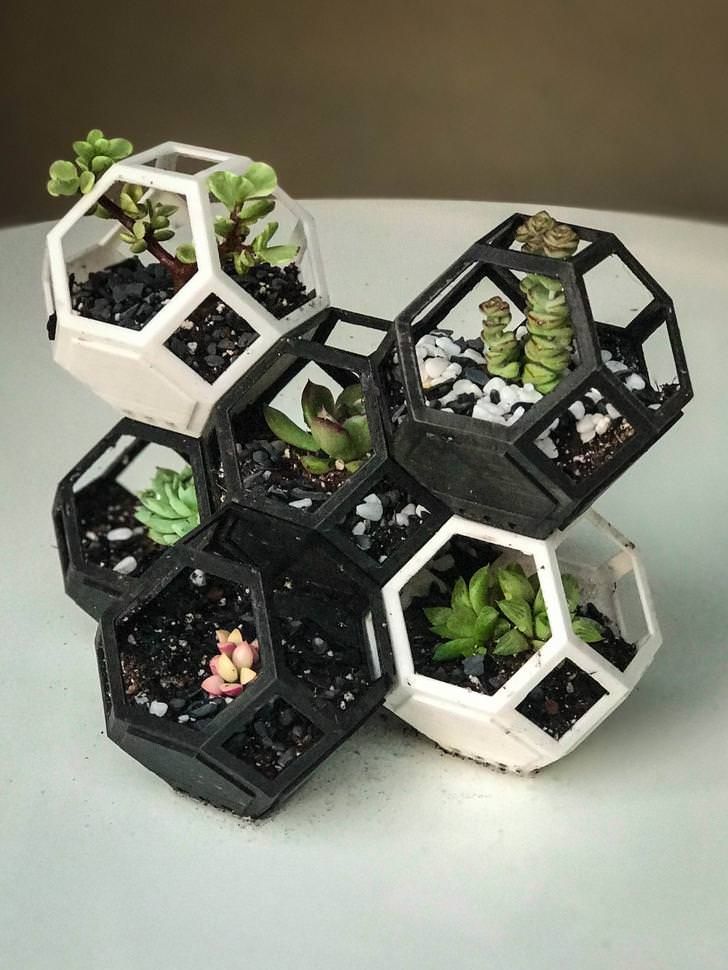 Then use those molds with things like polymer or precious metal clays, resins, low-temperature metals, and other castable materials.
3D printed mold forms need to be smooth and non-porous before molding. You’ll need to sand, fill, or use other extensive post-processing work to achieve the right look.
If you can keep the cost low and produce (customized) jewelry that you promote effectively (e.g. through social media), you will have a good chance at creating a successful 3D printing business in the jewelry niche.
4. Toys
Image: animm07 via MyMiniFactory
3D printed toys are a great option to sell. However, you need to be cautious about regulations on children’s products when choosing to manufacture them with your 3D printer. Some countries require certification to make and sell certain items. This mainly pertains to products for babies and very young children. The guidelines vary from country to country.
Fidget toys and articulated creatures geared towards older kids and adults run a much lower risk of liability and are quite popular. These items are even more memorable when printed from something like color changing, glow in the dark, or filled (Woodfill, Copperfill) PLA filament.
Recommended:
The 8 Best 3D Printers for Kids
Most toys are quick and efficient to make. They print easily on a traditional FDM 3D printer and don’t require much post-processing. Plus there are plenty of cool toy ideas out there that you can 3D print.
5. Nerf gun accessories
Image: GoKidd via MyMiniFactory
Customized or unique Nerf gun accessories and gun bodies are a popular niche in the 3D printing community. They also have quite a demanding retail market.
Items like sights, dart holders, extra clips for discontinued products, larger magazines, and improved barrels are all popular Nerf-related 3D prints. They are easy to create on most 3D printers and fit well with the other ideas of things to 3D print and sell.
It is also not uncommon for Nerf-enthusiasts to want custom guns that the company has not or will not make. Sometimes this means turning a cosplay prop into a functioning dart gun. Other times it means making a gun body that is not commercially available.
Cosplay prop and customized Nerf gun designs are great designs to sell. They have high markup potential and popularity. You can have a profitable business in this niche as long as you don’t overstep trademark rules.
The name Nerf is technically protected under trademark laws. It can help to use generic terms like dart gun, foam dart weapon, etc. in place of the brand in your product listings. This makes sure you don’t gain the attention of any corporate lawyers. They do periodic intellectual property sweeps on popular eCommerce platforms.
Accessories have a lower profit margin than 3D printing full Nerf guns. However, most users don’t care if their dart holders or magazines are not sanded smooth, so they are a quick and easy way to make money with a 3D printer.
6. Architecture models
Image: Format3D via MyMiniFactory
Architectural models are a difficult 3D printing project. They often recreate both the interior and exterior design of a building. They are usually printed in pieces so that the roof and separate levels can be removed for easy access to all the interior elements. Because of their complexity, they can be sold at a high markup and are a great option to 3D print and sell.
Architectural prints can be used for prototyping/visualization, education, play, and decoration. Selling house models as a dollhouse toy or a recreation of a famous building for education or decoration purposes is a great way to market them to consumers.
Some architectural and engineering firms like to have tangible models of their designs. This is helpful for prototyping, sales meetings, and even for troubleshooting the design. Aligning yourself with local companies looking for this 3D printing service could be a beneficial opportunity.
7. Figurines and statues
Image: philippeb66 via MyMiniFactory
Figurines and statues are yet another group of 3D printed products that sell exceptionally well. Many of the figurine and statue 3D models that are available online are of copyrighted content. Things such as characters from video games, movies, or tv shows. These are not particularly helpful resources for making commercial items.
Yet, there are still plenty of options for unbranded designs either through ready-made models or customized ones that you design yourself. Animals, mythological creatures, etc. are all popular designs to 3D print and sell without fear of copyright infringement.
Custom figurines of either customers or their pets are another option to diversify your product offerings. This does require an advanced skill level for 3D modeling and/or sculpting. If you aren’t there yet, keep it as an option for the future. In the meantime, you are welcome to look at our recommendations for free 3D modeling software.
8. Phone cases
Image: Malex via MyMiniFactory
Phone cases are a large market, and 3D printed versions are no exception. There are countless possibilities for making and selling phone cases with your 3D printer.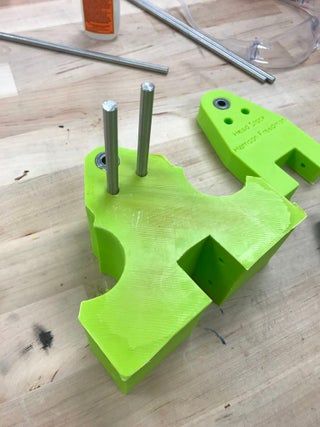 You can print basic stretch cases using a flexible filament like TPU, or decorative hard cases made from PLA or ABS.
Recommended:
The 10 Best PLA Filaments for 3D Printing
Basic cases are inexpensive and readily available to the consumer from most stores and online retailers. If you want to sell cases, it’s best to use unique or customized models.
The most eye-catching 3D printed options emphasize the technical capabilities of 3D printing. The geared iPhone case is a great example.
A large difficulty with 3D printing a phone case to sell is that there are so many different phone models available and they update constantly. As such, you may find it difficult to source consistent phone case models. You may also realize your designs are becoming quickly outdated if you model them yourself.
The best solution to the variability of phone case compatibility is to start out 3D printing and selling cases for only a handful of different phone models. From there, you could make the decision to scale up or down as needed.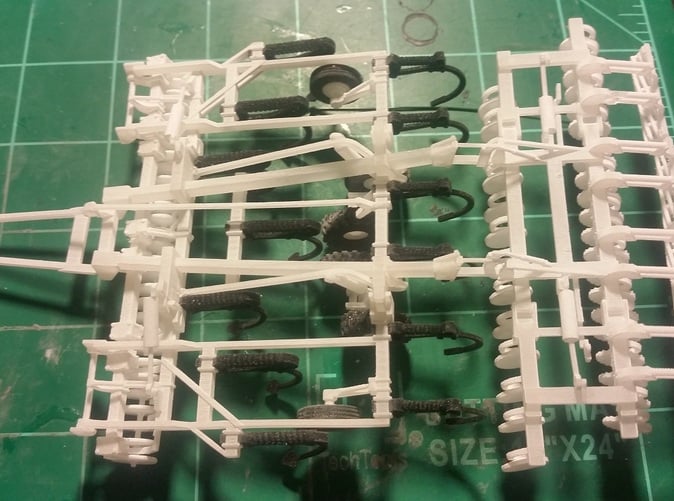
9. Self-watering planters
Image: diegopvp via MyMiniFactory
Planters in general are a hot seller in the 3D printing world, but self-watering planters are even more popular. They are hard to find in stores, making them a fantastic item to add to your business’ offerings.
Self-watering planters are typically designed in two parts: the planter and a water reservoir.
Since both pieces are in contact with water, they need to be watertight in order to not leak. Typical 3D prints have microscopic gaps between each layer. Water can seep through these layers and onto whatever surface the print is sitting on. A clear, non-toxic sealant is a great solution for this problem and gives customers a much better experience with their planter.
10. Designer vases
Image: didierklein via MyMiniFactory
3D printed vases are another home décor product capable of generating a large number of sales. With the exotic shapes that can be created in CAD and made on a 3D printer, the end results are far more modern and sophisticated than vases that are commercially available.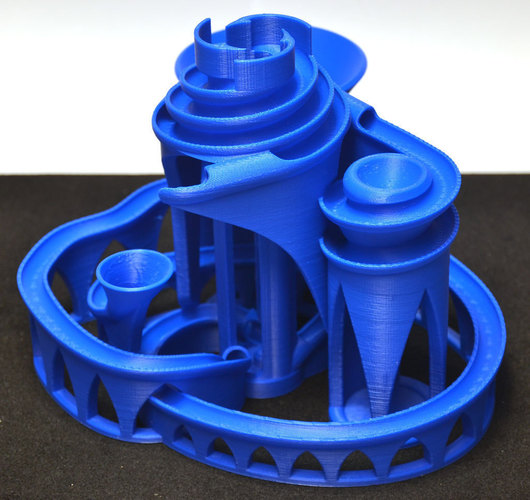
Like the planters mentioned above, vases need a sealant to make them watertight. They are quick and easy to make and can be 3D printed as one continuous spiral. The continuous print lines that this creates improve the speed and quality of the print job.
Items like vases can be printed on either FDM or resin 3D printers (if the print bed size is not an issue for the latter). Extruder-driven ceramic and clay 3D printers are also an excellent option if you are lucky enough to have access to one.
Regardless of the type of 3D printer you use, vases are an excellent choice for making money with a 3D printer.
11. Raspberry Pi cases
Image: Laza via MyMiniFactory
Raspberry Pi boards are a common component in homemade electronics projects. Pi boards are inexpensive single-board computers that are suitable for many projects. For example, they can control smart home equipment, act as a controller for other projects, power a video game emulator console, or run as an underpowered but functional DIY computer.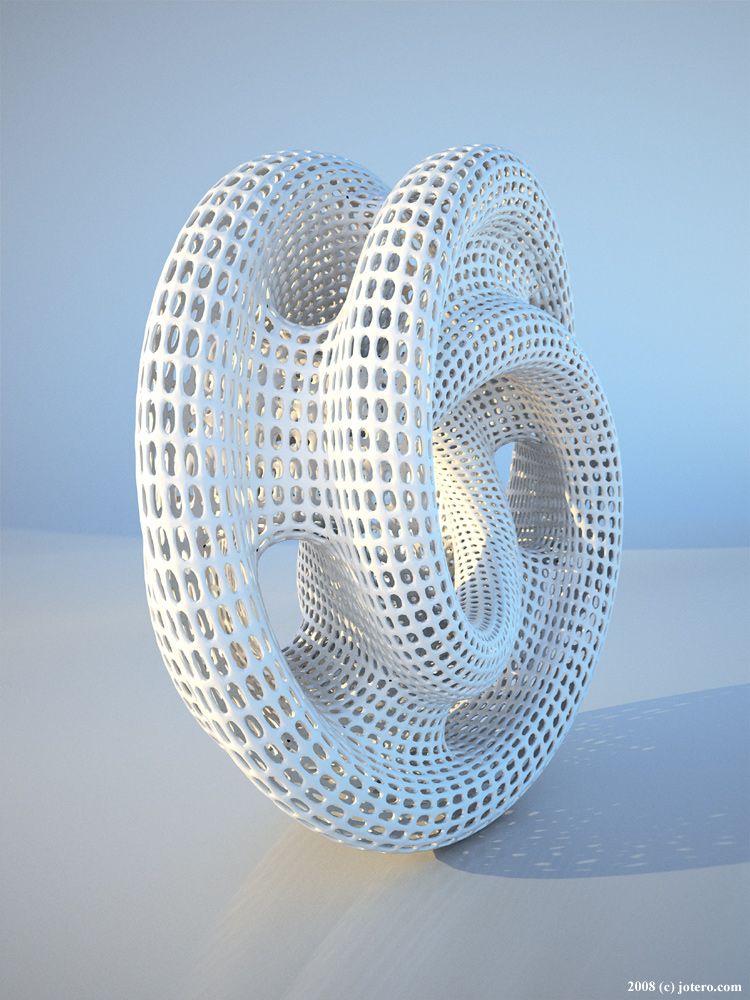
Since Raspberry Pi’s are so small, it is easy to print cases and enclosures for them. The cases not only protect their components but also make them look more functional and professional. Selling the cases to interested tinkerers has sales potential by itself. If you happen to be handy with electronics, you could also sell fully assembled Raspberry Pi projects.
12. Eyeglasses frames
Image: Sacha_Zacaropoulos via Thingiverse
3D printed eyeglass frames have risen in popularity over the years. Several major eyewear companies have started selling FDM-produced 3D printed eyeglass frames. These products are usually made from WoodFill and other specialty filaments.
Even so, consumers are also flocking to smaller businesses that can design a new pair of frames. Sometimes they want new frames designed for their existing lenses if their store-bought frames break. Other times, they want to transfer blue light or sunglass lenses to a new pair of 3D printed frames for comfort or aesthetic reasons.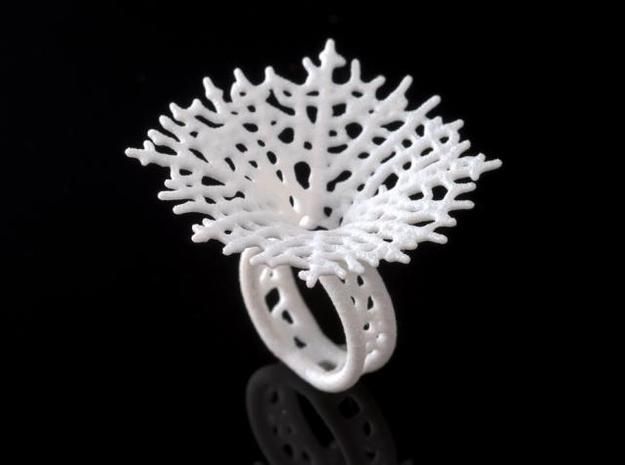
We don’t recommend using PLA or other low-temp filaments on this project. If the person wearing them spends enough time outside on a hot day, the frames could soften and warp from the heat. ABS and Nylon are safer filament choices, as they have a higher glass transition temperature (i.e. they melt at higher temperatures).
13. Lamps
Image: Frank Cheung via MyMiniFactory
You can make a variety of different types of lamps on a 3D printer. They are popular choices when it comes to making and selling 3D printed items. Home décor is a thriving market. When you can offer something unique for their living space, design-minded consumers take notice.
Lamps (especially pendant lights) most often require a 3D printer with a medium to large build volume. Because of their shape and texture, most designs don’t fare well when split and glued back together. Seams also change the way light passes through the filament, so they may be noticeable once the light is on.
14. Landmarks
Image: ShakeandB1ake via MyMiniFactory
Landmark models and statues recreate well-known buildings, places, statues, and other monuments. They vary from highly-detailed architectural models of famous buildings to sites like Stonehenge. They don’t usually come apart as architectural models do.
These models are popular sellers with tabletop gamers. They are sometimes used in tabletop campaigns and world or story-building exercises. They also make excellent educational tools and are great additions to the modern classroom.
Frequently asked questions
What are the most popular 3D printed items?
Cosplay props, planters, and miniatures are some of the biggest sellers. The popularity depends on which platform you are selling on. For example, on Etsy, the main customer base is looking for pretty, trendy things. Beautiful planters, jewelry, and the like will be most popular.
The best way to learn what is selling on your platform is to do a little research. Find the shops with the best sales numbers, see what their bestsellers are. Use that as an estimate of which categories and niches are most popular. It will be much easier to make money with a 3D printer by finding the niche that works best for you and to fill it with unique products.
Is it legal to 3D print and sell?
It is perfectly legal to sell your 3D prints. Issues rarely arise if you follow licenses of the models you download and you don’t sell trademarked goods. There are some extra considerations for certain groups of products. For example, you sometimes need special certification to make or sell items directed at young kids or babies.
Certifications vary from country to country, so research the limitations and laws of your country to find out more.
The easiest way to avoid liability is to design your own models to 3D print and sell. Creating your own models avoids the complications of using other people’s intellectual property.
Image: TobiasKuijper via MyMiniFactory
Designing your own 3D models is a good way to avoid copyright issues when selling 3D printsIs selling 3D prints profitable?
Depending on what you make and how you market it, selling your 3D prints can be a very profitable way to make money online. To get the best results from selling 3D printed items, you need to do thorough market research.
You should look at what items are selling, where they are selling, and what you can do to stand out.
Do people buy 3D printed objects?
They sure do! As awareness of 3D printing technology increases, more people understand it is an easy way to get their hands on custom or unique items.
Be sure you are very clear in your descriptions about what material the item is made from. It is common to see customers confuse 3D printed items with wood in their reviews.
Conclusion
That’s everything you need to know about selling your 3D printed items. Do you sell your prints? What’s the most difficult part of running a 3D printing business? Let us know in the comments below!
51 Cool Things to 3D Print (2022) – Clever Creations
Image: Marvin via PrusaPrinters
Our site is reader-supported. When you buy via the affiliate links on this site, we will receive a commission at no cost to you. All opinions remain our own. Learn more
One of the struggles of owning a 3D printer is deciding what cool prints to make next. With so many 3D model sharing websites, there are endless 3D print ideas to try.
In this article, we’ll give you our top picks for the coolest 3D printer projects and show you where you can find the models you need.
Top 3D Printing Projects and Ideas in 2022
Elastic Football
This two-player elastic football game uses rubber bands to make the player pieces flexible in order to manipulate the small ball across the printed field. The sides of the playing field have an abacus-style point counter for both players and a lever to control the goalie piece on the back.
- Designed by: Wilko_SLO
- Where to get: PrusaPrinters
Mechanical Wall Clock
Clocks are fairly complex and cool in general, but 3D printed clocks like this one by Hairald are especially interesting to look at.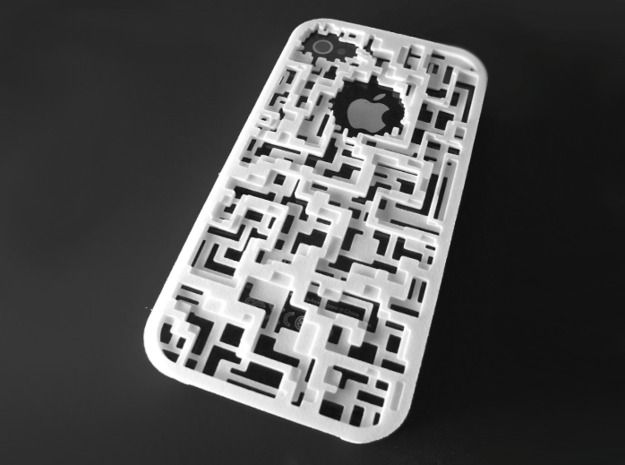 This design is fully printed and does not use any electronics or batteries.
The mechanism uses a wind-up method with a hand crank and a hanging weight to move the gears using the force of the falling weight. You can watch a video of this particular clock in action here.
- Designed by: Hairald
- Where to get: PrusaPrinters
Squid Game - Front Man Mask
Can’t get enough of Netflix’s Squid Game? Neither could the designer of this front man mask. Print this model for an interesting decor piece to hang on the wall or use it to finish off your best cosplay outfit.
- Designed by: r1nce
- Where to get: PrusaPrinters
Articulating Raspberry Pi Camera Mount
While the best 3D printers come with a built-in camera option for creating time lapse videos and remotely monitoring prints, you can also add this functionality to any 3D printer that does not natively have it.
This articulated camera mount uses a Raspberry Pi controller to bring a fully flexible camera option for remote viewing, time lapse recording, or taking stills of your prints as they are in progress.
- Designed by: Sneaks
- Where to get: PrusaPrinters
Original Simpsons TV
Keep a little ode to the Simpson’s on your shelf or desk with this miniature recreation of the original TV set from the show.
This design uses a Raspberry Pi and other inexpensive components to create a working miniature television screen that plays videos on loop.
- Designed by: buba447
- Where to get: Thingiverse
Charger Cable Organizer
The only thing more annoying than an unorganized wad of chargers and cables is a tangled unorganized wad of chargers and cables. These printable organizers store your chargers when not in use, keeping them tidy and protected from other cords.
They work like small spools, letting you unwind the charger only as far as you need. When you’re done using the cable, you just twist the lid to wind the cord back up.
- Designed by: DFV Tech
- Where to get: PrusaPrinters
Screw Measuring Tool
Nothing slows you down more than a container full of mixed-together mystery screws and bolts. This screw measure tool is easy to print and has all the most common bolt and screw sizes to help you quickly identify the size and type of errant bolts, screws, or nuts.
- Designed by: MattG
- Where to get: PrusaPrinters
Rugged Desktop Organizer
Keep your desk tidy and your office supplies close at hand with this multipurpose desktop organizer. It has built-in slots for your USB sticks, SD and micro SD cards, and compartments for your pens, scissors, and any other tools you use on the regular.
- Designed by: Byzantium3D
- Where to get: Cults
Giroid Vase
Both functional and beautiful, this giroid vase is a fast and easy print project that doesn’t require any supports or serious post-processing work.
If you don’t intend to use it with water (such as when using silk flowers), it’s ready to use right off the build plate. However, if you plan to use it as a traditional vase, it is best to spray it with some sort of sealant to keep the water from leaking through the print layers.
- Designed by: Area3D
- Where to get: Thingiverse
Marble Maze
You’ll need to move the zen garden on your office desk, because this printed marble maze is the clear cure for office boredom. Fully printable (aside from the marble, of course) and easy to assemble, this design uses snap-together ball and socket joints on the parts to avoid glue or other adhesives.
- Designed by: ericman314
- Where to get: PrusaPrinters
Cute Caravan Birdhouse
Camping enthusiasts rejoice: now the wildlife can also enjoy the charm of a vintage camper with these cute caravan birdhouses. You’ll need to 3D print the two colors separately before gluing the 3D prints together for a cute two-toned effect. This build fits on most print bed sizes.
- Designed by: PA1
- Where to get: Cults
Drippy Bucket
Add a little pop art to your work or living space with the drippy bucket. Printed as three separate pieces, the handle and paint drips both snap onto the main bucket without glue or screws required. It’s the perfect container for pens, dice, or even loose change.
- Designed by: davemoneysign
- Where to get: PrusaPrinters
Fractal Vise
Not only is this fractal vise model extremely cool-looking, it is also an incredibly useful tool once fully assembled.
This project requires quite a bit of hardware, including multiple sizes of bolts and screws, as well as lengths of both smooth and threaded rods. Assembling the vise is also quite time-consuming, but the designer thankfully has a video tutorial outlining the whole process.
- Designed by: TeachingTech
- Where to get: Thingiverse
Squeeze Fan
This hand-powered squeeze fan is as useful as it is fun. Using the handle pushes the inner gears and turns the propellers. This design is perfect for camping trips, emergency kits, and other scenarios where power or batteries might be hard to come by.
- Designed by: GeorgeZSL
- Where to get: Thingiverse
Face Shield
With the pandemic still in full swing, personal protection equipment is as important as ever. This basic face shield was designed by the Prusa research team and gained EU certification as a viable personal protection tool.
Whether you are still looking for protective methods from COVID-19 or work in an industry that requires face shields, this model is fast and easy to print.
- Designed by: Prusa Research
- Where to get: PrusaPrinters
Lithophane Moon Lamp
This project uses a lithophane model that maps the actual surface topography of the moon to make a realistic miniature rendering of it. This version adds tripod legs and a hole on the bottom for a light to make it a functional, beautiful lamp.
- Designed by: Frank Deschner
- Where to get: PrusaPrinters
Landy Mini
If you think this is a basic miniature car model, think again. Assembled with only a handful of screws, the Landy Mini has a fully functioning suspension system.
Though it’s a bit time-consuming to print and assemble, the Landy Mini is a fun and well-designed project that would look great on a desk or shelf in your home or office.
- Designed by: 3D Sets
- Where to get: PrusaPrinters
Self-Watering Planter
Love plants but have a brown thumb? This self-watering planter slowly feeds in water from a reservoir as the soil dries. So even if you forget to water them for a few days (or weeks, let’s be honest), they’ll still get the care they need.
- Designed by: Mikolas Zuza
- Where to get: PrusaPrinters
Split-Flap Display
Based on the split-flap displays of the past, this model uses a handful of components and a wireless adapter to make a DIY digital split-flap display that connects to your network.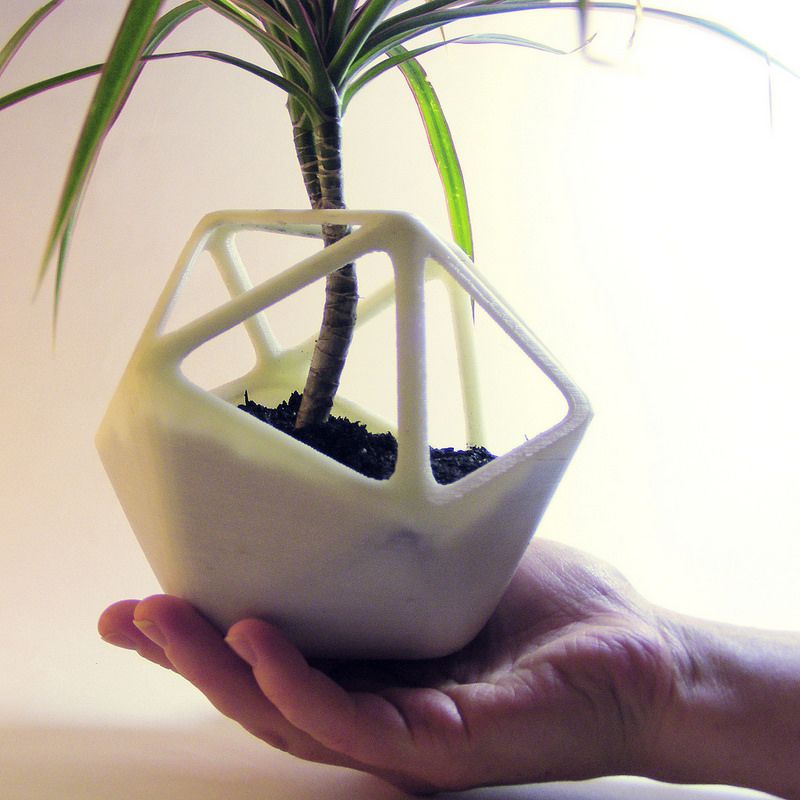 You can program it to work as a clock, calendar, message board, or whatever else you can think of.
- Designed by: David Kingsman
- Where to get: PrusaPrinters
Cryptex
Inspired by the Da Vinci Code, this cryptex has a small compartment to hide things like candies, jewelry, or notes inside. You can program the cryptex to open for a specific series of letters, much like a combination lock.
While this is in no way a secure place to store anything valuable (it is printed from plastic, after all), it’s a funny way to keep coworkers out of your sweets, to give someone a gift, or to play a game with your kids.
Recommended:
The 8 Best 3D Printers for Kids
- Designed by: Cees
- Where to get: PrusaPrinters
Bag Clip
A stark improvement on the chip clips of old, this clip prints in place with minimal supports. It uses a three-hinge system, so it stays on the bag more securely without slipping off. If you want something that will be quick and easy to print, this is a great option.
- Designed by: Andrei
- Where to get: PrusaPrinters
Rotating Rings Toy
The mini gyroscope has remained one of the most popular fidget toys in the 3D printing community for several years, most likely due to its unique design. It prints in place and can be used right off the build plate.
- Designed by: Marvin
- Where to get: PrusaPrinters
Mantis Clamp
The mantis clamp is an interesting take on a vise design, using a hand crank and gears to tighten and loosen the clamp. As illustrated in the photo below, that makes it a handy device for holding up small things like electronics components, painting miniatures, and so on.
- Designed by: zuberio
- Where to get: PrusaPrinters
Deadpool Bust
This fine-detailed Deadpool bust is a great novelty item for any Marvel fan. Printing this model in 3D printer resin on a resin 3D printer maintains the model’s high level of detail, whereas using a metallic filament like CopperFill or BronzeFill on a fused deposition modeling (FDM) 3D printer will give it the appearance of a metal cast statue.
- Designed by: Eastman
- Where to get: PrusaPrinters
Avocado Seed Floater
Sprouting avocado seeds is a little more delicate than just dropping them in some potting soil and hoping for the best. They need to be partially submerged in water for several days for the pits to start growing a sprout. Luckily, this is easy to control with this 3D printed seed floater.
- Designed by: Mikolas Zuza
- Where to get: PrusaPrinters
Drill Depth Stop
When you need a specific stopping point for your drill bit, these printable drill depth stops are an easy and economical way to keep your drill from going too deeply into your material.
The model offers a variety of sizes that correspond with popular drill bit dimensions, so you should be able to find one that suits your needs regardless of which drill bit size you use.
- Designed by: Highrise Workshop
- Where to get: PrusaPrinters
Sunflower Clock
Unlike the other clock we shared in this list, this beautiful design is a fully functional wall clock with added electronic components. This clock has a lot of different pieces to print, thanks to the thin bands of PETG used for the petals. It takes some time to assemble, but the final look is worth the effort.
- Designed by: Romano Rugeri
- Where to get: PrusaPrinters
Cute Skull Lamp
We’d say these skull lamps are a perfect addition to your Halloween decor, but they’re so adorable that you’ll probably want to keep them up year-round. They are easy to print and only take an inexpensive strand of LED lights and a few batteries to assemble them.
- Designed by: rayjizza
- Where to get: PrusaPrinters
Ancient Guardian from Zelda BOTW
Any Nintendo gamers reading this will automatically know what these deceptively innocent-looking articulated robots are, and probably started sweating and hearing dramatic piano music the moment they spotted them.
But if you haven’t been totally traumatized yet by the ancient guardians during your BOTW playthrough, these models are a must-print item. The legs are fully articulated and print in place, so you can just pop the entire figure off the build plate and immediately start your campaign to bring down Hyrule.
- Designed by: Crafty Sven
- Where to get: PrusaPrinters
Ornamental Bulbasaur
If you haven’t gotten enough Bulbasaur from Bulbasaur planters, low-poly figurines, or Pokemon chess sets, you’re in luck. This ornamental Bulbasaur model is one in a set of three decorative Pokemon models that you can print for free.
Since the model uses a lot of Victorian filigree elements, it looks fantastic with a metallic finish, especially with a patina. They acquired that look in the photo below using paint, but metal-filled filaments or cold casting the model in resin are two other possibilities for making this model look its best.
- Designed by: Psdwizzard
- Where to get: Thingiverse
3D Printable Drone
For a functional mini-drone, this design works well and is a lot of fun to use. Designed around a battery case for a single lithium battery, it is not going to be very powerful. However, it does work and it is a good beginner project for those wanting to learn how to 3D print and build more capable drones.
- Designed by: David Cledon
- Where to get: Thingiverse
Back Loaded Horn Speaker
This little printed speaker transforms into a powerful Bluetooth speaker with a little assembly and about $20 in components. Even better, the designer includes a wiring diagram and full assembly instructions along with the free STL, so even if you are new to this type of project, you can easily follow along.
- Designed by: guppyk
- Where to get: Thingiverse
Among Us Crew/Body/Ghost/Imposter
This five-piece set of Among Us models is a fun project for fans of the game. With all of the character types in the game available, you can vary the colors of each model to account for any possible in-game combination.
- Designed by: WalRit
- Where to get: Thingiverse
Print-in-Place Bearings
If you need bearings for one of your projects or you just want to give your printer a nice torture test to check its calibration, these print-in-place bearings are the answer. Designed in five common sizes, these models should have all the options you need for most projects.
- Designed by: guppyk
- Where to get: Thingiverse
Helmet Hanger
Both functional and decorative, this 3D printing project is the perfect solution for storing your helmet while also showing it off. The model is easy to print and allows for printing the sphere whole with supports or in two pieces without supports (to glue together after).
- Designed by: Sergi Lorenzo
- Where to get: Thingiverse
Tensegrity Table
When regular furniture gets too boring, choose some that appears to defy physics instead. This small table ties the bottom and top parts together with string, and the tension keeps the table parts upright. While the designer used blue string, a clear string is ideal because it’s harder to see and makes the table really look like it’s floating.
- Designed by: Austin Steingrube
- Where to get: Thingiverse
Hydroponic Self-Watering Seeds Starter
Another model for the gardening-challenged, these cute self-watering planters will keep your plants watered and nourished even if you don’t. The planter comes in five different poses, with some sitting flat and others dangling their legs over a ledge, you can get really creative in staging your planter people on your desk, table, or shelf.
- Designed by: Studio Aditivo
- Where to get: PrusaPrinter
Print-in-Place Briefcase
Need a place to store your miniature work documents? What about your doll-sized stacks of money? This print-in-place briefcase does exactly what it says: it prints a miniature briefcase in one piece with fully functioning hinges and latches straight off the build plate.
This model (and other print-in-place projects) are a good way to test your printer’s calibration and to see where it’s having issues.
- Designed by: Dehapro
- Where to get: Cults
Bone Fingers
These articulated bone fingers bend with your fingers, making their movements look incredibly realistic. The project requires quite a bit of gluing and assembly after printing, but they are a stunning addition to cosplay outfits and Halloween costumes.
- Designed by: Littletup
- Where to get: Cults
Lazy Dogs
Yet another print-in-place project on the list.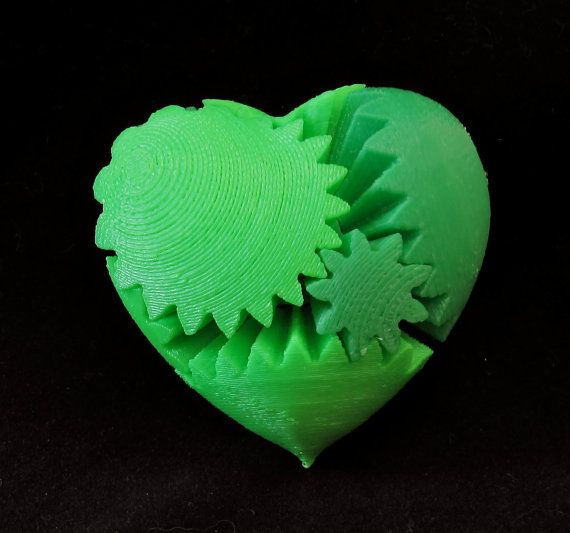 These adorable canines have articulated hinges in their body that gives them a wider range of flexibility. While they are mainly for decorative (or playful) purposes, these little dogs are quite popular with kids.
- Designed by: Mcgybeer
- Where to get: Cults
Hexagonal LED Panels
DIY printed light fixtures are one of the easiest ways to customize your decor, and these hexagonal LED panels are one of the best options we’ve seen.
Each hexagon light is printed and assembled separately before being fit together, which leaves plenty of room for creativity. Each light panel could have a different LED color, or work through a controller to loop through certain behaviors like blinking, twinkling, or transitioning through the RGB spectrum.
- Designed by: Jim Misel
- Where to get: Thingiverse
Mechanical Quick Grab/Release Phone Stand
This phone stand tightens around the phone when it’s placed in the cradle and loosens when the phone is lifted off. It also rotates the phone up, down, and side to side while it is in the holder for optimal viewing at any angle.
- Designed by: Arron Mollet
- Where to get: Thingiverse
Slim Credit Card Wallet
When you want the bare essentials to keep your pockets from being weighed down, a card wallet is an essential accessory. This particular one is fully printed and comes with the added bonus of an ejector button to help you easily remove your cards when you need them.
- Designed by: Aljaz Titoric
- Where to get: Thingiverse
Measuring Cube
A modern take on the old concept of measuring cups, these cubes are a fun way to incorporate the different measurement sizes into one piece. However, we don’t recommend using them for liquids in the kitchen since the small gaps between layers in 3D prints are not watertight.
- Designed by: Matt Stengler
- Where to get: Thingiverse
Thor Hammer
One of the more iconic Marvel props in the 3D printing community, Thor’s hammer is easy to print and looks great on display. While it has a lot of fine details that would be best captured with a resin 3D printer, it will be challenging to print it at full scale on most consumer resin printers.
- Designed by: Rob Pauza
- Where to get: MyMiniFactory
CNC Machine
One of the best things about having a 3D printer is the ability to use it to produce additional printers or machines. This CNC machine is a perfect example of that. It uses 3D printed joints to assemble the rails, motors, and carving tool into a fully functional CNC.
- Designed by: Creative Think
- Where to get: Thingiverse
Raspberry Pi 4 Case
In case you missed it, this list is full of projects and ideas that use Raspberry Pi boards as the controller. Being small, cheap, and surprisingly flexible in its capabilities, the Pi lends itself extremely well to 3D printing.
With that in mind, it’s no surprise that you can find dozens of models for Raspberry Pi cases on most of the project sharing websites. This one has one of the more attractive and functional designs available.
- Designed by: Carter
- Where to get: PrusaPrinters
Prusa Enclosure
Enclosures are often a necessity for printing ABS and other high-temperature filaments successfully, but DIY and budget printers rarely have them incorporated into their design. Fully enclosed 3D printers do exist, but they come at a price. Thankfully, enclosures are not overly difficult to make yourself, especially when upcycling existing furniture like this build.
This project gives you all the pieces needed to turn an IKEA Lack table into a functional 3D printing enclosure and filament station. While it is specifically designed for Prusa 3D printers, any printer that fits on a Lack table should work with this project.
Recommended:
9 Amazing DIY 3D Printer Enclosure Ideas
- Designed by: Ondřej Stříteský
- Where to get: PrusaPrinters
Fidget Infinity Cube
While fidget toys are always a popular category for 3D printing, these fidget cubes are especially interesting. Using a hinge design, you can fold and unfold the cubes in multiple directions.
This model prints flat and requires no assembly after printing. Since the hinges print in place, this project may take some experimentation with printer settings and calibration before it is printed successfully. The designer includes a test print with the model files so you can quickly try out different print settings without printing the full model.
- Designed by: Austin Vojta
- Where to get: PrusaPrinters
Addams Family Thing
Yet another spooky prop on the list, the Thing from the Addams Family is a great item to add to your Halloween decor. This is a model with a high level of detail (especially around the knuckles and nail beds) that would do well with resin printing.
Recommended:
Resin vs Filament 3D Printers: What’s the Difference?
- Designed by: Js-studio
- Where to get: PrusaPrinters
Collapsible Basket
Our final pick for print-in-place designs, the collapsible basket is fun to print, cool to use, and easy to put in storage when you don’t need it.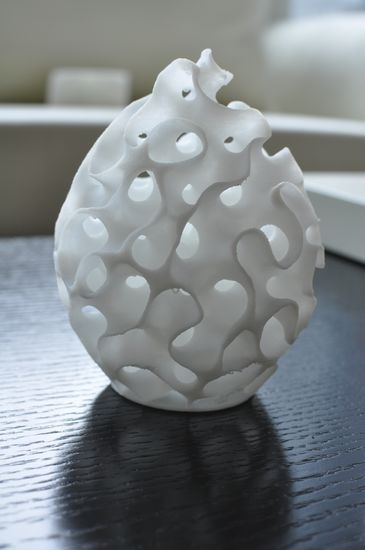
- Designed by: 3D Printing World
- Where to get: PrusaPrinters
Conclusion
Those were 51 of the coolest free 3D printing models! Did you like our picks? Have you printed any of these models before? Let us know in the comment section down below!
Scroll to Top
How to create models that are larger than the print volume of a 3D printer
Don't have a large format 3D printer yet? When evaluating the capabilities of a compact desktop 3D printer, do not limit yourself to print volume. Many objects, like your smartphone or a bridge over a river, are made up of many individual components. Therefore, splitting the model into smaller parts that can be aligned after printing is a great solution for 3D printing large objects that do not fit on the platform.
Also, splitting the model can be a great way to get a high quality result, even if the whole model fits on the platform. This makes sense when multiple or opposing surfaces must be free from support structures, when the model has complex ledges, or contains cavities where liquid polymer can remain.
3D printing of various parts opens up new possibilities, for example, the creation of prefabricated structures from various materials or the combination of rigid and flexible parts to simulate the overmolding method.
When choosing a gluing method, it is necessary first of all to take into account the required degree of strength of the glued joints, which depends on the purpose of the models:
-
chemical: use adhesive on artwork, scale models, and complex shapes that are not intended for functional use and should not be impacted;
-
Mechanical: Provide threaded holes or sockets for attaching parts that require a secure mechanical connection, or repeatedly detaching and attaching components as needed.
This tutorial focuses on building large, prefabricated 3D stereolithography (SLA) printed models with chemically bonded components. Read on to learn all the steps in this process, from model separation to post-processing for a professional finish.
Formlabs Form 3L is the first affordable, easy-to-use large format 3D printer optimized for reliable production of industrial quality models. The Form 3L stereolithographic 3D printer features a huge print volume of 30 x 33.5 x 20 cm and unrivaled cost-effectiveness.
Meet the Form 3L
We recommend two ways to separate models: adding features to the design that will allow the parts to fit together, or separating the model with straight lines, which will require them to fit together properly during the bonding process.
Regardless of which method you choose, if you have a lot of parts, it's helpful to add a unique identifier (letters/numbers) for each one to make assembly easier.
Use CAD software to split a 3D model and add basic centering components such as slots, pins, slots, notches, and tabs, or more complex features such as dovetails and slots to match model folds.
Adding centering components to the design makes it easier to assemble parts.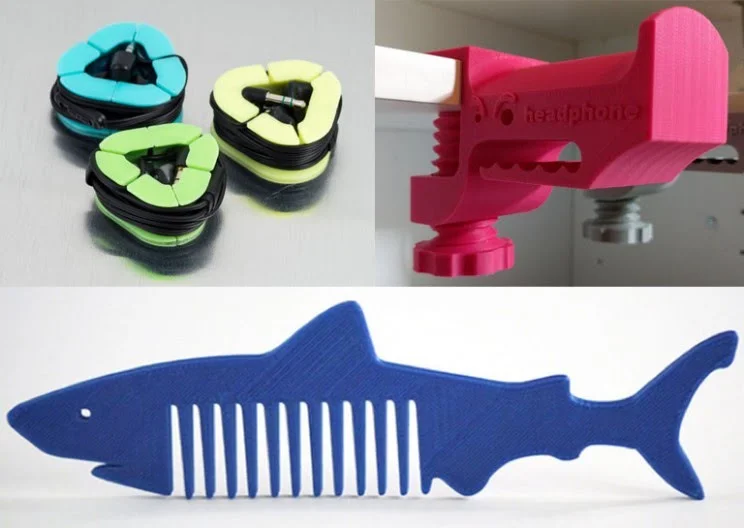
Ideally, these components should make it easier to align and assemble parts, but can cause problems if they differ even slightly from your 3D models, preventing perfect centering. Therefore, it is best to use centering components only when the printer can print parts with accurate dimensions that are not subject to deformation.
Splitting a 3D model along straight lines requires less effort than adding components to center it. With this separation method, there are also fewer problems if the parts are slightly deformed or differ in size.
Adding IDs for each part makes the assembly process easier.
On the other hand, parts separated by straight lines can be time consuming to assemble, as each part must be manually centered and ensured that they all remain in the correct position until the adhesive is completely dry.
By default, when printing on a stereolithographic 3D printer, solid models without voids are obtained. Depending on the design, different requirements may apply to the manufacture of large items. In such cases, 3D printing the outer shell or converting the structure into a hollow is a great way to save a lot of material and time. When printing hollow models on a stereolithographic 3D printer, be sure to add ventilation holes to avoid creating cavities filled with air and pressurized resin.
SAMPLE PART
Experience Formlabs print quality first hand. We will send a free sample of the printed model directly to your office.
Request a free print sample
Converting a model design to a hollow saves a lot of time and material because the printer only needs to print the outer shell.
Learn more about how to save materials and time by hollowing out 3D models.
Depending on the size of the details and the purpose of the model, we recommend three mounting methods:
| Epoxy glue (5-30 min) | cyanoacrylate (CCA, Supercollah) | Resin | |||||
|---|---|---|---|---|---|---|---|
Square.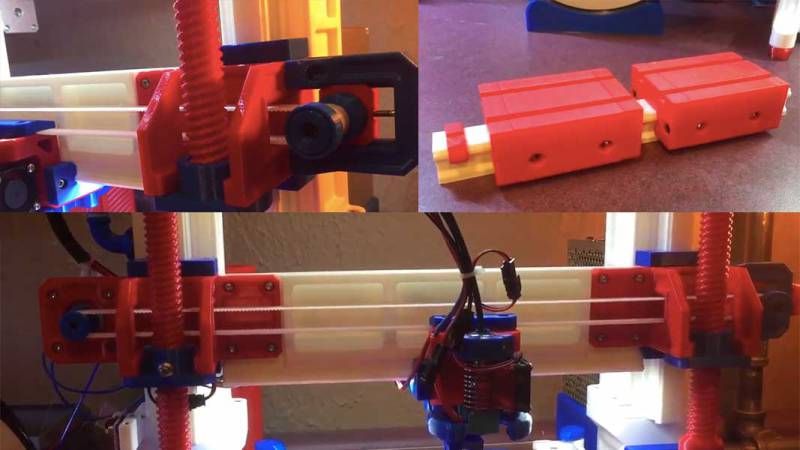 | Large | Small/Medium | Small | ||||
| Paintable | Yes | Yes | Yes | 9006 7Yes | 9006 70072Medium | Low | Low |
For large parts and maximum adhesion, use 5-30 minute dry epoxy. It takes longer to dry than other adhesives, allowing you to fit large 3D printed parts but slows down the assembly process. Most 5-minute epoxy adhesives stop changing shape in as little as five minutes and cure by about 75% in less than an hour.
For large parts and maximum adhesion we recommend using epoxy adhesive.
The next option is cyanoacrylate (CA or superglue), which quickly forms a strong bond, ideal for small to medium sized parts. Thoroughly clean the part before applying CA to the surface, because contaminants adversely affect the quality of the connection. CA has a moderate impact strength, but is not recommended for models that require high strength.
For small models, you can simply use liquid resin from a stereolithographic 3D printer. Pour a small amount of resin into a tray from a bottle or cartridge, pick it up with a pipette or syringe, and place it on the surface to be bonded. Connect the parts and wipe off excess resin that may spill around the edges. Aim a 5mW (405µm wavelength) UV laser pointer at the contact area to cure the resin and bond the parts.
This method produces a chemical bond similar to 3D stereolithography printing, but is only suitable for bonding small surfaces as a low power light pointer cannot penetrate the model deep enough to create a strong bond.
Note. Protective equipment must be worn when working with polymers, including proper eye protection and gloves.
Download PDF
Don't have time to read the article now? Download it in PDF format.
Download as PDF
Once the model has been built, it's time to move on to post-processing. This step includes geometric correction of the model to provide a smooth surface that matches the original 3D model, and aesthetic finishing to obtain a uniformly colored surface.
Depending on the precision of the printer and the size of the printed parts, there will almost always be slight voids or mismatches at the contact points. Automotive sealant (e.g. Bondo 907) adheres well to polymers, therefore, to eliminate such inconsistencies, it is recommended to apply it in a thin layer on the surface. Lightly sand the surface after each coat has dried to bring the model to its final shape.
Sealing models with automotive sealant (red area in image) will help eliminate small gaps and inconsistencies between parts.
Sanding helps remove traces of support structures and remaining inconsistencies in the model. Gently start sanding the surface with 150-grit sandpaper to remove traces of support structures and smooth edges where parts meet. Once the surface is smooth, sand it wet using 320 grit sandpaper to remove any remaining layer lines. Sand the surface in random motions so as not to leave marks. In most cases, these two methods will produce a fairly smooth surface, but you can continue to increase the grit of the sandpaper up to 2 times and, after wetting it, sand the entire model until the surface is reasonably smooth.
Power sanding is great for large flat surfaces, but can ruin fine details. Grinding of small models is recommended to be done by hand, and for large ones, a combination of manual and mechanical grinding is recommended.
Machining large parts with mechanical and manual grinding saves a lot of time. Power sanding is great for large, flat surfaces, but can ruin the fine details, sharp corners, and subtle contours that are typical of stereolithography. As a result of mechanical grinding, a lot of dust is also generated, so before starting processing, it is necessary to prepare the working area.
Note. The use of power tools requires full attention and the use of protective equipment.
The surface can be damaged very quickly without even realizing it, just by leaving the sander without moving.
When finished sanding the model, rinse it in soapy water to remove dust and debris and dry thoroughly before proceeding to the last step.
The primer helps the paint adhere to the surface and can indicate areas where additional sanding is needed or removal of traces of supports that you may have missed. The Universal Matte Gray Plastic Primer shows these spots exceptionally well. For best results, apply it to the surface in several thin coats. Sand critical areas and reapply a thin coat of primer. Repeat this process until the entire surface of the model is level.
Note. Use protective equipment during priming and painting, including a respirator to protect against paint fumes.
All-purpose matt gray primer for plastics is exceptionally good at showing fine details and helping to identify areas that need to be sanded down.
Find out more about sanding and priming in our detailed guide.
When painting with multiple colors, protect the model with a temporary coat. First, plan the order in which you will paint the model, depending on the color, transparency, and size of the area of a certain color. Start with small details so that fewer of them can be protected when painting with the main color. Apply painter's tape to the edges and corners. To quickly cover large areas, attach sheets of paper to them. Ribbon guides (laser cut) can also be useful for creating straight lines, circles and complex shapes.
When it comes to masking, figuring out the correct order is your first priority. In our case, the parts were first painted silver and the sections that would remain silver on the final part were then covered with painter's tape to hide them from the next l
painting. In our case, we first painted the parts silver and put masking tape on the areas that should remain silver in the finished model so that they do not get paint of a different color.
As with primer, several thin coats of paint should be applied for optimal results rather than one thick coat. Most spray paints will achieve the best color in warm and slightly damp conditions in the absence of wind. In this case, you must always follow the manufacturer's recommendations, which can be given on the paint container or in the technical documentation.
Consider the time the paint needs to dry: Allow layers to settle before applying the same color and allow the paint to dry completely before applying a new color.
The area where we applied masking tape is still silver.
Become an expert in painting 3D models with our detailed guide
Already wondering what your finished model will look like?
"Sorry sir, that R2-D2 over there is in excellent condition and inexpensive."
Formlabs optics designer Adrien Tanner created this R2-D2 model from 105 parts printed on a Formlabs stereolithographic 3D printer. It even has working electronics borrowed from the Form 2 printer - a galvanometer drive for sound reproduction, a cartridge dispenser for lamps, and a Z-axis drive for dome rotation. 9The 0003
Form 3L is the first large-format 30 x 33.5 x 20 cm 3D printer for producing massive, industrial-quality models.
Reduce order processing time when outsourcing or manual work when assembling large-scale 3D models. Now you can print large 3D models in their entirety on the Form 3L, the first affordable large format SLA printer.
Want to see how stereolithographic parts work? Explore our resources to learn more about stereolithographic resins, or request a free sample to evaluate print quality for yourself.
Request a free print sample
Furniture on a 3D printer: 3D printing
In this article we talk about making furniture using additive technologies - 3D printing - about the benefits and examples of using this approach in practice and about which technique it is best to apply.
This article was prepared using a publication from the site 3dsourced.com, which was translated and supplemented for you by the Top 3D Group.
You may have once had the idea to use 3D printing in the manufacture of furniture for your home, but you dismissed it, considering this idea too laborious, time consuming or expensive. After all, large industrial 3D printers with a huge print area, like the Farsoon SS403P 3D printer, are usually needed to create large pieces of cabinet furniture, right?
That used to be true, but now there are ways to use 3D printing in the interior without the need for large-format industrial machines.
Read on - we'll take a look at some of these applications with real examples.
Option 1: Build furniture with the Hangprinter
Designed by Torbjørn Ludwigsen, the Hangprinter is a cable-suspended and movable print unit designed to print large objects as cheaply as possible. The Hangprinter doesn't fit in a case, its print chamber is the entire room.
Hoping to inspire others to try frameless 3D printing, Thorbjörn has made the software files for this printer open and free for everyone to copy, use and further refine. Most parts of the Hangprinter can be 3D printed, and the cost of building one yourself is estimated to be as low as $250.
Chris Riley Stool
Introduced in mid-2017, Hangprinter printing immediately began to be tested in the creation of large objects. In the video below - one of the very first examples - Chris Riley's bar stool.
Such videos showed the strengths and weaknesses of Hangprinter, for example - the ability to create really large objects for relatively very little money and the possible delamination due to the lack of a closed camera.
Chris Riley's Stool printed with offset layers and delamination, and it also took two weeks to print because the Hangprinter was so loud that it couldn't be used at night and only had to be printed during the day.
Building and operating the Hangprinter requires familiarity with 3D printers, an understanding of the mechanics of how they work, skills in working with electronics and debugging devices, but there are also detailed instructions for beginners, as well as a small but growing community of other Hangprinter users who can be contacted for help.
For those who are willing to put up with the shortcomings described above, or are confident that they can avoid them, Hangprinter remains the most affordable and affordable way to create fully 3D printed furniture.
Option 2: 3D printed furniture on a large 3D printer
3D printed furniture from the “Print Your City” project. This model may not fit in your desktop printer.
The second method is to use a stationary 3D printer with a really large print chamber
Print Your City
The “Print Your City” project, for example, uses a 3D printer to print street furniture and other small architectural forms, consisting of a robot and a fenced indoor area equipped with a special printing platform.
Last but not least, the plastic for printing is made from recycled waste.
Despite the simplicity of the idea itself, this method of manufacture is beyond the reach of most people. Large 3D printers not only take up a lot of space, sometimes entire rooms, but are also incredibly expensive. Large industrial 3D printers like the Farsoon HT1001P can still cost hundreds of thousands of dollars.
Because of this, very few furniture projects are carried out by individuals, usually by businesses or very passionate enthusiasts, and the Wilkhahn Printstool stool shown below is an example of both.
Wilkhahn Printstool One
Designed by Thorsten Frank and produced by Wilkhahn, this 3D stool was produced on an industrial 3D printer and is available as part of Wilkhahn's premium office furniture range.
Wilkhahn is a German furniture manufacturer that strives to differentiate itself from its competitors.
“Unlike almost any other office furniture manufacturer, Wilkhahn stands for designs made in Germany all over the world. It offers high-quality office and dynamic conference furniture that sets the benchmark for the entire industry,” the company says.
Printstool One is one of the few 3D printed pieces of furniture available for sale. It takes several hours to create and assemble, including 3D printing the base and attaching the seat. The base is printed with lignin, an organic biopolymer that decomposes in nature.
Although the Printstool One is a commercial product, it is not easy to obtain. It is not part of the main Wilkhahn catalog and was released in a limited edition of 500 pieces.
The price for such a stool has not been disclosed and probably depends on options, seat material, for example. But given that regular stock stools in this manufacturer's catalog range from $266 to $660, it's safe to assume that the Printstool One costs at least $500, making it quite an expensive plastic stool. However, overpayment for exclusive furniture is a quite common phenomenon.
In recent years, 3D printing has become more and more accessible. Most likely, this will also affect its large-format sector.
RH Engineering & ManoFigura - home furnishings
Magna Patero Ortus - 3D printed sink RH Engineering & Manofigura .
In mid-2020, this pair of German designers broke into the luxury furniture and interiors segment with their signature Manoveneer finishing technology and large-scale 3D printing.
Their favorite printer is the BigRep One, large enough to print furniture, with a 1005 mm³ displacement, and costs around $39,000, depending on specifications.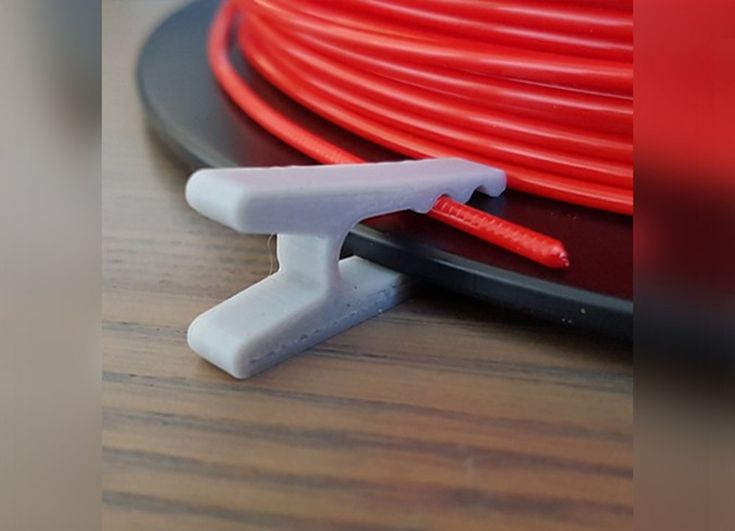
The production process begins with 3D printing of craft furniture based on the client's design, then the ManoVeneer branded coating is applied to the product. What Manoveneer is made of is a company secret, it is only known that the coating is waterproof, can imitate the texture of natural stone and weighs very little.
Option 3: modular printing on a small 3D printer
Large 3D printers will always be a barrier to 3D printing furniture due to their size and cost, prompting designers to look for ways to stop using them - they are turning to small 3D printers and print smaller parts for later assembly.
Supermod 3D printed wall
3D printed Supermod wall.
Designed by the founders of Simplus Designs, the Supermod shelving wall consists of individually printed modules that snap together.
Supermod was created for decoration, visual division of the room into zones and storage of small things in cells. As a modular system, Supermod bypasses the need for large scale 3D printers. While the assembled wall may be taller than most people, each module can be printed on an affordable desktop 3D printer.
The next method involves using 3D printed parts in combination with conventional ones like a table top shield or wooden legs, giving the 3D printed components the role of fasteners and framing elements. This is the most accessible way for a wide range of makers to use 3D printing in the creation or repair of furniture.
Option 4: 3D printed parts as accessories
John Christie Saul Dining Table and Chairs
John Christie, who has been designing custom furniture for over 20 years, returned to university at 40.
“During my studies, I became interested in 3D printing and how I could integrate it into the traditional furniture making process. In my projects, I studied how 3D printed parts can be used in the production of furniture. ”
”
John is best known for his Saul Dining Table and Chairs. The table is a handcrafted piece of wood with 3D printed connections.
The author suggested that his connection system would provide "greater customization options, reduced production time and waste" when applied to existing pieces of furniture.
This furniture set was exhibited at the Royal Academy of Arts in Edinburgh in 2016.
This is a craft project to sell products, but similar technology has been used by amateur authors as well.
Alexandre Chappelle Furniture
Designer and YouTuber Alexandre Chappelle has documented the process of making his own wooden table with 3D printed connections. As with John Christie's project, the only 3D printed parts on this table were the articulations, while the rest of the table's parts were made from wood using conventional hand tools.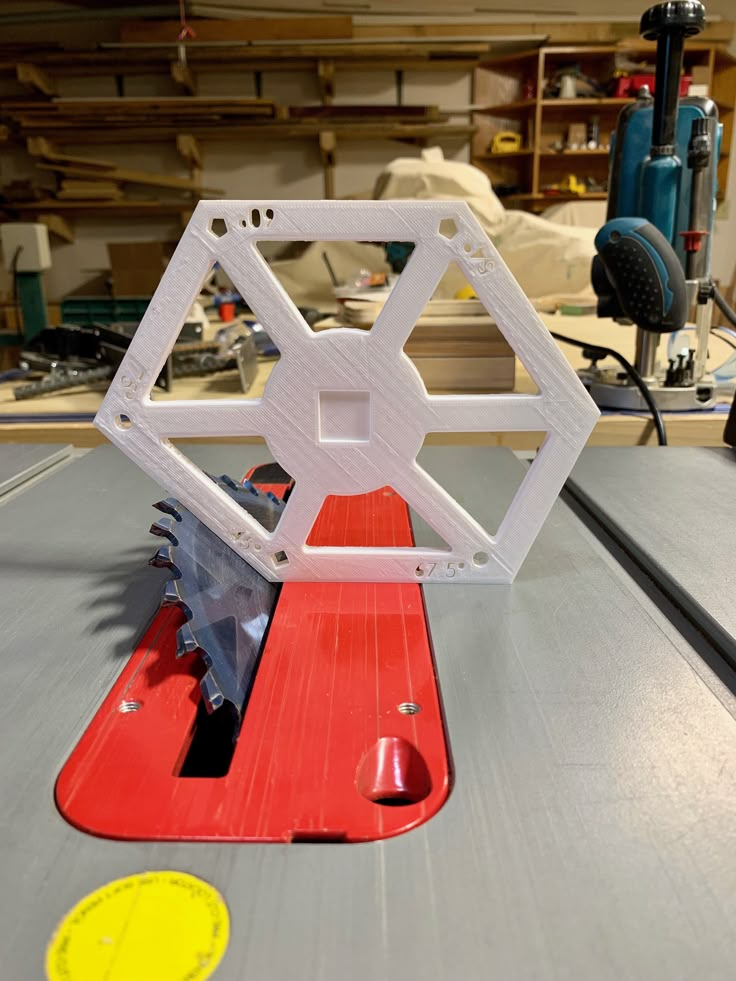
The chair is another creation of Alexandre Chappelle.
The author has posted the STL files and instructions on his personal website, where they are available for as little as $5.
This is perhaps the most affordable way to 3D print your own furniture, although the fact that John and Alexander's designs are mostly made from wood begs the question: is using 3D printed fittings 3D printed furniture?
What technique should be used to 3D print furniture?
So which of these methods can you use for your own furniture project?
If you are a professional studio or independent designer with the necessary funds, and you have a project that needs to be printed reliably and with high quality, then a large 3D printer will be the best option. 3D printing on a large printer can be ordered from a 3D studio if this is a one-time project and you are not going to purchase a printer.