Maker select 3d printer v1
Differences Between the Monoprice Mini V1 and V2 – Fargo 3D Printing
, ,
Monoprice Mini V2
From: Monoprice.com
Monoprice has recently released an upgraded version of their best-selling Select Mini 3D Printer. This leaves many people wondering what exact changes were made and which version is ultimately better. Compared to the V1, the V2 has the same specifications but does have some upgraded parts.
Improvements
While the software remained the same, there were some hardware improvements. The V2 boasts an upgraded all-metal hotend, which improves heating and prevents clogging. The new version also includes a BuildTak-like build surface, which means you can print directly onto the build surface instead of putting tape down first.
Additionally, the print bed is now insulated, which is supposed to improve the heating of the build surface. Monoprice also added a better internal electronic cooling fan and upgraded the control knob. And Wi-Fi connectivity is now officially supported through an app that can be downloaded onto a smartphone.
Other Changes
In addition to these improvements, there were also other changes that were minimal and do not affect the quality of the printer or the print quality. The IPS color screen was upgraded but provides no noticeable improvements. There was also a mainboard change which showed no additional benefits or downsides.
It’s important to note that the V2 has the same filament printing capabilities as the V1 even though fewer filaments are listed for the V2 than the V1. These other filaments are not listed for simplicity and because some modifications are needed before the V2 is ready to print those materials. For example, a more durable nozzle is needed before printing abrasives.
How Do I Know if I Have a V1 or V2?
There are two distinct differences between the V1 and the V2.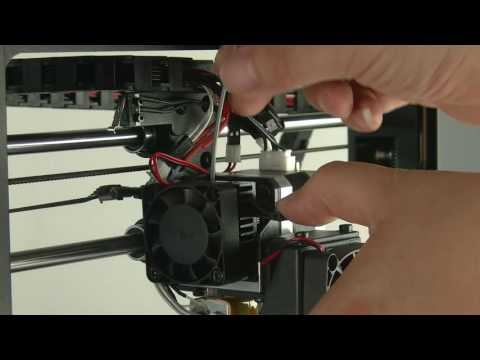 The first is the build plate. The V1 has a plain aluminum build plate that needs to be covered before it can be printed on. Meanwhile, the V2 has a black matte build plate that can be printed on directly. Additionally, the V2 has an internal cooling fan that is open to the back of the printer while the V1 does not. It is important to know that the V2 is also available in both black and white while the V1 is only available in white. If your Mini has the matte build plate and the internal cooling fan at the back then you have a V2.
The aluminum build plate of the V1.
From: All3DP.com
The build plate of the V2.
From: Monoprice.com
The back of a V1.
From: jet.com
The internal cooling fan on the back of the V2
From: Monoprice.com
Get updates, deals, and 3D printing tips when you join our community of over 6,000!
[sexy_author_bio]
What is the difference between the Monoprice Select Mini v1 & v2? : MPSelectMiniOwners
Looks like you're using new Reddit on an old browser. The site may not work properly if you don't update your browser ! If you do not update your browser, we suggest you visit old reddit .
Press J to jump to the feed. Press question mark to learn the rest of the keyboard shortcuts
Search all of RedditFound the internet!
Feeds
Popular
Topics
ValheimGenshin ImpactMinecraftPokimaneHalo InfiniteCall of Duty: WarzonePath of ExileHollow Knight: SilksongEscape from TarkovWatch Dogs: Legion
NFLNBAMegan AndersonAtlanta HawksLos Angeles LakersBoston CelticsArsenal F.C.Philadelphia 76ersPremier LeagueUFC
GameStopModernaPfizerJohnson & JohnsonAstraZenecaWalgreensBest BuyNovavaxSpaceXTesla
CardanoDogecoinAlgorandBitcoinLitecoinBasic Attention TokenBitcoin Cash
The Real Housewives of AtlantaThe BachelorSister Wives90 Day FianceWife SwapThe Amazing Race AustraliaMarried at First SightThe Real Housewives of DallasMy 600-lb LifeLast Week Tonight with John Oliver
Kim KardashianDoja CatIggy AzaleaAnya Taylor-JoyJamie Lee CurtisNatalie PortmanHenry CavillMillie Bobby BrownTom HiddlestonKeanu Reeves
Animals and PetsAnimeArtCars and Motor VehiclesCrafts and DIYCulture, Race, and EthnicityEthics and PhilosophyFashionFood and DrinkHistoryHobbiesLawLearning and EducationMilitaryMoviesMusicPlacePodcasts and StreamersPoliticsProgrammingReading, Writing, and LiteratureReligion and SpiritualityScienceTabletop GamesTechnologyTravel
Create an account to follow your favorite communities and start taking part in conversations.
Join Reddit
r/
MPSelectMiniOwners
r/MPSelectMiniOwners
About Community
r/MPSelectMiniOwners
This subreddit is a resource for owners and fans of the MP Select Mini 3D Printer from Monoprice.
Created Jul 4, 2016
15.2k
Members
15
Online
Similar to this post
r/MPSelectMiniOwners
What setting can I try to improve these lines on one side?
89%
13
6d
r/MPSelectMiniOwners
Printing issues after heater, thermistor and nozzle swap...
94%
11
4d
r/MPSelectMiniOwners
Is this the normal noise level? (Details below)
100%
13
1d
r/MPSelectMiniOwners
Which slicer and why(MP select mini v2)
100%
19
1d
r/MPSelectMiniOwners
Need advice with fixing hotend
100%
6
4d
r/MPSelectMiniOwners
power supply upgrade
100%
10
18h
r/MPSelectMiniOwners
Best settings for the MP select mini v2?
100%
16
2d
r/MPSelectMiniOwners
M.
 p
p50%
0
37m
r/MPSelectMiniOwners
Top layer Gaps Issue! Uneven extrusion at different speeds!
100%
2
1d
r/MPSelectMiniOwners
Klipper? on V1?
100%
0
2d
r/MPSelectMiniOwners
help with mini v2 nozzle temps
100%
7
4d
Reddit and its partners use cookies and similar technologies to provide you with a better experience.By accepting all cookies, you agree to our use of cookies to deliver and maintain our services and site, improve the quality of Reddit, personalize Reddit content and advertising, and measure the effectiveness of advertising.By rejecting non-essential cookies, Reddit may still use certain cookies to ensure the proper functionality of our platform.For more information, please see our Cookie Notice and our Privacy Policy .
Advertisement
Faberant Cube 3D printer from V1.
 15
15
We noticed that you have JavaScript turned off.
It must be enabled for the site to work correctly.
Contents
- Driver installation
- 3D printer connection
- Cura Slicing Program
- Print profiles for slicing
- Repetier-Host Printing and Management Software
- Preparing for 3D Printer
- Print Bed Calibration
- Filling, plastic removal
- Starting 3D printing from a computer
- Offline printing from SD card
- Extruder assembly
- Nozzle replacement
- Removing and installing doors
- Maximum print speed
- Maintenance
- Versioning, firmware
- Safety measures
Driver installation
Before connecting printers for the first time, starting from version 1. 15, install the electronics driver "lpc176x_usb_driver.inf", which can also be found on the SD card that came with the printer. To install, right-click on the file and select "Install" (for Windows).
Turning on the 3D printer and connecting to a computer
Connect the 3D printer to the computer via a USB cable, the connector is located on the back of the printer at the bottom.
Connect the power cable to the 3D printer, the connector is located on the back of the 3D printer at the bottom. Plug the power cable into a 220V socket.
Move the power switch to the up position. The switch is located on the back of the printer at the bottom, just above the power connector.
For printers from version 1.20: turn on the printer by briefly pressing the power button. The button is located on the back of the printer, above the power switch.
Cura Slicing Program
Install Cura Slicing Program
Download version 4. 7.1, 64 bit: Cura (Win), Cura (MacOS X), Cura (Linux)
Attention! Cura is designed for 64 bit operating systems.
If you want Cura to work on a 32-bit operating system, then use the old version.
Installing print profiles
Copy the "profiles.exe" file from the SD card provided with the printer to the folder where Cura is installed.
Double click on the "profiles.exe" file to start unpacking the files.
Restart Cura.
Printer setup in Cura
Start Cura.
In the "Preferences" select the Russian language.
Restart Cura.
From the Options menu, select Printer -> Add Printer.
In the menu that appears, find Faberant , click, select Faberant Cube.
If the printer is not visible, click on neighboring printers and then again on Faberant . The printer should appear.
Click Add.
When you add a printer, its name appears in Cura and you can select nozzles and materials.
Each of the nozzle options has its own preset settings. The user only needs to select from the drop-down menu which nozzle will be installed.
Available nozzles:
D0.1 small
D0.2 small
D0.3 standard
D0.4 standard
D0.4 steel small
D0.5 standard
D0.6 steel small
For nozzles of all diameters, profiles with different layer heights are selected, they can be viewed and selected by opening advanced settings in the "Custom" mode, section "Print Options" -> "Profile".
The height of the print layer for the Faberant Cube 3D printer with different nozzles is from 0.04 mm to 0.4 mm
By default, the nozzle diameter of 0.5 mm (D0.5 standard) is set on the printer. For this nozzle, the optimal layer height for printing any 3D models is automatically selected - this is a layer with a height of 0. 3 mm. If desired, the user can select a profile with a lower layer height.
A 0.3 mm nozzle (D0.3 standard) is supplied with the printer as a spare.
The Faberant Cube 3D printer can print a wide range of materials. The user can select print profiles for materials with optimal print temperature, and other important parameters in the drop-down menu "Material" -> "Universal".
The list contains the following materials from the following domestic manufacturers:
REC (PLA)
PrintProduct (ABS GEO, ABS M8, PET-GUN, PLA GEO, TiTi FLEX Hard, TiTi FLEX Spring, Nylon, Polycarbonate, Polypropylene)
Strimplast (ABS+, FLEX39, PETG, PLA, UltraPET, Polycarbonate)
U3Print - Nylon Super Carbon 2
Best filament (PLA)
Filamentary - Wax (Wax3D)
all settings are ready.
If the material is not listed, you can choose a similar one from the list or just "Standard Plastic".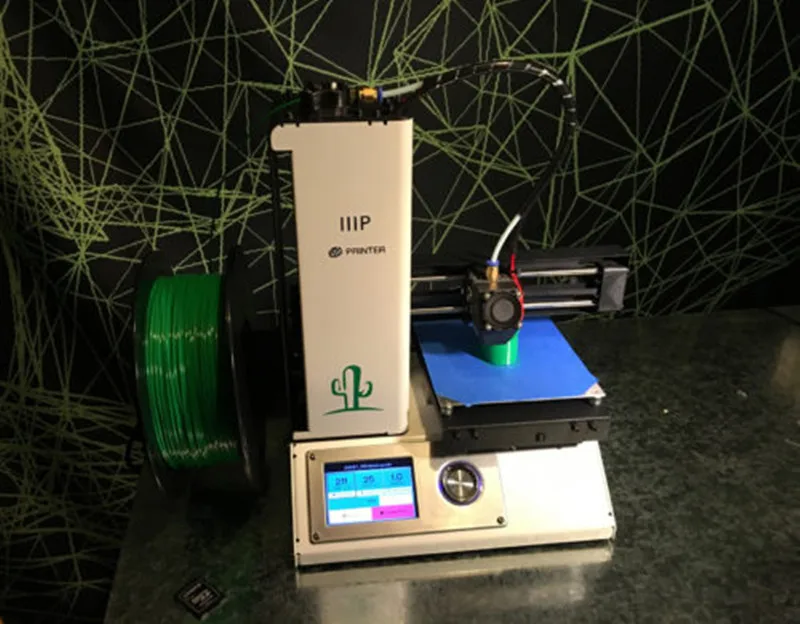 But the temperature of the nozzle and table, blowing will have to be specified independently in the advanced settings, guided by the data indicated on the coil with plastic.
After the user selects the nozzle diameter, layer height and material, you need to click on the "Slicing into layers" button, thereby starting the slicing process.
When the process is completed, the result can be saved to a file in Gcode format
To print from a computer, this file can be opened in the "Repetier-Host" printer management program and printing can be started.
For offline printing without a computer, the finished file must be saved to an SD card, inserted into the printer, and printing started from the printer's display menu.
Repetier-Host Printing and Management Software
Download and install "Repetier-Host" printing and management software ), Repetier-Host (Linux)
Next, in the "Repetier-Host" program menu, you need to switch the "Easy Mode" button to an inactive state to enable all the features of the program.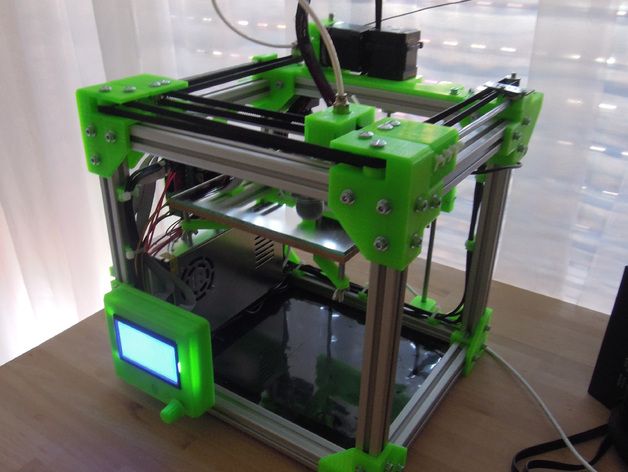
In the "Printer Settings" -> "Connection" you need:
1) enter the printer - "Faberant Cube"
2) select the last Com-port in the list
connection speed 3) 15
In "Printer Settings" -> "Printer" you need:
1) enter all the values, as in the picture
2) check all the boxes, as in the picture.
In "Printer Settings" -> "Extruder" you need:
- enter all values, as in the figure
In "Printer Settings" -> "Dimensions" you need:
1) enter all the values as in the picture.
2) save the changes by clicking on "OK"
Then click the "Connect" button (The USB cable must already be connected to the printer and the printer turned on).
If the printer is connected correctly, the table and nozzle temperatures will appear at the bottom of the program window.
Faberant Cube 3D Printer Preparation
Make sure there is at least 1 mm gap between the heating table and the nozzle.
If the table is raised higher, then lower it 1 mm down with a command from the Repetier-Host control program.
Check that all 3 limit switches are working.
Send Home X, Home Y, Home Z commands in turn.
Pressing the end sensor should stop the printer and reciprocate in one place. If so, then you can continue to work.
Heat up the 3D printer bed and nozzle from the Repetier-Host control program.
For ABS - table 100-120°C, nozzle - 230-245°C (see packaging with plastic)
For PLA - table 25-60°C, nozzle - 190-235°C (cm) . on packaging with plastic)
The table and nozzle can also be heated from the 3D printer display menu under "Temperature".
If necessary, the temperature of the table and nozzle can be changed during printing, both from the Repetier-Host control program and from the printer's display menu.
Print Bed Calibration
Semi-automatic 3-Point Table Calibration
Allows you to calibrate the print platform by 3 points on the plane.
All points are above the three screws with springs holding the top of the table to the bottom.
To start calibration in the printer display menu, select:
"Movement" -> "Table calibration" -> "Manual 3 points"
*Nozzle and table must already be at operating temperature. The table must be cleaned of plastic residues.
This will start a sequence of automatic commands and the printer will send the nozzle to the first point above the table, where it will descend and wait for the user's command.
At this time, the user must, having placed a sheet of A4 size paper in advance, twist the appropriate handle under the table in the right direction.
It is necessary to ensure that a sheet of paper sandwiched between the table glass and the nozzle is slightly pressed down, but can be removed without tearing.
If a sheet of paper is jammed or passes freely, tighten the appropriate knob.
When the gap is set, "Next Point" must be selected from the printer's display menu.
The printer will automatically continue moving to the next points, where the gap between the nozzle and the table also needs to be corrected.
When the gap is set at all three points, "Back" must be selected from the printer's display menu to end the calibration.
*Experienced user can set the gap without using a sheet of paper, "by eye". In this case, when calibrating, the nozzle must touch the table at each point. The gap between them should be equal to zero.
Semi-automatic 9-point table calibration
Allows you to accurately calibrate the printing platform by nine points on the plane. Possible unevenness of the table will be compensated by the printer software during the printing process.
Two steps are required for the table geometry compensation function to work:
1) Calibrate the table by 9 points
2) Enable the table geometry compensation function in G-code printing.
9-point table calibration:
To start the calibration in the printer display menu, select:
"Move" -> "Calibrate table" -> "Calibrate table"
*Nozzle and table must already be at operating temperature. The table must be cleaned of plastic residues.
This will start a sequence of automatic commands and the printer will send the nozzle to the first of nine points above the table, where it will descend and wait for the user's command.
At this time, the user must, having previously placed a sheet of A4 size paper, , use the display handle to twist it in the desired direction. The table itself will move up or down in increments of 0.020 mm.
It is necessary to ensure that a sheet of paper sandwiched between the table glass and the nozzle is slightly pressed down, but can be removed without tearing.
If the sheet of paper is jammed or passes freely, turn the display knob .
When the gap is set, "Next point" must be selected from the printer's display menu.
The printer will automatically continue moving to the next points, where the gap between the nozzle and the table also needs to be corrected.
When the gap is set in all nine points, the calibration is finished.
After that, select "Save settings" in the printer menu.
If necessary, it is possible to manually edit the values of the grid points of the table through the printer menu "Edit Grid".
*Experienced user can set the gap without using a sheet of paper, "by eye". In this case, when calibrating, the nozzle must touch the table at each point. The gap between them should be equal to zero.
Table Geometry Compensation Function
To enable the table geometry compensation function during printing, there must be an "M420 S" command in the print G-code after the "G28" command.
The "M420 S0" command can be used to disable the function.
When using ready-made print profiles from the printer manufacturer, the necessary commands are already registered automatically.
Filling, removing plastic
To start the procedure for changing plastic, you need to heat the nozzle to the operating temperature, select in the printer display menu: "Change filament"
The 3D printer extruder will automatically move aside, the printer will wait until the nozzle temperature stabilizes, then the extruder will start to rotate in the opposite direction to unload the filament.
At the same time, the message "Wait for filament unloading" will appear on the display of the 3D printer.
At this time, it is necessary to pull on the plastic thread coming out near the spool so that it does not remain in the extruder.
After removing the filament, prepare a new spool, thread the new filament into the feed tube of the extruder near the spool.
This will cause the 3D printer to display the message "Insert the bar and press the button to continue".
Press the display knob, the extruder will rotate, dragging the filament with it.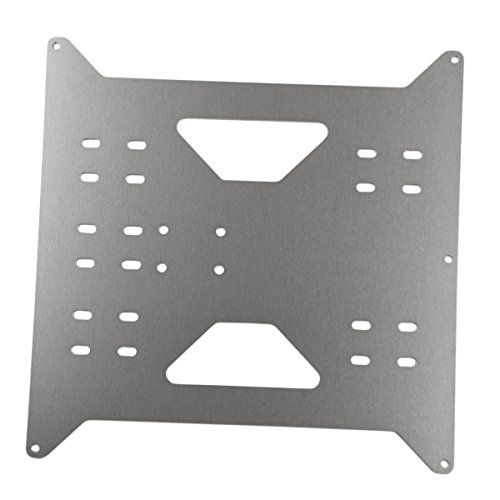 Push the filament from the side of the spool into the tube so that the feed mechanism of the extruder can hook it.
If done correctly, plastic should flow from the extruder nozzle. In this case, select "Resume Printing" from the display menu. This completes the filament change.
If the plastic does not flow out of the extruder, select "Squeeze More", slightly loosen the front pressure knob of the extruder, push the rod further into the tube, tighten the front pressure knob of the extruder. Repeat this until the plastic flows out of the extruder.
Attention! For all hard plastics, it is necessary to clamp the front pressure knob of the extruder until it begins to turn tight.
Do not overtighten the front knob, this will flatten the bar and put more stress on the extruder feed mechanism, which can lead to increased wear.
Do not loosen the front knob when printing with hard plastics, as this will cause plastic misfeeds and poor print quality.
Start 3D printing from computer
Load into the "Repetier-Host" control program the previously prepared in the "Cura" program for printing in Gcode format.
Start printing with the Start button.
Stopping the printing process is done by the "Stop" button
During printing, it is possible to change the print speed from 25% to 300% of the values specified in the Gcode.
It is also possible to change the amount of plastic supplied from 50% to 150% (default 100%)
Be careful when increasing these parameters, because. significantly exceeding 100% can damage the printer.
Offline operation, start 3D printing from SD card
For offline 3D printing without a computer, prepare the Gcode for 3D printing in advance and save it to an external SD card.
Turn on the printer, insert the SD card on the left side of the printer near the display into the dedicated slot.
At the same time, a message will appear at the bottom of the display that "Card inserted".
If during slicing the table and extruder temperatures were set in the code, then printing can be started immediately.
If the code does not indicate heating, then it is necessary to turn on the heating of the table and nozzle to the desired temperature from the printer display menu.
After the printer has warmed up, select "Print from SD card" from the menu.
In the list of files that appears, select the desired one, click on it, printing will start.
* Cyrillic filenames cannot be displayed correctly, so name files in the Latin alphabet.
During printing, it is possible to change parameters such as:
During printing, it is possible to "pause" the print, as well as change the filament.
Extruder assembly
Front View
Side View
Nozzle Replacement Procedure
Correct nozzle setting
Standard nozzles
- brass D0.3, D0.5
shortened nozzles
- brass d0. 1, d0.2
- steel D0.4, D0.6
* All work is performed in heat -protection
* Be careful with the white wires on the heater - they are thin!
1. lower the table along the Z-axis down 15 cm
2. Heat the extruder to the printing temperature of the plastic that was last used in printing.
3. carry out the procedure for extracting plastic from the extruder
4. Disconnect extruder heating wire
5. Loosen the nozzle together with the heating block on the thermal barrier (on a heated extruder) with the hexagon head from the printer kit
6. Unscrew the countersunk screw on the lower right in the radiator with a thin hexagon wrench and release the thermal barrier downwards
7. pull out the thermal barrier together with the heating block and nozzle down
8. holding the heating block, unscrew the nozzle from block 9 with a hex head0061 9. if necessary, remove plastic residue from all parts while they are hot
10. installation of the nozzle and assembly is carried out in reverse order on a heater heated to 240C
The maximum production speed of the 3D printer is up to 40 cm3/hour. (With a plastic weight of 1 g/cm3 - 40 grams/hour)
To achieve maximum production speed, all the following conditions:
1. The speed of movement and printing of all perimeters and filling is not lower than 100mm/sec.
2. The use of plastic that can be soldered well in layers at high speed printing (for example, PLA plastic).
3. Using plastic that can heat up enough to melt through the entire extruder at high speed (eg PLA).
4. Use the extruder temperature to melt the plastic closer to the maximum for that plastic.
5. Use a nozzle with a diameter of 0.5 mm and a layer height of 0.3 mm.
6. Simple product geometry.
If you deviate from the above conditions, the production speed of products will be less than the maximum.
If you need to increase the speed of manufacturing a product without changing the above conditions, then you can take advantage of one of the advantages of 3D printing that distinguishes it from other production methods - this is a change in the density of the internal filling (filling, infill).
Reducing infill density from 100% to 0 allows you to print the same product much faster.
Example: fill 0% - only side walls, bottom and top are printed on the product, it is empty inside. High manufacturing speed, but low strength.
Example: 20% fill - internal fill sufficient to support the walls of a product with complex geometry. High manufacturing speed, acceptable strength.
Example: 50% fill - dense inner fill. Good manufacturing speed, high strength.
Example: 100% fill - full internal fill. Low manufacturing speed, maximum strength.
Examples of simple products, 40 cm3, weight 40 g, for printing at maximum speed in 1 hour.
Example with 100% fill
size 4 *4*2.5 cm
material volume 40 cm3
print time 1 hour.
Download 3D-model file "Cube", size 4*4*2.5 cm, volume 40 cm3, with 100% fill.
Example with 20% fill
size 12 *4*2.5 cm
material volume 40 cm3
print time 1 hour.
Download 3D model file "Cube", size 12*4*2.5 cm, volume 40 cm3, with 20% fill.
In this example, an item 3 times as long, but with a sparse fill of 20%, is printed in the same time as an item 3 times smaller in length, but with a solid fill of 100%. This is because the volume of extruded plastic and the weight of both products is the same.
Maintenance
When using the 3D printer, keep the inside of the case clean.
Fine particles can be picked up by the airflow from the fan and then deposited on the pins, lead screw and belts, which can result in poor print quality and accelerated wear on the moving parts.
Periodically wipe down the inside of the case with a dry cloth and remove all small and large debris left after 3D printing from the build chamber. Alcohol-based wipes are allowed.
If there is dust or debris on the guide axles, lead screw, remove them with a dry paper towel.
XYZ axles are lubricated with Litol-24 grease. Frequency - 1 time in 6 months.
Z axis vertical lead screw - lubricated with PMS-100 liquid silicone grease. Application - from top to bottom around the circumference of the screw. Excess is removed with a dry cloth. Frequency - 1 time in 6 months.
Cleaning the Platen
After several print cycles, a patchy layer of dried adhesive may form on the platen, which is necessary to secure the part to the platen. An inhomogeneous layer of adhesive may impair the print quality of the first layer, so it must be scraped off with a clerical knife, and then carefully remove the scraped material with a dry cloth. After that, it is necessary to apply a new, even layer of glue.
It is also possible to smooth out uneven layers of dried glue with a damp cloth, but this must be done carefully so that moisture does not get on the edges of the table under the glass, where it can adversely affect the heating surface of the table.
All manipulations must be carried out with the extruder and table cooled down!
Faberant Cube 3D printer version, firmware
| Printer version | Improvements | Firmware | Changes |
| V1.20 | Remote shutdown function from the control program, from the print code, from the display menu. Automatic shutdown in case of malfunction. Automatic shutdown in case of malfunction. New reinforced extruder connector. Increased the brightness of the interior lighting. | firmware_v1.20_03.bin Download Firmware compatible with printers V1.18, V1.19 | Improved filament change algorithm via display menu. Improved algorithm for semi-automatic table calibration by 9 points. |
| V1.19 | Design improvements to improve printer build quality. | firmware_v1.20_03.bin Download | Firmware update |
| V1.18 | Improved accuracy of extruder temperature determination in the working temperature range. | firmware_v1.20_03.bin Download Firmware is not compatible with previous printer versions! | Firmware update |
| V1.17 | Optimization of metal part shapes, printer shell shape. Hole for adjusting the brightness of the display in the outer frame. | firmware_v1.17_04.bin Download Firmware compatible with printers V1.16 | Firmware update |
| V1.16 | New version of electronics - SKR 1.3 | firmware_v1.17_04.bin Download | Firmware update |
| V1.15 | New electronics 32 bit SKR 1.1 instead of Arduino DUE. Possibility to install standard and short nozzles - steel and small diameter 0.2 and 0.1 mm. | firmware_v1.15_47.bin Download | Firmware update |
Firmware installation procedure:
1) Connect the 3D printer to the computer via USB cable
2) Run the "Repetier-Host" printer management program, connect to the 3D printer
3) Enter the menu 3) Enter the menu Configuration -> EEPROM Configuration
4) Select "Export EEPROM Data", save the *. mepr file to a convenient location
5) Download the new firmware from the website
6) To download the firmware to the 3D printer, rename the firmware file to firmware.bin
7) Copy the firmware.bin file to the internal memory of the 3D printer (defined as a disk in Windows)
8) Reboot the 3D printer with the button under the monitor. This will automatically overwrite the new firmware in the printer's memory
9) After the printer becomes active, turn it off. If this is not done, the firmware may not work correctly the first time. *.mepr 9 file0010
11) 3D Printer Ready
Safety Precautions
1) Do not leave the printer unattended while it is running.
2) do not touch the heating element, nozzle or table with your hands. they heat up to a high temperature.
3) if it is necessary to maintain the heated parts of the printer, use heat-resistant gloves
4) do not touch the resulting part with your hands during printing.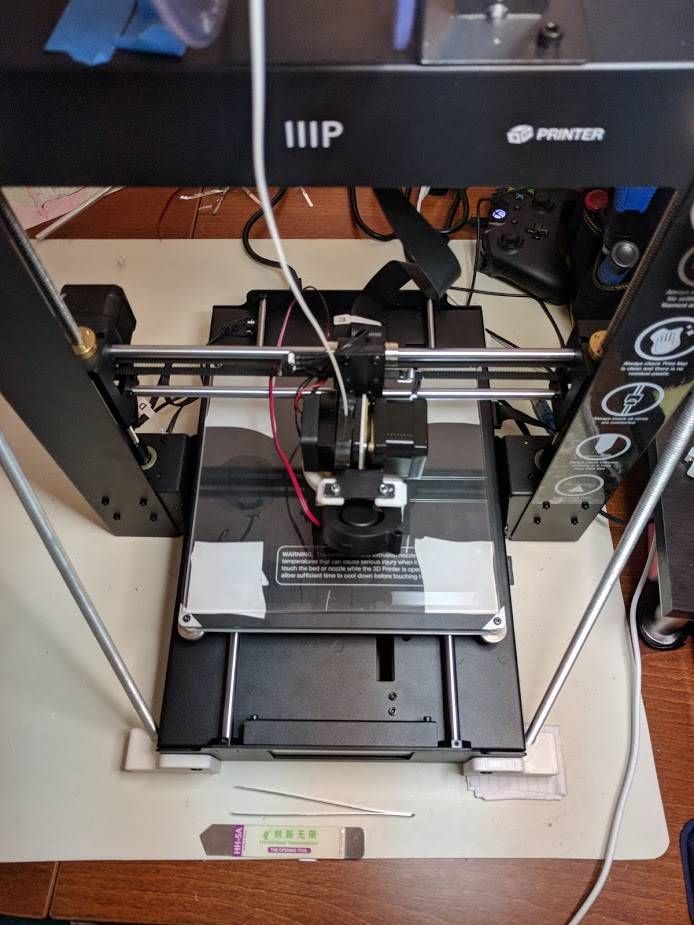
5) turn off the 3D printer from the 220V network after finishing work.
6) Do not lift, move, or lay on its side the 3D printer that is plugged in.
7) When printing with plastics other than PLA, ventilate the room.
8) Do not cover the operating printer with anything, as this may cause the electronics to overheat.
3D printer Funtastique EVO v1.0: first acquaintance / Sudo Null IT News For me, it has always been something complicated and incomprehensible, something that can only be collected in laboratories. But the year 2017 has come, and the printer can be assembled at home. Just read the instructions. Modular 3D printer Funtastique EVO v1.0 is suitable for the role of the first home printer when special knowledge in 3D printing is not required. It is assembled simply, like a children's designer, you do not need to solder or program anything. Everything has already been set up for us.

Packaging
The box is impressive. What's inside?
What's inside
Packing List.
Packing List
Characteristics
Funtastique EVO v1.0 3D printer parameters
Print area (XYZ): 125 x 1606 x mm Print layer height: from 0.05 mm
Nozzle diameter: 0.40 mm
Software: CURA RepetierHost
Consumable types: PLA, PVC, PETG, PP, Wood
Weight: 5.0 kg
Parts lie tightly in foam
Modularity
The printer consists of modules. The manufacturer offers the printer in finished form and in the form of a designer. I received the printer in a blue DIY kit. As far as I know, Dajet also has orange.
Opening
Assembly
It is easy to assemble and disassemble. All parts are fastened with clamps. Lightweight frame is made from ABS plastic.
Assembling
If placed in a room or office, it will not spoil the look of the interior at all. All thanks to the stylish design. Assembling and setting up the printer took me half an hour. Fastening all the details with clamps is a pleasure.
Table setting
Magnetic work table. The manufacturer says that you can do without adhesive tape. Partly it is. But if the part is high, then without a tape, further work will be impossible.
Table view
The table is easy to put on and take off. We collect.
Assembly
We fasten special guides.
Fastening the rails
Clip the modules into the slots.
Nozzle
We put the block with the nozzle.
Almost done
The outside already looks like a device.
Latches
The latches can be conveniently brought into place with a rubber mallet.
What is a hammer and what can it do
When all the parts are installed, we connect the drive belts.
Belt
In the instructions, we carefully follow the numbers of the parts to be mounted.
Tube
We connect the plastic guide tube.
Control box
Insert the control box.
Connect
And connect all the wires.
Starting up
Starting the printer
The printer blinked and happily announced that it was ready to go.
Head
The peculiarity of this printer is that it can work offline. It is enough to throw the model in gcode format on a flash drive and upload it for printing.
Software
The printer can be conveniently controlled using the included Cura software.
Cura is included in the package
Cura is completely in Russian, it is a pleasure to work with it, at least for me, a complete loser in this new business for me.
Test print
Test print
Trying a test print.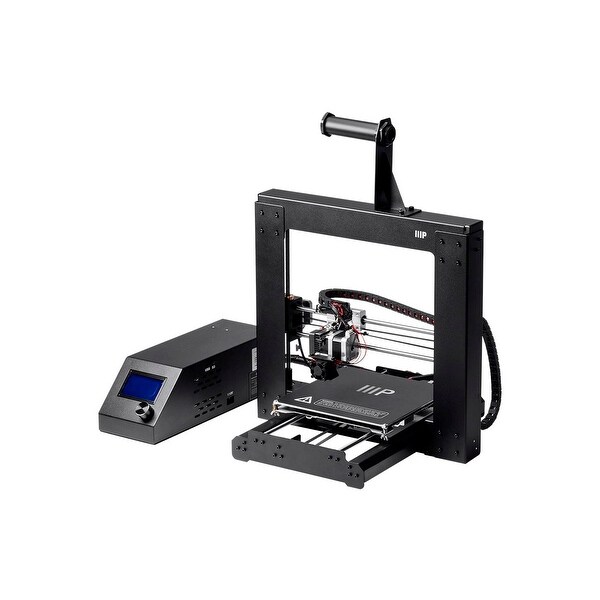
Be sure to put gasket
Indispensable without lining. Even better is to purchase a special adhesive tape. Below I will show why. Then the part will sit securely on the table.
Monitor
The printing process took about 5 minutes.
Plastic feed
Plastic is fed through the plastic feed unit.
Coil holder
The coil is located below.
Print process
Printing proceeds without any errors.
Printed
The output is a finished geometric object.
Printing without sticky paper results in a crooked bottom instead of a bottom
If you try to print a model without sticky tape or paper, the model may come out slightly crooked. In general, the main reliable bottom.
The first pancake is lumpy
Rejection as a reason for printing without a special tape
The one-sided tape failed at the very end when the robot needed eyes.