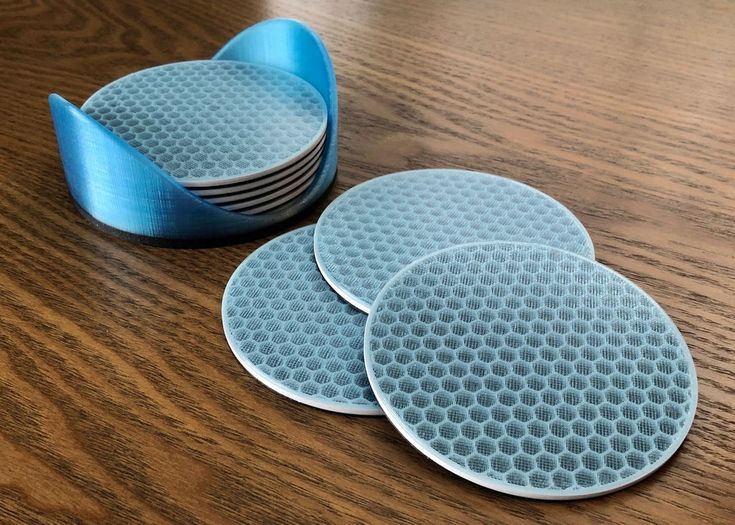
How much to charge for 3d printing reddit
How to make money with a 3d printer?
How profitable is 3D printing?
But first, let's answer this question. Can you really make money with a 3D printer?
The answer is yes and no. It depends on the niche that you serve. If you're 3D printing for the general consumer, then your profit margin might not be high because it's for personal use. Consumers love cheap stuff. You'll barely cover your cost because of the amount of labor required to finish just one job. But if you're serving clients where 3D printing solves a costly problem that they have, then they are more willing to pay you a lot more to solve it for them.
Here's what we mean by that.
Scenario A: Joe is looking to 3D print a door handle because his door handle broke.
Scenario B: Amanda is looking to 3D print a prototype of a product she plans to sell on Kickstarter.
Believe it or not, we get a lot of Joe's looking to get a quote for their missing appliance part. And most of them are surprised by how expensive 3D printing is and why can't it be as a cheap as Amazon!
We turn them away. Cheap clients are not worth your time.
Best entry level 3D Printer
Don't have a 3D printer already?
Phrozen Sonic Mini 4k 3D Printer
Check out this Phrozen Sonic Mini which is very popular among 3D printed miniatures enthusiasts.
$349.99 from Phrozen3D
Commisions earned
Different ways to make money with 3D printing
We've listed a couple of ways you can make money with a 3D printer. Some of these ideas are really good, some of them are bad. But we're listing them any way and it's up to you to make that decision if it's even worth considering.
Let's dive right in!
1. Sell pre-made 3D prints on Etsy
Etsy is one of the biggest marketplace for 3D printing. A lot of 3D printing hobbyists and even professional gravitate towards Etsy because of its large audience who are into handcrafted stuff. Some of them have even made a name for themselves on Etsy, whether that's selling pre-made items with a little bit of customization or selling full on 3D printed objects.
When we were starting out back in 2016, we were the first ones to start selling 3D printed planters. Made boatloads of money but ultimately had to stop because of copyright issues. But also partly, because it wasn't where we imagined company .
Remember how we said cheap clients aren't worth your time. On Etsy, you will encounter a lot of cheap clients.
Pros
- Quick way to validate your 3D printing idea
- Benefit from Etsy's huge audience
- Running ads are cheaper compared to Google
List of 3D printed products that you can sell on Etsy:
D&D miniatures
Planters
Vase
Freezing Bernie
How do you choose which products to sell?
On Etsy, you will see a lot of people selling different variations of the same thing - planters, iphone holder, headphone holder, etc.
Why?
Because these things sell!
Like it or not, Etsy will be full of copycats and originality doesn't matter. If your product sells, people will copy it. (And vice versa)
How can you stand out on Etsy?
There's a lot you can do to stand out, but here are some of the common ones that we hear over and over again.
Offer something unique that differentiates your product. Whether that's offering higher quality 3D print (resin), custom finishing, etc.
Avoid competing for price. It becomes
Ask your happy clients to leave a review
Take high quality product photos
2. Offer a specialized 3D printing
This comes down to finding a niche that you're comfortable to work with or if there's enough margin for you to be profitable.
Here's a list of niches you can offer your 3D printing services to:
Tabletop Miniatures
Toy Designers
Jewelry Designers
Architecture firms
Engineering firms for prototyping services
Pros
- You can standardize your process
- Repeatable business
- Easier to master one industry than be a jack of all trades
- You can become a known expert in that industry
3.
 Start a 3D printing business in your local area
We'll start off by saying that starting a 3D printing business is the most difficult thing to do out of all the other ideas on this list.
Pros
- Potential for high profits
- Local advantage over online only 3D printing companies
We were fortunate that we were located in NYC, where there is huge demand for 3D printing, and that we started in the early days when 3D printing was still new.
We're not saying this because we don't want you to compete with us, but we're saying this because we want you to know the risks involved in the 3D printing business. Many 3D printing companies have gone out of business because they could not make a sustainable profit to keep the lights on.
The amount of work that you have to put in on fulfilling custom orders is a lot. If you don't opt for an automated system, you end up doing a lot of back and forth with clients. And if you do opt in for these instant quoting systems, you can get a lot of low end jobs and lose out on clients with a very custom need.
The real money in offering a 3D printing service, especially if your a small business, is if you can differentiate yourself from merely becoming a commodity.
For us, we had to become more than just a 3D printing service. It sounds corny, but that was the reality. We had to offer other services that would add value to 3D printing. For example, a marketing agency came to us for 3D printed trophy in 24k gold. But we know that we can't 3D print gold. We can either tell them to take it to a metal plating shop or we can do it ourselves and charge on top of it.
We can charge a lot more because:
We're taking all the risk. If that metal plating fails, we have to 3D print again.
We're making their lives so much easier by being an expert at this field.
And if they're on a really tight deadline, we can charge even more because we're guaranteeing results.
Clients who care more about their time and results are willing to pay you a lot if you can deliver.
So we've partnered with a local metal plating company and later on started offering metal plating services for 3D printing.
Having capabilities more than 3D printing will allow you to charge more than just the 3D print by itself.
Whether that's painting, or creating molds. Whatever it is, you need to find the right clients.
Bonus: Offer 3D scanning services
3D scanning and printing services are perfect way to increase money you can make from owning 3D printer. Although this would require buying a 3D scanner, it's a good option to think about when increasing your chances of landing a 3D printing client.
4. Sell your 3D printing designs
Making money with 3D printing isn't only limited to running your 3D printer 24 hours a day. You can also make money from selling 3D models!
This might be hard if you don't have any design skills. You can either learn or hire a designer on Fiverr or Upwork.
Pros
- You can make money while you sleep
- More scaleable than running a 3D printing business
Patreon Business Model
Here's how it works. People pay you an X amount every month for you to publish 3D models for them.
This business model is very popular among the tabletop miniature community.
The above picture is from LordOfThePrint's Patreon. They're one of the popular designers focused on building 3D designs for tabletop gaming. They currently have 1,933 subscribers as of this writing. Assuming only 5% of that is merchants, (about 100) that's $3,866 of monthly recurring revenue!
Take this WallStreetBets 3D model by ChaosCoreTech for example. We spent $50 to have the rights to sell their design for a month. Imagine having 10 Etsy sellers wanting to sell your 3D model. That's have $500 of passive income every month for a few hours of design work!
Merchants/Etsy sellers are great target to sell your 3D models to because:
They'll use it to make more money
They know that your 3D model would print properly because you also know how to 3D print. You might also include supports to make it easier for them
You can show them how it would like 3D printed, thus, making it even easier to sell.
Marketplace Business Model
Some prefer to sell their designs as one-off product that people can just buy online without having to subscribe monthly.
Places where you can sell your 3D models
MyMiniFactory
CGTrader
TurboSquid
5. Start a YouTube Channel
We know that this is easier said than done. Creating content requires time, effort and consistency. With the amount of 3D printing related youtube channels out there, it might be hard to stand out.
But we're not here to stop you from starting your own channel. We're just here to tell you that you can make money with it.
Pros
- Potential for high earnings
- You can use your audience to make more money aside from YouTube Ads
6. Sell an online 3D printing course
If your confident enough with your 3D printing skills and you have knack for teaching others, then selling an online course about 3D printing can
What should you teach?
Again, you need to find a problem where people are willing to pay money for. If you search "3D printing" on Udemy, you'll find 3D printing courses that people are paying for.
It doesn't have to be "how to operate a 3D printer", it can be a course on "how to operate a profitable 3D printing business". With this strategy, you'll attract clients who are willing to pay money to make more money.
Pros
- Passive income
The following ideas are not so good
So you can probably skip to the end if you wish to.
7. Rent your 3D printer for events
With the pandemic and all, this is probably not a good idea. But it's still an idea right?
The business is very similar to a photo booth. A bar mitzvah will hire you for 3 hours to 3D print keychains for them.
But 3D printing takes a long time. They are going to complain that you didn't 3D print for everyone.
Yup, bad idea.
8. Sell your 3D printer
You can quickly make money if you sell the 3D printer you just bought. Guaranteed.
All jokes, aside
9. 3D print the word "money"
You will literally make "money" with a 3D printer with this strategy.
In summary
Yes, you can make money with a 3D printer. And there are a lot of ways that you can do it, whether that's selling 3D printed items, digital goods, or even offering a 3D printing service in your local area. Is it easy to make money 3D printing? It's not. You still need to work hard(and smart) to become successful in the 3D printing business.
The 10 Strangest 3D Printed Objects
Here’s a riddle for you: What’s more amazing: Technology? Or what can be made with technology?
Apply that riddle to any number of topics: medicine, the internet, nuclear armament, or engineering, and you’re in for an afternoon of philosophical pondering. But, as far as 3D printing is concerned, there’s a very clear answer to the riddle.
While 3D printing technology is amazing, the things that have been created using 3D printing are far more incredible. Let’s discuss the 10 strangest things that have been 3D-printed. But first, let’s briefly review what has been going on in the 3D printing world.
How does 3D printing work?
Have you ever made a sandwich? It’s simply an act of stacking layers of ingredients. The first layer is a slice of bread. The second layer is a coating of mustard. The third layer is a slice of lunch meat, and then there’s a layer of lettuce, and then tomatoes, and so on, so forth.
3D printing works in the same way. A 3D printer creates a physical object by stacking layer after layer of a particular substance. Each layer is poured as a liquid. Once the liquid dries or hardens, the next layer is poured on top. There are other 3D printing methods, but they work in roughly the same way.
A 3D printer works off of a computer-aided design (CAD). A CAD is basically a digital model of whatever’s going to be 3D printed. The CAD provides the exact specifications of the object so the 3D printer knows what the shape and size of each layer will be. Before you 3D print an object, you’ll first have to use a design-optimized computer to create a CAD of the object.
Are there limits to 3D printing?
Yes and no. Most of the limitations of 3D printing have to do with two things: size and substance.
On a regular printer, you can’t print a document that’s larger than the printer itself. Similarly, you can’t 3D print anything that’s larger than the 3D printer. But that hasn’t stopped some of the more ambitious individuals. An entire high-rise building has been 3D printed (we’ll get to that, soon). Obviously, the building wasn’t constructed entirely within the machine. But each portion of the building was 3D printed and then assembled onsite.
One of the trickier obstacles to overcome is the choice of material that’s used to print. The material must be something that can be melted and fused into a solid shape. Engineers are always working to develop 3D printers that can print using new kinds of substances, and there are now 3D printers that can print metal objects. There still isn’t a 3D printer that prints wood, but they’ve gotten close. Hilariously, there are 3D printers that can print food (yeah, we’ll get to that, too).
With enough creativity, you can overcome some of the limits of 3D printing technology and create some truly remarkable things.
Useful 3D-printed objects
3D printing technology has been around since the 1980s. Originally, it was used to create scale models of manufacturing prototypes or assembly line parts, and that’s still largely what it’s used for today. Machine parts and scale models are commonly built using 3D printers.
But in the last decade, 3D printers have become much more accessible to consumers. Media interest in 3D printers has also encouraged broader experimentation in lots of different industries, and these days both amateurs and professionals alike are printing unique 3D objects.
Strangest 3D-printed objects
Let’s discuss some of the weird objects that have been 3D printed. Some of these objects are actually quite useful. Others are not. But all of them are wonderfully weird. Here are 10 very bizarre things that have been crafted with 3D printers.
1. Mouse ovaries
Researchers at Northwestern University in Chicago created the first artificial mouse ovaries using a 3D printer. [1] Okay, so mouse ovaries aren’t technically useless - they’d be very useful for any infertile mouse. But ovaries aren’t the first thing you’d expect to be 3D printed, right?
The mouse ovaries were created by 3D printing layers of gelatin. Then they were surgically implanted in seven infertile mice. Of the seven mice that received implants, three mice successfully gave birth to litters of pups.
There are human implications to this discovery, of course. The researchers hope that someday, they’ll be able to print artificial human ovaries for cancer patients and others who are infertile.
2. Food
Speaking of mice: researchers at University College, Cork in Ireland 3D-printed objects using cheese. [2] They filled a 3D printer nozzle with Easy Cheese and printed “cheesy” designs with it, including a small bear. The designs were mostly flat because aerosol cheese isn’t the most stable printing substance.
There are other types of foods that have been 3D printed, too, one of the most famous being 3D printed chocolate. If you think that chocolate rabbits are neat, you should see some of the nifty chocolate designs that have been made with 3D printers.
Chocolate makes for a great 3D printing substance because it can be layered while it’s melted then easily hardened. There are several companies that sell 3D-printed chocolate, including chocolate behemoth Hershey. [3]
They’ve also 3D-printed pizza. A printer was equipped with three nozzles that dispensed liquid dough, tomato sauce and cheese. In under five minutes, the pizza dough was ready for baking. Researchers said they were able to accurately control the crispiness of the bread thanks to the 3D printer.
Here are some other cool foods that have been 3D-printed:
- Quiches
- Croutons
- Candies
- Cereal
So what’s on the horizon for 3D-printed food? For one, restaurants and bakeries will be able to print large quantities of stylized foods and pastries. But the hope is that people will be able to prepare food in their own homes without having to cook. Very futuristic, indeed. “Computer...Tea. Earl Grey. Hot.”
3. Skin
Researchers at the University of Toronto created a handheld 3D printer that could apply skin cells on a pig. The pig had its cells harvested, and the cells were grown to a larger quantity. Once researchers had enough cells, they used the cells as the printing substance.
The 3D printer was rolled over the pig’s wound “like a white-out tape dispenser.” Success! The skin cells successfully attached to the open wound area. Scientists think that in the future, this technology could be used to replace skin grafts. It would make it much easier to treat victims with open wounds - especially burn victims. [4]
The science of printing living tissues is known as bioprinting. Researchers have printed:
- Artificial bone
- Artificial blood vessels
- Artificial bladders
Scientists are hoping they’ll be able to finally end the long - and sometimes fatal - wait for organ transplants. [5]
[5]
4. Bikini
Textiles are notoriously difficult to print, but a company called Continuum Fashion has created a number of cool 3D-printed fashion items. Their standout fashion piece is the 3D-printed bikini. You can hit the beach and go swimming in style and comfort.
Continuum printed the bikini using a material called Nylon 12, which is strong, flexible, and waterproof. The bikini has an awesome texture, too. It’s composed entirely of interconnected beads, a testament to the intricate kinds of designs that can be printed.
The company also produces a line of 3D-printed women’s shoes. [6]
5. Mini Power Drill
You’ve got to see it to believe it. A man in New Zealand created the world’s smallest power drill with a 3D printer. The drill measures 17 x 7.5 x 13 mm, and is equipped with a 0.5 mm drill bit. And it works! The drill is powered by a hearing aid battery and utilizes a miniature motor and headphone-cable wiring. [7]
Should we call this the world’s smallest drill, or the world’s cutest drill?
6.
 Microscopic race car
There’s a bizarre creation courtesy of researchers at the Vienna University of Technology. They created a 3D printer that can create near-microscopic objects. To demonstrate its abilities, the researchers printed a tiny race car that’s just about the width of a hair follicle. [8] It’s not quite built to tackle the Monaco Grand Prix, but it would make a perfect vehicle for lice.
7. Wall-climbing robot
South Korean scientists used a 3D printer to build a robot that can climb walls. The robot mimics the movement of a gecko and is capable of climbing up vertical walls with the help of adhesion pads. The robot’s body was 3D-printed using a material called Polyamide 12. [9]
Another cool robot was 3D-printed at the University of California, San Diego. This robot has three legs and can navigate rough terrain, like sand and rocks. 3D printing was integral in building the robot. In order to crawl over rough terrain, the robot needed to be constructed of softer, more flexible materials than what most robots are made of. The researchers were able to 3D-print the robot’s soft and hard surfaces together. [10]
8. Unborn babies
Thanks to 3D printing, expectant parents can hold their baby before it pops out of the womb. A Russia-based company uses ultrasound scans to create a 3D-printed model of the unborn child. Umm… cute?
In actuality, the models aren’t made to be baby shower gifts. They help doctors evaluate the health of the developing child. The models are a bit surreal. They’re highly detailed and capture the smallest facial features of the unborn baby. [11]
Imagine the comedic possibilities of using an unborn baby model at a gender reveal party.
9. Buildings
Buildings aren’t strange (unless we’re talking about some contemporary architecture). But constructing a building with a 3D printer is strange. How on earth can a 3D printer construct something so gigantic?
Concrete is the main substance that’s used by a 3D printer to print a home. A crane lifts the printer nozzle above the ground and maneuvers the nozzle as it places layers of concrete. Some 3D printers can also layer insulation materials.
Most 3D-printed buildings don’t adhere to building codes, so they’re either built as temporary structures or they’re built very small. But construction firms are optimistic that they’ll be able to build more advanced structures as the technology progresses. [12]
10. 3D printer
That’s right: a 3D printer has printed a 3D printer. [13] This is the most “meta” item on this list. You can’t print a 3D printer in its entirety, but people have printed all of its individual parts, and then they’ve manually assembled them.
Honorable mention: light-created objects
Researchers at the University of California, Berkeley discovered how to 3D print solid objects out of liquid and light. The researchers used a gooey liquid that turns solid when exposed to a certain amount of light. They used light beams to sculpt solid figures within the liquid. The benefit of this technique is that it’s easier to print bendable items.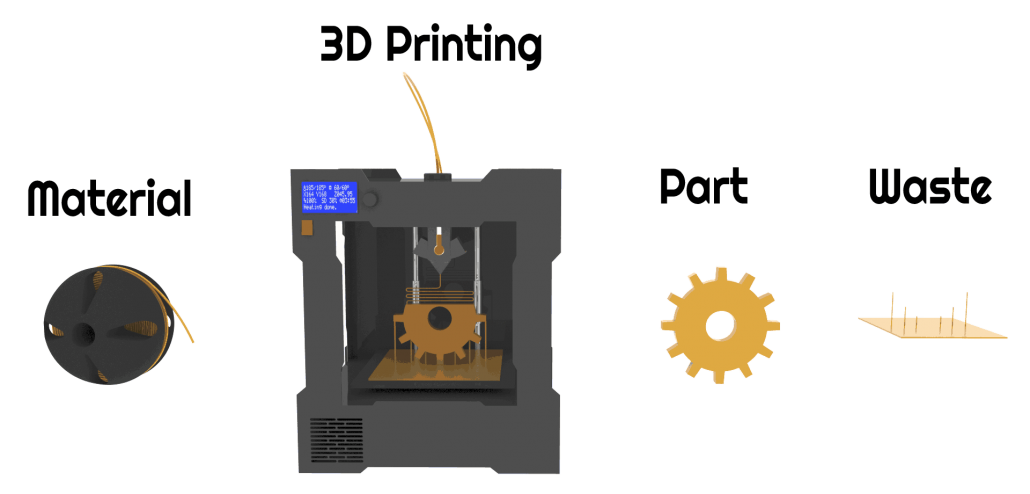 Objects printed in this way are also much smoother than those that are 3D-printed by traditional methods. [14]
None of the objects that they printed were uniquely “strange.” But the printing process itself is strange enough to be worthy of a mention on this list.
Your turn to contribute
What are you waiting for? You could be the next great inventor of a strange (or useful) 3D-printed object. Learn about HP 3D printing technology.
Here are some 3D printing ideas for you. You can print them on a large 3D printer or a home 3D printer. Some of these objects have been designed and 3D-printed by ordinary people!
- Musical instruments
- Busts
- Makeup
- Toys
- Cable catchers
- Pen holders
- Phone docks
- Tablet stands
- SD card holders
- Garden decor
- Recycling/sustainability equipment
There are so many cool items you can make with a 3D printer, no professional assistance needed. Get out there and start creating, and be sure to share your innovative or wild ideas with the rest of us. You can change the world with 3D printing, or you can print something that’ll make all of us laugh.
[1] TheGuardian.com; 3D-printed ovaries allow infertile mice to give birth
[2] Gizmodo.com; The First 3D Printed Cheese Was as Bizarre as You’d Expect
[3] Fabbaloo.com; 3D Printing Is Revolutionizing The Chocolate Industry
[4] CNet.com; This Handheld 3D printer can print skin onto people
[5] Science.Org.Au; Printing the future: 3D bioprinters and their uses
[6] BusinessInsider.com; The World’s First Bikini Made Using A 3D Printer
[7] Geek.com; World’s smallest working drill created with a 3D printer
[8] UniverseToday.com; Watch This 3D Printer Make a Microscopic Car
[9] 3DPrintingIndustry.com; 3D Printed Wall-Climbing Robot Emulates Gecko By Walking Upside Down And Underwater
[10] CNNMoney.com; New 3D-printed robot can walk on sand and rocks
[11] TechTimes.com; Expectant Parents Can Have 3D Models Of Unborn Babies
[12] CityLab. com; Is the Revolution of 3D-Printed Building Getting Closer?
[13] Sculpteo.com; Can you 3D print a 3D printer?
[14] BerkeleyNews.com; New 3D printer uses rays of light to shape objects, transform product design
About the Author
Zach Cabading is a contributing writer for HP® Tech Takes. Zach is a content creation specialist based in Southern California, and creates a variety of content for the tech industry.Building a home 3D printer with your own hands: recommendations from personal experience
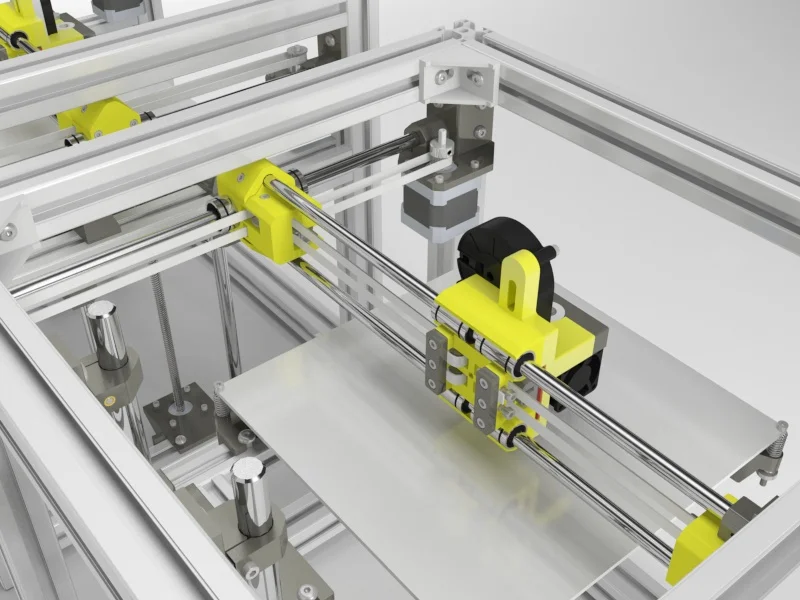
3D printing and assembly of 3D printers is my hobby and passion. Here I will not share detailed diagrams and drawings, there are more than enough of them on specialized resources. The main goal of this material is to tell you where to start, where to dig and how to avoid mistakes in the process of assembling a home 3D printer. Perhaps one of the readers will be inspired by applied engineering achievements.
Why do you need a 3D printer? Use cases
I first came across the idea of 3D printing back in the 90s when I was watching the Star Trek series.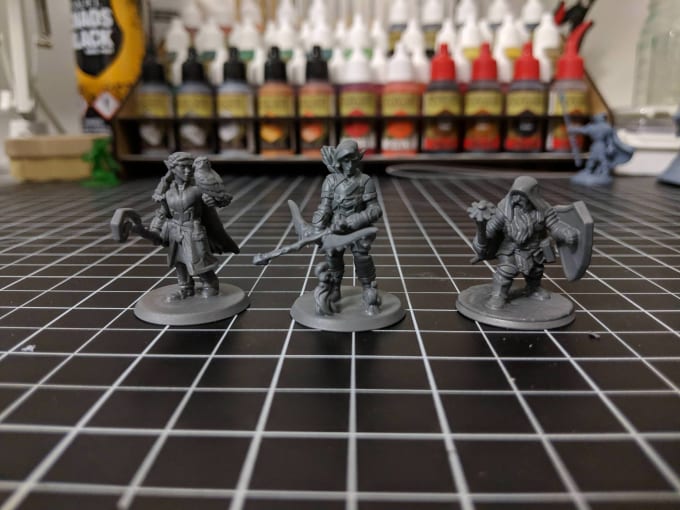 I remember how impressed I was by the moment when the heroes of the cult series printed the things they needed during their journey right on board their starship. They printed anything: from shoes to tools. I thought it would be great someday to have such a thing too. Then it all seemed something incredible. Outside the window are the gloomy 90s, and the Nokia with a monochrome screen was the pinnacle of progress, accessible only to a select few.
Years passed, everything changed. Around 2010, the first working models of 3D printers began to appear on sale. Yesterday's fantasy has become a reality. However, the cost of such solutions, to put it mildly, discouraged. But the IT industry would not be itself without an inquisitive community, where there is an active exchange of knowledge and experience and who just let them dig into the brains and giblets of new hardware and software. So, drawings and diagrams of printers began to surface more and more often on the Web. Today, the most informative and voluminous resource on the topic of assembling 3D printers is RepRap - this is a huge knowledge base that contains detailed guides for creating a wide variety of models of these machines.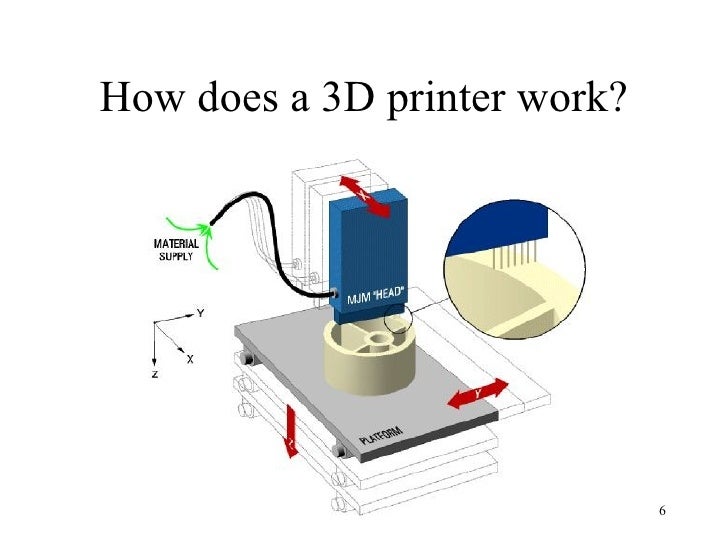
I assembled the first printer about five years ago. My personal motivation to build my own device is quite prosaic and based on several factors. Firstly, there was an opportunity to try to realize the old dream of having your own device, inspired by a fantasy series. The second factor is that sometimes it was necessary to repair some household items (for example, a baby stroller, car elements, household appliances and other small things), but the necessary parts could not be found. Well, the third aspect of the application is "near-working". On the printer, I make cases for various IoT devices that I assemble at home.
Agree, it is better to place your device based on Raspberry Pi or Arduino in an aesthetically pleasing "body", which is not a shame to put in an apartment or take to the office, than to organize components, for example, in a plastic bowl for food. And yes, you can print parts to build other printers :)
There are a lot of scenarios for using 3D printers. I think everyone can find something of their own.
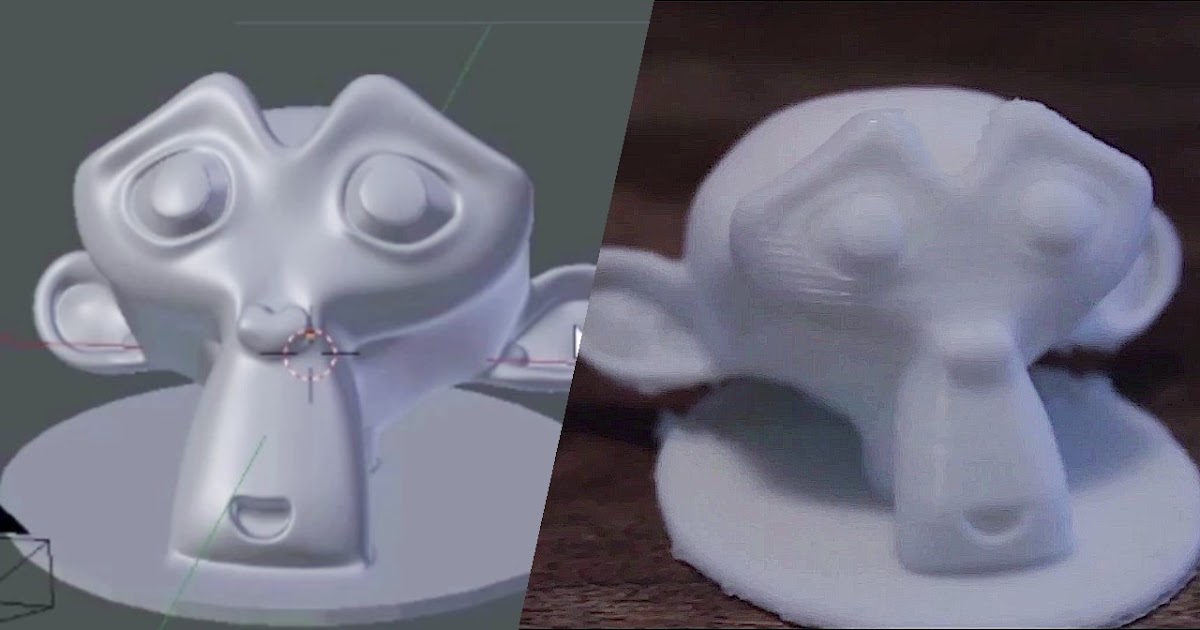
A complex part in terms of drawing that I printed on my printer. Yes, it's just a figurine, but it has many small elements
Ready solution vs custom assembly
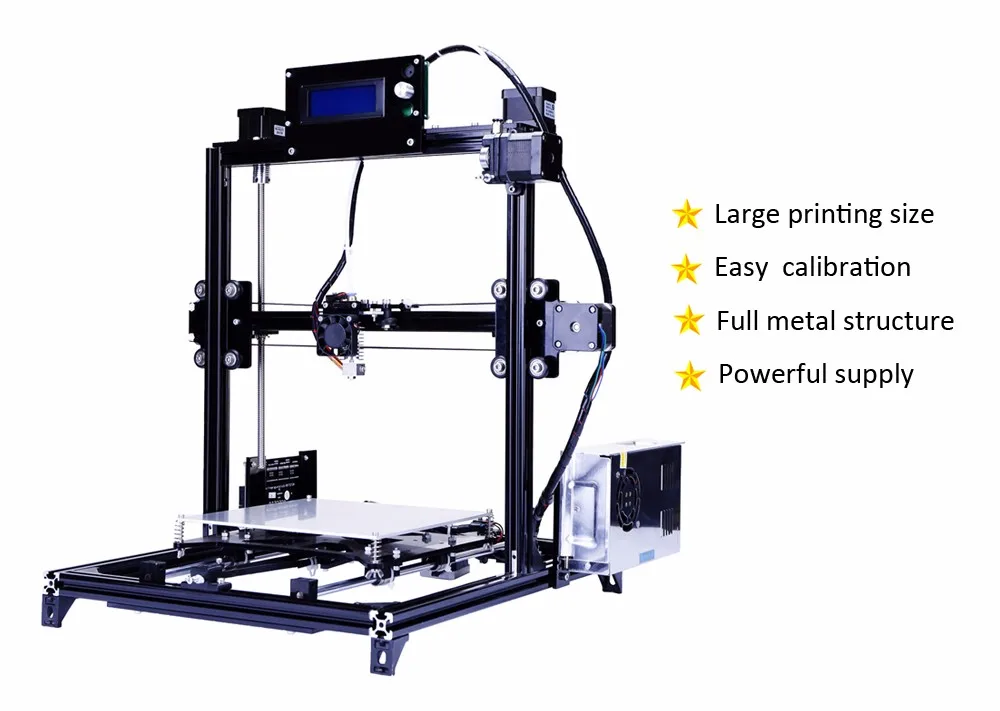
When a technology has been tested, its value in the market decreases markedly. The same thing happened in the world of 3D printers. If earlier a ready-made solution cost simply sky-high money, then today acquiring such a machine is more humane for the wallet, but nevertheless not the most affordable for an enthusiast. There are a number of solutions already assembled and ready for home use on the market, their price range ranges from $500-700 (not the best options) to infinity (adequate solutions start from a price tag of about $1000). Yes, there are options for $150, but we, for understandable, I hope, reasons, will not dwell on them.
In short, there are three cases to consider a finished assembly:
- when you plan to print not much and rarely;
- when print accuracy is critical;
- you need to print molds for mass production of parts.
There are several obvious advantages to self-assembly. The first and most important is cost. Buying all the necessary components will cost you a maximum of a couple of hundred dollars. In return, you will receive a complete 3D printing solution with the quality of manufactured products acceptable for domestic needs. The second advantage is that by assembling the printer yourself, you will understand the principles of its design and operation. Believe me, this knowledge will be useful to you during the operation of even an expensive ready-made solution - any 3D printer needs to be serviced regularly, and it can be difficult to do this without understanding the basics.
The main disadvantage of assembly is the need for a large amount of time. I spent about 150 hours on my first build.
What you need to assemble the printer yourself
The most important thing here is the presence of desire. As for any special skills, then, by and large, in order to assemble your first printer, the ability to solder or write code is not critical. Of course, understanding the basics of radio electronics and basic skills in the field of mechanics (that is, "straight hands") will greatly simplify the task and reduce the amount of time that needs to be spent on assembly.
Also, to start we need a mandatory set of parts:
- Extruder is the element that is directly responsible for printing, the print head. There are many options on the market, but for a budget build, I recommend the MK8. Of the minuses: it will not be possible to print with plastics that require high temperatures, there is noticeable overheating during intensive work, which can damage the element. If the budget allows, then you can look at MK10 - all the minuses are taken into account there.

- Processor board. The familiar Arduino Mega is well suited. I didn't notice any downsides to this solution, but you can spend a couple of dollars more and get something more powerful, with a reserve for the future.
- Control board. I'm using RAMPS 1.4 which works great with the Arduino Mega. A more expensive but more reliable board is Shield, which already combines a processor board and a control board. In modern realities, I recommend paying attention to it. In addition to it, you need to purchase at least 5 microstep stepper motor controllers, for example - A4988. And it's better to have a couple of these in stock for replacement.
- Heated table. This is the part where the printed element will be located. Heating is necessary due to the fact that most plastics will not adhere to a cold surface. For example, for printing with PLA plastic, the required surface temperature of the table is 60-80°C, for ABS - 110-130°C, and for polycarbonate it will be even higher
There are also two options for choosing a table - cheaper and more expensive./cdn.vox-cdn.com/uploads/chorus_asset/file/13615707/arobertson_181203_3123_7797.jpg) Cheaper options are essentially printed circuit boards with preheated wiring. To operate on this type of table, you will need to put borosilicate glass, which will scratch and crack during operation. Therefore, the best solution is an aluminum table.
Cheaper options are essentially printed circuit boards with preheated wiring. To operate on this type of table, you will need to put borosilicate glass, which will scratch and crack during operation. Therefore, the best solution is an aluminum table. - Stepper motors. Most models, including the i2 and i3, use NEMA 17 size motors, two for the Z axis and one each for the X and Y axes. Finished extruders usually come with their own stepper motor. It is better to take powerful motors with a current in the motor winding of 1A or more, so that there is enough power to lift the extruder and print without skipping steps at high speed.
- Basic set of plastic fasteners.
- Belt and gears to drive it.
Examples of elements appearance: 1) MK8 extruder; 2) Arduino processor board; 3) RAMPS control board; 4) motor controllers; 5) aluminum heated table; 6) NEMA 17 stepper motor; 7) a set of plastic fasteners; 8) drive gears; 9) drive belt
This is a list of items to be purchased. Hardcore users can assemble some of them themselves, but for beginners, I strongly recommend purchasing ready-made solutions.
Yes, you will also need various small things (studs, bearings, nuts, bolts, washers ...) to assemble the case. In practice, it turned out that using a standard m8 stud leads to low printing accuracy on the Z axis. I would recommend immediately replacing it with a trapezoid of the same size.
M8 trapezoid stud for Z axis, which will save you a lot of time and nerves. Available for order on all major online platforms
You also need to purchase customized plastic parts for the X axis, such as these from the MendelMax retrofit kit.
Most parts available at your local hardware store. On RepRap you can find a complete list of necessary little things with all sizes and patterns. The kit you need will depend on the choice of platform (we'll talk about platforms later).
What's the price
Before delving into some aspects of the assembly, let's figure out how much such entertainment will cost for your wallet. Below is a list of parts required for purchase with an average price.
Platform selection
The community has already developed a number of different platforms for assembling printers - the most optimal case designs and the location of the main elements, so you do not have to reinvent the wheel.
i2 and i3 are key platforms for self-assembly printer enclosures. There are also many modifications of them with various improvements, but for beginners, these two classic platforms should be considered, since they do not require special skills and fine-tuning.
Actually, illustration of platforms: 1) i2 platform; 2) i3 platform
On the plus side of i2: it has a more reliable and stable design, although it is a little more difficult to assemble; more opportunities for further customization.
The i3 variant requires more special plastic parts to be purchased separately and has a slow print speed. However, it is easier to assemble and maintain, and has a more aesthetically pleasing appearance. You will have to pay for simplicity with the quality of printed parts - the body has less stability than i2, which can affect print accuracy.
Personally, I started my experiments in assembling printers from the i2 platform. She will be discussed further.
Assembly steps, challenges and improvements
In this block, I will only touch on the key assembly steps using the i2 platform as an example. Full step by step instructions can be found here.
The general scheme of all the main components looks something like this. There is nothing particularly complicated here:
I also recommend adding a display to your design. Yes, you can easily do without this element when performing operations on a PC, but it will be much more convenient to work with the printer this way.
Understanding how all components will be connected, let's move on to the mechanical part, where we have two main elements - a frame and a coordinate machine.
Assembling the frame
Detailed frame assembly instructions are available on RepRap. Of the important nuances - you will need a set of plastic parts (I already talked about this above, but I'd better repeat it), which you can either purchase separately or ask your comrades who already have a 3D printer to print.
The frame of the i2 is quite stable thanks to its trapezoid shape.
This is how the frame looks like with parts already partially installed. For greater rigidity, I reinforced the structure with plywood sheets
Coordinate machine
An extruder is attached to this part. The stepper motors shown in the diagram above are responsible for its movement. After installation, calibration is required along all major axes.
Important - you will need to purchase (or make your own) a carriage for moving the extruder and a mount for the drive belt. Drive belt I recommend GT2.
The carriage printed by the printer from the previous picture after it has been assembled.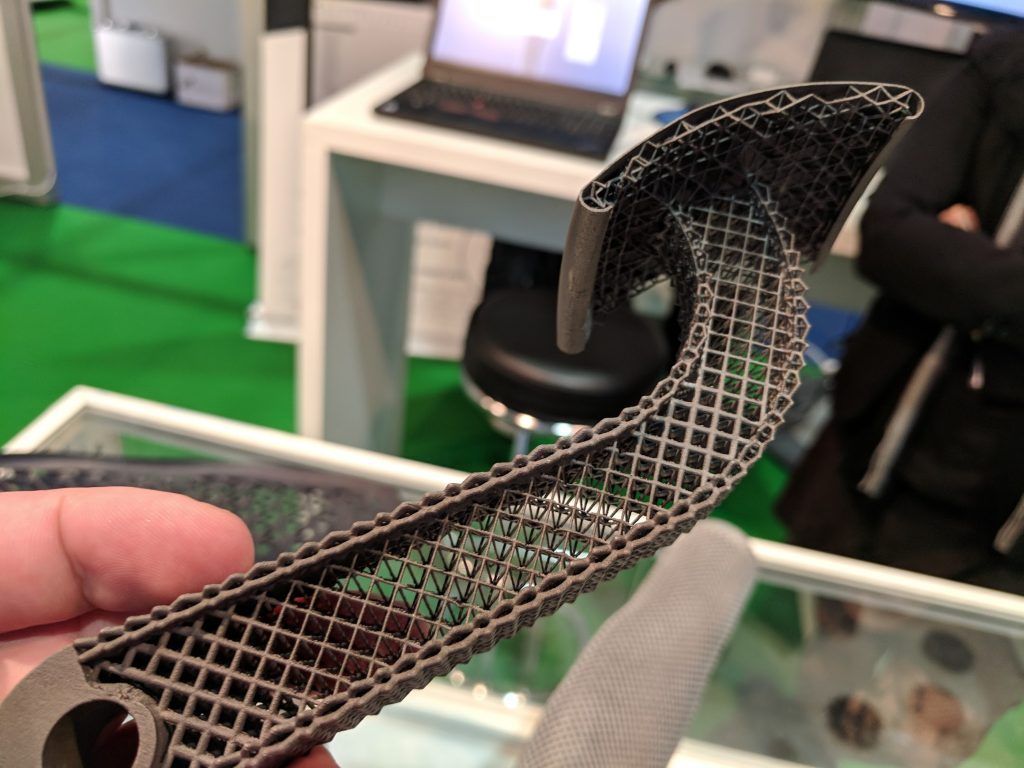 The part already has LM8UU bearings for guides and belt mount (top)
Calibration and adjustment
So, we completed the assembly process (as I said, it took me 150 hours) - the frame was assembled, the machine was installed. Now another important step is the calibration of this very machine and extruder. Here, too, there are small subtleties.
Setting up the machine
I recommend calibrating the machine with an electronic caliper. Do not be stingy with its purchase - you will save a lot of time and nerves in the process.
The screenshot below shows the correct constants for the Marlin firmware, which must be selected in order to set the correct number of steps per unit of measure. We calculate the coefficient, multiply it, substitute it into the firmware, and then upload it to the board.
Marlin 9 firmware constants0022
For high-quality calibration, I recommend relying on larger numbers in measurements - take not 1-1. 5 cm, but about 10. So the error will be more noticeable, and it will become easier to correct it.
Calibrating the extruder
When the frame is assembled, the machine is calibrated, we start setting up the extruder. Here, too, everything is not so simple. The main task of this operation is to correctly adjust the supply of plastic.
If underfeeding, the printed test item will have noticeable gaps, like test die 1. Conversely, the result will look bloated if plastic is overfed (dice 2)
Getting Started Printing
It remains for us to run some CAD or download ready-made .stl, which describe the structure of the printed material. Next, this structure needs to be converted into a set of commands understandable to our printer. For this I use the Slicer program. It also needs to be set up correctly - specify the temperature, the size of the extruder nozzle. After that, the data can be sent to the printer.
Slicer interface
As a raw material for printing, I recommend starting with regular ABS plastic - it is quite strong, products made from it are durable, and it does not require high temperatures to work with. For comfortable printing with ABS plastic, the table must be heated to a temperature of 110-130 ° C, and the extruder nozzle - within 230-260 ° C.
Some important details. Before printing, calibrate the machine along the Z axis. The extruder nozzle should be approximately half a millimeter from the table and ride along it without distortion. For this calibration, a regular sheet of A4 paper inserted between the nozzle and the surface of the heated table is best suited. If the sheet can be moved with little effort, the calibration is correct.
Another thing to keep in mind is the surface treatment of the heated table. Usually, before printing, the surface of the table is covered with something that hot plastic sticks to well. For ABS plastic, this can be, for example, Kapton tape. The disadvantage of adhesive tape is the need to re-glue it after several printing cycles. In addition, you will have to literally tear off the adhering part from it. All this, believe me, takes a lot of time.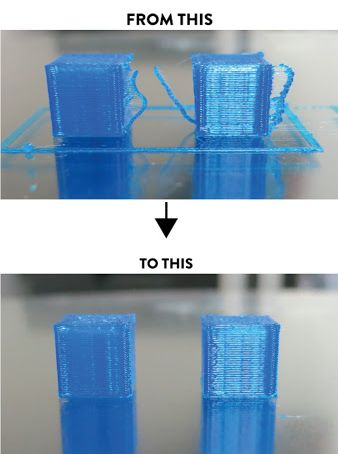 Therefore, if it is possible to avoid this fuss, it is better to avoid it.
An alternative option that I use instead of scotch tape is to apply several layers of ordinary light beer, followed by heating the table to 80-100 ° C until the surface is completely dry and re-applying 7-12 layers. It is necessary to apply the liquid with a cloth moistened with a drink. Among the advantages of this solution: ABS plastic separates from the table on its own when it cools down to about 50 ° C and is removed without effort, the table does not have to be peeled off, and one bottle of beer will last you for several months (if you use the drink only for technical purposes :)).
After we have collected and configured everything, we can start printing. If you have an LCD screen, then the file can be transferred for printing using a regular SD card.
The first results may have bumps and other artifacts - do not worry, this is a normal process of "grinding" the printer elements, which will end after a few print cycles.
Tips to make life easier (and sometimes save money)
In addition to the small recommendations given in the text above, in this section I will also give a short list of tips that will greatly simplify the operation of a 3D printer and the life of its owner.
- Do not experiment with nozzles. If you plan to immediately print from materials that require high temperatures, then it is better to immediately take the MK10 extruder. On MK8, you can "hang" special nozzles that support high-temperature conditions. But such modifications often cause difficulties and require special experience. It is better to avoid this fuss on the shore by simply installing the right extruder for you.
- Add starter relay for heated table. Improving the power supply system for this important printing part with a starter relay will help solve the known problem of RAMP 1.4 - overheating of the transistors that control the power of the table, which can lead to failure of the board.
 I made this upgrade after having to throw away a few RAMPS 1.4s.
 - Select the correct filament diameter for printing. I recommend using 1.75mm plastic for MK8 and MK10. If we take plastic, for example, 3 mm, then the extruder simply does not have enough strength to push it at an acceptable speed - everything will be printed much longer, and the quality will drop. ABS plastic is ideal for MK8, MK10 will be able to produce products from polycarbonate.
- Use only new and precise X and Y guides. Print quality will be affected. It is difficult to count on good quality with bent or deformed guides along the axes.
- Take care of cooling. During my experiments with various extruders, the MK10 showed the best results - it prints quite accurately and quickly. The MK10 can also print plastics that require a higher print temperature than ABS, such as polycarbonate. Although it is not as prone to overheating as its younger brother MK8, I still recommend taking care of its cooling by adding a cooler to your design.
 It must be permanently enabled, this option can be configured in Slicer. You can also add coolers to keep the stepper motors at an acceptable temperature, however, make sure that their air flows do not fall on the printed part, as this can lead to its deformation due to too rapid cooling.
 - Consider heat retention. Yes, on the one hand, we are struggling with overheating of the elements. On the other hand, a uniform temperature around the printer will contribute to high-quality printing (the plastic will be more pliable). To achieve a uniform temperature, you can put our printer, for example, in a cardboard box. The main thing is to connect and configure the coolers before that, as described above.
- Consider insulating your desk. Heated table heats up to high temperatures. And if part of this heat leaves properly, heating the printed part, then the second part (from below) just goes down. To concentrate the heat from the table onto the part, you can perform an operation to insulate it.
 To do this, I simply attach a cork mouse pad to its bottom using stationery clips.
Pins
I am sure that during the assembly process you will encounter a number of difficulties specific to your project. Neither this text nor even the most detailed guides will insure against this.
As I wrote in the introductory part, the above does not claim the status of a detailed assembly manual. It is almost impossible to describe all the stages and their subtleties within the framework of one such text. First of all, this is an overview material that will help you prepare for the assembly process (both mentally and financially), understand whether you personally need to bother with self-assembly - or give up on everything and buy a ready-made solution.
For me, assembling printers has become an exciting hobby that helps me solve some issues in home and work affairs, take my mind off programming and do something interesting with my own hands. For my children - entertainment and the opportunity to get unusual and unique toys. By the way, if you have children whose age allows them to mess around with such things, such an activity can be a good help for entering the world of mechanics and technology.
For everyone, the vectors of using 3D printers will be very different and very individual. But, if you decide to devote your personal time to such a hobby, believe me, you will definitely find something to print :)
I will be glad to answer comments, remarks and questions.
What to read/see
- what can be printed;
- 3D printer forum;
- RepRap community site with model descriptions and assembly instructions;
- printer that prints electronics.
Subscribe to the Telegram channel "DOU #tech" so you don't miss new technical articles.
Topics: DIY, embedded, tech
The first residential building made of concrete was printed in Russia for 59More than 70 years ago, the United States created the first machine for quickly (24 hours) pouring concrete houses, which was designed by engineering genius Robert Gilmore LeTorneau.
 Here is a video from 1946. In general, this idea of Thomas Edison is more than 100 years old (patent). Over the decades, concrete printing technology has changed, full-fledged 3D printing for individual projects has begun to be used. Now these houses look much nicer. For example, in February 2017, a residential building was printed in Stupino, near Moscow, on an Apis Cor construction printer. This is the first house in the Russian Federation, printed as a whole, and not assembled from printed panels.
 Building area 38 m². The total cost of turnkey construction, including the foundation, walls, ceilings, roofing, electrical wiring, doors and windows, exterior and interior decoration, amounted to 593,568.19 rubles (detailed estimate), but this is without the cost of the work of some specialists.
The printer is completely mobile. The loader brings it in the back and installs it on the prepared foundation at the construction site.
The printer is connected by a hose to a large concrete mixer, that is, an automatic system for mixing and supplying the mixture. It looks like this.
Then the work begins. All work on the construction of the house took about two months in Stupino. The project started in December 2016 and ended in February 2017. The advertised 24 hours is just the pure machine time of the Apis Cor printer. It was included at different stages to print self-supporting walls, partitions and building envelopes.
The device has an interesting design. It is located on a movable arm in the center and prints around itself, gradually rising. After the printing of wall structures is completed, it is removed with a crane - and it continues to work outside.
The appliance itself consumes 8 kW during the process, so you need to provide it with electricity during construction work.
The cost of printing a concrete house is much cheaper than building a conventional "box" of blocks.
In addition, such houses have a lot of additional advantages, which makes them truly unique.
1. Virtually arbitrary shape of the walls. Rounded walls with any corners. Here, the accuracy of construction is perfect, a drunken bricklayer will definitely not screw up your project. The printer has a built-in automatic leveling and stabilization system.
2. The walls are ready for painting with decorative plaster immediately after processing. You can roll yourself in one day and paint the house in arbitrary colors, and then repaint to suit your mood at any time. Plastering with a level and beacons is not required. There is an additional reduction in the cost of finishing work. This applies to both interior and exterior finishes.
3. You can perfectly plan the shape of the walls, the size and position of the windows, taking into account the surrounding landscape and lighting. By the way, there is an assumption that the walls on one side can be made slightly inclined to further increase the illumination. However, the design fantasy is limited by the available forms of double-glazed windows, because here you can’t get by with ordinary glasses, you need to install double-glazed windows so as not to freeze in winter.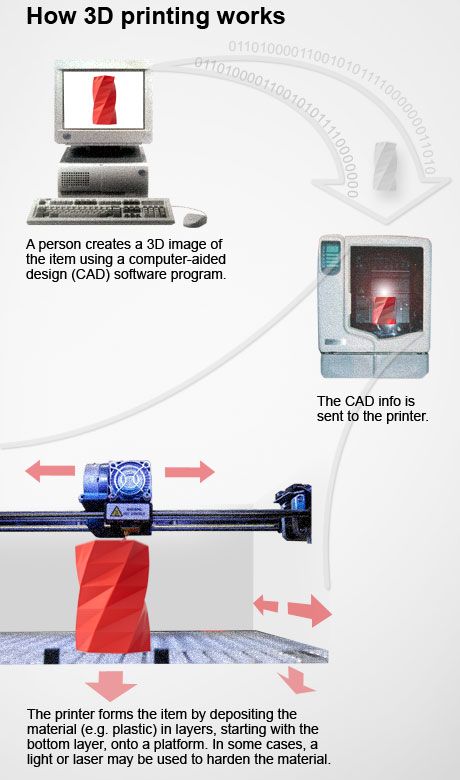
Among the disadvantages that come to mind is the flat roof.
It is clear that the developer guarantees that the roof effectively withstands high snow and operational loads. But it seems that stagnant water can accumulate on such a roof with all the ensuing (or rather, not ensuing) consequences. To prevent this from happening, a special wedge-shaped thermal insulation PIR Slope is used on the roof - a ready-made constructor for creating the necessary slopes and counter-slopes. They say that precipitation will be effectively removed from the roof surface, but still somehow unusual.
How the thermal insulation between the inner and outer walls will work is also interesting to check. Now the developer is experimenting with two methods of insulation: from Logicpir filling crumbs on one part of the house (thermal conductivity 0.022 W / m * K) and polyurethane filler composition on the other (0.023-0.025 W / m * K). Insulation was carried out simultaneously with the printing of structures, which significantly increased the construction time.
Well, not everyone will like the small size of the house - after all, not everyone is ready to live in a one-room apartment, a small studio. Although such an option for 38 m² is quite suitable for a single person to live. In addition, as mentioned, the technology allows you to build larger houses.
Yes, and for a round house, you have to buy a concave TV if you want to play computer games on a big screen.
This technology can also be used to print three-story houses, but they will cost much more than $10,000.
Other disadvantages are restrictions on construction dates. The use of a concrete mixture used as "ink" is possible only at a temperature of 5 ° C above zero. So if you do not want to put up an awning with a heater, then construction in winter is impossible. In the future, they promise that the printer will learn how to work with geopolymer concrete from natural components - such material can be printed at lower temperatures.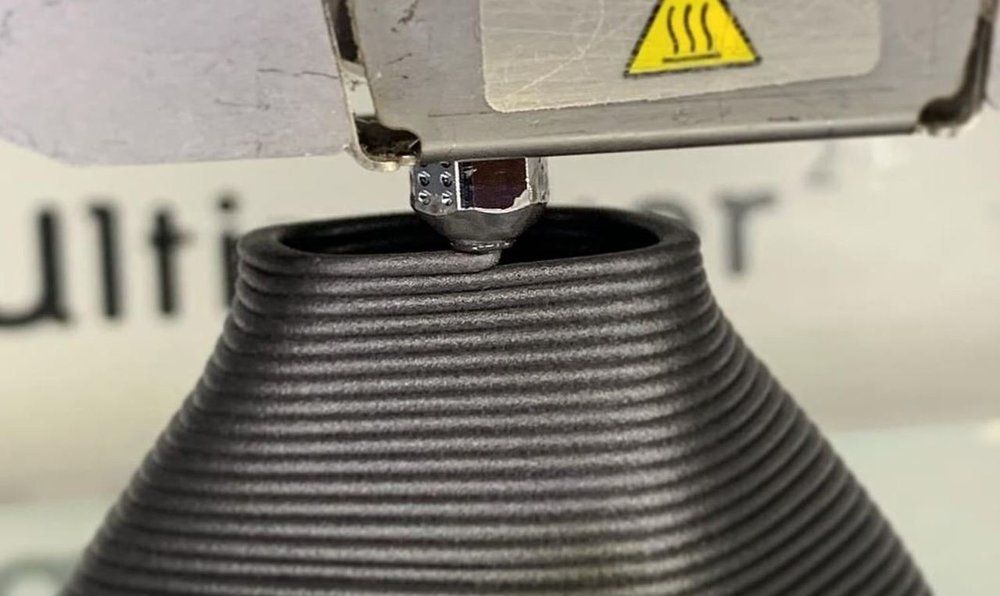 In addition, it is superior to ordinary concrete in other parameters.
After all, there is definitely no place in the house to install a boiler or other heating system. Probably the only option for living in winter is an electric heater.
The estimate for the first house was around $10,000, although the estimate does not include the work of all specialists. The estimate includes the installation of window and door blocks, wall decoration, facade painting, drainage, waterproofing, thermal insulation, but the rest of the work is not taken into account. Probably, with these works, a turnkey house will come out twice as expensive, that is, approximately $20,000.0003
| Foundation | RUB 14,819 |
| Walls | RUB 95,629.64 |
| Ceilings, roofing | RUB 144,267.55 |
| Wiring | RUB 12,650 |
| Doors and windows | 211 052 rub |
| Exterior finish | RUB 46,250 |
| Interior trim | RUB 68,900 |
But the contractor notes that expensive materials were used in this demonstration project.