Lung 3d printing
3D Systems and United Therapeutics Unveil 3D Printed Lung Scaffold
3D printing news News 3D Systems and United Therapeutics Unveil 3D Printed Lung Scaffold
Published on June 16, 2022 by Clemens M.
In a collaboration between United Therapeutics and 3D Systems, researchers have succeeded in developing a complex 3D-printed human lung scaffold. The lung scaffold was unveiled at the LIFE ITSELF conference in San Diego and is considered to be the most complex object ever created using additive manufacturing. The lung scaffolds, which have already been animal tested, are planned to be made in the future with the patient’s own stem cells.
Lately, you’ve probably heard a lot about the various applications of bioprinting. This new form of 3D printing using living cells is becoming increasingly important in medicine. For example, a surgeon in the USA has recently successfully transplanted an ear implant made from human cells. Most famously, it is expected to be able to create fully functional organs for human beings. Though this is not yet possible, steps like this lung scaffold chose the immense advancements which have already happened thanks to 3D printing.
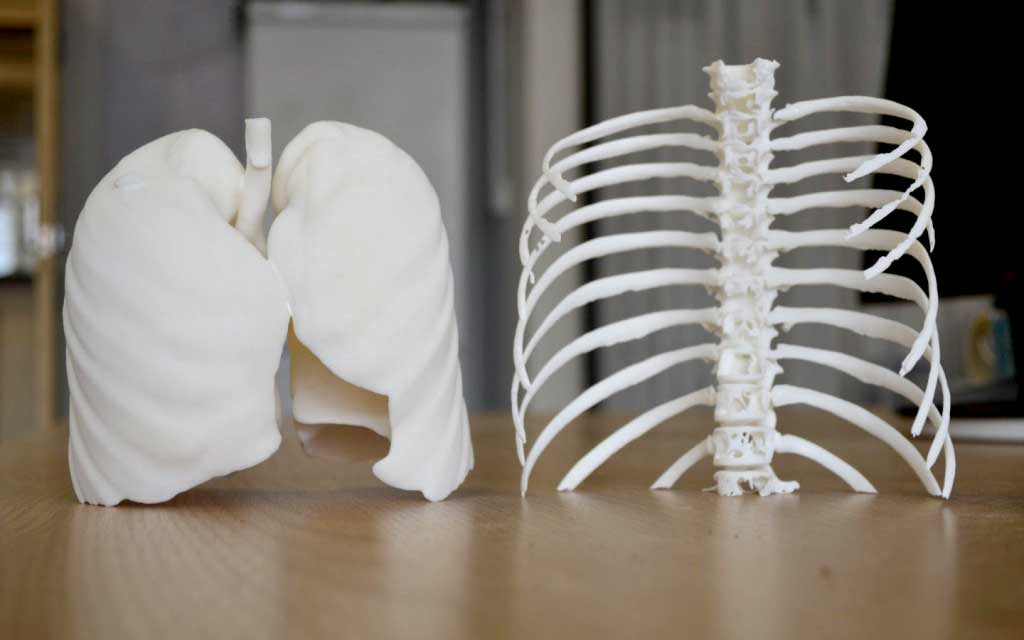
3D printed lung scaffold (photo credits: 3D Systems)
The Structure of the 3D Printed Lung Scaffold
The 3D printed lungs consist of a record 44 trillion individual parts (voxels), which are distributed over 4,000 kilometers (~2500 miles) of lung capillaries and 200 million alveoli. United Therapeutics scientists, therefore, plan to cellularize these 3D printed lung scaffolds with patients’ own stem cells. This method may make it possible to create compatible, transplantable human lungs in the future. By using each patient’s own stem cells, the bioprinted lungs would carry a significantly lower risk of rejection, thus not requiring immunosuppression which can be very dangerous for the patient. The newly developed advanced photopolymer-based bioprinting technology called Print to Perfusion could enable this type of donor organ to be manufactured in as little as three weeks.
According to Dr. Martine Rothblatt, chief executive officer of United Therapeutics, these 3D-sculpted lung scaffolds have already been tested in animal models, which have demonstrated the successful gas exchange of the lung scaffolds. Rothblatt commented, “With the continued hard work of dedicated scientists and engineers at United Therapeutics and 3D Systems, we hope to have these personalized, manufactured lungs cleared for human trials in under five years.”
The goal of the collaboration, she said, is also to create an unlimited supply of transplantable lungs in the future. For example, they would already use a process called ex vivo lung perfusion. This could increase the supply of transplantable lungs by extending the period of viability of human donor lungs by several hours. This method has successfully prolonged over 230 lives to date.
The demand for donor organs is steadily increasing. In 2021, for example, 2,524 patients in the U.S. received a lung transplant, according to the U.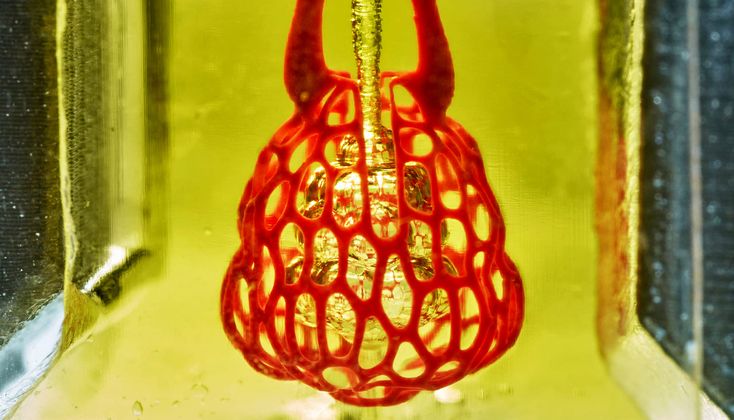 S. Health Resources and Services Administration. As of June 3, 2022, there were also 1,075 patients in the U.S. on the waiting list to receive a donor’s lung. Meanwhile, more than 150,000 Americans die each year from lung disease, including many waiting for a transplant. You can find out more about the project HERE.
Do you think 3D printed lung scaffolds could replace human donor organs in the future? Let us know in a comment below or on our Linkedin, Facebook, and Twitter pages! Don’t forget to sign up for our free weekly Newsletter here, the latest 3D printing news straight to your inbox! You can also find all our videos on our YouTube channel.
*Cover Photo Credits: yodiyim/Fotolia
United Therapeutics creates 3D printed lung scaffold
United Therapeutics Corporation said it has – in partnership with 3D Systems Corporation – produced the world’s most complex 3D-printed object, a human lung scaffold.
The human lung scaffold was demonstrated at the LIFE ITSELF Conference, held recently in San Diego, Cal.
Martine Rothblatt, United Therapeutics’ chairperson and CEO, and Chuck Hull, 3D Systems’ co-founder, executive vice president, and chief technology officer for regenerative medicine, explained to conference attendees that these 3D-printable lung scaffold designs consisted of a record 44 trillion voxels (similar to a 3D pixel) that lay out 4,000 kilometers of pulmonary capillaries and 200 million alveoli.
Scientists at the US-headquartered United Therapeutics plan to cellularize the 3D-printed scaffolds with a patient’s own stem cells to create tolerable, transplantable human lungs that should not require immunosuppression to prevent rejection.
“Last week, it was exciting to show the public our 3D-printed human lung scaffold, but we’re thrilled to share that our 3D-printed lung scaffolds are now demonstrating gas exchange in animal models. We are regularly printing lung scaffolds as accurately as driving across the United States and not deviating from a course by more than the width of a human hair,” Rothblatt said.
She added the goal is to have personalized, manufactured lungs cleared for human trials in less than five years.
Content continues below
Related Content
Rothblatt added, “Our goal is to create an unlimited supply of transplantable lungs in the future. Even today, we are using a process called ex-vivo lung perfusion to add to the supply of transplantable lungs by extending by several hours the period of assessment and viability for human donor lungs, resulting in over 230 lives extended to date.”
Lung transplants
According to the U.S. Health Resources and Services Administration, 2,524 patients in the U.S. received a lung transplant in 2021 and there are 1,075 patients on the U.S. lung transplant waiting list as of June 3, 2022. More than 150,000 Americans die from lung disease each year.
Hull said: “The reveal at LIFE ITSELF represents the culmination of our efforts with United Therapeutics that includes not only 3D-printed lungs, but two additional organs under development, kidneys and livers. These lung designs can be printed in as little as three weeks using our latest advanced photopolymer-based bioprinting technology we call Print to Perfusion.”
United Therapeutics
United Therapeutics is the first publicly traded biotech or pharmaceutical company to take the form of a public benefit corporation.
Its mission is to find a cure for pulmonary arterial hypertension and other life-threatening diseases. The company has received U.S. Food and Drug Administration (FDA) approval for five medicines to date.
Last month, the FDA approved the company’s Tyvaso DPI (treprostinil) inhalation powder. This is used treating pulmonary arterial hypertension and pulmonary hypertension associated with interstitial lung disease to improve exercise ability. Tyvaso DPI is the only dry powder inhaler approved by the FDA for use in these conditions.
Content continues below
Related Content
The use of 3D printing isn’t new, although bioprinting is a growing category. According to Mordor Intelligence, the global 3D bioprinting market was valued at $724.2M in 2020, but is expected to reach $2.4B by 2026.
Cover image: Shutterstock
short tips for the transition from a CAD model to a printed object / Sudo Null IT News
was withdrawn from publication due to a technical error. Please be understanding. Thank you!
Whether it's just a hobby or a source of income, 3D printing is always based on product design. Those accustomed to traditional technologies will have to rethink the entire approach to product design and manufacture. nine0008
When the project is ready, a number of additional operations are performed: setting the orientation of the model and other parameters that ensure the proper printing process. In addition, it is necessary to take into account the fact that most 3D printers allow you to choose the degree of filling the model with cellular structures. The correct choice of this parameter provides protection of the object from deformation and destruction during the printing process, as well as significant savings in material and reduction in production time.
Finally, the last factor influencing the success or failure of the 3D printing process is the strength of the connection between the model and the table. If the workpiece is separated from the table during printing, then all the work will go down the drain.
Here, we'll walk you through the 3D printing process and give you some simple tips on how to use additive manufacturing in the design phase. In addition, we will dwell on the methods of preparing a finished project for printing, and also consider ways to securely fasten the workpiece to the table. nine0002
These guidelines apply primarily to Fused Deposition Printers (FDM) printers, but may also apply to other types of printers. The process of obtaining a finished part by 3D printing is basically the same regardless of the method used.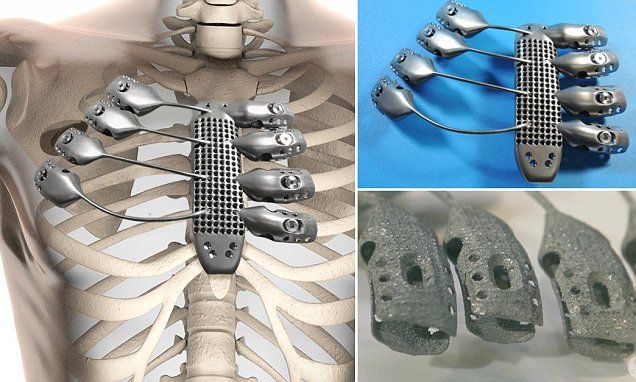
Designing an object
Any 3D printing starts with construction. If you are developing a product yourself, then you need to build a 3D model of it in a computer-aided design (CAD) system to turn the designer's idea into reality. In this case, the object can be both very simple and very complex. However, too thin and too small models should be avoided. nine0008
3D-CAD from Siemens from this article for 49900r (90% discount), the promotion is valid until March 20, 2020. Read more>>
Saving the file in a special format for printing
To print an object, its model must be saved in a special file format - for example, STL, which has become the de facto standard in the world of 3D printing. In this format, model surfaces are represented as a grid of triangles. Simple surfaces are broken down into a small number of triangles. The more complex the surface, the more triangles you will need. Today, other formats are used in 3D printing, in particular, the 3MF format developed by Microsoft. But the most common is still STL. nine0008
CAD systems make it very easy to save the model in the desired format: just click the Save As command. To improve print quality, it is desirable to set a number of settings for saving to the STL format - for example, the tolerance during transformation and the angle of the plane. The lower the conversion factor and the better the angle, the smoother the printed part will be.
Opening the file in the slicer program
Most, if not all, 3D printers come with their own slicer software. The slicer loads the STL file created in the CAD system and cuts it into layers, and then creates a control program for the printer. nine0008
Place the model correctly in the print space
After entering the print settings, the model (or several models) needs to be placed on the printer table. You can print many objects on one table at once. At the same time, compared to printing a single object, the time slightly increases, but in general it still turns out to be less. Here are some tips for choosing the right model orientation.
Set parameters
In the slicer program, the user sets parameters such as print speed, material consumption, nozzle and desktop temperatures. Most slicers have simple settings for beginners. In this case, most often there are also advanced settings so that experienced professionals can achieve optimal results. Advanced settings include percentage infill, amount of backing material, and type of backing or raft (this is a small, thin base that keeps the printed part stable. The backing is removed when it's finished). The number of options is truly endless. Specific settings vary depending on the brand of printer. It's easy enough to set them up. nine0008
Sending the control program to the printer
After setting the print settings, the placement of future objects on the table, their orientation and quality, it's time to finally start the printer.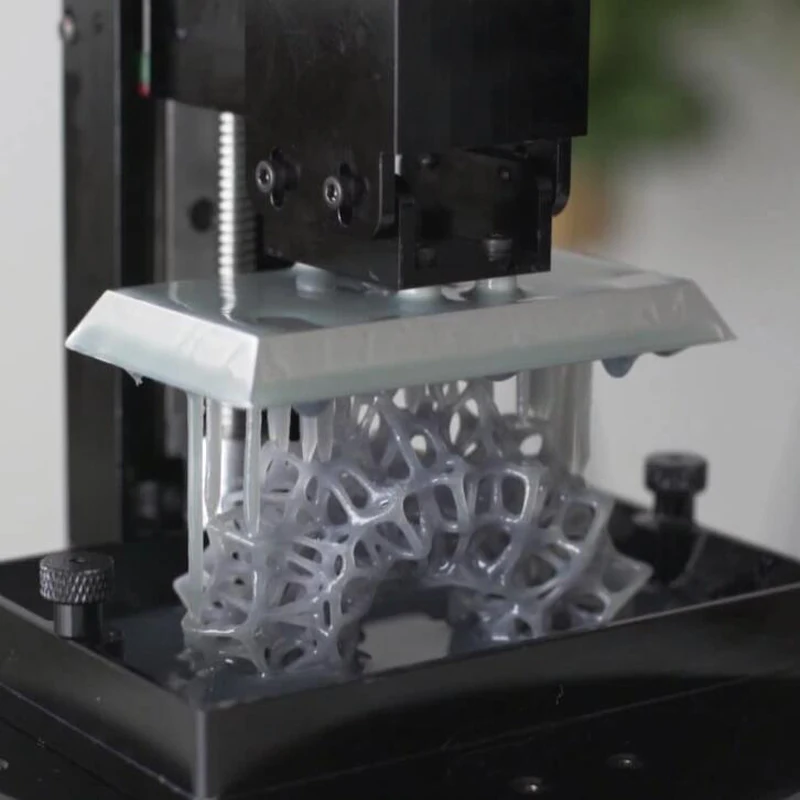 It is enough to press the Print button and find something to do while the production is in progress. Depending on the complexity of the design, the process takes from several minutes to several hours.
Finishing
Finishing includes removing the printed part from the table, as well as removing the support material by melting, mechanical separation or dissolution (depending on the design of the printer). The part may require some light sanding or polishing, but overall a properly printed object looks good from the start. Other types of finishing are placing plastic parts in a container with acetone to smooth out surface roughness, gluing (if the dimensions of the structure exceed the dimensions of the 3D printer or individual elements of the object must have different orientations), drilling holes and painting. nine0008
3D printing process
3D printer design considerations
Eliminate sharp corners
If the direction of the surfaces changes dramatically (for example, a vertical wall intersects with a horizontal overlap), then such a model is difficult to print. The printer will build excessive inner surfaces, wasting too much material. There are two easy ways to prevent this: add chamfers to smooth out where the surfaces meet, or round the corners so the printer gradually builds up a vertical surface. In addition, rounding will increase strength, since destruction most often occurs at sharp corners. nine0008
Elimination of thin walls and small geometries
Layer by layer fusing technology consists in supplying hot plastic through a nozzle with the formation of a printed object layer by layer. The thickness of the extruded plastic layer cannot be made smaller than a certain limit, depending on the diameter of the nozzle and the speed of the print head. Excessively thin-walled details are difficult to print - often the result is a chaotic weave of fibers. If the part can be printed, it is very fragile and breaks easily. nine0008
Too thick walls - also bad
On the other hand, if the walls are too thick, they become brittle and crack easily. This is especially important when printing from materials other than resins, as excess thickness during the manufacturing process leads to internal stresses in the part. Even when printing from plastics, material is wasted on walls that are too thick and time is wasted.
Removing large overhangs
3D printers allow you to create amazing shapes and surfaces, but they are not capable of printing directly in the air. If the part has a void with material above it, additional support material must be used. Most slicers add material automatically, but require you to specify the orientation and volume of the support structure. Printers with a single nozzle create an array of thin columns, which then have to be broken off. The result is an uneven surface. Therefore, it is recommended to avoid large overhanging elements whenever possible in order to reduce the need for support material. nine0008
If such an element is unavoidable, you can try to flip the object.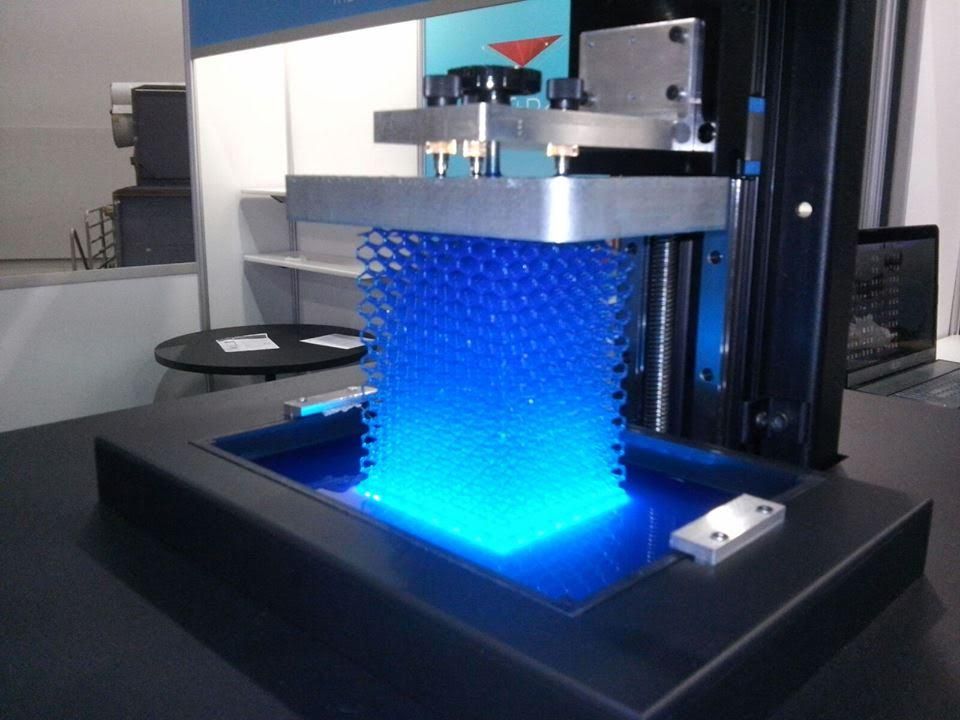 Most printers are capable of printing overhanging elements with an angle of about 45 degrees. At a certain height, the edge of such an element may sag somewhat. The actual capabilities of a particular printer are determined by trial and error.
Holes shrink
Remember that the part is made of heated plastic. As it cools, it inevitably shrinks. Therefore, holes and other critical structural elements have to be made larger so that after shrinkage their size is as close as possible to the required one. nine0008
However, if you need to make a tight tolerance hole, it is better to print it with a smaller diameter and then ream it with a suitable tool. This is especially true for holes whose axis is parallel to the printer table.
Increasing the footprint
If the area of contact between the object and the base is small, the part may separate from the table during printing. To prevent this from happening, wide bases are added to the model legs, which are installed on the printer table. In general, the closer to the table, the more material must be added to the support. There are other ways to securely fasten the part to the table, which we will discuss a little later. nine0008
Special moves
The right approach to design makes printing easier. In addition, there are special post-processing techniques that are important to be aware of.
Place round surfaces vertically
The model should be oriented so that the minimum amount of support material is used. Ideally, it should rest on the table with a large flat edge. In addition, circular geometry must be placed so that the circular faces are vertical. If we look at the printer table from above, we should see a round silhouette of the object. In this case, the part comes out as symmetrical as possible with the formation of a solid round structure. nine0008
Place voids and holes vertically
If there are voids in the model (for example, it is a rectangular pipe), it is desirable to place such voids vertically in order to reduce the volume of the support material. If you print the pipe in a horizontal position, you will have to provide support for the entire interior. If you put the pipe on the end, then no support is required at all.
The same is true for holes: to get a hole with a straight axis, it is best to print it vertically - in the form of a stack of rings, which avoids warping or deforming a round hole into an oval one. nine0008
Set print quality settings
Proper selection of print parameters, such as STL conversion tolerance and slicer program settings, allows parts to be produced with a surface quality that matches that of cutting. However, this entails an increase in print time. When choosing quality parameters, one should proceed from the purpose of the object: is it a finished product or a prototype? Will the part be visible or hidden? nine0002 The quality parameters also affect the shape of the holes in the part. In CAD files, holes are represented as a set of straight lines at an angle to each other. The higher the quality of the model in the saved STL file, the less the circle looks like a polygon.
Reducing the layer thickness
To obtain the best quality, especially when using layer-by-layer deposition technology, it is necessary to reduce the thickness of the layers. It does increase the print time, but the end result is worth it! nine0008
Optimizing the filling with honeycomb structures
In terms of strength, objects do not have to be solid. Similar to a honeycomb, printers can create a honeycomb infill that balances strength and saves expensive polymer material. However, if the printed part serves as a prototype for strength testing, and the serial product will be manufactured by traditional methods, and also if the part is subjected to certain types of mechanical stresses and pressures, a solid design will be preferable. nine0008
Choosing a material
The success of printing largely depends on the correct choice of material. Materials have different properties. For example, the melting point of thermoplastic polyurethane (TPU) and polylactic acid (PLA) is lower than that of acrylonitrile butadiene styrene (ABS). In addition, the material is taken into account when choosing the type of support structures. For an object made of polylactic acid, supporting elements can be made from the same polylactic acid, since it will be quite easy to separate them from the finished part. If the part is printed from ABS plastic, then the support elements must be made from a different material, and it is better not to use such elements at all in thermoplastic polyurethane parts. nine0008
Cellular filling
A solid body is not always the best choice for 3D printing. Printing solid parts has its advantages, but the internal honeycomb structure saves both expensive material and time.
Creating objects with a specified degree of filling with honeycomb structures is a unique opportunity for 3D printing.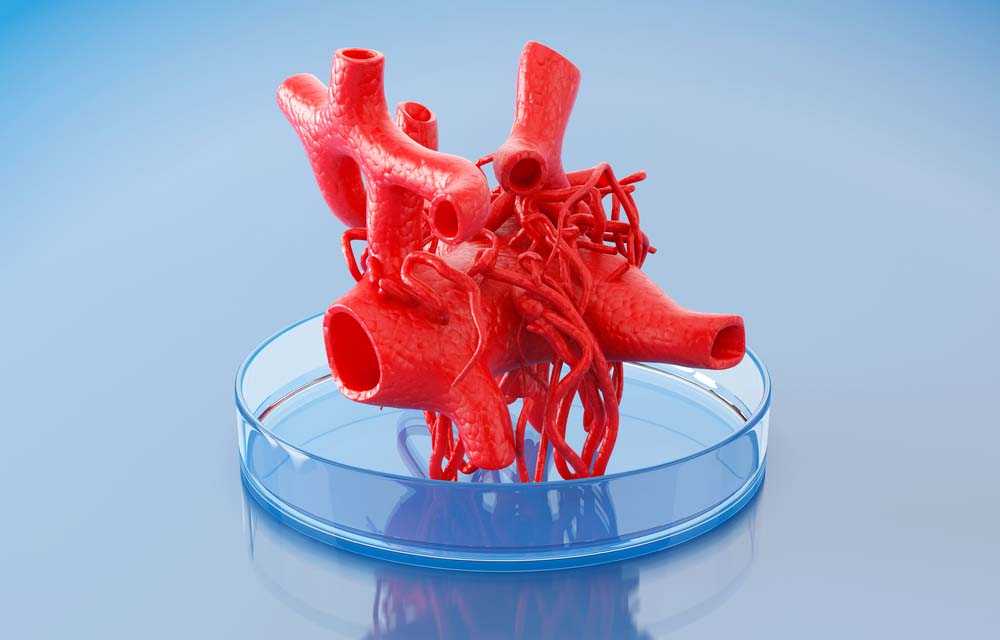 Moreover, it is not required to design such a structure: this is done by the slicer program. As a rule, it is enough to set only the percentage of filling (the closer it is to 100, the more solid the object will turn out) and select the type of cells, if the printer has such an opportunity. nine0008
In addition to saving time and material, the internal honeycomb structure has many other advantages.
Cellular filling prevents warpage
Printing large objects as a single piece introduces a danger of warpage. By reducing the infill percentage, the air during printing passes through the part, providing more uniform cooling and eliminating warping.
Cellular filling does not lead to loss of strength
Printing cells instead of solid material does not reduce the strength of the part. In many cases, a honeycomb part is strong enough for the chosen application, but lighter and less material intensive. nine0008
The function determines the choice of cell geometry
Most slicers support a wide variety of cell geometries. The optimal option is determined by the functional purpose of the object. Standard box padding simplifies printing, while hexagonal and triangular boxes add strength. Wave fill allows the object to bend or twist.
How to choose the right filling percentage?
In general, the strength of an object increases as the percentage of infill increases. Most printers have a default infill percentage of 20, which is optimal in some cases but too high or too low in others. Consider mechanical stresses in the printed object and increase the percentage of infill in areas where greater strength is required. If high strength is not required, choose the lowest possible filling. This saves material and speeds up printing. Most often, the selection of the optimal percentage of filling is done by trial and error. nine0008
Ways of fastening the workpiece to the table
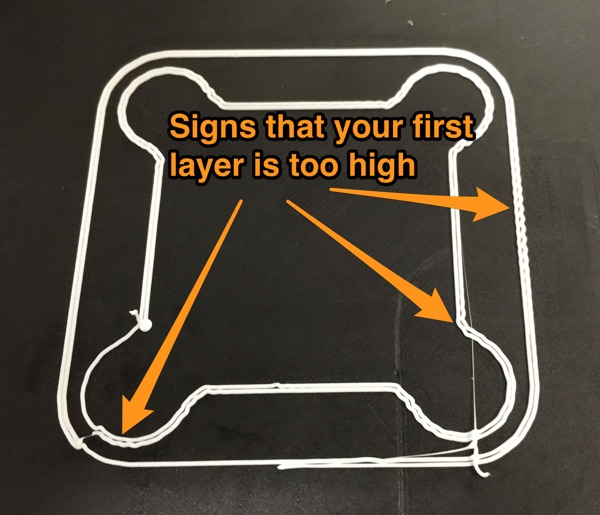
“Rafts”, “brims”, “skirts” – these terms sound funny, but they just refer to the three main ways of attaching a 3D printed part to a printer table. Let's take a look at each of these methods and their areas of application.
Skirt
The skirt involves creating a few rings around the object at the beginning of the print to make sure the plastic is extruded normally. The skirt is not in contact with the object at all. It surrounds the printable area and helps start the fusing process. When creating a skirt, a large volume of hot thermoplastic polymer passes through the nozzle. This prepares the printer for printing the part itself. This guarantees good adhesion to the table and obtaining smooth surfaces of the object. nine0008
Brim
The brim is a wide, flat area connected to the main object as a support base (think of a brim of a hat). It is very similar to a skirt, but connected to the model. In addition to all the advantages of a skirt, the brim keeps the edges of the object being made on the table.
When printing, the outside of an object often cools faster than the middle, causing the edges to curl. Brim prevents this phenomenon by holding the edges.
Raft
A raft is a detachable base, made in the form of a thin mesh platform, located under the entire object (which lies on the raft). To create a raft, the printer first prints a flat plate in two or three layers, and then begins to manufacture the object. nine0008
The rafts provide excellent adhesion to the table surface and also provide a strong print base. This is especially useful when making small and oddly shaped parts that do not fit well on the table, as well as thin-walled objects.
After printing is completed, in most cases the raft will separate easily from the part.
If the printer does not have a heated desktop function
Rafts are used if the printer does not have desktop heating. In this case, excessive adhesion becomes a problem. nine0008
An alternative method is to apply adhesive paper tape to the printer bed, with the edges down if possible (this also protects the bed). You can also use packing tape, but it is usually more expensive.
If buckling does occur or the object separates from the table, apply a dissolvable glue stick to the adhesive tape. This will enhance adhesion.
Find out the features of a specific 3D printer and take them into account when preparing a model
3D printing is not only a science, but also an art. Effective design for subsequent 3D printing requires an understanding of the technological process, taking into account its features and the purpose of the future object. This will greatly improve print performance. nine0008
Using Solid Edge in 3D printing
Not all CAD systems are suitable for 3D printing
The capabilities of the applied system should not limit the designers. Our Solid Edge system is designed with the latest 3D printing technologies in mind. Various 3D printers and 3D printing services are supported.
Take it to the next level with specific techniques for designing 3D printed parts
Generative modeling in Solid Edge opens up new possibilities: the designer selects a specific material, sets the design space, allowable loads, restrictions and target mass of the part, and the system automatically calculates the desired geometry. As a result, 3D printing methods can produce the most complex shapes.
In addition, when building models, the use of the results of three-dimensional scanning is provided. Solid Edge successfully combines the traditional boundary representation of solid models (B-Rep) and the representation of surfaces in the form of a grid of triangles, which avoids time-consuming transformations that are fraught with errors. nine0008
If you've already downloaded an STL file for printing, our unique synchronous technology makes it quick and easy to edit your imported models in Solid Edge in preparation for the process.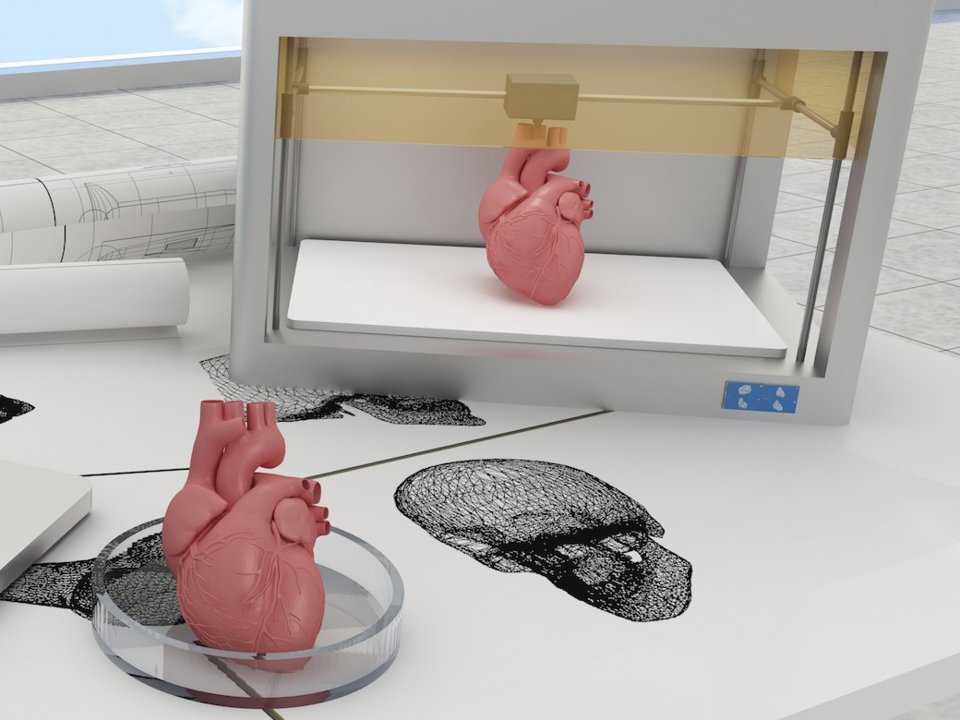
Printing with your own printer or submitting an order to a 3D printing service provider
Printing in Solid Edge on a local 3D printer is done using the 3D print command. Models can be saved in STL and 3MF formats, or sent directly to Microsoft 3D Builder. If you don't have your own 3D printer or need to try out different materials and surface finishes, Solid Edge allows you to directly submit your models to cloud-based 3D printing services (such as 3YOURMIND). You immediately receive quotes for the production of parts from various materials with its subsequent delivery directly to your door. nine0008
3D-CAD from Siemens from this article for 49900r (90% discount), the promotion is valid until March 20, 2020. Read more>>
50 3D Printing Ideas
It looks like we'll soon be drowning in unnecessary things made for 3D printing projects. But you can do something that will really be useful! If you're running out of ideas, here's a list of 50 3D printable items you're unlikely to throw away.
Bag clip with screw cap
Now the clip for the package will have a new feature - a hole with a cover for quick access, as in the photo. This clip is easy to print and convenient to use. Strange that no one thought of this before.
Author: Minkix
Download: Thingiverse
Modular Furniture Connector
This connector allows you to quickly assemble modular furniture. The default model is designed for 17×17 mm wood, but the size and material can be changed to suit your needs using a parametric file for customization. nine0008
Author: LeFabShop
Where to download: Cults
Sealant cap
No more throwing open sealant tubes away. The screw cap for the nozzle presses the o-ring tightly against the body of the tube and closes the access of air to the solvents inside.
Author: The-Mechanic
Where to download: Thingiverse
Laptop niche
Now the laptop will always be at hand, but hidden from prying eyes in a special niche that is attached to the bottom of any coffee table.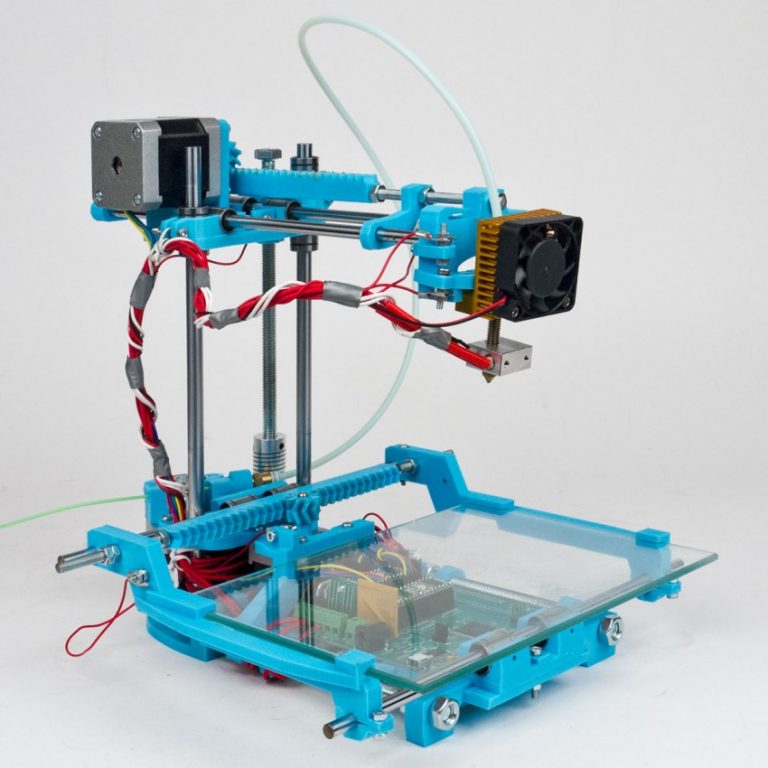 nine0008
Author: Too Snide
Download: Thingiverse
Phone holder - Candice
Elegant and simple, perhaps the easiest thing you can print on a 3D printer.
Author: Clem.C2
Where to download: Cults
Polypanel
The idea for Polypanels came from Devin Montes. A polypanel is a series of three-dimensional building blocks. The individual elements of a Polypanel look simple, but if you print a lot of them and different types, you can create all sorts of complex designs. Something like LEGO where you can design each brick. nine0008
Creator: MakeAnything
Download Location: MyMiniFactory
Clothes Hook
This clothes hook is designed as an E3D nozzle and can be printed as many times as you need for all your clothes.
Author: Filar3D
Download: Cults
Plant Pot
This anatomical brain flower pot is easier to print than it looks, creator DrFemPop says. For assembly, it is only necessary to glue the parts after printing. It turns out an original house for plants. nine0008
Author: DrFemPop
Where to download: Cults
Door Holder
This is a simple solution for holding a door. Double-sided adhesive tape is sufficient for surface mounting.
Author: Akiraraiser
Where to download: Thingiverse
Piggy bank
Simple piggy bank for beginners, no complicated settings.
Author: lecaramel
Where to download: Thingiverse
Cable ties
This tie is perhaps the simplest and most ingenious of all devices. Clips are printed as a whole sheet at once, and then the required amount can be cut off from it.
Author: Sunshine
Where to download: Cults
Roller ruler
An indispensable device if you need to measure the length of something non-linear: a piece of rope, a curved line, a perimeter with bends, etc. The ruler is called Geneva and has step 5 mm.
Author: MechEngineerMike
Where to download: Thingiverse
Tongs
This small solid piece of plastic can replace your pliers/pliers. These forceps take the force to the handles and redistribute it at the end of the grip. It's definitely pliers. Just smarter.
Author: BYU CMR
Where to download: Thingiverse
Cylindrical textured box
Beautiful tube from Syboulette decorated with hexagons. Well suited as a kitchen utensil for storing oatmeal, rice and other crumbly substances. nine0008
Author: Syboulette
Where to download: Cults
Door stopper
This door stopper is inspired by the Guyer Anderson cat statue in the British Museum. The design is hollow, which allows you to fill the limiter with something for additional weight.
Author: Duaneindeed
Where to download: Cults
Plague Doctor Mask
Not exactly the most useful item on the list since bubonic plague is a thing of the past.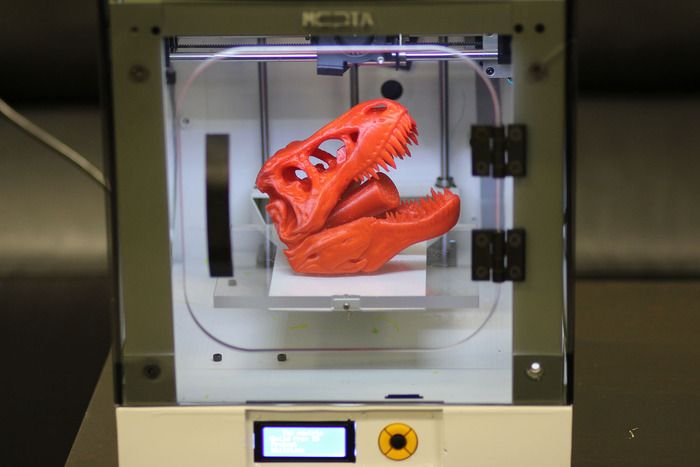 But a mask can come in handy, for example, when you need to clean up after your pet. And you can also go to the carnival in it. nine0008
Author: Odrivious
Download: Cults
Universal Spool Holder
This adjustable spool holder uses a spring and an adjustable rewind clutch. It's the perfect place to store those pesky wires.
Who made it: Vincent Goenhuis
Where to download: Thingiverse
Sturdy waterproof box
This tight-fitting box will keep things from getting wet. Print it in PLA or PETG, add a flexible TPU seal and M3 screws for the spring hinge, and you're done. nine0008
Author: ZX82
Where to download: Cults
Dice
This dice is suitable for flat 3D printing and has a face size of 16mm.
Author: Devin Montes (MakeAnything)
Where to download: MyMiniFactory
Collapsible Coat Rack
Really cool coat rack. That's all there is to say about her.
Author: Komaru
Where to download: Thingiverse
Business card holder
Perfect for showing off your new business cards to your Wall Street friends. What could be more delightful than this Zippo card holder with flip-top lid.
Author: PentlandDesigns
Where to download: Cults
Pencil and pen holder
Iceberg or melting beehive? Be that as it may, this is a handy pen and pencil holder that is cheaper to print than to buy.
Author: BeeVeryCreative
Where to download: Cults
Groovi Monster Audio Amplifier
This is a passive smartphone audio amplifier that looks stylish and does the job well. It's called Groovi Monster for a reason.
Author: 3DShook
Where to download: Cults
Cup holder
Can be used not only as a cup holder, but also as a coaster for hot dishes. The dimensions of the template are easily adjusted to suit any size cookware. nine0008
Author: jmdbcool
Where to download: Thingiverse
Clamp
Designed for fixing various materials, including the ends of the wire in the coil. Also great as a clothespin replacement.
Author: Med
Where to download: Cults
Pencil box
Suitable for storing all your desk trivia and trinkets (memory cards, rubber bands, pencils, paper clips, etc.).
Author: Monkey3D
Where to download: Cults
Headphone holder
This is a duck. Yes, you can hang headphones on it.
Author: Toshi_TNE
Download: Thingiverse
Polyhedral Succulent Pot
Unusual geometric pots for your growing succulent collection. These small pots can be configured to be connected together.
Author: PrintFutura
Where to download: Cults
Survival whistle
This is a survival whistle with original design. It is durable, easy to make and very loud (118 dB is more than enough to be heard in an emergency).
Author: Joe Zisa
Where to download: Thingiverse
Measuring cube
A simple and original measuring cube for the kitchen. On each side there are recesses for measuring the volume of ingredients (in cups - according to the American system, and in metric units for everyone else). It is best to print with PETG material, it is the safest for products. nine0008
Author: iomaa
Download: Thingiverse
Hinge
This is a parametric hinge that can be sized to fit your needs.
Written by Rohin Gosling
Where to download: Thingiverse
Car Eyeglass Holder
Attaches to your car's sun visor. Glasses will always be at hand.
Author: Trevor Long
Download: Thingiverse
Opener
The simplest things are usually the most useful. Convenient and easy to print opener. Covers the sharp edges of the cork as much as possible, protecting you from injury.
Author: Jeremy Peterson
Download: Thingiverse
Superhero Keychains
Sometimes you need to remind yourself of your hidden superpowers. Stylish and cool keyrings are well suited as a small gift.
Author: Formbyte
Where to download: Cults
Headphone stand
It will be useful for music lovers and gamers who use headphones a lot and often. After all, now they will no longer roll around anywhere.
Author: MakerBot
Download: Thingiverse
Bag Clip
The model consists of two printed parts. Allows you to keep packages closed and keep food fresh longer.
Author: Walter Hsiao
Where to download: Thingiverse
Plastic Wrench
Handy wrench, but don't choose soft plastic to make it.
Author: Daniel Noree
Where to download: Cults
Sliding Decal
No more worrying about whether cups are clean or dirty now in the dishwasher! With the help of a special mechanism, the slider easily changes the inscription on the plate.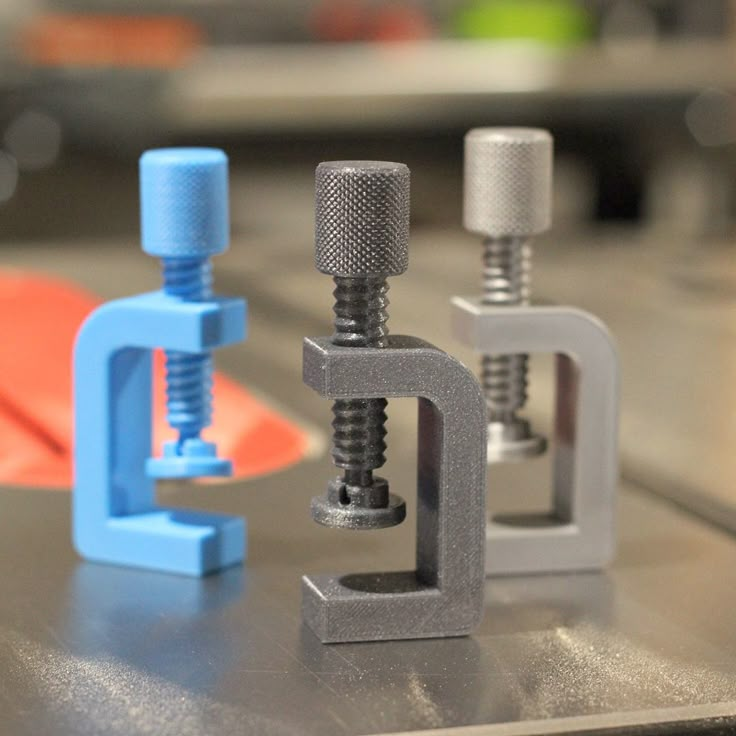
Who did it: MiddleFingerBoss
Where to download: Thingiverse
Collapsible basket
Cool picnic item. A folding square basket with five sections is printed from several parts and then glued together. For product safety, it is recommended to use PETG plastic.
Author: PatternToPrint
Where to download: Cults
Self-watering plant pot
Houseplants are dying from your forgetfulness? This will not happen again! This pot will water them by itself, and your conscience will be clear. nine0008
Author: Parallel Goods
Where to download: Cults
Maze Gift Box
Cash is not the most original gift. But if you present them in such a gift box, your friend will surely like it. The lucky recipient will have to work hard to get to the prize, because there is only one right way.
Author: Robert
Download: Thingiverse
Wired headphone holder
Your headphones will now be protected from tangles and breakage.
Written by Robert
Where to download: Thingiverse
Tube Squeezer
Helps squeeze out the contents of the tube to the last drop. Wide enough to fit most tubes on the market. Printed in three separate parts.
Author: Justin Otten
Where to download: Thingiverse
Webcam slider shutter
The best thing for the paranoid and just for those who are uncomfortable being under the gun of a webcam. Instead of sticking tape or sticky tape over the lens, attach a slider shutter to the body and open it when you need a video call. nine0008
Author: Horizon Lab
Where to download: Cults
Hexagonal Prefabricated Drawers
Useful to free the table from the noodles of cables, wires and just every little thing. The design can be easily expanded if necessary.
Author: Dan O'Connell
Where to download: Cults
Wall Mounted Phone Shelf
Attach the shelf to a power outlet and place your phone on it while charging.