How to ventilate 3d printer
How to Ventilate a 3D Printer Properly – Do They Need Ventilation? – 3D Printerly
3D printer fumes and pollutants are usually overlooked by people, but it’s important to ventilate your 3D printer properly.
There are some great ventilation systems that you can make use of to have your 3D printing environment safer and less harmful to people around it.
The best way to ventilate a 3D printer is to put your 3D printer in an enclosure and have a ventilation system that properly tackles the small particulates that 3D printers emit. Make sure you have carbon filters and a HEPA filter to tackle odors and smaller particles.
The rest of this article will answer some key questions on 3D printer ventilation, as well as detail some nice ventilation systems that you can implement yourself.
Do You Need Ventilation for a 3D Printer?
During the printing process, you might have smelled the odor that is produced by the printer. To expel this odor out of the machine and workspace, you can use good ventilation.
However, the quality and smell of odor depends on the type of material that is used for printing purposes. For example, PLA is much safer when it comes to the smell than other filaments such as ABS.
Other than the smell, we also have small particles that are emitted from heating thermoplastics at such high temperatures, the higher the temperature, the worse the particles usually.
It also depends on the chemical makeup of the thermoplastic in the first place. If you are printing with ABS, Nylon or resin material in SLA 3D printers, proper ventilation is highly recommended, along with a mask.
A good enough ventilation system can work very well for ensuring that the surrounding air is clean and not contaminated.
It is said that the average running time for a 3D print can be around 3-7 hours, which is almost a quarter of the whole day when it is producing fumes.
To avoid any kind of harmful effect on your health or body, you seriously need to set up a ventilation system.
Ventilation While Using PLA
PLA is made up of eco-friendly material that produces sweet-smelling fumes that are laced with ultra-fine particles (UFPs) and volatile organic compounds (VOCs).
Technically, these both materials are not harmful to your health according to the research, but exposure to them daily may cause issues, especially to those with respiratory issues.
An open window or air purification system should work well enough for ventilating PLA.
Although many studies and research mention that PLA is safe, it is hard to measure the marginal health risks over time, and they take many years to properly test for. The risk may be similar to other ‘hobby-type’ activities such as woodworking, painting or soldering.
One study did test PLA for its emissions, and they found that it mostly emits Lactide which is known to be quite harmless. You should keep in mind that different types of PLA are created differently.
One brand and color of PLA could be harmless, while another brand and color of PLA isn’t as safe as you may think.
Many of the studies on emissions from 3D printers are in proper workplaces with many things going on, rather than your standard desktop home 3D printer, so its hard to generalize the findings.
Although it may not be completely safe, the studies show that PLA isn’t very risky, especially compared to other activities that we do on a regular basis.
Even going into a big city with all the pollution from vehicles and factories are said to be a lot worse than 3D printers.
Ventilation for ABS
According to the Journal of Occupational and Environmental Hygiene, materials commonly used for 3D printing such as PLA, ABS, and nylon can be a source of potentially dangerous VOCs.
ABS has been shown to result in high VOC emissions when heated at those higher temperatures, the main one being a compound called Styrene. It isn’t harmful in small portions, but breathing in a concentrated amount on a daily basis can be harmful to your body.
The concentration of the VOCs however, aren’t as dangerously high as it requires to have serious negative health effects, so printing in a well-ventilated, large room should be good enough to 3D print safely.
I would recommend not 3D printing ABS in a space where you are occupying for long periods of time. If you are 3D printing in a small room with poor ventilation, the rise of VOC concentration in the air can be troublesome.
The UFPs and VOCs produced by ABS during the 3D printing process contains Styrene. This material is not harmful in small portions; however, breathing in it on a daily basis can harm your body.
This is the reason why ventilation is needed during the printing process with ABS.
I would ensure that you are at least using an enclosure with some type of ventilation, ideally in a larger room.
How to Ventilate a 3D Printer
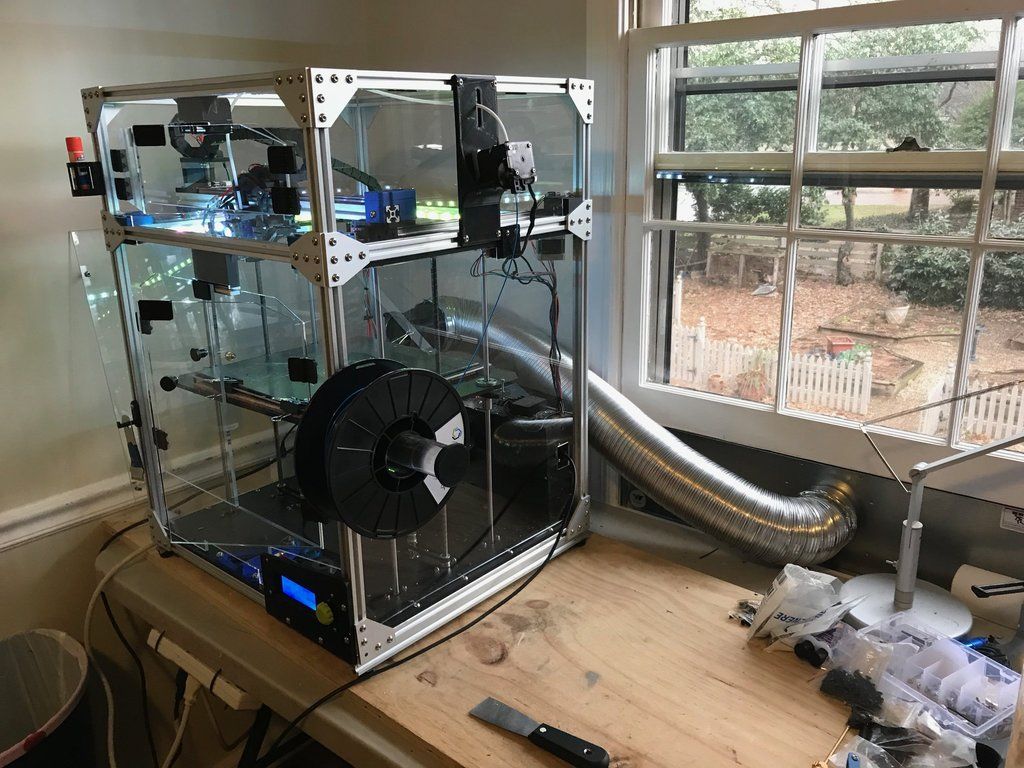
The best thing you can do to ventilate a 3D printer is to make sure your 3D printer chamber or enclosure is sealed/airtight, then to connect a vent from your chamber to the outside.
Some people use a window fan and put it near a window where your 3D printer is to then blow air out of the house. When printing with ABS, many users do this, and it works well to eliminate noticeable smells.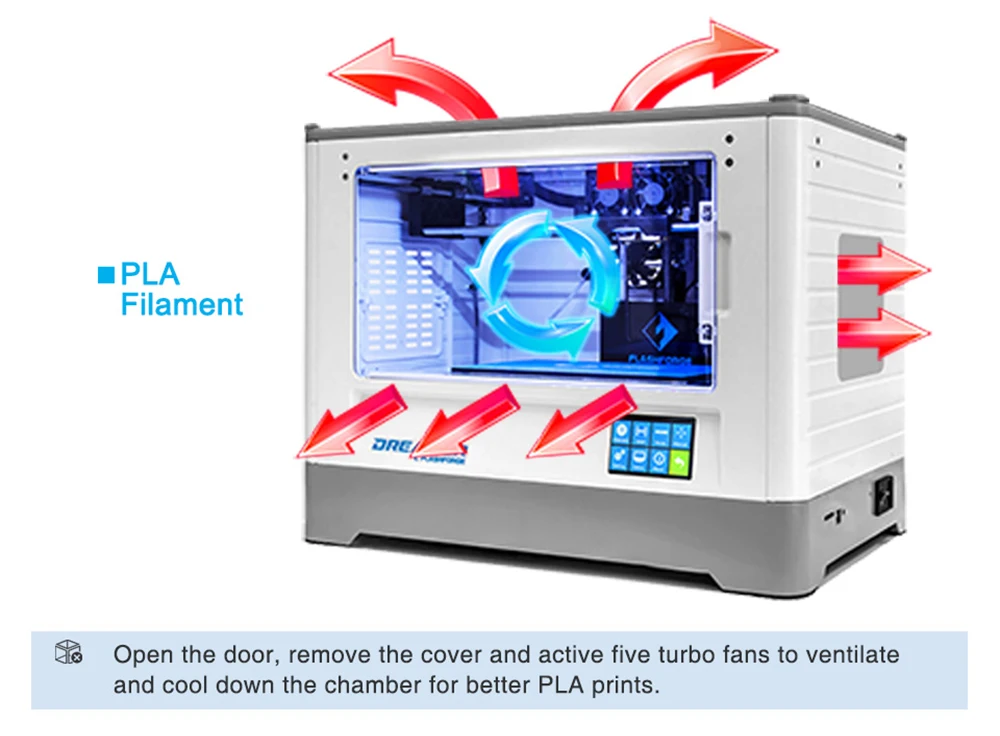
Installing Air Purifiers
Air purifiers have become common in major cities to keep the air clean. Similarly, you can use these air purifiers for your places where 3D printing is being performed.
Purchase a small air purifier and install it next to your 3D printer. Ideally you can put an air purifier within an enclosed system that contains your 3D printer so that the contaminated air passes through the purifier.
Look for the enlisted features in an air purifier:
- Have high efficient particulate air (HEPA) filters.
- A charcoal air purifier
- Calculate the size of your room and select the purifier according to it.
Air Extractors
Air Extractors are considered to be one of the best solutions to improve the ventilation of an enclosed room.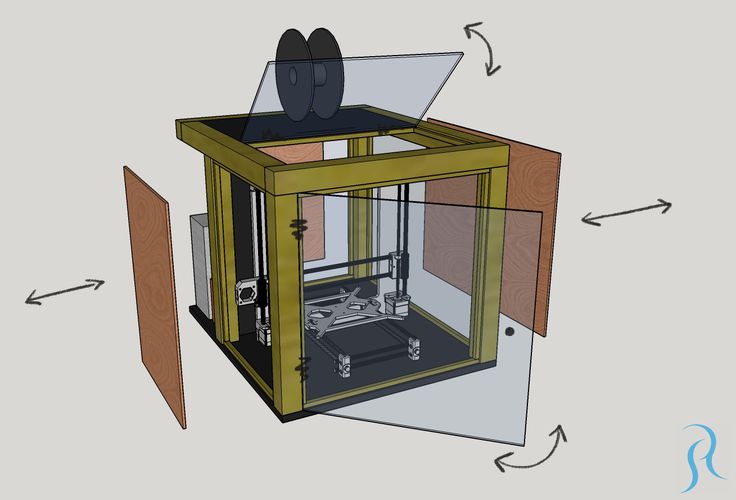 Its working is explained below for you:
- It sucks in the heated air.
- Exchange the heated air with the cool air from outside.
- It uses a fan and suction pipes.
There are two main types of extractors that you can easily purchase from the market, i.e., Twin Reversible Airflow Extractors with and without Thermostats.
Building a 3D Printer Enclosure
You can consider building an enclosure for your printer. It basically involves creating an airtight enclosure equipped with carbon filters, a fan, and a dry-hose that runs outside your home.
In the enclosure, the carbon filter will trap styrene and other VOCs, while the hose will let the air pass through. This is an effective ventilation process which you can make at home.
3D Printer with Built-in Filtration
There are very few printers that come with a built-in HEPA filtration. Even the manufacturers are aware of the fumes, but nobody bothers installing a filtration.
For example, UP BOX+ is one of the printers that come with HEPA filtration solutions that filter out tiny particles.
You can choose to get a 3D printer with built-in filtration, but these are usually more expensive so be prepared to pay extra for this feature.
The Elegoo Mars Pro is a good example of this which has a built-in carbon air filter to remove some VOCs and resin odor from the air.
How to Ventilate a Resin 3D Printer?
The best way to ventilate a resin 3D printer is to create a negative pressure enclosure which directs air away the enclosure to a space outside. Long term exposure to resin fumes are unhealthy, even if they don’t smell.
Most people don’t have a dedicated ventilation system and are looking for a simple fix to help ventilate their resin 3D printers.
Following the video above should improve your ventilation for a resin 3D printer.
Remember, resins are toxic and can become allergic to your skin, be careful while using them.
Are 3D Printer Fumes Dangerous?
Not all, but some 3D printer fumes are dangerous and can cause serious damage to the health. As previously described, those UFPs are the more dangerous kind of emissions, where they can be absorbed into the lungs, then into the bloodstream.
According to the research done by the Georgia Institute of Technology, 3D printer fumes can negatively impact the quality of indoor air leading to potential respiratory health issues.
The regulations provided by OSHA actually throw light on the fact that 3D printer fumes are dangerous for health and the environment.
According to the research done on 3D printing filament, ABS is considered more toxic than PLA.
PLA is made up of eco-friendly substance so it is less harmful. This is one of the reasons why PLA is so commonly used, especially over ABS, because of its safety and non-smelling properties.
How to Ventilate Your 3d Printing Workspace – 3D Printing Canada
How to Ventilate Your 3d Printing Workspace – 3D Printing CanadaFree Shipping to Select Cities $125+ ·
Find out more
+1 (905) 963-9066
The Comprehensive Guide to Comparing 3D Filament
Free Download
| Tags:
Have you ever smelt the sweet-fragrance of Ingeo PLA or the cloying smell of HITPS and gone; is this harmful to my health?
Thankfully, extensive research on 3D printing has provided answers to your question, and the answer is yes and no… Confused, aren’t you? but do not fret for today, I intend to expatiate more on the by-products of the 3D printing process its effect on your health and how to mitigate risks.
Sometime in 2014, scientists at the Massachusetts Institute of Technology, took it upon themselves to analyze the air around a working 3D printer and discovered that it emitted some substances. These substances include; ultrafine particles (UPs), Styrene and Volatile Organic Compounds (VOCs).
The research went further to list the different filament types used and the substances they produced. The list was rather exhaustive and I won’t bore you with the details but simply focus on PLA and ABS—the most used filament types in the 3D printing industry.
Now, taking a look at PLA, it is no secret that this thermoplastic is made from eco-friendly materials but how friendly are its emissions? When 3D printed, PLA produces sweet-smelling fumes which are laced with UP and VOC. Although studies have shown that the harm caused by UPs and VOCs is negligible, it is definitely not ideal for us to breathe in these fumes on a regular basis.
As for ABS, when 3D printing with it, the research shows that it produces both UP and VOCs which includes styrene. While not harmful in small portions, breathing in styrene on a regular basis can be harmful to the human body. Therefore, ventilation is needed anytime the 3D printing process is initiated.
Analyzing Your Ventilation NeedsSince the fact that breathing in 3D printing fumes could be harmful to the human health has been established, the next step is understanding your ventilation needs. But before going into that, let me outline some facts you need to consider about 3D printing:
1. The average time a 3D printing project runs for is 5-7 hours. This means your 3D printer will produce fumes continuously for a quarter of the day.
2. Both SLA and FDM printing technologies produce ultrafine particles, VOCs and styrene.
Returning back to your ventilation needs, the most important question to ask yourself and provide an answer to, is where do you do your 3D printing?
- In Enclosed Spaces: These spaces refer to any area without a clear ventilation outlet or not enough windows and doors that open up to nature’s atmosphere.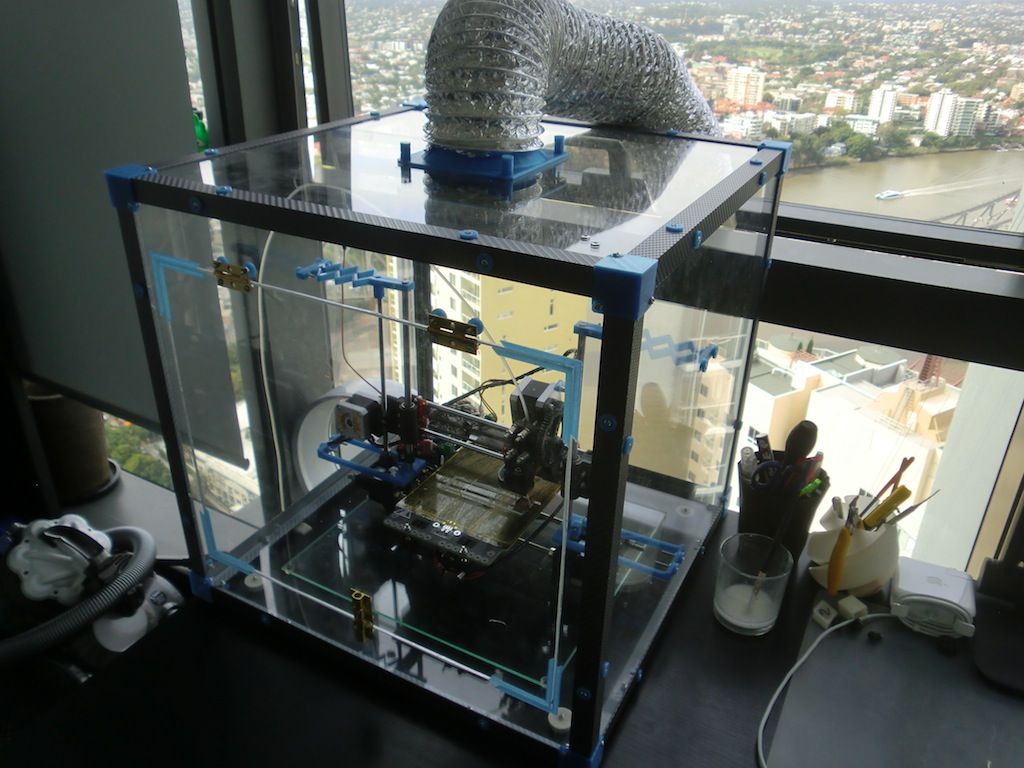 Enclosed spaces could include your bedroom, living room and basement.
- Open Spaces: This refers to work spaces with enough features that make cross-ventilation possible. Example of open spaces are your garage, external workshop or a toolshed located outside the main living area.
With these definitions of work spaces, it is already quite clear which of these structures will be conducive for 3D printing without any thought to ventilation as well as that which requires ventilation aid.
Therefore, if you have a choice, installing your 3D printing workstation in an open space ensures that the ultrafine particles, VOC and styrene your 3D printer produces dissipates into the air and gets diluted by oxygen. But if that option isn’t available, then you must consider taking some action to disperse the fumes produced in your enclosed space.
The Ventilation Solutions You Can ExploreIf you do not have any access to an open space workstation, do not be disheartened for there are a couple of solutions which can be taking advantage of to dispel the fumes a 3D printer produces. And here, I will highlight these solutions and the relief they bring to the table to simplify that important decision you have to make.
The easiest and most affordable solution you can consider is working with only standard PLA filament. The composition of PLA makes it eco-friendlier than the other filament types you can work with. Although this will limit your creativity, it is still a great option for entry-level hobbyists to consider.
If this solution is the one you find appealing and affordable, then it is also important to note that you will have to reduce the hours and number of projects you work on within the enclosed space.
Installing Air PurifiersIn Asia, China to be precise, toxicity in the air is managed through the installation of large air purifiers in major cities and it works. Therefore, you can borrow a leaf from China’s book by purchasing a small air purifier for your home. There are a plethora of air purifiers out there and to make the right choice, here are the features you must look for:
- An air purifier that uses high efficient particulate air (HEPA) filters.
- A charcoal air purifier
- The right size of air purifier. To get this, simply calculate the size of your room—by multiplying its length and breadth—then select an air purifier with the specifications for your room.
Air ExtractorsUsing an air extractor is a great way to improve the ventilation of an enclosed room. Air extractors work by sucking in heated air and exchanging it with cool air from the outside of a room. It does this with the use of a fan and suction pipes. The two main types of air extractors that you can purchase are:
- Twin Reversible Airflow extractors with thermostats and
- Reversible Airflow extractors without thermostats.
Like its counterpart—the air purifier—small air extractors are actually quite affordable and it should be an accessory you should consider purchasing with your 3D printer.
For hands-on DIY enthusiasts, you can also consider building an enclosed compartment dedicated to your 3D printer. The task involves creating an air-tight enclosure equipped with carbon filters, a fan, and a dry-hose which runs outside your home. The carbon filter will trap styrene and other VOCs, while the hose will serve as an air outlet/inlet.
-
So, here you have it, the four affordable options you should consider when looking for different ways to provide enough ventilation for your 3D printing workspace.
Back to blog
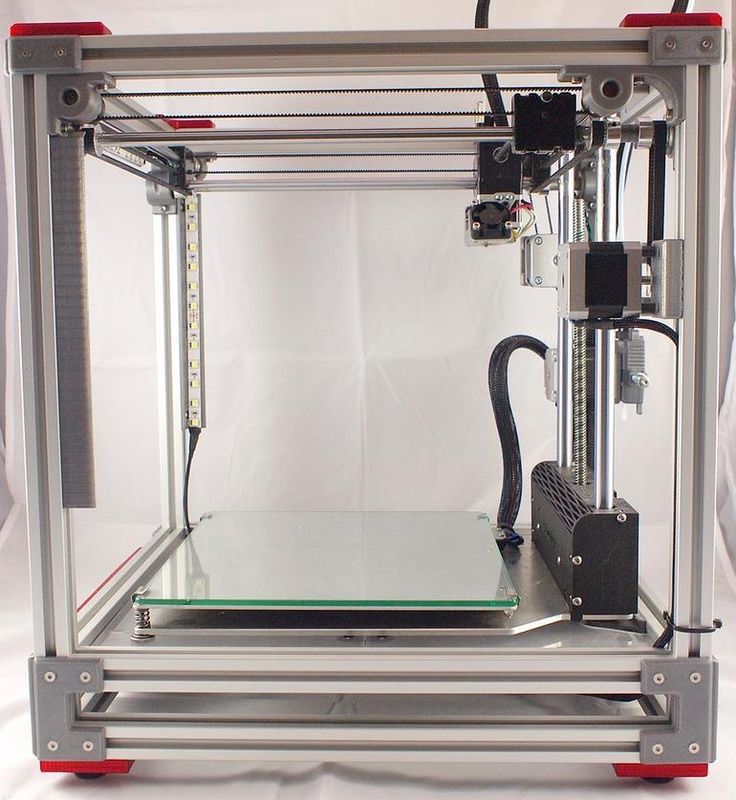
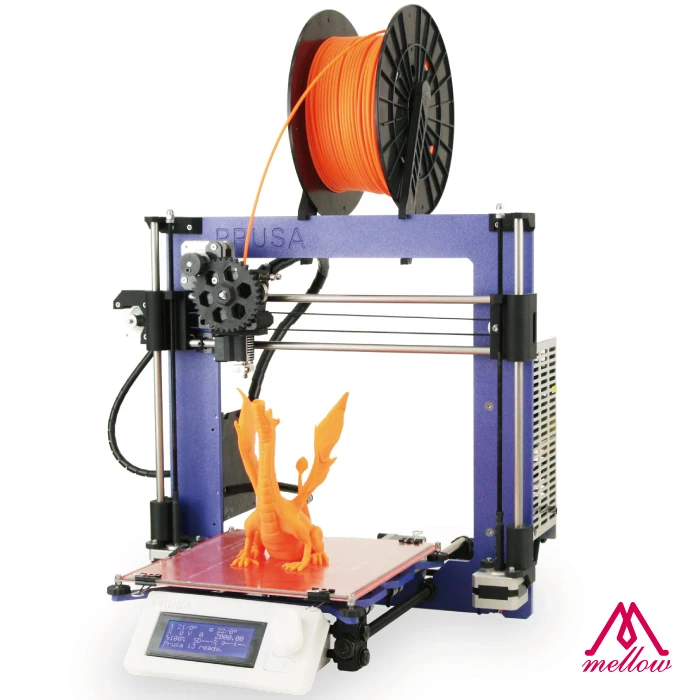
What to check and how to set up your new 3D printer?
Assembly kits, partially assembled or construction kits. Check for bad bearings. Square frame. Belt tension. Check the print table. Grease. Printing!
If you've just bought your first 3D printer, you'll no doubt be thrilled to set it up and start printing as soon as possible.
However, you must first go through a few checks and adjustments, which we guarantee will save you from frustration and wasted time in the future.
If you perform these checks now during the unpacking and/or assembly phase, your new 3D printer will work flawlessly from the first print and you won't spend countless hours trying to diagnose all sorts of print problems.
These are tips that are not written in user manuals, but this is what we have learned by using 3D printers for thousands of hours and watching the same problems occur over and over again due to incorrect initial settings.
Assembly kits, partially assembled or building kits.
Most of these tips are suitable for partially assembled 3D printers such as Creality Ender 3 (Pro/V2) or Anycubic I3 Mega.
Many of these 3D printers come as a semi-assembled kit where you need to connect the two halves of the frame together and then plug in some electrical connectors.
These semi-assembled kits are a great compromise between a fully assembled 3D printer and a DIY DIY kit, as they reduce production and shipping costs while requiring you to do only a small amount of work to set up the printer after unboxing.
This is also a great opportunity to learn more about how your 3D printer works so you can more easily diagnose problems in the future.
But whether your 3D printer is fully assembled or not, it will still benefit from going through this basic checklist.
DIY Kit 3D printers tend to have more guidance in their manuals on how to set up your device properly, whereas in a fully assembled 3D printer, the amount of options you can control is quite limited.
Check for bad bearings.
Before doing any tuning, our top tip is to check for bad bearings. This is the number one rule for budget 3D printers and can make a big difference in print quality. The most common failures are the linear ball bearings in the X and Y axes.
Turn off your 3D printer and move all axes along their paths. This way, if you have a bad bearing, you will be able to feel it seize as you move it, and you may hear some sort of grinding sound.
On 3D printers like the Ender 3, where radial bearing wheels run in a groove in the profile, you can turn each wheel. If you feel resistance, it means the bearing needs to be replaced.
Square frame.
Our first and most important tip is to make sure your 3D printer is square.
One of the most common causes of failed prints is incorrect X-axis position.
First, make sure the X-axis is parallel to the base frame. The base frame is the part of the printer structure to which the table is attached. The X axis is the horizontal part along which the extruder moves.
To do this, you can either measure the angle of the base frame or make sure that the angle along the X-axis is the same. Or you can measure the height of the x-axis from the base frame on each side and make sure the dimensions match.
The goal is to make your 3D printer level with itself, not with respect to your desktop.
The best tool for this is a digital level, as it will allow you to create a reference angle and measure from it. Alternatively, you can measure it with a steel ruler.
This will be your starting point for all other squares.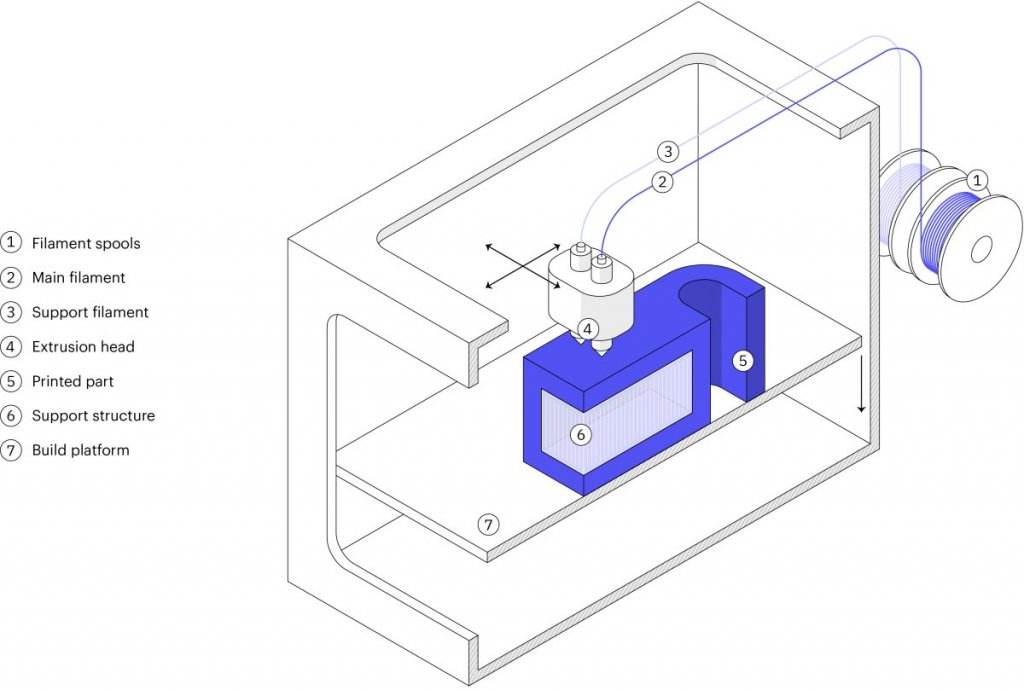
How you set up the X axis will differ depending on the specific 3D printer model. The Creality CR-10S Pro and Ender 3 models have a cam on one of the wheels that runs the X axis.
On dual Z axis models, you can detach the motors from the control and manually turn the lead screw until it lines up.
Now move the X-Axis up in Z and make sure it stays level throughout.
See also: X-axis offset on Ender-3. How to fix?
Belt tensioner.
We have already written a detailed post about the tension of 3D printer belts. This is another critical aspect that you should definitely check before you start printing.
Belt tension is a rather biased parameter, the setting of which you mainly carry out by touch or by sound. However, we recommend that you keep this element in mind when setting up printing for the first time.
Take our advice and tighten the belt tight enough, but don't let it stretch or break.
Check the print table.

The next step is to check that the print platform is flat. Place the steel ruler upside down on the table and see if there is a gap between them.
If difficult to determine, light from the back. If you see a solid beam of light between the ruler and the table, then your table is not flat.
If the table is not level, it cannot be corrected properly. Ideally, you will need to replace it with a new one.
A more budget friendly option is to use Creality Ultrabase glass as it is affordable and perfectly flat.
Some printer models (Ender 3 V2, Voxelab Aquila X2) have this glass included.
Now that you know your table is flat, you can calibrate it.
Many people think that calibrating the table aligns, but what you really need to do is make sure it is aligned with the X-axis.
If your 3D printer has auto-calibration, you can use this feature.
But in most cases, the method of pushing the paper between the nozzle and the platform works fine. As you gain experience, calibrating the platform will become a simple and intuitive task for you.
Grease.
Any place in your 3D printer mechanism that has a moving metal-to-metal contact should be well lubricated.
Some 3D printers, especially very cheap ones, do not apply lubricant at all or apply it haphazardly.
Critical components such as lead screws need to be lubricated.
Now that your lead screw is properly installed and lubricated, you can start 3D printing.
Printing!
You are finally ready to start printing. Print your first layer slowly. Set the print speed in the slicer for the first layer to 10-20 mm/s.
This will ensure good adhesion of your model to the table and an excellent base for your part. For other layers, you can set the print speed in the range of 30-80mm/s.
Print speed directly affects the quality of your print, in one of our next posts we will definitely explain all the nuances of this setting.
In the meantime, enjoy the rhythmic hum of your printer doing its first 3D print for you.
Happy printing!
How to calibrate a 3D printer?・Cults
Since their invention, 3D printers have proven that printing many objects is much more efficient than conventional manufacturing techniques. However, calibration is required for optimal performance when printing 3D parts. Many 3D printer owners find this procedure tedious and time-consuming. However, it is much easier than it seems if you know the right tips on how to do it. Cults3D presents the various steps you need to follow in order to successfully calibrate your printer.
To ensure that the odds are in your favor during 3D printer calibration, certain precautions must be taken beforehand. Calibrating the printer is indeed an operation that requires the strictness of , but not only. You also need to make sure that your 3D printer is perfectly clean.
To easily calibrate your 3D printer, it is important to take the necessary time to clean the printer tray and existing nozzles. Calibration may be distorted if there is filament residue or print marks on the plate or nozzle. Cleaning the 3D printer nozzle allows to limit the effect of underextrusion and recurring problems when changing materials.
In addition to ensuring that the 3D printer calibration runs smoothly, be sure to check that the mounting screws are properly tightened. It happens that on some models of 3D printers, the screws loosen. So it's important to spend a few minutes checking to make sure there's no play on between different parts of your 3D printer. By doing so, you give yourself the best chance of getting your future prints right. If so, feel free to visit our website. You will find the best printable STL files to get started with your 3D printer in complete peace of mind.
Calibrating the 3D printer plate is the first step in this maintenance procedure. To ensure excellent print quality on a 3D printer, it must, like the following steps, be performed correctly. Plate calibration guarantees the success of the first print layer. To do this, you need to perfectly align the plane. In other words, the printer plate must be flat with respect to nozzle movements. It is also important to adjust the distance between the roller and the nozzle.
Calibration of the plate that supports the 3D printer can be manual or automatic. This procedure is slightly different depending on the printer model. Manual printer calibration is carried out using 4 screws located at the four corners of your machine's plate. The challenge is to find the optimal height ratio between these four screws for 3D printer plate alignment . To achieve this, make sure you repeat the following steps at least once in the center and four corners of the 3D printer tray.
First place a piece of paper between the nozzle and printer plate. Then move the tray up and down, being careful not to get paper stuck under the nozzle. Once the paper can be moved by light friction on the nozzle, you can move on to the next checkpoint . Some 3D printers, such as the Raise3D E2, have built-in automatic tray alignment systems.
The printing temperature of a 3D printer is of great importance for the manufacture of your parts. However, it is relatively complex and depends on the material you want to print. This is because the print temperature of standard PLA filament varies between different brands of 3D printers. The temperature range for printing is usually specified by each manufacturer on spools of filament. The temperature of the 3D printer plate is also an important parameter to consider. This allows eliminate the risk of re-peeling on some technical materials such as ABS thread.
The 3D printer's extruder is the part that spits out the hot filament. This may be due to two main problems. Over extrusion when the filament is used a lot, and under extrusion when the filament is used little. It is also necessary to take into account the thickness of the filament passing through the nozzle of the 3D printer. However, it is relatively easy to fix if it is out of order. To find out if your 3D printer is under or over extruding, you'll need a ruler, tape measure, or compass. Start by doing two marks 100 mm apart on the filament, then align the bottom mark with the top of the extruder. Then set the extrusion length to 100 in the 3D printer software and run the extrusion command.
Calibrating 3D printers also requires checking the accuracy of their measurements . To do this, you can use a piece of tape to mark two areas 100mm apart on the printer's base plate. On one of them, install the nozzle and ask the printer to move 100 mm in the desired direction. Then check that your device is exactly on the tape.
Measurements are rarely correct on the first try. Even a difference of tenths of a millimeter can greatly affect the quality of subsequent prints. 3D printers are precision machines and their motors must be calibrated to ensure accuracy. For the X and Y axes , adjust the values of M92 until you fix the offset at exactly 100mm.