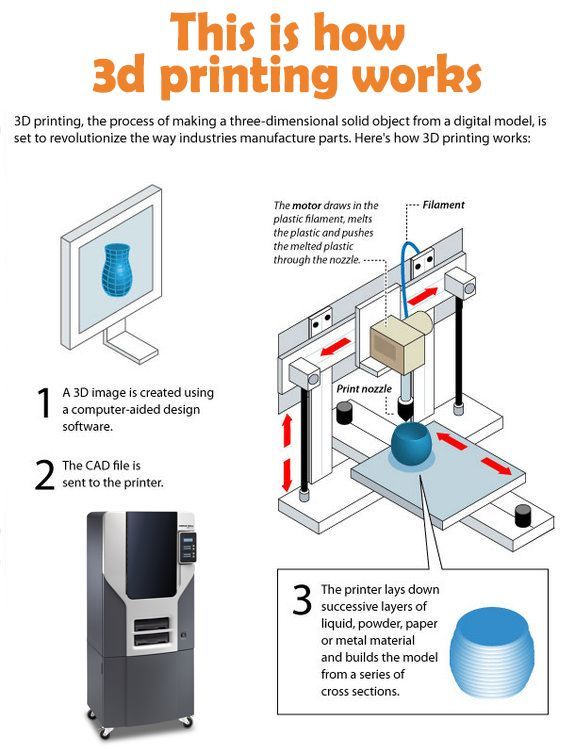
How to do 3d printing at home
Best Practices for 3D Printing From Home
Like many of us across the globe, chances are that you’ve had to quickly adapt from having a full workbench or stocked office to engineering and working from your home with more limited resources. In these times, the ability to adapt to these new surroundings and challenges will help limit product disruption and maintain development cycles down the line.
Formlabs desktop stereolithography (SLA) 3D printers’ compact size make them suitable for use at home or outside of the office. Additionally, with over 30 different materials simulating everything from silicone, polypropylene, ABS, and more, you’ll have more flexibility and use cases to adapt to new challenges as they arise.
Bringing your 3D printing in-house will help you cut costs and gain more control during times of uncertainty, especially if you’ve previously or currently rely on outsourcing 3D printed parts. Our customers have turned to 3D printing at home to cut costs and improve efficiency, continue critical product development, and support COVID-19 relief efforts.
Dan Kirchgessner, Community Manager, and Jake Kapusta, Senior Services Agent, share their best practices as they print from home.
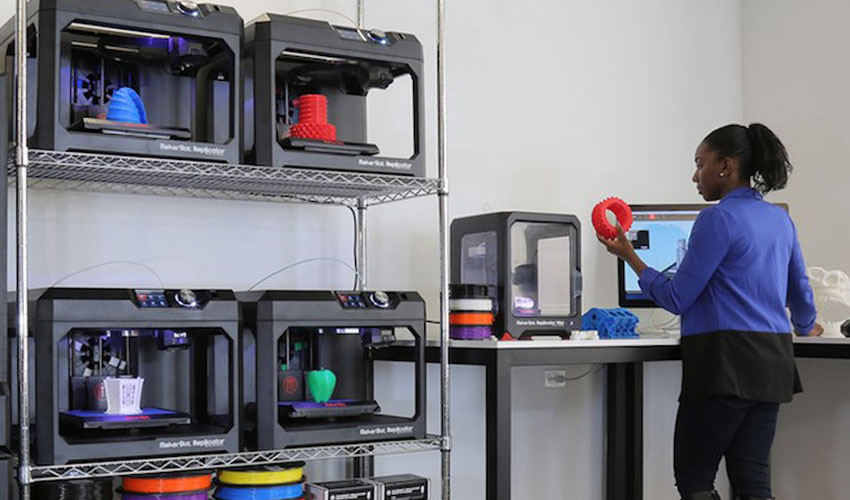
Before you transport or receive your 3D printer, you’ll want to make sure your space and environment are suitable for printing, post-processing, and any finishing needs you may have. You’ll want to declare level working spaces where you can place your printer(s), post-processing solutions like Form Wash and Form Cure, a workspace for part removal and finishing, and short-term storage for items like additional wash solvent, resin tanks, resin cartridges, gloves, post-processing tools, etc.
Alexis Hope, a designer and researcher based at the MIT Media Lab and MIT Center for Civic Media, says that when it came to setting up her home workshop, “getting the printer at home was a big impetus for me to set up a workstation. You need room for the wash and cure systems and a space to store your parts, so make sure you plan to have the necessary setup to be productive. ”
”
Alexis Hope’s home workshop.
Some of our most commonly asked questions about 3D printing from home relate to environmental considerations, like sounds and smells. To prevent any sensitivity to smells, we’ve found it helpful to keep the post-processing station in a well ventilated area or near an open window for easy access to airflow. While the Form 3 is relatively quiet, comparable to the sound of a microwave, you may want to consider placing it away from quiet areas of your house to prevent any type of disruption.
Woody Hedberg, print process engineer at Formlabs, recently set up a Form 3L in his apartment for materials testing. “I installed chipboard, thick cardboard, on the floor and walls of the space as a protective measure,” Hedberg says. He also found it useful to set up his space near an open window behind a closed door to mitigate any potential smells and sounds.
Once you have your space set up, gather your 3D printing essentials, such as rinse buckets, baskets, and bottles, tweezers, a scraper, removal tool, flush cutters, disposable nitrile gloves, and whatever additional tools you’ve found useful to your 3D printing workflow.
If you already own a 3D printer, you’ll first want to carefully consider how you’ll transport it directly from your office or workspace to your home. When preparing your Formlabs 3D printer for transportation, first, remove the resin cartridge, remove and clean the build platform, and then remove and cover the resin tank before placing it inside its tank case. Make sure that all accessories that contain resin are closed securely before transport.
For the Form 3, the Light Processing Unit (LPU) must be secured with the thumb screws and latch before transportation. Not securing the LPU may cause damage to your printer. Contact us if you can't find the screws.
Wrap your printer carefully and place it in its original packaging if possible. Don’t forget to pack all the accessories you might need for 3D printing and post-processing: Form Wash and Form Cure or finishing kit and alternative curing solution, and consumables such as resin tanks, resin cartridges, gloves, post-processing tools, IPA, etc.
Once you’re able to unpack all of your 3D printing supplies at home, don’t forget to re-level your printer in your new environment before printing.
Now that you’ve got your home printer setup ready to go, there are a few ways you can improve and optimize your workflow.
Align the start and end times of your prints to match your working hours to get the most working hours out of your printer. Using PreForm’s estimated print duration, you can plan for the start of your next print. Set long prints to run while you’re away from the workspace, so that you can finish the current print and begin the next one when you return.
Kevin Gautier, business development at Formlabs, finds his team shipping prints to each other more while working remotely. “Always remember to print a copy of the object for yourself, so you can go back and reference them.”
Kevin Gautier’s home setup.
In the same vein, Hedberg suggests to document in detail and photograph every print, especially if you don’t have excess storage. “Now that the team is all remote, we need to have a proper system of documentation. That doesn't mean I need to keep every single 3D printed part, but I do need to carefully document my prints and keep records for the team,” he says.
To monitor your print production in real time and track resin and tank usage, use Dashboard to monitor your print progress by printer. You’ll also be able to track the success and failure rate of your prints, so that you know which designs were most successful for future iterations.
“Get ahead with all the design work you can do and prioritize the critical physical prototyping tasks across teams,” suggests Zach Frew, engineering technician at Formlabs. Frew says it’s necessary to prioritize these tasks, especially when working with limited resources, and communicate them across your team members.
Practice safety when using Formlabs products. Wear nitrile gloves to handle IPA, and work in a well-ventilated area. Store IPA away from heat, sparks, and open flame. IPA evaporates rapidly, so keep containers closed whenever possible. Consult the chemical manufacturer or supplier for detailed safety information.
According to Formlabs materials guru Zac Zguris, “You need to practice good chemical hygiene. Keep everything clean. Ensure you wipe up any drips or spills immediately, use acetone or isopropyl alcohol to ensure no sticky residue remains. When it comes to wash IPA, this would include making sure you have fresh airflow in your workspace. A closet is not at all an appropriate location for active use of a 3D printer or an IPA wash.”
When handling resin cartridges and containers, always be sure you’re wearing gloves to protect your skin. Store cartridges upright, away from direct sunlight, in a well-ventilated area. Close the cartridge vent cap to prevent leaks.
Do not pour liquid or partially cured resin into drains or dispose of it with household waste. Do not pour isopropyl alcohol (IPA) that contains dissolved resin into drains or dispose of it with household waste. As always, all solvents and resins should be disposed of in accordance with your local regulations and supplier’s SDS. To learn more about safety precautions, continue reading on our support site.
Do you have any best practices or tips that you’ve learned along the way when making this transition to engineer from home? We’d love to hear about them. Feel free to share directly on social media by tagging @formlabs or #EngineeringFromHome or add a comment on our forums.
Continue reading to learn more of our best practices and see how other individuals are engineering from home.
How to Use a 3D Printer Step by Step (10 Tips To 3D Print)
Do you know how to use 3D printers? Can you manage to operate one without issues?
If you are new to 3D printing and still figuring out how to utilize 3D printers to maximize your output, then this page is for you!
I will help you get started in 3D printing by providing you a step-by-step tutorial. In addition, I’ll leave tips to help you achieve better printing results with your 3D printing machine. So, let’s get started!
Contents
- 1 How to 3D Print
- 1.1 Step by Step Instruction for Beginners
- 1.1.1 Step 1: Unbox
- 1.1.2 Step 2: Prepare the built plate.
- 1.1.3 Step 3: Heat your printer
- 1.1.4 Step 4: Loading/Unloading plastic filament.
- 1.1.5 Step 5: Level the bed.
- 1.1.6 Step 6: You’re now ready
- 1.1 Step by Step Instruction for Beginners
- 2 7 3D Printer Tips for Home and in the Classroom
- 2.1 1. Choose a brand that has good support
- 2.2 2. Level the print bed and set the nozzle
- 2.3 3. Check the nozzle temperature
- 2.4 4. Equip yourself with the right tools
- 2.5 5. Find the sweet spot of your 3D printer’s temperature
- 2.6 6. Bed Adhesive
- 2.7 7. Store your filament properly
- 3 Tips for Safe 3D Printing
- 3.1 8. Use the printer in a well-ventilated room
- 3.
 2 9. Unplug during maintenance
 - 3.3 10. Use heat-resistant gloves
- 4 How to Use a 3D Printer to Make Money
- 4.1 Accept 3D printing projects
- 4.2 Create and sell items
- 4.3 Rapid Prototyping services
- 5 Conclusion
- 6 References
I understand that one’s experience level matters in how he or she start 3D printing. So, this section aims to help beginners learn how to use a 3d printer at home or in the classroom.
To give an overview of the entire process, I’ll show you the basics of 3D printing and how to do 3D printing gradually.
Step by Step Instruction for BeginnersFor beginners who are confused about how to proceed with their first 3D printing after receiving their 3D printers, this section is for you.
Step 1: UnboxRemove the printer from the box. Ensure that you have removed all the packaging materials including the tape and zip ties.
Ensure that your print sticks to the bed. You can use blue painters tape, hairspray, Polyimide Tape, glue sticks or BuildTak Sheets to achieve that.
Step 3: Heat your printerHeat up your new printer and load your choice of filament. For first time users, PLA is highly recommended because it’s easier to use.
You have to familiarize your material because there are filaments that need special heat requirements for adhesion to the bed and maintaining an overall great print.
Step 4: Loading/Unloading plastic filament.Depending on the model of the 3D printers, some will give you the option to load and unload a filament in the controller menu. Just be sure that the extruder is not loaded with filament because the factory usually tests the machine and it may still contain a strip in the extruder. If there’s a plastic filament, you have to remove it. You can easily do this by pressing the release lever or button.
Once the extruder is empty, load the new filament. If your machine has a loading filament option, you can use it. Otherwise, you have to wait for the extruder to be heated, push the release lever and insert your filament into the filament hole.
Once you see a flow of filaments from the nozzle, then you are good to go!
Step 5: Level the bed.Bed leveling is a tricky process and it can be time-consuming and frustrating. If the build plate is not leveled, it could result in inaccurate prints. So, you’ve got to do this right.
The second type is very easy to use. If you’ve got the first one then make sure that the bed level adjusting screws are as tight as they can go in all four corners.
Once the print bed is leveled, you have to adjust the X-height, too. You have to do this to balance filament flow and bed adhesion.
After that, you have to set the value in software so that the printer knows what the gap is between the nozzle and the build plate.
At this point, get your file ready using your favorite slicer and save a g code file.
7 3D Printer Tips for Home and in the ClassroomUsing 3D printers is not as easy as you think. Yes, there are plug and play 3D printers that work straight out of the box, but you’ve got to be wise when it comes to choosing a 3D printing machine because, at one point, you are likely to encounter a problem.
So, here are some tips for you.
1. Choose a brand that has good supportThere are cheap 3D printers online, but if you are to choose one, you have to consider the manufacturer and the support available. It’s best if you get one from a local supplier for more accessible support.
In this way, if you encounter any problem, you can easily approach them and have it fixed. No need to ship it and wait for weeks to get it fixed.
2. Level the print bed and set the nozzleLeveling the bed and setting the nozzle will improve the quality of your 3D print. To make this easier, you can use a sheet of paper to determine the distance between the nozzle and the bed.
When the nozzle is clean and inappropriate distance from the bed, the paper will have minimal resistance when pulled free. It will also go back underneath the nozzle without force.
How to know if you need to level the bed:
- Filament height and width varies
- Gaps between lines of filament vary
- The filament is sticking to the build surface only in some places
How to know if you need to set the nozzle gap:
Nozzle too high
- Filament doesn’t stick to the build surface
- Filament comes out like spaghetti
Nozzle too low
- The first layer is barely visible or too thin
- The nozzle plows trough filament already on the build plate
- Filament gathers on the nozzle
- No filament extrudes on the build plate
 Check the nozzle temperature
Be careful with the nozzle temperature because if it’s too hot, it could leave strings of filament between separate parts. When building tall pieces, a high temperature melts the earlier layers that may result in malformation.
To avoid this mistake, include a one-centimeter cube built on the opposite side of the build plate. This removes the hot nozzle from the print and allows enough time for cooling.
4. Equip yourself with the right toolsIt’s important that you have all the tools needed to set up the machine and to keep yourself safe. So, equip yourself with these materials.
Index card. This comes handy when setting the bed level and adjusting the nozzle gap.
Screwdriver or hex key. You will need this to adjust the screws on the bed.
Flush cutters. This very helpful for removing the support material and makes a nice, clean-cut when trimming filament before loading.
Heat-resistant gloves. This will keep you safe when you are working around a hot nozzle. This is very important for students who are 3D printing in classrooms.
Clean cotton cloth and a brass brush. You will use this for cleaning the nozzle.
Calipers. This is absolutely necessary when trying to model parts that have to fit in specific places or when you just need an idea of how big a model actually is.
Razorblade or spatula. This is very helpful when scraping residue from the surface of the build plate.
Dish soap and clean, dry cotton cloth. This is useful for removing dust and grime.
Isopropyl alcohol. This is effective in cleaning a build surface that is permanently mounted to the machine.
5. Find the sweet spot of your 3D printer’s temperatureAdjusting the bed to the right temperature is crucial in producing the best results because it helps with print adhesion. As the machine prints the model, each layer shrinks as it cools and the eds of the print pull away from the build plate.
Also, when the bed temperature is too high, the model may develop the so-called “elephant foot.” When you observe this, you should slightly reduce the bed temperature for the next print.
6. Bed AdhesiveThe print should stick to the bed while 3D printing. If you have trouble with this, here are some recommendations depending on what filament you are using.
- PVA glue for PLA, Nylon, and TPU
- Aquanet Hairspray for PLA and ABS. This also works for PET and PETG
- Blue Painter’s Tape is highly recommended for PLA and PETG
- Kapton Tape is a great all-purpose bed adhesive and works perfectly well when paired with hairspray
- PEI holds onto prints when it’s hot and releases it when it’s cool. However, PETG and TPU/TPE stick too well, so you have to use a glue stick to act as a release agent between the PEI and print.
- BuildTak is versatile and it works really well for almost all materials especially on a Flexplate that has a good grip and an easy release.
Most filaments absorb water including ABS, nylon and flexible materials. It is very important that you keep them dry, thus the importance of proper storage.
When filaments are damp it expands during extrusion as the water turns to steam and bubbles out of the plastic. The filament pops or crackles through the nozzle, you will see smoke if you look closely to it. Unfortunately, the biggest problem is that it produces a rough finish.
So, store the plastic bins with desiccant between uses. Similarly, you can dry the spool of filament by placing it in the oven over a few hours at very low temperatures.
Tips for Safe 3D Printing3D printers are safe to use, but you should still take precautions. Here are some tips for a safer 3D printing experience.
Where can I use the additive manufacturing printer? Filaments can be toxic depending on the material, additives and colorants use. ABS is toxic while PLA is not. So, it’s best if you only use the machine in a room with proper ventilation especially if you are using ABS filaments.
9. Unplug during maintenanceYour 3D printer operates using electricity. For this reason, make sure to unplug it during maintenance.
10. Use heat-resistant glovesThe heated bed and nozzle are hot during operation, so you are at risk of getting burnt. If you need to touch anything while the machine is working, make sure that your hands are covered, hence the need for heat-resistant gloves.
How Much Does It Cost to Use a 3D Printer
3D printing is fun but it can be costly depending on what you print and what material you use. To help you understand how much 3D printing may cost you, here’s a breakdown.
Filament. Among the things, you should consider during 3D printing is the filament cost. This usually makes up 54.2% of the total print cost.
Electricity usage. Every time you use your three dimensional printer, you will consume energy. This depends on the energy cost in your country.
Using it at night might cost you lesser because during this time it is not as in demand and the cost plummets. Electricity usage is about 0.6% of your total print cost.
Software. You will need slicing software and computer aided design (CAD) software in the printing process for your CAD file to deliver 3D printed parts. The software is very helpful in creating 3D models. Whatever 3D model you need, the task will be easier with CAD software.
They may or may not contribute to your 3D printing cost. If you purchase a super expensive CAD package, it will definitely cost you much.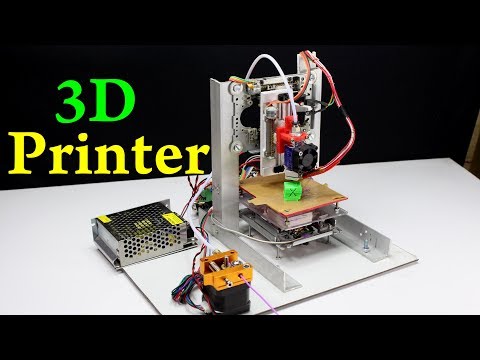 The good news is, there are free software that won’t cost you a cent.
Consumable Items. Consumables include blue tape, Teflon grease, modeling knife blades and products used for finishing, dry brushing, sanding, polishing, and painting.
This varies depending on the brand you purchase. In general, it’s difficult to calculate this but this will probably take 1.53% of your total print costs.
Repairs and Upgrades. In due time, your 3D printer might need a repair or upgrade. This varies depending on the cost of your printer, how you use it and how often you print.
Depreciation. Over time your printer’s value will reduce. You can calculate depreciation using the assumption that your 3D printer will be used for 5 years (even if it might last longer). Next, consider how often you use it.
How to Use a 3D Printer to Make Money3D printers are a good investment because you can manufacture items and make money from it. Yes, you can use it by offering 3D printing services. So, how can you do so?
The easiest and most practical way to make it profitable is to accept 3D printing projects. There are individuals who want 3D printed items or 3D models but don’t want to purchase a machine. So, offer to do the job and let them pay for your service.
You can join 3D printing communities to find potential clients. Moreover, there are many websites for commercial 3D printing where you can take 3D printing orders.
To make things more convenient for you, here are some sites that offer those services.
- 3D Hubs
- imaterialise
- Shapeways
If you are into business, you can use your 3D printer to create customized art and crafts. You can 3D print jewelry, accessories, phone cases, office supplies and more. Just be creative when it comes to offering 3D printed items or 3D models.
Rapid prototyping is in demand in architecture, design, engineering and construction industries. Those professionals can ask for your service to produce a scale prototype of their design for a conceptual presentation or to test the viability of the end product. So, 3D printers are profitable for this type of service because they are used to create prototypes.
Many are using 3D printing technology for prototyping because it offers tons of benefits including:
- Low cost
- Fast turnaround time
- Reduces the possibility of mistake in design
- Allows prototyping more variants of the same design
- Enables you to create more complex end products
3D printers are not easy to use. Thus, it may take time for you to be comfortable with your machine and maximize its functionalities for the additive manufacturing process. You may also spend on software to design and slice a 3D model because they are necessary for the printing process.
The good thing about 3D printers is that they can help you make money because they can be used to create 3D printed objects. Printing 3D objects is easy once you are familiar with your machine. So, apply the tips above to produce better and quality prints for a potential 3D printing business that will cater to those who need 3D printing services.
If you are interested to learn more about 3D printing technology, feel free to check our homepage.
References3dprinterchat.com/2018/01/step-by-step-guide-first-3d-printer/
all3dp.com/2/3d-print-quality-12-tips-on-how-to-improve-it/
3dprintingforbeginners.com/3d-printing-tips/
www.matterhackers.com/articles/the-top-ten-tips-for-getting-started-with-3d-printing
3dprinthq.com/cost-running-desktop-3d-printer/
Homemade metal 3D printer, but something went wrong / Sudo Null IT News
Hello everyone, my name is Sergey. In this article, we will talk about 3D printing with metal, more precisely, about my attempt to implement 3D printing with metal.
Very often, people who are interested in or engaged in any activity, no matter what, stumble upon something completely new and previously unknown to them, something that can help develop/improve their main activity. A similar situation happened to me.
Surfing the expanses of your Internet, I came across a wonderful technology for vacuum deposition of metals on various materials. On Habré there is an interesting article about this technology. In addition, on many other resources it was said that the evaporated metal moves towards the target in a straight line.
Many resources0003
And then I thought, what if I spray metal in the place I need, gradually increasing the thickness? I looked for information about whether someone did this - I did not find it.
Registered on a forum where sprayers gather together and began to disturb them with questions like: is it possible to build up a “film” with a thickness of 1 or more millimeters. To which I caught a lot of misunderstanding what it was for, but received a positive answer.
General information received, you can begin to prepare for experiments.
It is known from various articles and documents that a vacuum of no more than 10⁻² Pa is required. For comparison, the order of magnitude - the pressure that gives a household vacuum pump (Value and others) - about 4 Pa (measured value), i.e. pressure is 400 times greater than necessary. How to deal with it and what to do? To achieve low pressures, turbomolecular vacuum pumps are used, they work in parallel with the foreline pump and, literally by molecules, capture the remaining air from the chamber. The process is not fast. The pump looks like this.
We installed a pump, it pumps out air and everything seems to be fine, but how to find out the pressure? For this I chose an ionization vacuum gauge.
In fact, nothing else is needed, except for the chamber and evaporator. I did not find a ready-made affordable (in terms of finances) camera, therefore, I decided to make my own. It is of a small volume (about 8-10 liters) in order for the air to be pumped out faster. Usually, the chambers have a spherical shape, in my case it is, on the contrary, elongated, in order to be able to set the “target” (the place where the metal is deposited) at different distances from the evaporator. In addition, the camera has a lot of flanges for connecting all kinds of inputs/outputs and sensors. I modeled the camera in a well-known CAD program, drew drawings and transferred it to production.
Current leads and conductors I made from a brass bar and a brass rod, bought on the local market. (Juno, who is from St. Petersburg).
In the photo below, a tungsten boat is fixed between two conductors.
The bottom part looks like this. The photo shows the cooling tubes of the current leads. Subsequently, I abandoned them, due to the simplification of the system.
Assembling the camera did not take much effort and complexity. It is much more difficult to achieve vacuum retention in this chamber. To do this, I polished the flanges and all mating surfaces to avoid the slightest leakage through the rubber seal (in the photo below, I processed only the top flange).
As it turned out later, the weld is not airtight at all (meaning for low vacuum). I, out of inexperience, assumed that by pumping a pressure of 300 kPa into the chamber and immersing it in a bath of water, I would carefully find all the leaks and eliminate them. Yes, at the first stage I did just that, but the pressure in the chamber did not fall below 10-2 Pa, there were leaks. Interestingly, before the start of the test, at a pressure in the chamber of 300 kPa, bubbles emerged from the welds with an intensity of approximately 1 bubble (diameter 2-3 mm) in 30-40 seconds. And those were big losses that I eliminated.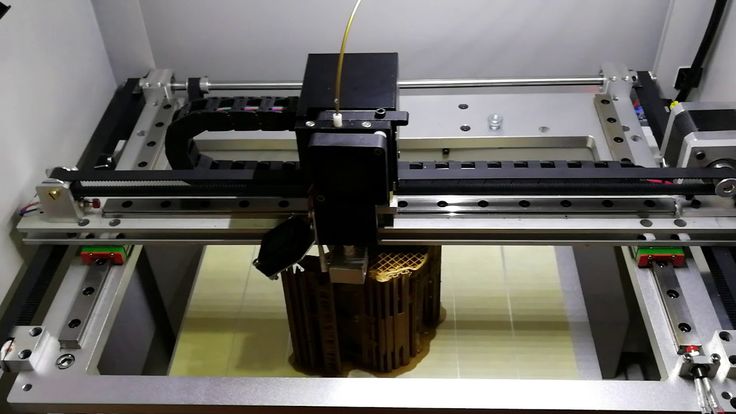 But what to do with minimal vacuum losses that cannot be tracked in "kitchen" conditions?
The solution was close. To do this, all you need is a mass spectrometer.
The idea is simple – the investigated chamber or container is connected to the vacuum chamber of the spectrometer. Air is pumped out, on the graph they look for extraneous peaks of any gases. After that, helium is supplied locally, to the places of possible leakage. It is helium, because its penetrating power is higher and the helium peak can be easily tracked on the spectrum. As soon as helium enters the chamber through a micro-hole, it is immediately visible on the spectrum.
I drove twice and looked for leaks twice. Now the chamber with the installed pump is hermetic and it is possible to carry out experiments further, having previously assembled all the components of the system on the rack.
General view of the incredible installation.
Starting up the plant and checking it comes down to maintaining the lowest possible pressure. The foreline pump is started first.
The pressure after the operation of the foreline pump can be seen in the picture below.
After the pressure is established (does not change). You can launch "heavy artillery" - a turbomolecular pump. It reduces the pressure by another 3 orders of magnitude.
The time has come for experiments, what I have been going for so long and what I have been waiting for so long.
First experiment.
Place a small amount of silver into the boat fixed between the conductors. Above the boat I install a steam conduit - a soldered tin cylinder, which, as I thought, should limit the spread of metal through the chamber. Above the steam conduit there is a lid with a hole of 2 mm, behind the lid there is a target on which the metal should condense. It is a pity that there are no photos left, but the vacuum chamber was completely dusty. There was not a single place where there was no applied layer of metal. In the photo below, it’s not a different planet at all, but silver sprayed onto the inner surface of the wall.
Second experiment.
I thought it was because of the large gaps between the boat and the steam line. The solution was born immediately and quickly. I took two boats and combined them so that a shell was obtained. I placed silver inside, and cut a hole with a diameter of 2 mm in the upper half.
And he began to heat up the whole thing. But, I did not take into account the rigidity of the boats and the rigidity of the current leads. The shells parted a little and a gap formed between them, through which steam also flew in all directions.
As a result - spraying in the entire volume of the chamber. In the photo below there is a viewing window, the boat in which was slightly above half, but the window was completely dusty.
Third experiment.
After a little thought and grief, I thought that the container with the evaporated metal should be airtight and with only one outlet, but how and what to make it. From tungsten - very expensive and difficult to process. The way out has been found! Graphite is an excellent material for making a crucible, let's call it that. On the ad site, I found an ad for the sale of graphite bars from the contact whiskers of a trolleybus, cut out a bar with a hole in the center and made a cover for it. In the photo below - just a bar with a hole for the material (without a cover).
And in this photo already in the chamber with the lid installed (the hole in the lid is 1 mm in diameter).
Under the spoiler are a few photos with a short period of time, from which you can see how dusty the viewing window is.
Loss of transparency
It is obvious that in this case, too, there was no success, to my great regret. All three experiments were carried out with a gradual increase in temperature from the state when evaporation does not occur.
A small video in which the information is presented in a slightly different way, in a different form and volume.
Video link
www.youtube.com/watch?v=4yWQOWIG1qw
Unfortunately, it was not possible to get what was intended, but, on the other hand, invaluable experience was gained in the design and manufacture of vacuum equipment. Most of this experience I have shared with you and I would be very grateful if you express your opinion on this issue.
Thank you all and good luck.
Helpful Tips for 3D Printing at Home
Perhaps you, like many others around the world, have had to quickly change from working in a workshop or office with many tools at hand to working at home with more resources. limited. During this difficult period, the ability to adapt to new circumstances and challenges helps to reduce production disruptions and avoid disruptions in the organization of the development cycle.
Formlabs desktop stereolithography (SLA) 3D printers are compact in size and can be used from home or outside the office environment. In addition, the ability to use over 30 different materials that mimic everything from silicone and polypropylene to ABS and more increases flexibility, expands the scope and makes it easy to adapt to new tasks as they arise.
Incorporating 3D printing technology in-house will help you cut costs and keep your feet on the ground during times of uncertainty, especially if you have previously used or currently use third party 3D printed models. Our customers are using home 3D printing to reduce costs, improve manufacturing process efficiency, continue developing critical products, and help overcome the COVID-19 crisis..
Dan Kirchgessner, Communications Specialist, and Jake Kapusta, Senior Maintenance Specialist, share practical tips for printing at home.
Before the 3D printer is delivered to your home, you need to organize your space and workspace so that you can print, post-process, and finish everything you need. You will need space to house the printer(s), post-processing stations such as Form Wash and Form Cure, workspace to separate and finish parts, and short-term storage space for items such as spare wash solvent, resin reservoirs, cartridges for resins, gloves, post-processing tools, etc.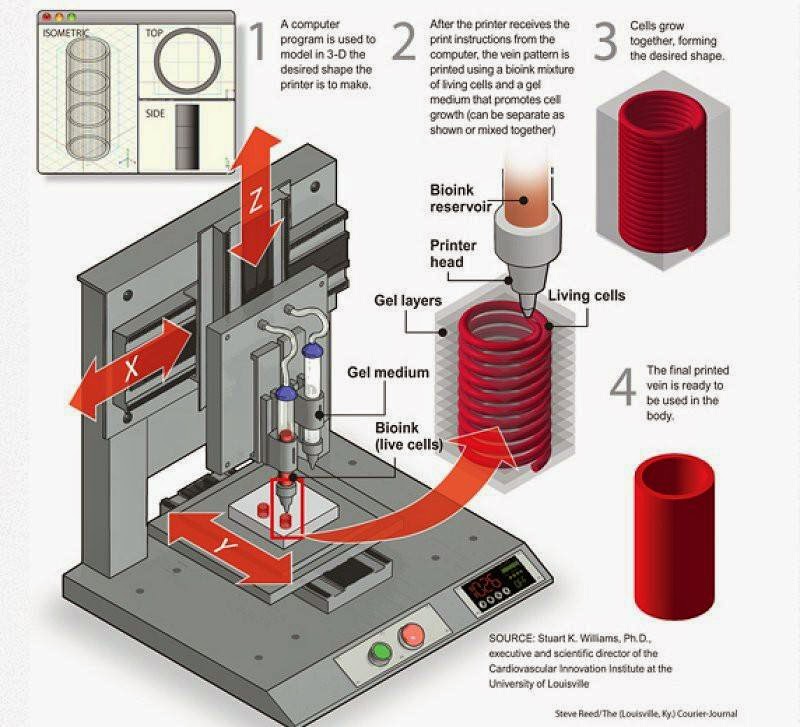
Alexis Hope, designer and researcher at MIT's Media Lab and MIT's Center for Social Interaction Tools, says that in setting up her home workshop, “getting the printer home was a great incentive to reorganize the workplace. Space is required for flushing and curing systems, as well as space for storing models, so proper organization of space is necessary for productive work. ”
Alexis Hope's home workshop.
Some of the most frequently asked questions about 3D printing at home have to do with environmental factors such as sounds and smells. To account for sensitivity to odors, we advise placing the post-processing station in a well-ventilated area or near an open window. Although the Form 3 is relatively quiet - it produces a noise comparable to that of a microwave oven - you may prefer to place it away from those areas of your home where you don't want to disturb the silence.
Woody Hedberg, Formlabs Print Process Engineer, recently hosted a Form 3L in his apartment for material testing purposes. “As a protective measure, I installed thick cardboard on the floor and walls of the room,” says Hedberg. In addition, for the workplace, he chose a space near an open window and behind a closed door to reduce the penetration of potential smells and sounds.
After preparing the workspace, lay out the items needed for 3D printing, such as rinsing containers, baskets and bottles, tweezers, spatula, detach tool, wire cutters, disposable nitrile gloves, and any additional tools that you may need during the work 3D printing process.
If you already have a 3D printer, the first thing you should consider is transporting it from your office or workplace to your home. When preparing your Formlabs 3D printer for shipping, first remove the resin cartridge, then remove and clean the platform, and finally remove the resin reservoir and close the lid before placing it in its storage case. Ensure that all accessories containing polymers are securely closed before transport.
Before shipping the Form 3 printer, secure the Light Processing Unit (LPU) with wing screws and latch. Failure to lock the LPU may damage the printer. Contact us if you can't find the screws.
Carefully wrap the printer in protective material and, if possible, place it in the original packaging. Be sure to pack all the accessories you may need for 3D printing and post-processing: Form Wash and Form Cure or post-processing kit and an alternative curing solution and consumables such as resin reservoirs and cartridges, gloves, tools for post-processing, isopropyl alcohol, etc.
After unpacking 3D printing consumables at home and before printing, be sure to check that the printer is level and stable in the new location.
Now that your printer is ready to use at home, there are several ways to improve and streamline your workflow.
Schedule the start and end times for printing to fit your work schedule. This way you can load the printer to the maximum. You can schedule the start of your next print using PreForm's Estimated Print Duration feature. Print time-consuming models while you're away from your workspace so you can print while you're away so you can start the next one when you get back.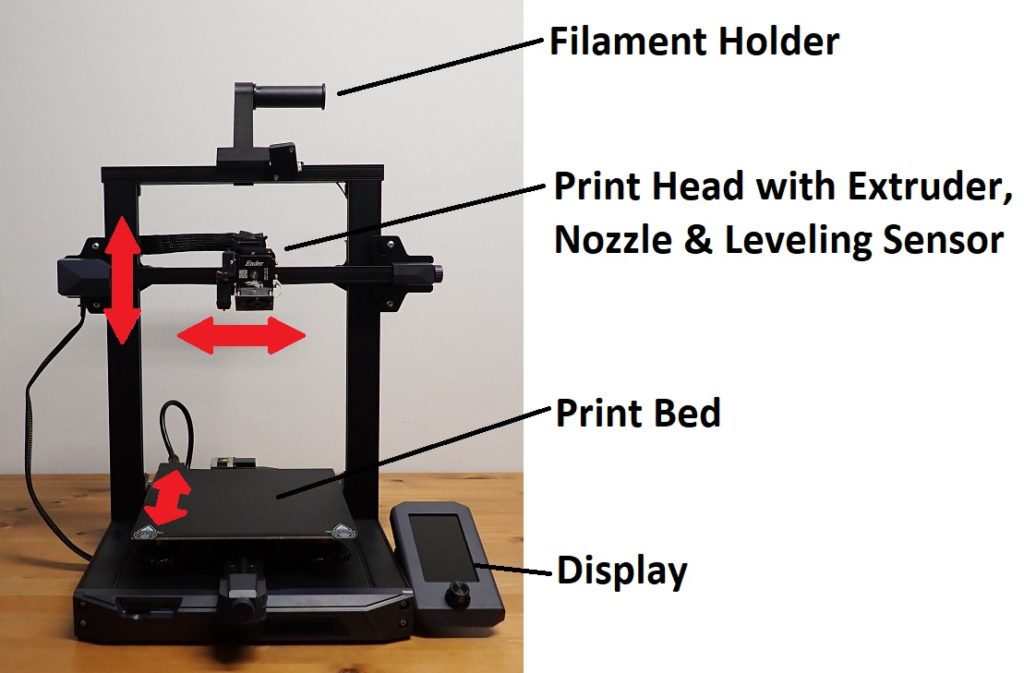
Kevin Gauthier, Business Development Specialist at Formlabs, found that when working remotely, his team sent models to each other more often: "Never forget to print an instance of an object for yourself so you can refer to it later."
Kevin Gauthier's home workspace.
Continuing the same line, Hedberg suggests documenting and photographing every 3D printed model in detail, especially if your storage space is limited. “Now that we are working remotely, we need a proper documentation system. This does not mean that every 3D printed model should be saved, but carefully documenting the printed models and keeping records for my colleagues, yes,” he says.
Use the Dashboard to monitor the printing process in real time, as well as tank usage and resin usage. You'll also be able to track quality prints and scrap rates so you know which designs are the best and use them for future iterations.
"Do all the design work you can and prioritize the critical tasks of making physical prototypes for different teams," says Zach Frew, Formlabs Technical Specialist. Frew says you need to prioritize these tasks, especially when work resources are limited, and share them with your team members.
Follow safety guidelines when using Formlabs products. Handle IPS with nitrile gloves in a well-ventilated area. Keep the IPS away from heat, sparks and open flames. Isopropyl alcohol evaporates quickly, so keep containers covered if possible. For detailed safety information, contact the manufacturer or supplier of this chemical.
As Formlabs Materials Expert Zak Zguris says, “You have to practice good chemical hygiene. Keep everything clean. Wipe up any drops or spilled liquids immediately. To avoid sticky residue, use acetone or isopropyl alcohol. When washing in the IRS, ventilation of the working space with fresh air should be provided. The cabinet is not at all suitable for the active use of a 3D printer or a washing station in an IRS.”
Always wear gloves to protect your skin when handling resin cartridges and containers. Store ink cartridges upright, out of direct sunlight, in a well-ventilated area.