Monoprice 3d printer iiip manual
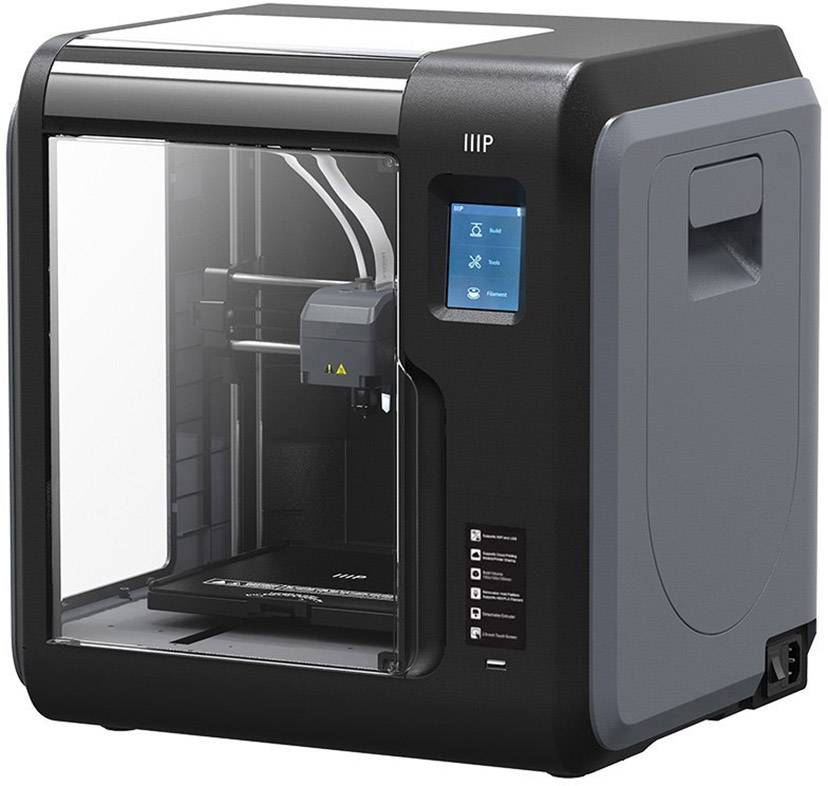
MONOPRICE 3D Printer User Guide
MONOPRICE 3D Printer User Guide
- Remove the Printer and Accessory Box from the packaging.
- Open the Accessory Box and verify that you have all the parts listed below:
1x Platform Sticker, 1x 1.5mm Hex Wrench, 1x 2.0mm Hex Wrench
1x 2.5mm Hex Wrench, 1x Phillips Screwdriver, 1x 8mm Wrench
1x M6 Brass Nozzle, 1x MicroSD™ Card, 1x MicroSD Card Reader
1x USB Cable, 1x AC Power Adapter, 1x AC Power Cord
1x Stick of Glue, 1x Package Sample Filament (200g), 1x Quick Start Guide - Remove the eggshell carton and plastic bag from the printer, then place the printer on a table or desk.
- Remove the cardboard block from inside the printer.
- Insert the Filament Guide Tube into the black Pneumatic Connector on top of the Extruder.
- Ensure that the power switch on the inline control on the AC Power Adapter is in the OFF position (O).
Plug the DC barrel connector on the AC Power Adapter into the Power Port on the right side of the printer. Plug the included AC Power Cord into the AC Power Adapter, then plug the other end into a nearby AC power outlet.
- Flip the power switch on the inline control to the ON position (I). After the printer finishes booting, you will see the following wizard. Depress the Knob on top of the printer to select Next on the Welcome Screen, then again to select Next on the STEP 1: LOAD FILAMENT Screen.
- Using a pair of scissors or side cutters, cut about an inch off the end of the filament, then gently straighten the end of the filament. Squeeze the lever on the Extruder, insert the filament into the bottom until you encounter resistance, then release the lever.
- Press the Knob to start loading filament.
 Once filament starts extruding from the Nozzle, press the Knob again to stop extrusion. Clean the extruded filament, then press the Knob to select the Continue option.
 - Remove the included microSD™ card from the Accessory Box, then insert it into the microSD card slot to the left of the LCD Screen. Press the Knob to select Next on the wizard.
- Press the Knob to select Print From SD. Rotate the Knob to highlight a .gcode file on the microSD card, then press the Knob to begin printing the highlighted model.
- Once the print is finished, remove the Magnetic Print Bed from the metal print platform, then bend it to remove the model. Replace the Magnetic Print Bed on the metal print platform.
Use the QR code at the right to download the manual or go to the website to download it from the product page (40108).
Documents / Resources
| MONOPRICE 3D Printer [pdf] User Guide 3D Printer, PN 40108 | |
| MONOPRICE 3D Printer [pdf] Instructions MONOPRICE, 3D Printer |
MONOPRICE MAKER SELECT PLUS IIIP USER MANUAL Pdf Download
Table Of Contents
2-
page of 38
- Contents
- Table of Contents
- Troubleshooting
- Bookmarks
Advertisement
Table of Contents
Table of Contents
Previous Page
Next Page
Table of Contents
Related Manuals for Monoprice Maker Select Plus IIIP
- 3D Printers Monoprice Select Mini Pro User Manual
(24 pages)
- 3D Printers Monoprice MP Cadet User Manual
(39 pages)
- 3D Printers Monoprice Mini Delta V2 User Manual
(58 pages)
- 3D Printers Monoprice 33820 User Manual
Mp voxel 3d printer (42 pages)
- 3D Printers Monoprice 30526 User Manual
Mp education invertor 3d printer (67 pages)
- 3D Printers Monoprice 15710 User Manual
Maker select pro ultimate 3d printer (28 pages)
- 3D Printers Monoprice MP10 User Manual
(24 pages)
- 3D Printers Monoprice Maker Ultimate 2 User Manual
(43 pages)
- 3D Printers Monoprice extrusion i3 13860 User Manual
(50 pages)
- 3D Printers Monoprice MP Delta Pro User Manual
(21 pages)
- 3D Printers Monoprice maker architect 13861 User Manual
(32 pages)
- 3D Printers Monoprice 35435 User Manual
Mp mini sla lcd high resolution resin 3d printer (28 pages)
- 3D Printers Monoprice MP Mibi Delta User Manual
(22 pages)
- 3D Printers Monoprice Delta Pro User Manual
(16 pages)
Summary of Contents for Monoprice Maker Select Plus IIIP
This manual is also suitable for:
157112187124165
MONOPRICE 3D Printer User Manual - Manuals +
MONOPRICE 3D Printer User Manual
- Remove Printer and Accessory Box from the packaging.

- Open Accessory Box and make sure you have all the parts listed below:
1x platform sticker, 1x 1.5mm hex wrench, 1x 2.0mm hex wrench
1x 2.5mm hex wrench, 1x Phillips screwdriver, 1x wrench 8 mm
1x M6 Brass Nozzle, 1x MicroSD™ Card, 1x MicroSD Card Reader
1x USB Cable, 1x AC Power Adapter, 1x AC Power Cord
1x Adhesive Stick, 1x Sample Filament Pack (200g), 1x Quick Start Guide
- Remove the eggshell carton and plastic bag from the printer, then place the printer on a table or table.
- Remove the carton from inside the printer.
- Insert Thread guide tube in black Pneumatic connector on top of Extruder.
- Verify that the power switch on the built-in control AC adapter is in OFF position (O). Connect the DC plug to the AC adapter to the power port on the right side of the printer.
 Plug the included Power Supply Cord into AC Power Adapter, then plug the other end into the nearest AC outlet.
- Set the power switch on the built-in control to ON position (I). Once the printer download is complete, you will see the following wizard. Suppress Knob at the top of the printer to select Next to Welcome screen, then select again Next to STEP 1. FILament LOADING screen.
- Using scissors or side cutters, cut off approximately 10 cm from the end of the thread, then gently straighten the end of the thread. Push lever on Extruder, insert the filament into the bottom until resistance is felt, then release the lever.
- Press Knob to start loading filament. As soon as the filament starts to extrude from the Nozzle, press the Knob again to stop the extrusion.
 Clean extruded filament, then press Knob to select Continue option.
- Remove included microSD™ card from Accessory box, then insert it into the microSD card slot on the left of the LCD screen. Press Knob to select Next on the master.
- Press Knob to select Print from SD. Turn Knob to highlight the .gcode file on the microSD card, then press Knob to start printing the highlighted model.
- After printing is completed, remove Magnetic seal Build a metal printing platform, then bend it to remove the model. Replace Bed with magnetic print on a metal print platform.
Use the QR code on the right to download the manual, or go to the website to download it from the product page (40108).
1 Documents / Resources
1. 1 Related Guides / Resources
Documents / Resources
Posted in MonopriceTags: 3D Printer, Monoprice, PN 40108Monoprice Select Mini 9 Budget 3D Printer Review0001
3DPrintStory Reviews Overview of the budget 3D printer Monoprice Select Mini
Prices for desktop 3D printers continue to fall. There were times when a $600 3D printer was a delight and a desire to order it as soon as possible, but technology does not stand still, and developers and manufacturers are looking for new options to lower the price even lower. This review is dedicated to one of the budget 3D printers costing about $200 - Monoprice Select Mini.
It is worth noting that this inexpensive model breaks established traditions and did not start with Kickstarter, unlike others like M3D Micro, Tiko, OLO / ONO and Trinus, which attracted the attention of consumers and investors thanks to crowdfunding platforms (by the way, this is really an effective development strategy for small startups, but there is often a mismatch between expectations and the final product).
Monoprice is different. This is an American company that did not particularly bother with the development and production of its own 3D printer, but simply imported the Malyan M200 from China, hung its logo on it and put an attractive price of $199. What if you got a defective 3D printer? No problem, send it back and they will replace it for you.
A reasonable question arises: can such a cheap 3D printer compete with Ultimakers or Printrbots? And is it even worth comparing? We will try to answer these and other questions in the review below.
Features Monoprice Select Mini
- Available;
- Robust design;
- Easy to use;
- Predictable 3D printing at low speed;
- Works with any slicing software and standard 3D printing materials;
- Upgradable and upgradeable;
- I think we already mentioned the price?
Disadvantages Monoprice Select Mini
- Difficult to calibrate;
- Prints poorly at high speeds;
- Print table not protected;
- Faulty power supply;
- WiFi module is not active;
- Unstable nozzle temperature;
- Strange oddities.
 ..
..
Short Verdict
The Monoprice Select Mini is a great 3D printer for the price. There is a heated table, easy to operate if you do not use high speeds, stable 3D printing quality.
Naturally, there are disadvantages. During operation, the temperature of the nozzle may change, and at high speeds, 3D printing errors occur. The calibration process takes a lot of time and the first time you have to tinker. Well, the most interesting thing is that the power supply burned out after 12 hours. But the latter, incorrect, can be attributed to an accidental marriage.
Despite all the shortcomings, the Monoprice Select Mini is a wonderful little 3D printer with many great features. In general, it performs in accordance with the information in the technical specifications, and the quality of the 3D printing even exceeded our expectations.
If you are not afraid to take it apart / put it back together, then you can do a few upgrades. The first thing to do is to replace the hotend and update the firmware to activate the WiFi module ( be careful! These upgrades have not been tested as part of this review and may damage your 3D printer! ). You can install the glass on the print table. Even with these upgrades, the price will still remain acceptable.
Would you recommend the Monoprice Select Mini as your first 3D printer? Yes, definitely.
Specifications and features Monoprice Select Mini
Monoprice Select Mini workspace 120 x 120 x 120 mm. The maximum resolution of 3D printing is 100 microns. Heated table. The 3D printing speed is 55 mm/s.
You can upload your 3D model via micro SD card or USB. The manual states that compatible slicing programs are Cura, Repetier-Host, ReplicatorG, and Simplify3D. This means that the Monoprice Select Mini recognizes the standard G-code, and this 3D printer is not tied to any particular software. Cura was used during testing for this review.
Monoprice Select Mini doesn't limit you in the media you use. You can print with any standard 1.75 filament using PLA or ABS thermoplastics. In our case, PLA plastic from ColorFabb was used.
These two points - the freedom to choose software and filament - are very important in this price range, because manufacturers such as M3D Micro and XYZprinting, which are Monoprice's main competitors in this niche, tend to use proprietary software and their own materials for 3D printing .
Unpacking and installation of Monoprice Select Mini
Installation of Monoprice Select Mini is quite simple. You can start typing within 20 minutes.
Inside the box you will find a 3D printer, a power supply, an imbus wrench for calibrating the table, a plastic spatula to scrape off the rest of the material from the table after printing, a 256 MB micro SD card and a micro USB cable.
One piece of paper contains basic instructions and a link to a website where you can download the full version.
You will also find a rectangular steel sheet, the purpose of which is not clear at first. It turns out that this is a coil holder that is attached to the side of the main unit.
It is important to note that the Monoprice Select Mini kit does not include media test samples. So stock up on filament with a diameter of 1.75 mm.
You can use the wheel to adjust. The menu is well structured and easy to understand. You can start the calibration process, preheat the extruder and feed the filament.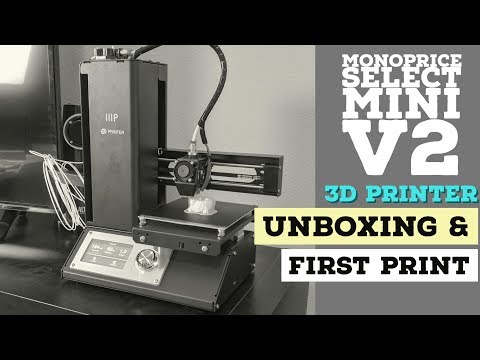
Calibration can be somewhat difficult. In theory, it should be carried out even before shipment, in production, and you should have a piece of paper between the nozzle and the printing table. If it doesn’t work, then hex keys will come in handy here. It will be necessary to try and tighten the screws at the corners of the table so that the sheet still passes.
At this stage, the first important shortcoming of this model becomes clear. The printing table is made of aluminum and does not have a special protective film or coating on it. So stock up on blue 3D printing tape or install glass right away. Otherwise, the table will wear out very quickly and you will have to change it.
Well, one more bug that got out in our particular case. The power supply burned out after 12 hours of use. Foaming it was not difficult, but it was very unpleasant. You can probably throw it off for marriage, but in any case, be prepared for a similar turn of events.
Design and build quality of the Monoprice Select Mini
Very pleased with the build quality of the Monoprice Select Mini. The construction is strong, reliable, with a steel sheet metal case that hides all the electronics. So don't worry about shipping damage.
This 3D printer uses deposition modeling technology. The classical Cartesian coordinate system is used. The design is similar to Printrbot Simple. One cooler is used to cool the nozzle. It is likely that problems may arise during 3D printing with unusual materials.
The extruder has a diameter of 0.4 mm and can be heated up to 230°C. We have not been able to test how easy it is to change, but in the long run this is an important factor as the nozzle will still need to be changed over time.
Print Quality Monoprice Select Mini
Pre-loaded models will already be on the micro SD card. They are supposed to be optimized for 3D printing on the Monoprice Select Mini. So before uploading our own models, we printed test ones.
The cat was printed first. The resolution was 200 microns. Everything went well until the last layers. The upper part of the paw and ears could not be printed even once. There were 3 attempts in total.
G-code analysis in Simlify3D shows that the table accelerates up to 55mm/s during the last layers. That is why the error was repeated. Quite a strange decision of the company - to provide a test model, which a priori will be printed with errors...
The second model that we printed is a test elephant. The resolution was also 200 microns and 10% infill. There were no problems! The result is excellent and you can see it in the photo below.
Next we moved on to our own models. We used Cura for slicing. This article reveals the excellent Cura settings for 3D printing on the Monoprice Select Mini and we used them.
We printed a classic 3DBenchy and Graphica model: a MEGA Ghost with 200 micron resolution and 10% infill, a V29 whistle with 200 micron resolution and 100% infill, and another 3DBenchy model with 100 micron resolution and 10% infill.
The simple 200 micron models worked well. There are no special problems with small protrusions and holes, although there are sagging. The layers are laid evenly along the X and Y axes.
The V29 whistle sounds as loud as intended, which means that the partitions were printed correctly. The Graphica Mega Ghost with its long tongue also printed correctly. The hinge glided smoothly. The
3DBenchy at 100 microns worked well too. When you look at the photo, don't forget that this is a $19 3D printer.9.
We have noticed that most errors in 3D printing occur when the spool of filament clings or there is not enough adhesive coating on the printing table. This cannot be attributed to the shortcomings of the Monoprice Select Mini itself, since this is a global problem for all FFF printers.
During operation, the print table may block access to the control wheel. This point is implemented in the design is not very ergonomic.
Another disadvantage is that the nozzle temperature has an error in the region of 5°C. For example, when the 3D printing temperature is set to 215°C, it jumps between 213°C and 217°C on the control panel.
This does not particularly affect printing with PLA plastics, but may have a negative effect during 3D printing with materials that are more sensitive to temperature changes.
Finally, we printed a Low Poly Moai bust. We scaled the model by 50% and printed with 100 micron settings and 30% infill. It turned out well on the whole, the only small marriage is the influx of material on the chin. By the way, we observed the same effect when printing 3DBenchy with resolution settings of 100 microns.
Life hacks and upgrades Monoprice Select Mini
A few words about upgrading the Monoprice Select Mini 3D printer. There are no official upgrades! But here are a few options that you can try to implement on your own.
In our opinion, it is necessary to deal with the temperature of the extruder, make it more stable. For example, you can implement a PID temperature controller.