Jetting 3d printer
What are the Material Jetting 3D Printers on the Market?
Published on April 29, 2021 by Amelia H.
Material Jetting is one of the seven families of additive manufacturing processes. As the name suggests, it consists of depositing material on a printing tray, layer by layer, much like a 2D printer that drops ink on paper. Here, the print head actually projects many fairly large drops of ink, usually composed of photopolymers which are then hardened by UV light. But the process can also use metal, ceramics and even wax, dividing material jetting into three subgroups: Material Jetting, better known as the patented technology PolyJet; NanoParticle Jetting (NPJ) and Drop on Demand (DOD). Regardless of the process used, the user usually obtains high-precision, highly detailed parts with the possibility of printing in colour and with several materials. To help you make your choice, we have selected a few 3D printers per technology, classified by sub-group.
Material Jetting
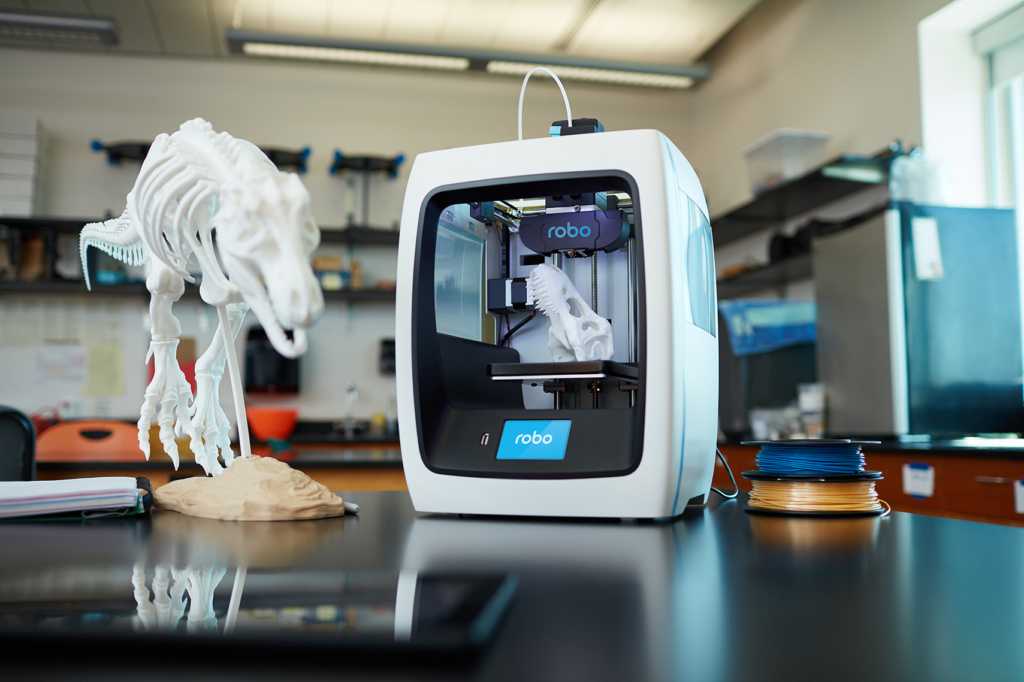
Stratasys – J750 Digital Anatomy
Stratasys is the leading player in 3D material jet printing, having merged in 2012 with Objet Ltd. the company that patented the process. Its process has been called PolyJet and makes it possible to create multi-material, multi-color and even transparent parts. Stratasys today offers a wide range of PolyJet 3D printers but we will focus on the J750 Digital Anatomy, mainly designed for the medical sector. It offers a volume of 490 x 390 x 200 mm but above all can recreate very precisely the behavior of human tissues on anatomical models, allowing health professionals to have a real feeling and to train better.
Mimaki 3DUJ-553 Printer
In 2017, the Japanese manufacturer Mimaki, which has historically specialized in 2D printing, unveiled the 3DUJ-553 industrial 3D printer. With a print volume of 508 x 508 x 305 mm, the 3D printer is based on a UV LED process. In this process a light hardens the different layers applied successively. The machine deposits ink droplets coloured, white or black, on the printing tray until the final piece is obtained. A considerable advantage for professionals, especially since the 3DUJ-553 would offer 10 million colors to its users. In addition, it is also possible to add transparency with translucent ink. Thanks to its simulation software, it is possible to have a very precise overview of the shape and colors of the part before printing. Also, the printer has a surveillance camera, allowing users to follow the printing process remotely. Finally, the machine uses a support structure that can be dissolved in water. This makes it possible to obtain accurate and neat models, without damaging them.
NanoParticle Jetting
XJet Carmel 1400MThe XJET Carmel line of AM systems relies on the company’s patented inkjet technology, NanoParticle Jetting (NPJ). NanoParticle Jetting is a material jetting technology that builds parts by jetting a liquid containing nanoparticles of either metal or ceramic material in suspension. XJET offers both metal and ceramic systems. Its metal NPJ systems come in two sizes. The smaller possesses a build plate of 700cm2, XJet Carmel 700M. While the larger, at 1’400cm2, called XJET Carmel 1400M, is equipped with one of the largest build trays the industry has to offer. XJET Carmel 1400M, delivers impressive quality, accuracy, and reliability, as well as high levels of productivity. Both sizes are compatible with software including Autodesk and Netfabb. The XJET Carmel 1400M is also compatible with a mobile app.
Like its metal systems, XJET’s Ceramic AM systems also come in two sizes, one with a build plate of 700cm2, called XJet Carmel 700C, the other with a build plate 1’400cm2, called XJet Carmel 1400C. Again, both sizes are compatible with software including Autodesk and Netfabb, and only the larger printer is compatible with the mobile app. Like XJET Carmel 1400M, XJet Carmel 1400C possesses a maximum build height of 200mm. Thanks to its NanoParticle Jetting Technology, XJet’s Ceramic systems deliver parts of the utmost quality, with impressive levels of detail, finish and accuracy. Which, as with XJet’s Metal systems, is accompanied by uncompromised throughput and build time.
Drop On Demand
Solidscape – S390
Belonging to the Prodways group, Solidscape has developed a range of 3D DOD printers dedicated to the jewellery sector, including the S390. Thanks to its two printing heads, the machine allows to deposit wax and a soluble support material in order to design very precise moulds, whether for injection, for lost wax moulding, etc. It offers a printing volume of 52 x 152 x 101 mm and a wide choice of compatible materials. The S390 automatically generates print media to protect the most fragile parts of the model. These dissolve completely, leaving durable wax models ready to be molded.
DragonFly LDM®
The DragonFly LDM® Lights-Out Digital Manufacturing system is unique in that it is the industry’s only comprehensive additive manufacturing platform for around-the-clock 3D printing of electronic circuitry.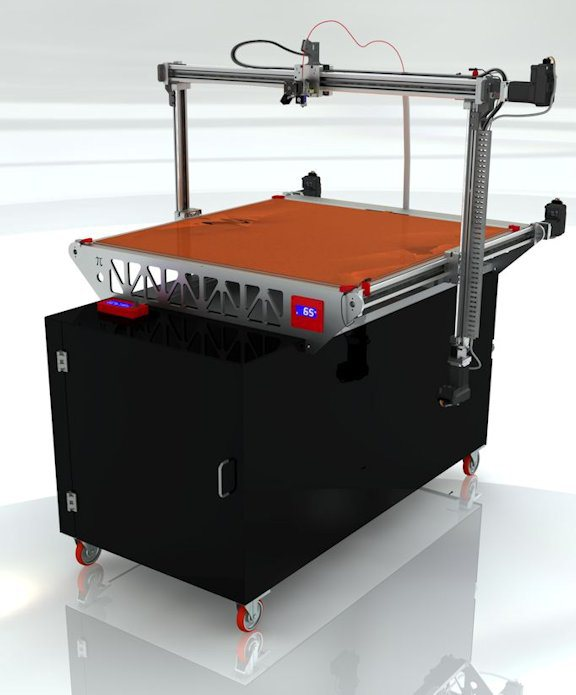 Equipped with Nano Dimension’s state-of-the art, LDM technology. This allows for unattended operation as the printer maintains itself, with typically just one weekly maintenance operation needed thanks to improvements like a new advanced printer head, software management algorithms and automatic self-cleaning of the print heads every few hours. Approximately the size of two refrigerators, DragonFly is extremely large with machine dimensions of 1400mm x 800 mm x 1800mm (~4’7” x 2’7.5” x 5’11”) and a build volume of 160mm x 160mm x 3mm (6.5” x 6.5” x 0.125”). It is a precise inkjet deposition printer with dedicated nano-inks, equipped with two printheads: one for nano-Silver conducive ink and the other for dielectric polymer ink. The DragonFly is able to concurrently print using simultaneous multi-material additive manufacturing. Minimum trace layer thickness is at 17 microns, the minimum Dielectric layer thickness is 35 microns and technical accuracy is .01mm or 1 micron, with Nano Dimension claiming that the system is setting new precision standards for 3D printed electronics.
 The DragonFly LDM® can be used in a variety of industries including aerospace, defense, automotive, medical and electronics, among others.
Other Material Jetting Technologies
XYZPrinting da Vinci Color
The combination of FFF and inkjet technology makes the da Vinci Color from the Chinese manufacturer XYZprinting a unique 3D printer. The inkjet technology uses CMYK cartridges, which allows millions of colour combinations to be printed by absorbing individual ink droplets. This means that the parts can be printed with the da Vinci Color in any color, which is why it is very suitable, for example, for the implementation of creative projects. The machine is compatible with various (special) PLA and PETG filaments and also prints the XYZ carbon fiber material with a special extruder. The maximum pressure range is 200 x 200 x 150 mm and a plane resolution of 100 – 400 micrometers can be achieved. The printing speed is 30 to 60 mm per second. The da Vinci Color also has an integrated touch screen and removable printing plate and can be wirelessly connected to the home network.
HP Multi Jet Fusion Technology
The famous HP 3D printer manufacturer offers HP Multi Jet Fusion (MJF) technology. Similar to the Binder Jetting process, the MJF process also deposits a binder on the powder. However, unlike the technique of binder projection printing, a second liquid agent is deposited to refine details and surfaces. Then the material is heated to make the different elements react together and create the final part. In 2018, the American company launched the HP Jet Fusion 300/500 range of machines, based on the same technology, but which allows to print functional parts in black or white. It includes HP Jet Fusion 340, 540, 380 and 580 3D printers.
ProJet CJP 860Pro from 3D Systems: (Colour Jet)
On a comprehensive list of 3D printers, we have of course not forgotten 3D printer manufacturing giant 3D Systems. That’s why the next machine is the ProJet CJP 860Pro color printer, which can create a realistic color experience thanks to its five print heads. What makes this 3D printer special is its ColorJet Printing (CJP) technology, which allows for parts that are up to 7 times cheaper than other technologies and, can eliminate waste through efficient use of materials. It also eliminates the need for supports, which significantly reduces post-processing time. The ProJet CJP 860Pro can also impress with its 5 to 10 times faster printing speed, saving additional time, allowing large format models to be built in just a few hours. As you can see, the press is an all-rounder: while it saves time and money, it delivers incredible color choice, a large build space capacity of 508 x 381 x 229 mm, and a sustainable factor.
What do you think about these material jetting 3D printers? Let us know in a comment below or on our Facebook, Twitter and LinkedIn pages! Sign up for our free weekly Newsletter here, the latest 3D printing news straight to your inbox!
The Complete Guide to Material Jetting (PolyJet) in 3D Printing
Published on July 25, 2019 by Alexandrea P.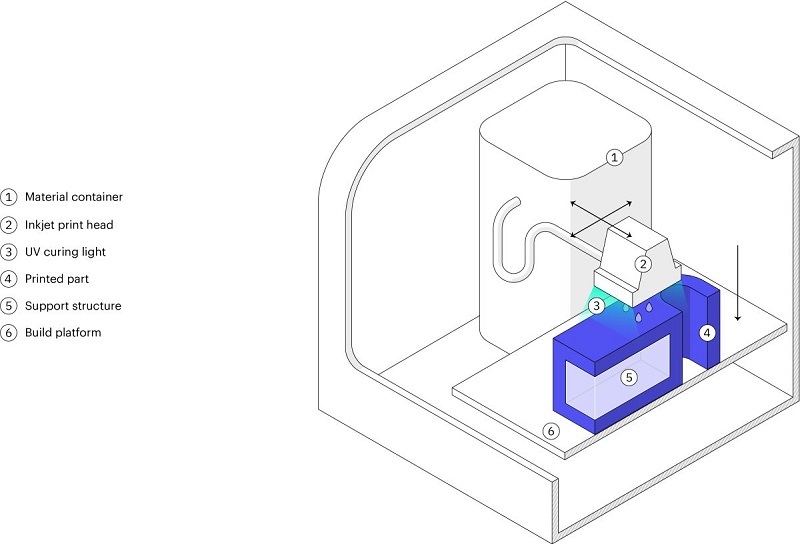
3D printing continues at a frantic pace, but the processes behind this technology are still unclear to some. After our articles on Selective Laser Sintering (SLS) and Fused Deposition Modeling (FDM) technologies, we now present Material Jetting. This process is known for enabling the creation of objects that combine several materials and colours. So how does it work exactly?
Material Jetting patented by Objet Ltd. in 1999 under the name of PolyJet (which merged with Stratasys in 2012), combines Inkjet technology and the use of photopolymers. Inkjet technology is used by conventional 2D printers on paper while photopolymers are materials that harden when exposed to ultraviolet rays. This technology has many benefits, including excellent resolution (up to 0.016 mm), smooth surfaces (no staircase effect unlike objects printed using FDM technology) and a wide choice of materials and colours for a relatively low cost and printing time.
How does Material Jetting 3D printing work?
Like any 3D printing technique, the process begins with the creation of the desired object using CAD software; it is then cut into several digital images, each corresponding to a layer of the object, via slicing software, also called the slicer. The STL file is then sent to the 3D printer for printing.
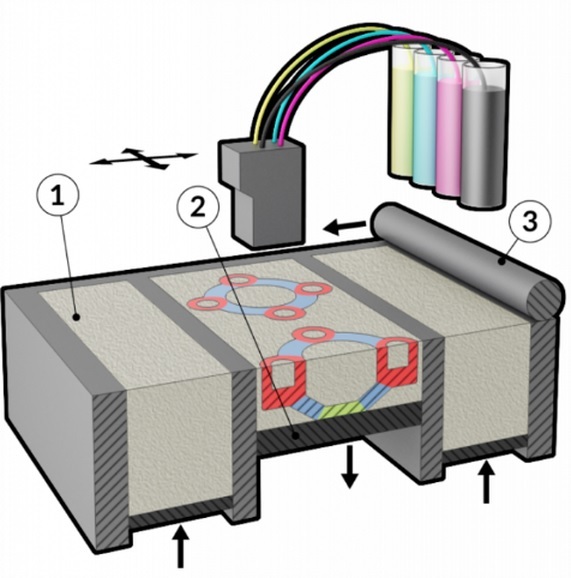
Once the process starts, the liquid resin is heated to 30-60°C to obtain the appropriate viscosity for printing. The print head, very similar to that of an inkjet printer, then projects hundreds of micro-droplets of ultraviolet light-sensitive photopolymer resin. This is integrated into the print head and hardens the material to form the first layer. Like the stereolithography (SLA) process, this technology is based on the principle of photopolymerization. Multi-material and polychrome printing is possible because the printhead holder has many nozzles capable of simultaneously “spraying” various materials as well as a soluble carrier material for example.
The Material Jetting process | Image Credits: 3D Hubs
The advantages and disadvantages of Material Jetting technology
The main advantage of Material Jetting technology is its ability to print multi-material and multi-colour parts. Thanks to its multiple print heads, each material can be stored in a separate head, allowing different materials and colours to be processed.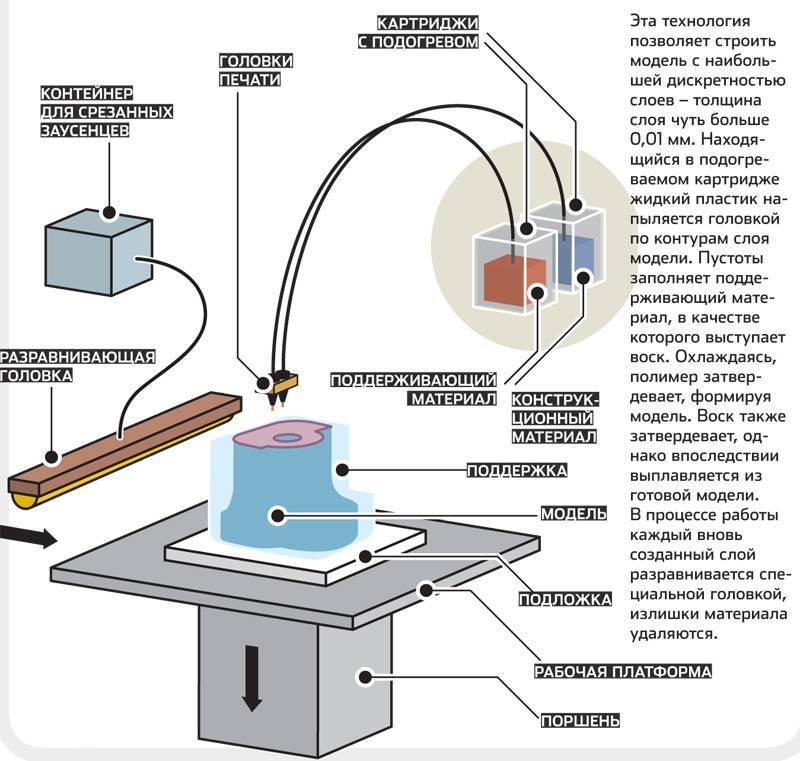 The composite material obtained is called Digital Material and is suitable for creating detailed prototypes that are close to the final model (temperature resistance, biocompatibility, stiff or flexible, etc.).
Limitations include a smaller build volume – it is not possible (yet) to manufacture large-format parts. In addition, as with most other technologies, the process requires printing media and a post-processing step. During this step, the supports and resin residues must be removed with a special solution and the part must be completely cured in a UV chamber. It should be noted, like all pieces made from photopolymers, they are sensitive to light, which can change their properties over time.
Application areas for Material Jetting 3D printing
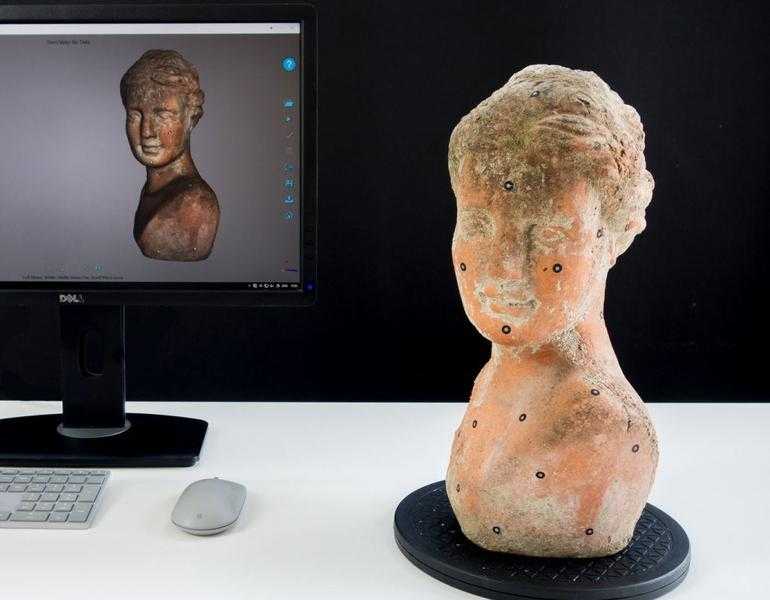
As explained above, the main application area for Material Jetting 3D printing is the production of detailed and functional prototypes. It allows to see, touch and feel visual models in a similar way to a finished final part.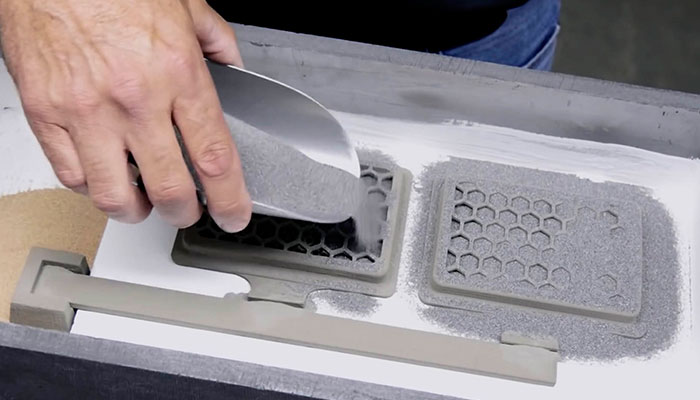 This method is of particular interest to the medical sector because it allows the creation of anatomical models to scale, in different colours, faithful to the human body. In this way, the doctor can explain a disease to a patient in a concrete way and surgeons can train for surgery in advance. This 3D printing technology is also used in artistic or jewelry fields.
The main market players
As previously mentioned, Stratasys is the pioneer of this technology and markets various machines using Material Jetting technology, that they call PolyJet. Perhaps the best known are the J750 and J350, both of which are compatible with Pantone colours and can print prototypes in more than 500,000 colours, textures, gradients, transparencies and material hardness. 3D Systems also offers a range of Material Jetting 3D printers, a technology they have named MultiJet, such as the ProJet MJP 5600, which is not as colourful as Stratasys, but can also be used to manufacture different prototypes, with elastic or hard materials.
Another company that uses the basic principle of material projection technology is the Israeli company XJet. However, they have developed a method of spraying nanoparticles, i.e. they do not print with plastic droplets, but with liquid droplets loaded with ceramic or metal nanoparticles.
Illustration of the technology developed by XJet
Was this guide useful? You can leave a comment in the section below or on our Facebook and Twitter pages! Sign up for our free weekly Newsletter, all the latest news in 3D printing straight to your inbox!
3D Inkjet Printing (3DP) – 3dprofy
Turch October 21st, 2014
3DP stands for Three-Dimensional Printing , and translates as three-dimensional printing. This technology is one of the varieties of systems for the additive construction of a product according to its CAD model and differs from numerous similar schemes in that the process is carried out according to the principle of a conventional printer - through print head nozzles. Thus, 3D inkjet printing is a natural continuation of the development of conventional 2D printing technologies. To date, it has achieved fairly good results, such as color printing.
Products printed on the Z Corp's Spectrum Z510 color 3D printer
The history of the emergence and development of 3DP
For the first time, the idea of \u200b\u200brealizing equipment using this printing scheme was proposed by two students at the Massachusetts Institute of Technology Tim Anderson and Jim Bredt in 1993. It is thanks to them that the term 3D printing has spread around the world. And this is quite fair, because the first model of the device was a modification of a conventional 2D printer. Instead of ink, he used a special adhesive composition, which applied layer by layer to the surface of the bonded substance, the boundaries of the future three-dimensional product.
In 1995, Tim and Jim formed the Z Corporation, which brought this technology to market, improving it to such an extent that in 2012 3D systems Corporation wished to acquire it along with the company. Under her brand, former Z Corporation models are now sold worldwide.
One of the directions of the ExOne company (USA) is the production of 3D printers that use the same technology. This firm was founded in 2005 as a subsidiary of the Extrude Hone Corporation. Using the patents obtained by Anderson and Bedt, they launched a line of printers that even print metal products today.
3D inkjet printing technology
Today there are more than thirty 3D printing technologies, which in one way or another duplicate each other, although each has its own characteristics. The American Society for Testing and Materials (ASTM International) has divided 3D inkjet printing technologies into two categories:
- Material jetting - material jetting.
- Binder jetting Binder jetting.
In the first case, the building material itself is fed directly through the nozzles, which hardens after application. In the second, an adhesive is sprayed onto a thin layer of gypsum, polymer or metal powder.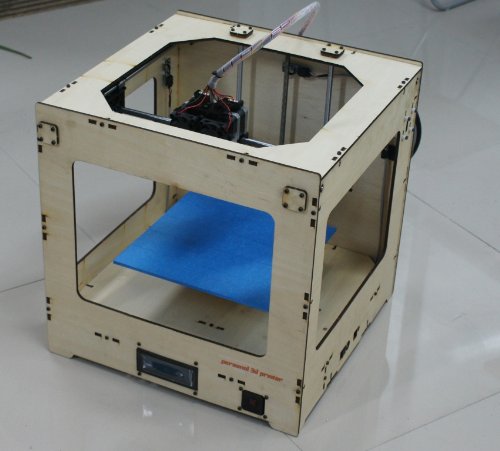 3DP technology in its original form represented exactly the second method.
If we consider it in more detail, then printing occurs in the following way:0003
- To begin with, a CAD model is loaded into a computer connected via an Ethernet cable to the printer, which is “cut” into layers, about 0.1 mm thick.
- Next, a thin layer of powdered material (gypsum, polymers, sand, metal) is applied with a roller on a special platform.
- The print head sprays the binder (glue, water, special mixture) along the coordinates of the boundaries of the first layer received from the computer.
- After that, the platform with the model is lowered by the thickness of the layer down, and the chamber with the building material is lowered by the same distance.
- Next, the roller unrolls the next layer and the process repeats.
- After the end of 3D printing, the product is removed from the powder layer and thoroughly cleaned of its residues.
When making models from metal powder, a firing process in a special furnace is added. Let's take a closer look at this process.
The figure above shows 4 stages of his stage:
- First, according to the above scheme, the so-called "green model" is formed from the matrix powder and binder (1,2).
- Next, the article is placed in an oven filled with a protective gas, usually nitrogen.
- When the temperature rises to 1000-1100 degrees, the binder is removed, and the free space around the powder particles is impregnated with bronze (or other metal) previously placed next to the "green" model. This process is called infiltration.
Materials used for 3DP printing and their cost
Gypsum has traditionally been used in 3D printing, and water played the role of a binder in this case. However, technology has stepped forward and, as is clear from the previous section, metals (bronze, copper), sand and polymer mixtures are now also used. Dyes are mixed into the binder, which makes it possible to carry out color printing on such a 3D printer.
The cost of the simplest powders is on average 600-700 euros for a 10 kg bucket (8200 cm3), the price of the binder is about 660 euros for 3.8 liters.
Characteristics of finished products and their application
Models made of gypsum and polymers are not too strong to be used in the production cycle as a mold, however, they are quite suitable for rapid visualization of prototypes of various parts and products . It can also be used in various architectural and design works or in the manufacture of souvenirs.
Products using metals have better properties, however, their strength is still at an average level: tensile strength 610 MPa, hardness HRC = 10-20.
Such characteristics are quite suitable for the manufacture of plastic injection molds, which can withstand from 200 to 500 thousand production cycles. They are also used to make parts that work under friction conditions - shafts, bushings, gears, etc.
Disadvantages
- Gypsum-based products are quite fragile and can only be used in a narrow field of activity.
 As a mold, it can only be used once, after which it is destroyed.
 - When working with gypsum powders, a lot of dust is generated, so a good extraction is necessary.
Advantages
- High speed of building parts - about 6 mm in height per hour, with a working area of 780 x 400 mm it will be 1780 cm3, which is an order of magnitude superior to laser rapid prototyping technologies.
- Relatively low cost of consumables.
ExOne offers the following 3D printer models:
M-Flex printer model from ExOne.
Results
Printers using inkjet 3D printing technology is one of the possible solutions to implement the problem of rapid prototyping. It should be noted that despite some shortcomings, it still found a place in the market today and continues to develop actively along with many of its competitors.
DIY 3D printer from inkjet printer
How to assemble a 3D printer from parts from an inkjet printer?
3D printer is a high-tech and expensive machine. If you buy a cheap device, you may encounter poor-quality assembly, fragile components and a short uptime. Having in stock unnecessary, decommissioned, failed inkjet printers and scanners, you can assemble a printing device from their parts to create three-dimensional models.
DIY inkjet 3D printer
If the main factor in choosing a device for printing 3D objects is the cost of the device, it is worth assembling a 3D printer yourself. According to user reviews, cheap models of 3D printed devices made in China have the main drawback - the low quality of components. In particular, guides are the weak point of Chinese devices. These elements are subjected to significant stress, and if they are of poor quality, they can be deformed under the action of tension belts.
Important! In older document printers, the rails are made of hardened steel. They do not bend even with considerable effort. Such details will be an ideal alternative to regular Chinese ones.

By dismantling unnecessary office devices, you can get a set of spare parts necessary for assembling a 3D printer and save a lot on the purchase of components. These are:
- printer head slide assembly;
- timing belts;
- mechanical or optical limit switches;
- power supply;
- stepper motors and drivers with controllers and other parts.
Attention! Inexpensive inkjet printers were mostly equipped not with stepper motors, but with DC motors with an encoder. Theoretically, they can be used in the assembly of a 3D apparatus by redesigning the latter. Stepper motors are usually extracted from scanners.
But the advantage of DC-motors should be noted: they consume electricity only during movement, while stepper motors are constantly supplied with power.
Accessories such as hot end, extruder and control board will have to be purchased. The frame is assembled from improvised materials - plywood, steel corners or parts of the cases of disassembled copiers.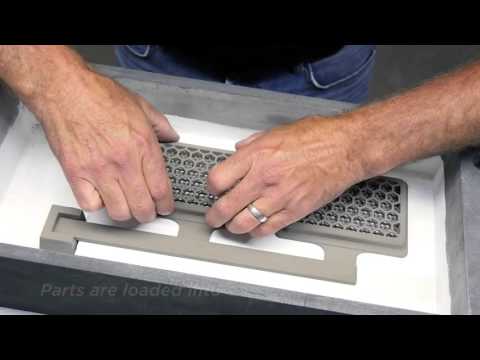
A self-assembled printer will be much cheaper than factory counterparts, but at the same time, it will be of higher quality than budget models presented on the market by Chinese manufacturers.
How to make a 3D printer from an inkjet printer: step-by-step instructions
To work on assembling a printer from donor components, you will need a set of tools and materials:
- hacksaw, drill - to make the case;
- soldering iron and solder - for mounting electrical cables;
- screwdrivers and hex set - for assembling components;
- pliers;
- multimeter tester - for checking the electrical circuit;
- screws and nuts;
- cable ties;
- electrical tape.
Attention! Knowledge of electronics and engineering is a plus.
Accessories:
- steel rails;
- timing belts;
- micro stepper motors;
- stepper motor drivers;
- extruder and hotend;
- optical sensors - limit switches-microswitches;
- power supply;
- connecting cables;
- electronic control board and microcontroller based on Arduino;
- LCD display;
- desktop glass;
- parts for the frame.
Next, you will need to stock up on a fair amount of patience and pedantry - assembly requires careful observance of all instructions.
Assembly process
- Fabrication and painting of the frame.
- Mounting of X and Y frame axes and fixing stepper motors on them. The extruder will move along the X axis, the Y axis is needed to move the platform.
- Mounting the Z axis support rod.
- Attaching the extruder.
- Connection of heating elements, cables, power supply.
- Assembly of electronic elements: boards, microcontroller, LCD display.
After assembling and testing the electrical circuits, install the software. At the last stage, the working table, the X, Y, Z axes, the temperature of the heating elements and the filament pulling speed are calibrated.
Important! After starting the printer, print a test model. It will show all the flaws in the assembly and settings.

Mistakes and how to avoid them
Printer performance depends on the quality of the installation. But it is not always possible to eliminate errors when assembling the device.
- One of the serious mistakes that is often made when assembling a printer with your own hands is the incorrect installation of the frame elements. Even a slight misalignment of the corners will cause jamming when the carriages move. The geometry of the mating parts must be maintained as accurately as possible.
If the body is made of plywood, it is recommended to cut its elements on a CNC laser machine. When assembling a frame from metal corners, it is necessary to control the mating angles of the parts at each stage. - The second common problem is the backlash of the frame elements. In this situation, print quality cannot be achieved. There should be no gaps between the parts. They occur either when the fasteners are loosely tightened, or if the frame elements are poorly prepared, that is, the dimensions are incorrectly maintained.
- If the electrical wiring connectors are not of good quality, there will be constant power outages. And the installation of short wires will cause them to break. The length of the wiring must match the dimensions of the frame, taking into account moving parts. It is necessary to check the tightness of the connection of the connectors, thereby minimizing the risk of disconnecting individual components and mechanisms from the power supply.
Quality control of the assembly at each stage, checking all connections and geometry of structural elements will help to avoid problems.
That's interesting! The article discussed how to assemble an FDM printer from improvised materials and parts left after dismantling office equipment. And an engineer from the Netherlands assembled a powder-type 3D printer based on an inkjet printer. As a filament, he used gypsum, sand, metal powder, and filled the cartridge with a binder. Otherwise, the technology is similar to laser layer-by-layer sintering.
Learn more