How much resin does a 3d printer use
How Long Does 1 Liter & 500ml of 3D Printer Resin Last? – 3D Printerly
I know that there are many people wondering just how long a bottle of 500ml or 1 liter of resin would last them. This article will aim to answer that question, so you have a better idea of how long your bottles of resin should last you.
Keep on reading for more information about how long 3D printer resin should last you, and even how to make it last you longer.
How Much Can You 3D Print with 1 Liter of Resin?
The question of how much you can 3D print with 1 liter of resin used to be a very important one because resin was so expensive in the past.
Luckily, with the increase in popularity and manufacturing of resin, we have seen a significant decrease in the print.
You can 3D print around 120 to 140 tabletop figurines or minis with 1 liter of resin, each model having a height of around 1 inch. If you 3D print cubes with a 1cm x 1cm dimension, then you can print 500 cubes of that size. Larger models can require 100ml+ of resin in one go.
The best way to determine how much you can 3D print with 1 liter of resin is to import an STL model into your chosen slicer software, then reading how many milliliters of resin will be used.
The SLA slicer that most people gravitate to is between PrusaSlicer, ChiTuBox, and my personal favorite, Lychee Slicer.
When you work out the amount of resin you’ll use for one print, you take 1000ml, and divide the number of ml for the print.
A simple chess rook of about 53mm in size can be printed using only 11ml of liquid resin. This indicates that you can print around 90 to 91 chess rooks of 53mm in size with 1 Liter of resin (1000ml / 11ml = 90.91).
Don’t forget to include the proper orientation and supports for the most reliable results.
Most SLA users use resin to print miniatures or small-sized models but require a lot of detail in them.
The fact that how much you can print with 1 liter of resin is directly dependent on the size and details of your designed model.
The video below goes through just how much each resin 3D printed miniature costs, giving a good insight to how far your resin can go.
https://www.youtube.com/watch?v=n0K2R_YO25A
How Long Does 500ml of Resin Last?
500ml of resin can last the average user around 2 weeks of normal use when printing small models on a regular basis. You could use 500ml of resin in a few really large 3D prints, which could take 2 or 3 days. 1 liter of resin can last you anywhere from 5 days to a month of printing.
It depends on the layer height you are using for your objects, because a 0.025mm layer height is going to need twice as many layers as a 0.05mm layer height 3D print.
Depending on the orientation of the model, the number of supports, the scale/size of the model, your success/failure rate, 500ml of resin can last you a month or so, or just a few days.
You can print a complete chess set including a few failures or mistakes, and you will end up sparing some liquid resin as well.
The Chess Set (SLA/DLP) files from Thingiverse is a good representation of a real life example. When you hollow the models with a 1.5mm wall thickness, and add a 2mm hole for resin draining, the set of 16 pieces takes around 156ml of resin.
With 500ml of resin, you’d be able to 3D print around 3 complete chess set pieces.
The exact answer to how long 500ml of resin lasts depends on different factors especially the size of your print.
This Reddit user shows how much you can 3D print with 250ml of resin.
So what does a 250ml bottle or resin get you… from PrintedMinis
Things such as the failure or printing mistakes you make during the process, whether your print is hollow or filled 100%, and the number of times you strain the vat can affect your level of resin usage, especially in the early stages of SLA 3D printing.
In the future with more experience, you reduce the usage of resin to print more by following some tips that will be discussed later.
How Does 1 Liter of Resin Compare to 1 kg of Filament?
Looking at the output mass with the same amount of resin and filament, you will get more output mass from 1 kg of filament as compared to 1-liter liquid resin.
Resin is a little more dense as compared to filament so when you compare 1 liter of resin to 1kg of filament, that resin is going to convert to less than 1kg in weight of the liquid resin.
For resin, you are looking at around 1.1 grams in weight per millimeter of liquid.
For Monocure 3D Rapid Clear Resin, they state a resin density of 1.12g per ml.
When you convert resin ml into grams, you get around 900grams of resin.
On the other hand, resin 3D printers mostly specialize with smaller objects, hence the smaller build plate, so 1 liter of resin may actually strength further than 1kg of filament in terms of how long it’ll last.
As the resin 3D printers are mostly used to print smaller objects, the printing use of 1-liter resin and 1 kg filament will be similar.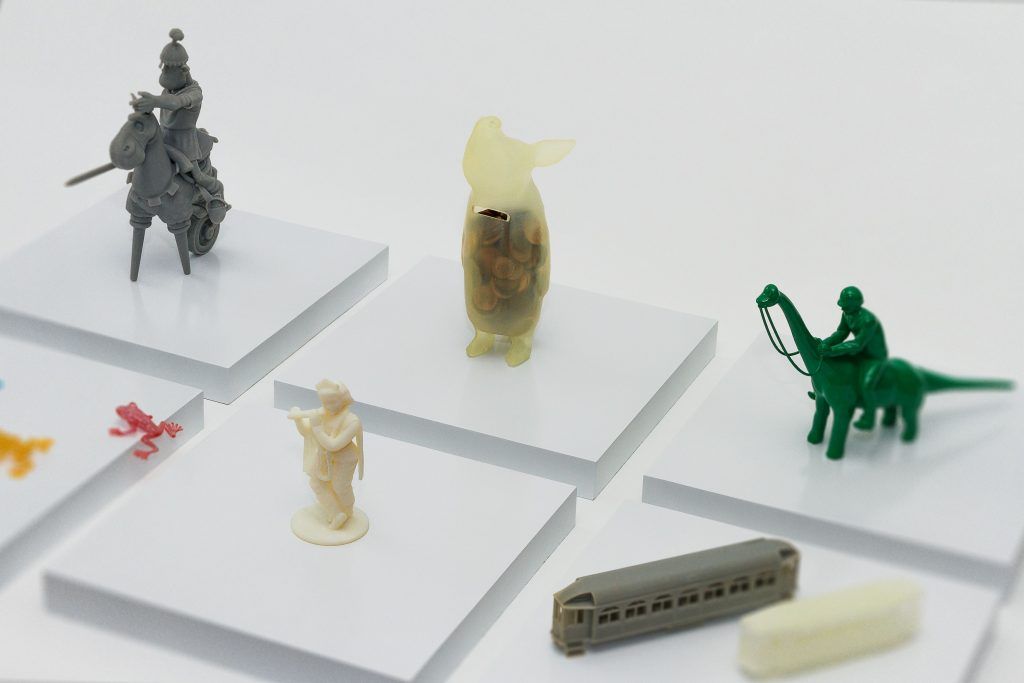 If you are printing the exact same objects, with the same size, the filament may perform better.
You do have to take other factors into account such as infill, hollowing, supports, and more.
I think the comparison is pretty close and really depends on your overall experience and preparation techniques.
Many people don’t realize that you can get away with less support with SLA or resin printing, but this comes about with more experience.
If we talk in terms of the cost and dollars that you will spend on both products, the filament will clearly win the comparison.
UV resin is known to be more expensive than filament of any type, usually, the price of UV resin is about twice or even 3 times more than the filaments’ average price.
I think in the near future, we will start to see the price become a lot closer in comparison.
1 liter of resin most likely won’t go as far as 1 kg of filament. It’s a lot easier to waste resin compared to the solid filament, and infill can really make a difference.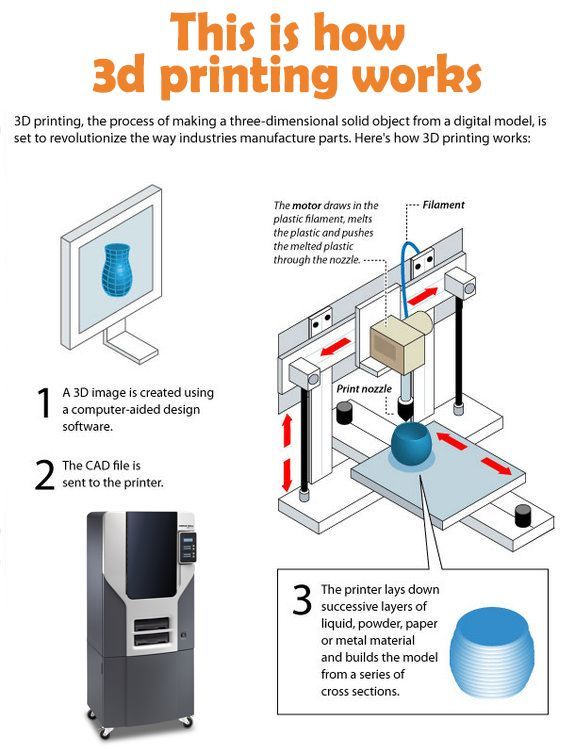
Utilizing your software efficiently and angling the model efficiently on the build plate, you can mitigate the amount of support and can get printed volume the same as you get from 1 kg of filament.
There are many tutorials where they can correctly guide you on how to produce successful resin 3D prints.
How Do You Make Resin Last You Longer?
The best and most useful method is to design and angle your 3D print model in a way that reduces the amount of resin to print that model.
There are different ways to reduce the amount of resin, and you can start by reducing the support and this can only be done if you angle the print efficiently.
Many print settings can also help you in this regard. The size of your print, details, structure, and many other factors can affect the resin usage. Below are some of the best tips that can help you to print more models using less amount of resin.
- Angle Model in a Way that Reduces Supports
- Print Smaller Objects if Possible
- Try to Reuse the Clean UV Resin
- Hollow Your Resin Models
- Avoid Spills and Wiping up Too Much Resin
Angle Model in a Way that Reduces Supports
Supports are essential in resin 3D printing but the amount of the resin used for supports can be reduced.
You should use different types of software such as ChiTuBox, Lychee Slicer, or PrusaSlicer to add support. The software will allow you to see a visualization and angle the model in a way that reduces the need for support.
PrusaSlicer is known to use a large amount of supports, but they do work really well in reducing failures in your resin prints. I’ve had many 3D prints fail because of bad support settings and incorrectly calibrated UV power settings.
Having more supports and bracings can compensate for other bad settings, so it can actually end up saving you resin in the long-run. With more experience and tutorials, you can really improve your support placement and reduce overall resin used, making it last longer.
Print Smaller Objects if Possible
The larger your model is, the more resin it will consume. In some cases, you want to print some large models on your 3D printer, but doing this regularly will definitely cause you to use up a lot more resin.
Wherever you can reduce your model size, I would advise it if you want your resin to last longer.
As the example is mentioned above, a chess rook that is 53mm in size can be printed using 11ml of resin, but the same rook may use more than twice the resin when printed in 110mm in size.
Some people think doubling the size of an object means you’ll use double the resin, but you might be surprised to know that it increases at a much higher rate.
I illustrated this in my article about The Best Layer Height for 3D Printing which you can check out.
The difference between a 3D benchy at a 0.1mm layer height and the same benchy at a 300% scale is 2 hours and 56 minutes compared to 40 hours and 8 minutes. That’s about 13x higher rather than the 3x you might have thought.
Try to Reuse the Clean UV Resin
UV resin can be reused, you only have to ensure that there are no residues of cured resin.
Reusing the resin may cause issues but if you take it out of the vat, clean it properly, and mix it with the fresh resin, the results will be pretty good. Shake the resin bottle well so that fresh and used resin can form a great mixture.
Hollow Your Resin Models
Similar to infill with FDM filament printers, you have material on the inside of your models. Many people leave their resin models full, without hollowing out the model.
Hollowing your models can save plenty of resin over time, and depending how big of a wall you give your objects, they can still be as strong as you need them to be.
The general wall thickness for hollowing a resin 3D print is around 1.5mm to 3mm so give that a go and see how it works for you.
If you do want that extra strength for your resin prints without requiring such a large wall thickness, you’ll want to get a strong resin like the Siraya Tech Blu Strong & Precise Resin from Amazon.
You can also go with the Siraya Tech Tenacious Flexible & Impact Resistance Resin from Amazon also.
Avoid Spills and Wiping up Too Much Resin
Take some extra care when handling your resin to ensure it’s not spilling unncessarily or needing to be wiped up all the time. You want to have a good workstation where you have plenty of space and accessories to help you streamline the resin printing process.
Many people love having an all-in-one solution for washing and curing such as the ELEGOO Mercury Plus 2-in-1 Wash & Cure Machine from Amazon.
Does 3D Printer Resin Expire?
3D printer resin does expire after a while, usually having a shelf life or expiry date within 1 year or 365 days. Other premium brands have expiry dates of up to two years. Keeping your resin sealed properly in a cool, dark place should help it last longer.
You want to try your best to keep resin out of the light and not in a warm place to prolong its life. They will last longer if they have been left unopened for a while as well. Avoid putting your resin in an area like a window seal or where sunlight directly shines.
3D printer resin shelf life is one of the most common questions asked by UV resin users. Usually, all UV resin manufacturers claim that the shelf life of their resin is 12 months.
Most brands should have a production and expiry date on the bottle, but others only mention the production date, and you can assume that it will expire after one year.
Even though your resin has an expiry date, some people have 3D printed their expired resin successfully.
There are many users who have claimed that they are using 18 months old resin and the prints are coming out flawlessly.
The expiry date is mentioned because with the passage of time the substance like light receptors inside the resin may evaporate and this will require more time to cure properly.
Even if you face this problem you can alleviate this problem by mixing it with some newer or fresh resin to balance it out more.
Just make sure you keep UV resin in the best suitable environment away from the sunlight, and you can use UV 3D printer resin even after its expiration date. Don’t forget to shake well before using the resin.
How Much Resin Do You Need for 3D Printing?
If you are wondering how much resin a 3D printer uses, you are not alone. Many people wonder exactly how much resin you need to pour in the resin vat in order to create a final 3D print model.
You want to have enough resin in the vat to where it can flow and fill in the areas where your model is printing. Ideally, you want to have an excess amount of resin in the resin tank to keep on the safe side. Try to keep your vat filled up about 1/3 of the way up, and don’t fill it too high since it can overflow.
When you want to add more resin, you can pour it right on top of the build plate since it lowers right down into the vat and drips off onto the FEP film where your print is being cured.
Sometimes you’ll run into a situation where you are on your last bit of resin and still want to complete a 3D print. Since the resin has to flow back onto where your print is, the best method of success means having an even pool of resin inside the vat.
Once you start to see gaps and spaces in your resin, you’ll start to find that the resin doesn’t reach your model, meaning it won’t properly cure below your model resulting in a failed print.
How Much Can You Print with a Bottle of 3D Printer Resin?
3D Insider is ad supported and earns money from clicks, commissions from sales, and other ways.
While most people who are casually into 3D printing are more familiar with the image of layers being built by extrusion of filament, FDM technology actually isn’t the first technology that was developed for 3D printing. That title belongs to stereolithography or SLA. Like FDM, SLA is also an additive manufacturing method that creates prints layer by layer. The similarities pretty much end there as they take very different approaches to build 3D printed objects.
How much can you print with a 1-liter bottle of resin?
Knowing now that liquid resin is kind of expensive, the next question is: how much can you get out of it? This question is easy to answer if you already have an SLA printer, as the built-in slicer software can typically estimate the volume of liquid resin needed to print a design. In fact, any 3D modeling software should be able to give you information on the volume of your 3D model, which should be a good enough estimate of the volume of resin you’ll need to print it in an SLA machine.
If these resources are not available to you, then we can answer this question using more rudimentary metrics. Most people use their SLA printers to create small but highly detailed objects. A good example would be figures for a tabletop board game, each with a height of around 2.8 cm. or a little higher than an inch. With a 1-liter bottle of liquid resin, you can print between 120 to 140 of such figures. If you were only printing cubes that measured 1 cm. on each side, you could print up to 500 cubes in just a single 1-liter bottle. In any case, the point is that there’s lot in that bottle.
As we’ve mentioned, your slicer software should give a very good estimation of how much resin your design will be needing. At this point, don’t forget to include any possible support structures in the resin volume calculations. If you’re a little short on resin or you want to minimize resin use, you always have the option of reducing the fill percent of your design. This will, of course, come at the price of reduced weight and durability.
Of course, you can’t just fill the vat with the exact volume of resin that your print will require. There should always be a good amount of excess resin, as you need to be able to have enough resin to fill the bottom of the resin vat at all times. A good rule of thumb is to fill the vat with enough resin to cover the build platform when it is at home or ‘zero’ position. Most printers are equipped with a capacitive sensor that will prevent the resin tank from overflowing.
Another precautionary measure is always to have some extra resin lying around. It will be very rare for you to get through a whole 1-liter bottle before encountering some misprints, so it pays to have some more reserved. This is even more important if you’re just starting with SLA printing, as you’re more prone to commit mistakes. Call it a start-up budget, if you will.
Fortunately, any leftover liquid resin in the resin vat can be safely reused. We advise against returning the unused resin to the cartridge or the original bottle to avoid contamination. Instead, just leave the unused resin in the vat with the printer cover intact. The printer cover should protect it from any ambient light, but it still best to store the printer away from direct sunlight. When reusing resin, check the leftover resin for clarity or consistency issues before proceeding with the print.
How does 3D printer resin work?
The liquid resin used in SLA printing is composed of a mixture of monomers and oligomers – basically the building blocks of what will eventually be the plastic polymers of the finished print. These monomers and oligomers are typically composed of carbon, hydrogen, and oxygen molecules with a few minor additives.
Once the printing process starts, the liquid resin in the resin tank of the printer is hit by a series of beams of ultraviolet light. The ultraviolet light serves to provide enough energy for the chemical bonds of the monomers and oligomers to come undone, which results in the formation of reactive sites.
The reactive sites of each monomer or oligomer act as potential sites where they can bond together and form long polymer chains. These long chains can entangle with themselves and with each other, which brings about the rigidity and durability of the final print. This whole process is called photopolymerization.
In SLA printing, the curing process can be extended to further enhance the durability of the final print. Even when a solid object has been built, some of the resin materials remain in an unreacted or “green” state. To push the remaining resin to polymerize fully, the finished print can be placed inside a UV-curing chamber for 1 to 2 hours. Post-printing curing is also possible using sunlight, but the print will have to be exposed to the sun for up to 2 weeks.
Why use resin for 3D printing?
Despite being less popular compared to FDM, SLA has a couple of compelling advantages which has kept it relevant in the modern 3D printing industry. In fact, SLA is the perfect alternative to FDM, as it excels in areas where FDM performs poorly.
When printing with resin, layer lines and resolution are not as problematic as with FDM. The resolution of an SLA print is only limited by the size of the individual beams of ultraviolet light that induce photopolymerization.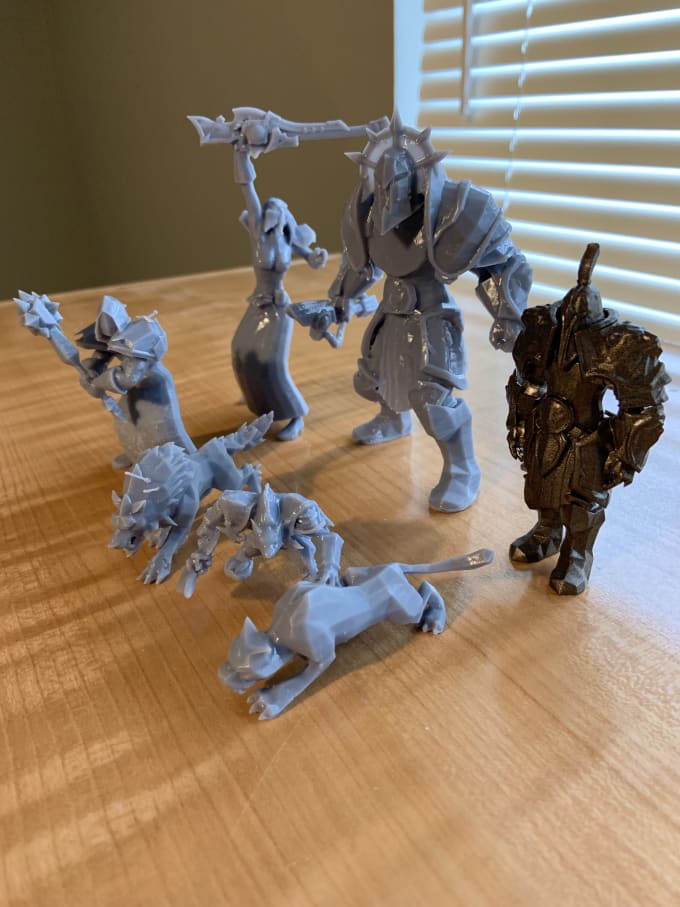 These beams of light can be extremely fine, allowing SLA printers to print with XY resolutions of less than 100 microns. Resolution along the Z-axis is even smaller – usually 20 microns or less. At this level of detail, layer lines are hardly perceptible.
The level of resolution that SLA prints can achieve has made SLA the technology of choice for printing objects with a high level of detail. Character figurines, jewelry, and product prototypes are some of the most common applications of SLA printing.
The process by which SLA builds its prints also makes it a faster option when making multiple, small objects. Since there is virtually no difference in the time it takes for the ultraviolet light to build a small layer and a big layer, it is often more practical to print multiple items at a time with SLA.
Limitations of 3D printer resin
Most desktop-scale SLA printers take the bottom-up approach. In this type of orientation, the light source is located at the bottom of a resin tank with a transparent bottom. As each layer is built, the build platform moves up to allow the fresh resin to enter the bottom of the resin tank in preparation for the polymerization of the next layer.
This type of SLA printer is simpler and cheaper to manufacture but is severely limited in its build volume. As the build is being printed, its weight continues to bear down on the build platform to which it is adhered to. This means that you will have to play it safe when it comes the size of the object you are printing, as a larger object has more chances of falling off the build platform.
Support structures can also be problematic in SLA printing. Since there is no option to print an object using two different materials, support structures will inevitably be made with the same material as the rest of the build. This makes removal of support structures especially difficult, often involving cutting and smoothing of nubs.
Lastly, there is no doubt that the biggest hurdle of resin printing technology is price. Most SLA printers in use today are of the industrial-scale variety. Although there are already a few desktop SLA printers out there, their availability is still very limited. The cheapest SLA printer you can get today is the SparkMaker High Resolution Resin SLA Printer, which costs about as much as a mid-range FDM printer. The SparkMaker is very basic model – more advanced models can be easily ten times more expensive.
Aside from the cost of the printer, you also need to take into account the cost of the liquid resin. Nowadays, the standard price for a 1-liter water bottle of liquid resin is around $50. This price is for a very low-end resin product. For professionals who want to get the best quality possible, a premium resin could cost as much as $500 per liter.
Considering that you can get a 1-kg. spool of FDM filament for less than $20, buying liquid resin results in a huge jump in the cost of consumables. This means that SLA is more expensive not just in terms of capital investment, but also in recurring costs.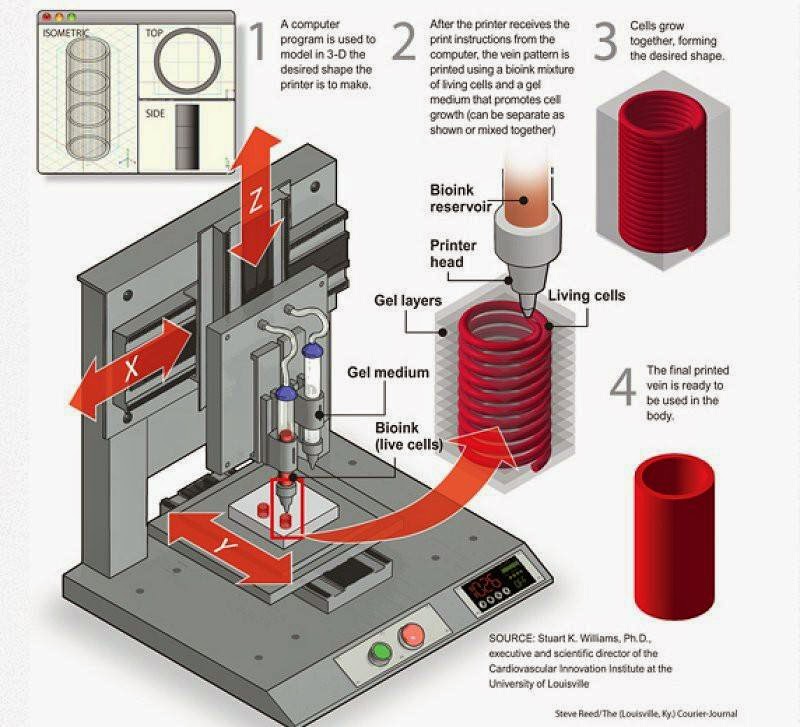
Final thoughts
The prospect of being able to create highly detailed and perfectly smooth SLA prints in the comfort of your home or workshop sounds exciting. Right now, the technology has not matured yet for desktop SLA printing to be a thing, but it has enough benefits and potential for the 3D printing community to remain largely optimistic. Large strides toward this goal have already been made with the release of the first few desktop SLA printers.
The high cost of liquid resin is still a pretty big hindrance to the acceptance of SLA printing. The fact that even recurring costs are higher with SLA is probably even more intimidating for the casual 3D printing hobbyist. Fortunately, you won’t be sold short with a bottle of liquid resin. With proper planning, you could get more than a hundred highly-detailed prints out of a single bottle.
Warning; 3D printers should never be left unattended. They can pose a firesafety hazard.
SLA 3D printing: how durable is the resin?
SLA 3D printing is said to produce complex and precise parts with good surface quality. In addition, due to the wide variety of resins, the range of use of SLA is constantly expanding. However, when tough and functional parts are required, SLA printing is usually not the choice. Why?
See how durable your resin print can be (Photo: SolidSmack)
Well, it is true that most standard resins are relatively brittle compared to other 3D printing materials and are not recommended for stressed parts or outdoor use, but there are tough and durable resins on the market that are specifically designed for more durable applications. .
In this article, we'll take a look at these tough 3D printing resins and show you just how strong they can actually be.
There are many SLA resins on the market, each suitable for a specific application (Source: Pinterest)
Most 3D printing resins are based on epoxy or acrylate, the latter being more commonly used in desktop printers. Therefore, SLA-printed parts are considered to be fragile and best suited for decorative applications and prototypes rather than functional and load-bearing components. But this is true only if the resin is chosen incorrectly.
Examples of heavy duty resin can be found in a wide variety of industries. There are casting resins for jewelry making and 3D printing in the field of dentistry for making mouthguards, crowns and surgical guides. There are also high temperature resins that are suitable for a variety of industrial applications, and even resins that can produce rubber-like parts.
Let's take a look at the strongest resins available and find out how durable they are compared to other FDM 3D printing materials.
Cycle test in progress (Source: Afinko)
Let's start with a brief look at the mechanical property, which is closely related to the tensile strength of the material. Tensile strength is defined as the maximum stress a particular material can withstand when stretched before failure.
The higher the tensile strength, the stronger the material is considered.
Now about resins. Let's first compare standard 3D printing resins with resins sold as rigid, and then compare these stiffer resins with common FDM materials such as ABS, PLA, and PETG.
Standard and hard resins
Hard resins show double strength compared to standard resins (Source: Lucas Carolo via All3DP)
with a standard resin, chosen as a standard, was a color UF-mol of ANYCUBIC because the Photon SLA printer is one of the most popular on the market.
It is clear from the graph above how much stronger the hard resins are compared to the standard. In fact, the three resins selected for this comparison—Formlabs Tough 2000, eSun Hard-Tough, and Siraya Tech "Blu"—show nearly double the tensile strength of Anycubic resin. (The Formlabs rigid resin line, including 2000, can only be used with the latest Formlabs printers.)
Just because a resin is strong does not mean that prints made with these resins will be twice as strong as when printed with standard resin. Other factors such as model design and print parameters also play an important role in the final strength of the product. However, comparing tensile strength is an easy way to determine which material is stronger.
But how do these tough resins stand up to other plastics produced by FDM 3D printers?
Siraya Blu had more strength than some FDM materials (Source: CNC Kitchen via YouTube) , who developed a test method in which a 3D printed hook is stretched to failure, simulating a tensile test.
Stefan constantly tests different materials with this method and the results are shown in the graph above. In a video where he tests Siraya Blu resin, Stefan found that Siraya's rigid resin was stronger than some FDM materials such as ABS and ASA, although not as strong as PLA and PETG.
SLA print (left) has the same strength regardless of orientation, but FDM print does not (right) (Source: Formlabs)
Although material properties largely determine the strength of a given print, there are other important factors that can affect mechanical performance.
How a design is printed greatly affects its durability. For example, a certain component can be strengthened by distributing more material in places where stress will be concentrated. The freedom of design afforded by 3D printing means that there are often computational tools such as topology optimization that automate the process.
How a part is made also depends on how well it can withstand external influences. In the context of 3D printing, this is determined by the print settings determined during slicing. It is well known that the height of higher layers greatly affects the strength of FDM parts and this is also true for SLA prints. Most FDM slicers have multiple infill densities and patterns to reduce media and print time, however they are rare in SLA. However, the third-party ChiTuBox slicer includes these features, which provide the ability to increase toughness while optimizing material utilization.
Anisotropy is when a physical property of an object or material has a different value when measured in different directions.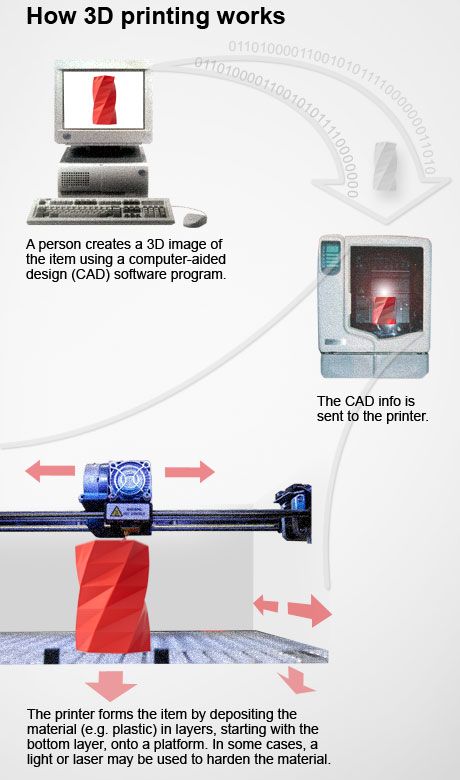 This happens in 3D printing when FDM printed objects display different material properties depending on the direction in which the part is assembled. More specifically, this happens when a lower adhesion is created between layers on the Z axis, which causes lower tensile strength compared to the X or Y axis. As you can see in the image above, when a weight is applied to an FDM print that is not oriented or not modeled for anisotropy, it may break. However, when it comes to SLA printing, the opposite is true because the resin is isotropic. During his testing with Siraya's Blu, Stefan confirmed this by experimentally showing that the parts are equally strong regardless of the assembly direction. Formlabs also came to the same conclusion, which is discussed in their article on the isotropic properties of SLA printing.
Orthesa on an ankle joint from a durable resin (source: Animake)
Given everything that we learned, it becomes clear that when choosing the correct resin, 3D-first-clock SLA can produce imprints of durable like FDM.
To illustrate this point, here is an inspiring example of how resin prints strong, functional, and complex parts in the world of orthopedics.
Matej Vlašić's son Nick from Slovenia was born with cerebral palsy and could not stand or walk without assistance. Mr. Vlašić created special orthopedic ankle orthoses for Nick using SLA printing. About a year later, the final product design allowed Nick to walk for several days.
Like many other orthotic devices, AFOs must be strong enough to provide support while supporting the entire body weight during movement. Mr. Vlašić used Formlabs resin, which proved to be durable and comfortable even over long periods of use. Thanks to this success, Mr. Vlašić founded Animake. He and his team provide diagnostic treatments and 3D printed orthotics to help other children in need of special AFOs.
Source
Tags:
SLA 3D-rendering, 3D-printed orthopedic devices, FDM resin, Chitabox slider, Anycubs resin, Formlabs Tough.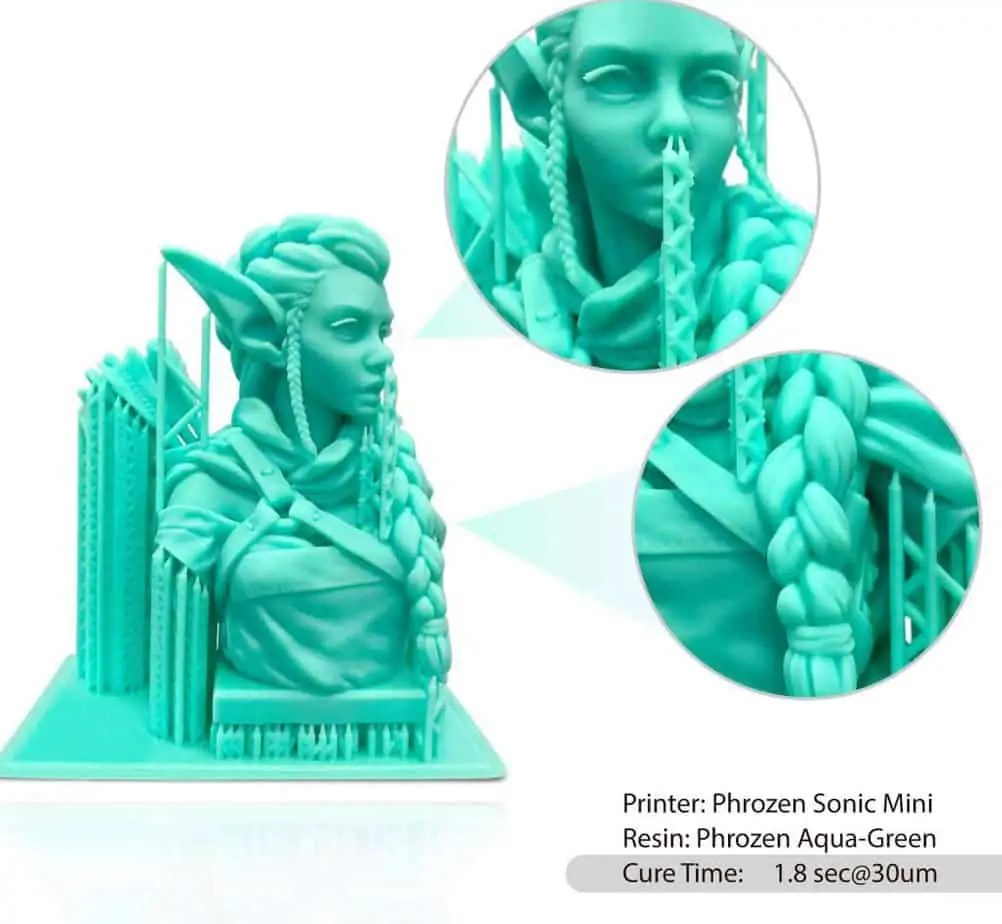 3D printer
3D printers can be sorted not only by the printing technologies used, but also by the consumables used. In this section, we will look at devices that use photopolymer resins to build models.
- 1 Consumables
- 2 Laser stereolithography (SLA)
- 3 Projector Stereolithography (DLP)
- 4 Multi-jet (MJM and PolyJet)
- 5 3D pens
- 6 Additional illumination
Consumables
Photopolymer resins are liquid polymers that harden when exposed to light. As a rule, such materials are sensitive to the ultraviolet range, which determines the design of photopolymer printers. One of the common design elements is a transparent colored cap or housing made of a material that filters ultraviolet radiation. This is done both to protect the user's eyes and to protect the supplies inside the printer from exposure to sunlight and background lighting.
Photopolymer resin loaded into Form 1 3D printer
The physical properties of resins after polymerization vary widely. Both rigid and flexible options are available, transparent and matte. A wide selection of colors is also available. Resin consistency and exposure times also vary, so a range of compatible media should be considered when choosing a printer.
The last aspect to consider when choosing a material is its toxicity. There are both quite toxic options and biologically safe ones.
The cost of consumables can be considered the Achilles' heel of photopolymer printing. The plants themselves are already reaching quite acceptable price levels, but it is still quite difficult to find inexpensive photopolymer resins. It is hoped that the proliferation of inexpensive photopolymer printers will lead to an increase in the production of consumables and lower prices.
Laser Stereolithography (SLA)
SLA Model
The firstborn of photopolymer printing and modern 3D printing in general. The technology was developed in 1984 by Charles Hall, who later founded 3D Systems.
SLA printers use laser emitters to cure the photopolymer supply.
A typical SLA printer consists of a consumable tray sitting under a build platform driven vertically by a raise/lower mechanism.
Alternatively, the cuvette itself can be driven - what matters is the relative movement of the platform and the container. Above the cuvette is a laser emitter and a mirror system for deflecting the laser beam.
During printing, the platform is immersed in the consumable for the thickness of one layer of the digital model.
Since photopolymer resins can be quite thick, a leveling mechanism is often used to speed up the process.
SLA printer operation scheme
After leveling, the material illumination process starts. Illumination is produced by laser irradiation. Most photopolymer resins are designed to cure (polymerize) when exposed to ultraviolet light, which determines the choice of laser frequency. The movement of the beam along the X and Y axes is determined by the operation of the deflecting mirrors.
After the drawing of the layer is completed, the platform is immersed in the material for the thickness of one more layer, and the process is repeated with the drawing of the next layer of the digital model.
Model building animation
SLA printing takes quite a long time, and printers using this method tend to have relatively small build areas.
This is mainly due to the high cost of laser emitters: printing large objects with a single laser will take too much time, and installing additional emitters and mirrors will complicate the design, increase the dimensions of the installation and raise the price to an unacceptable level for most users.
Despite the success of this technology, projected stereolithography is considered to be a more promising, albeit very similar, method.
Projector Stereolithography (DLP)
Formlabs Form 1 Desktop DLP Printer
A close relative of laser stereolithography, this method uses digital LED projectors instead of laser machines with mirror deflection systems. The method became popular due to the development of technology for the production of low-cost high-resolution digital projectors by Texas Instruments.
Layers are illuminated using a digital projector that highlights the patterns of the entire layer, which distinguishes this method from SLA, where the "picture" emerges progressively using an ultraviolet laser.
A similar approach has previously been used on SGC-type units, but this technology used physical photomasks, making the process costly, time consuming, slow and noisy.
FTI continues to exist, a development of SGC that is virtually indistinguishable from DLP printing, as it also uses digital LED projectors.
DLP printer design
Simultaneous illumination of an entire layer using projectors allows you to significantly speed up the printing process even compared to SLA printers that have a high scanning speed (ie beam movement).
In addition, these printers are less sensitive to rough physical impact due to the absence of delicate mirror systems.
The absence of mechanical mirror systems improves accuracy. Finally, the cost of projectors sets them apart from laser systems.
Projection size can be quite significant, reaching the average of popular FDM printers.
An interesting feature of DLP printers is the ability to "reverse" or "reverse" printing.
In this case, the projector is installed under a transparent (material choice for transparency in relation to ultraviolet light) cuvette, and the platform does not sink into the material, but gradually rises, pulling out the layers of exposed polymer.
This approach eliminates the alignment mechanism and achieves even higher Z resolution than SLA printers.
In addition, the size of models in height is not limited by the depth of the cuvette, which favorably affects the dimensions of the printer and the possibility of increasing the build area.
Multi-jet printing (MJM and PolyJet)
3D Systems ProJet 3500HDMax MJM printer
MJM and PolyJet technologies are practically indistinguishable from each other. The name difference comes from the respective patents: Multi Jet Modeling is owned by 3D Systems, and PolyJet is owned by rival Stratasys.
The very principle of multi-jet polymer printing was developed by the Israeli company Objet, which eventually became a division of Stratasys.
Multi-jet printing technology combines features of 3D inkjet printing (3DP) and projection stereolithography (DLP).
How the MJM PolyJet printer works
Models are built by spraying photopolymer using linear arrays consisting of multiple nozzles.
The applied layer is immediately exposed to ultraviolet lamps - as a rule, two processes occur simultaneously.
By the time the array reaches the end of the build chamber, the previously deposited material is hard enough to print a new layer.
Composite models created on the ProJet 3500 DP dental printer
This approach allows to achieve very high printing speed, but is characterized by high design complexity, which negatively affects the cost of such installations and limits their distribution to professional use.
One of the advantages of MJM and PolyJet technologies is the ability to create composite structures from photopolymer resins with different physical characteristics.
It is thus possible to create models with easily removable supports, use several colors and use flexible and rigid materials in parallel within one model.
3D Pens
CreoPop 3D Resin 3D Pen
Recently, there has been a craze for hand-held printing devices called 3D pens. At the moment, there are three main options for such devices: drip-jet pens (DOD), called BioPen and used in the development of new methods for treating damaged tissues, FDM 3D pens, which are manual extruders (in fact, an analog of the usual hot glue guns, but using thermoplastics) and developments in 3D-drawing with photopolymer resins.
The CreoPop 3D pen was the first "handheld resin printer". The design of this device is quite simple, because the most complex function, positioning, is performed by the user himself. The pen only extrudes resin through the tip surrounded by LED emitters.
CreoPop 3D pen in action
This way the resin hardens immediately after application, allowing you to literally draw on air.
The advantage of such handles over FDM-analogues is the low operating temperature - there are no heating elements in the device. As a result, with such pens you can even draw on the skin.
In addition, a wide range of photopolymer resins with different physical properties can be used with such devices, which greatly expands the range of possible applications. At a minimum, this is a relatively inexpensive, but entertaining toy.
The only drawback is the relatively high cost of consumables, but such devices are unlikely to require large volumes of photopolymer resin for domestic use.
Additional illumination
Final illumination of photopolymer models in a homemade camera
Full curing of models can take quite a long time, so models in SLA and DLP-printing are only partially polymerized, sufficient to maintain the physical shape of the part.