Hot melt extrusion 3d printing
Hot Melt Extrusion and its Application in 3D Printing of Pharmaceuticals
Review
. 2021;18(4):387-407.
doi: 10.2174/1567201817999201110193655.
Sanjeevani Deshkar 1 , Mrunali Rathi 1 , Shital Zambad 2 , Krishnakant Gandhi 3
Affiliations
Affiliations
- 1 Department of Pharmaceutics, Dr. D.Y. Patil Institute of Pharamceutical Sciences and Research, Pune, Maharashtra 411018, India.
- 2 ThinCR Technologies India Pvt Ltd, Rahatani, Pune, Maharashtra 411017, India.
- 3 Solinova Lifesciences, Hyderabad, Telangana 500072, India.
- PMID: 33176646
- DOI: 10.2174/1567201817999201110193655
Review
Sanjeevani Deshkar et al. Curr Drug Deliv. 2021.
. 2021;18(4):387-407.
doi: 10.2174/1567201817999201110193655.
Authors
Sanjeevani Deshkar 1 , Mrunali Rathi 1 , Shital Zambad 2 , Krishnakant Gandhi 3
Affiliations
- 1 Department of Pharmaceutics, Dr.
 D.Y. Patil Institute of Pharamceutical Sciences and Research, Pune, Maharashtra 411018, India.
 - 2 ThinCR Technologies India Pvt Ltd, Rahatani, Pune, Maharashtra 411017, India.
- 3 Solinova Lifesciences, Hyderabad, Telangana 500072, India.
- PMID: 33176646
- DOI: 10.2174/1567201817999201110193655
Abstract
Hot Melt Extrusion (HME) is a continuous pharmaceutical manufacturing process that has been extensively investigated for solubility improvement and taste masking of active pharmaceutical ingredients. Recently, it is being explored for its application in 3D printing.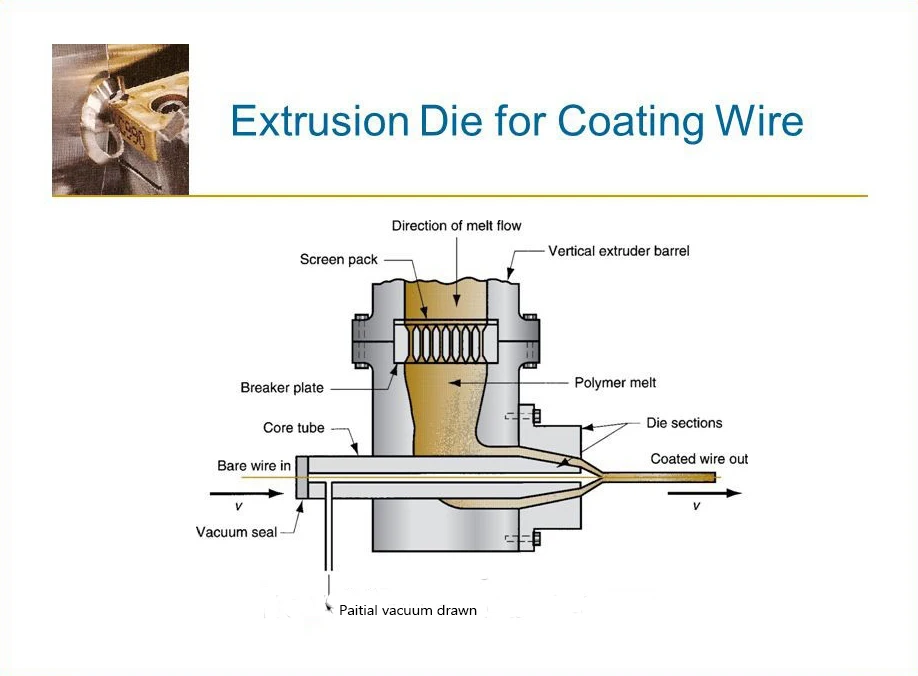 3D printing of pharmaceuticals allows flexibility of dosage form design, customization of dosage form for personalized therapy and the possibility of complex designs with the inclusion of multiple actives in a single unit dosage form. Fused Deposition Modeling (FDM) is a 3D printing technique with a variety of applications in pharmaceutical dosage form development. FDM process requires a polymer filament as the starting material that can be obtained by hot melt extrusion. Recent reports suggest enormous applications of a combination of hot melt extrusion and FDM technology in 3D printing of pharmaceuticals and need to be investigated further. This review in detail describes the HME process, along with its application in 3D printing. The review also summarizes the published reports on the application of HME coupled with 3D printing technology in drug delivery.
Keywords: 3D printing; FDM; Hot melt extrusion; additive manufacturing; fused deposition modeling; rapid prototyping.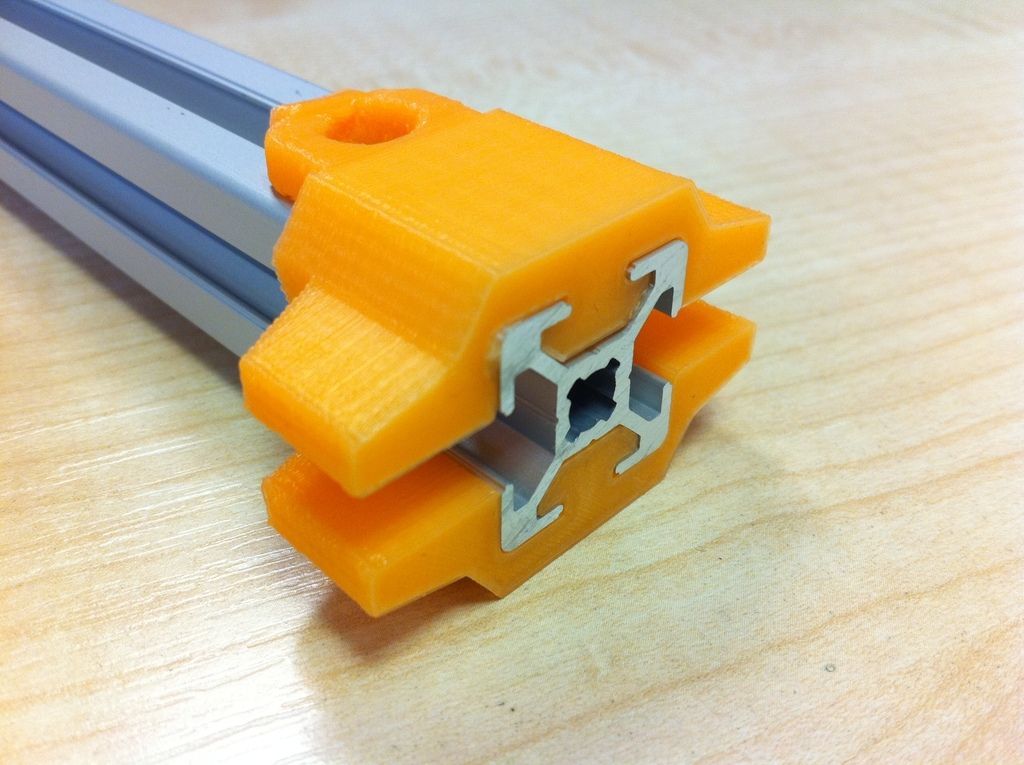
Copyright© Bentham Science Publishers; For any queries, please email at [email protected].
Similar articles
-
Coupling hot melt extrusion and fused deposition modeling: Critical properties for successful performance.
Bandari S, Nyavanandi D, Dumpa N, Repka MA. Bandari S, et al. Adv Drug Deliv Rev. 2021 May;172:52-63. doi: 10.1016/j.addr.2021.02.006. Epub 2021 Feb 9. Adv Drug Deliv Rev. 2021. PMID: 33571550 Free PMC article. Review.
-
3D printing in personalized drug delivery: An overview of hot-melt extrusion-based fused deposition modeling.
Dumpa N, Butreddy A, Wang H, Komanduri N, Bandari S, Repka MA. Dumpa N, et al. Int J Pharm.
 2021 May 1;600:120501. doi: 10.1016/j.ijpharm.2021.120501. Epub 2021 Mar 19. Int J Pharm. 2021. PMID: 33746011 Free PMC article. Review.
 -
A comprehensive overview of extended release oral dosage forms manufactured through hot melt extrusion and its combination with 3D printing.
Nashed N, Lam M, Nokhodchi A. Nashed N, et al. Int J Pharm. 2021 Mar 1;596:120237. doi: 10.1016/j.ijpharm.2021.120237. Epub 2021 Jan 21. Int J Pharm. 2021. PMID: 33484928 Review.
-
Advanced Pharmaceutical Applications of Hot-Melt Extrusion Coupled with Fused Deposition Modelling (FDM) 3D Printing for Personalised Drug Delivery.
Tan DK, Maniruzzaman M, Nokhodchi A. Tan DK, et al.
 Pharmaceutics. 2018 Oct 24;10(4):203. doi: 10.3390/pharmaceutics10040203. Pharmaceutics. 2018. PMID: 30356002 Free PMC article. Review.
 -
An update on the contribution of hot-melt extrusion technology to novel drug delivery in the twenty-first century: part I.
Kallakunta VR, Sarabu S, Bandari S, Tiwari R, Patil H, Repka MA. Kallakunta VR, et al. Expert Opin Drug Deliv. 2019 May;16(5):539-550. doi: 10.1080/17425247.2019.1609448. Epub 2019 May 3. Expert Opin Drug Deliv. 2019. PMID: 31007090 Free PMC article. Review.
See all similar articles
Publication types
MeSH terms
Substances
Researchers Combining FDM 3D Printing with Hot-Melt Extrusion for Drug Delivery Systems - 3DPrint.
 com
comWe’ve often seen 3D printing used to make drug delivery systems, but a trio of researchers from the University of Sussex are combining FDM technology with something called Hot-Melt Extrusion, or HME, to do the same. Deck Khong Tan, Mohammed Maniruzzaman, and Ali Nokhodchi, from the university’s Pharmaceutics Research Laboratory, recently published a paper, titled “Advanced Pharmaceutical Applications of Hot-Melt Extrusion Coupled with Fused Deposition Modelling (FDM) 3D Printing for Personalised Drug Delivery,” that details their work.
The abstract reads, “The most common 3D printing technology is called the Fused Deposition Modelling (FDM) which utilises thermoplastic filaments as a starting material, then extrudes the material in sequential layers above its melting temperature to create a 3D object. These filaments can be fabricated using the Hot-Melt Extrusion (HME) technology. The advantage of using HME to manufacture polymer filaments for FDM printing is that a homogenous solid dispersion of two or more pharmaceutical excipients i.
e., polymers can be made and a thermostable drug can even be introduced in the filament composition, which is otherwise impractical with any other techniques. By introducing HME techniques for 3D printing filament development can improve the bioavailability and solubility of drugs as well as sustain the drug release for a prolonged period of time. The latter is of particular interest when medical implants are considered via 3D printing. In recent years, there has been increasing interest in implementing a continuous manufacturing method on pharmaceutical products development and manufacture, in order to ensure high quality and efficacy with less batch-to-batch variations of the pharmaceutical products. The HME and FDM technology can be combined into one integrated continuous processing platform. This article reviews the working principle of Hot Melt Extrusion and Fused Deposition Modelling, and how these two technologies can be combined for the use of advanced pharmaceutical applications.
”
Number of HME patents issued for pharmaceutical applications between 1983-2006.
HME technology was originally developed in the 1930s to manufacture plastics and rubber products, but more interest has been developing since the 1980s in its use in the pharmaceutical industry, as the technology can also be used to produce filaments for FDM 3D printing – perfect for drug delivery systems.
Active pharmaceutical ingredients (APIs) are blended with a thermoplastic polymer, then extruded as filaments. It’s a continuous process that applies pressure and heat to melt, or soften, materials through an orifice in order to create new products which possess uniform density and shape.
Extrusion itself can change a substance’s physical properties when it’s forced through a die or orifice, under controlled conditions, on the hot-melt extruder, which contains heaters for melting the materials and is one of the main components of HME; others include a motor, an extrusion barrel, and rotating screws inside the barrel.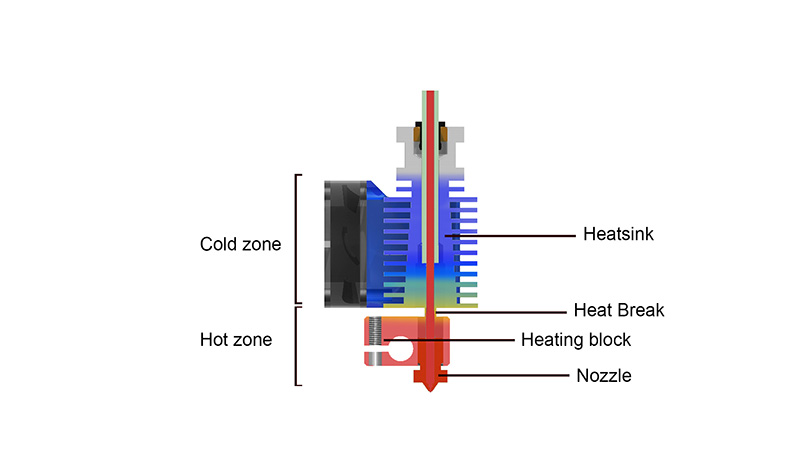
The researchers explained, “The screws in the extruder can provide shear stress and intense mixing of the materials. The friction created by the screws in the barrel and the heat provided cause the polymeric material to melt. The screw then conveys the melted material down the barrel. The extruder is controlled through a central electrical control, which is connected directly to the extrusion unit. Some of the processing parameters that can be controlled are screw speed in revolutions per minute (RPM), feed rate, temperature along the barrel and the die, and the vacuum level for devolatilization.”
Because the HME process is flexible and can meet regulatory requirements in the manufacturing of dosage forms, it’s now used quite often in pharmaceutical applications.
Three different zones of a screw in an extruder: feeding, compression/melting, and metering zone.
“During the hot-melt extrusion process of pharmaceutical dosage forms, APIs, thermoplastic polymeric carrier and processing aids such as plasticisers and antioxidants, are heated and mixed in the extruder and then being forced through a die into shapes including granules, cylinder or films,” the researchers wrote.
“In recent years, much work has proven that HME has the ability to improve the solubility and bioavailability of poorly soluble drugs.”
Pairing the technology with FDM 3D printing can help increase the range of usable FDM polymers, improve the usability of FDM 3D printers across many industries, and ultimately streamline the complex processes of conventional manufacturing methods for pharmaceutical products.
“The powerful processing technology of HME has also attracted much attention in developing different types of drug delivery systems, as it has opened up the opportunity to use some of the molecules that were previously seemed not suitable to be made into pharmaceutical dosage forms,” the researchers wrote. “Its ability and efficiency in producing solid dispersions has also made it possible for the development of sustained, modified and targeted drug delivery systems. The different drug release systems can be achieved by controlling the formulations and the processing parameters when using HME.
”
A schematic diagram of a typical hot melt extruder.
HME, which does not require the use of a solvent, can be used to make drugs with a less bitter taste, while also lowering production times and increasing process efficiency. But the the process is not without its issues – it requires high energy input for shear forces and the extruder barrel’s elevated temperature, which can cause thermal degradation of the APIs. But, research is ongoing to solve these issues by using different engineering approaches, along with proper equipment design and formulation.
“The advantages of using FDM in the production of pharmaceutics include design flexibility, cost-effectiveness and high reproducibility. As FDM takes thermoplastic filaments as printing materials, the filaments can be produced using HME. Drug loaded filaments can be extruded from the HME and then fed directly to the FDM 3D printer. Therefore, the HME technology and FDM can be combined into a single continuous process for higher efficiency,” the team concluded.
“The combined process provides an automatic production process and could limit material loss. When these two technologies are coupled into one single process, it opens up the possibility of creating any dosage forms in-house for immediate consumption. This is particularly useful for hospitals in remote areas.”
Discuss this and other 3D printing topics at 3DPrintBoard.com or share your thoughts below.
Stay up-to-date on all the latest news from the 3D printing industry and receive information and offers from third party vendors.
Tagged with: 3d print drug delivery • 3D printed drug delivery system • drug delivery • fdm 3d printing • Hot-Melt Extrusion (HME) • journal article • research paper • University of Sussex
Please enable JavaScript to view the comments powered by Disqus.
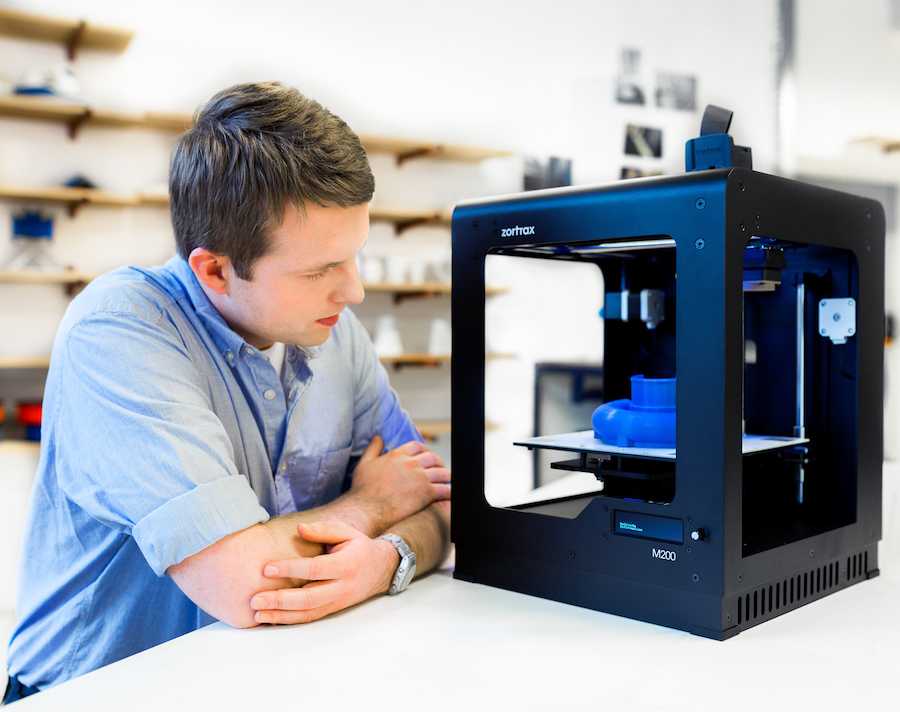
REC Wiki » FDM 3D Printer Basics
Thinking about buying a 3D printer and don't know where to start? Then you are welcome under the cat: in this article we will try to explain as clearly as possible what FDM 3D printing is and how to work with FDM 3D printers.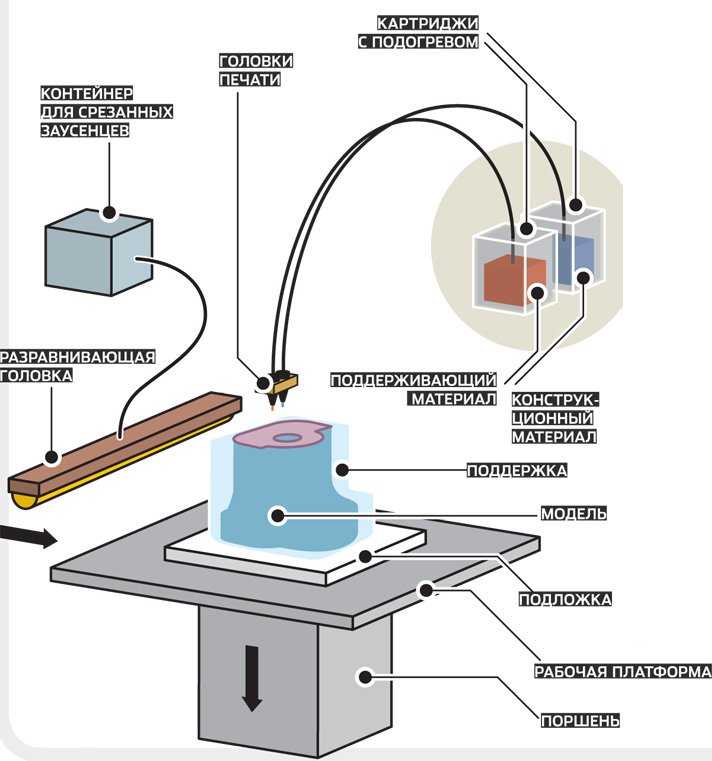
To begin with, let's immediately deal with possible confusion in terms. In industry literature, FDM (Fused Deposition Modeling) and FFF (Fused Filament Fabrication) 3D printing technology is abbreviated. What is the difference between them? Absolutely none, it's all about patent law. Initially, the technology was called FDM, and the patent belonged to the American corporation Stratasys. Competitors had to come up with an alternative name - FFF. Patent expired in 2009year, so nowadays these designations are completely interchangeable - a matter of taste.
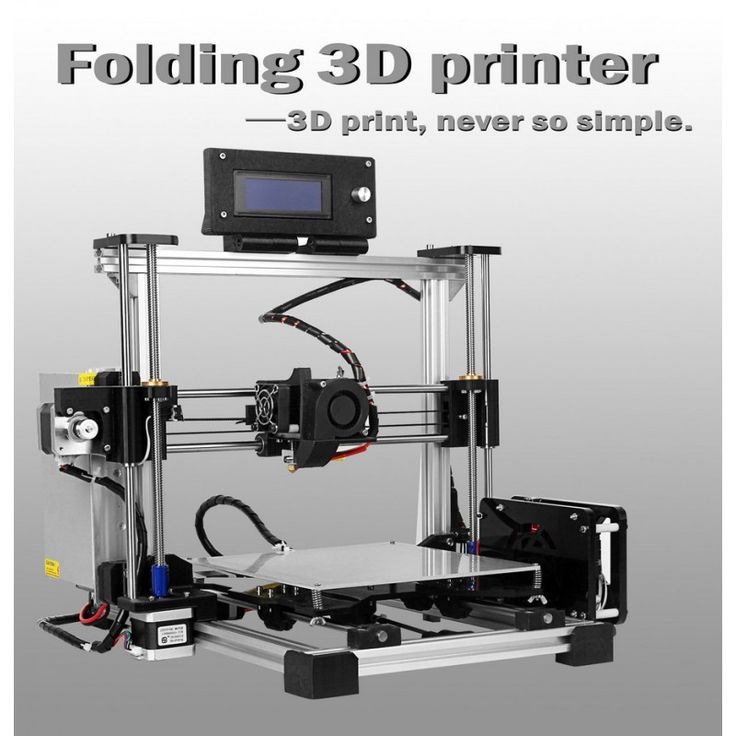
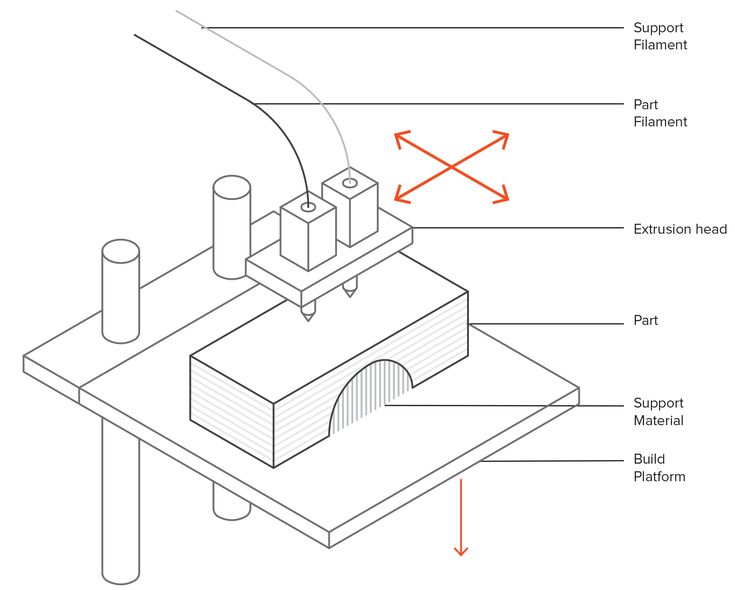
The technology itself involves the layer-by-layer application of a polymer melt with thin threads - layer by layer, until the entire model is grown. It is the most affordable and at the same time highly versatile 3D printing technology thanks to a huge range of compatible materials. This includes conventional polymers, and refractory structural thermoplastics, and even composites with various reinforcing and cosmetic fillers - fiberglass, carbon fiber, metal, ceramic, wood, and so on.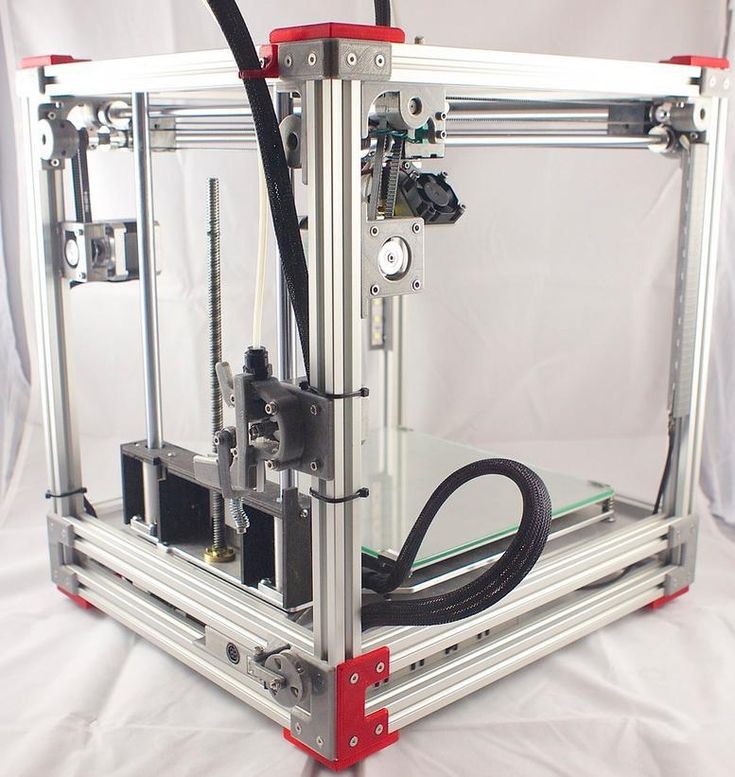
To understand how FDM 3D printing works, you first need to understand how FDM 3D printers work. Most of them are three-axis systems, relying on a conventional, rectangular coordinate system (aka Cartesian, aka Cartesian): left-right on the X-axis, front-to-back on the Y-axis, and up-down on the Z-axis.
How FDM works 3D printer
Main components:
Stage . This is the work surface on which products are built. Tables can be made of different materials (glass, aluminum and others) and are mounted on the platform. The platform can be cold or heated: heating often helps with adhesion (i.e. sticking) and shrinkage. More on this below.
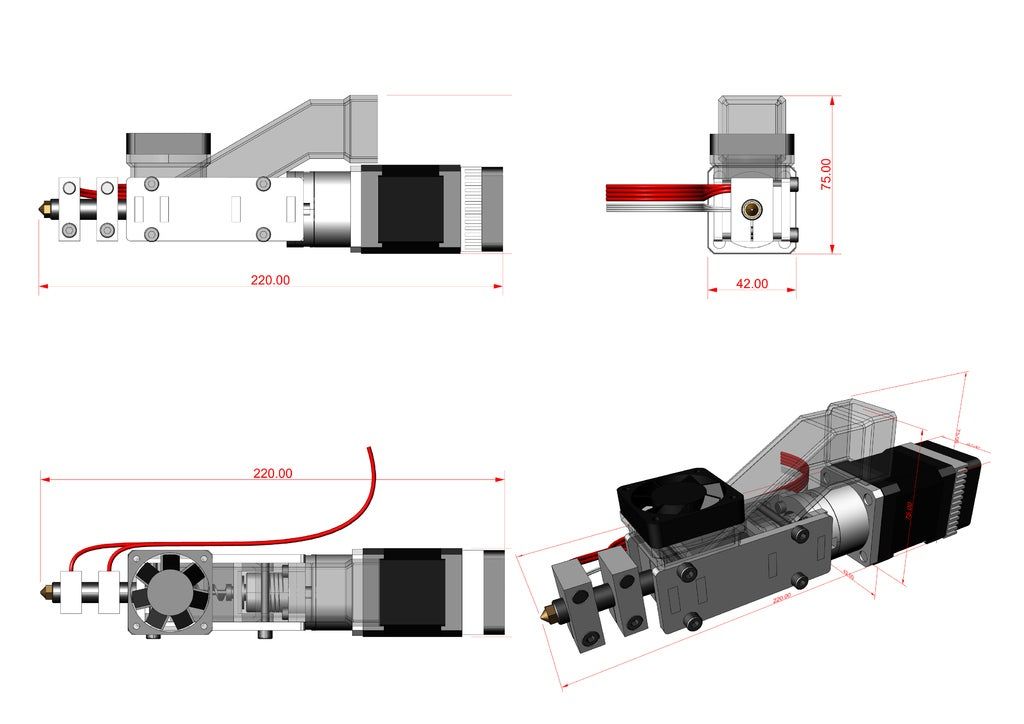
Extruder . Mechanism responsible for feeding the filament, heating the material and applying the melt. Extruders, in turn, consist of two parts:
- cold part, including a filament feeder with a motor and gears;
- hot end, including a hot end (a metal tube in which plastic is melted), a heating block, a nozzle, a heat sink and fans to cool the thermal barrier and the material to be laid.

3D printer with Bowden extruder
Extruders can also be divided into two types - Bowden extruders and direct extruders - according to the material feeding method. If only the hot part is installed on the carriage, and the cold part is attached to the frame of the 3D printer, such a scheme is called Bowden - in honor of the Bowden tube connecting the two parts and conducting the filament from the feeder to the hot end ( in the illustration above ). If the cold and hot parts are installed on the carriage together as a single unit, such a scheme is called a direct feed or direct extruder ( in the illustration below ).
3D printer with direct extruder
There can be several extruders on a 3D printer to work with different materials at the same time, but most systems, especially budget ones, are equipped with only one.
Control system . The operation of the electrical and mechanical components of the 3D printer is controlled by a board with a connected interface.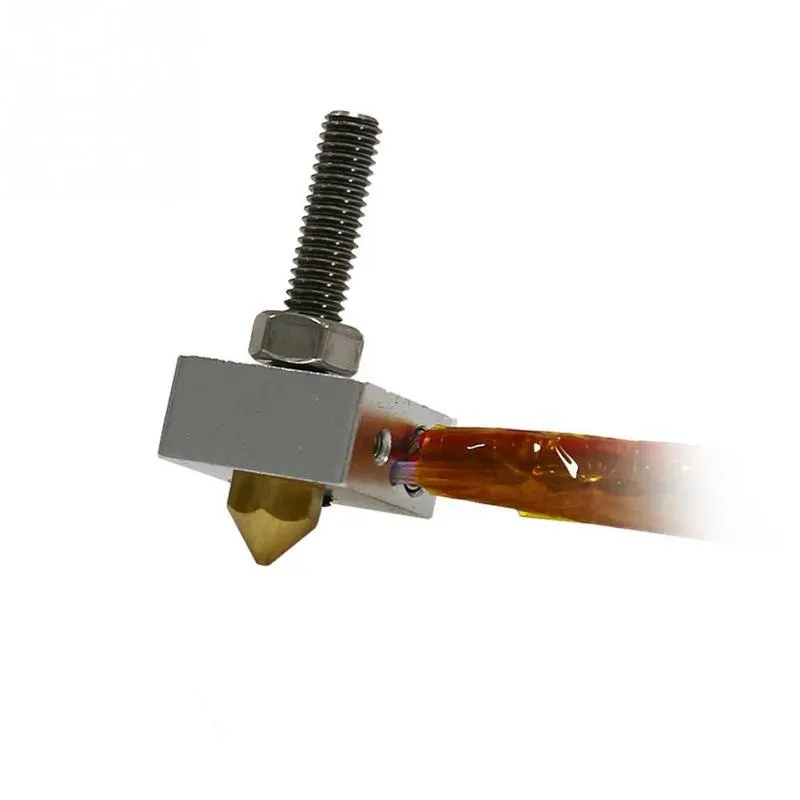 These can be either simple LCD screens with an encoder, a USB port and a card reader, or more advanced options with touch screens, built-in memory, wireless communication modules, and so on. It all depends on the manufacturer and the cost of the equipment.
How an FDM 3D printer works
The process begins with transferring a file with a digital 3D model converted into machine code (G-code, Gcode) to a 3D printer. Such files contain a complete set of step-by-step commands that tell the 3D printer to what temperatures the hotend and platform need to be heated, at what speed to feed the material, along which trajectory to move the head.
After receiving the start command, the 3D printer heats up the hot end and the stage to the set temperatures, depending on the plastic used. When the hot end is ready, the filament feed begins. At this point, the 3D printer is ready to print. Further, the head is lowered (or the table is raised towards the head, depending on how the equipment is arranged), and the melt begins to be applied to the table through the nozzle.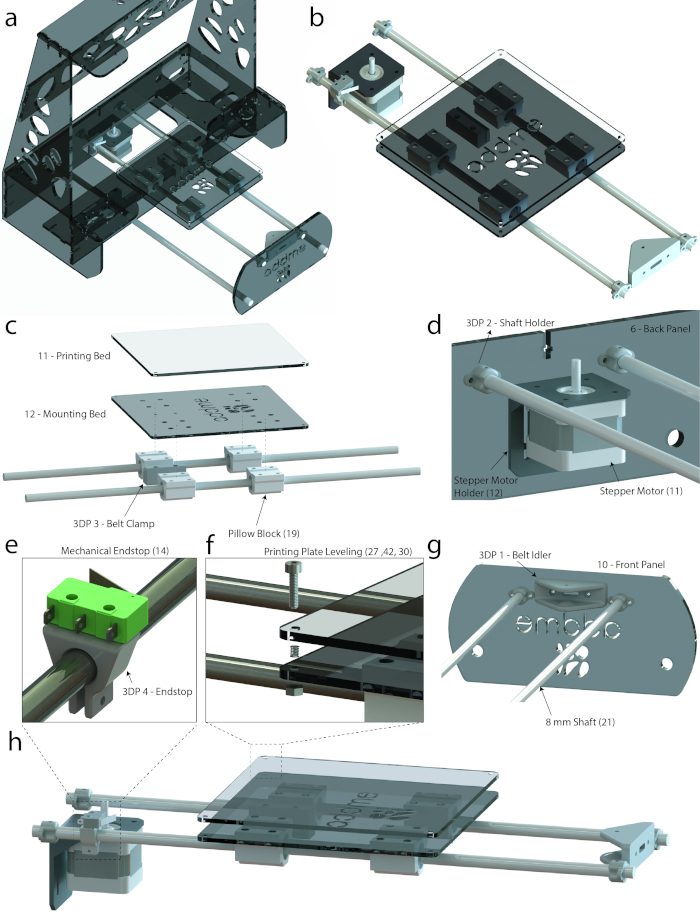 Depending on the material being used and the print speed, one of the fans on the head can blow over the plastic being laid to allow it to harden before applying the next layers. After applying the layer, the head rises slightly (or the table lowers), and then the laying of the next layer begins - and so on over and over again until the whole model “grows”.
How to make or find a digital 3D model
To print products, you need to have a digital copy on hand. There are two options here: you can model it yourself or to order, or you can find a ready-made 3D model on the Internet.
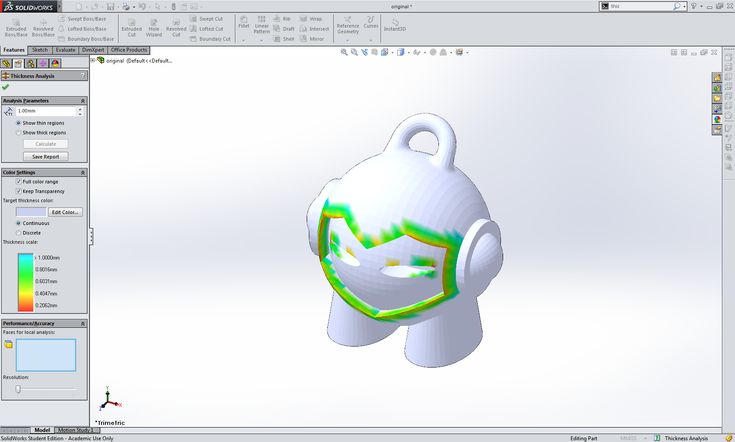
3D modeling requires special editing programs or computer-aided design systems such as Fusion 360, SolidWorks, Blender, Compass-3D and others. Some are offered for free, while others require payment. If you are ready to try your hand at 3D modeling, we have prepared a special article with links to the most popular programs, including free ones.
If you do not have the time or desire to model yourself and are not ready to pay professional modelers, there is also a way out: many sites, such as Thingiverse, 3Dtoday or MyMiniFactory, offer libraries with again paid and free 3D models designed specifically for 3D printing. A list of the most popular sites can be found in the article at this link.
Preparing digital 3D models for 3D printing
As we have already mentioned, 3D printers accept files with machine code, so having a digital model on hand is not enough - it must be processed into G-code using a special program called a slicer .
Slicers allow you to manually set 3D printing parameters such as temperature and speed, wall and layer thicknesses, infill density, and more. The program then “slices” the 3D model into horizontal layers (hence the name: to slice means “cut”), converts each layer into a series of machine instructions (G-code) understandable by 3D printers, and saves the code in a separate file, ready to 3D printing.
Support structures (supports)
One of the key functions of slicers is the generation of support structures, also called supports. FDM 3D printers cannot print by air - the nozzle must apply the material either to the table or to the already laid material. Accordingly, at strong angles of inclination or when building long "bridges" between different segments of the part, overhanging sections need some kind of support. The supports are just temporary structures, also printed by a 3D printer with the sole purpose of supporting the hinged sections of the model itself. Once the 3D printing is complete, such supports are removed - either by hand or with a solvent or even water if a special water-soluble filament such as REC PVA is used to print the supports. The option with soluble supports is relevant in cases where the 3D printer is equipped with at least two extruders - one prints the base material, and the other the support one.
Results of 3D printing of models with soluble support structures before and after removal of supports plastic will turn into garbage at the end of the work. There are other nuances: for example, supports should not touch vertical walls, otherwise it will be difficult to remove them later, and at the same time the risk of damage to the product will increase.
Fortunately, all popular slicers can analyze 3D models and place supports automatically. A detailed list and descriptions of the most popular slicers are available in the article at this link.
Preparing the FDM 3D Printer
Loading Filament . Consumables for FDM 3D printers are round bars of plastic called filaments. The filaments are wound on spools or supplied in coils. Coils are cheaper, but they need to be rewound onto spools by hand or the plastic can get tangled up during 3D printing.
The filament must be fed into the extruder before printing can begin. To do this, the hotend must be heated to a temperature that depends on the selected plastic. This information can be found on the packaging.
The filament is then inserted into the feeder, which feeds the filament into the heated hot end. If the automatic loading function is not provided, the filament can be threaded manually: to do this, press the drive gears of the feeder and gradually push the bar into the hot end until molten plastic flows from the nozzle.
Platform adjustment . Calibration of the 3D printer is very important, as the successful laying of the first layer depends on it. Before starting 3D printing, you need to make sure that the platform sits level. Many modern 3D printers are able to perform calibration automatically using built-in sensors, such as BL Touch. Otherwise, the platform must be manually leveled: for this, special adjustment screws must be provided under the platform.
The correct zero on the Z axis is the key to a successful start of printing
At the same time, do not forget to correctly set the zero on the Z axis, that is, the distance between the nozzle and the platform at the very beginning of 3D printing. If the distance is too low, then there will be problems with the supply of the melt, and if it is too high, then the plastic will not set to the surface of the stage.
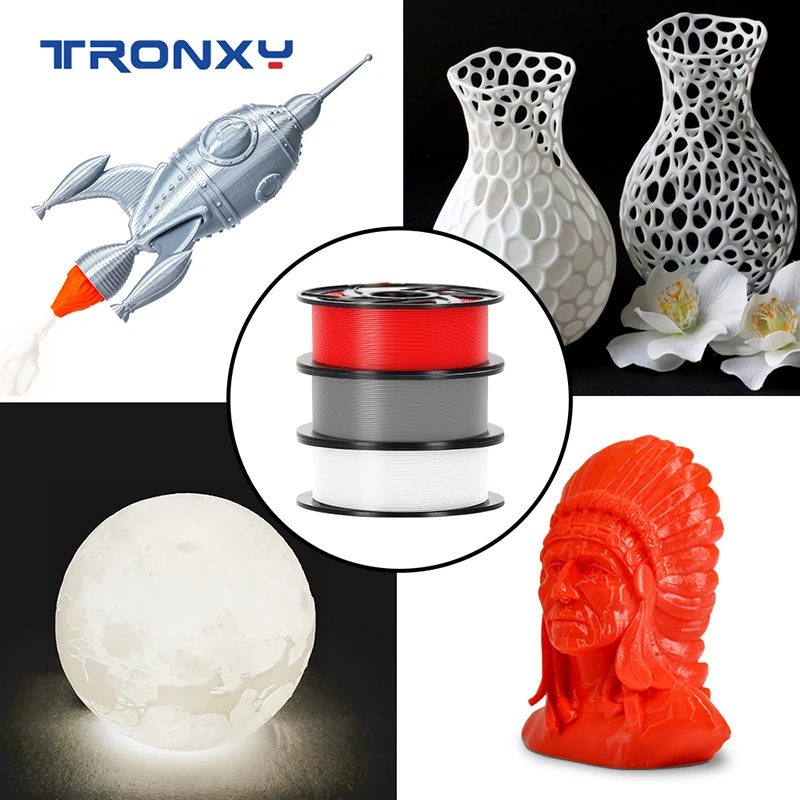
Consumables
As we have already mentioned, FDM 3D printers are loaded with spools of filaments. The most common bar diameter is 1.75 mm, but there are also printers that work with filaments with a diameter of 2.85 mm. This point must be taken into account when buying plastic for 3D printing. The mass of the coils can be different - from 500 g to 3 kg and even higher. Pay attention to the recommendations of the manufacturer of your 3D printer and the design of the system itself: in some 3D printers, the spool mounts are located inside the working chambers or special compartments, so a spool that is too large may not fit.
Compatibility of 3D printers with different materials depends on the maximum extrusion temperature, nozzle material, the need for a heated stage and the use of a heat chamber. For example, to work with polysulfone, you will need an extruder with a hot end temperature of 350-380 ° C, and if you are going to work with abrasive materials, such as composites of the X-Line, Clotho and Technika lines, the brass nozzle should be replaced with a more wear-resistant one, such as steel. Key parameters are always indicated on the packaging and in product descriptions.
Some examples of 3D printing plastics:
Polylactide (PLA, PLA), acrylonitrile butadiene styrene (ABS, ABS) and polyethylene terephthalate glycol (PETG, Relax) are the most common and inexpensive polymers with different properties, well suited for most applications .
Thermoplastic polyurethane (TPU, Easy Flex), styreneethylenebutylene styrene (SEBS, Rubber), and thermoplastic polyester elastomer (TPEE, Flex) are flexible, elastic polymers that replace rubber and silicone. They require special working conditions, a detailed guide is available at this link.
FormaX, GF Max, UltraX, Clotho and rPETG GF are carbon and glass reinforced composites with increased strength and wear resistance.
Polyetheretherketone (PEEK) and polysulfone (PSU) are refractory engineering thermoplastics that can replace metals in some applications.
A complete list of consumables is available in our catalog.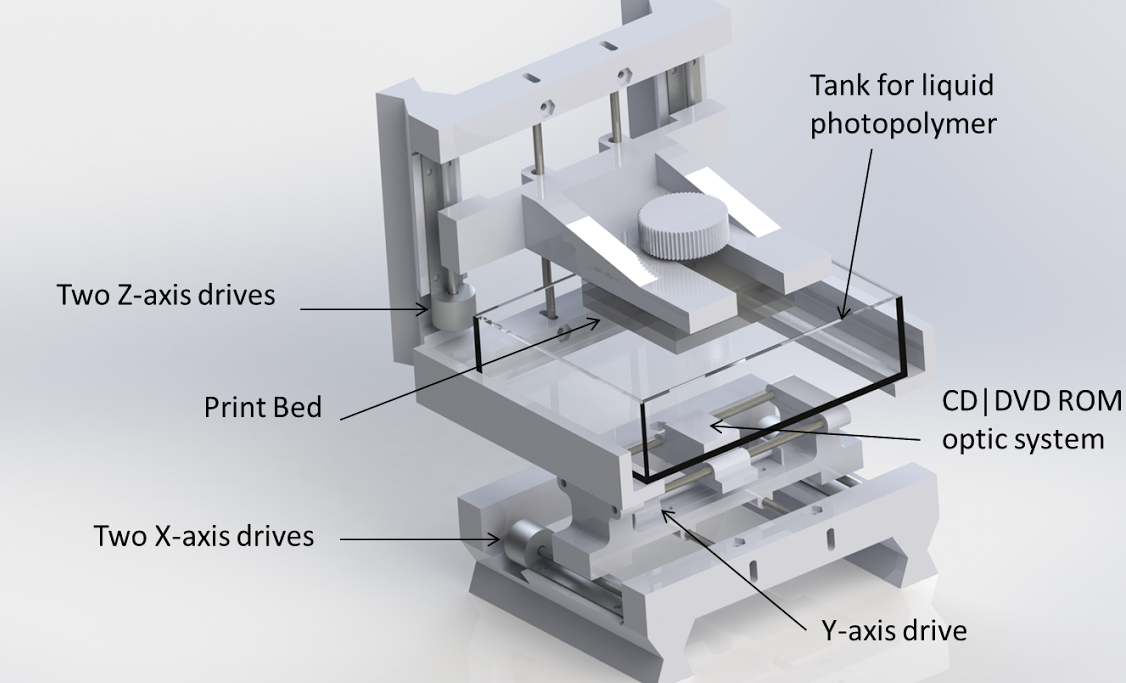
Post-processing
Post-processing is the last production step. Depending on the geometry of the product, the material used and the task at hand, this may include:
Remove supports . Support structures are often essential and need to be removed once the 3D printing is complete. This should be done carefully so as not to damage the product itself. If you have a 3D printer with at least two extruders on hand, the supports can be printed with soluble materials, such as water-soluble polyvinyl alcohol (PVA). This is somewhat more expensive, but greatly simplifies the procedure and improves the final quality.
Sanding . The visibility of the layers depends on the diameter of the nozzle, but ribbing in general cannot be avoided - this is the specificity of the layer-by-layer 3D printing technology. When working with hard plastics, the surfaces can be sanded to the desired smoothness.
Painting . Items can be printed in different colors using multiple extruders or manually changing the filament, but this approach is limited. Fortunately, most polymers lend themselves well to being primed and then painted.
Polishing and smoothing . Perfectly smooth, glossy surfaces can be achieved in two ways: either by polishing after sanding, or by chemical treatment. In the latter case, a suitable solvent will be required for surface treatment. Which one depends on the polymer. For example, acetone is good for ABS, but not effective for PLA.
Bonding and welding . Connections are necessary in cases where the products simply do not fit into the working area of the 3D printer. Many polymers can be bonded, but in some cases welding may be required, such as with a hot air gun.
Read more about post-processing in the article at this link.
Common problems
Web (left) and twist (right)
Curl . This usually occurs when the material to be laid cools, contracts and simultaneously pulls previously laid layers towards itself, causing them to break away from the table at the corners and edges.
Web . Thin threads of plastic between different parts of the model, appearing when the head is idle, may be the result of incorrect temperature, speed and retract settings. Some materials, such as PETG, are particularly prone to web formation due to their high fluidity.
Clogged nozzle . One of the most annoying faults that has ruined many models in the history of FDM 3D printing. Signs of a clogged nozzle are feed mechanism clicks and no melt flow from the nozzle. The reasons may be different: defective filament, incorrect temperature settings, inefficient cooling of the thermal barrier, and others.
Layer offset . Ripples or the so-called "ringing" on the walls of products most often indicates play or curvature of the shafts along the Z axis.
Under extrusion . Efficient material feeding problems can cause gaps in layers.
Overextrusion . The opposite is true here: Applying the melt too quickly leads to sagging.
A guide to troubleshooting the most common problems is available at this link, at the same time we suggest that you familiarize yourself with separate articles on cleaning nozzles and combating deformations.
Maintenance of the 3D printer
To keep the 3D printer in good condition, the following operations should be carried out regularly:
Cleaning the stage Before starting 3D printing, it never hurts to clean the stage with a cloth soaked in isopropyl alcohol and apply a fresh coat of glue, varnish or other adhesive if necessary. Read more about adhesion here.
Nozzle cleaning . Corks and carbon deposits are easier to prevent than to remove, so be sure to wipe the nozzle clean immediately after or at least before starting 3D printing.
Waste collection . During hot end warming up, 3D printers often "snot" - they squeeze out a small amount of melt before starting to build a model. Such "snot" should be promptly removed so that they do not interfere on the table and inadvertently do not fall into the moving mechanisms.
Consumable storage
Proper storage of filaments is a separate and very important aspect. First, many plastics age when exposed to ultraviolet light, so it is advisable to store the filaments in a dark place or opaque containers. Secondly, dust deposited on the bar can contribute to the formation of plugs in the nozzles. Thirdly, some plastics are very hygroscopic, that is, they easily absorb moisture, and this can lead to the formation of all kinds of defects.
The best option is to always store unused filaments away from sunlight in airtight bags or containers with silica gel sachets inside. The storage and drying of filaments are described in more detail in separate articles - here and here.
3D printing of intumescent material - 3D printers
print-material support structures support-material
I recently saw this video about Super Swelling Polymer and was inspired. Printing a swelling structure would be interesting in a way. However, sodium polyacrylate is not a printable material. Does anyone know of such material? Preferably, the swelling is activated by water.
@User2341, 👍5
Talk
2 answers
▲ 1
This video is about sodium hemicarbonate (C3h4NaO2) which is a superabsorbent polymer that has the ability to absorb 100 to 1000 times its weight in water. It is used as a desiccant on products whose moisture may be a problem mainly during storage before sale. The video shows how water gets inside the sodium polycarbonate particles, this happens inside a diaper or any product that absorbs the smell of urine, also used to control wastewater.
In addition, you can find something similar on some products that have a small bag labeled silica gel (SiO2).
, @ Fernando Baltazar
▲ 1
There appear to be at least two papers on the use of hydroxypropyl cellulose (HPC) filaments.
This proposal/article from the Journal of Drug Delivery Science and Technology July 30, 2015 appears to at least partially meet your criteria, Fused Deposition Modeling (FDM) 3D printing of a swellable/erodible capsule device for oral pulsatile drug release Melocchi et al.:
The aim of this work was to investigate the possibility of 3D printing by fused deposition modeling (FDM) in the manufacture of capsule devices for oral pulsatile release based on a swellable/erodible polymer (hydroxypropyl cellulose, HPC). This included experimental evaluation of the feasibility of fabricating hollow structures with FDM and producing HPC filaments by hot melt extrusion (HME), which are not commercially available.
In addition, it was necessary to create the appropriate CAD files. For processing HME and FDM, a twin-screw extruder equipped with a rod die and a specially designed pull/calibrator, as well as a MakerBot Replicator 2 3D printer, respectively, were used. Bodies and caps with satisfactory physical and technological properties have been obtained. The release test of the assembled capsule devices showed a delayed phase before the rapid and quantitative release of the drug. The morphological changes undergone by the device in contact with water and their release efficiency were found to be comparable to similar injection molded systems. Thus, the feasibility of fabricating oral pulsatile-release capsule devices by FDM 3D printing, starting from specially prepared HPC filaments, was demonstrated and the potential for real-time FDM prototyping was evaluated.
Fused Deposition Modeling (FDM) 3D Printing of Swellable/Erodible Oral Pulsating Drug Release Capsule Device | Request PDF. Available at: https://www.
researchgate.net/publication/282800986_3D_Printing_by_Fused_Deposition_Modeling_FDM_of_a_SwellableErodible_Capsular_Device_for_Oral_Pulsatile_Release_of_Drugs [Accessed 30 July 2018].
In addition, from the production and characterization of the £D printing thread by sewing materials V. Mirón, S. Ferrandiz*, D. Juárez, A. Mengual
There is also mention of pharmaceutical materials production as it reflects Melocchi 4 in its paper on filaments based on insoluble (ethyl cellosol, Eudragit RL c), rapidly soluble (polyethylene oxide, Kollicoat1 IR), enteric (Eudragit1 L, hydroxypropyl methylcellulose acetate succinate) and swelling/degradable (hydrophilic cellulose derivatives, polyvinyl alcohol, Soluplus1) polymers successfully produced
There is also this, which refers to Melocchi's article above, Fused Deposition Modeling (FDM) of 3D printed tablets for intragastric floating delivery of domperidone:
Domperidone (DOM).

Learn more