Diy structured light 3d scanner
9 Accurate DIY 3D Scanners You Can 3D Print At Home (2022)
3D scanners can get really expensive. We’d know – we’ve tested and researched them in creating our ranking of the best 3D scanners . However, if you’re willing to be a little more thrifty you can save a lot of money building your own DIY 3D scanner — and have a cheap 3D scanner you can feel proud of building yourself!
DIY projects, especially in an area where precision is key, have an unfairly slap-dash reputation. In fact, there are some very accurate DIY 3D scanners on our list, you just need to assemble them yourself.
The best part: they’re almost free if you 3D print the parts — your only costs are the camera/parts.
However, don’t be fooled – you won’t get $20,000-quality scans from these kits. And it takes focus and skill to build such a technical piece of kit – hence we’ve included a couple of easy-assemble kits which cost more, but let you get right down to scanning. For the DIY kits, we’ve included download links and links to documentation to get you started.
What Makes a Good DIY 3D Scanner?
- Price-performance ratio: for the price, how good are scans?
- Resolution: how crisp is scan quality
- Accessibility: you may be able to print most of the 3D scanner, but are the rest of the parts easy to buy?
- Ease of assembly and use: quick and easy builds are always better. The best 3D scanner projects can be built by anyone, newbie or expert.
3D Printable 3D Scanners
Ciclop DIY 3D scanners
Many of the best DIY scanner kits are based on the original Ciclop open-source files. Massive companies like BQ have created their version, as well as tweaked versions such as CowTech Engineering’s take.
We’ve included them all here, as each option are some of the most DIY accurate 3D scanner options for this price range. For a pre-assembled scanner with the same quality, you’d likely need to spend double this.
3DSourced is reader-supported. When you buy through links on our site, we may earn an affiliate commission. Learn more
BQ Ciclop
- Resolution: 0.3-0.5mm
- DIY 3D scanner technology: laser triangulation
- Price: around $150 — Available on Amazon worldwide here
BQ are a Spanish technology giant who are well-known across Europe for their smartphones, tablets, and 3D printers. They’ve also developed their Ciclop DIY 3D scanner, which scans a volume up to 250 x 205 mm, based on laser triangulation technology.
An important feature of the BQ Ciclop is that it’s a completely open source 3D scanner. You’re free to modify it as you wish, following the RepRap philosophy. It’s easily accessible via USB or Bluetooth, and can 3D scan with a resolution of between 0.3-0.5mm.
- We also have a ranking of the best open source 3D printers.
Another great addition to this DIY 3D scanner is that it works with Horus open source 3D scanning suite which BQ also developed.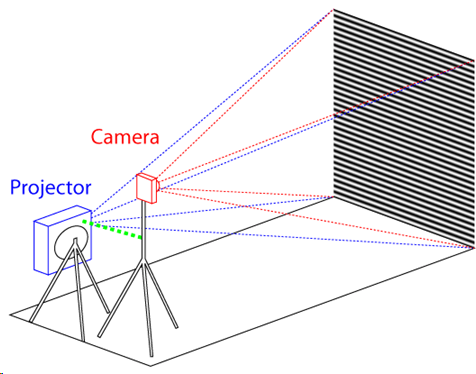 This makes scanning much easier with the compatible program. You can buy just the electronics (includes an Arduino, webcam etc) and print the parts yourself for $115, or buy the whole kit for $240. Not bad.
However, it is worthy of note that the BQ Ciclop is difficult to assemble. Other DIY 3D scanners are quicker and simpler to build, though the Ciclop is still a fantastic DIY 3D digitizer.
Murobo Atlas — Great Raspberry Pi 3D Scanner
- Resolution: 0.25mm
- DIY 3D scanner technology: laser triangulation technology
- Price: $200-250 — Available on Amazon worldwide here
Another homemade 3D scanner, the Atlas has the highest quality specs of any DIY 3D scanner we researched. It includes a 3D printed body made from PLA and ABS filaments, which can be purchased online. If you’re a serious DIY fanatic, you can print the parts yourself via the download link here.
Depending on if you already own a Raspberry Pi or not, you can save money on the build. This is because the Atlas DIY 3D scanner uses a Raspberry Pi camera to take detailed 3D scans with an accuracy of 0.25mm. Depending on your choice, the Atlas is likely to cost between $200 and $250, which is far less than most professional 3D scanners.
Moreover, Murobo has made considerable efforts to make sure that the Atlas DIY 3D scanner is convenient and simple to use. To achieve this, the Atlas comes with FreeLSS free 3D software which enables you to easily take 3D scans. In addition, you can access your Atlas via your computer’s browser through WiFi, as well as via SD card.
Overall, this DIY 3D scanner Raspberry Pi collaboration is a really interesting and creative way of combining several different innovative technologies to create a scanning device. If you’re an Arduino fan instead, you may be able to make it work for you too.
CowTech Ciclop
- Price: $119 – $159 (depending on whether you’re 3D printing the parts or not) — Available on Amazon here
- Resolution: 0.
 5 mm
5 mm - Maximum scan volume: 200 x 200 x 205 mm
BQ formed the foundations of the DIY 3D scanner kit, and remains one of the best DIY 3D scanner on tight budget options. Then back in 2015, CowTech Engineering used the foundations led by BQ, putting their unique spin on an updated model.
True to the open source movement, Cowtech started a Kickstarter campaign to raise money to put their version of the original, the CowTech Ciclop, into production. The team set the lofty goal to raise $10,000, and were met with surprise when the community rallies to raise $183,000. The CowTech Ciclop DIY 3D scanner kit was born.
So what are the differences between CowTech’s version and BQ’s DIY 3D scanner?
The CowTech Ciclop still uses the Horus 3D software program as it does a fantastic shop for 3D scanning objects. Differences however include a slightly different design, which the team spent days designing so that the parts could be 3D printed on any FDM 3D printer. Some desktop 3D printers only have a small build volume, so CowTech designed parts that can be printed on any printer with a build volume of 115 x 110 x 65 mm, which almost all 3D printers have.
Additionally, CowTech’s Ciclop has adjustable laser holders, and whereas the BQ Ciclop uses threaded rods, CowTech’s DIY 3D scanner uses laser-cut acrylic. This isn’t anything drastic and the scanners still look fairly similar, but CowTech only intended to improve the existing design, not reform it. CowTech sell the Ciclop, ready-to-scan, for $159 on their website. Overall, this is a great cheap DIY 3D scanner, and very effective for laser triangulation 3D scanning.The CowTech Ciclop DIY 3D scanner is an improvement on BQ’s revolutionary model.
OpenScan Classic and OpenScan Mini
- Max Scan Volume: 180 x 180 x 180 mm / 80 x 80 x 80 mm
- Accuracy: Up to 50 microns
- DIY 3D scanner technology: Photogrammetry
- Price: Starting at $100.
 00 up to $200.00 for a complete kit with 3D printed parts and electronic
The Mini and Classic are two low-cost but high-quality 3D printed DIY scanner projects designed by German company OpenScan. In action, the OpenScan uses a stepper motor mounted to a 3D printed frame to rotate an object to capture images from various angles. These are then compiled into a high-quality 3D model using open-source software or OpenScanCloud, ready for 3D printing.
Where the OpenScan Classic and Mini differ from one another is max scan volume and camera/SBC options. The Mini features an 80 x 80 x 80 mm scan volume, while the Classic more than doubles the scan volume to a roomy 180 x 180 x 180 mm, perfect for scanning larger objects.The Openscan Mini – the cheaper and smaller 3D printable 3D scanner.
The OpenScan Mini is tied to a Raspberry Pi and only works with either a Pi Camera or Arducam IMX 519 and includes one-click easy scanning.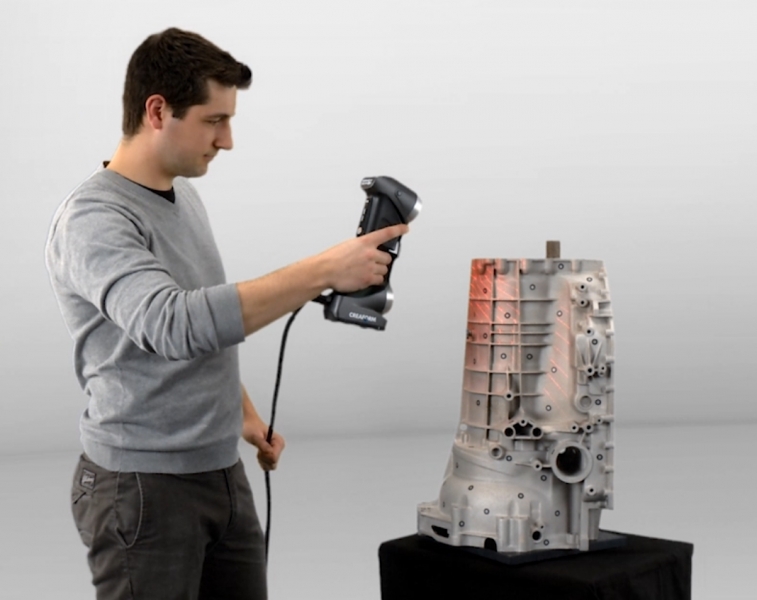 This allows the completed scanner to rotate not just the object but also the camera for a more detailed point cloud.
On the other hand, the OpenScan Classic is also compatible with Smartphones and DSLR cameras, which generally means better quality photos and, as a result, higher-quality models. It’s the tinkerer’s option and better suited for those that want to customize the scanner to their needs.
OpenScan offers a solution for all DIY skill levels and budgets, whichever model you decide on. You can customize kits based on your needs or order a complete kit that includes all the electronics and 3D printed parts.
The full assembly guide is here.
AAScan Open Source 3D Scanner Based on Arduino and Android
AAScan is a very recent (February 2020) DIY open source 3D scanner that’s fully automated in taking photos and moving the object around on the scan plate. All the files are on Thingiverse, which we’ve linked below. Interestingly, the creator stresses that the AAScan is intended to be a purposefully minimalist machine, able to scan but not filled with extra features beyond this primary capacity.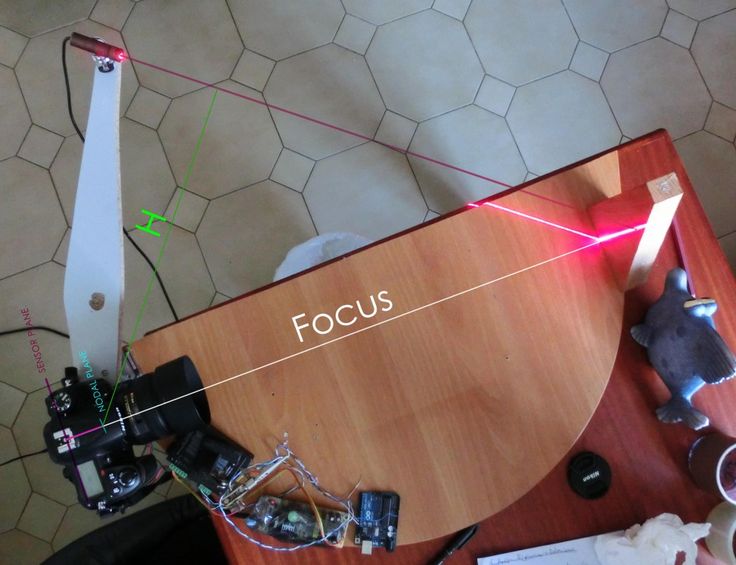
All the instructions for how to build, print and assemble the AAScan are on the Thingiverse page, requiring an Arduino, some electronics, and either a 3D printer to print the plastic parts or someone else to print them for you — such as from a 3D printing service.
You can view the DIY scanner on Thingiverse here.
FabScan Pi
- DIY 3D scanner technology: laser triangulation
- Price: $100-200 depending on which version
The original FabScan was a DIY 3D scanner built by Francis Engelmann as part of his Bachelor’s thesis back in 2010. Since then, there have been numerous improvements made in new iterations up to the newest model, the FabScan Pi. This new model uses a Raspberry Pi camera along with the new design to offer higher quality 3D scans.
Based on laser triangulation technology, the FabScan Pi is one of the best DIY 3D scanner options for those who are into doing it themselves. Depending on if you go for one of the older models or the latest, the price can vary between $100 and around $200 to completely create the 3D scanner. Overall, it’s a really cool kit and thesis which you can make at home.
If you want to create your own FabScan, you can follow the assembly guide here.The FabScan Pi is an interesting option with new evolutions being developed all the time.
DIY Standalone 3D Scanner by Jun Takeda
- DIY 3D scanner technology: Photogrammetry
- Price: $200.00
The DIY Standalone 3D Scanner is an excellent option for those that want a hands-on project that results in a reasonably accurate and easy-to-use stationary 3D scanner.
By combining a Mbed board with a camera and OpenCV libraries, the scanning process is largely automated with just a single button push. The scanner captures multiple images of an object to create a 3D model that’s then output as an STL file written to an SD Card.
To complete the project, you’ll need a GR-LYCHEE as a centerpiece sided by smaller electronic parts, plastic sheets to create the housing, and various nuts and wiring to piece it all together.
As the name implies, it’s very much a DIY project and, as such, would best suit those happy to troubleshoot any potential hurdles with little hand-holding. Though there are instructions, you’re responsible for designing the housing, wiring the board, and calibrating the camera.
Arduino-Controlled Photogrammetry 3D Scanner by Brian Brocken
- DIY 3D scanner technology: Photogrammetry
- Price: ~$100
The Arduino-Controlled Photogrammetry 3D Scanner is a 3D printable 3D scanner DIY project that leverages the camera on any run-of-the-mill Smartphone and a cheap Arduino UNO SBC to keep costs low.
The core idea is to assemble a turntable consisting of 3D printed mechanical parts, including a print-in-place bearing. A Bluetooth-connected Smartphone does the actual scanning via the normal photogrammetry process. As for electronic components, you’ll need a servo motor, LCD screen, Arduino Uno, PCB, stepper motor, Bluetooth remote, regulator, and a small joystick module.
Once assembled, the Arduino-Controlled Photogrammetry 3D Scanner can capture anywhere from 2 to 200 photos in a single 360° rotation for reasonably detailed scans. The images are then sent to photogrammetry software such as AutoDesk Recap Photo to assemble a 3D model.
Aside from the cost of filament, expect to pay no more than $100 for all the parts and the STL files to 3D print the turntable.
Semi-assembled DIY scanners
Revopoint POP / POP 2
- Price: $500-700 — Available at Revopoint store here
- Accuracy: 0.3 mm
- Max Scan Volume: 200 x 300 x 300 mm
- Scan Speed: Up to 8 FPS
- DIY 3D scanner technology: Structured light
Though not technically a DIY scanner, we thought we’d slide in the Revopoint POP as a cheat option for those that want to save time and want largely better quality scans than you’d get with a homemade alternative.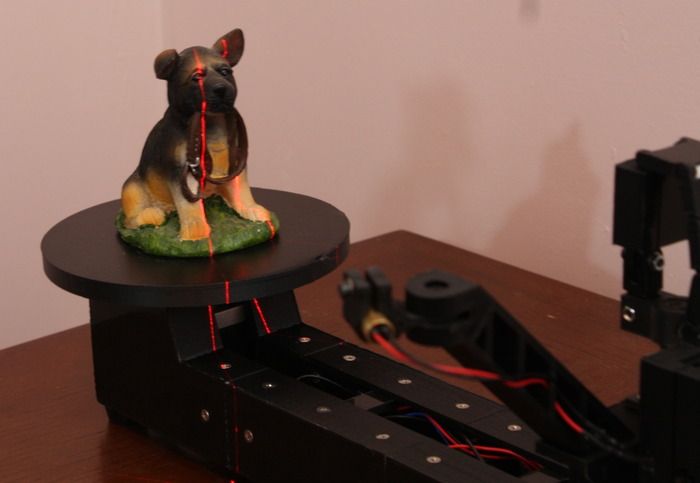
It comes semi-assembled – you just need to attach the tripod, connect the USB and the turntable, add the sticker markers for better scan tracking, and optionally build and attach the larger turntable – so you can get started in just 5 minutes!A basic mug scan we did on our Revopoint POP 2.
The catch? At around $500, the Revopoint POP is considerably pricier than a DIY scanner. Still, it may be worth paying the premium for the convenience and reliability.
The Revopoint POP offers 0.3 mm accuracy (the POP 2 offers within 0.1 mm!) and automatic alignment technology, making for more detailed and smooth full-color 3D models than DIY scanners. It can capture 360° scans of objects up to 200 x 300 x 300 mm, besting most DIY options.
The main benefit of all this is high accuracy scans that are just about ready for 3D printing with very little post-processing needed to iron out imperfections and poor surface details.A statue scan we did with our Revopoint POP 2.
Ease of use also extends to the intuitive software, which works with Smartphones for on-the-go scanning and features exports to STL and OBJ formats. Alongside, it bundles in best-of both-worlds handheld and stationary modes. Five different scanning profiles allow you to tune the POP to each scan with face, body, feature, mark, and dark mode.
Read more: we tested and reviewed the Revopoint POP 2
Can You Make a 3D Scanner?
- Choose a DIY 3D scanner design.
- Source the non-3D printable parts such as the camera, stepper motor, single board computer (such as an Arduino), wiring, and other electronic parts.
- 3D print the housing, brackets, turntable, mounts, and other parts required for the 3D scanner project.
- Wire and assemble all the parts.
- Configure and set up the single board computer.
- Test and scan.
FAQs
Which is the Best DIY 3D Scanner?
This depends on how much DIY you want to take on yourself, and how much you are ready to spend.
One of the most cost-effective options is scanners based on the Ciclop open-source 3D scanner design.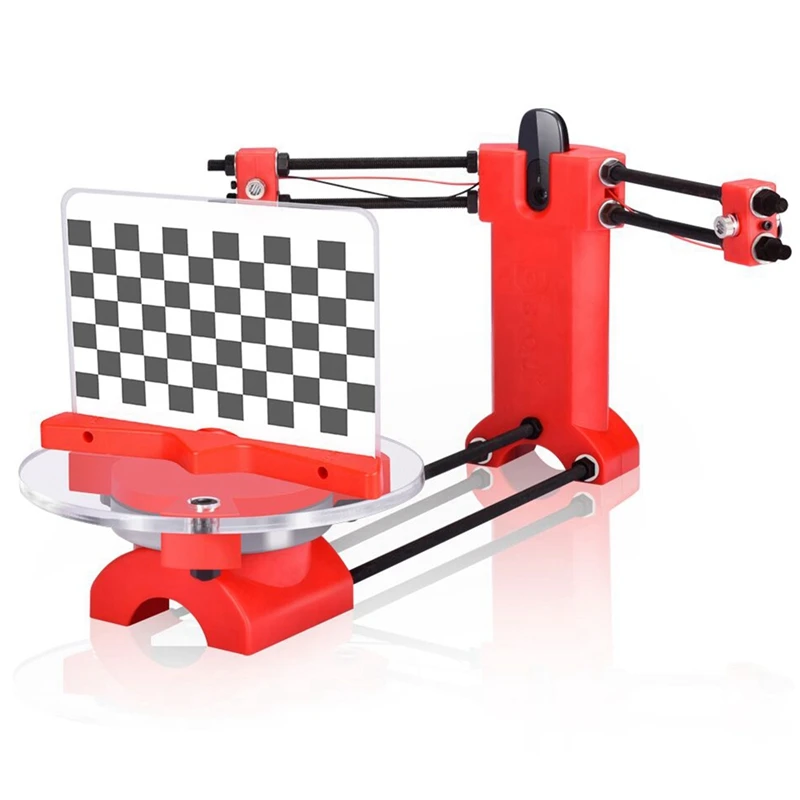 You can purchase a low-cost Ciclop scanner like the BQ Ciclop or CowTech Ciclop 3D scanner, then 3D print the parts from home and modify and tune the scanner to your liking.
Alternatively, the Revopoint POP is an excellent semi-assembled 3D scanner with great specifications and software at an affordable price for those that want to save time.
What is a DIY 3D Scanner?
A DIY 3D scanner is a cost-effective, home-made device constructed from manufactured or 3D printed parts designed to capture the characteristics of a specific object – such as size, surface details, and shape – by scanning it from multiple angles to create an equivalent point cloud that can be processed into a 3D model via software.
Other articles you may be interested in:
- The best 3D scanners
- The best low-cost 3D scanners
- Top 3D scanner apps for iOS and Android
- The best photogrammetry software
- Structured light 3D scanning vs laser scanning
- 3D body scanners: a guide
- Industrial 3D scanners
How to develop a low-cost 3D scanner using structured light
Develop a 3D Structured Light Scanner for Low Cost
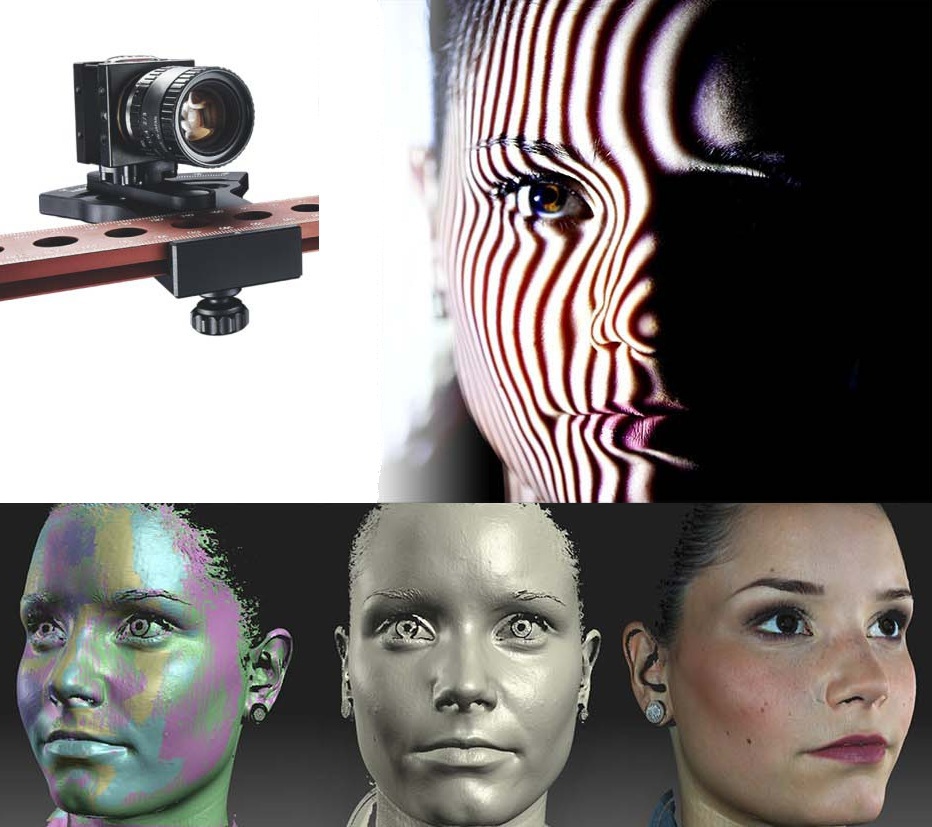
Structured light has become a prominent 3D surface measurement technique that is acknowledged for its high speed and accuracy.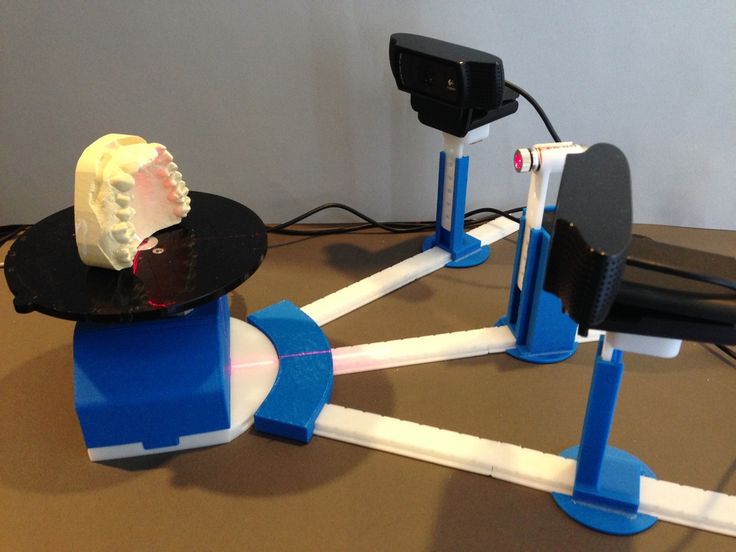 As the essential component of any structured light scanner, the industrial and scientific light engines are usually either quite expensive or have low brightness. As such, many hobbyists employ commodity projectors (bit.ly/VSD-SL3D). With a large diversity of commodity projectors available on the market, scanners of different scales can be built, ranging from pico projectors to theater projectors with the size of target objects ranging from several millimeters to several meters.
The principal difficulty of making structured light scanners with commodity projectors is to synchronize the graphics interface and the camera over HDMI. Because the instantaneous output of the HDMI port is unpredictable, an uncertain number of irrelevant frames could be inserted before the expected video frame is displayed, which makes it almost impossible for the camera to correctly capture the sequence of structured light patterns in an efficient way. Fortunately, with the dearth of FPGA development boards that have single or even dual HDMI ports, it is now possible to overcome this obstacle. One such FPGA module, used as part of this research, is the Xilinx (Santa Clara, CA, USA; www.xilinx.com) Spartan 6-based Mojo board, by Alchitry (Littleton, CO, USA; www.alchitry.com) or the Xilinx Artix 7-based Mimas A7 board by Numato Systems (Bengaluru, Karnataka, India; www.numato.com).
A team from the Department of Electrical and Computer Engineering, University of Kentucky, has developed FPGA-based projector controllers to build industrial-quality 3D scanners using commodity projectors. As featured below, one such system is a dualprojector structured light scanner composed of two Optoma Corporation (New Taipei City, Taiwan; www.optoma.com) ML750ST projectors, each of which has 500 lumens and a projection area with an approximately 36” diagonal. In addition to the FPGA-based controller, the system also features a Basler (Ahrensburg, Germany; www.baslerweb.com) acA1920-150uc USB 3.0 camera, which features the 2. 3 MPixel PYTHON 2000 global shutter CMOS sensor from ON Semiconductor (Phoenix, AZ, USA; www.onsemi.com) and a 150 fps frame rate.
The controller supports two working modes depending on the source of the structured light patterns. One mode internally generates the structured light patterns using the FPGA, while the other passes through the structured light patterns from the graphics interface on a PC, which could range from an Intel (Santa Clara, CA, USA; www.intel.com) Core i5 PC, off-the-shelf laptop, NVIDIA (Santa Clara, CA, USA; www.nvidia.com) Jetson, and even a Raspberry Pi (www.raspberrypi.org). When generated internally, Line 2 of the camera is configured as programmable output and is set high by the operator. The FPGA then sends structured light patterns to the projector and triggers the camera on the corresponding vertical syncs. Upon completing a scan, the operator sets Line 2 of the camera to low, telling the FPGA to stop sending structured light patterns and sending all black patterns instead.
When passing HDMI video from the host PC to the projector, Line 2 is still set low by the operator while patterns from the PC are passed through the scanner to the projector. The difference here is that the FPGA reads the red channel of the top-left pixel as a one byte of identification data indicating the number of the frame. By reading this top-left pixel as a handshake, the FPGA can decide if and when to trigger the camera with vertical syncs.
In this way, the operator can synchronize their pattern set to the camera without any loss of video and without dealing with the potential replication of frames by the graphics interface. There is no specific requirement for the graphics interface. Most PC graphics interfaces should work as long as they support OpenGL SL 3.3 or higher. Besides conducting the handshake for the system synchronization, the software running on the PC also sets up parameters under which the camera operates, such as exposure time, trigger source, resolution, etc.
In the 3D scanner, the projectors run at 120 fps using either an 8 or 24 frame structured-light sequence, depending on the required scan accuracy. The system can make 5 to 15 scans/second, and according to our experimental data, the scanner achieves a scanning accuracy with less than 2 mm standard deviation at 1 m range in its 5 scans per second mode.
For developers or designers interested in assembling their own scanner, sample project files have been made available at bit.ly/VSD-3DSL.
Ying Yu is a PhD student, and Daniel L. Lau is a Kentucky Utilities Professor and Certified Professional Engineer. Both are with the Department of Electrical and Computer Engineering, University of Kentucky (www.uky.edu).
90,000 parts and technology. Self-made 3D scanner - ABC IMPORTContents of the article:
- The principle of operation of shooting in volumetric mode
- What is photogrammetry and how it affects the display of objects
- Turntable - the second stage of creating a scanner 0 Additional software
- Spinscan by Tony Buzer: the foundation of all scanners
- FabScan
- VirtuCube
- BQ - laser scanning system
- "Atlas" - a completed project that needs some work
- CowTech Ciclop: a new model of a multifunctional device
- So what is the difference between the CowTech version and BQ DIY
- Turntables and tables for creating scanners
- Microsoft Kinect 3D scanner 9007 Before you build a scanner
If you want to make your own 3D scanner, the first step is to find a webcam. If you have it, the cost of the entire project will cost 40-50 dollars. Desktop 3D scanning has made great strides in recent years, but it still has major limitations. The hardware of the technique is built on the basis of a certain volume and resolution of scanning. You can get good results only if your subject meets the requirements and shooting resolution.
How 3D shooting works
You will be interested in: How to control your TV from your phone: recommendations
Photogrammetry uses a set of conventional 2D photographs taken from all sides around an object. If a point on an object can be seen on at least three images, its location can be triangulated and measured in three dimensions. By identifying and calculating the location of thousands or even millions of points, the software can create an extremely accurate reproduction.
Unlike a hardware scanner, this process has no size or resolution restrictions. If you can photograph an object, you can scan it:
- The limiting factor in photogrammetry is the quality of the photographs and therefore the skill of the photographer.

- Photographs must be clearly visible and clearly in focus.
- They must also be placed around the object so that every part of them is covered.
Without a 3D scanner, you can only make a 3D image of large objects. Small items cannot be scanned. To understand this in more detail, we will analyze the concept of photogrammetry.
What is photogrammetry and how does it affect the display of objects?
You will be interested in: Hair dryer for curling: an overview of the best models, specifications, reviews
Photogrammetry is the science of taking measurements from photographs, especially to reconstruct the exact position of points on a surface. It can also be used to reconstruct the motion paths of designated reference points on any moving object, its components, and in close proximity to the environment.
In short, it gives you the ability to create a 3D grid from multiple photos by comparing similarities between images and triangulating them in 3D space.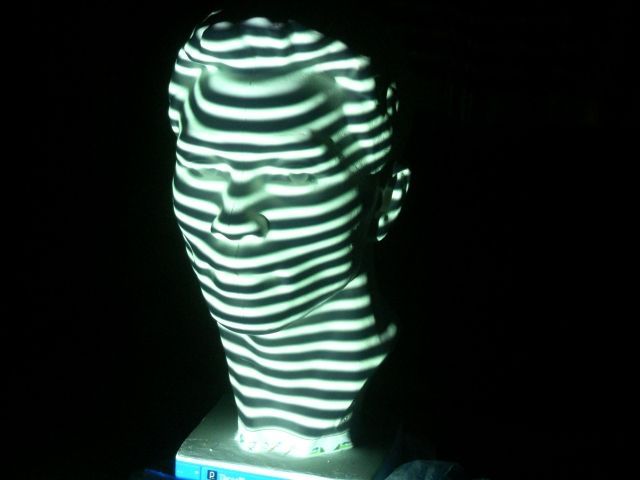
Photogrammetry has been around for a while, but it wasn't until Autodesk jumped into its Memento beta program that things started to work. Memento was renamed to ReMake when it left the beta phase. Sounds like magic, right? Well, it's not magic, it's reality. Now anyone can do 3D scanning without spending hundreds on a scanner. Even affordable open source 3D scanners require quite a lot of knowledge to get them to work properly. With photogrammetry anyone can get what they want.
Turntable - the second step of creating a scanner
All you need to create your own 3D scanner is your smartphone, the included headphones and a player. Here's how it works: you turn the crank, and for every full turn of the turntable, the phone's camera is triggered by the headphone volume 50 times.
You will be interested in:Audiophile headphones: rating, review of the best models
Simple! Transfer photos to your computer and then use Autodesk ReMake to do wonders. It's amazing, but not only is it good at meshing, it also provides tools to tweak the mesh, repair holes, align, prepare for 3D printing, or serve as a system shape as a 3D resource for games or renders!
Well, given that Apple has removed the headphone jack for the iPhone 7 and above, an updated version of the scanner creation will be used. It is based on the principle of working on a trigger for a Bluetooth camera. This will replace the need for a headphone jack.
- High quality photogrammetric scanning requires high quality photographs of the subject from all angles.
- The easiest approach for scanning small things is to rotate the object while taking the photo.
- To do this, the scanner uses a stepper motor controlled by the Arduino board.
- The stepper rotates the object by a fixed amount, and then the infrared LED goes out in a freaking ingenious series of flashes that mimic the camera's wireless remote control.
An LCD screen with a set of buttons allows the user to control the Arduino.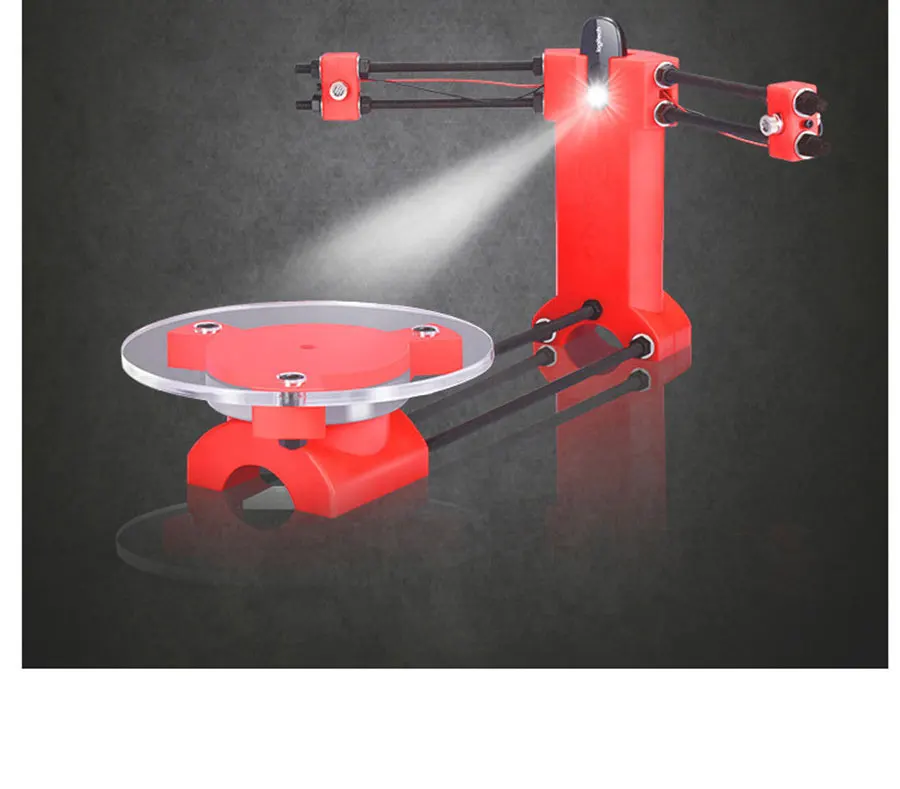 Using the buttons, the user can select the number of shots to be taken per revolution. A high quality DIY 3D scanner can work in automatic mode, where it takes a picture, advances the stepper motor and repeats it until it completes a full revolution.
There is also a manual mode in which each press of the button takes a picture, moves the jog dial and waits. This is useful for scanning details. The 3D scanner focuses on the frame around the image.
Optional software
When the photogrammetry software detects a feature in a photo, it tries to find that feature in other images and records the location on all pictures that appear.
There are two solutions:
- One is to move the camera around the subject so that the background stays in sync with the movement.
 This is good for large objects, but it's much more difficult to automate the process.
 - An easier solution is to leave the background untouched. This is easier to do for small objects. Add the right lighting to that and you're on your way to featureless backgrounds.
Another tip is to overexpose your images with a stop or two. This allows you to capture more detail in the subject's shadow while separating the background so that any remaining background objects disappear into brilliant white.
- "Arduino". It has pins that are not covered by the LCD screen, making it easy to connect.
- SainSmart 1602 LCD Shield which has a display and some buttons to control the scanner.
- Stepper motor driver (Easy Driver).
The NEMA 17 stepper motor will rotate the scan object. With a large stepper motor (with appropriate driver and power supply), this high quality DIY 3D scanner could scale up the scan. 950 nm IR LED triggers the camera.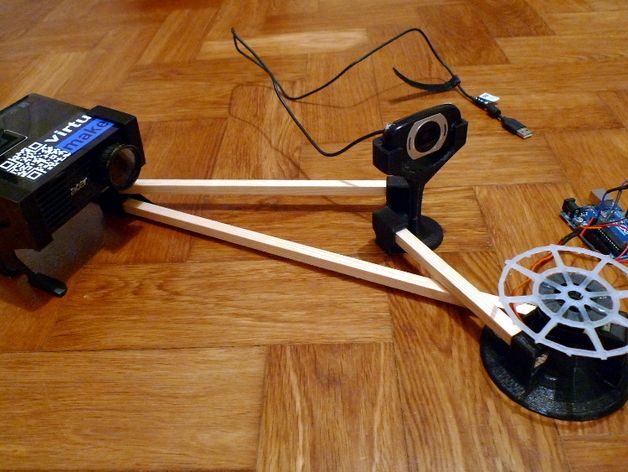 Some popular models of handheld 3D scanners are based on this principle. You can repeat the building process with your own hands. We offer several options to choose from.
Spinscan by Tony Buzer: the basis of all scanners
You will be interested: Where to put the tablet in the dishwasher: instructions
In 2011, 3D printing genius Tony Buzer released Spinscan. This is a homemade open source 3D scanner based on a laser and a digital camera. Later, MakerBot used the ideas from Spinscan to create the closed source Digitizer Scanner.
FabScan
FabScan started as a graduation project and has since been adopted by a small community that continues to work on improving its capabilities. The FabScan works like many other laser scanners, but it's aided by a built-in housing that helps even out light levels, preventing scan distortion.
VirtuCube
An alternative method for laser scanners is the structured light scanner. Using a pico projector instead of a laser, the VirtuCube can be easily created with a few printed parts and basic electronics. This whole system can be placed in a carton box to prevent other light sources from causing printing errors.
Two exciting new open source laser scanners have already been released: The BQ Cyclop and Murobo Atlas.
BQ - laser scanning system
Spanish consumer electronics company BQ announced the Cyclop 3D scanner at CES. Cyclop uses two laser line levels, a standard USB webcam, and BQ's custom Arduino controller. BQ has written his own scanning application called Horus. While reports say the Cyclop isn't available yet, BQ says it will be later this year.
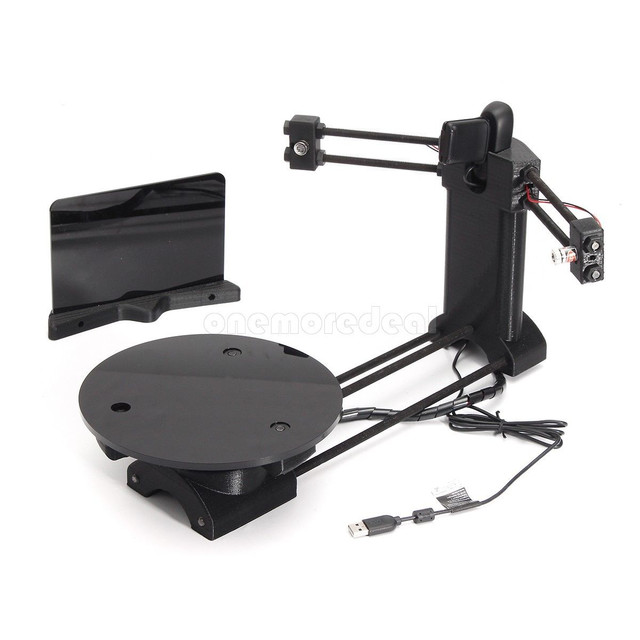
"Atlas" - a project in progress, requiring further development
Murobo's 3D scanner with a description of how it works is currently seeking funds on Kickstarter. Like Spinscan, Digitizer and Cyclop, Atlas uses laser line modules and a webcam to scan an object on a rotating platform. Atlas replaces the Arduino Raspberry Pi to integrate control and capture into a device. Like Cyclop, the creator of Atlas promises it will be an open source project.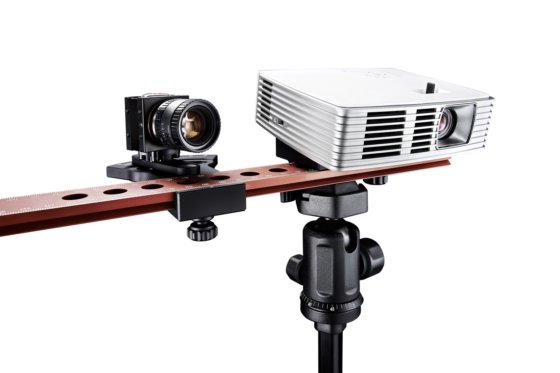 Sets for 129dollars sold out, but some remained at $149 and $209.
In 2019, the company aims to launch a smartphone-based 3D scanner that not only displays background visibility but also constructs focus when capturing an image. In America, DIY novelties are amazing. If you don't know how to make a 3D scanner, use the unfinished version of Atlas. There is a fairly clear functionality, and developers only need to flash the device and ensure the operation of those functions that they want to see as a result.
CowTech Ciclop: new multifunctional
Price goes up to $160 (depending on whether you print 3D parts or not). The company is based in the USA. The resolution of the finished images reaches 0.5 mm. Maximum scanning volume: 200 × 200 × 205 mm. BQ formed the basis of a DIY 3D scanner kit for a 3D printer. With your own hands, you can modify the version of the model to create images in four-dimensional space.
CowTech Engineering leveraged BQ-led funds to give unique value to the updated model. Opportunities added:
- environmental review,
- background capture,
- inverted style lens display.
True to the open source movement, Cowtech launched a Kickstarter campaign to raise money to launch a production version of the original, Ciclop CowTech. The team set a lofty goal of raising $10,000 but was greeted with surprise and delight when the community was able to raise $183,000. The CowTech Ciclop DIY 3D scanner kit from a camera and phone was born.
So what's the difference between the CowTech version and the BQ DIY version?
CowTech Ciclop still uses Horus 3D software as it is a fantastic store for 3D object scanning. The differences, however, lie in a slightly different design, which the team spent several days developing so that the parts can be 3D printed on any FDM 3D printer.
The same blanks can be used to design your own devices. The company's 3D scanners and printers only have a small build volume, so CowTech has designed parts that can be printed on any printer with a build volume of 115×110×65mm, which is found in almost all 3D printers.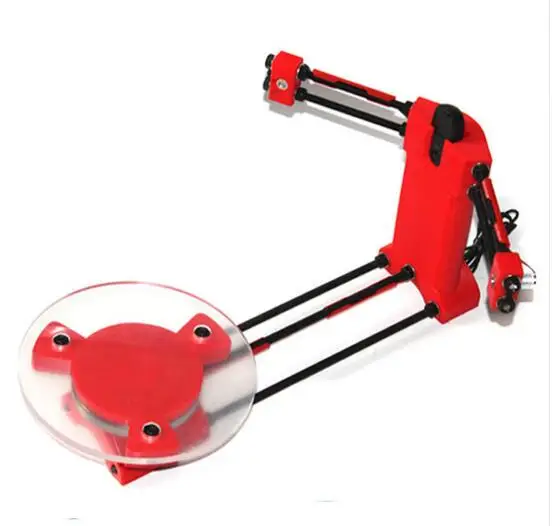
Ciclop from CowTech:
- There are adjustable laser holders here.
- CowTech DIY uses laser cut acrylic.
BQ Ciclop:
- Models use threaded rods.
- No laser cut acrylic.
No big deal, and the scanners still look pretty similar, but CowTech only intended to improve on the existing design, not reform it. CowTech sells scan-ready Ciclop for 159dollars on your website. All in all, this is a great cheap DIY 3D scanner, very efficient for laser triangulation 3D scanning.
Rotary machines and tables for creating scanners
This is because it is based on photogrammetry rather than laser triangulation and is compatible with your smartphone! You can download the 3D printable file to sync devices.
You can make a 3D scanner with your own hands from improvised means. You just need to trust the creators of DIY 3D. A simple device instantly turns your iPhone or Android into a 3D scanner by connecting it to this player. Then, using headphones and a phone camera, he takes over 50 photographs of the object, which will be scanned as the turntable rotates.
Once you have taken these images, you can load them into a program such as Autodesk ReCap to turn the photos into a full 3D file.
Overall this is a fantastic creative project and a great DIY 3D scanner for people on a budget.
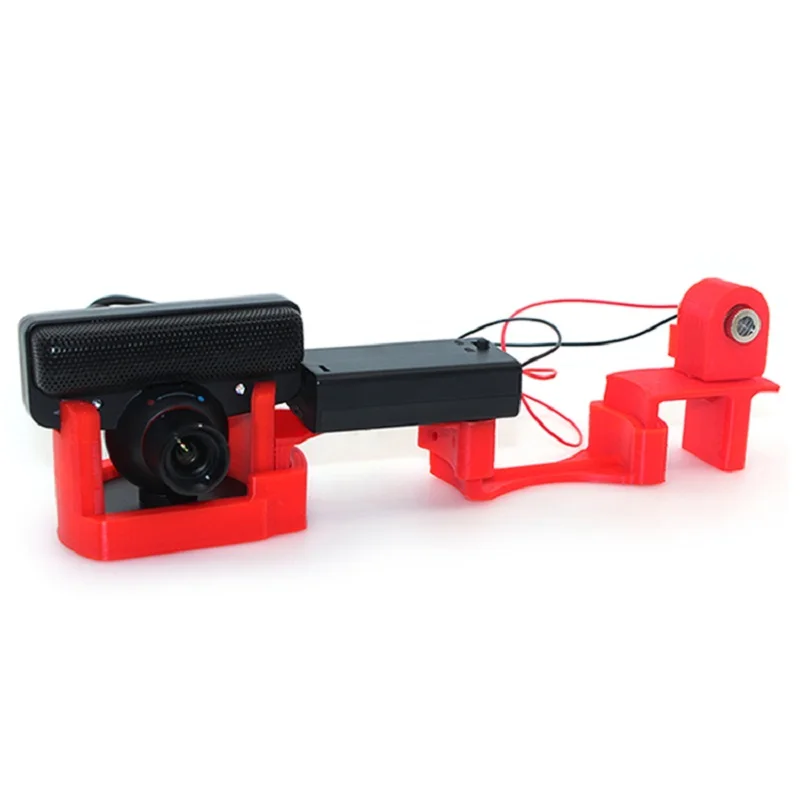
Microsoft Kinect 3D Scanner
It's even lower at just $99 (but no longer sold, though Kinect V2 is still available with Xbox One). The company's slogan is: "Make your own 3D scanner from Kinect and surprise your friends.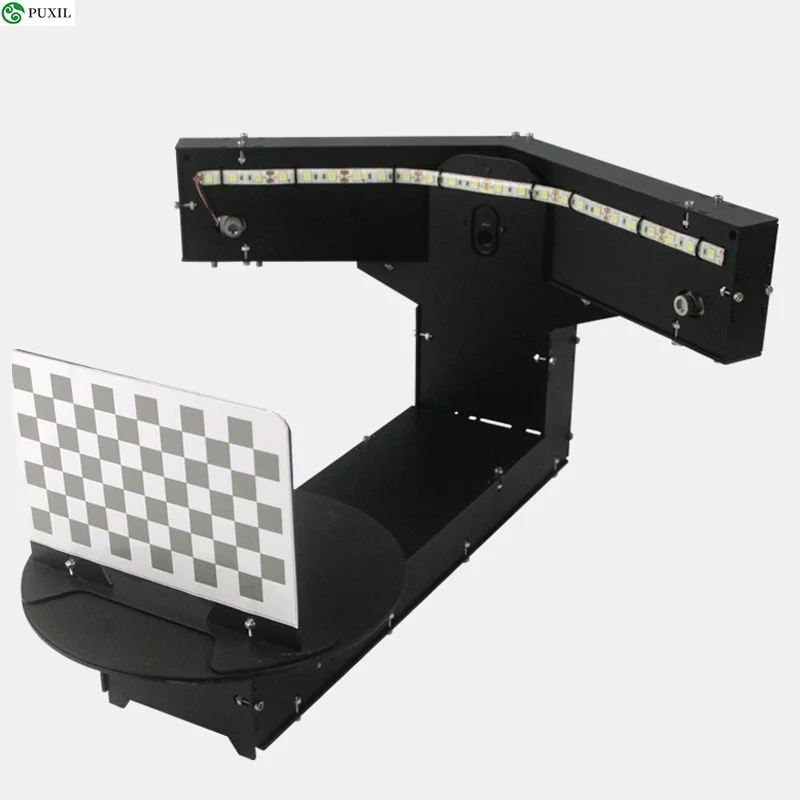
While Microsoft has responded to demand by creating its own 3D Scan app for the Kinect scanner, there are a number of third-party options that may be preferable. These are:
- Skanect, made by Occupital, which also sells a structure sensor.
- Reconstruct Me. It provides a set of tools that allow you to perform 3D scanning for less than $100.
You will be interested in: How to measure the diagonal of a TV: basic methods
The results are not fantastic, but for the price they are quite acceptable. It has been shown to be inferior to traditional protogrammetry in quality, especially in fine detail, such as on small models such as shark teeth. However, for beginning 3D scanners this is a fantastic entry level product, especially since you may already have one for the Xbox 360. Of course, in order to know how to make a 3D scanner from your phone with your own hands, you need to calculate what is needed for this. If you plan to use Pi Scan to control your cameras, then you should use the Canon PowerShot ELPH 160. But if you are using some other setup, here are some general recommendations for choosing cameras:
 ).
).
Much depends on the budget. Scanners are sold at the same price as cameras. If you want to do everything yourself, then the budget is limited. Pay attention to the affordable segment of the optics and spare parts market.
- The first difficulty encountered in building a 3D laser scanner is finding a rotating platform. At the same time, it needs to be controlled only with the help of MatLab. Instead of spending a lot of money or time, you can buy a 28BYJ-48-5V stepper motor with a ULN2003 drive test module board.
- Next, glue the platform to the stepper motor shaft and place it in the groove inside the holder. The platform should be flush with the "marble", but keep in mind that the cheaper it is, the more inconsistent diameters that can make things not level.

- If you have a method for obtaining precise rotation that can be controlled in Mat Lab, set up the camera at any distance and height, as well as the laser line to the left or right of the camera and the turntable. The angle of the laser should be optimal to cover most of the turntable, but nothing needs to be exact, we'll handle the difference in model scale in code.
- The most important part for proper operation is camera calibration. Using the MatLab computer vision toolkit, you can get the exact focal length and optical center of the camera with an accuracy of 0.14 pixels.
Please note that changing the camera resolution will change the values of the calibration process. The main values we are looking for are the focal length, measured in pixel units, and the pixel coordinates of the optical center of the image plane.
Most cheap compact cameras do not have a software interface. They can only be operated manually or mechanically. But a team of volunteers has developed software that allows you to remotely control and configure Canon compact cameras. This software is called CHDK.
- The CHDK is downloaded to the SD card, which is then inserted into the camera.
- When the camera starts, CHDK starts automatically.
- Because CHDK never makes permanent changes to the camera, you can always just remove the dedicated CHDK SD card for normal camera operation.
CHDK is an essential prerequisite for the software controllers listed below. The controllers run on a PC or Raspberry Pi and communicate with the CHDK software running on the cameras via USB. With other kinds of cheap cameras, the only control option is some kind of mechanical or manual start through the installer programs as shown above.
Source
Structured Light Digitization vs. Handheld 3D Laser Scanning
As technology continues to evolve, the 3D scanning market boasts a wide variety of brands, device categories, and price ranges. Today we will take a detailed look at the key selection criteria for an industrial 3D scanner and provide information on the characteristics and applications of various types of metrological systems.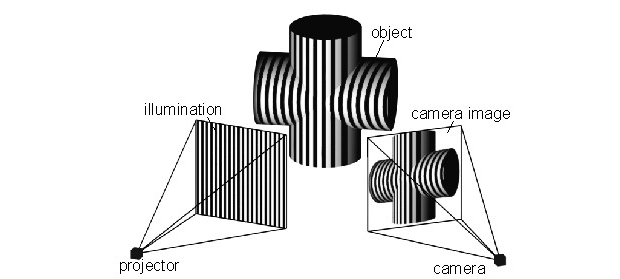
3D metrology scanner selection criteria
When evaluating the capabilities of various 3D scanning devices, the following points play the most important role:
User side:
- requirements for data quality, accuracy and detail;
- usage scenarios, size of scanned objects, textures and digitization time;
- budget.
From the manufacturer:
- user reviews;
- brand and services offered;
- software and updates.
Let's compare two examples of 3D scanning systems in our range:
OptimScan 3D Metrology Scanner with Blue LED Structured Illumination
The OptimScan system is designed to digitize relatively small objects with high precision and detail: cast and forged parts, molding and foundry tooling, plastic components, fine detail products, and the like. It can be used in conjunction with collaborative robotic arms, for example, for digitizing large objects - car bodies, stamped parts, and so on. Applications include automotive and transportation, electronics, molding and foundry tooling, aerospace, and others.
FreeScan UE Handheld 3D Laser Scanner
The FreeScan UE 3D Scanner lets you capture medium to large objects, as well as work with dark and reflective surfaces. Examples include casting dies, clay models, automobile bodies, aircraft engines, large blades and vanes, and the like. Applications include automotive, rail, energy, construction and others.
Structured Illumination 3D Scanners: Precision and Detail
High-precision systems based on structured LED illumination technology and handheld 3D laser scanners form a point cloud in different ways. The former build the cloud in separate solid frames, while the latter generate a cloud by combining and merging frames with a partial display of the object.
Structured light 3D scanning features:
- stable accuracy of the metrological level, in the case of 3D scanners of the OptimScan line, reaching 0.
 005 mm;
 - good detail.
Level of detail when digitizing with the OptimScan 3D scanner
3D handheld laser scanners: compact and versatile
3D handheld scanners offer the advantages of being compact and adaptable to a wide range of materials through the use of laser emitters:
- handheld 3D laser scanners are flexible, easy to use and fast: the FreeScan UE 3D scanner weighs only 750 grams, and it takes about ten minutes to digitize a car;
- wide range of material compatibility: dark and reflective surfaces can be digitized without the need for frosting sprays;
- high accuracy, in the case of FreeScan UE up to 0.02 mm with high repeatability.
Key points for choosing between two types of metrology 3D scanners
The main thing to pay attention to is data quality requirements and working conditions.
For high demands on quality and detail, we recommend using 3D scanners with structured illumination technology.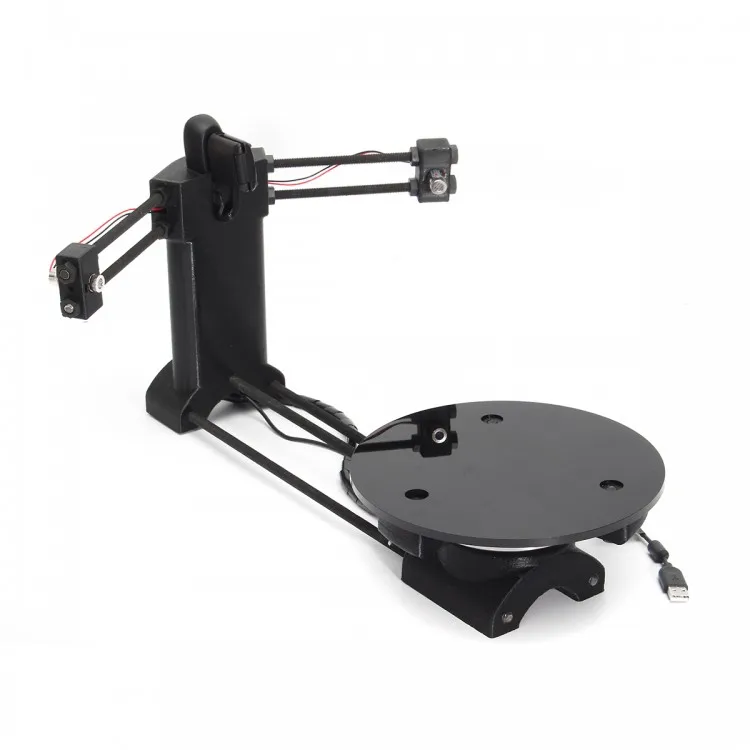 Examples:
3D scanning of small objects with high precision and detail
3D scanning on the production line with the required accuracy in the range of 0.005-0.015 mm
If compactness and versatility are in the forefront, handheld 3D scanners are worth using. Examples:
3D scanning of stationary, bulky, non-separable objects
3D scanning of dark and/or reflective surfaces without matting spray option
In general, structured light 3D scanning is best suited when there are strict requirements for accuracy and detail. When working with dark and reflective surfaces, matting sprays can be used. Handheld 3D laser scanners, on the other hand, are well suited for working in tight spaces and are highly compatible with various types of surfaces.
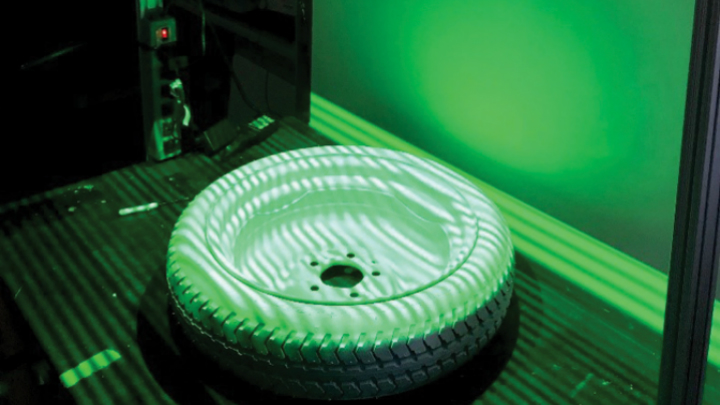
There is a misconception that 3D scanning systems based on structured illumination technology are not versatile enough and have too low performance.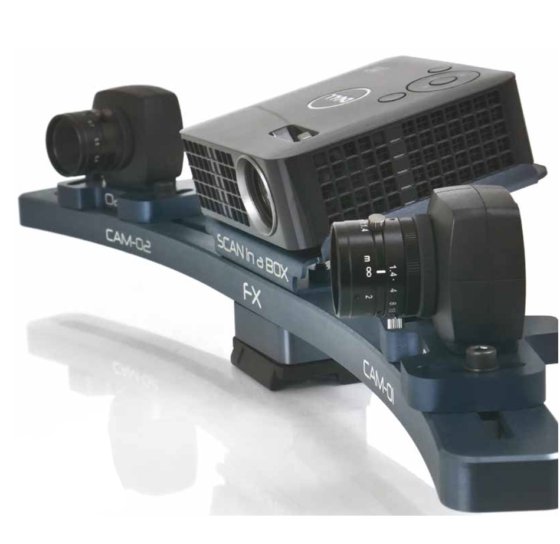 In fact, these 3D scanners demonstrate high capture speeds and good repeatability, especially when scanning objects on turntables, working with complex geometries, and even in cases where repeatability control of production batches is required.
For example, digitizing an 8 cm impeller pump using a turntable takes only about one minute.
In addition, high-precision structured light 3D scanning systems are very effective in conjunction with collaborative multi-axis robotic arms and coordinate measuring machines with automatic data processing.
3D inspection of the F-35 fighter assembly line
Application examples for metrology 3D scanners
3D scanning with structured LED illumination
Example #1: 3D scan of the bottom of the optical modem case
Example #2: 3D scanning of mobile phone components
Example #3: Digitizing thin walls with a minimum thickness of 0. 16 mm
16 mm
Example #4: Digitizing a 6 mm part
Example #5: Digitizing a form with the required accuracy of 0.03 mm
Handheld 3D scanner applications
Example #1: 3D scan of an aircraft engine
Example #2: 3D scanning of cast metal parts
Example #3: 3D scan of a reflective mold die
Conclusion
We hope that we have been able to provide useful information for the selection of the optimal equipment. To summarize:
- For precision 3D scanning of small to medium-sized parts, use 3D inspection scanners with structured LED technology;
- For medium to large parts, choose handheld 3D laser scanners;
- Many users with high requirements for measurement control prefer to keep both structured light scanning systems and 3D laser scanners on hand, using one or the other depending on the task at hand, thereby increasing the overall efficiency of design and manufacturing processes.
Learn more