Charging for 3d printing
How to Price 3D Printing Service Fees – ACRL TechConnect
Many libraries today provide 3D printing service. But not all of them can afford to do so for free. While free 3D printing may be ideal, it can jeopardize the sustainability of the service over time. Nevertheless, many libraries tend to worry about charging service fees.
In this post, I will outline how I determined the pricing schema for our library’s new 3D Printing service in the hope that more libraries will consider offering 3D printing service if having to charge the fee is a factor stopping them. But let me begin with libraries’ general aversion to fees.
A 3D printer in action at the Health Sciences and Human Services Library (HS/HSL), Univ. of Maryland, BaltimoreService Fees Are Not Your Enemy
Charging fees for the library’s service is not something librarians should regard as a taboo. We live in the times in which a library is being asked to create and provide more and more new and innovative services to help users successfully navigate the fast-changing information landscape. A makerspace and 3D printing are certainly one of those new and innovative services. But at many libraries, the operating budget is shrinking rather than increasing. So, the most obvious choice in this situation is to aim for cost-recovery.
It is to be remembered that even when a library aims for cost-recovery, it will be only partial cost-recovery because there is a lot of staff time and expertise that is spent on planning and operating such new services. Libraries should not be afraid to introduce new services requiring service fees because users will still benefit from those services often much more greatly than a commercial equivalent (if any). Think of service fees as your friend. Without them, you won’t be able to introduce and continue to provide a service that your users need. It is a business cost to be expected, and libraries will not make profit out of it (even if they try).
Still bothered? Almost every library charges for regular (paper) printing. Should a library rather not provide printing service because it cannot be offered for free? Library users certainly wouldn’t want that.
Determining Your Service Fees
What do you need in order to create a pricing scheme for your library’s 3D printing service?
(a) First, you need to list all cost-incurring factors. Those include (i) the equipment cost and wear and tear, (ii) electricity, (iii) staff time & expertise for support and maintenance, and (iv) any consumables such as 3d print filament, painter’s tape. Remember that your new 3D printer will not last forever and will need to be replaced by a new one in 3-5 years.
Also, some of these cost-incurring factors such as staff time and expertise for support is fixed per 3D print job. On the other hand, another cost-incurring factor, 3D print filament, for example, is a cost factor that increases in proportion to the size/density of a 3d model that is printed. That is, the larger and denser a 3d print model is, the more filament will be used incurring more cost.
(b) Second, make sure that your pricing scheme is readily understood by users. Does it quickly give users a rough idea of the cost before their 3D print job begins? An obscure pricing scheme can confuse users and may deter them from trying out a new service. That would be bad user experience.
Also in 3D printing, consider if you will also charge for a failed print. Perhaps you do. Perhaps you don’t. Maybe you want to charge a fee that is lower than a successful print. Whichever one you decide on, have that covered since failed prints will certainly happen.
(c) Lastly, the pricing scheme should be easily handled by the library staff. The more library staff will be involved in the entire process of a library patron using the 3D printing service from the beginning to the end, the more important this becomes. If the pricing scheme is difficult for the staff to work with when they need charge for and process each 3D print job, the new 3D printing service will increase their workload significantly.
Which staff will be responsible for which step of the new service? What would be the exact tasks that the staff will need to do? For example, it may be that several staff at the circulation desk need to learn and handle new tasks involving the 3D printing service, such as labeling and putting away completed 3D models, processing the payment transaction, delivering the model, and marking the job status for the paid 3D print job as ‘completed’ in the 3D Printing Staff Admin Portal if there is such a system in place. Below is the screenshot of the HS/HSL 3D Printing Staff Admin Portal developed in-house by the library IT team.
Examples – 3D Printing Service Fees
It’s always helpful to see how other libraries are doing when you need to determine your own pricing scheme. Here are some examples that shows ten libraries’ 3D printing pricing scheme changed over the recent three years.
- UNR DeLaMare Library
- https://guides.library.unr.edu/3dprinting
- 2014 – $7.20 per cubic inch of modeling material (raised to $8.45 starting July, 2014).
- 2017 – uPrint – Model Material: $4.95 per cubic inch (=16.38 gm=0.036 lb)
- 2017 – uPrint – Support Materials: $7.75 per cubic inch
- NCSU Hunt Library
- https://www.lib.ncsu.edu/do/3d-printing
- 2014- uPrint 3D Printer: $10 per cubic inch of material (ABS), with a $5 minimum
- 2014 – MakerBot 3D Printer: $0.
 35 per gram of material (PLA), with a $5 minimum
 - 2017 – uPrint – $10 per cubic inch of material, $5 minimum
- 2017 – F306 – $0.35 per gram of material, $5 minimum
- Southern Illinois University Library
- http://libguides.siue.edu/3D/request
- 2014 – Originally $2 per hour of printing time; Reduced to $1 as the demand grew.
- 2017 – Lulzbot Taz 5, Luzbot mini – $2.00 per hour of printing time.
- BYU Library
- http://guides.lib.byu.edu/c.php?g=216600&p=1429612
- 2014 – 2017 – Makerbot Replicator 2/ Ultimaker 2 Extended
- $0.20 per gram for standard (0.2mm) resolution; $0.30 per gram for high (0.1mm) resolution.
- University of Michigan Library
- The Cube 3D printer checkout is no longer offered.
- 2017 – Cost for professional 3d printing service; Open access 3d printing is free.
- GVSU Library
- https://www.gvsu.edu/techshowcase/makerspace-18.
 htm
htm - 2014 – $0.35 per gram with a $6.00 minimum
- 2017 – Free (Ultimaker 2+, Makerbot Replicator 2, 7, 2x)
- https://www.gvsu.edu/techshowcase/makerspace-18.
- University of Tennessee, Chattanooga Library
- http://www.utc.edu/library/services/studio/3d-printing/index.php
- 2014 – 2017 – Makerbot 1th, 5th – $0.10 per gram
- Port Washington Public library
- http://www.pwpl.org/3d-printing/3d-printing-guidelines/
- 2017 – Makerbot 5 – $1 per hour of printing time
- Miami University
- 2014 – $0.20 per gram of the finished print; 2017 – ?
- UCLA Library, Dalhousie University Library (2014)
- Free
Types of 3D Printing Service Fees
From the examples above, you will notice that many 3d printing service fee schemes are based upon the weight of a 3D-print model. This is because these libraries are trying recover the cost of the 3d filament, and the amount of filament used is most accurately reflected in the weight of the resulting 3D-printed model.
However, there are a few problems with the weight-based 3D printing pricing scheme. First, it is not readily calculable by a user before the print job, because to do so, the user will have to weigh a model that s/he won’t have until it is 3D-printed. Also, once 3D-printed, the staff will have to weigh each model and calculate the cost. This is time-consuming and not very efficient.
For this reason, my library considered an alternative pricing scheme based on the size of a 3D model. The idea was that we will have roughly three different sizes of an empty box – small, medium, and large – with three different prices assigned. Whichever box into which a user’s 3d printed object fits will determine how much the user will pay for her/his 3D-printed model. This seemed like a great idea because it is easy to determine how much a model will cost to 3d-print to both users and the library staff in comparison to the weight-based pricing scheme.
Unfortunately, this size-based pricing scheme has a few significant flaws. A smaller model may use more filament than a larger model if it is denser (meaning the higher infill ratio). Second, depending on the shape of a model, a model that fits in a large box may use much less filament than the one that fits in a small box. Think about a large tree model with think branches. Then compare that with a 100% filled compact baseball model that fits into a smaller box than the tree model does. Thirdly, the resolution that determines a layer height may change the amount of filament used even if what is 3D-printed is a same model.
Charging Based upon the 3D Printing Time
So we couldn’t go with the size-based pricing scheme. But we did not like the problems of the weight-based pricing scheme, either. As an alternative, we decided to go with the time-based pricing scheme because printing time is proportionate to how much filament is used, but it does not require that the staff weigh the model each time. A 3D-printing software gives an estimate of the printing time, and most 3D printers also display actual printing time for each model printed.
First, we wanted to confirm the hypothesis that 3D printing time and the weight of the resulting model are proportionate to each other. I tested this by translating the weight-based cost to the time-based cost based upon the estimated printing time and the estimated weight of several cube models. Here is the result I got using the Makerbot Replicator 2X.
- 9.10 gm/36 min= 0.25 gm per min.
- 17.48 gm/67 min= 0.26 gm per min.
- 30.80 gm/117 min= 0.26 gm per min.
- 50.75 gm/186 min=0.27 gm per min.
- 87.53 gm/316 min= 0.28 gm per min.
- 194.18 gm/674 min= 0.29 gm per min.
There is some variance, but the hypothesis holds up. Based upon this, now let’s calculate the 3d printing cost by time.
3D plastic filament is $48 for ABS/PLA and $65 for the dissolvable per 0.90 kg (=2.00 lb) from Makerbot. That means that filament cost is $0.05 per gram for ABS/PLA and $0.07 per gram for the dissolvable. So, 3D filament cost is 6 cents per gram on average.
Finalizing the Service Fee for 3D Printing
For an hour of 3D printing time, the amount of filament used would be 15.6 gm (=0.26 x 60 min). This gives us the filament cost of 94 cents per hour of 3D printing (=15.6 gm x 6 cents). So, for the cost-recovery of filament only, I get roughly $1 per hour of 3D printing time.
Earlier, I mentioned that filament is only one of the cost-incurring factors for the 3D printing service. It’s time to bring in those other factors, such as hardware wear/tear, staff time, electricity, maintenance, etc., plus “no-charge-for-failed-print-policy,” which was adopted at our library. Those other factors will add an additional amount per 3D print job. And at my library, this came out to be about $2. (I will not go into details about how these have been determined because those will differ at each library. ) So, the final service fee for our new 3D printing service was set to be $3 up to 1 hour of 3D printing + $1 per additional hour of 3D printing. The $3 is broken down to $1 per hour of 3D printing that accounts for the filament cost and $2 fixed cost for every 3D print job.
To help our users to quickly get an idea of how much their 3D print job will cost, we have added a feature to the HS/HSL 3D Print Job Submission Form online. This feature automatically calculates and displays the final cost based upon the printing time estimate that a user enters.
The HS/HSL 3D Print Job Submission form, University of Maryland, Baltimore
Don’t Be Afraid of Service Fees
I would like to emphasize that libraries should not be afraid to set service fees for new services. As long as they are easy to understand and the staff can explain the reasons behind those service fees, they should not be a deterrent to a library trying to introduce and provide a new innovative service.
There is a clear benefit in running through all cost-incurring factors and communicating how the final pricing scheme was determined (including the verification of the hypothesis that 3D printing time and the weight of the resulting model are proportionate to each other) to all library staff who will be involved in the new 3D printing service. If any library user inquire about or challenges the service fee, the staff will be able to provide a reasonable explanation on the spot.
I implemented this pricing scheme at the same time as the launch of my library’s makerspace (the HS/HSL Innovation Space at the University of Maryland, Baltimore – http://www.hshsl.umaryland.edu/services/ispace/) back in April 2015. We have been providing 3D printing service and charging for it for more than two years. I am happy to report that during that entire duration, we have not received any complaint about the service fee. No library user expected our new 3D printing service to be free, and all comments that we received regarding the service fee were positive. Many expressed a surprise at how cheap our 3D printing service is and thanked us for it.
To summarize, libraries should be willing to explore and offer new innovating services even when they require charging service fees. And if you do so, make sure that the resulting pricing scheme for the new service is (a) sustainable and accountable, (b) readily graspable by users, and (c) easily handled by the library staff who will handle the payment transaction. Good luck and happy 3D printing at your library!
An example model with the 3D printing cost and the filament info displayed at the HS/HSL, University of Maryland, BaltimoreHow to calculate 3D printing costs?
We often see online discussions about the price of 3D prints, or more specifically: how to calculate the price for having something 3D printed. Since there are many myths floating around, we figured out that many people will be interested in a deep dive into various aspects of this field. So, how do you set the right price for a 3D print? We’ll take you through the main aspects of 3D printing pricing that affect the price, however, if you’re not really keen on learning every single detail, feel free to scroll down to the end – we have a small surprise for you there.
Let’s imagine a purely hypothetical example of a certain Josef from Prague (any similarities to actual persons or places are purely coincidental), who bought three 3D printers to make some profit: he has the Original Prusa i3 MK3S, Original Prusa MINI, and the Original Prusa SL1.
A customer ordered this test object from Josef and wishes to know the price of the object printed on the printers mentioned above. It should be printed with Prusament PLA Orange (MK3s and MINI) and with Prusa Orange Tough resin (SL1).
Material costs
Josef already knows that the most expensive aspects are manpower and filament (or resin). Filament and resin prices depend on the manufacturer’s pricing, which makes counting the material costs very simple. 1kg of Prusament PLA Orange costs 24. 99 USD (without tax and shipping) and according to PrusaSlicer, one tree frog model consumes 6.27 g of filament (basic settings – 0.15mm layer height, 15% gyroid infill).
Josef simply calculated (24.99 / 1000 * 6,27) that material for one tree frog on the MK3s or MINI will cost him 0.15 USD. Printing a tree frog without supports on the SL1 (0.05mm layer height) will consume 10.43 ml resin – this costs 0.6 USD. If the customer wants to print it with other materials, the price could rise a lot. There are filaments with a price exceeding 90 USD/kg and resins more expensive than 315 USD/kg.
The bottom line here is pretty simple: Material cost = filament price / filament weight (g) * model weight (g)
Manpower costs
Josef values his work at 9.50 USD/hour (calculated from average wage in the Czech Republic for the year 2020). He already knows that print preparation (including slicing) takes him approximately 5 minutes (10 minutes in case the resin in the SL1 needs to be changed). Therefore, he calculated the work on one treefrog to 0.8 USD for MK3s/MINI and 1.6 USD for SL1. It’s not too expensive to prepare small models downloaded from the internet. However, it’s important to know that plenty of models require more difficult print preparations. Even slicing alone can take even 30 minutes or more – e.g. preparing supports for SLA printing using manual supports can take a long time.
The price for human labor can, in many cases, reach dozens of USD, especially in cases when something completely new has to be designed. Even a relatively simple technical part can take several hours to draw, which increases the price dramatically.
3D printer operation costs
Another thing that Josef calculated was 3D printer operation costs. He started with electricity: according to the local electricity distributor’s rates, 1 kWh costs from 0.07 USD to 0.09 USD. Let’s work with 0.09 USD. The printer input power depends on several factors, however, most of the time it needs around 100-150 W. Printing a tree frog on the MK3s takes 1h 16 min, 1h 10min on the MINI, and 1h 48 min on the SL1. With 150W power input (usually it’s not that much), electricity for printing one tree frog will be less than 0,023 USD. Such a low price is practically negligible.
On the other hand, Josef would like to recoup the money he spent on buying his printers within 6 months (4392 hours) of printing. This led him to add a fixed fee to printing hour costs. The fee (based on our actual printer prices) is 0.21 USD/hour for the MK3S, 0.1 USD/hour for the MINI, and 0.36 USD/hour for the SL1.
3D printer operation costs = Printer price / required investment return time (h) * print time (h)
Electricity cost = negligible
Margin
Josef is still afraid that his investment might not return with these prices. There are other factors coming into play as well: for example, a printing accident could occur, causing the loss of filament.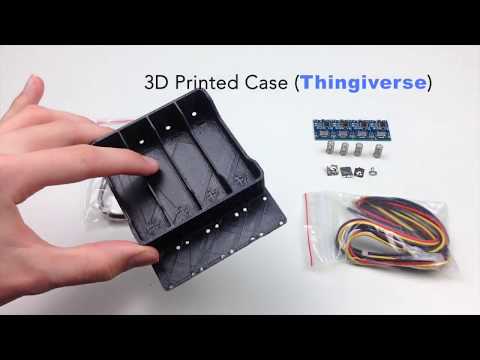 Or there may be extra maintenance costs. The most common issues are usually print quality problems (e.g. printing large ASA-based objects can lead to warping etc.). You can head over to our older articles about print quality and troubleshooting.
In other words, it’s not easy to calculate a price that would cover all potential issues and/or mistakes. It largely depends on the user’s experience and many other factors. In this case, Josef has to observe what percentage of prints tend to fail over a long period, and what do these failures cost him. However, for starters, he set the margin to be 30% of the material (filament or resin) price.
So, let’s sum up the order: Josef charged the customer the following prices: 1.3 USD (MK3s), 1.16 USD (MINI), and 3.15 USD (SL1), tax not included. Certainly, there will be many people who see it differently – there are customers who won’t pay larger sums of money and there are makers who don’t see it profitable enough.
The purpose of this guide is to give you an overview of all things you should take into account when calculating the costs. Basically, you need to include the material costs, time spent on print preparations, and some kind of “failure insurance”, plus general running costs. The price for energy consumed is almost negligible. Really long prints will be around a dollar, tops. Obviously, we did not include taxes – if you want to start a business with commissioned 3D printing, you need to check your country’s laws regarding this kind of work.
Here’s a complete recap of Josef’s order:
Material: 0.15 (MK3s) + 0.15 (MINI) + 0.6 (SL1) USD
Labor: 0.8 (MK3s) + 0.8 (MINI) + 1.6 (SL1) USD
Printer operation: 0.27 (MK3s) + 0.12 (MINI) + 0.65 (SL1) USD
Margin (30% of material cost): 0.05 (MK3s) + 0.05 (MINI) + 0.18 (SL1) USD
Total: 5.42 USD
Finally, let’s see how the price would change if the customer wanted to have a truly large and complex model printed on the MK3s. Again, it’s a downloaded model, which is pretty much ready to print, however, it takes 1 day, 17 hours, and 48 minutes to finish. The material of choice is a non-standard carbon fiber composite material XT-CF20, which costs 49.99 USD and we will need 756 g to finish the print. Other values necessary for the calculation remain the same:
Material: (49.99 / 750) * 756 = 50.39 USD
Labor: 0.8 USD
Printer operation: 0.21 * 41.8 + 0.023 * 41.8 = 9.74 USD
Margin (30% of material cost): 50,39 * 0,3 = 15,12 USD
Total: 76.05 USD
It comes as no surprise that larger objects and expensive materials also mean much higher final prices, even though the price for labor stays the same. Printer running/maintenance costs gradually increase with printed hours. Similarly, the price can increase even with seemingly simple parts, if it needs more of Josef’s time (for example drawing the part, manual editing of supports etc. ).
).
3D print calculators
We know that there’s a lot of things to cover, so this is why we made this handy 3D Printing Price Calculator! It’s incredibly easy to use: just fill in the data and it will give you the result immediately! You can set every necessary attribute there and you can share your results with other people. The calculator can also import existing G-codes, saving you even more time. Give it a go!
Do you use 3D printing to make a living? Share your experience with pricing and general thoughts in the comment section – we’re sure that many others will find it useful!
Happy printing!
printing 3D model of the device and electronics control circuit with my own hands
After gaining access to a 3D printer, I decided to assemble a Qi charger with my own hands. In this tutorial, we will make a stylish wireless phone charger that is powerful enough to quickly charge modern smartphones and will respond to them by glowing LEDs.
Step 1: Model
The case was designed in Autodesk Fusion 360 and 3D printed. The top and bottom parts were printed in gray rubber, while the central part was unpainted.
Step 2: Printing
In order for the surface of the parts to be even, they were all printed at an angle. After printing was completed, all the supports were carefully detached. A little polishing brought the details to perfection. All the parts captured in the pictures above have just come out of the printer and have not yet been processed.
Important note: as you can see in the photo above, the wall of the lower part is broken. This did not happen when printing on a printer, it just could not withstand the load during assembly.
Step 3: Electronics
The most important part of our device is the wireless charger. I bought my PCB on eBay. There are three main characteristics when choosing a charging board:
- The charger must be Qi compatible.
 Qi technology is a near-universal standard that should charge almost all smartphones that support wireless charging.
 - Three coils are much better than one. Most cheap chargers have only one coil that transmits electromagnetic energy to the phone. This greatly reduces the charging speed and also reduces the range of the charger
- Charging indicator light. When the phone is charging from the coils, the indicator is on. In this project, we will introduce LED elements that will light up and go out while the phone is charging.
Charging circuits are rated for 5V, while the LED strips run on 12V. To use both together, I purchased a converter that took the 12V input down to 5V. The body of the converter was larger than the specification stated, so I had to get rid of the body by covering the water sensitive areas with epoxy.
For the lighting effect I used a blue 12V diode strip. The width of the diode strip must be small enough to fit into the gap, the width of which is equal to the central part of the package printed in transparent rubber.
You will also need capacitors, transistors, resistors, relays, circuit boards or breadboards, and miscellaneous items.
Step 4: Relay/Transistor
My charging circuit contains two different types of backlight. When the phone is not charging, a current of 1.3V is applied to the red LEDs. When charging starts, the current rises to 3V, "lighting up" the blue diodes. This works great for me, as the transistors act as switches at similar current levels. To provide an audible alarm when the phone is charging, I also added a relay that makes a nice "click" when the current turns on or off. To control all the electronics, I created an unusual circuit that connected both circuits - a charging indication circuit and a 12V power supply.
Due to the fact that the current in the backlight circuit varies, I have the option of attaching a relay directly to the positive and negative terminals.
Step 5: LED Circuit
I don't have much circuit design experience so my circuit is not the best but it works well. Diode fading circuitry is very simple and is used to minimize the hardness of the on-to-off transition. When the voltage is applied, the brightness of the diodes quickly increases, and when the current is turned off, the diodes slowly go out and it looks very beautiful.
After making sure the circuit worked, I soldered it on the PCB. After checking the functionality, I cut the board to the size that fits in my case.
Step 6: Assembly
Once all circuits are connected, assembly is easy. The only hard thing is getting all the electronics to fit inside. It's like putting together a puzzle. The charging coils fit well into their slot. To supply electricity, I had to drill a hole in the wall of the case. To protect the device from short circuits, all exposed electronics were isolated. The 12 volt power supply was connected through a hole in the wall and held tight enough to not think about gluing it. When everything is checked for functionality, glue all the modules to the case to prevent displacement.
Step 7: Finished product
Homemade wireless charger works and I'm very happy with how it looks.
Step 8: 3D CAD models
All model dimensions are in inches.
Files
- ChargeTop.stl
- ClearCharge.stl
- PlateBottom.stl
10 Great Storage Solutions
Nobody likes a mess. You can create comfort by using wall shelves made using 3D technologies. With the help of 3D printing, it is possible to create unusual, functional items that will update the interior and improve life. 3D printed wall shelves are a great home decor option that combines aesthetic appeal with practicality.
10 Cool Storage Solutions with 3D Printing
3D printed shelves can be made with a 3D printer that can be screwed to the wall, or variations that can be installed separately. Today, extraordinary configurations plus original technical solutions are in trend.
Fractal Hexagon
The fractal shelf looks amazing with its hexagonal shape. Prefabricated design will fit on any wall. It can be printed from PLA with a layer height of 0.25 mm.
Modules
The Moidules variation allows you to adjust the size of the shelves according to your personal preferences. It can be made up of boards in three different thicknesses (9 mm, 12 mm or 1/2 inch). The 3D printed parts are essentially the joints that connect the panels together to form a single shelf. Since this design uses wooden boards and plastic joints, it is possible to make the product self-contained, requiring no drilling.
Pencil
Need a shelf without having to place heavy items? The stationery holder can be made from two 3D printed parts and some household items, including pins and pencils.
Mini-box
This model is a separate shelf suitable for storing artifacts or books. It is recommended to print with a layer thickness of 0.2 mm and 10% infill.
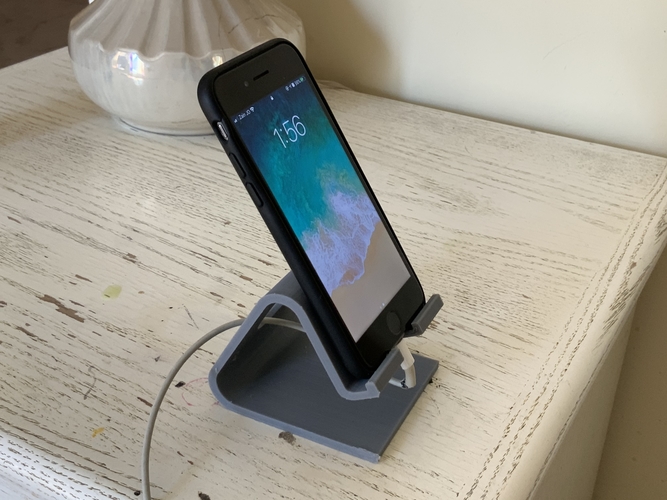
Phone Charger
Everyone has been in a situation where you need to charge your phone, but the socket is inconveniently located in a place where you don't want your smartphone to just lie around.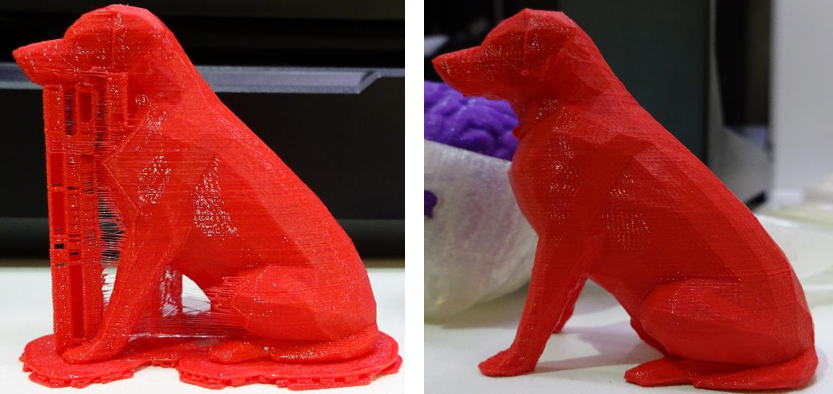 The practical design solves the problem by offering a shelf that hangs from the adapter. That is, the adapter passes through the hole, is inserted into the socket and becomes a support for the shelf itself. Now you can put your phone to charge without the risk of tripping over wires. In addition, the design is foldable, making it easily portable, ideal for travel.
Shelf with a secret
Of course, safes are practical, but a secret shelf is much more interesting. This model has a hidden pull-out compartment that can store cash, cards or other small items. The design is recommended to be printed from PLA with a layer thickness of 0.2 mm and infill of 25%. No supports or rafts are required.
Corner
Need a shelf for your corner? They can be hard to find, but you can print a copy that allows you to display decorative items, as well as keep them away from pets. According to the manufacturer, this shelf should be printed with 40% infill. Production takes about 18.5 hours and requires only 90 grams of material. No supports are required.
Steps
This shelf consists of several levels of display space. The manufacturer suggests sticking it to the wall with double-sided tape, so there are no holes in the design.
Steampunk
Steampunk is a genre in art, literature and other creative disciplines that draws inspiration from nineteenth century steam technology or mechanistic aesthetics. The design with creative use of gears definitely fits this style. The model looks more like a shelf holder than a stand itself. Products are printed from PLA, the use of supports does not matter, and raft is not needed.
Headphone hanger
Not only can this shelf support 4kg of weight, but it also includes a headphone holder to store your device neatly. The design can be fixed to the wall with just two screws, making installation easy. It is recommended to print an original and practical hanger on a 3D printer with a shell thickness of 0.