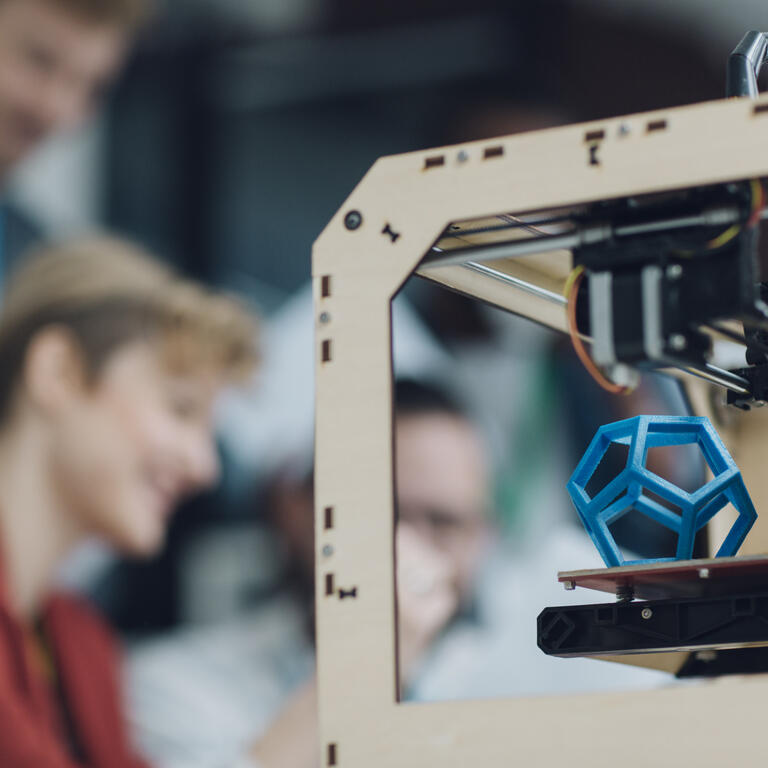
Blender 3d printing toolbox download
3D Print Toolbox — Blender Manual
Reference
- Category
Mesh
- Description
Utilities for 3D printing.
- Location
3D Viewport ‣ Sidebar
- File
object_print3d_utils folder
- Author
Campbell Barton
Installation
This add-on is bundled with Blender.
Open Blender and go to Preferences, then the Add-ons tab.
Click Mesh then 3D Print Toolbox to enable the script.
Description
Blender can be used to created meshes for 3D printing. Meshes exported from Blender are usually imported into a piece of software takes the mesh and “slices” it into paths that the 3D printer can execute. An example of such Slicer software is Cura.
In order to correctly slice a mesh, it needs to be “watertight”, meaning that the surface is closed everywhere. Additionally, there should be no edges or faces sticking out. 3D Print Toolbox helps you analyze problems in your mesh that could cause slicing issues.
It can be found in 3D Viewport ‣ Sidebar ‣ 3D-Print, when a mesh is selected.
Analyze
Statistics
By clicking either Volume or Area, the volume or area of the mesh is calculated and shown.
Checks
The Checks panel.
A number of different checks can be performed to analyze in which ways your mesh might be invalid for use with a Slicer.
Upon execution of one of the checks, the Result field shows which, if any, parts of your mesh are invalid.
When in Edit Mode, clicking these results selects these parts of your mesh. You can use View Selected Backslash to focus on these parts.
Although Slicers are becoming increasingly tolerant when it comes to “tidiness” of meshes, it is always worth trying to provide as clean a mesh as possible.
- Solid
Checks for Non-Manifold edges and Bad Contiguous edges.

Edges should connect to exactly 2 faces. In it connects to only one, it means there’s a hole in the mesh. More is also not allowed. These edges are considered Non-manifold. If one of the faces’ normals is pointing in a different direction than its neighbors, its edges are marked as “Bad Contiguous”.
In this screenshot, the left shape has a hole, and the right shape has one of its faces flipped.
Left, marked in blue: Non-manifold edges. Right, marked in red: Bad contiguous edges.
- Intersections
These two cubes have intersecting faces. A Boolean modifier would help in this example. It’s worth noting that some slicer applications can deal with this, so it’s not always required to resolve this issue.
- Degenerate
Faces and edges which have 0 area or length, are considered degenerate. In this example, the top face of a cube has been scaled down to 0, but have not been merged. A Merge ‣ By Distance would resolve this issue.

There’s a hidden face here.
- Distorted
The vertices of a quad or ngon can be folded in such a way that the face is not flat. In practice, quads are rarely ever flat. When exporting, these faces are converted to triangles. If the surface is excessively deformed, this can result in unexpected shapes.
In this example, a quad has been folded into a saddle-like shape. This triggers the Distorted check. It would be best to triangulate by hand here.
This quad can triangulate in unexpected ways.
- Thickness
Faces that form very thin geometry might be missed entirely by the slicer. Such faces are marked as Thin.
- Edge Sharp
Similar to Thickness, sharp edges can thin pieces of geometry which might be missed by the slicer
- Overhang
As 3D printers can’t print in mid-air, parts of the model which overhang will not print correctly. In practice, slicers can add additional material, support, to anticipate for overhanging layers.
- Check All
Performs all of the above checks at once. In this example, Suzanne shows quite a few problems. This is because the eyes are separate parts, and the sockets have holes. This makes the mesh not Solid and Intersecting. Some of the faces are Distorted.
Clean Up
- Distorted
Triangulates the faces which are considered Distorted, as explained above.
- Make Manifold
Attempts to fix various problems which might make a mesh non-manifold, such as by fixing bad normals, filling holes, and removing empty edges and faces.
Transform
Scale To
- Volume
Scales the model to an exact given volume.
- Bounds
Scales the model so that the biggest axis of the objects bounds (or dimensions) match the given value.
Export
Provides quick access to Blender’s object exporting operators found in File ‣ Export.
How To Use The 3D Print Toolbox Add On? – blender base camp
One of the fastest-growing industry subsets today is the field of 3D printing, the ability to design an object virtually and then construct that object as a single piece using specialized tools and software. Blender is capable of creating 3D printable objects and then sending them to an application used for the 3D printing process. To make life easier, Blender has an add-on for helping to construct models for the purpose of 3D printing.
To activate the Print Toolbox Addon, first, go to Edit > Preferences > Add Ons, and in the search bar in the top corner type in print toolbox, making sure the tickbox is enabled before closing the preferences panel. To locate the toolbox, press the N key on the viewport to open the side panel, and select the print toolbox tab.
This is perhaps the single most important add-on that you can use for 3D printing in Blender, but what exactly does it do and how can it help to construct printable 3D objects?
What Is The 3D Print Toolbox Actually Designed To Do?
The 3D print toolbox is designed primarily to identify geometry that is likely to cause issues with the printing process. 3D printers are limited in their capabilities and so as the designer of the object you need to ensure that the model falls within these limitations. An example of such a limitation is the size of the model, as each 3D printer is capable of producing objects in a certain size range.
So the 3D print toolbox is able to accurately calculate both the area and volume of a selected model, which are the parameters used for defining an object’s size in 3D printing.
Equally as important is the ability to find geometry that is not suitable for a 3D printable model. This comes in several different forms and so the print toolbox is able to find which faces effectively fail specific tests. An example of this is finding overhanging faces that are not supported by the rest of the model.
Toolbox LocationWhile the primary purpose of the print toolbox is to identify problem areas of the model, it is also capable of cleaning up your geometry with the help of a couple of simple tools. However, it will only fix the geometry that it finds issues with, and we suggest other methods as well for actually fixing these issues, such as removing duplicate vertices.
Get 30 Days Free Access To The Blender Course Library
Why Do We Need To Use The Add On To Identify Issues With The Model?
You can easily get away with poor topology for your 3D models in a rendered image or animation, so long as it does not have a noticeable impact on the models’ appearance or animated movements. When creating a model for use in-game design you have a few more parameters to consider such as the topology, normals, and density of the geometry.
But 3D printing takes things a step further because you are telling a machine (the 3D printer) to create the exact object that you design. However your design may not be practical for a 3D printer to create, or it may have issues with the geometry which can always impact the final result.
Check All IssuesIt is very easy to design a model for virtual purposes, but much harder for creating actual physical products.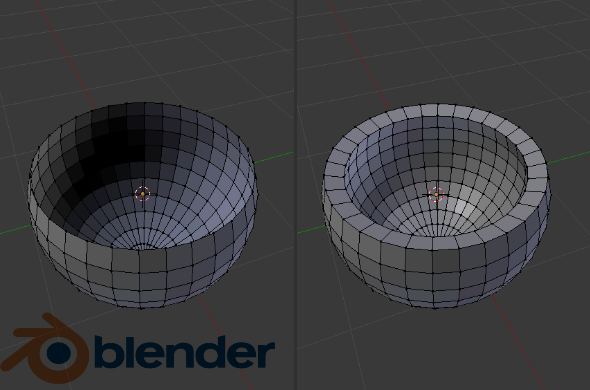 Getting a model wrong for a video game simply means importing the model back to Blender, and editing it so that any errors are corrected, before sending it back to the game engine.
By contrast, a 3D printed model requires a significant amount of time to create, as well as cost for the materials used for printing. As you can tell, messing up a printed model can be costly, both in terms of time and money.
Is it Ok If My Model Is Not Perfect For 3D Printing?
It is unlikely that your 3D model will ever be truly perfect, especially if you are adding more detail, like with sculpting for example. The idea of the 3D print toolbox is so that you can control the threshold at which faces will be deemed no longer usable, as there is no definitive value, this falls on the hardware that you are using.
If you are using your own 3D printer at home or in your business, then we recommend researching the limitations of your selected printer, and possibly creating some dummy models to test first. When you send your model to the software used to create the actual 3D print, the model will need to be suitable for 3D printing but does not need to be perfect. Remember that there are parameters that your printer will be able to work within, so there might be a tiny bit of leeway.
Selecting The Geometry In Edit Mode
Before we break down the purpose of each option in the toolbox, we want to highlight the ability to select the geometry that falls into one of the categories in the checklist. We do this by first selecting the check all button in the toolbox to view our categories.
Selecting Geometry With The ToolboxThen we transition from object mode to edit mode, and when you do you may find that some of the options transform into buttons if the value is greater than 0. If for example, the nonmanifold edge becomes available, then you can click the button and all edges that are classed as nonmanifold edges become selected on the model.
The same applies to any other options in the list, such as selecting non-flat faces. This allows you to actually identify where the problem geometry is on the model.
A Breakdown Of What You Can Do With The 3D Print Toolbox
There are numerous potential limitations that can hinder the creation of a good 3D model, so below we have a list of what limitations the 3D print toolbox can help identify:
Volume And Area
First, you have the ability to calculate the volume and area of an object, as these are important for defining the size of your model when printing.
The area of a 3D object is the surface area of all of the objects’ faces combined. For example, a cube has 6 sides, and every side is 2×2 meters in size. So 2×2=4 and then 4×6=24, meaning that the area is 24 meters squared.
Volume on the other hand is the area that the object itself takes up. While area takes the height and depth of each face and adds all the faces together, the volume is the height * width * length of the object. In the case of the cube where all sides are 2 meters, this reads as 2x2x2=8, so the volume is 8 meters cubed.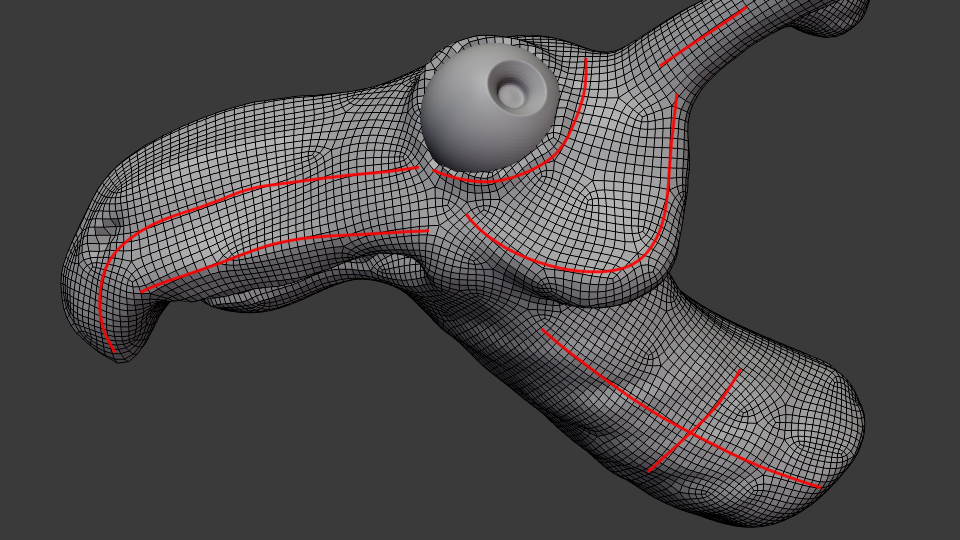
Solid Object
This should be fairly straightforward. Any real-world object that is created and has a defined shape needs to be a solid object. This means that all parts of the object need to have some level of thickness, which can be created through extruding or by using the solidify modifier.
The normals of the object are also important, which represent the direction that the vertices, as each vertex has a ‘front-facing side’ that needs to be visible to the printing software.
Clicking will tell you if there is any nonmanifold geometry, which means any geometry that cannot exist in the real world, like a flat face extruded out of a box.
It also indicates if you have any bad contiguous edges, which are edges of the model that are facing the wrong way. In other words, the normals of the vertices used to create these edges are incorrect.
To correct this you can select all your geometry, use the hotkey Alt + N and then recalculate the normals to face outwards.
Intersections
This is one of the more difficult ones not to spot naturally and is when you have two or more faces that are intersecting each other on the object.
This is most likely to occur on abstract objects where a randomizer tool has been used to shape the geometry. This is a killer for 3D printing so you need to make sure that you have no intersecting faces on your model at all.
Degenerate
At face value, you may not know what the term degenerate is, but it is actually very important for 3D printing. The term degenerate here applies to any geometry whose size leaves it outside the printable range of your 3D printer, or of any value that you determine.
The focus is on locating what are known as zero faces, which are faces that are too small to be printed. This is the first tool that you can control in the toolbox, as it allows you to set the minimum value that an edge or face must reach to not be considered a degenerate piece of geometry.
The values here are connected to your chosen unit of measurement for Blender. In my case, I use meters as my UOM (unit of measurement) so the value of 0.00010 is equivalent to 0.1mm. If you know what the minimum value is for your 3D printer, then you should set this to the same value, or slightly higher.
Distorted
The individual faces that make up your models should generally be flat, but this is not always the case as moving individual vertices around will affect the faces that they are used to creae.
This is one of those where you do have a slight bit of leeway for distortion but the best way to avoid it entirely is to increase the density of your geometry, as smaller faces are less likely to be heavily distorted.
Be careful not to go too small though as you still want to be able to edit your model without difficulty, The value used to define distortion is set to degrees by default.
It is set to 45 degrees by default, increasing the value increases the threshold for allowing more distortion on your model, while lowering the value makes the tool more sensitive for located distorted geometry.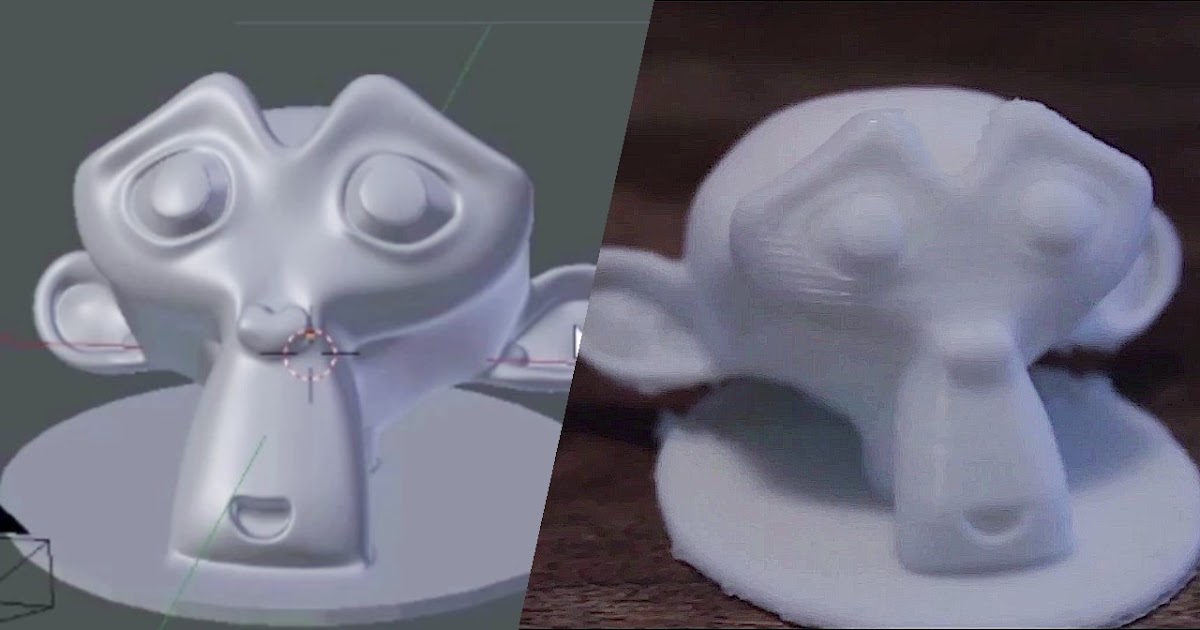
Thickness
When you are working with a very small object, you need to ensure that there are no parts of the object that lack the thickness necessary to be printed.
For example, you design a character with extended fingers. The design may look good, but if the thickness of the fingers is too small then they will not print correctly.
The minimum thickness is set to 1mm, but many home-based printers go as low as 2mm, so check the specs for your machine and then set the value accordingly.
Sharp Edge
A perfectly sharp edge does not exist in the real world, but it cannot be avoided in 3D modeling. What you can do with your models however is reduce the angles that your edges create to generate a smoother appearance.
Two tools that can be used to reduce that sharp look for your model are the subdivision surface modifier and the bevel modifier.
You can set the value of the sharp edge indicator to any value in degrees to highlight if there are any edges that have an angle equal to or greater than that value.
A basic cube for example has 12 edges and each edge has a value of 90 degrees for its angle. Set the sharp edge value to 90 and select check all, then you will see that the object has 12 sharp edges. Set that same value to 91 and check again, you will find that the number of sharp edges has been reduced to 0.
Higher density objects are less likely to have edges with greater angles, and an ideal value to keep below for printing is 60 degrees. Again you can use bevels to achieve this on your model.
Overhang
When an edge or face is overhanging, then that means it is in a position where it is not directly supported by the rest of the model.
While it is perfectly possible to print with overhangs, there is the risk of structural weakness in these areas of the model. That means that you are most likely to break the model where there are overhangs.
You may not want to change your model though as having overhanging faces may just be a hazard to your chosen design. What you can do instead is set up your printer outside of Blender to create support material, which can be cut off easily after Printing.
Scale To
This tool can be used alongside the volume and area indicators and is very handy if you are working as a business for creating 3D printable models. Say for example you are designing figurines and all of these figurines need to be of a certain size.
Scale To TransformThe ‘scale to’ tool can be used to adjust the volume or area of the model to a specific value. This is a great way to ensure that your products are all the same size or thereabouts.
Clean Up
When you have identified all of your non-manifold geometry, you will be able to use the clean-up tools to get rid of the geometry. Note that this is not a perfect tool and while it will reduce the number of nonmanifold edges on your model it may not eliminate them all depending on the model’s shape.
Clean Up ToolYou should look to combine other tools with the clean up option to make sure that your object is in the best shape possible.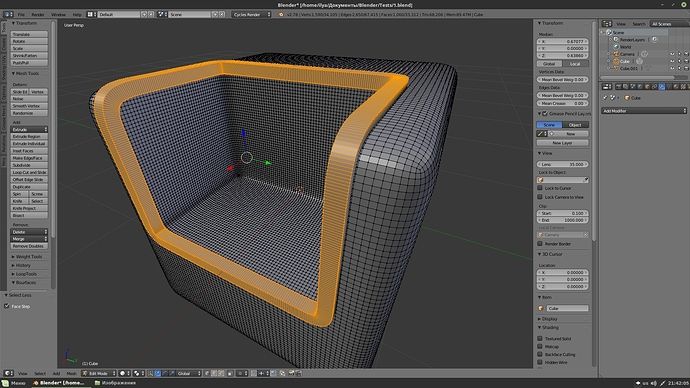
Export
Finally, the addon allows you to export your 3D model as a file format that is suitable for the 3D printing process. You have four options to choose from and each is slightly different but all effective for 3D printing. These formats are:
- OBJ
- PLY
- STL
- 3XD
The obj format is best suited for beginners as it limits the export to simple geometry data, but we tend to use the STL format for objects that we want to prep for 3D printing due to its versatility with the data it stores.
Thanks For Reading The Article
We hope that you were able to find the information that you were looking for. Below we have gathered a list of additional topic articles that we believe you may be interested in.
- How To Organise My Node Setups When Creating Materials?
- Where Does Blender Get All Of Their Money From?
- What Are The Main Features Of The Blender Software?
- How To Identify Normals In Blender?
- Creating A Wireframe Mesh Out Of Any 3D Object
Get 30 Days Free Access To The Blender Course Library
-
How To Convert An Image To Grease Pencil?
Blender offers the ability to create objects of various types, ranging from your typical mesh object to curves, text, etc.
 Since Blender has so many object types, it also offers
Continue Reading
-
How To Design A 3D Model Using An Image?
Most 3D artists will use reference material when designing new objects in 3D modeling applications like Blender. This can be done in different ways, So what is the simplest method
Continue Reading
-
Using The Transform Node In Geometry Nodes?
Geometry nodes are the latest phase of Blender’s incredible development, and it introduces procedural 3D modeling using a node system. For this note system to be successful, it needs to
Continue Reading
Top 20 Free 3D Printing & 3D Printing Software
Looking for 3D printing software? We've rounded up the top 20 software tools for beginners and professionals alike. Most slicers are free.
What is a slicer? This is a program for preparing a digital model for printing. Models for 3D printing are usually distributed in STL files. To turn an STL file into G-code (a language that a 3D printer understands), a slicer program is required. It is called a slicer because it cuts (to slice - English) a 3D model into many flat two-dimensional layers, from which a 3D printer will add a physical object.
Which slicer should I choose? In this article, we will tell you which slicer is best for 3D printing for each stage of your work. Which one is better for preparing a 3D model for printing? But what if you need to create a 3D model from scratch? And if you are only taking the first steps in 3D?
Don't be afraid: we've answered all of these questions, including the required skill level for each program and where you can download it. The great thing is that most of these programs are completely free and open source.
- Cura
- CraftWare
- 123D Catch
- 3D Slash
- TinkerCAD
- 3DTin
- Sculptris
- ViewSTL
- Netfabb Basic
- Repetier
- FreeCAD
- SketchUp
- 3D Tool
- Meshfix
- Simplify3D
- Slic3r
- Blender
- MeshLab
- Meshmixer
- OctoPrint
#1: Cura
For beginners who need a slicer to prepare STL files for 3D printing
Cura is the default slicer software for all Ultimaker 3D printers, but can be used with most others , including RepRap, Makerbot, Printrbot, Lulzbot and Witbox. The program is completely open source, its capabilities can be extended using plugins.
This program is very easy to use and allows you to manage the most important 3D printing settings through a clear interface. Start in Basic mode to quickly get up to speed and change print quality settings. If finer control is required, switch to Expert mode.
Cura can also be used to directly control the printer, but then the printer and computer must be connected to each other.
Download: Cura
Price: Free
Systems: PC, Mac, Linux
#2: CraftWare
3D printers by the Hungarian startup CraftUnique to support their CraftBot crowdfunding machine. However, the program works with other printers.
Like Cura, CraftWare allows you to switch from "Easy" to "Expert" mode, depending on how confident you feel. It's a colorful app that features a visual G-code visualization with each function represented by a different color. But the most outstanding feature is the individual support service. As far as we know, only the paid program Simplify3D has this.
Please note, however, that this program is still in beta, so bugs may occur.
Download: CraftWare
Price: Free
Systems: PC, Mac
#3: 123D Catch
-systems, smartphones and tablets, which allows you to convert images of objects into a 3D model. Pictures can be taken with a smartphone/tablet or digital camera.
You need many photos of an object from different angles - the more the better - after which they will be compiled into a 3D model.
123D Catch is more of a fun app than a professional 3D printing tool, but after some tambourine dancing, you can get good results, especially when paired with an STL editor like MeshLab or Meshmixer.
Price: Free
Systems: PC, Android, iOS, Windows Phone
#4: 3D Slash
and surprisingly simple, and refreshingly new. With 3D Slash, you can design 3D models using your dice skills.
You can start with a large block and, like a virtual sculptor, remove small cups from it with tools such as a hammer or drill, or start from empty space and build a model from cubes and other shapes. You can paint with flowers or use template pictures.
Other features worth mentioning are tools for creating logos and 3D text. The Logo Wizard imports an image and creates a 3D model, while the Text Wizard allows you to enter and format text, and then turn it into 3D.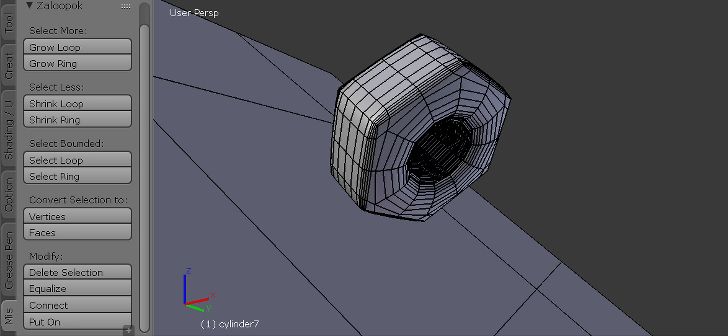
Recommended!
Download: 3dslash.net
Price: Free
Systems: PC, Mac, Linux, Browser
#5: TinkerCAD
- A computer-aided design (CAD) system for 3D printing, which is a good starting point for beginners. Since its capabilities are limited compared to Blender, FreeCAD and SketchUp, many users switch to more powerful tools after some time.
As in 3D Slash, here you can build models from basic shapes. At the same time, unlike 3D Slash, TinkerCAD allows you to create vector shapes in 2D and convert them into three-dimensional models.
Come in: Autodesk TinkerCAD
Price: Free
Systems: Browser
#6: 3DTin
For beginners who want to create 3D printable models
another easy and intuitive online tool choice for beginners in 3D modeling. All you need is a Chrome or Firefox browser with WebGL enabled.
Choose from a huge library of 3D shapes and add them to your sketch. All sketches are stored in the cloud, access to them is free if you honor the Creative Commons license. Everything can be exported to STL or OBJ formats.
Enter: 3DTin
Price: Free
Systems: Browser
#7: Sculptris
For beginners who want to create 3D printable models
clay. This is a fantastic 3D modeling program if figurines are your main task. For example, you can make a bust of your favorite video game or comic book character. Sculptris is completely free and bills itself as a stepping stone to the more complex (and expensive) ZBrush tool.
Download: Pixologic Sculptris
Price: Free
Systems: PC, Mac
#8: ViewSTL
For beginners who want to view STL files
ViewSTL is the easiest way to view STL files . Simply open a web page and drag the STL onto the dotted box.
The STL online viewer allows you to display the model in one of three views: flat shading (for a quick view), smooth shading (for a high-quality image), and wireframe.
Enter: ViewSTL
Price: Free
Systems: Browser
#9: Netfabb Basic
some nice features that allow you to analyze, "repair" and edit STL files before moving on to the model cutting stage.
A good choice if you need more than just a slicer and want to be able to quickly fix STL files without having to learn programs like MeshLab or Meshmixer.
Don't let the 'Basic' in the title fool you, Netfabb Basic is actually a very powerful 3D printing tool. It's "basic" only in the sense that it doesn't cost €1,500 like Netfabb Professional!
Download: netfabb.de
Price: Free
Systems: PC, Mac, Linux
No. 10: Repetier
For advanced to prepare STL files for 3D printing
9002 the next level of 3D printer slicer software, but if you want to stay open source, you should look into Repetier. It is the great grandfather of 3D printing software and a favorite of the RepRap community. To date, the program is moving by leaps and bounds from the level for beginners to advanced users. Packaged in an all-in-one configuration, it supports up to 16 extruders, multi-slicing via plug-ins, and virtually every fusing 3D printer on the market. Get ready to tinker!
What's more, Repetier Host works remotely via Repetier Server, so that the 3D printer can be controlled via a browser, tablet or smartphone.
Download: Repetier
Price: Free
Systems: PC, Mac, Linux
#11: FreeCAD
The program is a great option for developing your design skills. More technically, this parametric 3D modeling program allows you to easily change the project by rolling back through the history of the model and editing the parameters.
Download: freecadweb.org
Price: Free
Systems: PC, Mac, Linux
#12: SketchUp
For beginners who want to create 3D printable models
SketchUp is the perfect combination of simplicity and the perfect combination functionality, with a user-friendly interface and a relatively flat learning curve (i. e., as experience grows with the time spent), the ideal program for developing three-dimensional models.
The Make SketchUp version is free and will include everything you need for 3D modeling if you also download and install the free STL exporter. There is also a professional edition for architects, interior designers and engineers.
Download: sketchup.com
Price: Free (SketchUp Make), $695 (SketchUp Pro)
Systems: PC, Mac, Linux
#13: 3D-Tool Free Viewer
view and validate STL files
3D-Tool Free Viewer is a sophisticated tool that, among other things, allows you to check the structural integrity and printability of your file. With the Cross-Section function, for example, you can look at the model from the inside and check the wall thickness. Very useful if you want to check your STL file for killer errors before printing.
Download: 3D-Tool
Price: Free
Systems: PC
#14: Meshfix
your model for errors.
Price: Free
Systems: Browser
#15: Simplify3D
For professionals to prepare STL files for 3D printing print. A flexible algorithm checks the model for problems, fixes them, shows a preview of the printing process (ideal for identifying potential problems), and then slices it.
This slicer offers the best infill pattern options in the competition. For models that require supports, Simplify3D will create the appropriate structures on its own and give you full control over their placement. For printers with a dual extruder, when printing with different materials, the Dual Extrusion wizard will help, as a result of which, for example, it will be easier to remove the dissolving filament.
Simplify3D supports 90% of today's commercially available desktop 3D printers and is compatible with Marlin, Sprinter, Repetier, XYZprinting, FlashForge, Sailfish and MakerBot firmware. Simplify3D can also be used to directly control the printer, but then the printer and computer must be connected to each other.
Download: simplify3d.com
Price: $149
Systems: PC, Mac, Linux
#16: Slic3r
source code, which has a reputation as a carrier of super new functionality, which you will not find anywhere else. The current version of the program is able to show the model from multiple angles, so that the user gets a better preview experience.
There's also an incredible 3D honeycomb infill, the first of its kind that can extend over multiple layers rather than repeating itself like a stamp. This significantly increases the strength of the internal filling of the model and the final printout.
Another option is direct integration with Octoprint. Once the files on the user's desktop are sliced, they can be directly uploaded to Octoprint with one click.
Download: Slic3r
Price: Free
Systems: PC, Mac, Linux
#17: Blender
For professionals who want to create 3D printable models
Blender is a popular computer-aided design (CAD) system with a steep learning curve. Not at all the best choice for beginners, but what you need if you are quite experienced and need something more complex for modeling and printing.
In short, Blender is one of the most powerful tools out there. Its community is always ready to help, there are a lot of educational materials. It's also open source, so enthusiasts often write extensions to make it even better and more powerful.
Download: blender.org
Price: Free
Systems: PC, Mac, Linux
#18: MeshLab
For professionals to prepare STL files for 3D printing
MeshLab - advanced editor. It allows you to remove parts of a 3D model, merge two models into one, patch holes. If you need a program to modify models for 3D printing or some kind of "repair" work, MeshLab is the right choice.
Price: Free
Systems: PC, Mac, Linux
#19: Meshmixer
For professionals to prepare STL files for 3D printing files. It's especially good for identifying potential problems and fixing them automatically. For example, it will show paper-thin walls that can lead to problems with 3D printing. Meshmixer is part of the Autodesk family of 3D printer software, so it should work well with tools like TinkerCAD.
Price: Free
Systems: PC, Mac
#20: OctoPrint
start, pause or interrupt 3D print jobs. Combined with Wi-Fi capable devices, it makes for a great monitor for remotely monitoring the 3D printing process.
Octoprint understands the G-codes of almost all 3D printers and slicers and includes a gCodeVisualizer to visualize this code before or during printing.
If you want to work away from your 3D printer and control it remotely, Octoprint is the best you can find.
Download: octoprint.org
Price: Free
Systems: PC, Mac, Linux
Source
Top Free 3D Printing Software in 2021 zero? What software is best for beginners? All these questions can be answered in our article. The applications presented in the review are completely free or have free versions for students, teachers and open source projects.
Why did we put this section before all the others? The answer is very simple. By knowing the whole 3D printing process, you can better understand how each software is involved in the preparation and printing of 3D parts.
If you have become a happy owner of a 3D printer, but have absolutely no idea what to do with it and how to get started, then this part of the article is for you.
Different programs are used to print 3D models:
- 3D modeling/design/CAD software;
- Software for editing, viewing and restoring STL files;
- Slicing software;
- 3D printer host.
Before starting work, you need to create a 3D model. To do this, you can use different programs for modeling. We wrote in detail about free versions of software for 3D modeling here.
A small life hack for beginners. If you are not ready to create a model on your own, you can choose and download the right one from the marketplaces. There are also free download links in the maker communities - sometimes the proposed 3D models can be not only interesting, but also useful.
Once a 3D model has been created, it must be converted to a printable format. For desktop 3D printers, this is the STL format. Some created or downloaded files have defects that lead to failures during printing. It is for editing STL files that there is special software that helps prepare the model for playback on the printer.
Slicer software helps to convert STL file into printer friendly G-code. The functionality of such programs allows you to split a 3D model into thousands of flat 2D layers, which will be sequentially reproduced on a printer.
Finally, the 3D printer host provides communication between the computer and the printer. It allows you to receive information for printing, as well as change the parameters of the device in real time via a PC. Often the Slicer and host are combined into one 3D printing software that is supplied by the printer manufacturer.![]()
Dear readers of the 3DToday portal, we want to inform you that a new section "Knowledge Base" has been opened on our website of the LIDER-3D online store. In this section, we share owls, experience, settings and secrets of the world of additive technologies, go to the section at this link.
Examples of some already posted articles in the Knowledge Base section: Post-processing of models after 3D printing, 10 calibration models for your 3D printer, How and what 3D printers print, Printing with HIPS plastic, ABS printing settings, Recommendations for Resin Post-Processing HARZ Labs, Best Free 3D Modeling Software for Beginners.
Cura
One of the popular slicer software that comes with all Ultimaker printers. However, its functionality is suitable for use in conjunction with other 3D printers. Since this software is one of the most popular among makers, you can not waste time on profile settings - for most printers they can be found in the program itself.
The software is designed to change important print settings. Start with the “Recommended” mode to select improved quality settings for your printer and easily adapt to the program.
More precise control of all parameters is possible in the “Custom” user mode. By switching to this mode, you can manage more than 400 different settings.
Cura is not only a simple and intuitive slicer for home users. The software can be used as the main software for your printer, as well as integrated with CAD systems such as SolidWorks or Siemens NX.
The program is constantly updated and supplemented, which allows you to make 3D printing on your printer better.
►►►Link to office. site Cura
PrusaSlicer
This software is based on Slic3r and, unlike the prototype, has gained great popularity among users. The main difference is a large list of customizable parameters and additional features that make the work more convenient.
An easy-to-use user interface, built-in support for Prusa printers, and multi-plastic settings make it easy to get started with your 3D printer. The slicer also allows you to place additional supports, work with different materials and use smooth features with variable layer height.
The PrusaSlicer can be used with both FDM and resin printers. Settings panels for users with different experience in 3D printing help to significantly improve the quality of finished models.
A great bonus for those who have worked with Slic3r before - PrusaSlicer supports most of the original features and accepts Slic3r configuration packages when importing profiles.
►►►Link to office. website PrusaSlicer
MatterControl 2.0
MatterControl is a CAD modeling software, slicer and simultaneous host for a 3D printer. With host functions, you can directly control printing by connecting the printer via USB. The program also allows you to cut STL files for export to an SD card for offline printing and, of course, create projects in a separate section of the CAD software.
Structured interface makes it easy to create models and prepare them for printing.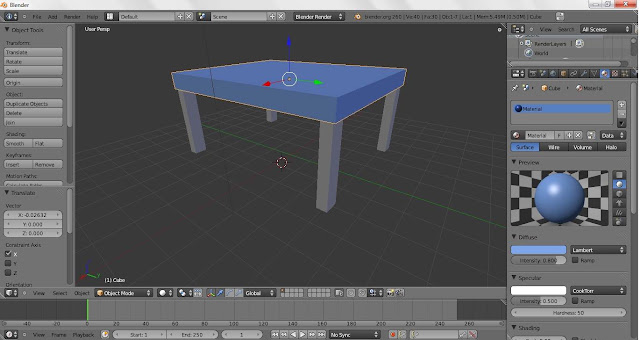 A file browser and a library of geometric primitives make it easy to import data into print. Geometric figures can be used as supports, which helps to achieve high quality printing of complex details.
Advanced print settings and a user-friendly viewer make this software one of the best for comprehensive control of the 3D printing process. In addition to the host and slicer functions, MatterControl has design tools that allow you to design parts. The resulting 3D models are easy to export to a slicer and print. Thus, the program allows you to control the entire process - from creating a model to cutting it and sending it to print.
►►►Link to office. PrusaSlicer 9 website0005
3DPinterOS
3DPrinterOS is a cloud-based 3D printer management software. It combines the functions of a slicer, a host, and an STL file editor. The program can create a print queue, manage the printer and plug-in system based on STL data analysis and recovery applications, and perform cloud slicing.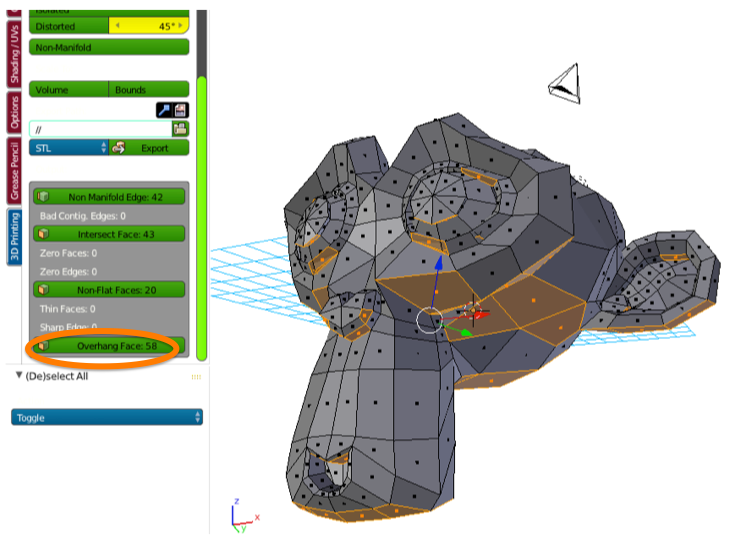
The free Starter package allows users to download G-codes and send them to print, remotely control the printing process, and get support on a like-minded forum. For a modest fee, you can access additional features, including the ability to collaborate on a project.
In fact, this program is a universal tool for converting files for printing in the STL format. That is why 3DPrinterOS is suitable for small businesses, education, production and design.
►►►Link to office. website 3DPinterOS
KISSlicer
The abbreviation of this application “Keep It Simple Slicer” can confuse inexperienced users. It's actually quite a complex 3D printing tool. Conflicting user reviews, however, allow us to conclude that the program is popular and has sufficient functionality to work with 3D printers.
The free version of the program is suitable for most users who work with printers with a single extruder. KISSlicer helps simplify certain aspects of slicing with Profile Wizards for printer-specific settings and Tuning Wizards for optimizing materials. The paid version of the program allows you to work with printers with 2 extruders.
Although the application settings are quite complex, it's worth the effort - the slicer allows you to have full control over the entire printing process.
►►►Link to office. KISSlicer website
Slic3r
This software is for open source slicers. Its main difference is advanced features that are not found in any other application.
Despite the fact that Slic3r releases almost no updates to its program, it is the base for many other open source software. For example, many programs use 3D honeycomb cavity filling, which is a special merit of the Slic3r developers.
In 2018, a new version of the software was released with new integrated functions. So, this version has new fill patterns, experimental support for SLA and DLP printers, 3MF format, and USB printing.
On the software website you can find a detailed manual that gives you an idea of all the functions of Slic3r. A great bonus of the program is the direct integration with OctoPrint for printing at the touch of a button.
►►►Link to office. website Slic3r
SliceCrafter
Browser-based slicer from IceSL developers. Using the program, you can quickly load STL files, cut them, and then prepare the G-code for printing. In the browser program, you can use almost all the options that IceSL offers.
Although many users find this version less powerful, it is suitable for beginners who do not want to set up more complex 3D printing programs.
►►►Link to office. website SliceCrafter
IceSL
IceSL is an excellent tool for 3D modeling and printing. Several working windows allow you to edit the model directly through a Lua script, select different settings for slicing the model, and view the result in real time. Despite the apparent complexity of working with the software, IceSL allows for elegant parametric modeling.
Slicer settings menu allows beginners to easily and quickly prepare a 3D model for printing.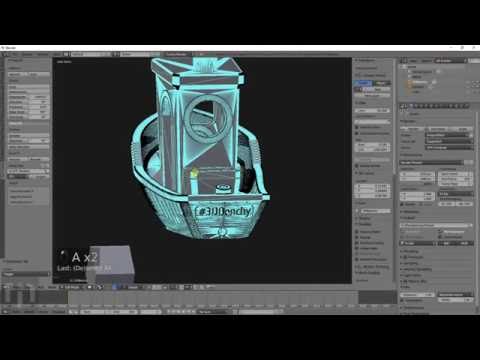 In the latest version of the program, it became possible to specify different values for print settings at a certain layer height. All this allows you to make smooth transitions from dense to light filling and gradation of the thickness of the layers from fine to coarse.
►►►Link to office. site IceSL
OctoPrint
This program is a host for 3D printers that allows you to control printing and change settings. The software also allows you to remotely control the printer using a Wi-Fi module connected to the device.
OctoPrint accepts G-code from almost any slicer, while the host allows you to visualize the received files before and during printing. In addition, cutting files can be done directly in the program, using it as a slicer.
OctoPrint offers not only a wide range of tools for remote print management, but also several ways to keep track of your tasks. You can set up push notifications or send alerts through different messengers.
The software is open source and has an active user community that offers many plug-ins to extend the program's functionality. On the community page, you can find many add-ons that will be useful when printing.
►►►Link to office. site OctoPrint
Repetier-Host
Rep-Rap developers favorite host - Repetier is a high performance print management and file preparation software.
Repetier-Host is positioned as a universal software that helps manage printers with a large number of extruders (up to 16 extruders), and also supports almost any 3D printer on the market.
The program has remote access functions through the Repetier Server, which allows you to control your printer through a browser on a PC, tablet or smartphone.
►►►Link to office. Website Repetier-Host
AstroPrint
Like 3DPrinterOS, this program is a cloud-based solution for controlling and managing your 3D printers. Also, using AstroPrint, you can change slicer settings, manage printer and material profiles. A free account allows you to save print information and access all settings through a browser or the AstroPrint mobile app.
This software is unique in that it is compatible with Thingiverse and MyMiniFactory as well as free versions of CAD programs such as 3D Slash and Leopoly. The application also has tools for cutting 3D models with the ability to send files for printing from a smartphone.
The software will be useful for those who work in large scale networks such as 3D farms, enterprises and universities.
►►►Link to office. website AstroPrint
3D-Tool Free Viewer
3D-Tool Free Viewer is designed to check the structural integrity of STL files and the ability to print a document on your printer. Additional functions, such as "Cross Section" also allow you to look inside the 3D model and evaluate some parameters.
This program can be useful if you want to check your STL file for errors. The user-friendly interface of the software allows you to measure the size, surface area and volume of all parts of the figure, as well as change the distance, angles and radius at the touch of a button.
For those who do not have sufficient knowledge and experience in CAD, the program offers a quick way to check the STL file and prepare it for 3D printing.
►►►Link to office. website 3D-Tool Free Viewer
MakePrintable
This useful web service allows you to check STL files for errors and correct critical values that may affect printing. Unlike other free programs, MakePrintable gives you complete control over the process. You can choose the level of print quality, make the mesh hollow, fix the polygon count, and even merge multiple targets into one.
Although the program no longer offers a free version with limited functionality, users may find several ways to use the program. The program has different payment options - for a single file download (about $ 2 per file) or a "Maker" package with the ability to upload up to 30 files per month (monthly price about $ 15).
The advantage of the program is the compatibility of plug-ins with Blender and SketchUp.
►►►Link to office. MakePrintable 9 website0005
Meshmixer
Meshmixer is a super modern and free software from the Autodesk 3D printing family for viewing, checking, editing and repairing STL files. This program helps you identify potential problems and fix them automatically. For example, the program identifies insufficient wall thickness.
The program is positioned as a universal tool for 3D meshes, offering a variety of tools for working with mesh, 3D modeling, surface embossing and others.
Whether you're trying to fix an STL file, prepare a model for printing, or design multiple objects, Meshmixer is ideal for all of these purposes.
►►►Link to office. website Meshmixer
MeshLab
MeshLab is an open source application that allows you to edit STL files and also has tools for working with 3D triangular meshes. The software's capabilities help you check, render, repair, and transform meshes, and even solidify models and close holes.
The application is great for editing 3D models created in CAD. Despite the fact that the latest version was released in 2016, the program is still popular with makers.
►►►Link to office. website MeshLab
NetFabb
NetFabb is a slicing software that includes advanced analysis and recovery of STL files. One of the most powerful tools, NetFabb aims to streamline the user experience by offering support creation, mesh repair, and a wide range of generative design tools.
The program is free for students, as part of an Autodesk subscription. The 3-year student license allows you to choose one of the following versions:
- NetFabb Standard allows you to quickly prepare a model for printing;
- NetFabb Premium with advanced options for creating grids, supports and automatic packaging of parts;
- NetFabb Ultimate allows you to calculate assembly failures, provides modeling tools, customizable toolpath strategies, and helps automate the process of preparing a model for 3D printing;
- NetFabb Simulation helps you simulate certain metal printing technologies prior to production.

►►►Link to office. NetFabb site
About programs for 3D modeling, which even a beginner will understand, we wrote in this article. Here are equally useful, easy-to-use, and most importantly, free programs for three-dimensional modeling and 3D printing.
3D Builder
3D Builder application offers its users to quickly visualize and edit 3D models. The software helps to create and import files in 3D printing formats. Using simple editing tools, even entry-level users can create 3D images.
The application has its own extensive library of 3D models. You can also upload an external file or use the Kinect V2 sensor to scan and import a new 3D image. By joining the 3D Builder community and downloading the 3D Printing SDK, you can expand the capabilities of this free program.
►►►Link to office. website 3D Builder
Figuro
This browser-based modeling software combines the accessibility of TinkerCAD with the power of more advanced 3D modeling tools. The program is suitable for those who want to improve their design skills without going too deep into details.
The creation of objects in Figuro is based on the principle of polygonal modeling - you generate polygons by modifying them and combining them with each other. If you are using the program for the first time, we recommend using additional tools for checking and repairing STL files.
The program has a simple and pleasant user interface. An extensive gallery allows you to evaluate the capabilities of the software and get inspiration for creating new objects.
►►►Link to office. Figuro 9 website0005
Fusion 360
Fusion 360 is a professional 3D modeling CAD program. Unlike other software, the software allows you to cover the entire process of planning, testing and 3D design.
The program has powerful tools for solving industrial design problems. Fusion 360 allows you to simulate the design of objects under design as well as the loads that they will face after commissioning.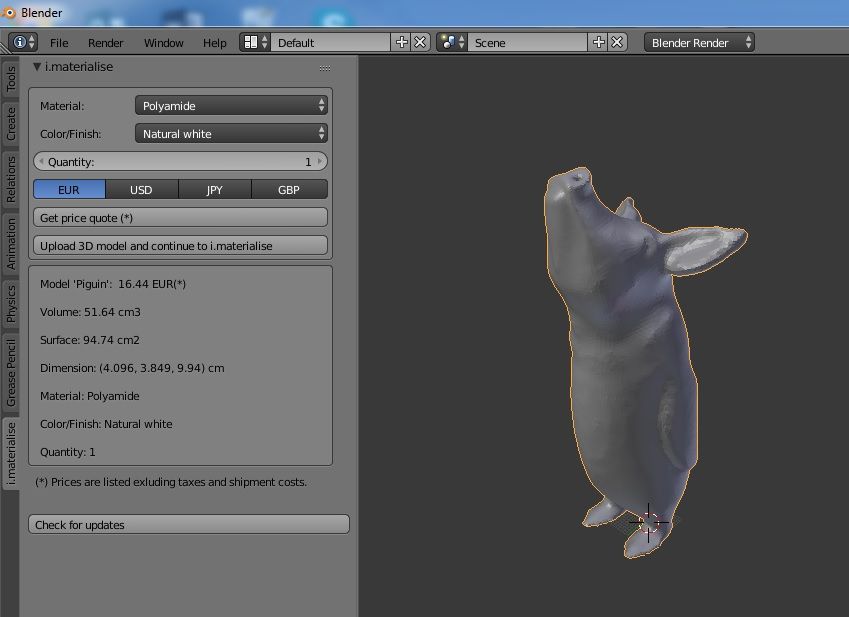
Design collaboration, cloud file sharing, and import/export of various CAD file types make the application easy to use.
Fusion 360 is free for students, startups and hobbyists. At the same time, amateur projects must not be commercial, startup income must not exceed $ 100,000 per year, and the student license of the program is limited to three years.
►►►Link to office. site Fusion 360
FreeCAD
Multifunctional CAD software allows you to perfectly develop design skills. Parametric modeling software creates models according to the given parameters. The big advantage is the ability to drag and control objects directly with the mouse.
A feature of this program is the ability to return to the history of the creation of an object and edit its parameters. Despite the fact that the software is free, it has all the necessary tools for full-fledged work.
FreeCAD allows users to draw 2D shapes as a basis for creating additional objects. The program is suitable for product design, mechanical engineering, architecture and other areas.
►►►Link to office. FreeCAD website
OpenSCAD
Unlike the other programs presented, OpenSCAD focuses more on the CAD aspect of 3D modeling. The software works as a 3D camillator that reads a script file describing a 3D model and then converts the object into a 3D model.
The open source program is constantly updated with new features. For example, the latest update has a new Customiser panel. Get support and advice on using the application and working with updates in the user community.
The software does not have interactive components, but it helps to better control the modeling process and manage the design parameters settings. OpenSCAD is considered to be the ideal tool for students.
►►►Link to office. OpenSCAD website
Blender
A popular CAD program with a steep learning curve. This software is not the best choice for a beginner, but is ideal for those who are familiar with 3D modeling concepts and want to create more complex models.