Cyvasse 3d print
3D printed Cyvasse is Game of Thrones for the board game geek
Michael Le PageFor the purposes of storytelling, not every element in a fictional universe needs be fleshed out; but where you have fans, there you also have those who will gladly seize on a concept and do their best to bring it to life.
Case in point is a board game designed by Michael Le Page, medical scientist and PhD student by day, board game enthusiast and Game of Thrones fan by night. Inspired by a Cyvasse set that appeared on Thingiverse last year, he decided to make his own.
But it wasn't a spur-of-the-moment plan; for a year prior to the Thingiverse Cyvasse, Le Page had been working on creating a set of rules for the game, based on what little information he could find in George RR Martin's A Song of Ice and Fire.
"There's not a lot in the books to go off -- GRRM himself never tried to define the rules -- but he did say it was a mix of Chess, Stratego and Blitzkrieg (which is based on a hex grid), and we have a list of quotes that say things like that the pieces are made of 'onyx and ivory', Dragons can be taken by Trebuchets and that Heavy Horses were 'circling around his rear'," Le Page said of his process.
" There's also one quote that says Myrcella and Trystane were moving pieces over squares of Jade, Carnelian and Lapis Lazuli, which if you think about how you do a checkered grid with three colours, suggests a hex grid. The rest was basically trying to make something which played well and felt like it had the gravitas of Chess."
His set, therefore, looks quite different to the traditional square board seen in games like chess, draughts and previous versions of Cyvasse. The board is hexagonal, with three different colours of hex on the grid -- neatly hollowed out so the pieces can slot in, a design choice born of cutting costs by minimising the amount of print material required.
Le Page also found that the process of designing and producing the board changed the rules he had devised.
"In the last year it's been a case of trying to get it made, discovering that wood carvers are expensive, and people who work in metal or any other material are too. I even looked at getting it outsourced to India and it was still going to cost me over a grand. Eventually when I started looking into 3D printing I found Google Sketchup is free! I've discovered I'm half decent at designing in 3D and that ordering designs through Shapeways was much cheaper than anything else I'd seen -- and I didn't even need to buy a printer!" he explained.
"The 3D printing process did change the design a little: I had imagined it in my previous video as a hex grid of squares, the way a lot of footpaths are tiled with concrete squares in a hex grid. Anyway, it turns out it was just easier to make the 3D printed version with hexagons, not squares (with holes in them, so they're cheaper to print)."
The finished set, available on Shapeways, comes in at a total of $304 (AU$322, £179) plus shipping for the board and each of the two sets of pieces. You can read more about the development of the rules on the Westeros forum, and take a closer look at the set in the video below.
Free STL file George R. R. Martin's Cyvasse (unofficial game)・3D printer model to download・Cults
Sculptris Dummies: Star Wars Alien Rebels
Free
Forest Dragon
Free
Guild Mage Redux (32mm scale)
Free
Knight w/Polearm (28mm/Heroic scale)
Free
Tower of Darkness (28mm/Heroic scale)
Free
Knight w/Greatsword (28mm/Heroic scale)
Free
Cultists (28/32mm scale)
Free
Dragon Knights (28mm/Heroic scale)
Free
Best 3D printer files of the Game category
Tabaxi Sailor - Tabletop Miniature
Free
Daenaris Vinyl Figure Stand Funko Pop
Free
F-100D Super Sabre
€0. 83
83
COWBOY BEBOP DART-SHIP
Free
Attack on Titan Sword
€3.39
ARTICULATED FISH
€2.50
ABO EKENS articulated Flexy Pokemon Flexible
Free
Dodge Challenger Bodie for OpenZ 1:28 RC Chassis V3b
Free
Best sellers of the category Game
Hrafnagud and ROXS Units
€9.68
GIANT CROCODILE ARTICULATED
€4.24
Snake and Rattlesnake
€3.86
Chopper Motorcycle Print-In-Place
€1
Catafrac Heavy Armoured Warriors - Limbs Pack
€1. 85
85
Space Dwarf All - terrain vehicle
€15.50
Warriors of Iron Heads and MK 3 Shoulder pads
€4.32 -15% €3.67
Imperial Heavy Weapons & Regimental Flags [PRESUPPORTED]
€2
Off-Road Car
€2
Lazy Cat
€3.86
Articulated Dragon
€3.86
Octopus 2.0
€3.86
Fotiann Wildmen
€9.68
Nice Flexi Dragon
€1.77
SM Healer Conversion Kit
€6
Short range artillery for the legionnaires
€10
Would you like to support Cults?
You like Cults and you want to help us continue the adventure independently? Please note that we are a small team of 3 people, therefore it is very simple to support us to maintain the activity and create future developments. Here are 4 solutions accessible to all:
ADVERTISING: Disable your AdBlock banner blocker and click on our banner ads.
AFFILIATION: Make your purchases online by clicking on our affiliate links here Amazon.
DONATE: If you want, you can make a donation via PayPal.
WORD OF MOUTH: Invite your friends to come, discover the platform and the magnificent 3D files shared by the community!
Wax3D. From drawing to metal.
It has been a year and a half since we started selling our modeling wax composition for 3D printing of wax molds for metal casting. At first, there were many doubts, including ours, that this material was generally needed by someone. There were fears that the value of the totality of its consumer properties lies outside the range of economic feasibility. I had to experiment a lot, work with foundries across the country, communicate with both foundry workers and with the end customers of castings. In fact, we have come a long way in introducing our technology into production: from an idea that arose more than 2 years ago to working with end customers of castings on a commercial basis.
Somewhat unexpectedly for us, we are engaged not only in the production of Wax3D, but also in the printing of wax waxes on order, and at the moment, in the full cycle of work with clients. This was not our goal from the beginning, but as it turned out, you can tell someone for a long time and stubbornly and explain the prospects, but all this is empty when there are no real examples of commercial use. And what can be commercial use if no one is doing it? The result is a vicious circle. A year of speeches at various forums, exhibitions and seminars showed that the public somehow revives only by the time the photos of real waxes appear on the big screen and, most importantly, castings made from them. And it is desirable that these were not trinkets. Based on the understanding received, the decision was born: to do it yourself. For, as they say in the troops of Uncle Vasya: 'No one but us'!
The path is difficult, but, as it turned out, quite commercially justified!
For about half a year now, the queue for wax printing has not been getting smaller, despite the constant growth of the printer fleet. On average, machine time for printing from Wax3D is scheduled for all machines for a period of 3 to 4 weeks.
Now, re-reading the comments to my first articles on wax printing, I can't help but smile - there was so much skepticism and doubt! However: 'The dog barks, the caravan moves on.' - a principle for all time.
This concludes the lyrical introduction. Let's move on to facts and figures.
Initially, I wanted to give detailed information in this section with numbers, formulas for calculating the cost and cost-effectiveness, but I realized that this would be beyond the scope of such an article, and no one would read it anyway. That's why I didn't waste my time or yours. Everything is short and sweet.
1. What products are Wax3D stencils suitable for?
For any products, the detailing of which does not exceed the capabilities of FDM 3D printing. That is, these are not jewelry, but rather the casting of rather large technical parts.
The photo shows examples of what we have been doing recently:
Meticulous Quality Control Department ))
Bronze casting on printed wax wax
2. For which runs is the technology suitable?
From a single piece to a run of dozens of stencils. With the increase in circulation, the cost of the final product falls slightly.
Here's a simple example we've been working on:
We were ordered to print a batch of stainless steel test casting waxes. 4-12 copies of each item were printed. The cost of one stencil ranged from 500 to 1500 rubles. That is, the average price of wax can be taken for 1000 rubles.
For a trial run, this price is more than justified, since the cost of manufacturing wax casting equipment for one wax mold in this case is on average 150.000 rubles. Subsequently, after all approvals and field tests, each product had its own wax casting equipment. This was justified, since the circulation of each casting subsequently amounted to about 5000 copies and the price of the tooling added only 3-5 rubles to the price of the final product. It is not difficult to estimate that a batch of 150 castings is on the borderline of the expediency of manufacturing tooling. For smaller batches, it is advisable to use 3D printing of Wax3D stencils.
Staples, staples... A whole bunch of staples!
But the staples are already made of steel. No wonder they tried!
3. Economic feasibility. To what extent is printing from Wax3D with subsequent casting more profitable than other technologies for producing metal products?
In short, the entire production cycle of casting is on average 10-12 times cheaper than milling and 8-9 times cheaper than metal 3D printing.
Let's take as an example one of the completed orders for casting from steel CT45. The pedal assembly of an ancient mechanism that wished to remain anonymous. Printing with metal to the client was calculated in the region of 500.000 rubles. Printing the same wax + casting cost him about 60,000 rubles.
4. Is it possible to print everything from PLA, burn it and cast?
Possible. Burn it out. Cast off! :) Once, now, our regular client asked us to print one form from PLA for him to try out for subsequent burning. Of course, we went to meet him and did everything as he asked. The next time he ordered stencils from us, he didn't even think about PLA. What happened, I asked him?
In the course of burning out, the crust of the mold burst and the casting was hopelessly damaged. Its surface was far from ideal - there were caverns and non-straits. The rather high ash content is to blame for everything, but the most important thing is the increased gas formation during burning. And there is no way to defeat this flatulence without changing the technology and composition of the molding sand.
Printing from PLA costs about the same as from Wax3D, but not sure about the result. The price of a mistake is quite high. That is why for us the issue of burnable polymers is closed once and for all.
5. What is the process for working with Wax3D stencils? What needs to be changed in the casting technology in order to work with such waxes?
If the foundry is equipped with a boilerclave for melting waxes from classic model wax compositions, then nothing needs to be changed.
Sprues and sprues adhere to Wax3D wax just as well as wax models.
The shaping of the crust is just as easy and with the same technology.
A good plus, which was appreciated by casters, is the rather high strength and flexibility of our stencils. Unlike stencils made from model waxes, our Wax3D printouts can be dropped more than once :)
6. Who are Wax3D stencils NOT suitable for?
For foundries not equipped with a boilerclave, but using open baths of hot water to melt wax models from the crust. The melting point of Wax3D is 96C +-3c. The temperature of boiling water is not enough to bring the printout into a highly fluid melt state. The required temperature for this is 120-150C, and it is easily achieved in the boilerclave.
7. Are there any tricks to printing from Wax3D?
Wax3D is a very unusual material for 3D printing. The rod is quite delicate, flexible, breaks easily, softens at temperatures above 45 ° C and melts at 96C.
Printing with this material is possible in a rather narrow temperature range: from 110 to 135c. Below these temperatures, it does not adhere well in layers; above this range, it is prone to slipping and the formation of artifacts on the surface.
The table for the first layer must be set to a temperature of 100-110c, for the remaining layers it must be turned off!
Nothing out of the ordinary? However, there are 4 most common obstacles in the way of a wax printer :)
a. Not every printer out of the box will print at temperatures below 170C. These features of the firmware can of course be fixed or bypassed. Information on how to do this is on our website in the description of the wax.
b. To paraphrase Dr. House from the TV series of the same name: 'All printers lie!' - they lie shamelessly, without embarrassment and a twinge of conscience! Maybe because they are not burdened with faith or morality, but most likely because they all have different temperature sensors that are calibrated differently, or not calibrated at all! At hot end temperatures around 100c, the spread of real indicators can reach 10-15c, but there are also unique ones...
The same, and even more so, for the table temperature. And if your printer cheerfully reports to you that the table is heated up to 100s, then its actual temperature can range from 60 to 90s.
Therefore, I note separately that I mean exactly the degrees of Mr. Celsius, and not the parrots and 'parrot wings' of a certain spherical printer in a vacuum.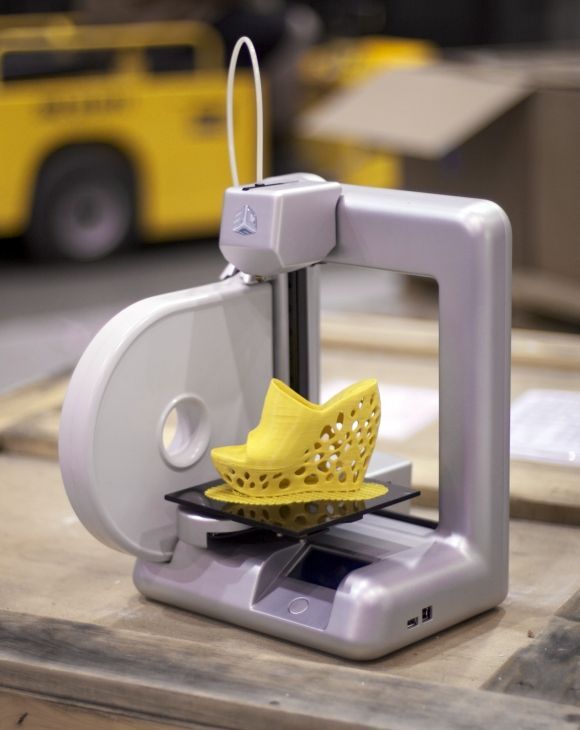 A calibrated thermocouple is an essential tool for any 3D printer!
in. Some slicers, such as Polygon slicers from Picaso, for some reason, do not know how to work with the printer table and change its temperature during printing. It is impossible to manually change the temperature of the table during printing on Picaso printers. I have not encountered similar difficulties on other printers. Of course, you can get around and solve all this, but how - it's better to ask Picaso3D.
#supovsorry! ))
Some printer models are designed in such a way that they can only print with a very limited set of polymers. And the reason for this is most often the device of the head designer printer. We recommend our customers to have a Teflon tube inside the thermal barrier, going all the way to the nozzle, as well as good cooling of the thermal barrier. If the thermal barrier does not cool well or the filament pulling mechanism itself heats up, do not expect stable printing. Here I will not poke a finger at any manufacturer - everyone knows his own heroes :) Also, a direct filament supply to the extruder is required without long Teflon tubes with several kinks. And, of course, NOT a 'bowden' serve.
Our choice of plywood workhorses with direct feed and Titan Aero print head.
Shall I urge you to master this material? For you, like us, to print wax wax at a price 50 times cheaper than printing on Solidscape? The fact that the market for such a service is not saturated and is practically devoid of offers? Of course not! Why do we need competitors? Print better gnomes - they are so lacking for everyone !!! :D
All our materials and works will be available at the 3Dtoday Fest in November. Don't miss it - https://fest.3dtoday.ru
With respect to engineers and dreamers!
Team 'Filamentarno!'
www.filamentarno.ru
What is SLS 3D printing. How does an SLS 3D printer work? Overview of additive technologies.
What is SLS?
Hello everyone, Friends! 3DTool is with you!
In this article, we will talk in detail about one of the most promising technologies 3D printing . Selective laser sintering.
Selective Laser Sintering (SLS) is an additive manufacturing process belonging to a broad family of wafer synthesis methods. In SLS, a laser selectively sinters polymer powder particles, fusing them together to create layer after layer. Granular thermoplastic polymers are used as construction material. Options for such devices can be considered in our catalog. For example, the Sintratec 3D printer.
This technology is used both for prototyping functional polymer products and for integration into small production runs, as it offers complete design freedom, high precision and produces parts with good and stable mechanical properties, unlike FDM or SLA .
Naturally, as in any other case, the possibilities of technology can be used to the full only if its key advantages and disadvantages are taken into account, so let's take a closer look at its features and principle of operation.
SLS printing process
How does SLS work?
The SLS fabrication process works as follows:
I. The powder chamber, as well as the entire printable area, is heated to just below the melting temperature of the polymer, after which the leveling blade distributes a thin layer of powder over the build platform.
II. The CO2 laser scans the contour of the next layer and selectively sinters (melts) the polymer powder particles. The cross section of the component is scanned ( sintered ) completely, so the part is monolithic.
III. When the layer is completed, the work platform moves down and the blade re-coats the surface with powder.
The process is repeated until the entire part is completed.
After printing, the part is completely sealed in the non-sintered powder, so the chamber and powder must cool before being removed. Cooling down can take a significant amount of time, up to 12 hours. Then the resulting part is cleaned of powder residues with compressed air. The unsintered powder is collected for further reuse.
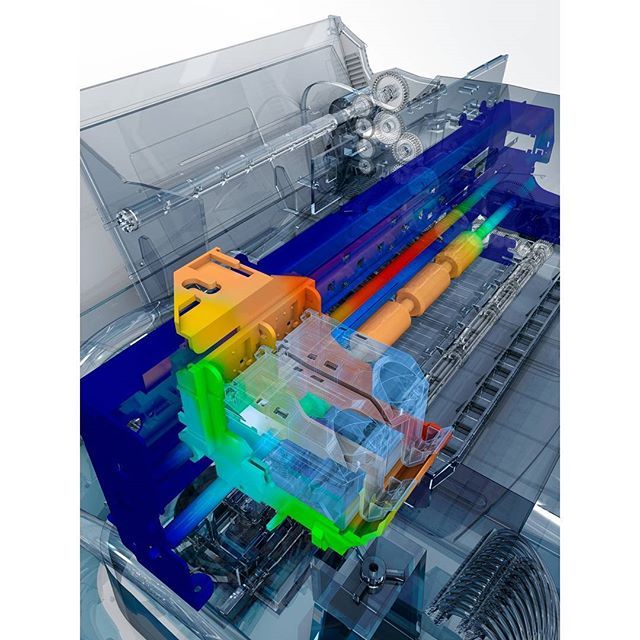
Schematic diagram of an SLS 3D printer.
SLS Printing Specifications
Printer Specifications 1 1 In SLS, almost all print options are set by the printer manufacturer. The default layer height for is 100-120 µm . For example, the Sintratec 3D printer we mentioned above allows you to print a much thinner layer, the layer thickness declared by the manufacturer varies from 50 to 150 micron.
The main advantage of method SLS is that the part does not need supports. In this case, the non-sintered powder plays the role of the necessary support. For this reason, the SLS method can print geometries of any shape that are impossible to print with any other additive or subtractive manufacturing method.
When printing with this method, it is very important to use as much of the printable area as possible, especially in small-scale production. Regardless of the amount of detail in the printable area, if the overall height is the same, printing will take the same amount of time. This is because it is the recoating step that determines the total print time ( the laser scanning and sintering itself is very fast ), and the printer has to cycle through the same number of layers. Also, you need to take into account the time for refilling the hopper with powder, because the same amount is poured into the chamber, regardless of the size of the printed part.
Layer caking
When using method SLS , the sintering strength of the layers to each other is excellent. This means that printed on SLS printer parts have almost isotropic mechanical properties.
As an example, the mechanical properties of samples printed on SLS using standard polyamide powder ( PA12 or Nylon12 ), the most commonly used material in SLS printing , are shown in the table in comparison with the properties of solid nylon:
Parts printed on SLS have superior tensile strength and modulus comparable to solid material, but are more brittle ( their elongation at break is much lower than ). This is due to the internal porosity of the resulting part.
!Typical SLS part has about 30% porosity!
The porosity gives parts printed on SLS a characteristic grainy surface. This porosity also means that the parts can easily absorb water and are easy to paint. At the same time, such parts require special post-processing if they are to be used in a humid environment.
Shrinkage and deformation
SLS-parts are subject to shrinkage and deformation: when the newly sintered layer cools, its dimensions decrease and internal stress accumulates in it, due to which the underlying layer is pulled upwards.
Shrinkage of 3 to 3.5% of is typical for SLS printing of and should be taken into account by printer operators during model preparation.
Large flat surfaces are most prone to deformation. This problem can be mitigated slightly by orienting the part vertically on the build platform. But still, the best way to reduce deformation is to minimize the thickness of the flat areas of the part, and add cutouts to the model where the design allows. These actions will also reduce the overall cost of the part, as less material will be used.
Finished sls-part with embedded embedded elements.
Excessive caking
Over-sintering occurs when excess heat around the contour of the part melts the unsintered powder around. This is fraught with loss of detail on small objects such as slots and holes.
Excessive sintering depends on both element size and wall thickness. For example, a slot with a width of 0.5mm or hole diameter 1mm will print successfully on a wall thickness of 2mm but will not print if the wall thickness is 4mm or more. As a general rule, slot widths from to 0.8 mm and holes from to 2 mm in diameter can be safely printed in SLS without fear of excessive caking.
Powder removal
Since printing method SLS no supports required, parts with hollow sections print quickly and accurately.
Hollow sections in this case reduce the weight and cost of the part, as less material is ultimately used. But you will need to make outlet holes in the part to remove unsintered powder from the internal cavities. The general recommendation in this case is to add at least 2 outlet holes with a diameter of at least 5 mm to your part.
If high rigidity is required, the parts must be printed solid. An alternative here would be to make the structure hollow, with no outlets. In this way, the powder will be compacted tightly into the part, increasing its mass and providing some additional support when mechanical loads increase, without affecting print time. Also, instead of one solid internal cavity, you can add a honeycomb structure ( similar to the infill patterns used in FDM ) to further increase the rigidity of the model. Laying out the part in this way will also help reduce warping.
Removing powder from an SLS part
General materials SLS
The most commonly used material for SLS is Polyamide 12 (PA 12) , also known as Nylon 12 . At the moment, there are more and more materials with different properties for SLS 3D printing every day, for example, elastic polymers are represented by TPE powder and its analogues. Other technical thermoplastics such as PA11 and PEEK are also available but are not as widely used.
As an example, you can see the list of materials used in our catalog: Sintratec Powder Sls.
Polyamide powder can be supplemented with various additives ( such as carbon fibers, glass fibers or aluminum ) to improve the mechanical and thermal properties of the printed part. Materials supplemented with additives are usually more brittle and have higher anisotropy.
Post-processing
SLS produces parts with a powdery, grainy finish that is easy to paint. The appearance of printed parts of SLS can be improved to a very high standard using a variety of post-processing methods such as polishing, classic painting, spray painting and varnishing. Their functionality can also be improved by applying a waterproof coating or metal coating.
Advantages and limitations of SLS
Summarizing the above, the key advantages and disadvantages of the technology are given below:
- SLS parts have good, isotropic mechanical properties, making them ideal for functional parts and prototypes.
- SLS does not require support, so complex geometries are easy to print.
- SLS's manufacturing capability is excellent for small to medium series production.
- Only industrial SLS systems are currently widely available, so lead times are longer than other 3D printing technologies such as FDM and SLA.
Learn more