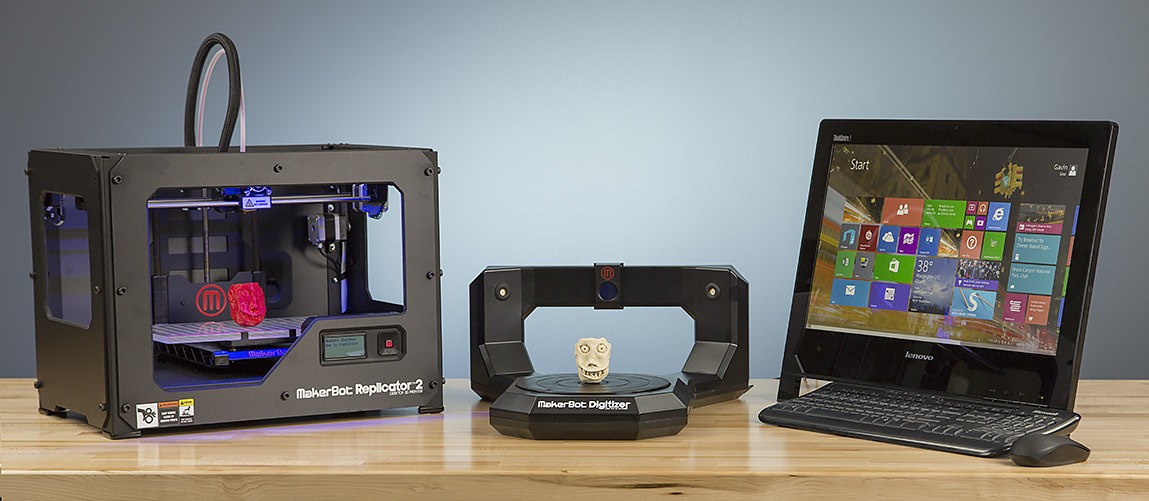
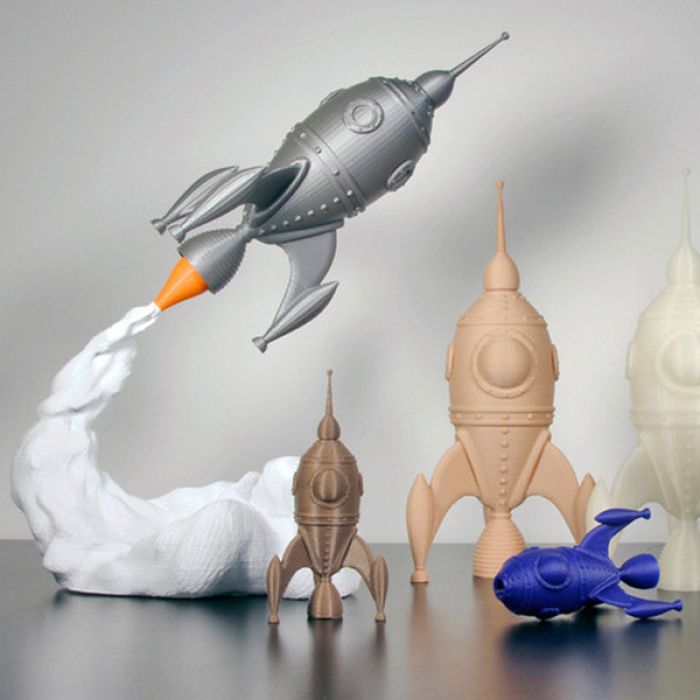
Black box 3d printer
Portfolio - Marc Schömann Industrial Design
Open Source Tool Changing 3D Printer
Open Source Tool Changing 3D Printer
Project
Open Source Project
Challenge
Multimaterial printer with the ability to combine difficult materials such as TPU and nylon in a single printing process.
Outcome
3D printer with water-cooled interchangeable extruder. Depending on requirements, additional extruders and tools can be added.
Project
Open Source Project
Challange
Multimaterial printer with the ability to combine difficult materials such as TPU and nylon in a single printing process.
Outcome
3D printer with water-cooled interchangeable extruder. Depending on requirements, additional extruders and tools can be added.
Multimaterial
FDM printing is not just one of the slowest 3D printing processes; it also lacks accuracy and requires support structures. But in some aspects, they can still exceed High-end printing processes such as selective laser sintering or poly fusion. While these processes can produce accurate parts consistently, they struggle when it comes to material diversity. And that’s when FDM shines. You can print almost any thermoplastics like PLA, ABS, ASA, TPU, Nylon, PEEK and even Polyimide – which can withstand crazy temperatures. But the best part about it, these Materials can be combined. Multitool printing enables entirely new ways to design and fabricate things previously rendered impossible.
Update Jan 2021
Note that most of the Information on this page is outdated. We are working on new shiny content but in the meantime you´ll find all necesary resources and information on Discord and Dazouki. You´ll find Blackbox Kits and spares at kb-3d.com/store/.
Multimaterial
FDM printing is not just one of the slowest 3D printing processes; it also lacks accuracy and requires support structures.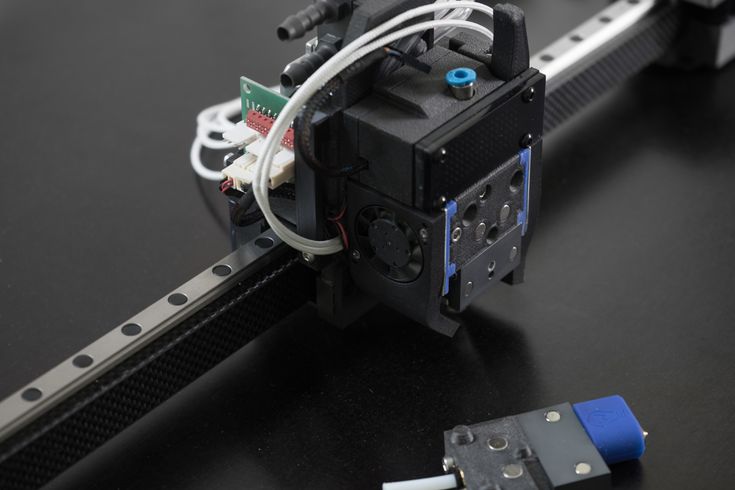 But in some aspects, they can still exceed High-end printing processes such as selective laser sintering or poly fusion. While these processes can produce accurate parts consistently, they struggle when it comes to material diversity. And that’s when FDM shines. You can print almost any thermoplastics like PLA, ABS, ASA, TPU, Nylon, PEEK and even Polyimide – which can withstand crazy temperatures. But the best part about it, these Materials can be combined. Multitool printing enables entirely new ways to design and fabricate things previously rendered impossible.
Update Jan 2021
Note that most of the Information on this page is outdated. We are working on new shiny content but in the meantime you´ll find all necesary resources and information on Discord and Dazouki. You´ll find Blackbox Kits and spares at kb-3d.com/store/.
Features Features
Discord Discord
Assembly Guide Assembly Guide
Download Download
Open Source
Completely free and open source, including source files!
Printsize
300x300x240mm ( XYZ)
Exchangable Toolheads
Tiny tools can be picked up at any stage of the print
The tool bank and X-axis are water-cooled and cool the tools passively when docked.
Hybrid Extruder
The Tools are small and simple, additional tools stay affordable
Slim tool design
Due to the narrow tools, motorized and complicated tool changers can be dispensed with.
Small bowden driven switchable tools along with a permanent direct drive Extruder
The extruder is based on an optimized Bondtech BMG, but the distance between the hot end and the extruder has been shortened compared to the original. The dual drive gears, along with the shortened gap between hotend and drive gears makes the extruder particularly suitable for precise printing of flexible materials.
- Water Tubing
- Filament Channel
- Spring Loaded Extruder
- Kinematic Tool Coupling
- Endstop
- Mastercooler
- Hotend T0
- Fan
- Tool Retainer
- Passive Cooler
- Hotend T1
Kinematic Coupling
The tool is exchanged between toolbank and X-Axis by a retainer, along with a quasi kinematic coupling system ensuring repeatable accuracy
Detachable Fans
The fans are Slide locked into the Extruder and can easily be detached for unrestricted access to the hotend
Dual Filament Drive Gears
Dual drive gears and short gap between hot end and drive gears ensures uniform extrusion, even with flexible materials
Integrated Belt Tensioner
Correct belt tension is important because the angle of the XY axes depends on it and it´s a crucial factor to achive quality prints
Silicone leak blocker
Silicone wiper prevent material oozing from the inactive extruder
Offset Tools
The tools are slightly offset to ensure safe operation and prevent oozing into the print
Belted Z-Axis
The affordable 1:25 pulley reduction on the Z-Axis is capable of tiny layer heights and fast Z-Hops.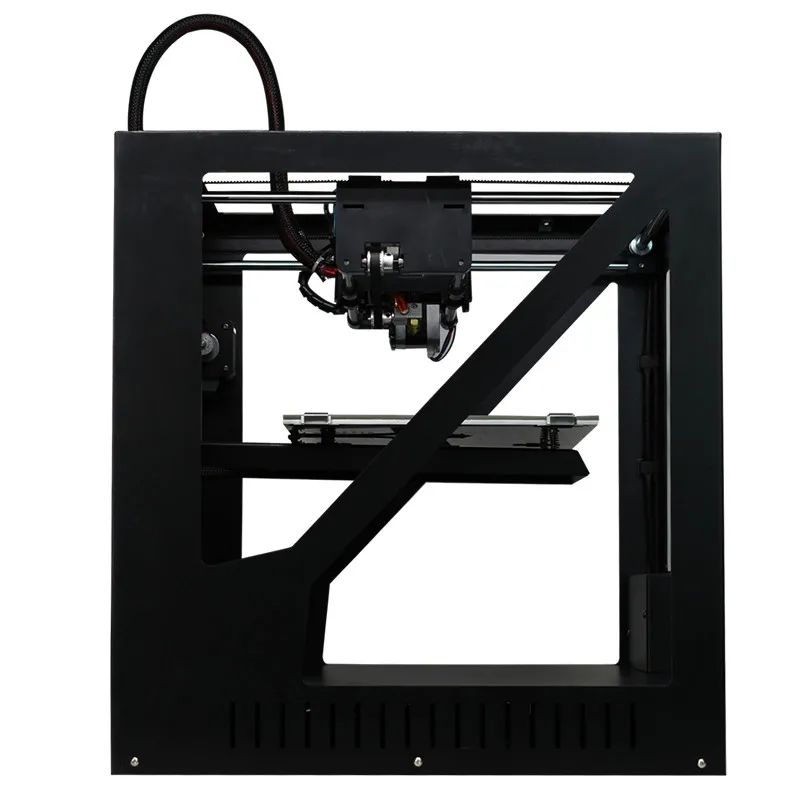 It can do fast feedrates which enable true 3D movement.
Technical Data
General
T-Slot 40×40, 20×20, 20×60
Housing
Lasercut Acryl, easily detachable
Dimensions
Frame Size
570x520x428mm (WxDxH)
Print Size
300x300x240mm (XYZ)
Printhead
Permanently mounted direct drive Extruder
Up to 3 exchangable bowden tools
Feeder
Dual drive gear optimized for flexible materials
Cooling
Water cooled
Hotend
Dice V2, E3D compatible
Heatbreak
E3D Chimera/Kraken
Kinematics
XY-Axis
Core XY
Z-Axis
Belt driven Z-Axis with 1:20 pulley reduction
Blackbox is the vision of a 3D printer which pushes the boundaries of fused filament fabrication. It is an open-source project down to the source files, and everyone is invited to participate! There are already few but skilled people contributing actively to this project.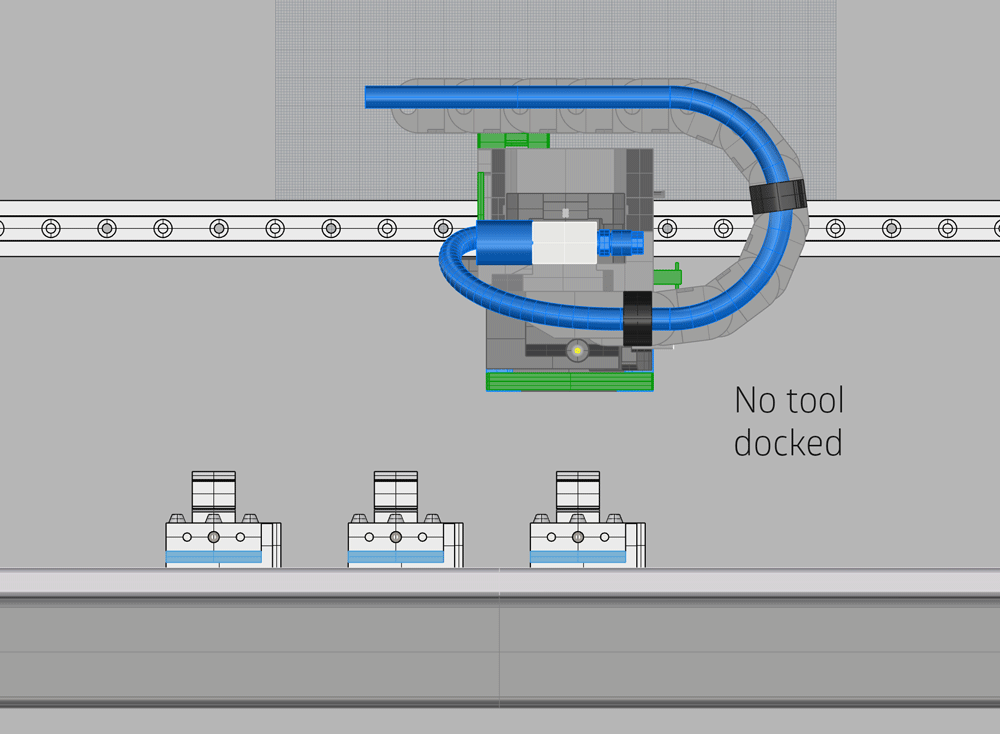
Join the Community!
Join the Team and work on this Project with the community. You can help designing new tools, implementing enhancements or fixing bugs. We are currently converting the Rhino files to Fusion 360 and everyone is invited to join! Visit the Forum to get to know the community!
Become a Patreon
If you don´t have time to participate directly but still want to support the project, you can become a Patreon! I´ll share exclusive source files of all my creations with my patreons, and it helps me to push jobs, test more ideas, and create more content!
Talk about it!
Outreach is everything these days. But my channels are limited, by sharing liking and reposting this project you help to find encouraging people sharing the Blackbox vision.
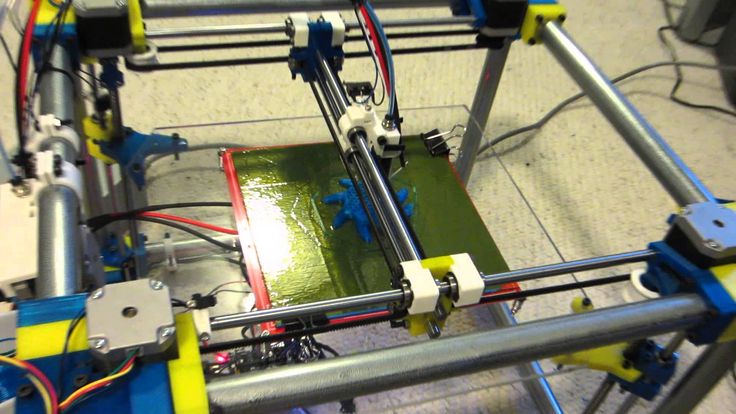
Blackbox is mostly built with off the shelf parts making it easy to replicate. Printed pieces got very few overhangs and are highly optimized for troublefree printing. The only CNC milled parts are for the water-cooled tool-changer. It´s also possible to build an air-cooled version with any Nema 17 based extruder.
We are working on updates and better documentation, sign up to the newsletter by downloading the source files so you won´t miss major updates!
All files are released according to the following license unless specified differently in the file or directory: CC-by-NC
Blackbox STEP
Source File ...
26.692 MB 224 downloads
Blackbox V93
Blackbox V106
Blackbox BOM
Curated BOM with US/EU/Worlwide suppliers ...
8kb 1068 downloads
Blackbox BOM
The High-Quality Open Source 3D Printer « Fabbaloo
By Kerry Stevenson on March 1st, 2021 in printer
Tags: blackbox, open source, water cooling
Blackbox 3D printer during build [Source: Blackbox Project]There are plenty of open source designs for 3D printers, but most of them are for relatively straightforward desktop machines. That’s not the case with Blackbox.
Blackbox is a project spearheaded by Frankfurt-based industrial designer Marc Schömann, who runs the site layershift.xyz. Schömann has previously designed 3D printers, leading to the Blackbox.
There is a clear gap in 3D printer capabilities in the market. At the low end, we see inexpensive desktop systems, sometimes without enclosures. While these can often produce competent prints, they are usually no match for more expensive devices that employ not only enclosures but more sophisticated mechanical systems, higher-end componentry, and advanced designs.
Unfortunately, these systems usually cost a great deal more than the inexpensive desktop units.
But there could be a way to get into that category with less expense, and that’s by building your own Blackbox 3D printer using its fully open source design.
Blackbox 3D Printer Specifications
Blackbox 3D printer in operation [Source: Blackbox Project]The Blackbox offers a number of features that you might not find on an inexpensive open source 3D printer. These are some of the features I noticed:
- Large build volume of 300 x 300 x 275 mm
- Full enclosure
- Five-element toolchanger with direct drive
- Water-cooled toolheads (!)
- Belt-drive Z-axis
- Automated leveling and calibration
This is the only water-cooled option I’ve seen presented in open source form. Water cooling should enable more precise thermal control, and thus more reliable and consistent 3D printing quality.
The belt-drive Z-axis is a very interesting feature, as it allows for several different movements not always available in common directly-attached stepper motor configurations. You can move the bed more precisely, but also move it far faster. This is an excellent feature that hopefully will make me forget all those terribly slow bed raising and lowering experiences.
Blackbox 3D Printer Cost
To purchase a commercial 3D printer using water cooling systems, you could expect to pay a great deal of money.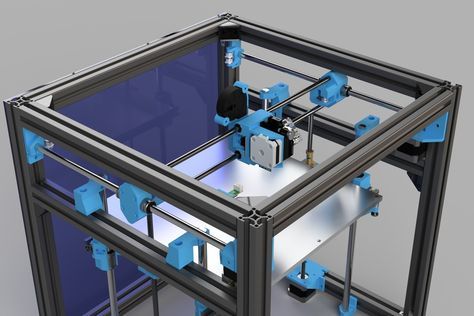 However, if you were to build a Blackbox from the open source plans with off-the-shelf parts you would likely save quite a bit of cash.
The Blackbox documentation says you can build a fully operational Blackbox 3D printer for approximately US$2,900. That’s a higher cost than inexpensive desktop systems, but far less than commercial equivalents.
On the other hand, you have to build the Blackbox yourself, and that’s not a task for everyone. The Blackbox documentation explains:
“Blackbox has some new (to most) design elements that will push you to learn about systems you may not have dealt with before. In general though, the recommendations from other DIY printer build communities translate well.
This probably shouldn’t be your first 3D printer. There are always exceptions, but the experience you have will likely lean on your previously acquired skills from using and maintaining other machines.”
The project is entirely online and provides extensive documentation, as well as the source files for all the Blackbox designs.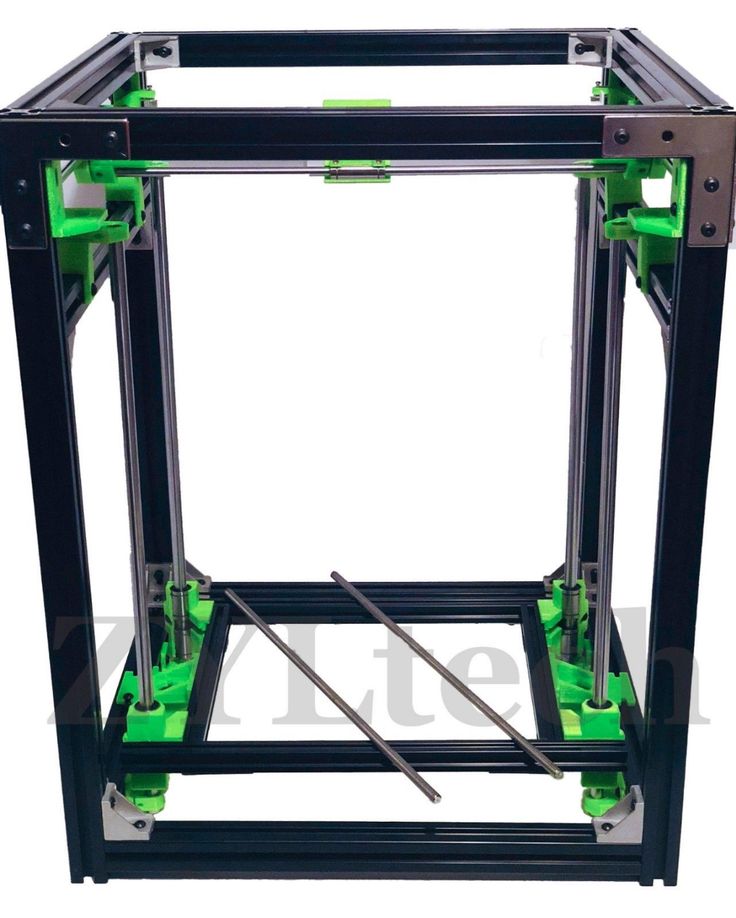 Not only are the printable and CNC-able files provided, but you can also download the CAD design files in .STEP or Autodesk Fusion 360 formats. The Fusion 360 files in particular load with all parts linked into assemblies.
There is a detailed assembly guide, a dedicated private Facebook support group, and a real-time Discord server. It seems there will be plenty of assistance, should you need a question answered.
Like many open source projects, the Blackbox project posts their roadmap publicly in Kanban card form. Currently they’re working on improving the end-stop systems, as well as aluminum upgrades. One “idea” that hasn’t yet moved forward is the idea of using different types of tools, such as plotters, lasers, assembly grabbers, etc. This would fit well with the tool changing capability of the system and make it an even more powerful 3D printer.
If you’re interested in building a high-end 3D printer, the Blackbox could be a design to investigate.
Via Layershift and Dozuki
By Kerry Stevenson
Twitter Kerry Stevenson, aka "General Fabb" has written over 8,000 stories on 3D printing at Fabbaloo since he launched the venture in 2007, with an intention to promote and grow the incredible technology of 3D printing across the world. So far, it seems to be working!
View all of Kerry Stevenson's posts.
3DQuality Sparky. The black box of your print
I was very surprised by the fact that Russian companies decided to give their printers to bloggers for review. Apparently, they have reached a quality that is no longer ashamed to show. Already Picaso classic was given to Sergey, Imprint only promises, now they decided to give me 3Dquality.
In my memory, the company did not have printers with H-Bot kinematics, all deltas, but jerks in different cases. Of course, they were scolded for the quality of assembly and development, but courage is fine. This is a desire to admit your mistakes (and they are) and change for the better, a little later I will explain why I had such a feeling.
In my humble opinion, this printer is an alpha version of what is planned for release, because there are many weak points that definitely need to be reworked. Plus, during the testing process, the company asked to write about various shortcomings, shortcomings that could be added to the list of things that need to be resolved before release into the series.
In general, we finish in philosophy and move on to practice.
Unboxing
Box with a bunch of stickers, in the form of technical specifications and shipping signs.
Printer inside, bagged and lined with yoga mats. It is useful, though not just to throw out foamed polyethylene. You can put the printer on the rug and work out. Solid benefit and how fashionable now - eco-friendly.
Bound instructions with color pictures.
The cat was the first to try the rugs, they liked them very much.
Set
From what was in two boxes a small list:
1) PLA coil.
2) Spare parts and tools box
3) Power cord
4) Hairspray.
Damn, it was unexpected, I thought everyone refused such a tool, there is the usual 3D glue.
There are two flash drives in the box, one SD for printing from it, and the second USB - it contains all instructions and software.
Two spare fuses.
Spare PT100 from triangles, heater and cooler 40 mm.
More wrenches, spare nozzle and spatula. The black key is interesting, it is 5.5 * 7. On the one hand, for M3 nuts, and on the other, for replacing the nozzle.
Unusual marking, I did not expect that the name of the plastic would be written on the bottom of the box, which, judging by the marking, cannot be turned over like that at all.
Appearance
And so, the printer has a dibond case, inside of which there are two steel plates: for XY-kinematics and mounting the Z axis from below.
The printer's designer was inspired not by Pablo Picasso, like his competitors, but by Kazimir Malevich, the printer has the shape of a cube, the color matches.
The printer is closed with acrylic caps: one for the coil compartment, with magnets, the second on top and the third on the front.
The one on the side has two rubber handles to open without breaking nails and close without pinching fingers. I will remove the nuts sticking out everywhere in the next part.
The remaining two are closed with swivel hooks. They are small, it is not very convenient to turn, you can make more for convenience. At the same time, the top cover can be moved to remove, but the front one cannot be pulled out like that, you will have to turn two hooks to pull it out. What prevented them from making them also on magnets is not very clear.
The stark black design is enhanced with yellow acrylic panel mounts and a printed head cover.
Display form factor - 1264, mini version with LCD screen with twist. This is the only strongly protruding part, in fact, as on all printers equipped with an encoder to the display. But the SD card is recessed almost flush, pulling out and inserting is convenient.
Russified menu, understands Cyrillic files.
There is a hole for the reset button. Apparently, the plans were to make the printed button flush, but they were in such a hurry that they did not focus on such trifles.
In general, Uberdesign is not bad. No protrusions sticking out for you to hang the coil, there is a separate section for this, this is really cool. The brains from the usual basement have moved to the side part and it is no longer necessary to turn the printer over for repairs.
Inner world
The first was not me...
In addition to the intestines, it is interesting to see everything that is inside the case.
The head is covered with a printed cover with slots. Why such slots were chosen, I do not know, but the air passing through them whistles.
Top cover slides on rails and does not lock in any way.
Under the cover - a switching board screwed to the radiator. And then, we didn’t get something.
Steel beam, everything runs on 12 rails from KGT. Not the worst that could be.
Feeder - E3D Titan clone.
Spool seat made of two pieces of shaft.
Table - steel, welded, painted. The seams are neatly cleaned. Heating - silicone heating pad. Bearings in a block housing, bolted to the table.
Shafts - 12 mm. Mountings are milled.
The Z-axis motor is on top. The table under its own weight after turning off the motors smoothly falls down.
Nut - black, POM.
Electronics compartment on the opposite side of the coil, screwed on with 4 screws. A piece of strap is provided for fixing in the open position. The solution is interesting, but unfinished. It would be much more convenient, for example, to have 2 loops at the bottom and another piece of belt on the opposite side.
Cable management... well, it's not there, no offense. Yes, several bundles were made with nylon ties, but it’s probably not worth releasing in production with such wire design.
They were too lazy to shorten the thermistor for the heat chamber, wrapped it up as best they could.
Board - BTT SKR 1.3 with A4988 drivers. I was afraid that they would kick me out of the house with this black box and replaced all the drivers with TMC2209. Well, somehow it’s not serious, to put A4988 for home use.
Platinum thermometer as head temperature sensor. They did not install the amplifier separately, they hung it on 1 screw to the board. The firmware is Marlin 2.0. I don’t know the subversions, the menu has been somewhat redesigned.
As PSU - PSU for LED lighting, 300 W at 12V.
Print examples and rakes
Some things print just fine, but when PLA needs airflow, the printer fails. It is lacking catastrophically, even though everything around is blown by two radial coolers.
White PLA kit.
Remains of the old SBS from BF. Which I decided to use with a 0.5 mm nozzle and a layer height of 0.35. It was printed at 70 mm/s multiplied by a factor of 350%, which was set with a twist. For me, he keeps the speed well. In the next post I will tell you about the improvements that I will make and, in general, in terms of print quality with different tests.
Conclusions
The printer as a phenomenon is not bad, but given the very crude version that came to me, it needs to be improved before mass production.
The list of improvements is sufficient:
1) Camera illumination. It is required if you have a closed printer. Well, no one will climb into it with a flashlight on the phone. It is not comfortable.
2) The covers must be removed easily and quickly, without turning the stops. One cover on magnets is already there, why not do the same for all the others?
3) Drivers in the printer. I would like a careful and thoughtful approach to the client, do not torture his ears, installing TMC drivers is unlikely to greatly increase the price of the printer.
4) Cable management must be. Well, this is not some kind of DIY, this is a printer that, according to the plan of 3DQuality, should work with sparks. Accordingly, in case of any problems, opening the electronics compartment, it was immediately clear which cable was connected to what and so that it could be replaced without unraveling the tangle of wires.
5) Radiator. In it, the lower part, which is most heated, does not have fins for cooling, and the formation of traffic jams is a matter of time. In this design, it is the bearing element of the kinematics, two ends of the belt are attached to it.
6) Belt tensioner. This important design element must be present in H-bot/CoreXY. In this case, the belt is fastened to the radiator with two plates. And the tension is done with the help of hands. Yes, the motor mounts have cutouts so that by loosening the motor screws and pulling it back, you can tighten the belt. But everything is limited to the body, inside which there is no way to crawl, unscrew and move the motor.
7) Firmware. She is a full-time Marlin, the menus are completed so that it is convenient. But the plastic change point does not provide for pulling out the entire piece of the rod from the tube and replacing it with a new one, i.e. this menu item simply heats the hot end and pulls out something about 20 mm, and then we squeeze the clamp by hand and change the plastic. Not a very convenient thing, because. Not enough space for two hands.
I could not stand it and redid it as best I could, because they forgot to put washers between the flange bearings, and the bearing installation level was crooked, so that the dust from the belt fell onto the upper part of the compartments.
Nominally, it is, but it blows everywhere, and not under the nozzle. With the camera closed and ABS printing, I turn on at full power, it prints well, no cracks, no overheating.
Inserted the printed washers, modeled the mounts for the bearing assemblies and redid the belt mount and put the tension spring.
The list of positive aspects is present:
1) In the minimum amount of space, the most useful is used. This applies to the compartments on both sides of the table. In one of them electronics, and in the other - a coil with plastic.
2) There is no need to turn the printer for repairs, the electronics compartment opens so that you can check the operation during repairs.
3) Separate thermistor for temperature measurement in the passive thermal chamber. I've always wondered how high it is when printing ABS. Now I know that with a table temperature of 100 degrees and a closed chamber, the temperature is 50-52 degrees.
With this approach, it would be logical to combine the chamber and the coil compartment into one air volume. And the plastic will dry without damage to the print, and you can make a beautiful cutout in the form of a company logo.
4) Kinematics on a steel plate. This helps to avoid distortions and increase the rigidity of the entire structure.
5) Rigid welded table. It is as rigid as possible, does not flex when pressed.
P.S. I'll leave a couple of pictures for the next post.
Yes, this is the recently introduced Creality HALOT-SKY with 8.9 inch display. Beaten by a hostile railroad expedition. But, only the cap was damaged. Which I glued and plan to paint to look nice.
Metal 3D printer | Formlab development case
Design and ergonomics for the black box: appearance and design of the case of a new model of a 3D printer - the first of the line.
It also happens that you have an excellent, very competitive product. But you can’t start selling it (yes, your cat is purebred and even well-fed, but the old bag in which he sits spoils everything).
In just a few months, Formlab was able to develop for a manufacturer of systems using additive technologies what his new industrial 3D printer lacked - an original case (and make a prototype).
So fast - because the customer company had to have time to prepare the device for the exhibition. Today they are already taking orders.
Metal 3D printer Additive Solutions. Case developed in FormlabMeet the black box
Additive Solutions (Titan-Avangard LLC) has planned to create a whole line of industrial printers for metal 3D printing. We decided to start with a machine for printing medium-sized parts - D250. Not big, but not small either, dimensions - 2000x1000x2400 mm.
Formlab took care of the design and ergonomics of the case. The design of the internal architecture of the printer has already been developed, and it was forbidden to interfere in this area.
The D250 is a selective laser melting (SLM) printer. The working chamber for printing is filled with inert gases - argon or nitrogen: there is no oxygen in the chamber, so the 3D printer can print, including those metals that are afraid of oxidation (for example, titanium). The digital model of the part is pre-divided into layers with a thickness of 20 to 100 microns. When printing each layer, a consumable is applied to the table - metal powder, and a powerful laser beam begins to fuse layer by layer in succession.
The printer consisted of two parts. At the bottom there were containers with consumables and other structural elements - a power supply, a computer, etc., the top one consisted of a monitor and a metal movable tabletop, on which the part was to be printed.
But these are plans, but for now the device was nothing more than a black box. Maybe the customer's full-time designers could - over time - turn the box into a full-fledged machine, but here this very time worked against it. Sales had to start the day before yesterday, and even the “pictures” of the future printer posted on the website could be a way out of this situation.
A common thing for such laser devices is a signal pole, provided by GOST. But the D250 also needed three emergency STOP buttons located on three sides, as well as pedals so that one operator could control two build wells - raise them, lower them or hold them at the desired height.
For the same operator, a step was to be provided on the housing.
The device had to be serviced somehow. How?
Through removable panels. The side was supposed to be hinged, access to the upper part of the chamber was also needed to pull out the part, the rear panels had to be removed to access the electrics ... And in general, the customer did not mind that absolutely all elements of the case could be removed, moved apart or opened. In addition, the metal case had to protect all internal elements from dust and moisture according to the IP30 standard.
Designing
The requirement that the design should not be similar to competitors' devices was easy enough to meet, given that in the mass this design was somewhat ... well, let's say, cabinet-like. But, in addition to this, it was necessary to take into account the fact that the customer company presented its goods and services as products of European quality, and the appearance of the printer had to meet expectations.
It was impossible for a new 3D printer to be like these competitorsSketches. This is what a black box could look like
The customer insisted on the dark colors of the case, the logo illuminated from the inside and on painting the metal with a slight shagreen. The gloss just didn't fit.
Winning variantRoof leaves with glass or separately?
The creators of the printer really liked the idea of Formlab with a protective screen moving down, which covered the installation chamber. But according to the terms of reference, access to the upper part of the chamber was needed in order to pull out the finished part.
We proposed to make a roof that would fold halfway, but not on hinges, but in some other way, more technologically advanced. Again, they drew several options, but the customer came up with his own: the top cover became all-metal, opened completely, and not half, and was held on by shock absorbers. And the outer glass went down parallel to the body along the guides.
An idea can be anything good, but to implement it, so that it is both cheap and reliable... It was necessary to think and count. What exactly to put? It definitely had to be a composite material, but which one? If it is lightweight polycarbonate, will it withstand the high-temperature process that will take place in the chamber?
If something is heavier, how to fix it? Will I have to bend it (the developers from Additive Solutions did not like the right angle of the camera)? And how much will all this cost? We calculated and “tried on” all the options.
We settled on bending 10 mm polycarbonate sheet with a colored translucent sticker. And we also managed to get rid of the upper edge that supports the glass of the frame: it looked somehow not very beautiful both with the screen raised and with the screen lowered.
Solving the problem with the camera glass was only part of the job. The platform-step of the operator was extended to the full length of the printer and increased in depth (in accordance with safety rules), and also adapted to the stacker. At first, the platform had two cutouts, but closer to the end of the project and the formation of the final version of the design, they were transformed into one.
Decided on the color We experimented for a long time with cutouts - both the sliding glass and the cutout on the platform-step. Along the way, we noticed that most customers are drawn like a magnet to compare their product with Apple products - if not completely “apple-style design”, then at least “an iPhone-like cutout”.
According to the terms of the ToR, the printer manufacturer's logo not only has to be present somewhere in a conspicuous place, it must also be highlighted. Well, this also happens: the placement of the logo was stipulated in the TOR, it took a long time to figure out the options, and then ... they decided to do it without a logo at all. The logo has gone into the software interface and is now displayed on the built-in touchscreen (of course, if the printer is turned on).
The logo walked around the body of the 3D printer... and left for the touchscreenPrototype and "series": there is a difference, and what else
At the beginning of May, we agreed on the terms of reference for the development of the case. Two weeks later, sketches were ready, in which Additive Solutions immediately found their own version. A month later, a prototype hull appeared (Formlab shared its contractor with the customer).