3D scanner dslr
DSLR Photogrammetry 3D Full Body Scanners
A DSLR full body 3D scanner relies on photogrammetry to create a 3D scan. Photogrammetry works by finding shared features between multiple photographs to calculate depth. It is predominantly used in the visual effects industry.
*Note: Scroll to the end of the article for an update on the current state of DSLR photogrammety full body 3D scanners. Access full 3D scanning technology comparison here.
Average Cost:
$50,000 to $250,000
How it works:
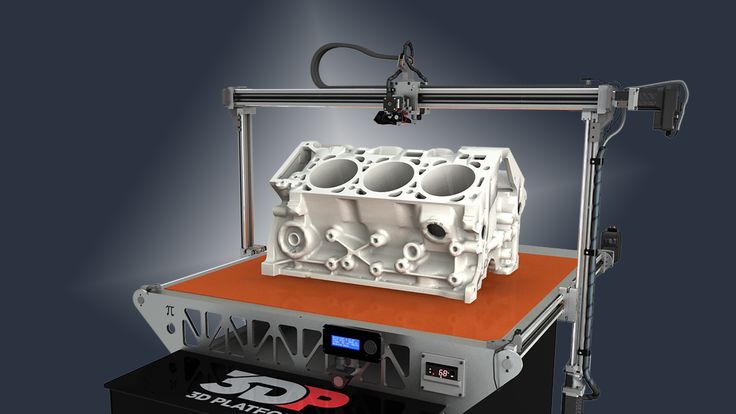
A DSLR photogrammetry full body 3D scanner normally consists of 70 to 150 DSLR cameras (it can have many more depending on the application) and lighting equipment mounted at specific angles around the subject being 3D scanned. The cameras have a special peripheral attachment that can synchronize the captures so all cameras fire within a fraction of a second of each other. These setups rely on exceptionally high quality data and specialized camera angles so the cameras typically need to be manually moved and focused on the subject being scanned to accommodate for their body shape and pose. Following a capture, the photos are transferred to a computer where an operator will run the photos through photogrammetry software. The photogrammetry software will create a point cloud by locating features shared across many pictures and calculating their depth. The time to process a 3D model using photogrammetry software ranges from 25 minutes to multiple days depending on the speed of your computer and the desired resolution.
Limitations:
Like all other full body 3D scanning technologies, photogrammetry struggles with scanning transparent and reflective materials. In addition, photogrammetry struggles with flat colored materials (ex: plain colored clothing) since the software relies on being able to identify matching pixels across numerous images, so if an individual is wearing a plain black t-shirt, it has a very difficult time trying to figure out which black pixel corresponds to which across images. Photogrammetry does not do as good a job at capturing fine details as other technologies, so fine details like buttons on clothing or glass frames typically do not come out. If you need to reliably calculate the geometry of person being 3D scanned (ex: medical applications), then you are likely better off going with a different technology.
Post production:
The largest advantage of a DSLR photogrammetry system is the 3D scanning process is instantaneous so your subject has very little opportunity to move and mess up the data. That having been said, you still want to make sure the person you are 3D scanning is completely still for the capture. In addition to the reliability increase an instantaneous capture affords, it also means you can achieve excellent texture quality as when the photos are being stitched together, they all match perfectly. With poor calibration or due to the material limitations listed above, it is sometimes difficult getting good geometry data. Post production work on a 3D scan from a DSLR photogrammetry system is typically spent fixing jagged geometry, adding geometry to parts that were not covered by enough camera views and accentuating fine geometry details like buttons on clothing. The post production time for 3D scans off of a DSLR photogrammetry system is usually a couple hours per file, and can vary depending on how much detail you want to add to the 3D scan. One thing to note, is typically when a company advertises the quality of a 3D scan off of a DSLR photogrammetry system, they advertise the file after it has been touched-up by a 3D artist. To compare systems apples to apples, be sure to ask for raw, unedited files from anyone you speak with.
Pros:
- Quality - When calibrated correctly, DSLR full body 3D scannners can produce very high quality 3D scans, which is one of the reasons why they are used in the VFX industry. NOTE: Hybrid full body scanners are now starting to catch up.

- Scan time - Since photogrammetry is an instantaneous process it is very well suited for scanning things that have trouble standing still (people, pets etc.).
Cons:
- Portability - Due to the high number of cameras, lights and networking equipment DSLR photogrammetry systems can be really heavy, tricky to assemble and awkward to move around.
- Processing time - Depending on the speed of the computer and the desired quality level, the time it takes to process a 3D scan is 0.5 - 24+ hours, so it is infeasible to preview a 3D model for your customer and assess the 3D model quality while the customer is still onsite. The other downside to long processing times is a processing queue can build up very quickly, significantly affecting throughput. If for example a customer wants multiple 3D scans processed before deciding which to purchase, it may be multiple days before that customer gets models to choose from. For DSLR photogrammetry systems it is a good idea to have multiple computers running to process the 3D scans to increase throughput.
- Cost - The cost to buy all of the DSLR cameras (~$415 /camera), lights, networking equipment and stands to mount the cameras on can easily be greater than $50,000 and typically costs well over $100,000. In general, this is the most expensive 3D full body 3D scanning system.
- Space Requirement - Photogrammetry systems require an entire room, 20’ x 20’ in dimensions.
Conclusion:
While a well calibrated DSLR photogrammetry system can produce very high quality 3D scans, because of their the high upfront cost, their space requirement and their long scan processing time, they are not well suited for the mass market. Another thing to note is the resolution of the 3D scans produced from DSLR photogrammetry systems is much higher than what current full color 3D printers on the market can produce, so much of the increased quality is immediately lost due to 3D printing limitations. DSLR photogrammetry full body 3D scanners will always exist for cases where photorealistic models are required such as in the visual effects industry.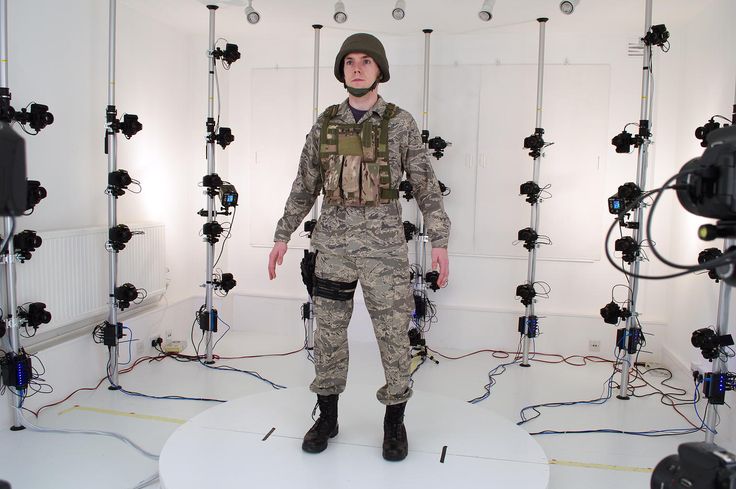 We predict they will persist and fill the niche for ultra high end 3D photography where 3D models are printed at over one foot (size at which the increased 3D model quality is apparent on a 3D print) for many hundreds if not thousands of dollars per 3D figurine.
Update since original posting:
We've now published a full comparison page that shows all the main types of 3D scanning technologies used to capture people. To learn more about how DSLR photogrammetry full body 3D scanners stack up to other technologies on the market, you can check out our full body 3D scanner comparison page here. Since the original posting of this article, the 3D printed figurine market has started to shift farther to using higher quality hybrid full body 3D scanners. The main drivers in this shift: software and advances in GPU hardware. While DSLR photogrammetry 3D scanning systems are still used in the VFX industry, most new scanners for the 3D printed figurine industry are all hybrid 3D scanners. These advances in software and GPU hardware have also allowed hybrid 3D scanning to extend beyond just 3D printed figurines to other applications like AR, VR, gaming and the medical industry. An example of this shift can be seen in this comparison between a rendered 3D scan and a real person (model on the left is the rendered one):
The texture quality on the left used to only be possible from a very high end DSLR Photogrammetry 3D scanning system, but is now the standard output from a hybrid 3D scanner. More information on 3D scanning in AR/VR and other applications:
- 3D Scanning for AR and VR
- 3 unexpected ways to use full body 3D scanners
- Is 3D Scanning Technology a Catalyst to Augmented Reality’s Growth?
Want to see what state of the art hybrid 3D scanning is like?
Photogrammetry - 3D scanning with just your phone/camera
Have you ever wished that you could easily transfer a real object into a digital file? The technology is here, but most of us simply do not have access to high-end 3D scanners that can reconstruct the digital geometry of a physical model. Not to mention that some objects can be way too big for any traditional 3D scanner. However, there is another, much cheaper way to create 3D models corresponding to real-world objects.
What is photogrammetry?
Photogrammetry (or SFM – Structure From Motion) is a process that estimates the three-dimensional coordinates of surface points using pictures of a single physical object taken from different angles. At least that’s the oversimplified one-line explanation. You take a bunch of pictures of the object from all possible directions, then you use these photos as an input for a specialized software. This software will look for features that are visible in multiple pictures and try to guess from which point was the picture taken. Knowing the camera positions and orientations, it creates a 3D point that corresponds to the 2D feature on the photo (basically a pixel). Ideally, you’d get a finished 3D mesh as an output. But often it might be better to process the reconstructed points into a mesh manually for much better results.
Software
The list of available photogrammetry software is pretty long. The problem is that most of the programs are either very expensive or limited in features in the free version. Some programs even offer cloud-based computation, which is handy, but further increases the cost.
We tried to pick the best free software:
- Colmap (Win/Mac/Linux) – will be used in this article
- 3DF Zephyr (Win) – Free with the limitation of max 50 photos
- Visual SFM (Win/Mac/Linux)
We will also need some kind of software for post-processing of the output data. The choice is pretty easy here – Meshlab.
The computation is fairly demanding on the hardware. Running it on an old laptop might not be feasible as the computation times would get extremely long. Many applications also depend on the NVIDIA CUDA interface (Colmap), which does not run on AMD graphics cards.
Taking pictures for photogrammetry
Obviously, you’ll need a camera. A smartphone camera will work just fine, but if you have a DSLR, it’s even better. If you’ll be using DSLR, crank the aperture to at least 7-8 to increase sharpness and to avoid shallow depth of field.
You’ll want to capture at least 20 pictures. During our testing, we often shot 50-80 pictures to capture every detail. Keep in mind, that some pictures might get discarded if the program doesn’t find enough similarities with other pictures.
- Move around the target object in circles. Do not move the object or its surroundings between pictures.
- Overlap! You want to have each part of the model captured by at least 2 pictures. Ideally, you’d have about 60-80% overlap in succeeding pictures.
- Avoid hard shadows, use diffuse lighting or take the pictures outside on a semi-cloudy day.
- The object should make a significant portion of each image.
- Avoid moving targets (e.g. pets, unless they are sleeping).
- Avoid very glossy or transparent targets. (More on this later)
Ideal targets for photogrammetry are textured or rough items (statues). If it’s an option, you can cover glossy or transparent objects with powder (flour) to avoid reflections. Or cover the glossy surface with a painters tape.
Advanced users can also capture a video of the target and then convert it into individual frames. In this case, keep the shutter speed high (e.g. 1/80) to avoid blurry frames.
Reconstructing geometry from photos
We suggest creating a folder that will hold all the files for a single reconstruction. Inside that folder create another folder called “Photos” and place all your pictures here. Quickly go through the photos and delete any blurry ones. We’ll be using Colmap on Windows 10 for the reconstruction.
- Launch Colmap using Colmap.bat
- From the top menu choose Reconstruction – Automatic reconstruction
- Set the Workspace folder, this folder will be used for storing reconstruction calculations and the output mesh
- Create another directory next to the Photos folder for this purpose
- Set the Image folder the Photos folder containing all your pictures
- You can leave the Vocabulary tree empty, alternatively, you can download and use one from this download page
- Keep the Data type as Individual images or change it to Video frames if you created the pictures from video
- Change the quality to Medium
- You can try High quality, but in our experience, Colmap crashes very often with this setting
- Leave other settings with default values and hit Run
- This process may take anywhere from 5 minutes to seemingly eternity depending on the number of photos and specs of your PC
When Colmap finishes the reconstruction, you’ll be presented with a reconstructed view of the scene and estimated positions of the camera.
Colmap set-up and finished view of the reconstructed scene
Colmap output
As an output Colmap creates 2 files that we’re interested in, fused.ply and meshed.ply. You’ll find them in a subfolder in the workspace folder you created before (Workspace folder/dense/0/). Meshed.ply is, as the name suggests, an already triangulated mesh. Colmap isn’t the greatest at creating meshes from the tracked data, but if you want to save yourself some work, the mesh is definitely usable. PLY can be easily converted to STL in Meshmixer or Meshlab, for example. However, it’s not a good idea to try printing this mesh directly. All meshes created by 3D scanning or photogrammetry usually contain a lot of errors and lack the flat base that could be easily placed on the print bed. Follow our guide on repairing corrupted 3D models and cutting models to learn how to fix these problems. Also, keep in mind that the scale of the scanned object will be pretty much random, so adjust it accordingly.
The second file is the more interesting one. The fused.ply file contains a so-called point cloud. It’s just a set of points in space, no triangles and therefore no mesh. We’ll have to create the mesh ourselves, it’s an extra work, but the result is usually much better.
Creating mesh from point cloud data
- Open Meshlab, Select File – Import Mesh and choose the fused.ply file
- You’ll be presented with the captured scene made from 3D points
- Pick the Select vertexes tool from the main toolbar (top) and use it to select all points you wish to delete
- The tool works as a box selection, hold down the left mouse button to create a selection
- You can hold Ctrl to add more vertexes to already selected ones
- Click on the Delete vertices button in the main toolbar.
Selected vertices will disappear
- Repeat steps 3-4 until you’re left with just the points you want to use for creating the mesh of the scanned object
- Select Filters – Remeshing, Simplification and Reconstruction – Screened Poisson Surface Reconstruction
- The Reconstruction Depth has a major effect on the final result. Values between 13-15 usually look the best and take a reasonable time to compute
- Other settings usually work best at default values, but feel free to experiment with them
- Hit Apply to create a Mesh
- The edges of your model will usually end as a weird shape or even curl up and create a huge blob.
- Similarly to selecting and deleting vertices, you can do the same with triangles using the Select in triangular region and Delete faces tools from the main toolbar
- Select File – Export Mesh
- If you want to be able to share the scan in digital form with the texture, use formats such as PLY, 3DS or OBJ
- For 3D printing pick STL
Tips for improving your reconstructed model
Here are some more tips to get rid of some imperfections and to improve your reconstructed model in Meshlab:
- Smooth your model from the menu Filters – Smoothing, Fairing and Deformation – Laplacian Smooth
- Try increasing the Smoothing steps value to 8-15
- You can repeat this process as many times as you like, however smoothing your model too much will get rid of valuable detail
- To get rid of extra faces often generated by reconstruction, you can choose Filters – Selection – Select Faces with edges longer than…
- Tick preview
- Change the Edge threshold value so the vast majority of the faces you want to delete are selected, but all faces you want to keep are still unselected
- If your model has a huge number of vertices and faces, it can be hard to work with, not to mention slicing, which would take forever.
Decrease their amount using Filters – Smoothing, Fairing and Deformation – Quadric Edge Collapse Decimation
- Set the desired number of faces
- Anything above 1 million faces is definitely overkill. Even 100k faces are usually more than enough
Examples
Statues
Statues are perfect for photogrammetry. Their surface is rough, unable to cast any reflections. There are lots of details and features to be tracked by the software. Statues are usually too big for traditional 3D scanners not to mention the inconvenience of carrying a 3D scanner outside and trying to set it up there. But with photogrammetry it’s easy, just grab your camera and start taking pictures. However, as they are usually placed outside, there are a few things to keep in mind. Try to avoid having moving targets in your picture. If there are people walking by, let them pass and in the meantime take pictures from the directions where people are not visible. If possible, wait for a cloud to block the sun, so that there are no hard shadows.
The Sitting Woman statue by Václav Bejček from 1967, the reconstructed 3D model (check the 3D view on Sketchfab), and the printed version
Baby Groot
Scanning a 3D print might seem stupid, using the original STL file is obviously much better. But it’s a good benchmark of this technique, we can easily compare the reconstructed model to the original STL used for print. Another legit reason to use photogrammetry to digitize 3D print is if you hand painted it and want to share the model with the hand painted texture.
As you can see in the 3D view below, in terms of geometry, there is an obvious loss of quality. That said, most of the features were successfully reconstructed and with a couple of small touch-ups, the model would look pretty good. And the texture is a nice touch as well.
Press I and select Matcap to hide the texture and compare just the geometry of the models
Ping Pong Paddle – dealing with glossy surfaces
Reconstructing a ping pong paddle was pretty easy with one exception. The two big surfaces (the ones that hit the ball) have no details to be recognized by the software and to make matters worse, they are glossy. As the camera circles around the paddle, the glossy surface changes in appearance and reflects surrounding light sources. This results in barely any points being reconstructed on this surface. This will ultimately lead to incorrect mesh shape. To prevent this from happening, some detail has to be added to these surfaces. That can be easily done with for example painters tape. Stick a few stripes of it over glossy surfaces to avoid reflections and create a matte textured look. In the 3D view, you can see the difference this quick hack made.
Glass – transparent surfaces
Similarly to glossy surfaces, transparent objects are a problem. Sharp edges may be captured by the photogrammetry software, but smooth transparent areas will be completely ignored, which will lead to incomplete data for mesh reconstruction. Again, you can use painters tape to cover these surfaces. Alternatively, you can use water dissolvable colors with a sprayer and dirty up the glass.
Conclusion
Meshes created by photogrammetry can easily outperform cheap 3D scanners. You can recreate huge objects that would be nearly impossible to capture with traditional 3D scanning tools. It’s extremely affordable and chances are that you already have everything you need for photogrammetry – a camera (smartphone) and somewhat powerful PC. And it doesn’t have to end with reconstructing a statue. Do you own a drone? Take a few pictures, reconstruct, and print your house. So…
Is photogrammetry a viable 3D scanning tool? Definitely YES. Should you print reconstructed models without any touch-ups? Probably not.
Just like any other 3D scanning technique, the final mesh won’t be perfect. Some areas might be missing details, flat surfaces may not turn out completely flat, the mesh may contain holes, non-manifold edges or other errors. However, if you’re able to fix these problems, the final result will be well worth the time.
Sources
Schonberger, Johannes Lutz and Frahm, Jan-Michael, Structure-from-Motion Revisited. University of North Carolina at Chapel Hill, Eidgenossische Technische Hochschule Zurich.
All3DP – Autodesk 123D Catch Review
TheOpenScan DIY 3D scanner works with Raspberry Pi, DSLR or smartphone cameras. — CNXSoft - Android Set-Top & Embedded Systems News
OpenScan is an open source homemade photogrammetry-based 3D scanner that works with Raspberry Pi camera modules, compatible ArduCam modules, as well as DSLR cameras or your smartphone camera.
After we wrote about the Creality CR-Scan Lizard 3D Scanner, an open source project caught our attention. OpenScan kits include 3D printed parts such as gears, two stepper motors, a Raspberry Pi screen, and a Ringlight module for efficiently photographing a specific object from different angles.
OpenScan ClassicThe above OpenScan Classic kit allows you to scan 18x18x18 cm images and includes the following components: A4988
If you are going to use Raspberry Pi as shown on the right side of the picture, you will also need
- Raspberry Pi 3B+ SBC or compatible,
- 8MP Raspberry Pi Camera 8MP with 15cm ribbon cable (or compatible with e.g. Arducam 16MP)
- 1x Pi Shield (either pre-soldered or self-soldered) )
- 1x Pi Camera ring light (optional but highly recommended), pre-soldered or soldered by yourself
- 8xM3x8mm, 10xM3x12mm, 8x M3 nuts, 50x6mm steel rod, 2x 1m stepper motor cable
Alternatively, you can use a smartphone or a compatible ring-illuminated DSLR mounted on a tripod. There used to be an Arduino kit, but it's outdated now.
An alternative design is the OpenScan Mini pictured above with a Raspberry Pi camera and a ring light suitable for scanning up to 8x8x8 cm.
The system will then take photos from different angles under the same lighting conditions thanks to the ring light. Depending on the complexity of the property, you may need to take hundreds of photographs. Photos can be imported into photogrammetry software for processing. Open source photogrammetry programs include VisualSFM, which is fast but only outputs point clouds, and Meshroom and Colmap with mesh and texture support, but both require a machine equipped with a CUDA capable GPU. Meshroom is the most popular and actively developing.
There is also OpenScanCloud, which will process photos in the cloud with minimal user intervention. It's free thanks to donations, but use is limited and whether it can stay operational may depend on continued support from donations. Here's a short demo of how it all works.
Find the latest Raspberry Pi Python software and custom Raspberry Pi OS image on Github, and Raspberry Pi scanner and screen 3D files on Thingiverse.
The easiest way to get started is to buy one of the kits directly from the project store for 107 euros and up. Please note that the complete kit with pre-soldered boards, Raspberry Pi 3B+ and Arducam 16MP camera module costs about 298 euros including VAT.
It is also possible to use photogrammetry without a kit, e.g. for larger objects, by simply photographing the object yourself, but the results can be mixed, as Build for Motorsport found out when comparing the CR-Scan Lizard 3D scanner to photogrammetry using only a DSLR camera . It should be noted that both methods also required editing the 3D model to remove "dirt" and adjust some of the shapes.
We express our gratitude to the source from which the article was taken and translated, the site cnx-software.com.
You can read the original article here.
3D scanning of people, animals and props for VFX, gamedev, AR, VR
REALISTIC 3D avatars
for games, metaverses, movies, advertising and neural networks
Welcome to Twin3D
- Create custom realistic 3D avatars of people and characters
- We provide full-cycle content production services with 3D avatars
- We blog in telegrams about 3D, avatars and metaverses — subscribe!
Services
Virtual Influencers and Assistants
Create custom realistic virtual influencers for brands, digital bloggers and virtual assistants.
We provide a full cycle of character creation and digital content with it.
Read moreServices
3D scanning of people, animals and props
3D scanning using photogrammetry and photometric stereo technology in AAA quality. In the studio or on location.
- 3D Scanner Matrix - 200 professional DSLR cameras.
- Scanning speed - 0.01 sec.
- 100% photorealistic.
Services
3D scanning of facial expressions and creation of blend shapes
Scanning facial expressions - emotions, phonemes and visemes for facial animation. We use photogrammetry and photometric stereo technologies for skin micro-detailing.
Read moreServices
3D digitization of clothing
Digital clothing creation from scratch or by scanning
- Realistic fabric simulation
- High detail
- Ability to animate with or without an avatar
Services
VFX production with 3D avatars
We create photo and video content with 3D avatars or virtual influencers for advertising and posting
Read moreServices
Scanning and modeling 3D props
Realistic digital objects for use in production
Read moreServices
Motion Capture
Mockups for more realistic avatar movement and faster animation production
Read moreServices
4D scanning
4D scanning (or volumetric scanning) technology records 3D animation from a living person in real time. This allows you to achieve ultra-high realism, which is important in the production of cinematic videos and in AR / VR projects.
Services
On-site 3D scanning at the client's location
The optimal solution for creating avatars for celebrities, actors and extras.
Read moreApplications
VFX
3D scanning and digital 3D modeling of actors, extras and props. Digital stuntmen. Onsite 3D scanning.
GameDev
Complete cycle of preparing 3D character models for gamedev projects. Adaptation to VR, AR, Unreal Engine and Unity. Creation of datasets of 3D scans of people for the development of character constructors.
Metaverses
Creation of 3D celebrity avatars and metaverse characters. Mobile 3D scanners for digitizing metaverse users at events and locations. Digitization of props.
Artificial intelligence
Creation of datasets of 3D scans of people, animals and props for machine learning of neural networks.
Digital advertising and media
Development of virtual influencers, brand ambassadors and bloggers. Development of digital content with virtual influencers for digital advertising.
E-commerce
Creation of 3D models of goods for online stores, marketplaces, manufacturers in order to attract additional attention of buyers
How we scan
Company Blog
58% of Americans follow at least one virtual influencer
01/09/2023
The Influencer Marketing Factory team shared interesting information about consumer attitudes towards virtual influencers in the US. According to…
A film for schoolchildren was filmed in Twin3D
21/12/2022
One of the educational activities is the creation of educational films. For children, to keep their attention, they shoot artistic pictures.
B…
$ 25 million for the development of technology for creating 3D avatars
10/12/2022
If someone is seriously thinking about the metaverse, then you need to understand that without a convenient technology for digitizing users into 3D avatars, it will be inferior. …
Our projects
3D scanning of actors, extras and props.
- Movies and Series
- Rollers and clips
- Projects in production
- Games
film "My dad is the leader"
2022
Film "Major Grom: The Plague Doctor"
2021
Film "Row 19"
2021
Psycho series
2020
Side Effect Movie
2020
Goalkeeper of the Galaxy movie
2020
Ice-2
2020
Fairy
2019
Film "Ninth"
2019
Invasion movie
2019
Film "Union of Salvation"
2019
Film "Ilyinsky Frontier"
2019
Series "Godunov"
2018
Series "Fortress"
2018
The Defenders movie
2017
3D artist avatars for SODA LUV feat. EGOR KRID "Aquadisco"
2022
Citymobil commercial
2022
Citymobil commercial
2022
Husky "Outro" for Jager Music Awards
LSP. Online concert on MTS Live XR 12/19/2020
JAB "Main"
2019
Dima Bilan "Lightning"
2018
Short film Husky "Psychotronics"
2017
Film "One Hundred Years Ahead"
2023
Faded AAA game
2023
Sensorium Metaverse
2022
Film "The Challenge"
2023
3D scanning of characters for the AAA game "Faded"
in production
Digitization of celebs for the Sensorium metaverse
in production
Creation of morphable 3D heads for the characters of the game "King's bounty 2"
2021
Our partners
FAQ
Here you will find answers to the most frequently asked questions. If you cannot find an answer here, please feel free to contact us.
Do I need to make an appointment for a scan?
Scanning in the studio is carried out by appointment, at least one working day before the planned date of scanning. The most reliable option for booking a convenient date or several days is to conclude an agreement with our studio in advance with fixing specific dates and times for scanning.
What are the clothing requirements for a successful scan?
To guarantee a high-quality assembly of a 3D scan, we recommend avoiding black clothing, as well as shiny, transparent and translucent materials, elements and accessories.
When are discounts granted?
We provide discounts in case of ordering more than 5 3D models, as well as on-site scanning at the location from 3 shifts. The calculation of the amount of the discount is carried out individually.
Is it possible to order scanning from you at a location with a trip to another region or country?
Our 3D scanner is mobile; The calculation of the cost of field scanning is carried out individually and includes the work of the scanner, as well as the cost of transporting equipment and the transfer of two studio employees.