3D print first layer curling
How to Fix First Layer Edges Curling – Ender 3 & More – 3D Printerly
3D prints can sometimes have issues with the first layer edges curling or warping, leading to further issues in the printing process. This article will detail how to fix first layer edges curling on your 3D printer, whether an Ender 3 or another machine.
To fix first layer edges curling, you want to use good first layer settings to improve build plate adhesion. One thing you can do is to increase the build plate temperature so that filament adheres better. You also want to ensure your bed is leveled to a good standard. Printing with an enclosure can help too.
This is the basic answer that you can use, but there are more details you’ll want to know, so keep reading for more.
Why Do First Layer Edges Curl?
Warping is the main factor behind the first layer’s edges curling off the print bed. Warping happens when parts of the 3D model on the bed cool rapidly and shrink after printing.
As a result of this shrinkage, these parts can detach from the build plate and curl upwards. Here are a few reasons this can happen.
- Low build plate temperature
- Incorrect cooling settings
- Improperly leveled print bed
- External air drafts
- Dirty build plate
- Poor build plate adhesion
- Clogged print nozzle
- Small first layer height
- Small first layer footprint
How to Fix First Layer Edges & Corners Curling
You can fix curling first layers by adjusting your printer’s setup and settings.
- Increase your build plate temperature
- Turn off cooling for the first few layers
- Level your print bed correctly
- Print with an enclosure
- Clean your build plate
- Apply an adhesive to the print bed
- Unclog the printer’s nozzle
- Increase the first layer’s height
- Add rafts and brims to your print
Let’s look at these in more detail.
Increase Your Build Plate Temperature
The heated build plate helps keep your print’s first layer hot, so it has time to cool and set slowly. If it’s set to the wrong (lower) temperature, you can end up with curled edges on your first layer.
So, it must be set to the right temperature. The optimal build plate temperature for any 3D filament is slightly below its glass transition temperature – the point at which it solidifies.
At this temperature, the material can cool uniformly without rapid shrinkage.
Check the manufacturer’s datasheet to get the right build plate temperature for your filament. However, if you do not have access to that, here are the build plate temperatures of a few standard filaments.
- PLA: 40-60°C
- ABS: 90-110°C
- PETG: 70-80°C
- TPU: 50-60°C
Turn Off Cooling for The First Few Layers
Rapid cooling from the fan is usually bad for the first few layers. These layers need to stay hot and cool uniformly to avoid warping, as I mentioned earlier.
To achieve this, turn off part cooling for the first few layers so the first layer can stick properly to the print bed. You should do this for all materials to avoid warping.
Slicers like Cura usually turn off cooling for the first few layers by default. However, you should still check to be sure.
Here’s how you can turn off part cooling on Cura.
- Go to Print settings
- Under print settings, select the Cooling sub-menu
- Make sure the Initial Fan Speed is at 0%
Level Your Print Bed Correctly
If you notice that curled-up edges on your print are limited to one area of your bed, then your problem might be an improperly leveled bed.
For the first layer to stick to the print bed properly, the nozzle needs to push or squish the first layer into the bed. The bed needs to be a set height from the bed for a proper squish.
If the bed is too far from the nozzle, the first layer won’t squish on the bed properly. As a result, the filament can curl up and detach from the bed relatively easily.
Conversely, the nozzle will have trouble pushing out the filament if it’s too close. So, make sure you level your bed correctly so the nozzle is at the optimal distance from the bed.
Pro-tip, if you’re using an Ender 3 printer, you should upgrade your bed springs, so your bed stays level for longer. The Aokin Bed Springs from Amazon is a significant upgrade over the stock springs.
These springs are stiffer, so they can resist vibrations and stay level better. They are also straightforward to install on your print bed.
You can learn more about that in this article on How to Fix Ender 3 Bed Leveling Problems.
Print With an Enclosure
Even if your cooling fan is off, stray drafts of cold air from the room can still cool the first layers rapidly, leading to curling. If you can’t maintain an ambient room temperature, you’re going to need an enclosure.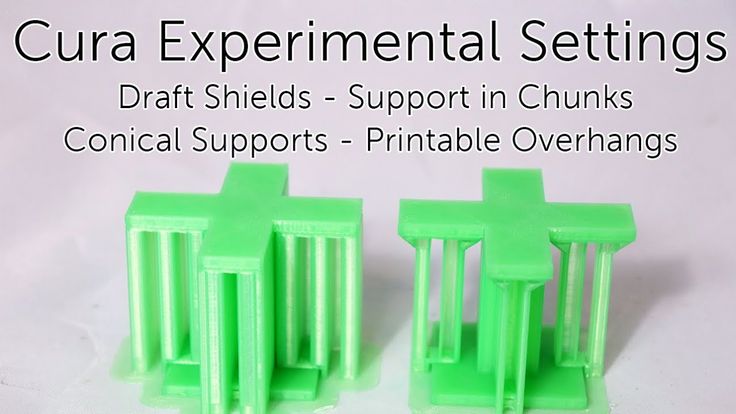
An enclosure isolates your print from the fluctuating temperatures in the room and keeps the printer’s heat in. It also provides a stable, constant temperature environment for printing your model.
A great, affordable enclosure you can get for your printer is the Creality 3D Printer Enclosure from Amazon. You can choose between the small and the large version, which can fit large printers like the CR-10 V3.
It’s also made from dust and noise-reducing, flame-retardant materials, making it the safer choice. One user reported that the enclosure stabilized her printing temperatures and eliminated warping on their glass plate.
A less effective method you can use to shield the print is by printing a draft shield. A draft shield is a feature you can add in the slicer to provide a barrier for your main print to avoid warping.
Here’s how you can add one in Cura:
- Go to Print settings
- Go under the Experimental sub-menu
- Search for Enable Draft Shield
- Tick the box and set the dimensions for your draft shield.
Clean Your Build Plate
Dirt and residue from previous prints can prevent your model from sticking properly to your print bed. To avoid this and get the best first layer possible, you should clean your print bed regularly.
To clean your print bed, follow these steps:
- If the bed is removable, take it off the printer
- Wash it with warm soapy water
- Rinse it off and clean it with a clean, lint-free cloth
- Wipe it down with IPA to eliminate any remaining stubborn plastics on the plate.
Note: Avoid touching your build plate with your bare hands after cleaning it. Oils on your hand can transfer to the build plate, making adhesion much harder.
Apply An Adhesive to The Print Bed
Using an adhesive on the print bed can help the first layer adhesion immensely. The adhesive will hold the first layer down on the build plate, so it doesn’t curl up when it cools and contracts.
There are plenty of quality adhesives you can use for this. Here are some of them:
Glue Stick
A glue stick is a cheap, easy-to-use option for increasing your build plate’s adhesion. All you have to do is apply a thin coat to your printing area, and your prints should stick better.
An excellent glue stick you can use on your bed is the UHU Glue Stick from Amazon. It’s a non-toxic brand that offers excellent build plate adhesion, and it’s also easy to clean off afterward.
One user even described it as the perfect glue for ABS and PLA. They said it sticks the print to the plate when hot and releases the print easily after cooling.
Hairspray
Hairspray is an inexpensive tool you can use to enhance bed adhesion in a pinch. Almost all hairspray works, but you’ll get better results with stronger “extra-hold” brands.
To use it, spray an even coating on the bed and leave it for a minute. Gently pat off the excess hairspray on the bed, and you should be good to go.
Blue Painter’s Tape
Blue Painter’s tape is another great tool for better build plate adhesion. The top side of the tape is porous, so filament materials can stick to it quite easily.
The tape is also heat-resistant, so it can withstand the heat of the print bed without failing. You can get this quality Duck Release Blue Painter’s Tape from Amazon.
It works great on all print bed surfaces, and it also comes off cleanly from the bed without leaving any residue.
Unclog Your Printer’s Nozzle
A dirty nozzle will usually result in blockages and under-extrusion, preventing the nozzle from properly laying filament. If the filament is coming out of your nozzle at an angle or slowly, your nozzle might be clogged.
The solution to this is to disassemble your nozzle and clean it properly. You can clean it with a wire brush, a tiny drill bit, or by printing cleaning filament through it.
You can check out how to clear your nozzle in this article that shows 5 Ways to Fix and Unclog Your Extruder’s Nozzle.
Increase The Initial Layer Height
A thin first layer is easier to warp because it might not squish evenly and stick to the build plate. A higher layer height ensures that the first layer has a larger contact area with the print bed, making it harder to warp.
Your first layer height is recommended to be between 120 -150% of the regular layer height for the best first layer. For example, if the layer height is 0.2mm, the first layer height should be between 0.24mm and 0.3 mm.
Add Rafts and Brims to Your Print
A first layer with a small footprint cools faster and unevenly. Additionally, the small footprint doesn’t provide enough stability and build plate adhesion, which means it can lift and curl easily.
Rafts and brims extend the first layer’s surface area giving it more grip and stability on the print bed.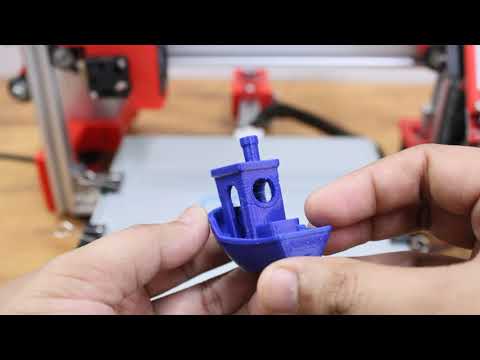 As a result, the first layer can resist the warping forces better.
Here’s how you can add them to your model on Cura:
- Go to Print Settings
- Go to the Build Plate Adhesion sub-menu
- Select whether you want a Raft or a Brim
How to Fix 3D Printer That Only Prints First Layer
Your printer can suddenly stop printing after the first layer, leading to print failure in some situations.
You can fix these issues in the following ways:
- Adjust the extruder arm’s tension
- Cool down the extruder
- Check your cooling fan and extruder
- Inspect and clear your nozzle for clogs
- Reduce the printing temperature
- Check your PTFE tube
- Adjust your retraction settings
- Repair Your STL File
Adjust The Extruder Arm’s Tension
If the extruder arm isn’t gripping the filament properly, the extruder will have trouble supplying the nozzle with the filament for printing. In cases like this, you’ll have to adjust the tension on the extruder arm so it grips the filament more tightly.
Most extruders come with screws that you can tighten to adjust their tension. You can follow the steps in this Simple Extruder Tension guide to get the optimal feeder tension.
Cool Down the Extruder
If you’re printing in a hot environment or an enclosure, the extra heat can cause the extruder to overheat. Once the extruder motor overheats, it can stop working.
To fix this, try and reduce the temperature in the environment.
Increase The Power to The Extruder
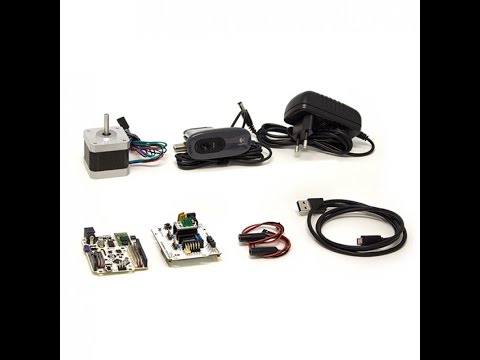
If the extruder is clicking and finding it hard to supply filament, then the solution might be the poor power supply. You can solve this by increasing the power input to the extruder from the mainboard.
Doing this requires quite a bit of electronics know-how. You can read more about this in this article I wrote on How to Fix an Extruder Motor That’s Vibrating but Not Turning.
Repair Your STL Files
If your STL file is full of errors like surface holes and floating surfaces, it can result in a bad G-Code file when you slice it. As a result, you’re going to have trouble printing the model.
There are many online and offline tools available for fixing your STL files. They include Formware, Netfabb, 3D Builder, and Meshmixer.
You can learn how to use these tools in this article on How To Repair STL Files For Printing.
Check Your Fan and Extruder Wiring
Some users have reported a peculiar firmware bug where the extruder goes off immediately after the cooling fan comes on in the Creality CR-10. This usually happens after the first layer.
The cause of this can be that maybe the fan and the extruder might be plugged into the wrong ports on the motherboard. So, check to see if they’re connected to the correct ports.
Also, it might be that the power supply cannot produce enough power for both components. You can try reducing or turning off the cooling fan for subsequent layers to see what happens.
Check Your Nozzle for Clogs
Clogs in your nozzle can restrict the filament from coming out on subsequent layers. One Redditor discovered this problem in his nozzle due to a gap between the heat break and the nozzle.
Having an issue with the nozzle clogging after the first layer or so. Just changed to an all metal extruder and was having the issue before I changed it. I really need some help I am at my wits end from 3Dprinting
The filament can leak out of this gap, causing a clog in the nozzles. They fixed the problem by taking apart the nozzle, cleaning it, and re-installing it properly.
To do this, you need to tighten the nozzle and make sure it is flush with the heat break. You can learn how to install the nozzle in this article on How to fix Filament Leaking Out Of The Nozzle.
Also, you need to make sure the hotend fan is blowing and cooling the heat break properly. If it isn’t, the filament will melt prematurely in the heat break, leading to clogs.
Reduce The Printing Temperature
If the printing temperature is too high, it can lead to over-extrusion of the filament. This can clog up your nozzle when it tries to retract molten filament into itself.
Also, if the temperature is too high, it can end up melting the stock Bowden tube on the printer. So, always make sure you’re printing with the correct temperature for the material.
The best way to find the material’s optimal temperature is to check the manufacturer’s datasheet. If you do not have access to it, then you can print a Temperature Tower to determine the best temperature.
You can also create a Temperature Tower directly through Cura by following the video below.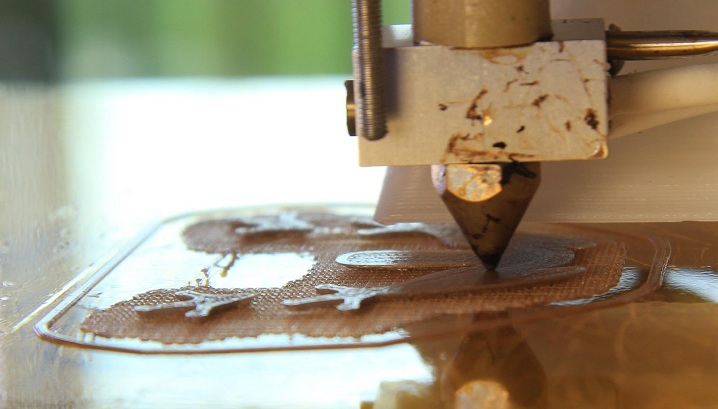
Check Your PTFE Tube
If your PTFE tube is damaged in any way, it might have gaps between it and the nozzle that can cause leaks and, subsequently, clogs. Remove your PTFE tube and check the end for any signs of charring or damage.
If you find any, you can either cut the tube’s end off (if the tube is long enough), or replace it. An excellent replacement for it is the Capricorn Bowden PTFE Tubing from Amazon.
The Capricorn tubing is made from high-quality Teflon material, making it less susceptible to heat from other filaments. One user even said they printed models at temperatures of up to 250°C without any problem.
When installing the tube back, make sure it sits flush against the nozzle without any gaps between them. Check out this video on how to install it properly.
Adjust Your Retraction Settings
If your retraction settings are dialed in properly, your printer can end up pulling molten filament back to the cool zone, clogging it. To avoid this, make sure your retractions settings are within the proper range.
For example, Bowden extruders require a retraction distance of 4-7mm. On the other hand, the optimal retraction distance for direct-drive extruders falls between 0.5-2mm.
I wrote an article on How to Get the Best Retraction Length & Speed Settings.
Best 3D Printer First Layer Tests
There are plenty of simple one-layer models you can use to test out your printer’s first layer. As the printer prints these models, you can make fine adjustments to your printer’s set up to ensure the best quality.
Let’s look at them.
CHEP Bed Level Print
This model was made by a YouTuber named CHEP. It contains a G-Code you can use to level your bed effectively.
It also contains a series of concentric squares that you can use in testing the build plate adhesion on all corners of your build plate.
You can follow this video to learn how to use it.
First Layer Test
This test will print a series of shapes in a square on your build plate. You can check the outlines of these shapes for over-extrusions or under-extrusions.
You can also check the infill lines in the shapes themselves.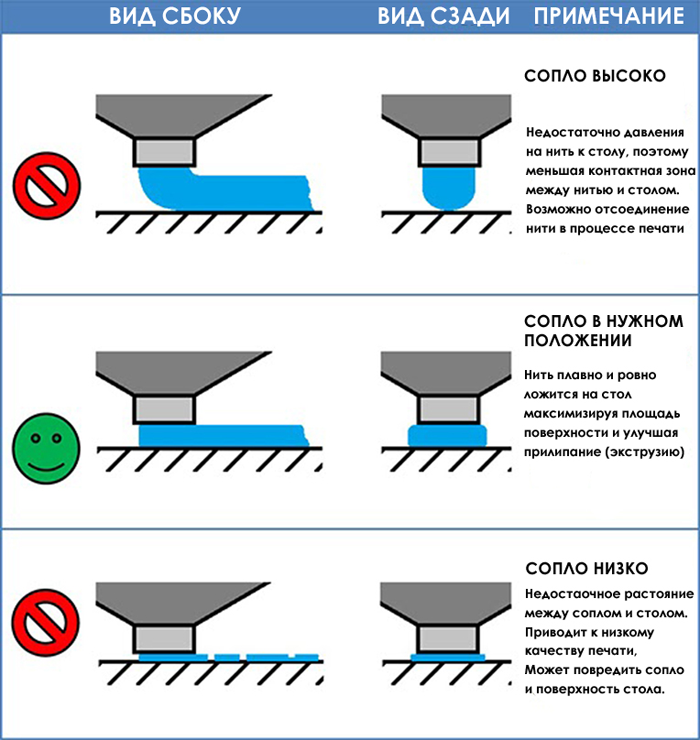 If the lines are far apart, the nozzle might be too high.
If the filament isn’t coming out properly and is barely visible on the plate, then the nozzle is too low.
Getting the first layer right is very important as it sets a great foundation for the rest of your print. So, I hope these tips help you get that flat, smooth first layer.
Good luck and happy printing!
What Causes 3D Print Warping and How to Prevent It
3D print warping is a common problem in fused deposition modeling (FDM) that causes parts to deform on the print bed. If you’ve ever noticed that the base of your 3D print is curling up and the corners are unsticking from the build plate, that’s warping. The good news is that there are several tips and tricks to prevent warping and improve your chances of a successful, warp-free 3D print.
What causes 3D print warping?
3D print warping happens when extruded filament layers on the 3D printer build plate cool too quickly and shrink.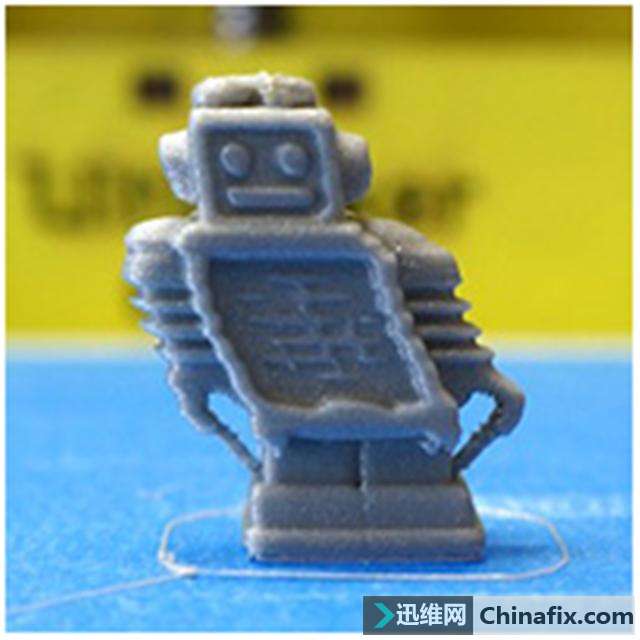 This causes the plastic material to contract and pull away from the build plate, resulting in warping (or curling, as it is sometimes known).
We can understand the problem of warping better if we zoom out a bit and look at the FDM process on the whole. In FDM 3D printing, a heated extruder deposits melted filament onto a print bed. This filament is made from a thermoplastic, a type of material characterized by its ability to melt into liquid form and resolidify when cooled. This means that in the printing process, as each layer is deposited, the filament hardens as it cools, but it also shrinks.
Thermoplastic filament shrinks as it cools; if it shrinks too quickly it can lead to warping
Warping occurs when the cooling process happens too quickly or unevenly and 3D printed layers shrink and pull on less solidified layers, ultimately lifting the first layer off the build platform and causing deformation. Though it is possible to experience warping with any type of 3D printed part, it is more common when 3D printing larger parts or parts with a large surface area.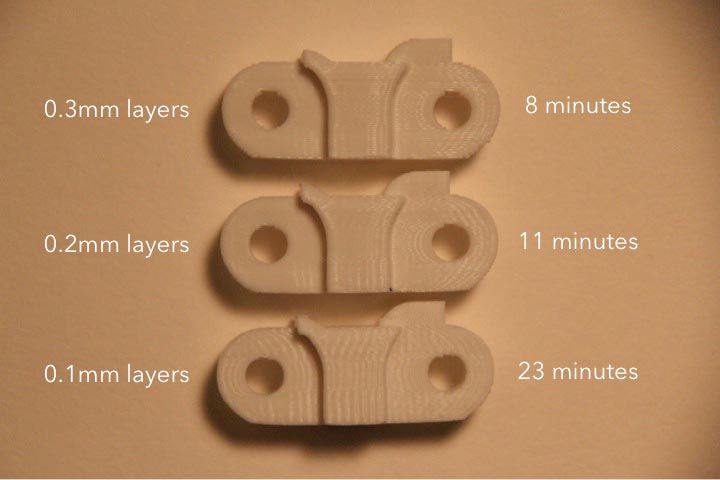 Certain 3D printing filaments are also more prone to warping than others. Typically, materials with a higher printing temperature, like ABS, suffer more from shrinkage because the temperature difference as they cool is more extreme.
How to fix 3D printer warping?
Fortunately, the chances of 3D print warping can be mitigated and 3D print outcomes can be improved using a few key techniques.
Bed Adhesion
One effective way to minimize the risk of 3D print warping is to improve your 3D printer’s build plate adhesion. Good bed adhesion will keep your 3D printed part stuck to the build surface and prevent the first layers of the print from curling up as they cool.
Bed adhesion can be achieved in a few ways. For example, there are dedicated 3D printer adhesives that can be applied to the build plate before printing. Many also opt for more DIY adhesives, like glue sticks and hairspray. A third option is tape, which is placed on the build plate surface.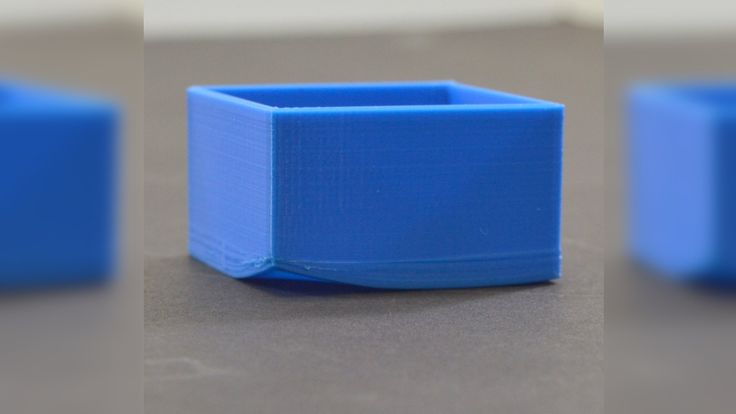 Painter’s tape is a popular option because it can be removed easily and the porous texture of the non-stick side keeps filament stuck down.[1] Kapton tape is also commonly used to encourage bed adhesion.
If you are using adhesives on your 3D printer, be sure that the print surface is clean before and after printing. Glue residue can cause an uneven print surface, potentially impacting calibration and the quality of future prints. It is also a good idea to try a test print if you are using a new adhesive to ensure it keeps the bottom layer of the print down but can also be easily unstuck when the print is done.[2]
An enclosed build chamber can reduce the risk of warping by maintaining a stable print temperature.
Temperature
Because cooling filament too quickly is what causes shrinkage and warping, it is key to control the temperature of your build as much as possible. 3D printer temperatures can be regulated using different methods or a combination of approaches. One of the most effective tricks for improving bed adhesion is to use a heated build plate. Each type of filament will have its own recommended bed temperature for good adhesion—for example, PLA works best with a heated bed at a temperature of between 60 and 70°C, while ABS requires a hotter print bed of between 100 and 120°C.[3]
Using an enclosed print chamber can also help to maintain an ambient temperature throughout the printing process and stop 3D printed layers from cooling too quickly. Many 3D printer models have a built-in enclosed chamber, but those that don’t can still benefit from a DIY enclosure. Other ways to improve temperature consistency in your 3D printer are to adjust cooling fan speed settings (especially for the first layers of a print) and keeping your room temperature as ambient as possible (i.e. keeping cold air out by closing windows).
Brim or Raft
Brims and rafts are tried and true techniques for boosting bed adhesion, especially for ABS and other high-temperature filaments. These 3D print features are added in slicer software right before printing and have several functions.
Specifically, a brim is a 3D printed border that connects to and goes around the edges of a 3D printed part. Brims are typically a few millimeters wide and consist only of 1-2 layers. They increase the footprint of the 3D printed part and anchor its edges to the build platform. A raft is similar, only it is also printed under the 3D printed part, acting as a base for it.
Brims and rafts are especially beneficial for 3D printed parts with unbalanced geometries or small footprints, as they can stabilize the print and secure it to the build surface. Both brims and rafts must be removed after printing, either by hand (by peeling them off) or using a tool. Printed parts with brims or rafts may require additional post-processing to achieve a smooth first layer.
3D printed brims can help to anchor the printed part down to the build platform.
Slicer settings
The risk of warping can also be reduced substantially by implementing the right print settings for the first layers of the printed object. Most slicer software programs allow you to adjust the print speed and layer height specifically for the first layer. A slower print speed for the first printed layer of a build will help to ensure that the filament sticks to where it has been deposited and is not pulled by the nozzle as it moves. Choosing a slightly thicker layer height for the first layer can also improve bed adhesion and help reduce any leveling inconsistencies.
Another print setting that can influence warping is fan speed. Fans are built into some FDM 3D printers and ensure the build space does not get too hot. By tweaking fan speeds you can maintain closer control over print cooling. For example, fans can be programmed to turn on only after the first few layers of a print have been deposited. This helps the first layers cool slowly and evenly on the print bed.
Conclusion
3D print warping is a frustrating problem most makers will encounter at some point or another. By following the tips and methods laid out in this article, however, you can ensure good bed adhesion, consistent printing temperatures, and ultimately reduce warping and improve print quality overall.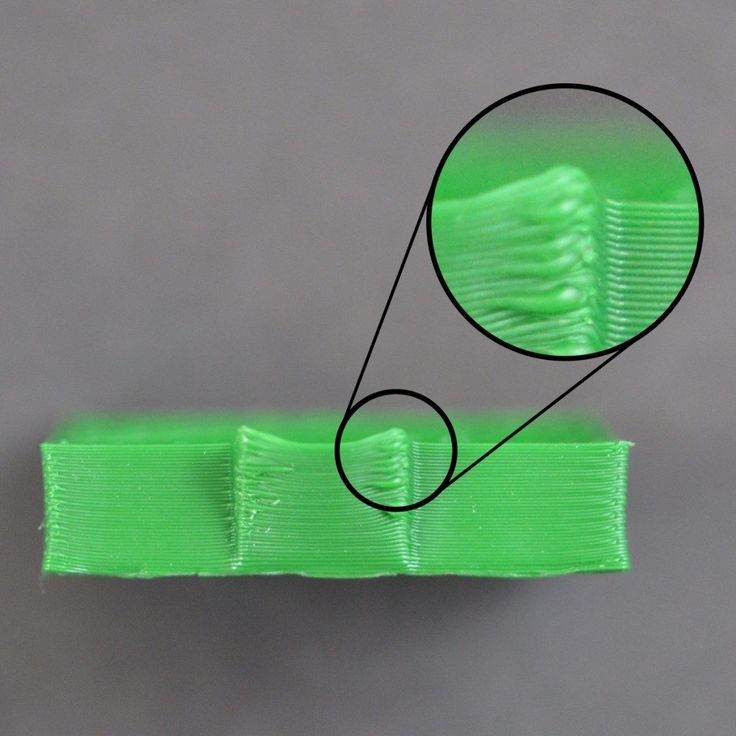
References
[1] TapeManBlue, 2022. “The Complete Guide to Blue Tape for 3D Printing”. [Internet]
https://tapemanblue.com/blogs/tips-tricks/blue-tape-for-3d-printing [Accessed March 31, 2022].
[2] Ultimaker, November 10, 2020. “Build plate adhesion: How to get your print to stick to the build plate”. [Internet] https://support.ultimaker.com/hc/en-us/articles/360012015680 [Accessed March 30, 2022].
[3] Simplify3D, 2022. “Warping”. [Internet] https://www.simplify3d.com/support/print-quality-troubleshooting/not-sticking-to-the-bed/ [Accessed March 30, 2022].
Problems with the first layer in 3D printing: how to make it perfect
The first layer of 3D printing plays a huge role in the success of the project. If you follow simple procedures and use the experience of professionals, there will be no problems.
Expert Tips
Printing the first layer with a 3D printer is important because this step forms the base, requiring more plastic. If the starting layer does not adhere well to the work surface, the model may move before it is completed, resulting in scrap. Excessive adhesion should also be avoided, as it will then be difficult to separate the finished object from the table. The first layer should strike a balance between print stability and ease of removal of the model from the desktop plate.
Setting the first layer settings
First you need to properly level the surface to build. Many new printers already have built-in auto leveling technology.
The key to a successful first coat is optimizing your print settings. By adjusting the settings in the slicer, you can ensure that the initial level is successful and the appearance of the rest of the printed product remains unchanged.
Most useful settings:
• Extrusion and table temperature. Higher heat levels will allow the plastic to melt and adhere better to the plate, so it's worth trying to raise the heat of the nozzle and table by about 5°C each.
• The line width of the first layer. Setting this value higher will allow the layers to cling to the platform and hold well, reducing the chance of failure. You can often set this to twice the nozzle size of a 3D printer (which is typically 0.4mm).
• First layer height. A higher level will mitigate the effect of small leveling errors, effectively increasing reliability. Usually the thickness can be increased up to 0.3 mm using a standard nozzle.
• First layer print speed. A slower build process will give the plastic more time to melt, which will have an effect similar to raising the print temperature. Trying this adjustment is worth it if the layer height or line width is increased.
• Auxiliaries for the first layer. The rafts, supports and margins help with adhesion by refilling the nozzle to ensure a smooth flow of plastic. In the case of rafts and boards, they also increase the surface area for better traction.
When the first layer settings are ready to work, care must be taken to care for the plate to "grow" the object.
Cleaning the build platform
If the printable surface is dirty and greasy, then correctly set first layer settings will not help. The base layer will most likely not stick, and the print will fail.
To avoid these problems, you should wipe the platform before each print cycle, or at least between several cycles.
The procedure can be performed with isopropyl alcohol (regular rubbing alcohol or IPA) and a paper towel. It only takes a couple of seconds, but it will be an excellent preparation for work.
IPA can also be used to clean models when ready, so it's a good idea to keep the liquid in an accessible place.
Material selection
Finally, you need to make sure that all available resources are taken into account. This applies to both the filament, which is built, and the print surface of the printer. The following tricks will help you avoid trouble:
• Apply a thin layer of adhesive to the platform to improve adhesion to the table plate. This can be hairspray, blue masking tape, or standard household glue. This will help tough materials stick, and will also act as a spacer for materials that adhere too well, preventing damage to the surface.
• Avoid printing directly on the TPE and PETG board. These filaments are notorious for sticking unnecessarily to the print bed and can rip out pieces of any surface, including PEI, Kapton tape, and even glass. For these materials, a release agent must always be used.
If these simple guidelines are followed when 3D printing the first layer, then problems will disappear as the user creates a solid foundation for successful work. It is worth remembering these tips whenever problems appear on the first layers that need to be quickly eliminated.
Troubleshooting 3D printing・Cults
This article should help you identify various 3D printing related problems. Find the image or description in this list that best describes the problem you're experiencing. We offer some tips that should help you solve this problem.
As you know, 3D printing is an empirical process and it is through mistakes that you learn to understand, set up and use your machine. With the help of this list, you should be able to resolve the major bugs. If you are still experiencing issues or have additional tips to add to this list, feel free to contact us and let us know!
#1 Drooling
Symptom
Thin threads are woven into gaps between different parts of a 3D printed part.
Common Name: oozing
Possible Cause
Plastic continues to leak out of the head as it moves due to residual pressure in the heater and fluidity of the molten plastic.
Suggested remedies
Increase filament retract length in Slic3r, retraction distance in CuraEngine. Retracting the filament will cause the pressure in the print head heater to drop. The effect can be modulated by adjusting the retraction speed directly in the slicer.
Increase print head speed. This allows the melted plastic to spread less time and leave marks between the printed parts.
Reduce the extrusion temperature of your plastic. If it is too high, the plastic becomes more fluid and flows out of the extruder faster.
#2 It is collapsing
Symptom
Collapse or poor quality of the overhanging surface, leaving small bumps.
Common name: overhang
Possible cause
The plastic deposited on the periphery of the protrusion does not solidify fast enough, so the deposited filament moves before it solidifies. The phenomenon is repeated or emphasized from one layer to another.
Suggested fixes
Vent the deposited plastic more efficiently, for example by adding a fan to the extruder or directly with a portable fan.
Create print supports under the overhangs.
Reorient the part to avoid overhangs.
#3 Flaky sides or top
Symptoms
Contours not bonded enough.
Flat surfaces are not completely covered.
Possible cause
Not enough material is deposited. Too narrow, the deposited wires do not touch each other enough and therefore do not stick to the adjacent wire.
There is dirt in the nozzle that prevents the flow of the melt.
The extrusion temperature is too low, the wire dries out too quickly or shrinks and therefore does not stick to the adjacent wire.
Suggested Tools
Calibrate the extruder to obtain material flow according to data received from the slicer.
Unlock the extrusion nozzle.
Increase extrusion temperature.
Increase the blending speed in your slicer.
#4 There is not enough material on thin parts
Symptom
The edges of a very thin area are not strong enough, there is not enough material.
Possible cause
Recycling or reworking is not effective enough.
Incorrect filament solidification.
Slippage of the thread drive during retraction.
Suggested remedies
Reduce the retraction speed and length while printing.
Increase "extra leg length when retracting" when using Slic3r.
Increase the spring pressure on the driven gear.
#5 Blisters
Symptom
Blisters, mismatched geometry, such as small bumps that are seen mostly in areas with a small surface area.
Possible cause
The filament is too hot during extrusion or the filament cooling system is not effective enough.
Suggested media
Place more parts on the plate while printing. In this case, the nozzle will print more objects and therefore allow more time for the part to cool before passing over it again.
Improve the cooling of your 3D printed object by adding cooling systems.
#6 Thin walls delaminate
Symptom
At a thin wall without filler, the threads diverge, they are not glued together on the sides.
Possible Cause
The walls of your 3D print are too thin or not adapted to such a small size.
Suggested tools
Draw thicker walls to adapt to the thread thickness.
In the slicer settings, set a slug width that is a sub-multiple of the wall width while remaining consistent with the extrusion diameter and layer height.
Change slicer.
#7 Layer shifts horizontally
Symptom
The layer is shifted in the X or Y axis (or both).
Possible Cause
Print head or plate movement problem.
Suggested fix
Decrease the acceleration on the axis with the problem.
#8 Layers shift evenly
Symptom
Layers almost always shift along the X and/or Y axis after a certain print height.
Possible Cause
Head or plate offset failure due to overheating of motors going into safe mode.
Suggested fix
Cool engines with cooling systems (fans).
#9 Corners curl up
Symptom
Deformation in the Z direction during 3D printing. This figure increases in case of a strong overhang.
Common name: curling
Possible cause
Poor hardening, shrinkage effect due to temperature difference of the wire deposited on the previous cooled layer.
Suggested Solutions
Increase slope in the 3D part to reduce overhang.
Further cooling of the deposited plastic using a ventilation system.
Add print supports to affected areas.
#10 Corners fall off
Symptom
The corners of the printed object are peeling off the plate, creating an uneven base.
Common name: warping
Possible cause
Poor fit between workpiece and insert.
Material shrinkage factor too high.
The first layer is not pressed enough against the board.
Suggested media
Change media as PLA is less likely to warp.
Apply adhesive to the printing plate (glue, tape, varnish, etc.).
Correctly adjust the plate height before printing.
Apply a thinner first coat to further crush the deposited wire.
Add a bezel under the first layer.
Heat up the stove.
Clean and degrease the base.
Change the filling strategy. Fill the bottom concentrically instead of linearly, then fill the inside in a honeycomb pattern to avoid any shrinkage effect.
Decrease the internal fill density of your 3D printed object.
#11 Extrusion density too low
Symptom
Incorrect material density.
Possible cause
Material consumption too low
Suggested remedies
Unlock the extrusion nozzle.
Filament blocked upstream of extruder (e.g. spool assembly)
Check thread drive (e.g. knurled screw problem)
Corners #12 not forming correctly
Symptom
The corners are not straight enough, they can even stick out and increase the size of the part.
Possible cause
Too much material is deposited in the corner due to the nozzle slowing down too much as it passes through the corner.
Suggested remedies
Intentionally soften the corner of the part in the 3D modeling software.
Increase the "jerk" on your 3D printer's axis controller.
#13 There are black drops
Symptom
Burnt (blackened) plastic in some areas of the printed object.
Possible Cause
Poor nozzle seal causing burnt PLA or ABS to drip around the nozzle.
Suggested fix
Remove the nozzle and close it again.
#14 Layers poorly welded
Symptom
Part breaks at the attachment point between two printed layers.
Possible cause
Too much cooling, the deposited layer does not adhere well to the previous layer, because it was not hot enough during the deposition.
Suggested remedies
Reduce fan speed during printing.
Increase the minimum print speed in the slicer.
#15 Bubbles form on the first layer
Symptom
The first layer comes off the plate locally in the form of bubbles.
Possible Causes
Moisture present in the material which gradually evaporates upon contact with the heating plate.
Insufficient heating plate temperature for the material being used.
Suggested products
Store raw material rolls in a dry place, in closed packaging, with a desiccant bag.
Dry damaged material: place in a rotary oven at 40°C for approximately 3 hours. Be careful not to heat above 45°C or 50°C as this may cause the threads to stick together in the bobbin and even lose their cylindrical shape.
Increase the temperature of the heating plate.
Printing on tape or special adhesive.
#16 Fragile top and bottom
Symptom
Horizontal sides too thin and brittle.
Possible Causes
Insufficient material thickness above and below thin fill print. The laid threads have too few support points and break between the threading ribs.
Suggested remedies
Place at least 2 or 3 fully filled layers ("Solid layers" option in Slic3r) for the "top" and "bottom" faces.
Increase the fill of your object.
#17 Hole tops collapse
Symptom
Horizontal center hole top wires collapse during construction.
Possible causes
Plumb line too horizontal.
Mismatch between nozzle temperature, wire cooling and speed.
Suggested fixes
Reduce or eliminate this overhang area by modifying the 3D file geometry. An example is in the large hole in the photo, shaped like a drop of water, not a cylinder.
Add print supports below this area if the overhang is too difficult for the 3D printer.
Avoid too much slowdown in this area, even if the layer print time is short.
#18 Color or clarity varies
Symptom
The color or transparency of the material changes in different areas during 3D printing.
Possible causes
Different crystallization of the material due to different cooling rates. This may be due, for example, to the printing time of individual parts of the object or to the power of the fan.
Radiation from the nozzle can affect the thermal cycle of the previous layer and thereby change its appearance.
The applied layer is too hot because the underlying layer has not had time to cool.
Be careful, the physical-mechanical properties of the part may change due to these differences in crystallization!
Suggested fixes
Better control of cooling through slicer settings: change fan power based on plate cooling time or slow print speed in proportion to plate surface.
Reduce extrusion temperature for faster and more uniform phase transition.
#19 Layers are delaminating
Symptom
Some layers are flexing and cracks appear between the different printed layers.
Possible causes
Twisting phenomenon due to the effect mentioned in #9 the above happens between layers.
The wire cools too quickly at the exit of the nozzle, it does not weld properly with the previous layer.
Strong contraction of the material during cooling or phase change.
Some materials extruded at high temperature (ABS, PC...) may present a significant shrinkage phenomenon.
Suggested remedies
Change the extrusion temperature.
Change the media.
Avoid blowing on a wire that has been set aside, reducing fan power, or placing the printer in a draughty room.
Close the assembly area in a controlled cabinet at a temperature close to the glass transition temperature of the material.
#20 Drops appear
Symptom
Drops of material are deposited at various points on the side surface of the 3D printed object.
Possible Causes
Excessive extrusion when resuming extrusion after stopping extrusion when moving from one point of the part to another or when changing layers.
Suggested Remedies
Some slicers have a setting that allows, after a pause in printing, to request that more be pushed in before resuming normal printing than was removed by retraction.
#21 Bowden extruder salivation
Symptom
Extruder Bowden is either too hard or too hard. First impressions of your extruder are not great, too much extruded material, bridges between different areas in motion where extrusion should stop.
Possible cause
Insufficient thread shrinkage to compensate for the gap in the Bowden tube. Depending on the diameter of the tube and filament, as well as the length of the body, the motor must draw a certain length of filament through the bends of the tube before the filament is drawn out of the heating head.
Suggested fixes
Increase the "pull" distance in the slicer. The detail on the left was printed with 1.