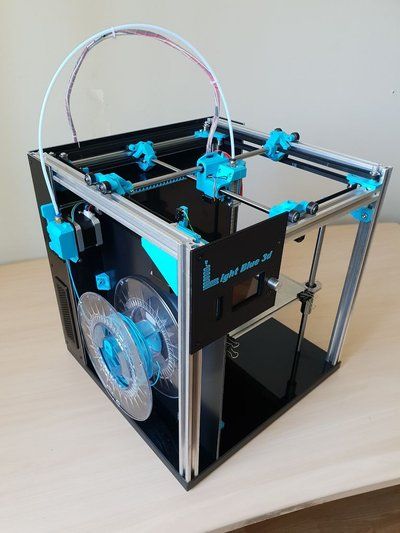
Bitx40 3d printed case
▷ bitx40 case 3d models 【 STLFinder 】
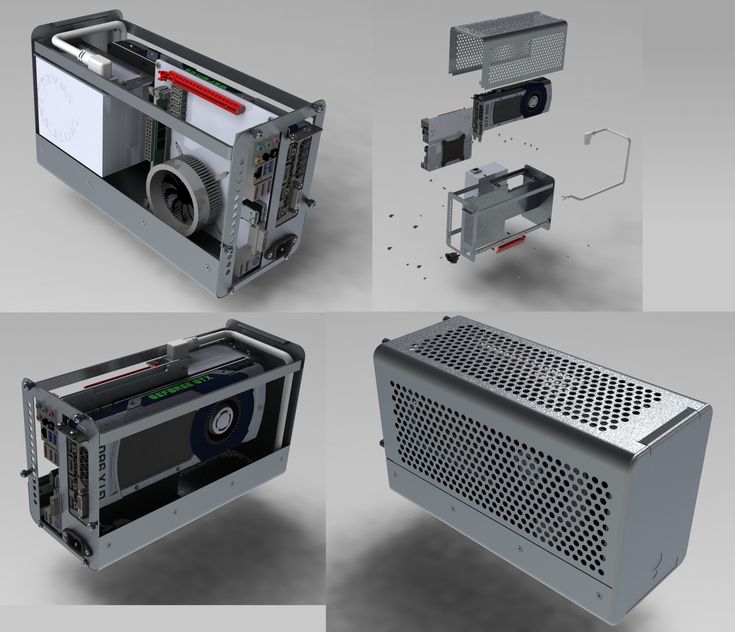
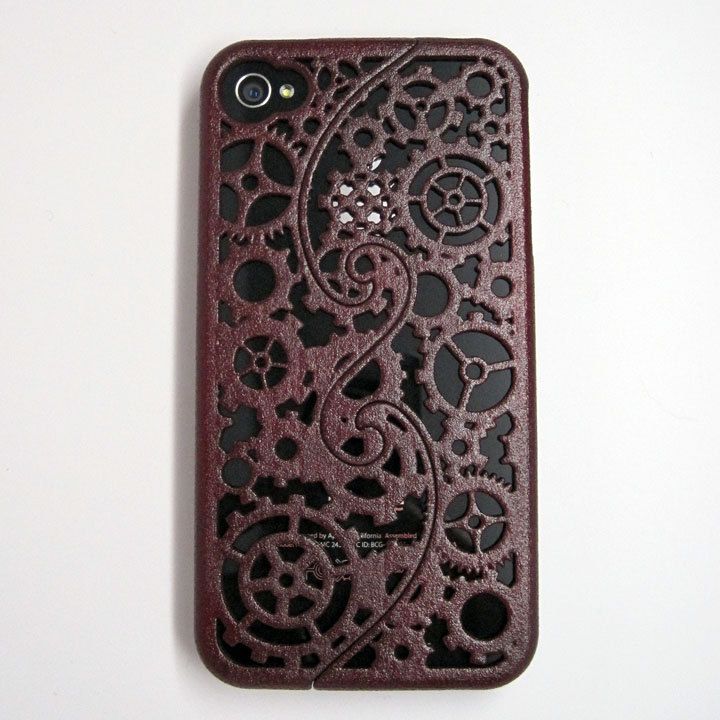
BITX40 Case
thingiverse
This is my take on a BITX40 Case.
BitX40 Case
thingiverse
This is a custom case for the BitX40 QRP radio.
bitx40
thingiverse
... with Customizer! ...http://www.thingiverse.com/apps/customizer/run?thing_id=1615173 Instructions Using the following options: font_size = 12 plate_width = 25 plate_height = 4 text_content = Bitx40 text_height = 3 plate_length = 60 line_separation = 30
Bitx40 enclosure REMIX by WB9BBC
thingiverse
Reworked the BITX40 CASE by: -Added mounting holes for the LID. -Incorporating the BEZEL+LCD as an integral unit.and added mounting holes.
-Removal of the front panel MIC connector in favor of a left-side BAOFENG Speaker Microphone K-Mount...
BITX40 enclosure
thingiverse
Customized from: " The Ultimate box maker by Heartman" You must print two copies of BITX40_Front_and_back_panel.stl and other two copies of BITX40_Bottom_and_top_shell.stl. Do not print the BITX40 Full image because it is only to see the whole...
Bitx40 Microphone
thingiverse
Three STL files that make the components for a microphone for a BITX40 radio: a bottom, top and button pusher on the side. Use the mic and pushbutton switch parts that are included in the Bitx40 kit from Farhan. Add a phone handset coil spring wire:...
BITX40 Hand Microphone
thingiverse
I used: - the microphone from the BITX40 kit - a storebought 66mm diameter speaker (8 Ohms, 2W, labeled "MLS3") - a storebought case-mountable push button (10mm) - cat5 ethernet cable going to a DB9 connector - 4x M3x10 bolts to mount the cover - hot...
BITX40 Front Panel
thingiverse
... for a BITX40 transceiver. ...The panel is intended to replace the blank panel on an Exellway EF01 case.
Updated to FrontBB.STL to address previous mistakes.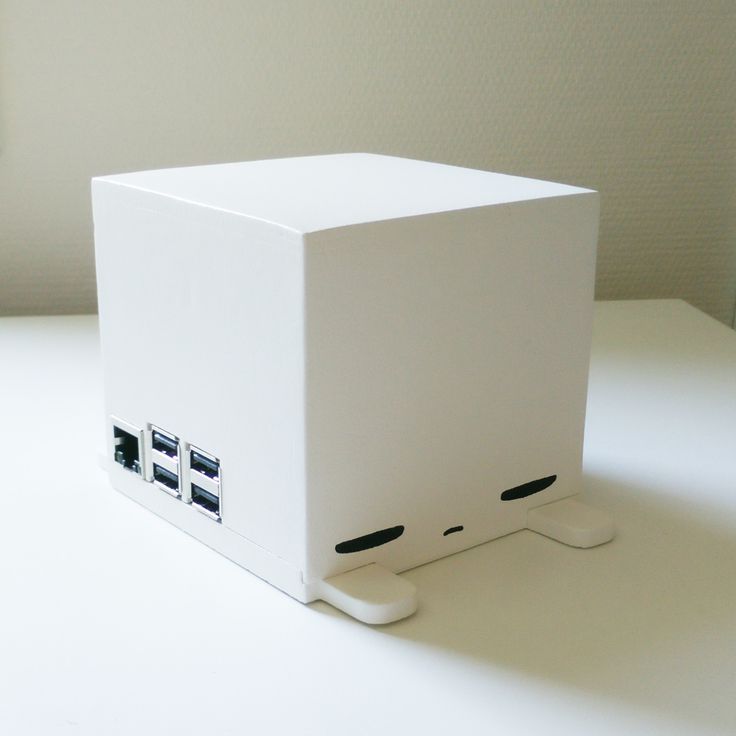 The LCD cutout is still a bit snug, but all the other mistakes are fixed.
...
The LCD cutout is still a bit snug, but all the other mistakes are fixed.
...
BitX40 Ergonomic Enclosure
thingiverse
This is a slightly revised version; I've included cut-away supports for the bottom plate inset for the top case and made some of the holes a little larger to reduce the amount of post-printing work that was required. When I print it in PET, the top...
Bitx40 knobs
thingiverse
Offering 2 types of tuning knobs and a volume knob.
K2BAG BITX40
thingiverse
Customized version of http://www. thingiverse.com/thing:1264391 Created with Customizer! ...http://www.thingiverse.com/apps/customizer/run?thing_id=1264391 Instructions Using the following options:...
W7RLF Dual Purpose Enclosure Bitx40 or uBitx
thingiverse
... is Ryan's (W7RLF) design impleted by Dave, K0NYK. ... 6.75" W x 7" L x 3.5" Rear H, 1.75" Front H The only holes are for the speaker and display so you can do your mods. Display bezel included. Power and VFO Knobs Included for both ubitx and bitx40.
Case
thingiverse
Case
Case
grabcad
Case
Case
grabcad
Case
case
thingiverse
case
case
grabcad
case
Case
thingiverse
Case
CAse
thingiverse
case
Case
thingiverse
Case
Case
thingiverse
case
case
grabcad
case
case
grabcad
case
Case
pinshape
Case
case
thingiverse
case
CASE
grabcad
CASE
Case. .
.
grabcad
Case
case
thingiverse
case
case
thingiverse
Case
case
thingiverse
case
| Enclosure Accessories | |||
| | uBITX Microphone Case 1 for $15, 2 for $25 Free Shipping Courtesy Jerry Radcliffe N8KLX Note: If you select 2 for $25 it appears as one item in the cart, I will know it's for two.  | ||
| Notice: Put tape very flat on bottom of enclosure. Try not to have any wrinkles which can touch circuit board leads. Add Aluminum Tape for Increased RFI Protection 5' - 6' for $3.00 | |||
| Front Cover for M6YPA Case Also Includes Personalized Nameplate. Add Hinges and or Latches from h/w store. Note: Hinge at bottom for angled display $19.95 Free Shipping Conus Blue Transparent Frosty Shown.
| |||
| Embed Your Callsign or Printed Callsign for $10 If you already have a uBITX or Bitx40 enclosure I will 3d print you a label with your callsign for the same price and free shipping CONUS.  Please specify callsign below. Please specify callsign below. | |||
| uBITX Enclosures Frosty Transparent Clear and Frosty Transparent Orange > Dark Blue | |||
| Orange and Red Shown. Voltage Regulator Cutout Option Left Side Will ship without unless selected as an option. | KE0KHA uBITX Enclosure Pre-drilled holes and plenty of bosses. Power and VFO Knobs Included. Screws not included. $32.00 Free Shipping CONUS $36 Carbon Fiber / Dark Brown Email to specify customizations or if you are an international buyer. Definition of boss: | ||
| KE0KHA uBITX Enclosure GRAB BAG Pre-drilled holes and plenty of bosses. Power and VFO Knobs Included.  Screws not included. $28.00 Free Shipping CONUS Email to specify customizations or if you are an international buyer. This is a unique enclosure because it will be made of multiple colors. I have a lot of rolls of colors with just a small amount of PLA so I have to use it up. This is a FUN enclosure for the STRONG OF HEART. Not a misprint. Callsign added to front.
| |||
| US Army Green | KE0KHA uBITX Enclosure Mods Version $47.00 Free Shipping CONUS $54.00 for Carbon Fiber PLA Power and VFO Knobs Included. | ||
| BITX40 Enclosures Dual Purpose Enclosures | |||
Red | W7RLF Bitx40 Enclosure Ryan's Design. $32 Free Shipping CONUS $34 Carbon Fiber/Dark Brown Email to specify customizations or if you are an international buyer. 6" W x 7" L x 3.5" Rear H, 1.75" Front H The only holes are for the speaker and display so you can do your mods. Display bezel included. Power and VFO Knobs Included. | ||
Red | W7RLF Dual Purpose Enclosure Bitx40 or uBitx Ryan's Design. 3/4" Wider to handle either radio and/or mods. $34 Free Shipping CONUS
| ||
| KG7UMN Bitx40 Enclosure $28 Free Shipping CONUS $30 Carbon Fiber/Dark Brown Email to specify customizations or if you are an international buyer. Power and VFO Knobs Included. | |||
| | IK8YFW Bitx40 Enclosure $28 Free Shipping CONUS $30 Carbon Fiber/Dark Brown Email to specify customizations or if you are an international buyer. Power and VFO Knobs Included. | ||
| | M6YPA Bitx40 Enclosure $30 Free Shipping CONUS $32 Carbon Fiber/Dark Brown Front Panel Bosses included. Knobs Included. Email to specify customizations or if you are an international buyer. | ||
|
| Extra Large M6YPA Bitx40 Enclosure 35mm longer and deeper $38 Free Shipping CONUS $40 Carbon Fiber / Dark Brown Email to specify customizations or if you are an international buyer.  Power and VFO Knobs Included. | ||
| Misc. / Misprints | |||
| | Wedge for M6YPA Case, Also Includes Personalized Nameplate. $17.95 Free Shipping Conus. Case sold separately.
| ||
| Prototype KE0KHA uBITX Enclosure Mods Version No bosses on Front, less on top Cover rear edge is rough. Cover is gray like case, Front is dark brown $30.00 Free Shipping CONUS (Normally $47.00) Room for your mods | |||
| Other Enclosures | |||
| Carbon Fiber | QRP Labs QCX Enclosure by G8XUL SHORT VERSION Width: 4. 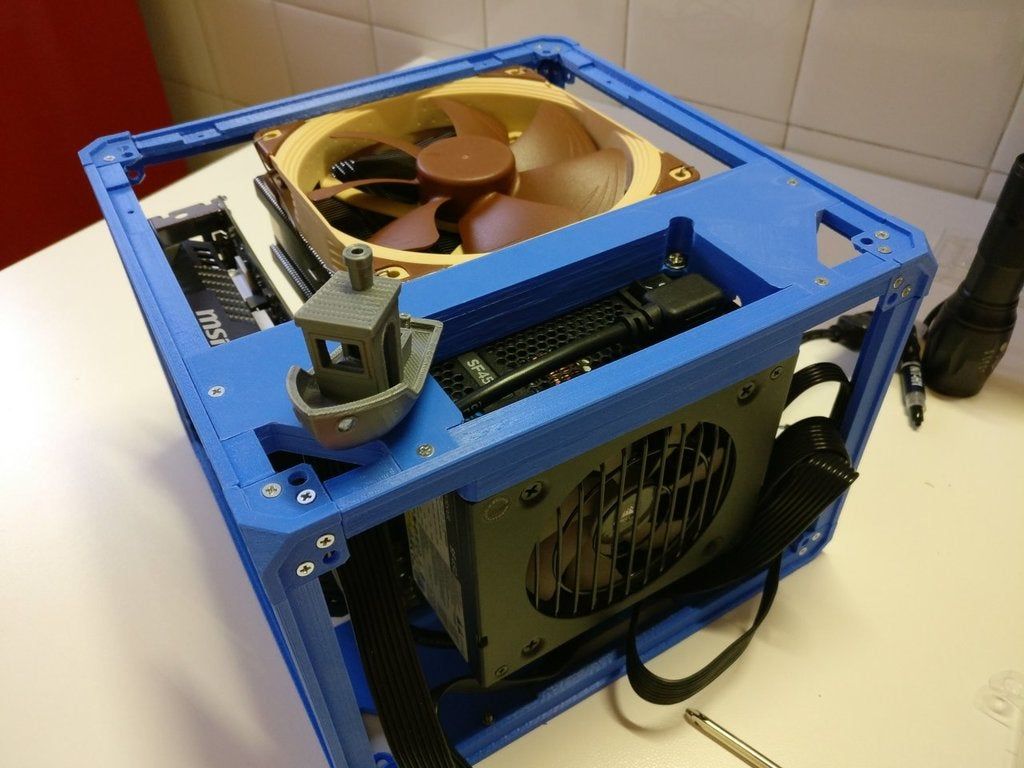 25" 25"Depth: 3.75" Height: 1.5" Email to specify customizations or if you are an international buyer. | ||
| QRP Labs QCX Enclosure by G8XUL REGULAR VERSION Width: 4.25" Depth: 5.5" Height: 2.0" Email to specify customizations or if you are an international buyer. |
Top Enclosure・Cults
3D Printer Models Skip to content47 DIY AMP CASE NE5532 HIFI HEADPHONE AMPLIFIER
Free
Closed loop for printing in place for extrusion 20x20
Free
OpenAPS Modular Enclosure
Free
OpenAPS Edison/Explorer 2500 mAh
Free
HDD/SSD Enclosure 2.5" | Laptop Hard Drive Case
Free
Storage box for small items with divisions
Free
Enclosure for 47 DIY Amplifier NE5532 Headphone HiFi Amplifier
Free
Arduino Ethernet, LCD and Servo
Free
SNES 2.
 5" hard drive enclosure
 Free
Filter holder
Free of charge
GX-16 box
Free
Creality Bi Metal Satsana Cover
Free
Ender 3 display PCB cover with toggle cutout
Free
Step-Up_Booster_150W_Case
Free
Office sign (decoration)
Free
Housing Filament groove / guide
Free
WD Elements Portable Hard Drive Enclosure with sliding cover
Free
Prusa Ikea lack table body corner parts for without glass
Free
Another case of Arduino
Free
Genuine Prusa handles for MK# body
Free
Switch housing
Free
Printer housing with electronics and power supply
Free of charge
Tuff Case for SUHSAI portable hard drive
Free
wall right for my ultimaker
Free
vibrating Filaflex
Free
Lack table by Ikea screwless glueless leg tie
Free
Raspberry Pi 4 Box Logo Case Enclosure
Free
Arduino LCD Keypad Shield Enclosure Box
Free
Ender 3 Series Electronics Compartment
3. 72 €
72 €
Sonoff Pow R2 - Double Wall Mount Case
Free
Electronic unit SKR V1.4/Turbo
Free
Filtration Hepa charcoal ABS/carbon for 3D printer in box
5 €
Mini housing Kossel
Free
Sanguinolu Box (WIP)
Free
BITX40 handheld microphone
Free
UV Curing Station Controller
Free
3.5 mm jack with phono stage Junction box
Free
RAMPS/Arduino Mega Enclosure 50mm Fan
Free
V-Slot Panel Mount 2020
Free
Sonoff Type 86 Junction box adapter for double junction box US
Free
DIY 3D Printer Enclosure - Create your own fully customizable enclosure
44. 90 €
90 €
Voxelab Aries / Flashforge Finder 3.0 side panel mount (chassis)
Free
Snapmaker 2.0 touch screen bracket
Free
Trust SpotLight webcam mount for Creality housing
Free
HDD 9 Drive Cage with ziptie remix.
Free
Stackable stand and hard drive cage
Free
Adjustable Parametric Clip Case
Free
FlashForge Creator Pro Hood Insert 2.0
Free
we give a "factory" appearance / Habr
You are determined to release your development to the mass market.
The first stumbling block that many face is how to make a high-quality device case in small batches?
How to make a “candy” out of a 3D printed model, which will not be ashamed to be sold?
One option is processing and painting.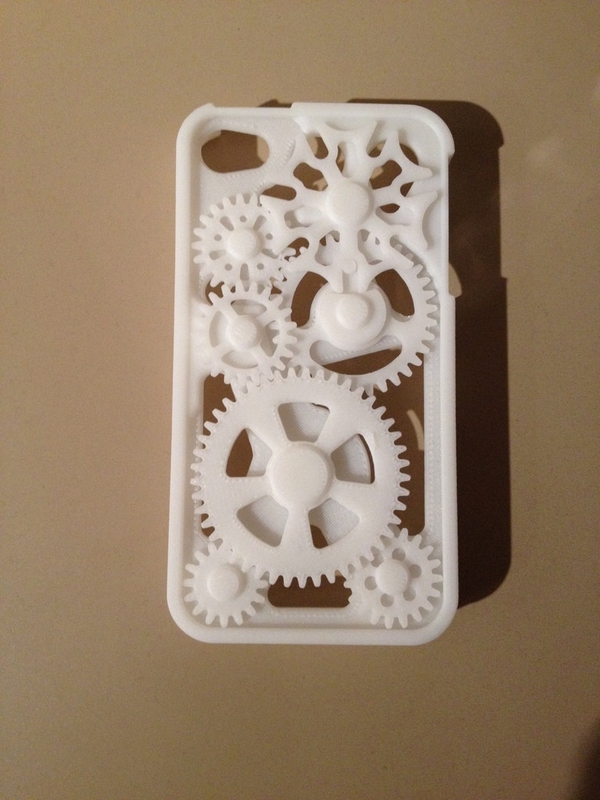 About the intricacies of coloring polyamide - under the cut. Lots of photos!
Why polyamide?
Let's look at the comparison table from Can-touch (not advertising, but the guys know their business and it’s not a pity to mention them: at prices above the market, they are responsible for quality and solve problems without “freezing”).
- Polyamide parts are strong and well suited for use as a final product.
- Detail - better than plastic printing, but worse than resin printing.
- SLS printing with polyamide is quite inexpensive and, depending on the size of the part, costs even less than casting into silicone molds.
- In addition, casting is a rather labor-intensive process, and the productivity of the casting shop is rather limited, detailing also does not always allow ideas to be realized.
- Small parts (such as latches) may simply not cast.
- Polyamide can be machined well - sanded, sanded, etc.
These properties make it an excellent material for small series cases.
Next is a guide on how to get a “factory” soft-touch coated part.
Tools:
Airbrush/Airbrush:
I use IWATA Eclipse, but a more modest one will do. It is better to consult in shops involved in modeling. The key for us is the size of the paint spot and the size of the tank: you should not take a huge half-liter for painting fences. Almost everything is suitable for painting models.
Compressor with pressure reducer:
Look in the same shop for modellers.
Scale:
Be sure (!) to accurately mix the paint with the hardener.
Primer, paint, varnish, film, thinner, etc.:
the order is done well, only here they are often loaded).
Paint preparation:
Polyamide is printed using selective laser sintering technology: the model is obtained with good detail along the horizontal axes and small “steps” along the vertical.
In addition, the surface is porous - it is necessary to carefully sand it to a perfectly smooth state.
This is the most important stage of the process - all the unevenness after painting will be visible!
Therefore, first use sandpaper grit P400-P500. Then we grind to a perfectly smooth surface with grit P700-P800.
Before:
After:
As you can see, the stairs didn't really disappear. At this stage, only the horizontal surface is well processed - it is not visible in the photo, but it is smooth to the touch. The ends are still rough. We remove the bulges with sandpaper, but to remove the pores, we will have to grind off half the wall - it’s not good.
Primer:
In order to ensure good adhesion between the paint and the material, a primer is used. In addition, the primer allows you to fill in the bumps and make the surface perfectly smooth. All proportions and drying parameters are in the attached specifications.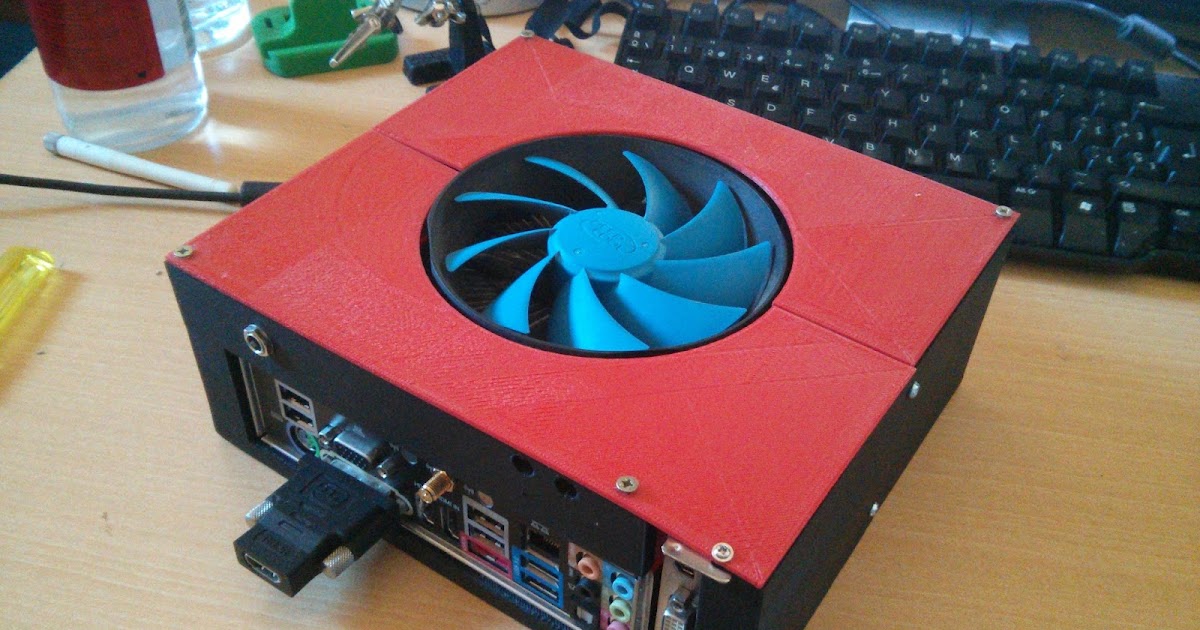 For polyamide I used:
Important!
Apply the primer in a very thick layer until all irregularities are filled, remove the excess by sanding. The airbrush / airbrush blows the paint out to the sides, preventing it from laying down in a thick layer, so you need a second one, as thick as possible. To speed up the process, you can place the parts in the oven at a temperature of 50-70 degrees.
One coat:
After drying and processing:
One coat is not enough to get a good result! Not all pores are eliminated, the surface is not ideally smooth everywhere.
Don't paint until you get a perfectly smooth surface!
The paint won't cover it.
It may be necessary to apply a third coat of primer, dry and sand. We skin the same way: first with large sandpaper, then with fine sandpaper (it is better to use waterproof sandpaper, as it clogs rather quickly, and it is better to rinse it).
Two layers, smooth surface:
If islands appear somewhere, in principle, it's okay, as long as it feels smooth to the touch and all the pores in the plastic are closed.
Painting:
We thoroughly rinse the airbrush with a solvent after the previous use (at the end of painting it is recommended to pour the solvent into the tank and drive it through the nozzle - after that it will be easier to clean).
Mix paint according to specification:
Apply evenly: it is better to apply paint less and move more by hand. We keep the airbrush away from the body so as not to accidentally leave smudges (it is better to practice on paper if you have never dealt with airbrushing).
At this stage, it will become clear how well you primed / sanded the surface. If everything is done correctly, the magic of transformation into a perfect detail will take place before your eyes. You don't need a lot of paint - a couple of dense layers are enough. Then we dry it in the oven, and while it dries, we clean the airbrush for soft-touch varnish.
Soft touch varnish:
After painting, the part will already seem fantastic to you, but the same
will create a soft-touch coating "wow-effect", will hide small surface inhomogeneities, and also protect the paint from damage.
It is important to apply the lacquer on perfectly smooth dry paint. If surface roughness appears after painting, you can gently (VERY CAREFULLY) smooth the surface with light movements of the finest sandpaper.
Be sure to practice on different surfaces in applying varnish - you need to apply in 1-1.5 layers. We apply, after we have finished the work, it is recommended to immediately clean the tank from the varnish with a solvent.
We put the parts in the oven to dry, along with them some test part, also varnished (the temptation to touch the part is too great, and the fingerprint on the wet part can no longer be covered, so it’s better to touch the one you don’t mind).