3D printing pillowing
A Quick guide to Pillowing Problem in 3D Printing
3D-Pillowing Solutions
There are totally various choices on the market for eliminating pillowing in 3D Printing services.
Applying a thicker top layer
The best way to strengthen the highest layer is to use a thicker top layer, which is meant to make the surface strong and robust. Since it is also the case with warping, it should also facilitate with pillowing and is additionally the simplest solution to the problem.
To stop possible warping, merely set the very bottom layer to a thicker value. During this way, you'll be able to guarantee the higher mechanical resistance to the thermal stress caused by the filament cooling.
Also, you can conjointly stop pillowing. During this case, you increase the thickness of the highest layer to assist it in maintaining its deformation ensuing from the cooling of the material.
But how thick must the top layer be to effectively prevent pillowing? to see the optimum layer height, you can follow your straightforward formula:
- Top layer thickness should be around 5 to 6 times than the other layers' thickness.
If the standard layer height is set to be thin, it will not work this way.
- One should increase the top layer height beyond six times. Adjust the top layer settings. Try various settings to find out what works best for your print object.
Increasing the filling percentage
As already mentioned, pillowing especially seems to occur once the load of the covering layer seems to be unacceptable in itself, permitting the material to enter the areas between the individual layers.
By doing so, the filament finds a way through the tiny gaps between the filling structure, which favours pillowing during this case. A filling of twelve percent is already enough for you to supply your print models with no problems. However, if pillowing happens regularly, you ought to increase this filling proportion to twenty-five per cent to stop it.
Although this is often a straightforward solution, it is typically utilized by users as a final resort to remedy pillows that occur. The corresponding settings are simply adjusted within the slicer software. However, there are consequences.
The quantity of filament required for 3D Printing services will increase, as will the desired printing time. Therefore, if you're trying to find high printing speed and price savings by using as little filament as possible, this answer might not be of abundant interest to you.
Reduction of the printing speed
If you notice the looks of pillows that successively contain holes, these holes are created by the upper layer buckling because of its own weight. However, these holes can be totally eliminated.
For doing this, printing temperature should be lowered only for the top layer. So that the layer stiffens quickly, make a note that the lower temperature has no effect on the adhesion of the layer since this is the last layer of the print model.
Customize 3D Printer Cooling
It can be an alternative or in addition to lowering the printing temperature of the upper layer in the 3D Printing services. Increasing the cooling of your 3D printer permits the top layer to cool down and cure as quickly as potential. To try to do this, set the cooling of your fan to the most setting.
However, if you think that printer cooling alone isn't enough to combat pillowing, you'll be able to conjointly use a desktop fan to supply further cooling for the top layer.
Increasing the gap between building plate and print head
If you enhance the distance between the print head and the building board, this can make the top layer to cool down as rapidly as possible and stop pillowing.
The reason for this is often that the nozzle temperature is incredibly high, and thus the close temperature is additionally exaggerated accordingly. However, if you take away the print head slightly from the building platform, the ambient temperature remains unaffected.
For this action, you ought to have already got some expertise with a 3D printer, since improper execution may also cause issues comparable to poor layer adhesion in the 3D Printing services.
Frequently Asked Questions
What is deformation, and why will it happen?
If a section of the print object bends upwards, this ends up in distorted 3D Printing online. This drawback is especially acute once the temperature variations between the layers of extruded plastic are too great.
What does hygroscopy mean and the way does it have an effect on print quality?
If filaments are exposed to wetness, issues with print quality often occur afterwards. This is often because of the supposed hygroscopy, the absorption of moisture by the filaments.
Since most filaments are absorptive by nature, they naturally absorb moisture within the air. However, this property may be an issue which will have a significant negative impact on 3D print quality. Unfortunately, wet within the printed material isn't visible from the outer look.
Consider the filament is heated at the hot end of a 3D printer. This is often mirrored in the formation of ugly bubbles. Different visible consequences are jams in the extruder, brittle, soft or fragile printed objects and meagerly adhesion to the printing bed.
Which materials are most stricken by hygroscopy?
Basically, all printing materials of 3D Printing Bangalore are a bit hygroscopic. Therefore, filament should be kept properly and to boot dried if needed. However, nylon, PC, PETG, PVA, TPU and several other versatile filaments have evidenced to be notably hygroscopic. PLA, ASA and polypropene (PP) are considered less hygroscopic.
Conclusion
Initially, it is troublesome for the user to become comfortable with the technology of a 3D printer and 3D Printing Bangalore. Over time, however, you'll have a good variety of experiences with faulty or utterly failing prints, and you'll learn how printer and slicer settings will manufacture the specified results in 3D Printing Bangalore.
If the issue is pillowing, it's vital to spot this problem and confirm the cause. Once you've found the proper answer for you, you'll be ready to still create flourishing prints.
Since pillows appear on the surface comparatively late, the Printing cannot be stopped. This makes it important that you just spot the issue before it will occur and take acceptable preventive measures.
As long as you target the top layer and apply these solutions, there's nothing to prevent unflawed 3D printed models.
Read More : How to deal with Mold repair in Injection Molding Service
5 Ways How To Fix Pillowing in 3D Prints (Rough Top Layer Issues) – 3D Printerly
You’ve set up your printer, had many successful prints but for some reason the top layer of your prints aren’t looking their best. This is an issue many 3D printer users have dealt with.
It can be annoying to have a print go perfect, until the very end where you experience pillowing, which results in a rough surface at the top of your prints.
To help users out I’ve put together an easy ‘how-to guide’ on fixing top layer issues (pillowing) with a few easy methods for you to try out now.
If you are interested in seeing some of the best tools and accessories for your 3D printers, you can find them easily by clicking here (Amazon).
What is Pillowing Exactly?Pillowing is simply a phenomenon that occurs which leaves the top layers of your prints rough, unclosed, uneven and bumpy. Just an all-round pain to experience, especially after a long print.
Unfortunately, there isn’t a type of filament or printer which is completely immune to pillowing, but some are less likely to be affected than others.
The effects of pillowing is very similar to warping but it occurs at the end of a print rather than at the start. It produces a pillow-shaped pattern at the top, hence the well-fitting name. It usually effects prints that have a large, flat top surface.
The top of a print will have a type of rough and bumpy pattern that represents the infill directly below the top layers.
Why Does Pillowing Happen in the First Place?There are two main reasons for this happening:
- Insufficient cooling – causing the filament to warp away from the infill up towards the nozzle then it cools there and causes this effect. This is because the material gets tight and sticks over the infill but warps over the voids below.Your layer cooling fans might also play a part where they aren’t strong enough to get the material to the correct temperature to avoid this. If you are printing too fast, your materials may not have enough time to cool properly and produces the same results.
- Not enough supporting material – at the top of a print to complete the print and close it. On top of this, if you don’t have enough solid top layers to your prints, pillowing can occur easier.
Simply put, this issue of pillowing mainly appears because of incorrect print settings and improper cooling. If you want a quick solution to improve your print quality, get yourself the widely-popular Noctua NF-A4 fan.
Prints that are set up with small layer heights are affected more so because materials warp easier when there is less support underneath each layer.
Another thing to know here is that 1.75mm filaments (printer standard) are more likely to be affected than the 2.85mm filament counterparts.
Softer filaments such as TPU, and higher temperature filaments such as ABS and polycarbonate do have more pillowing issues than harder filaments, but these are problems which can be solved with a few different methods.
How to Fix Pillowing Issues in 3D Prints
1. Increase Top Layer ThicknessEven though pillowing is a result of imperfect cooling, the issue comes about from the addition of a thin top surface.
Top layers of a print is what influences the pillowing effect. The more top layers that you have, the more chances for your printer to cover over the gaps.
There is an easy fix for this problem.
The first thing you should try to prevent pillowing/rough top layers is adding more top layers to your prints. This is done quite easily from your slicer settings by increasing the ‘top thickness’.
Each extra layer that you have on your print, it means that there are more opportunities for the layer to melt away the possible pillowing effect that you may have encountered underneath.
I’d recommend having a top layer thickness which is six to eight times the layer height, which should be more than enough to alleviate any pillowing issues that you have been experiencing.
So if you are printing an object using a 0.1mm layer height, you would want a top/bottom thickness of 0.6-0.8mm so that the top surface of your print can close and prevent the sagging/pillowing effect.
Keep in mind though, if you have really thin layers, your print is more susceptible to warping and curling because the layers become more fragile. In this case, you’ll need more layers at the top to close the print properly.
Some people say to keep your top layer height total to roughly 1mm, so:
- Layer height of 0.1mm – print 9 top layers
- Layer height of 0.2mm – print 4 top layers
- Layer height of 0.3mm – print 3 top layers
This isn’t required but if you want to be on the safe side, it’s a good rule of thumb to go by.
2. Increase Infill Density PercentageIncreasing your infill density percentage does a similar thing with increasing the number of top layers.
This method helps by giving the top layers more surface area to be supported by, making it fuller and smoother rather than rough and low-quality.
Pillowing happens because of the gaps between the infill, for example, if something was printed at a 100% infill density, there would be no chance of pillowing because there aren’t any gaps in the middle of the print.
So reducing these gaps by increasing the infill below the top layer it reduces the chance of it happening.
When you are printing at lower infill levels such as 0%, 5%, 10% you are more likely to notice pillowing effects. It really does depend on the design of your print, if you have a delicate product and need a lower infill, you want to compensate by using a stronger material.
Some printers are more prone to pillowing than others but as time goes on, printers are developing at a high rate in terms of quality.
Some prints will print just fine at 5% infill, others may struggle.
Comparing the two methods above, the top layer method does usually use more filament, but depending on what functionality you have with your part it could be a better idea to use the infill method.
Some 3D printer users have reported having a minimum infill percentage of 12% should hold up and reduce pillowing.
The video below shows just how easy these two methods are.
Another method you can use is to lower the print speed for your top solid layers. What this does is give your top layers more time to cool off before they start peeling away. When your layers have more time to cool off it gives the material time to harden, giving it more support and strength.
It doesn’t necessarily reduce your layer adhesion, but it does prevent your prints warping away which forms the pillow on top.
This may take a bit of trial and error but once you get the right settings down, you’ll be printing objects successfully.
When it comes to print quality, typically you have to balance overall printing times with lower or higher quality. It’s a necessary trade-off but it does show its benefits when your prints are finished.
There are methods out there where you can decrease print times and keep that high quality you desire, which leads us into the next method.
4. Improve Your Cooling FansOne method requires the modification of your printer and is using a cooling fan.
Some printers already come with a layer cooling fan, but they may not work efficiently enough to correct the pillowing issues you are having. Many times, a 3D printer is equipped with cheaper parts to keep costs down.
One thing you can do if you already have a cooling fan is to print a more efficient layer cooling duct, where the airflow is direct all the way around the nozzle or directed specifically at the part, rather than at the heater block.
If this doesn’t work or you don’t have one, getting a new layer cooling fan is the best idea.
There are many premium parts that you can make use of that get the job done much more efficiently than the standard part.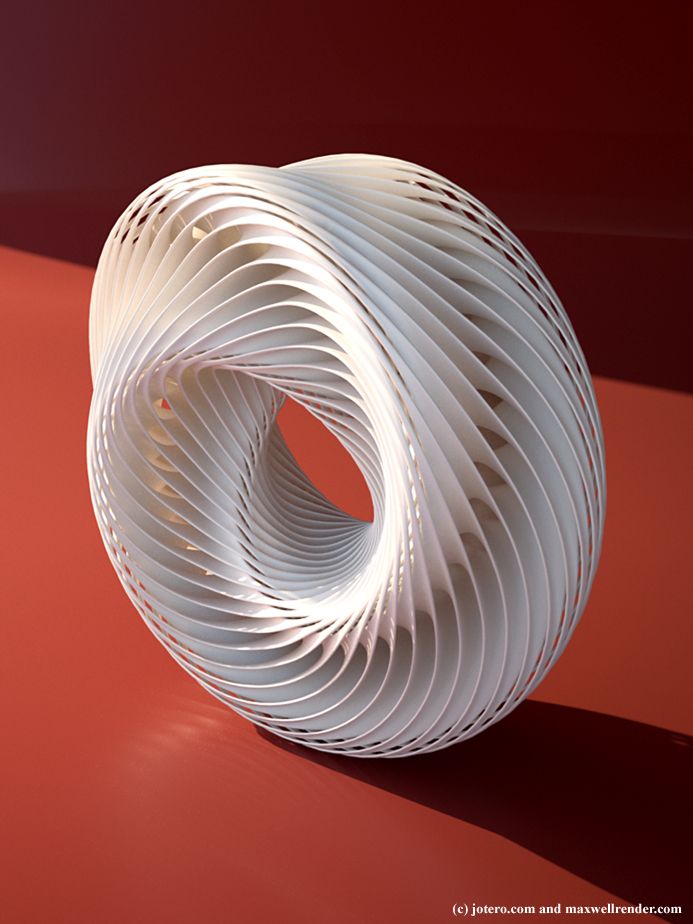
When it comes to cooling fans, the Noctua NF-A4 is one of the best out there. The advantages for this high-rated premium fan is its superior quiet cooling performance and great efficiency.
It’s a cooling fan that has saved 3D printer users countless hours on failed prints.With this fan, your cooling issues should be eliminated.
It’s aerodynamic design offers superb running smoothness and amazing long-term durability.
Turning your fan on is the first obvious step, which can sometimes be done in some slicer programs. If you can’t set your fan in your slicer, it is possible to manually edit the G-code using the M106 command. You shouldn’t have to do this in most cases, but it isn’t too difficult to do with a guide.
Something as simple as a desk fan could help if you aren’t comfortable installing a cooling fan onto your 3D printer. However, cooling fans may just blow the cool air towards specific parts of your prints and not all over, which is where you might see pillowing.
Keep in mind, depending on what fan you have you might not want to run it at maximum speed. Some materials are more sensitive to warping and pillowing so when you have the fan’s air pressure blowing at a print, it increases the chances of warping.
There is such thing as rapid cooling, and it can have a negative effect on the quality of your prints.
With materials such as Nylon, ABS and HIPS you ideally want a low fan speed.
If the plastic doesn’t cool enough, it causes the material to either hang down or curl up in the areas where the infill lines are. It creates an uneven surface which is a problem for the next layer that goes on top of it. That’s when you get your rough, bumpy top surface.
5. Lower Your Printing TemperatureIn some cases, lowering your printing temperature could help due to the nature of the issue. This can cause more issues than it solves though, so it isn’t a solution to jump straight into. It could make your prints start under extruding.
I’d definitely try the previous methods before pulling this one out the bag. Materials usually have a temperature range to print at the best quality, so once you’ve found a perfect temperature for your setup, you don’t usually want to be changing it around.
Depending on what material you are using to print, some have cooling issues such as the high temperature filaments out there. You can avoid having to play with temperature settings to prevent pillowing if you implement the other methods with more intensity.
This method works the best with the high temperature materials because they take a longer time to cool down and get to a firmer state.
Big changes in the temperature of these materials as they are extruded onto the build surface make them more likely to warp.
When you lower the temperature of the nozzle’s hot end for the top layers, you effectively prevent pillowing as you are combating the issue directly. Having your cooling fan running at a high power to assist the cooling is recommended with these materials.
You want to aim to cool down the extruded filament as quick as you can so it can set into it’s intended place properly and doesn’t sag into the spaces between the infill.
If you’ve followed these solutions, the problem of pillowing should be a thing of the past. The best solution is a combination of them so once you’ve done these, you can look forward to smooth top layers and high-quality prints.
How to Get a Smooth Top Layer in 3D Prints
The best way to get a smooth top layer in 3D prints is to enable ironing in your Slicer, a setting which commands your nozzle to run over the top layer of your print and smooth out the top layer, following a path that you can input within the settings.
Check out the video below by The 3D Print General who goes over ironing settings. They work really great for 3D prints with flat top surfaces, but not for objects that are round like figurines.
Best Cura Ironing Settings for Top Layers
Ironing Flow
The default setting in Cura for Ironing Flow is set to 10% in Cura but you want to bump this up to 15% for better quality. You may have to do some trial and error with some of these values to get the top layers as you desire, so you want to balance out the Ironing Flow with Ironing Speed.
Ironing Speed
The default setting in Cura for Ironing Speed is 16.6667mm/s in Cura but you want to bump this up to 90mm/s or above 70. This will depend on what Ironing Pattern you are using though, since using this speed for a pattern like Concentric won’t bring the best results, but for Zig Zag, it works well.
The Concentric pattern did better using an Ironing Speed of around 30mm/s.
Ironing Line Spacing
The default setting in Cura for Ironing Line Spacing is 0.1mm, but you can get better results by doing some testing with this. A value of 0.2mm while adjusting or increasing the Ironing Flow & Ironing Speed can bring amazing results.
If you are using a thicker Iron Line Spacing, you usually get better results by having a higher Ironing Flow & Ironing Speed.
If you love great quality 3D prints, you’ll love the AMX3d Pro Grade 3D Printer Tool Kit from Amazon. It is a staple set of 3D printing tools that gives you everything you need to remove, clean & finish your 3D prints.
It gives you the ability to:
- Easily clean your 3D prints – 25-piece kit with 13 knife blades and 3 handles, long tweezers, needle nose pliers, and glue stick.
- Simply remove 3D prints – stop damaging your 3D prints by using one of the 3 specialized removal tools.
- Perfectly finish your 3D prints – the 3-piece, 6-tool precision scraper/pick/knife blade combo can get into small crevices to get a great finish.

- Become a 3D printing pro!
Pillows for birthday, anniversary, New Year (printing holiday pictures on pillows)
A good healthy rest is the basis of excellent well-being and the key to a long life journey. Man sleeps a third of his century. Think about it: we hug a pillow longer than our dearest relatives! So why not make this accessory a souvenir? The originality of such a choice cannot be disputed, so there is already one plus. And the color print applied to the pillowcase is able to convey your most sincere feelings and wishes. For an anniversary pillow (wedding, work experience, graduation), this can be a thematic drawing or an inscription. You give not only an object for sleep, but also a mood! Here is the second plus.
A gift pillow for a birthday is considered a special interior item, and not just bedding. It turns out that the donor presents the birthday man with two gifts in one! By the way, this is the third positive moment. It makes no sense to list the advantages of such a gift move: a lot depends on the imagination of the donor or the designer of the performing company.
"Creative headboard" as a gift is suitable, perhaps, for any occasion. Proof - pillows for the New Year: for adults, children, teenagers or themed (with a special meaning).
Depending on the main purpose of the "head restraint", its shape may change. The classic square takes the form of a sleeping cocked hat, rectangle, circle, heart or cushion (under the waist, for example).
New Year's pillows act in three guises:
- Bedding element.
- Pouffe for a sofa or armchair.
- Automotive softening pad.
Perhaps new roles of soft gifts will soon appear, as the fashion trend is actively developing.
Russian principle
Pillows with holiday pictures or romantic prints have become especially popular during the pandemic. People, being in self-isolation, order soft gifts through Internet platforms, then send them by courier to friends, girlfriends, relatives.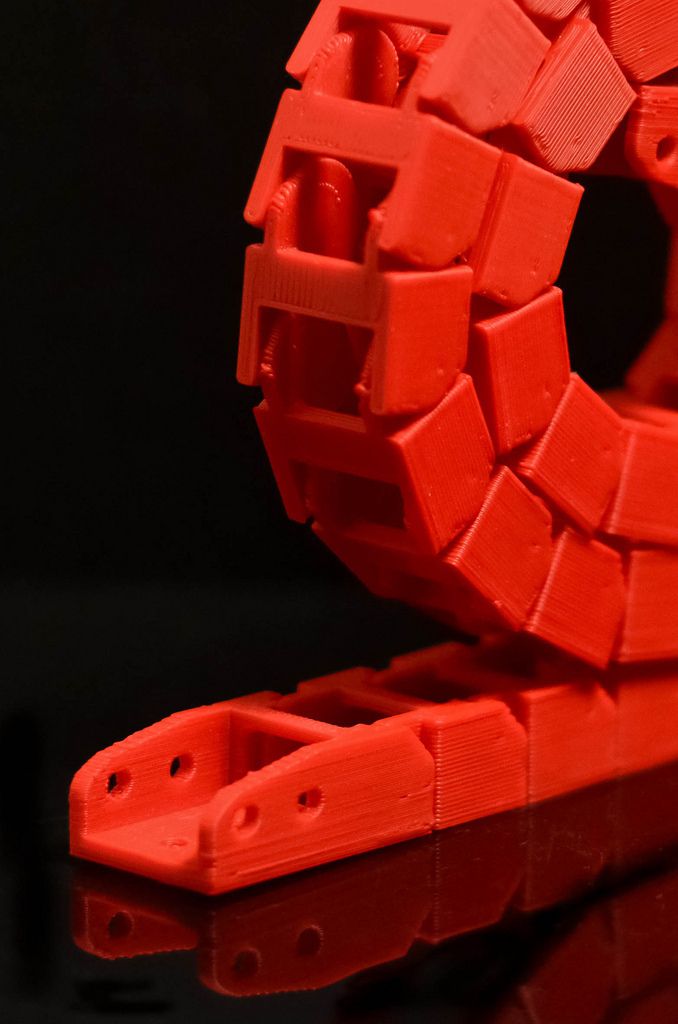 This model has always been available, but it was during the quarantine period that customers began to give photo pillows more often.
This “marketing phenomenon” has not yet been studied, but there is a logical explanation. Perhaps the old Russian recipe for stress works: "lie down, sleep, and everything will pass." The reception is simple, effective, does not require investments, it is enough to walk to your favorite sofa. This is an important point: people have become more demanding on the design of a bed, armchairs, chairs, as well as the entire environment. A personalized birthday pillow becomes a bright accent, attracts attention, decorates. At the same time, a stylish accessory has other advantages:
- Availability.
- Speed of production (1-2 days).
- A variety of colors, shapes, design options.
- Long service life. The pillowcase with a pattern can be washed, the colors do not lose their brightness.
And this form of gift will appeal to everyone, regardless of gender, age or profession.
Pillow Dictionary
Manufacturers actively responded to new customer requests. Photopillows (another neologism) have new types and purposes. Sometimes their functions can cause laughter or sarcasm, but this is from a lack of information.
The method and manner of its design directly depends on the purpose of the "headrest". Let's focus on a few popular brands and explain the terminology.
Mushroom pillow. Anti-stress "roller" with a special filler (small balls for massage of nerve endings), which can be kneaded as much as you like. The material of the pillowcase stretches, easily returning to its original shape. Liked by adults and children. Laughter is inappropriate: to relieve stress is a useful thing. It has long been customary for the inhabitants of the East to sort out the rosary to calm down, only the Europeans were far behind in this direction. The shell of such a pillow is made of natural materials reinforced with synthetic fibers.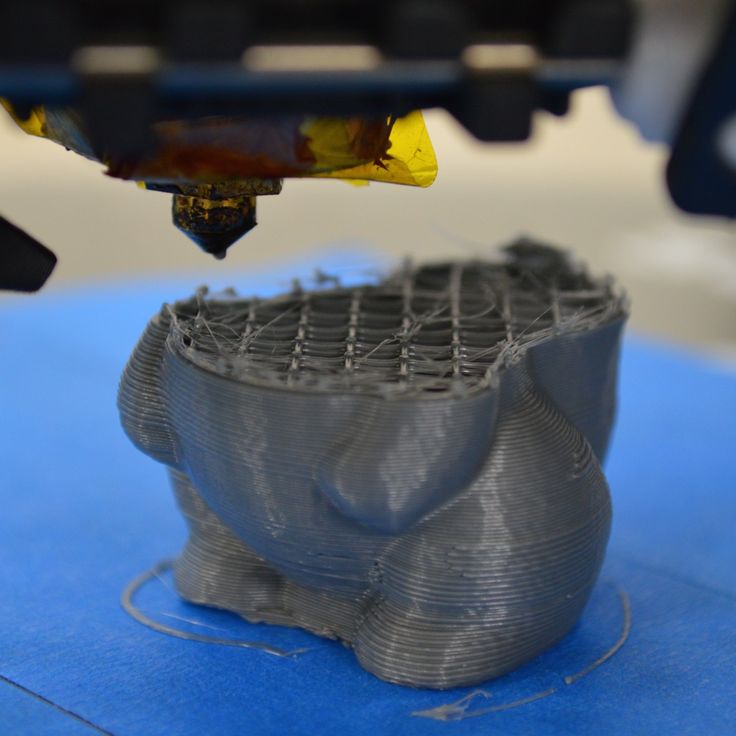 "Antidepressant" will last a long time without losing shape and color.
Donut 3D. Donut-shaped head pad: bright, compact, soft. Usually serves for its intended purpose, in his spare time decorates the interior of the kitchen, living room or bedroom.
Name. About nominal gifts it was said above, here it is necessary to look wider. On such pillowcases, you can place not only a name, but also a slogan, an appeal, a confession, an anecdote. A convenient way to open your feelings for a girl on Valentine's Day. True, you still have to buy a bouquet, but you have already made a gift with it!
Decoration. Soft decoration can be used in the "regular" mode. It is good not only for its brightness, but also for its shape: “circle”, “triangle”, “traffic sign”, “heart”, “male biceps”. Pillow cakes, ice cream, cupcakes are offered. Do you have your own form suggestions? They will be fulfilled.
Long pillow. The original headrest for two at once. Looks unusual, stylish. To improve the effect, they order printing of photographs of memorable moments of life, make a collage on both sides. Such models are also called "hugs", as they are convenient to hug during sleep.
Dakimakura. Headrest in the form of a life-size puppet. The character is ordered by the buyer: this is a cartoon character, a famous politician, actor or movie character. Particularly romantic natures order a "sculpture" of their boyfriend (girl). Wits call such a gift a "pillow for the lonely", although this is not true. It would be more correct to call it "a pillow of lovers."
Advice! To order, use photos of the maximum size or trust the manufacturer, who has the appropriate photo bank. You should not take pictures from design sites: as a rule, they upload obviously small-sized pictures that cannot be used in print, the picture will turn out blurry.
Views: 2371
Other articles
Corporate symbols on flags and pennants
A flag with corporate symbols can become an interior decoration in the office of any organization. ..
..
How to quickly and inexpensively make an inscription on a T-shirt
choose t-shirts of any sizes, colors and patterns. However, the demand...
Printing images on fabric
Today, there are a large number of different methods of printing images...
The first flag of Russia - a cross banner
The white-blue-red state banner did not appear in 1703, as is sometimes considered modern ...
Flags of cities and subjects of Russia on it...
Features of printing products on banner fabric
Large format advertising made on textiles can be installed:
High Speed Fabric Features
Industrial direct printing on fabric is the optimal solution for the production of banners with...
Hanging poster printing
Hanging posters are a common element of modern promotions, so...
The main state symbols of Russia
State symbols Russia are signs that distinguish our country from others. In 1993. ..
..
Flags of districts and districts of Moscow
The development and use of state symbols in the capital are regulated by the law of the city...
Basic Rules for Using Flagpoles
The flagpole is the pole needed to raise the flag. They are made of wood, metal...
Repair, washing and cleaning of flagpoles
Flagpoles are used to install panels in open spaces: in squares, roofs...
Materials and fabrics for making banners
When choosing fabric for banners and pennants it is necessary to analyze the expected conditions ...
Fabrics used in the manufacture of flags
The fabrics used in the production of flags must meet a number of strict requirements:...
Distinctive features of pennants and banners
Today, there are many varieties of fabrics that are installed or hung out...
Flag of Russia - state symbols, color designation
The company "PREMIUM FLAG" offers to buy the flag of Russia. April 28, 1883 Emperor Alexa...
Types and meanings of flags on ships
The first versions of the flag signal system appeared in the 17th century. The International Code was adopted...
How should the flag be hung?
Any flag carries certain information. So that an ordinary passer-by can understand it,...
National flags in the form of a square
Rectangle - a shape that has become traditional for the national flag, but there are several...
Printing on textiles
For several thousand years, mankind has been familiar with printing process. The first material on which ...
3D Photo You can zamoviti like a pillowcase znіmny on bliskavtsі so and a pillow with a repetitive synthetic winterizer. Druk is applied on a sprat of different fabrics (gabardine, blackout, satin, plush)
Seller INTERNET STORE "3D - PHOTO INTERIOR DECOR, INTERIOR TEXTILE" develops its business on Prom.ua 10 years.
The PRO sign means that the seller is one of the paid packages of Prom.ua services with extended functionality.
Possibility of air bags
233
Prepared Photo Pillows with whatever image and size. You can zamoviti like a pillowcase znіmny on bliskavtsі so and a pillow with a repetitive synthetic winterizer. Druk is applied to Kilka Vidiva tissue (Gabardin, Blacks, Atlas, Plus)
for the order of the vice of the zrunnis of the tsnizni tsіniza novelty
16243248