Arduino reprap 3d printer
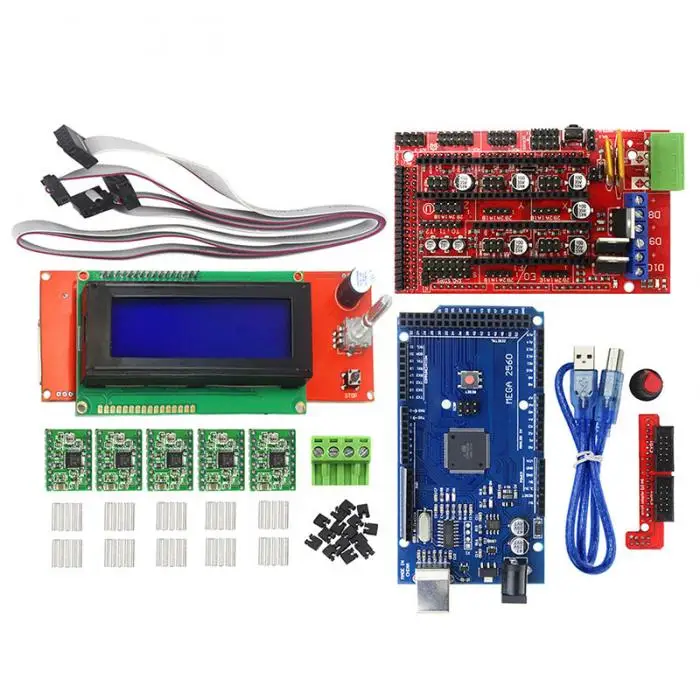
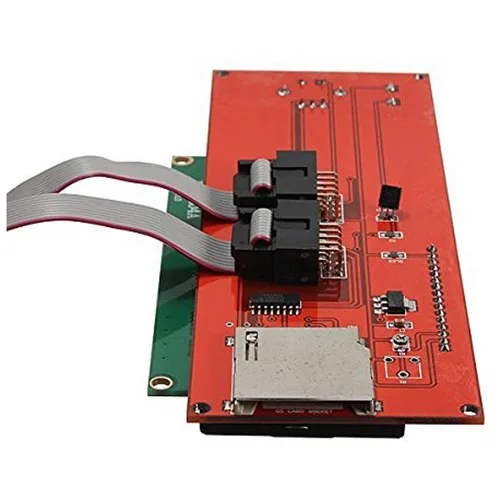
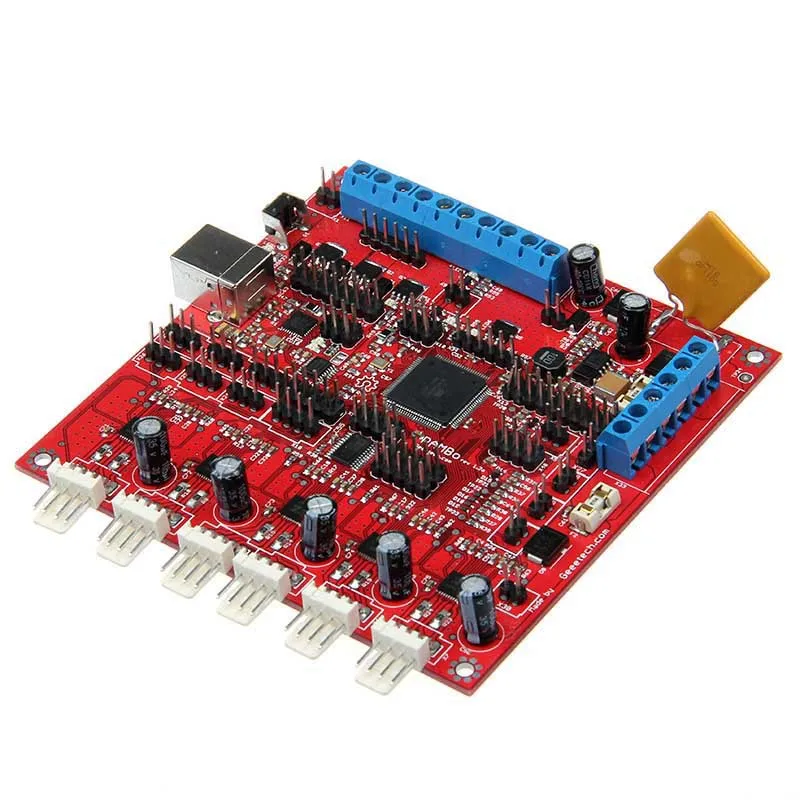
3D Printer RepRap Controller Ramps 1.4 Shield for Arduino Mega 2560
3
3
3
3
3
3
- Product
- Description
- Reviews (0)
- What's in the box
Description
Highlight
- Walk-In Price: RM25
- Warranty: 1 Month (T&C Apply)
- Fully assembled & tested, no soldering required
- It is designed to fit the entire electronics needed for a RepRap in one small package for low cost
- The modular design includes plug in stepper drivers and extruder control electronics on an Arduino MEGA shield for easy service, part replacement, upgrade-ability and expansion
DESCRIPTION
- Fully assembled & tested, no soldering required
- It is designed to fit the entire electronics needed for a RepRap in one small package for low cost
- The modular design includes plug in stepper drivers and extruder control electronics on an Arduino MEGA shield for easy service, part replacement, upgrade-ability and expansion
- A number of Arduino expansion boards can be added to the system as long as the main RAMPS board is kept to the top of the stack
FEATURES
- Fully assembled & tested, no soldering required
- Designed to fit the entire electronics needed for a RepRap in one small package for low cost
- Modular design includes
- Plug in stepper drivers
- Extruder control electronics on an Arduino MEGA shield for easy service, part replacement, upgrade-ability and expansion
- A number of Arduino expansion boards can be added to the system as long as the main RAMPS board is kept to the top of the stack
- Dimension(L*W*H): 114 x 61 x 30 mm
PACKAGE INCLUDE
1 x 3D Printer RepRap Controller Ramps 1.4 Shield for Arduino Mega 2560
Reviews (0)
view all
back
0 reviews
What's in the box
1 x 3D Printer RepRap Controller Ramps 1.4 Shield for Arduino Mega 2560
Tags: 3826 mega2560
Follow Us
List of Firmware - RepRap
This page is the authoritative list of active firmwares.
For a list of out-of-date firmwares, see List of Abandoned and Deprecated Firmware:
Contents
- 1 Klipper
- 2 Prusa Firmware
- 3 Sprinter
- 4 Teacup
- 5 sjfw
- 6 Marlin
- 7 MK4duo
- 8 Sailfish
- 9 Grbl
- 10 Repetier-Firmware
- 11 Aprinter
- 12 RepRap Firmware
- 13 ImpPro3D
- 14 Smoothie
- 15 Redeem
- 16 Further reading
| FIRMWARE INFO | |
| Details | Description |
| Name : Klipper | Firmware that runs all calculations on a host and has the MCU execute steps at specified times |
| Features | |
| |
| Compatible Electronics | |
| |
| How to download | |
| Can download like this: git clone https://github.com/KevinOConnor/klipper | |
Documentation & Misc.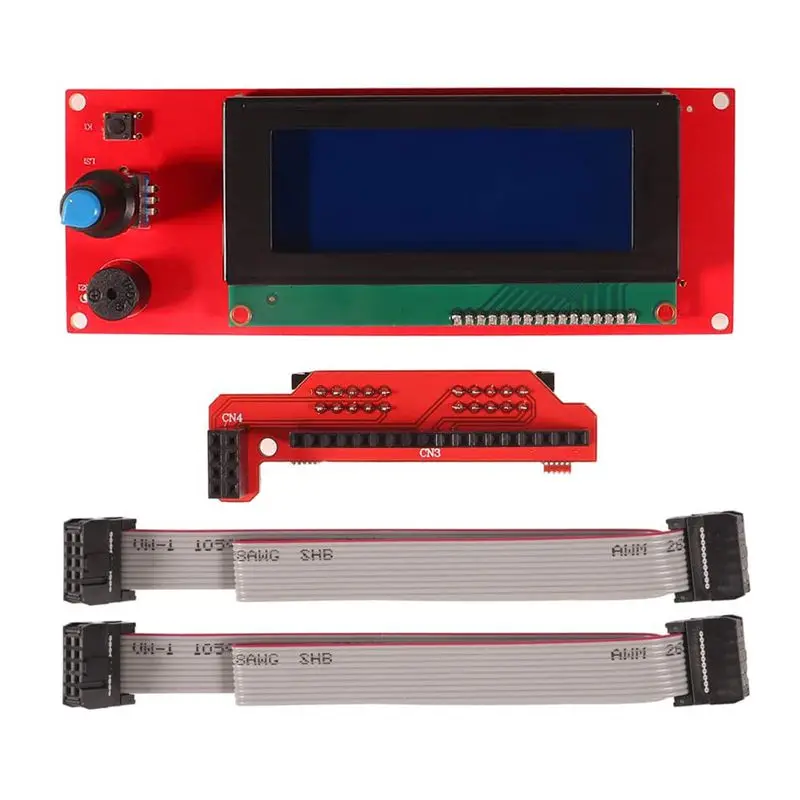 Notes Notes | |
| Documentation on GitHub: https://github.com/KevinOConnor/klipper/blob/master/docs/Overview.md | |
| FIRMWARE INFO | |
| Details | Description |
| Name : Prusa Firmware | Prusa Firmware is provided by Prusa Research for Prusa printers. It is a fork of Marlin which has been highly tailored for Prusa FDM 3D printers. |
| Features | |
| |
| Compatible Electronics | |
| |
| How to download | |
| Can download like this: ? | |
Documentation & Misc.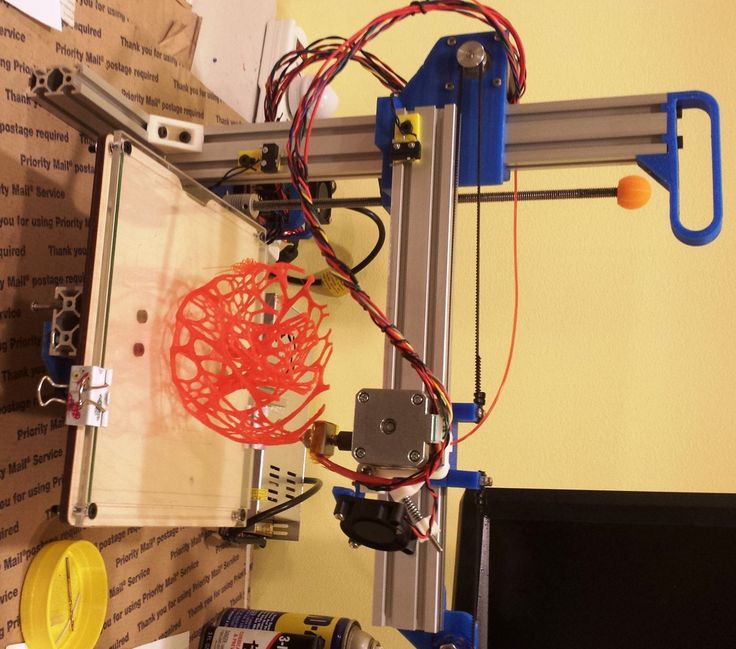 Notes Notes | |
| ? | |
| FIRMWARE INFO | |
| Details | Description |
| Name : Sprinter | forked from Klimentkip. Seems to be a popular firmware |
| Features | |
| |
| Compatible Electronics | |
| |
| How to download | |
| Can download like this: git clone https://github. | |
| Documentation & Misc. Notes | |
| Only documentation seems to be over at Sprinter
| |
 com/kliment/Sprinter.git
 | FIRMWARE INFO | |
| Details | Description |
| Name : Teacup | A dummy-proof firmware for many ATmega and ARM based controllers with emphasis on ease of use, high performance and clean code design. |
| Features | |
| |
| Compatible Electronics | |
| |
| How to download | |
| Newbies see Teacup Firmware#Installation. Developers download like this: git clone https://github.com/Traumflug/Teacup_Firmware.git | |
Documentation & Misc. Notes Notes | |
| Documentation is in the wiki under Teacup Firmware. | |

| FIRMWARE INFO | |
| Details | Description |
| Name : sjfw | A featureful modern Reprap firmware. |
| Features | |
| |
| Compatible Electronics | |
| |
| How to download | |
| Download from GitHub by running git clone https://github. | |
| Documentation & Misc. Notes | |
| See the sjfw page for more information. | |
 com/ScribbleJ/sjfw.git
 | FIRMWARE INFO | |
| Details | Description |
| Name : Marlin | Development on this firmware appears to be very active. Forked from Sprinter and Grbl. |
| Features | |
| |
| Compatible Electronics | |
| |
| How to download | |
| The latest release of Marlin can always be found at marlinfw.org. All Marlin release and development branches are hosted on Github. | |
| Documentation & Misc. Notes | |
| |
 (For more info see: this reprap-dev mailing list message.)
 0-1.5
0-1.5| FIRMWARE INFO | |
| Details | Description |
| Name : MK4duo | Development on this firmware appears to be very active. Forked from Marlin. Forked from Marlin. |
| Features | |
| |
| Compatible Electronics | |
| |
| How to download | |
| You can download tagged versions on [1] All branches (most current is MK4duo 4.3.19_dev) are on [2] | |
| Documentation & Misc. Notes | |
| The included readme.md MK4duo | |
 0-1.5
0-1.5Sailfish
| FIRMWARE INFO | |
| Details | Description |
| Name : Sailfish | This is firmware for Makerbots. There seems to be two different versions of this firmware. One I think is for older makerbots forked off the Makerbot G4Firmware. The other appears to be newer and forked from Marlin. |
| Features | |
| |
| Compatible Electronics | |
| |
| How to download | |
| See Thingiverse thing 32084 Sources are available at github for both the Gen3/4-based firmware and the Marlin-based firmware | |
Documentation & Misc.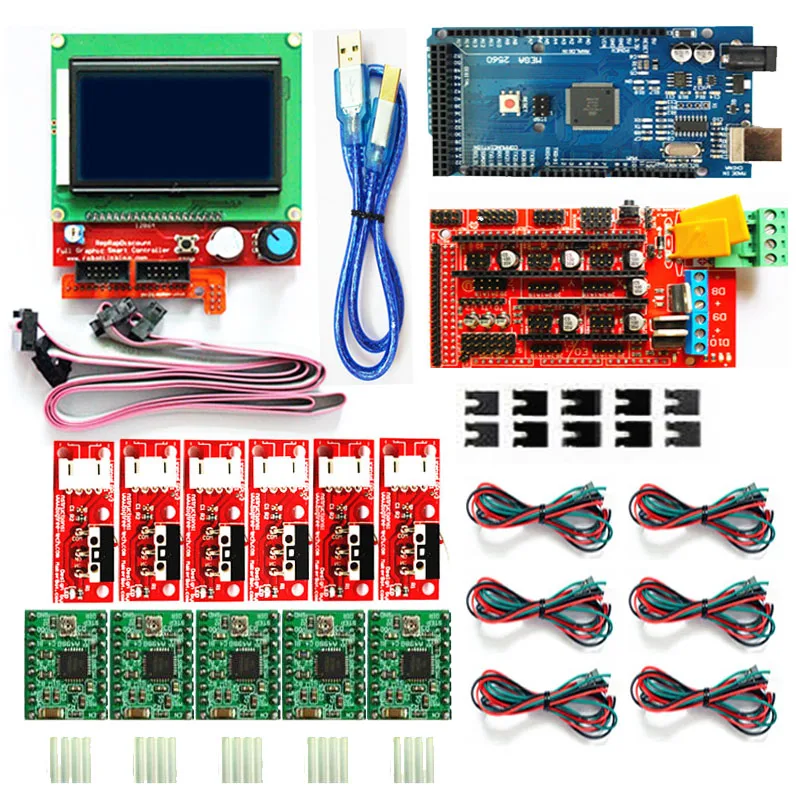 Notes Notes | |
| Sailfish documentation. | |
| FIRMWARE INFO | |
| Details | Description |
| Name : Grbl | Grbl is a no-compromise, high performance, low cost alternative to parallel-port-based motion control for CNC milling. Does not control extruders. |
| Features | |
| |
| Compatible Electronics | |
| |
| How to download | |
| Downloadable from github by running: git clone https://github. | |
| Documentation & Misc. Notes | |
| Documentation is at http://dank.bengler.no/-/page/show/5471_gettinggrbl From the website:
| |
 com/simen/grbl.git
 | FIRMWARE INFO | |
| Details | Description |
| Name : Repetier | forked from Sprinter. |
| Features | |
| |
| Compatible Electronics | |
| |
| How to download | |
| github code | |
Documentation & Misc.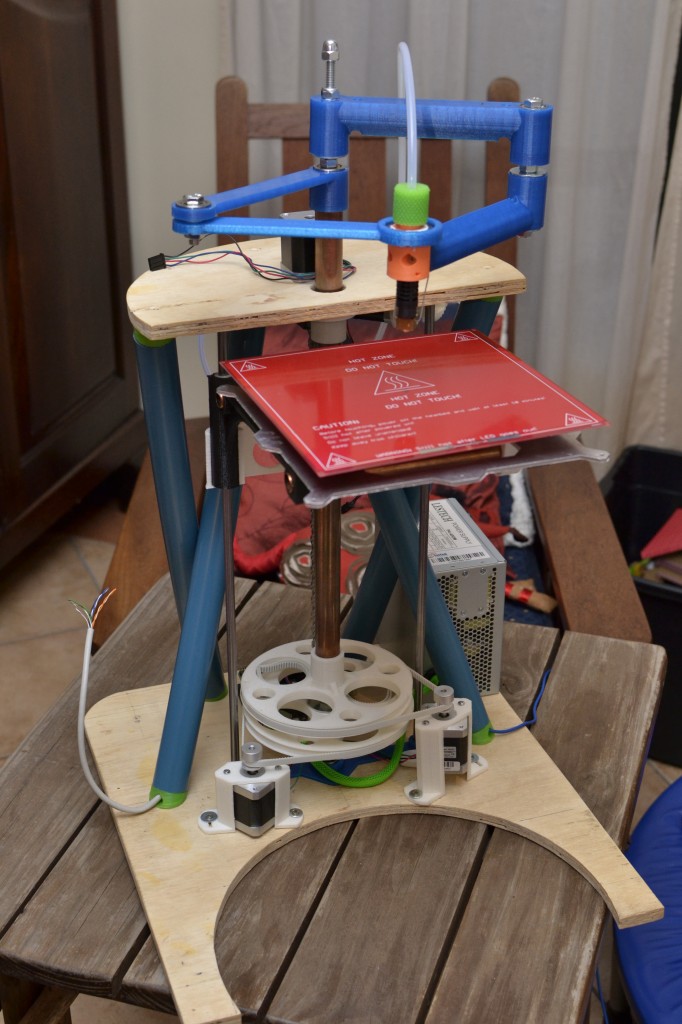 Notes Notes | |
| github wiki | |
| FIRMWARE INFO | |
| Details | Description |
| Name : Aprinter | Aprinter is a portable firmware system, written from scratch in C++ with a heavy dose of template metaprogramming. A web-based configuration system is used to configure the high-level features for a particular machine, but also to define the low-level configuration for supporting different controller boards. |
| Features | |
| |
| Compatible Electronics | |
| |
| How to download | |
| github online configuration tool and build service | |
| Documentation & Misc. Notes | |
| github | |
 Height measurements are printed to the console.
 A g-code post-processor is provided to translate tool-using gcode into what the firmware understands. This post-processor can also control fans based on the "current tool".
| FIRMWARE INFO | |
| Details | Description |
| Name : RepRap Firmware | RepRapFirmware is intended to be a fully object-oriented highly modular control program for a wide variety of machine kinematics |
| Features | |
| |
| Compatible Electronics | |
| |
| How to download | |
| |
Documentation & Misc.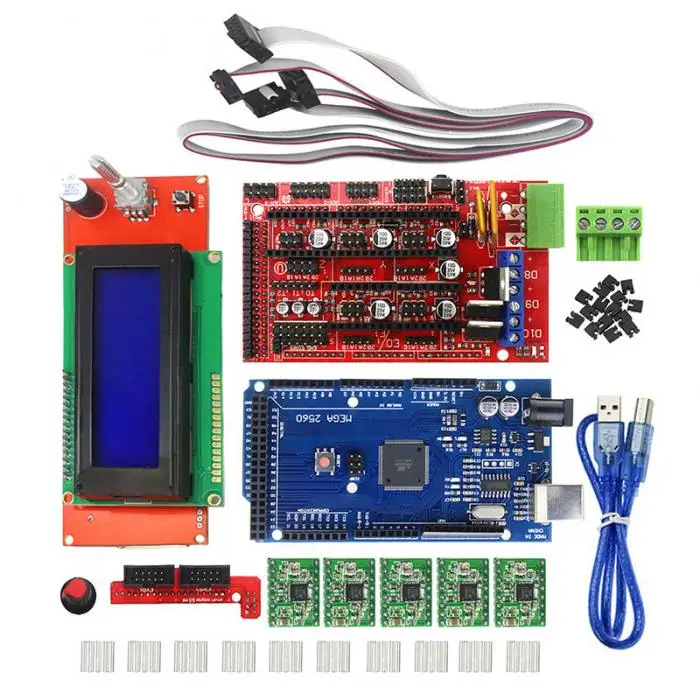 Notes Notes | |
| |
| FIRMWARE INFO | |
| Details | Description |
| Name : ImpPro3D | Adaptation of Sprinter for a specific electronics named 'ImpPro3D' |
| Features | |
| |
| Compatible Electronics | |
| |
| How to download | |
| Can download like this: git clone https://github.com/MaxPro3D/Firmware_ImpPro3D.git | |
Documentation & Misc.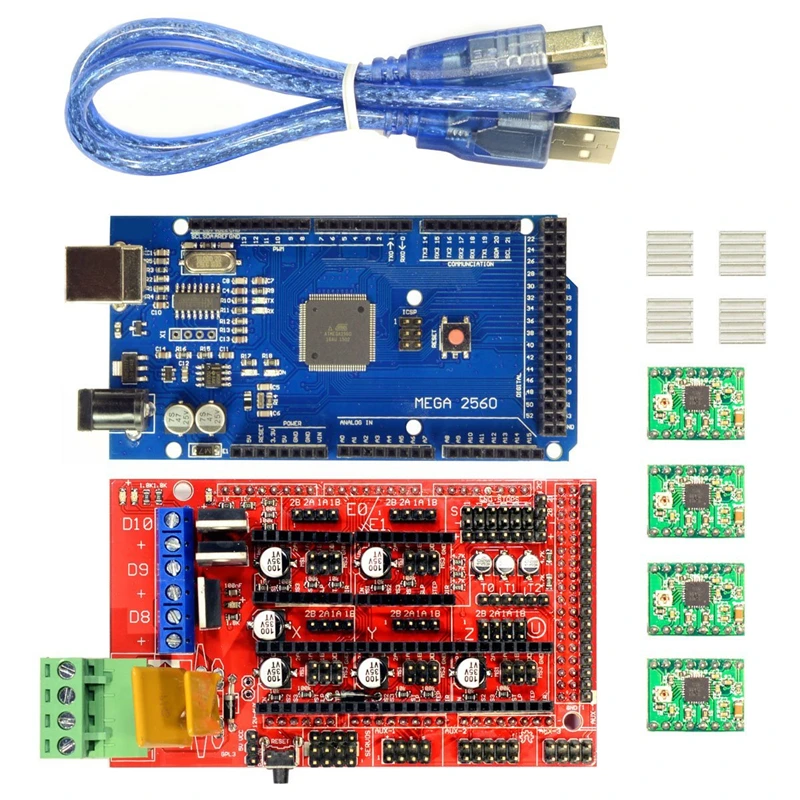 Notes Notes | |
| Only documentation seems to be over at ImpPro3D and https://sites.google.com/site/imppro3den/ | |
Smoothie
| FIRMWARE INFO | |
| Details | Description |
| Name : Smoothie | Firmware for 32-bit ARM NXP LPC1768 Cortex-M3 boards (includes a port of Grbl) |
| Features | |
| |
| Compatible Electronics | |
| |
| How to download | |
| Can download like this: git clone https://github. | |
| Documentation & Misc. Notes | |
| |
 com/Smoothieware/Smoothieware.git
 Redeem
| FIRMWARE INFO | |
| Details | Description |
| Name : Redeem | Firmware for BeagleBone Black written in Python with a small core of the Bresenham algorithm written in C. The C-core is based on Repetier. |
| Features | |
| |
| Compatible Electronics | |
| |
| How to download | |
| Can download like this: git clone https://bitbucket. | |
| Documentation & Misc. Notes | |
| |
 org/intelligentagent/redeem
 Further reading
- List of Firmware/ru
- List of Firmware/ua
- Firmware/Alternative
- Firmware/Constant Acceleration
Firmware/FiveD on Arduino
- Firmware/Linear Acceleration
- Microcontroller Firmware Hints
- Builders/Software and firmware
- Getting Started with the Arduino GCode Firmware
- Microcontroller firmware installation
Creation of a 3D printer based on arduino for laboratory prototyping
Plesovskikh Daniil Olegovich 1 , Echmaev Alexander Ivanovich 2
1 (Computer science, computer engineering and computer technologies)
2 ASP Service Center LLC, Tobolsk, service engineer
Annotation
The article provides an analysis and systematization of modern technologies of 3D printers and 3D printing. The conducted research suggests that for educational purposes and university laboratories it is possible to independently create a 3D printer by students as part of a course or diploma design. The most optimal solution to this problem is to choose the Prusa Mendel i2 as the base model with its further technical and software improvement.
Keywords: rapid prototyping, 3D printer software.
Plesovskih Daniil Olegovich 1 , Echmaev Alexander Ivanovich 2
1 Tyumen State University (branch in Tobolsk), 5th year student of the faculty of natural sciences, specialty "Vocational training" (Informatics, computer science and computer technologies)
2 Service Center ASP LLC the city of Tobolsk, IT service engineer
Abstract
This article provides an analysis and systematization of modern 3D printers and 3D printing technologies. The following research provides an opportunity to claim that for educational purposes and university laboratories independent creating of 3D printer by students as part of coursework or graduation work is possible. The best possible solution for this problem is choosing Prusa Mendel i2 as a basic model with further technical and program improvement.
Reference to the article:
Plesovskikh D.O., Echmaev A.I. Creation of an arduino-based 3D printer for laboratory prototyping // Modern scientific research and innovation. 2015. No. 7. Part 2 [Electronic resource]. URL: https://web.snauka.ru/issues/2015/07/52797 (date of access: 10/21/2022).
Digital technology has come a long way in the last decade. What we already consider everyday and mundane is actually the result of long, hard research and experimentation. Today, the manufacture of various industrial items or the restoration of parts has become possible not only in the factory, but also at home, thanks to three-dimensional printing, which is actively entering everyday life and becoming an integral part of it for many users. Despite the fact that 3D printers have appeared quite recently, the media are increasingly talking about a variety of areas of their application: technology (manufacturing of parts, layouts, templates), everyday life (printing toys, souvenirs, dishes, etc.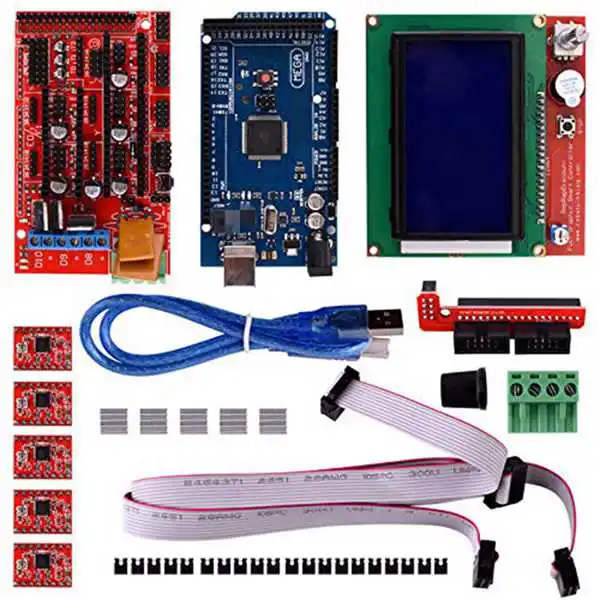 ), obtaining composite materials, the manufacture of individual prostheses and even human organs. The possibility of using the principle of 3D printing in the manufacture of building structures and residential buildings is being considered [1].
A 3D printer is a peripheral device that uses a layer-by-layer method to create a physical object from a 3D digital model. In foreign literature, this type of device is called a fabber, and the 3D printing process is called rapid prototyping [2].
This technology has broad prospects for development and implementation, since have a number of advantages over traditional methods of creating various parts. One of these advantages is visibility - the detail is much easier to perceive when it is a three-dimensional object, and not represented, for example, in the drawings. The second advantage is speed creation - this is most pronounced when performing complex details. The third advantage is the absence of physical efforts on the part of a person.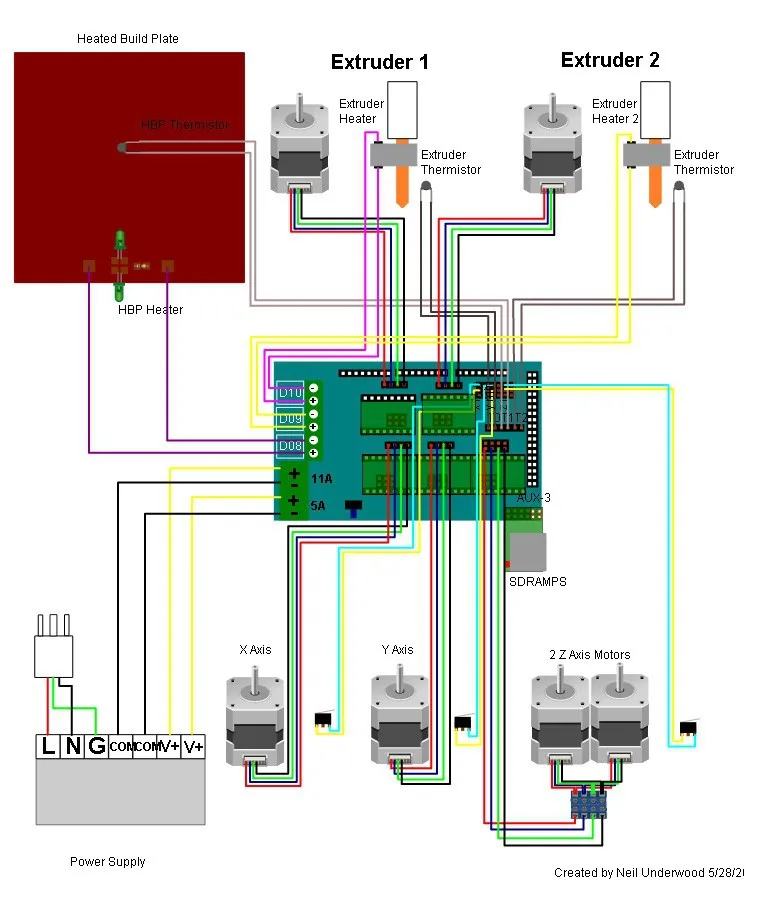 The role of a person in this process is to create a virtual layout, using some kind of graphic editor that allows you to create 3D models.
3D printing is becoming more and more popular and cheap, accessible to most mid-sized manufacturing companies and even the average user. With the help of a 3D printer, it is possible to develop a project in a short time: create a layout and get a prototype, carry out the necessary tests of the sample even before the finished product is manufactured, and even use it for its intended purpose if it is made of a suitable material. The use of 3D printing for rapid prototyping significantly reduces the time and cost of creating products, and also allows you to prevent a number of design problems even at the modeling stage.
Today, 3D printers offered for sale are quite diverse in terms of their consumer qualities. According to their purpose, the classification is presented in Table 1 [3].
Table 1. Classification of 3D printers by purpose (customer orientation)
| Printer type | Target audience | Features |
| Consumer | For people working at home.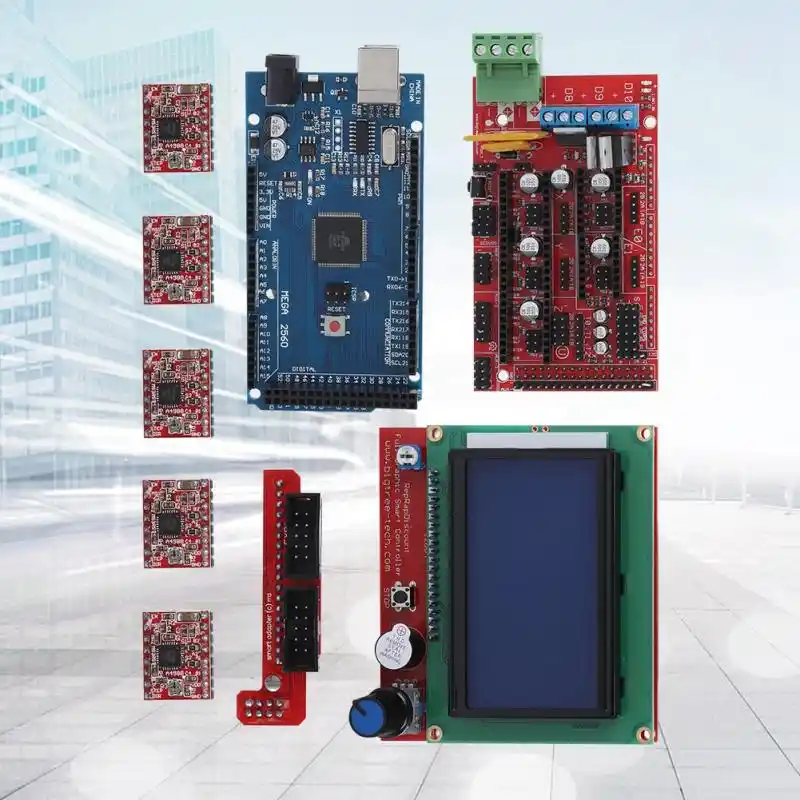 | Simple, intuitive interface. Printed with ABS and PLA plastic. The printing process is long. Oriented to print not complex objects. |
| Personal | For a small business with a small budget, with the need for occasional use of 3D printing. | 3D printers have higher print quality and accuracy. |
| Professional | For companies with a constant need for prototyping, modeling, manufacturing of various kinds of objects with high quality and accuracy. | Very large and noisy. Can produce several different objects at the same time. A trained operator is required to operate this printer. |
| Industrial | For companies with a need to produce high-precision, high-quality products in large sizes or volumes. | They are a combination of precision and quality. Large print area. Can quickly change profile and use materials from ABS plastic to titanium. Large print area. Can quickly change profile and use materials from ABS plastic to titanium. |
The first ideas for 3D printing date back to the 1980s. It was during that period of time that a stereolithograph was created, which created objects using a special photopolymer plastic. This was the first technology that became the basis for modern 3D printers: a laser beam traced each pixel of the picture, creating it from a liquid substance, which, when frozen, became a solid element of the object.
Today, the basis for creating models on 3D printers can be a variety of materials: several types of plastic, gypsum, wax, photopolymers, metal, etc. Today, manufacturers are actively creating new components and materials for 3D printers, allowing you to get more and more realistic samples. Depending on the material used, a number of different printing technologies are distinguished. Their systematization is presented in table 2.
Table 2. Classification of 3D printers by printing technology
| Technology name | Technology Description |
| I. Extrusion type | |
| FDM (Fused deposition modeling) | The working element of the printer - the extruder head melts the plastic filament that the printer is loaded with. Next, the molten element is fed through the nozzle, and then quickly solidifies at room temperature. Instead of plastic, another material can be used, such as wax or a ceramic mixture. |
| PolyJet Technology | Photopolymer is fired in small doses from thin nozzles, as in inkjet printing, and immediately polymerizes on the surface of the device under the influence of UV radiation. An important feature that distinguishes PolyJet from stereolithography is the ability to print with various materials.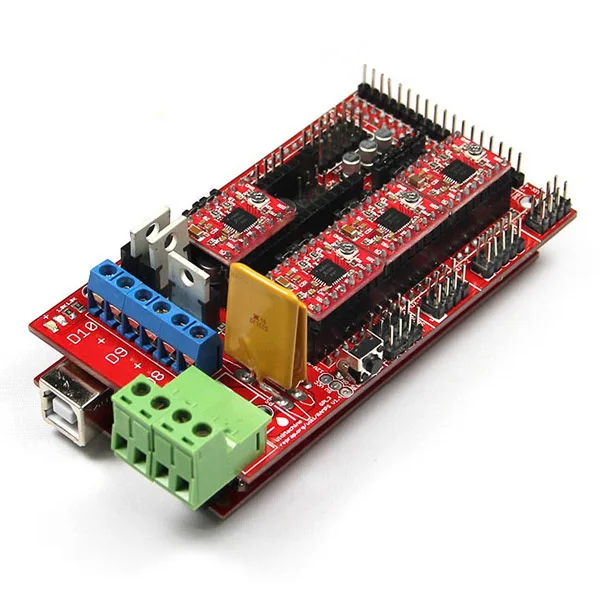 |
| LENS (Laser engineered net shaping) | Material in powder form is blown out of a nozzle and hit by a focused laser beam. Part of the powder flies past, and the part that falls into the focus of the laser instantly polymerizes and forms a three-dimensional part layer by layer. |
| II . Sintering type | |
| SL (Stereolithography) | There is a small bath of liquid polymer. The laser beam passes over the surface, and in this place the polymer is sintered under the influence of UV. After one layer is ready, the platform with the part is lowered, the liquid polymer fills the void, then the next layer is baked |
| LS (Laser sintering) | Similar to SL, but instead of a liquid photopolymer, it uses a low-melting plastic powder that is laser-cured. Under the action of a laser, the plastic melts, becomes elastic, and then sintered into a single mass.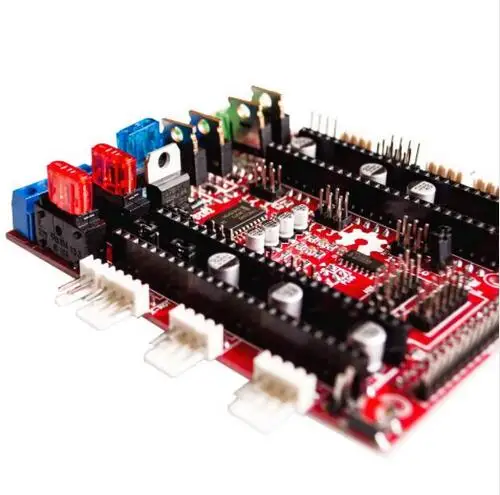 So that the plastic does not ignite or oxidize under the influence of the laser temperature, nitrogen (an inert gas) is added to the chamber where the work is carried out. So that the plastic does not ignite or oxidize under the influence of the laser temperature, nitrogen (an inert gas) is added to the chamber where the work is carried out. |
| II . Adhesive type | |
| 3DP (Three dimensional printing) | An adhesive is applied to the material in powder form, which binds the granules, then a fresh layer of powder is applied over the glued layer |
| LOM (laminated object manufacturing) | Thin laminated sheets of material are cut with a knife or laser and then sintered or glued into a 3D object. |
Such a wide field of application of three-dimensional printing dictates the need for students - future specialists in the field of informatics, computer engineering and computer technology to get acquainted with the specifics and capabilities of this technology. Which, in turn, requires the creation of a prototyping laboratory equipped with a sufficiently powerful computer (graphics station) and a 3D printer. However, industrial and serial three-dimensional printers are quite expensive for a student laboratory, where the main developments, as practice shows, are term papers and diploma projects that implement students' creative ideas [4]. Based on this, the subject of this study was the creation of an inexpensive 3D printer for a student rapid prototyping laboratory.
For educational purposes, within the framework of a graduation project at the Department of Informatics and Methods of its Teaching, a branch of Tyumen State University, it was decided to create such a printer on their own by students studying in the specialty 051000 - Vocational training (computer science, computer engineering and computer technology). As part of this study, a fairly large number of literary and Internet sources were analyzed. The main criteria for choosing a model and components were:
- Availability of purchasing the element base,
- Low price element base,
- Sufficient level of performance assurance,
- Availability of control programs for microcontroller firmware.
- Ability to work with freely distributed software for 3D modeling.
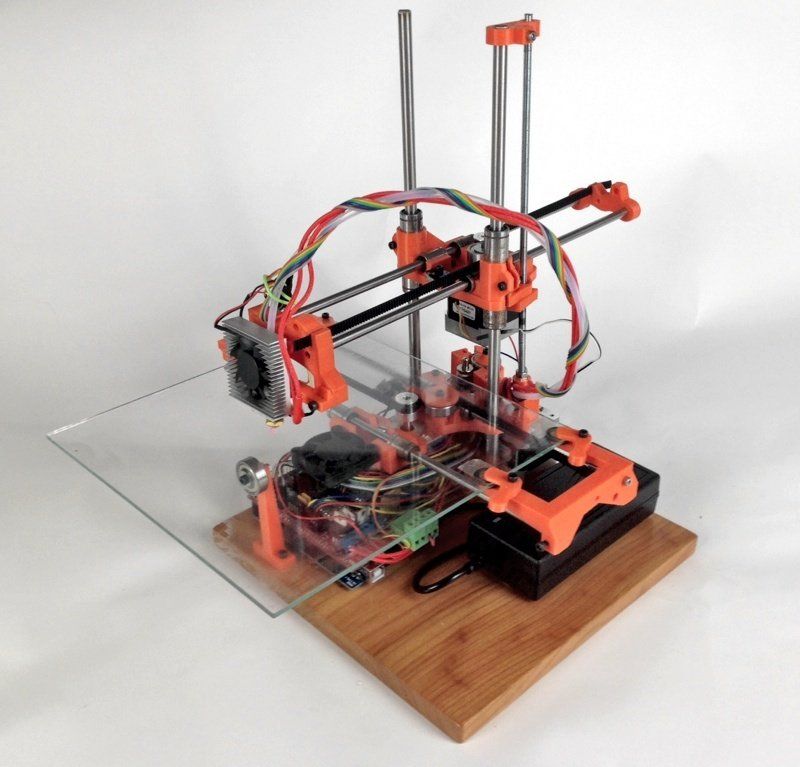
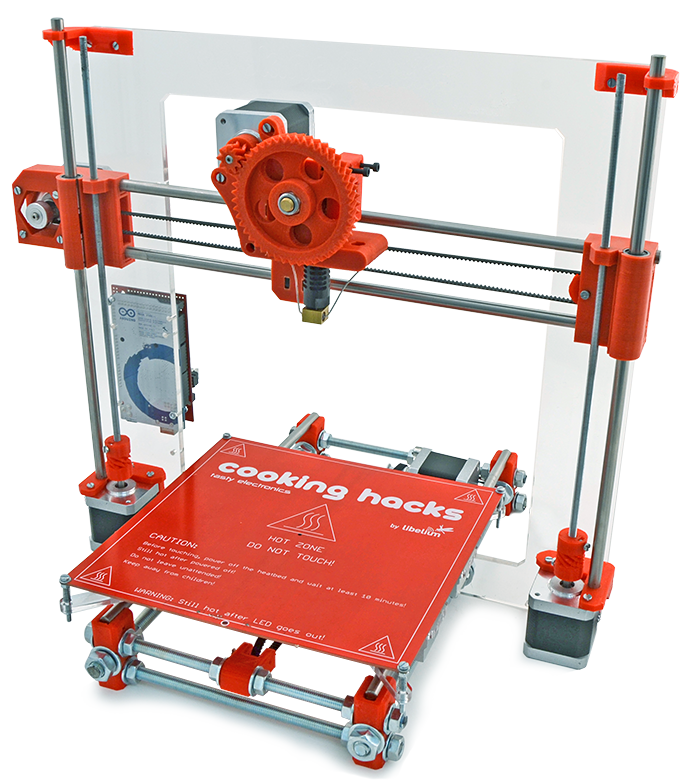
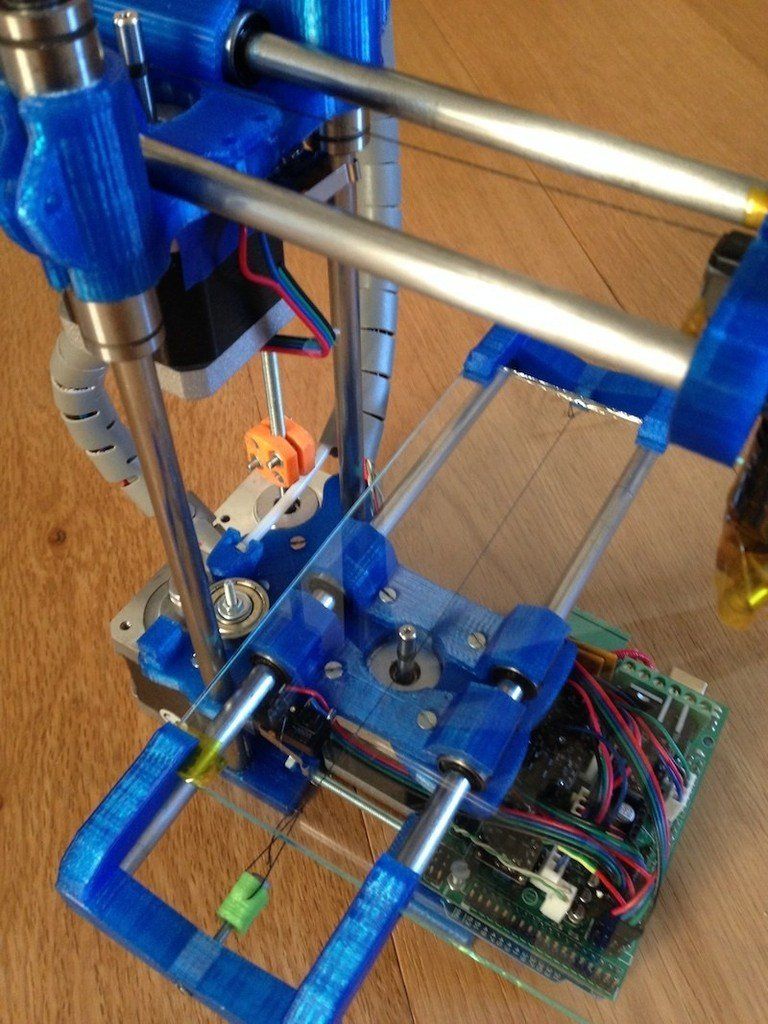
The model selected for implementation is of the RepRap type, a family of inexpensive printers that you can assemble yourself from available materials. This device is "open source" - you can reproduce, or make your own changes. The Prusa Mendel i2 model was chosen as the basis for the development. The main material used by the printer for printing is PLA plastic, the printing method is extrusion.
The printer base is made up of steel studs and axles, which are attached with plastic parts and nuts. The sides form an equilateral triangle with a side of 390 mm. The length of the hairpin between the sides is 320 mm.
To feed plastic into the die, move the extruder head along the rails and the print stage along the X, Y, Z axes, five motors must be included in the printer design. The model being developed uses five NEMA-17 stepper motors.
The printing table on which the layer-by-layer formation of the model takes place is a heated surface.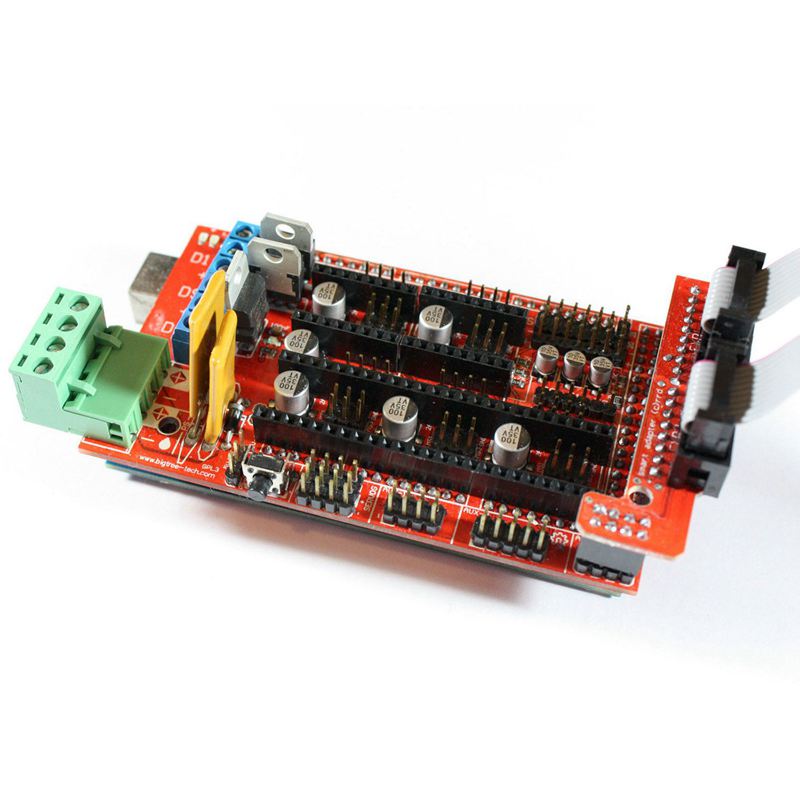 Heating is carried out so that the plastic does not come off during the printing process. The model being constructed uses the MK2b Dual Power surface. A thermistor is used to control the temperature regime of the table. The table itself to reduce temperature losses has a multilayer structure: plywood, thermal surface, mirror surface.
Fig.1.
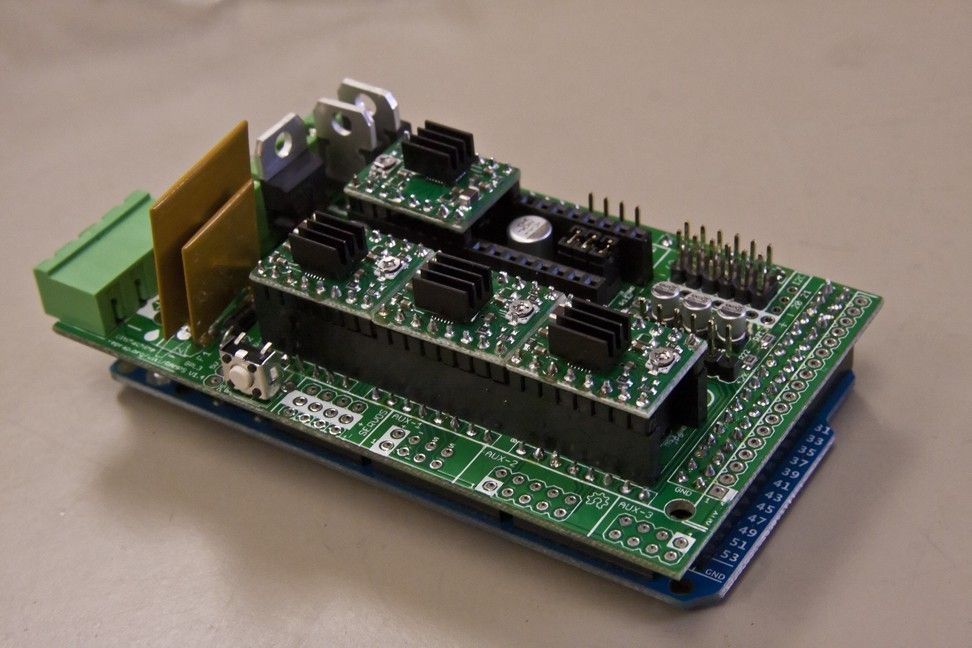
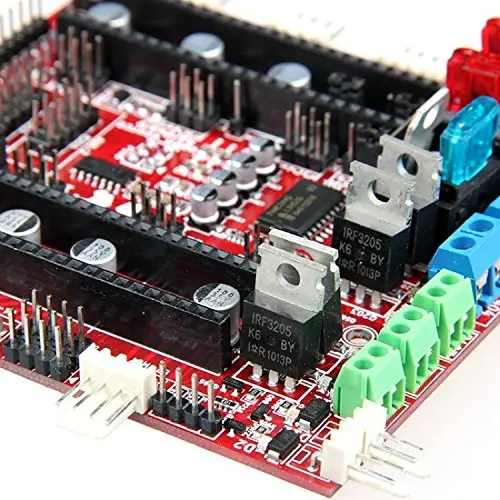
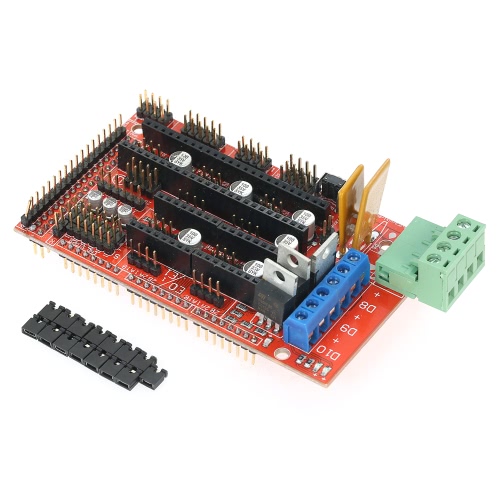
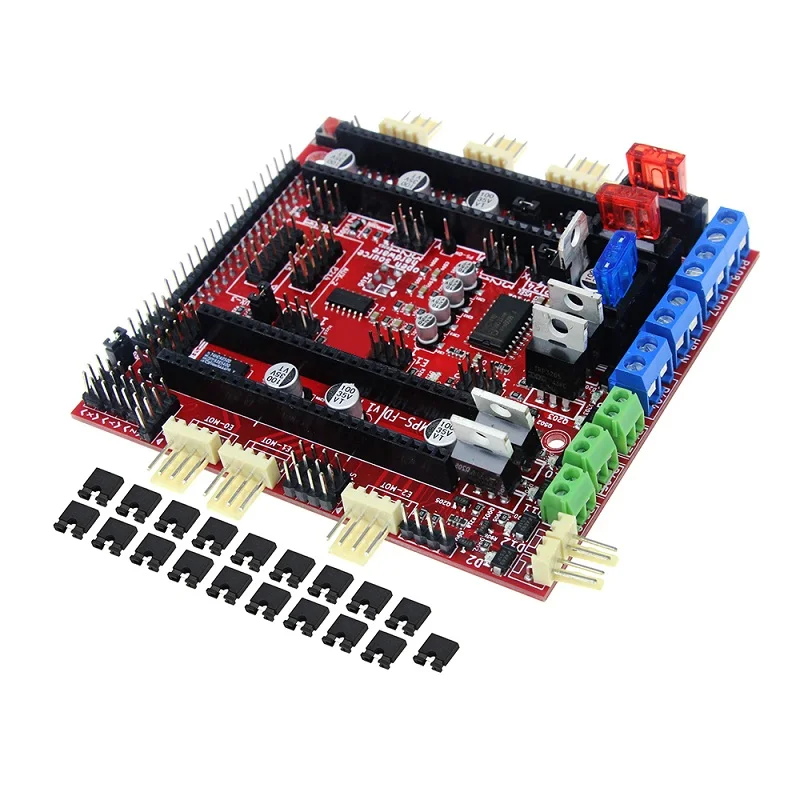
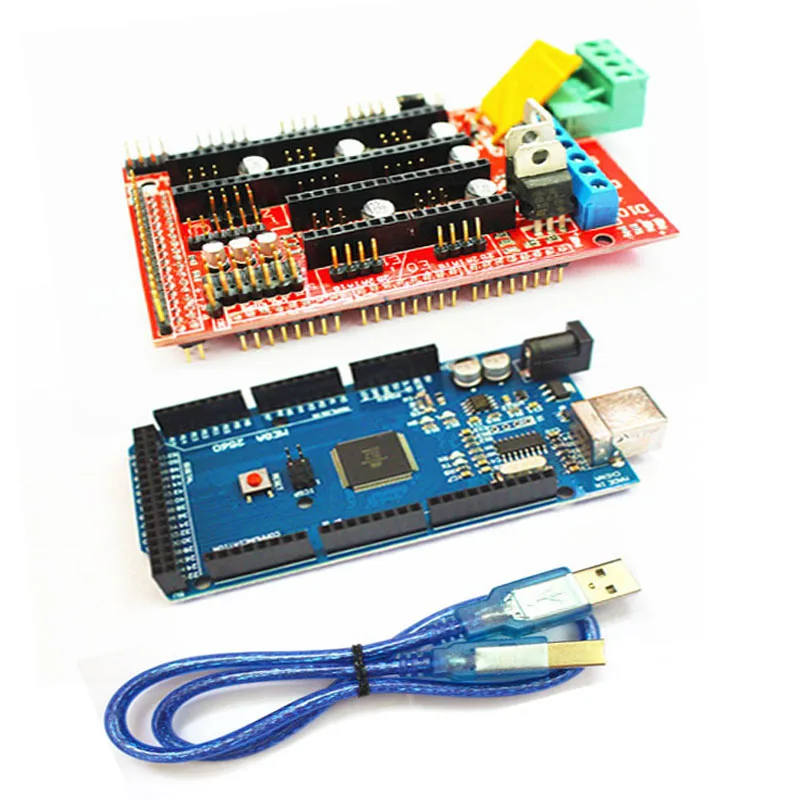
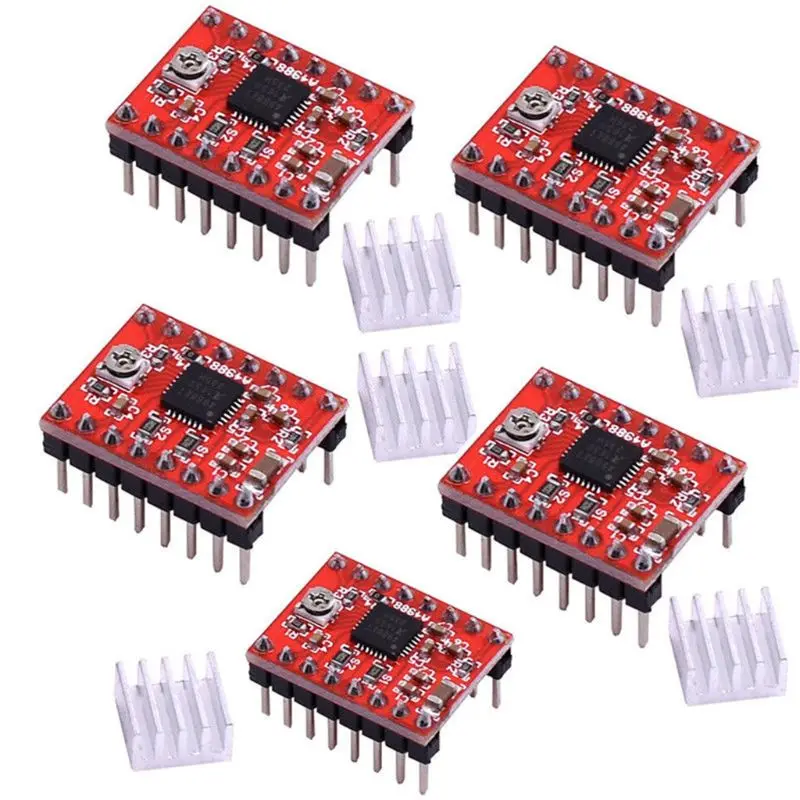
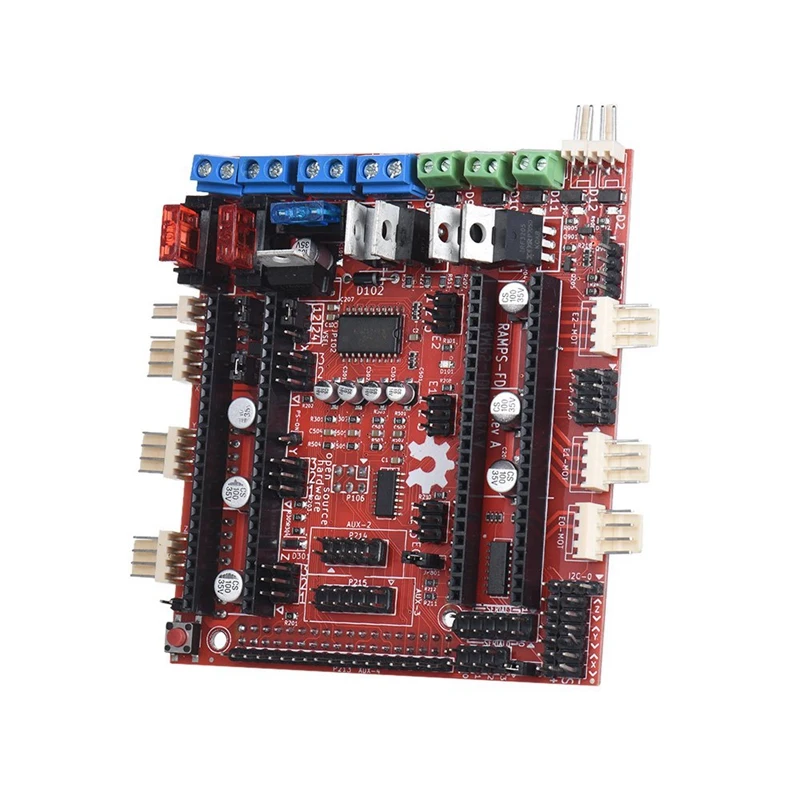
One of the challenges of designing a 3D printer is the choice of control electronics. Today, there are many variants of it, including those specially designed for 3D printing. In our project, the Arduino Mega platform was chosen, because. this is a fairly reliable device, it has convenient support, including outside the RepRap-community, it is easy to get help, there are a large number of additional peripherals. To control the motors in the created design, the RAMPS 1.4 controller was used, which is installed on the Arduino from above, and on it, in turn, the motor drivers serving the peripherals are fixed.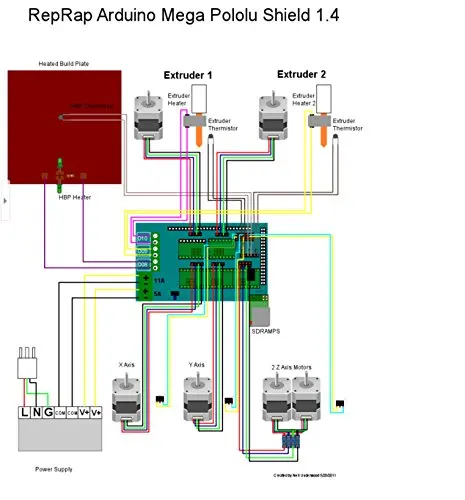 The design used 4 drivers, because. Z-motors are paired and served by one driver (motors providing vertical movement of the extruder head). The scheme for connecting peripheral devices to RAMPS 1.4 is shown in fig. 1
As a power supply in the design, a block from a computer was used, giving a voltage of 12 volts and a power of approximately 300 watts.
Free and open source software used to make the printer work:
1. PC software for Arduino firmware;
2. Sprinter - software that will generate firmware for Arduino;
3. Repetier Host is a program used to convert STL files (a format widely used for storing 3D object models in rapid prototyping technologies. Information about an object is stored as a list of triangular faces that describe its surface, and their normals), into G-codes that the printer controller understands. Despite the large number of settings, Repetier Host has a fairly simple and intuitive interface (Fig. 2).
Fig.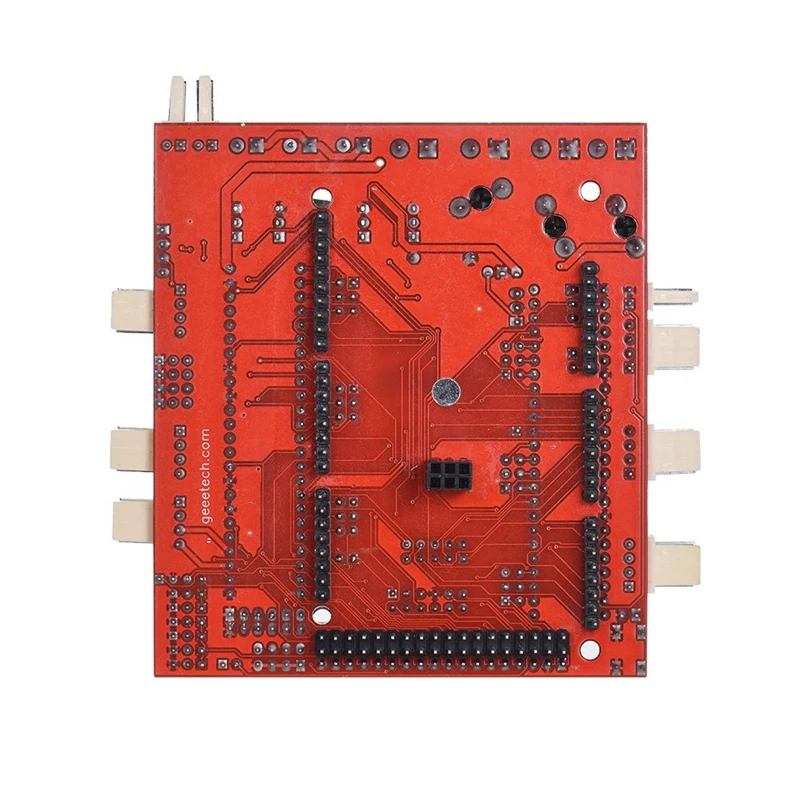 2.
2.
4. To create 3D models, the OpenSCAD program (Fig. 3) is used, designed for programming solid-state CAD models. The program is a cross-platform software product. It is a 3D compiler that reads a script file that describes an object and builds a 3D model according to this script. This gives you full control over the model and allows you to easily change any step in the process of modeling or manufacturing parametric designs.
Fig.3.
References
- The era of 3D printers has already arrived. URL: http://3dprintage.com/ (accessed 04/19/2015)
- 3D printer. URL: https://ru.wikipedia.org/wiki/3D (accessed 04/19/2015)
- Classification of 3D printers (7 3D printing technologies) . URL: http://geektimes.ru/post/159931/ (accessed 04/21/2015)
- Buslova N.S., Echmaeva G.A., Klimenko E.V. Recommendations for the implementation of the final qualifying work of bachelors in the direction 540200 - physical and mathematical education, vocational training profile 540203 informatics: Methodological guide.
 - Tobolsk: TGSPA im. DI. Mendeleeva, 2011. - 32 p.
Number of views of the publication: Please wait
All articles of the author "Echmaev Alexander Ivanovich"
Answers to questions on ramps 1.4
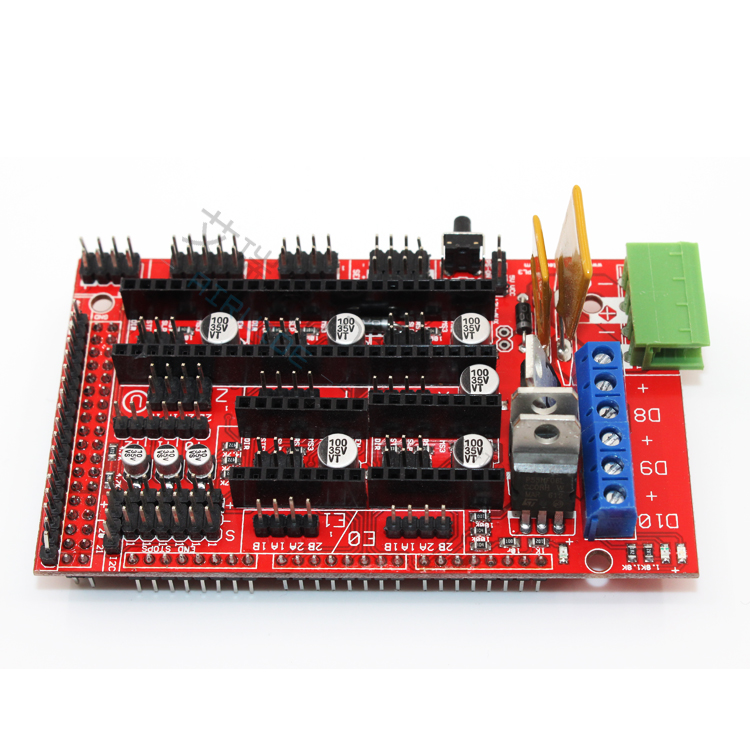
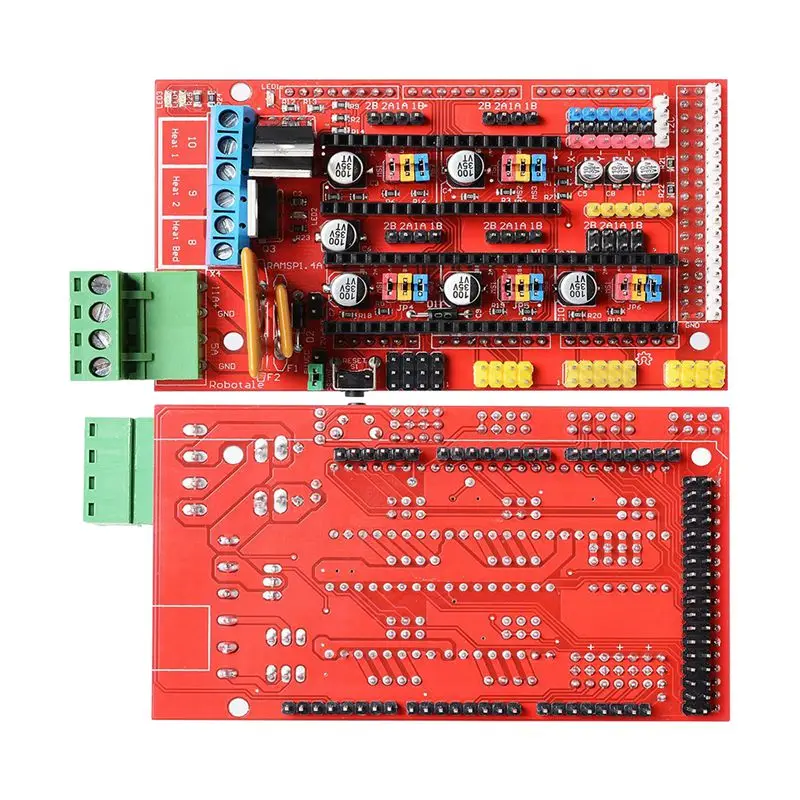
For questions specifically related to the RAMPS 1.6 controller board - The RepRap Arduino Mega Pololu Shield, or RAMPS for short, is an Arduino Mega expansion shield designed to house all the electronics for a RepRap 3D printer in a small, inexpensive package.
The RepRap Arduino Mega Pololu Shield, or RAMPS for short, is an Arduino Mega Shield extension designed to fit all electronics for a RepRap 3D printer in a small, low cost package.
New in version 1.4 is the use of surface mount capacitors and resistors to increase coverage in case of problems. Also, unlike version 1.3, version 1.4 is no longer suitable for home board etching.
For more information and a complete list of features, see the RepRap RAMPS printer wiki.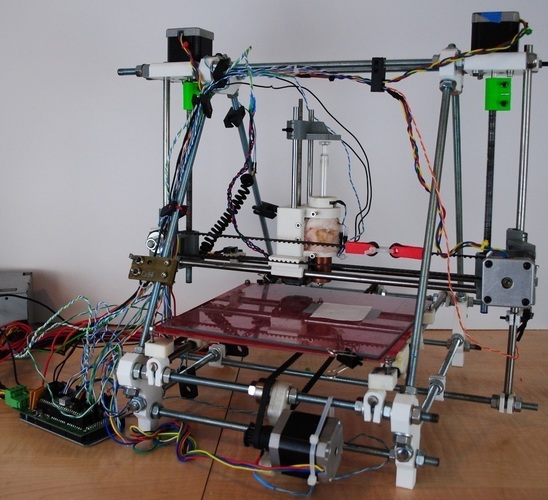
- TMC2130 External VM RAMPS 1.4 I'm trying to replace my DRV8825 with a TMC2130 on a Prusa i3 remake clone, 12V RAMPS1.4, motor currents have been taken into account. Because they don't work as well with 12V as they do with higher voltages, I...
- Confusing Stepper Motor Behavior I'm trying to control stepper motors for a 3D printer with a RAMPS 1.4 screen connected to an Arduino Mega 2560. I've uploaded the firmware Marlin on board and currently using Pronterface for…
- Do wire insulation types TW, THW and THHN or THWN matter in terms of RAMPS 1.4 power or MK2a thermal layer? I'm still looking for wires for my Prusa i3 to connect the power supply to the RAMPS 1.4 and the power supply to the MK2a heating table. I also recently found 400 feet. Wire storage ,…
- Where and how to connect a physical emergency stop button directly to the RAMPS 1.4 board to quickly stop all stepper motor movements? This is a Prusa I3 printer.
 I run it directly from a PC with Repetier 2.2.4. Repeater has a mild emergency Stop, but you have to grab the mouse and hover over the hotspot on...
 - Endstops won't work when using Marlin firmware I have an old Solidoodle 2 that I bought broken at a garage sale and which I'm converting to use RAMPS 1.4 with Marlin firmware. All engines are working properly, I have…
- Why does the power supply turn on and off automatically? I have a 12V/30A power supply. I also installed the firmware on the Arduino Mega2560. But the problem is that the display on the LCD keeps turning on and off automatically (it's stuck on the logo...
- Direction of the 4 pin fan on the RAMPS board The question is simple - I have a RAMPS 1.4 running Marlin 1.1.9 with three used MOSFETs (end, fan, table) but I would like to have a couple of other fans controlled by Marlin.…
- Connect Arduino Mega USB input (for power supply) and RAMPS 1.
 4 power input at the same time Can I connect Arduino Mega USB input (for power supply) and RAMPS 1.4 power input at the same time? This is because when I connect the power supply to RAMPS 1.4 only, the LCD...
 - Can I connect a power supply with a higher current rating than RAMPS 1.4 can handle? I have a 12V/30A power supply. Will the RAMPS 1.4 screen light up if I use this power supply with it?
- Maximum input current, voltage and power for RAMPS 1.4, 1.5 and 1.6? I need to know the maximum input current, voltage and power for: RAMPS 1.4 RAMPS 1.5 RAMPS 1.6 I want to build a homemade 3D printer. RAMPS 1.6 can only put out 270W. But if…
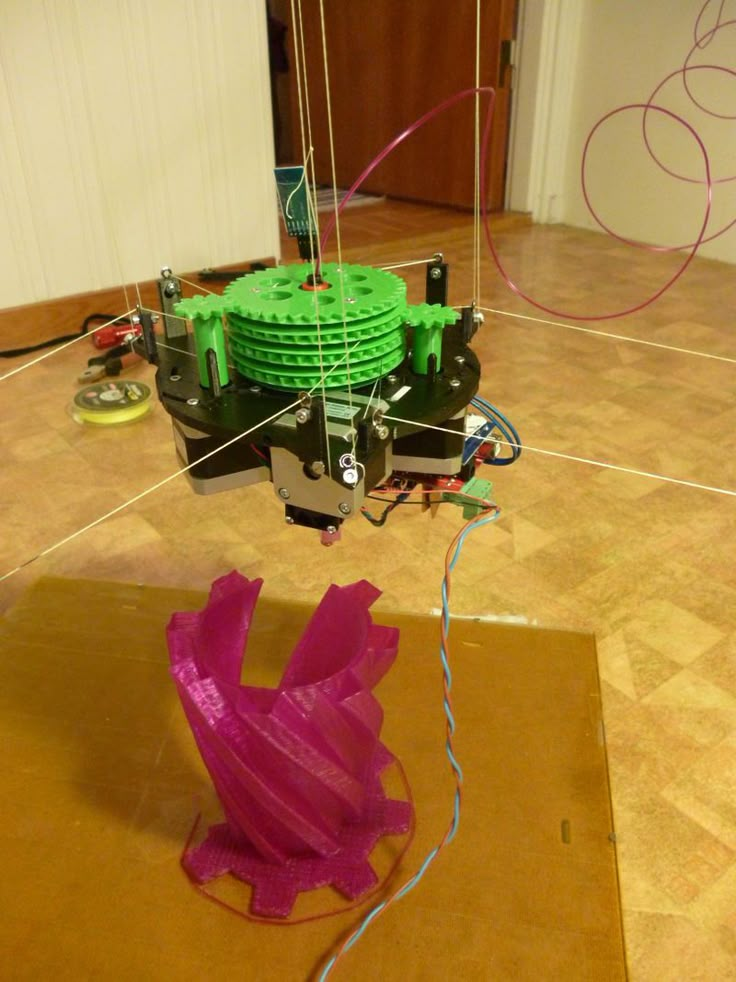
- How to set up Marlin to turn on automatic fans with dual extruder I successfully built my custom 3D printer and set up Marlin for two extruders and one heated bed. Here is a photo of the printer. My heated table runs on a linear axis with…
- Right Z axis problems My 3D printer was working fine but one day I put it in an acrylic box and put it to work which was not a good idea because the Z axis grabbed the box, after that the Z axis started…
- How to connect motors with z axis in parallel on Prusa i3? The wiring diagram for the i3 has a small circuit board or breadboard or something.
 And it is mentioned that z-axis motors should be connected in parallel, but beyond that they don't give…
 - Hot end temperature increases to infinity after several layers I have a "classic" home 3D printer, Arduino Mega, RAMPS 1.4 with Marlin 2.0. It worked, was put into storage, and now I'm trying to start it again. During all stages…
- Stepper motor is running with pauses, driver problem I am sharing here this problem that happens to me. I have a printer installed with Arduino and RAMPS 1.4 shield with A49 drivers88. I was trying to calibrate the printer when I came across…
- Bed Heating Failed, Printer Halted, Please Reset A couple of weeks ago I successfully built a 3D printer and printed an XYZ calibration cube with ABS material at a bed temperature of 80°C. The next day I tried table heating at…
- Marlin restarts when 5 Vcc pins are on and servomotor is connected (RAMPS 1.4) My printer is using ATmega 2560 with RAMPS 1.
 4 screen, A49 stepper drivers88 and 2004 LCD controller interface. The power of the power supply is 360 W (12 V, 30 A). I…
 - Heated bed heating acceleration I am currently using a 12 volt, 20 amp power supply (Model S-240-12) The stepper motors and extruder need 5 amps and the heated tabletop needs 11…
- How do I change the thermal sensor pin? Thermistor on my Anycubic Mega displays meaningless temperatures (e.g. 700°C) because the resistor in the hotend works fine, the problem is 100% in the board (Trigorilla RAMPS 1…
- Limit switch problems on RAMPS 1.4 and a custom 3D printer running Marlin 1.1.0-rc6 So I'm trying to fix a custom 3D printer for my institute and I'm running into a problem I can't figure out. So the limit switches for the Y and Z axes…
- Temperature problems after switching to RAMPS 1.4 I recently switched to RAMPS 1.4 on an Arduino Mega 2560. Ever since I got extruder temperature drops a couple of minutes after printing, but it looks like a problem with the temperature reading, eh…
- Cooling fan spins very fast, noisy on startup I built a 3D printer from parts.
 It uses a standard 12V power supply, an Arduino Mega 2560 replica, and a RAMPS 1.4 board. Hotend cooling fan connected to 12V-AUX pin (the one that…
 - 3D printer always resets after extruder start My 3D printer (Inventor 3D plus) is using RAMPS1.4 with Arduino Mega using Marlin firmware (modified by manufacturer) . I preheat with the hot end and…
- How do I turn on the RAMPS 1.4 when not using the heated table? I bought a new RAMPS 1.4, Arduino Mega 2560, new 12V 20A power supply, not using a heated printbed. In the 5 terminal, in RAMPS 1.4 only take as many amps as it should (is it 5 huh?) …
- Stepper motors do not work when connected to RAMPS 1.4 Stepper motors do not work when connected to the RAMPS board in pins X,Y, Z. I used A4988 drivers and the Arduino board is the original version. I checked the input voltage on the RAMPS board,…
- Heated table does not heat up Hello, I am building a Prusa MK2 clone.
 Therefore, I connected all connections to the RAMPS 1.4 shield. I successfully used the Pronterface to set the temperature of the table, but it didn't heat up... So I...
 - Mixing Nozzle vs Dual Nozzle vs IDEX vs Tool Changer for pva and pla I am planning to build a dual extrusion 3D printer. I want to use PVA with one of the extruders and base material with the other, so color printing is not important to me and I just want to...
- Burnt MOSFET and high heated bed resistance I am new to 3D printing and making a 3D printer from scratch (cartesian). I have a RAMPS 1.4 shield and an Arduino Mega 2560 board. I have a few questions and it would be really nice if I could get…
- Three RAMPS boards wasted connecting to heated table Printer. Everything works fine, except for the heated table. When I connect my heated table to terminal D8, smoke comes out. This is my 3rd RAMPS board and I…
- CoreXY with 8 bit board problems I know the CoreXY kinematics are very complex and hard to compute for firmware, making it more suitable to use a 32 bit board.
 For some reason I can't use either…
 - Arduino and power up RAMPS I want to run two stepper motors with Arduino Mega 2560 and RAMPS 1.4. But somehow I burned the Arduino when I connected the motor and connected the board to the computer. Can I connect…
- TMC2208 Drivers - Microvias configured incorrectly I just installed two TMC2208 drivers on my RAMPS board. I followed a very good step by step tutorial and after some trouble, I got it to almost work. One problem I have is…
- Automatic Table Leveling with Stepper Lock I have a discontinued botObject printer that I want to run with a RAMPS 1.4 board. Table alignment was done with the print nozzle pressed against the spring loaded…
- RAMPS 1.4 LED 2 blinks when trying to warm up the table On my i3 clone I tried to add an Anycubic i3 Ultrabase to my RAMPS 1.4 board and after adding the necessary configurations to the Marlin firmware I am able to heat up the table.
 The problem is that it is very...
 - Display lockups when doing G-code for laser cutting with Marlin on a RAMPS board I'm working on a laser cutter. I am using RAMPS 1.4 and Marlin software. To get the Marlin software to work with the laser, I was inspired by this blog from dreammakercnc: ...
- Stepper motor homing as extruder using E0/E1 with limit switch and end stop Note: I expanded my question as some of you mentioned that this question is not entirely clear. I'm using a RAMPS 1.4 board with an Arduino mega 2560. I need to control a stepper motor in…
- Which 3D printer controller should I use? I recently built a 3D printer from scratch and used an Arduino Mega + RAMPS 1.4 to control it. A few weeks later, I installed a heated table so that my prints would better adhere to…
- How do I connect a NEMA 17 stepper motor to RAMPS 1.4? I have a NEMA 17 17HS4401 stepper motor and a RAMPS 1.
 4 driver. Engine outputs: RED A+ BLUE A- GREEN B+ BLACK B- while the RAMPS board has the following: 2B 2A 1A 1B …
 - Makerbase MKS Slot2 V1.0 + RepRapDiscount Full Graphics LCD + RAMPS 1.4 I want to add an external SD card adapter to my RepRapDiscount Full Graphics LCD. My 3D printer is based on (Arduino Mega + RAMPS v1.4 + RepRapDiscount Full Graphics LCD). I buy…
- Stepper motors do not move, RAMPS 1.4 I have an Arduino Mega clone and RAMPS 1.4 along with A4988 drivers and NEMA 17 motors that do not move. The motors are easily turned by hand with or without RAMPS. Between…
- Extruder steps per mm wrong after rebuilding I have a problem that after upgrading my printer to an aluminum frame my extruder went from about 400 steps per mm at 16 micro steps (which was perfectly in line with the recommendation…
- Z motor does not move during automatic home My Monoprice maker select recently burned its melzi board.
 So I bought the ramps 1.4 kit. I plugged it all in and flashed the firmware with marlin (most recent build). When it boots up,…
 - Printing chocolate with RAMPS 1.4 Can I print chocolate or food with RAMPS 1.4? I have seen printers that are capable of printing food. But I'm not sure if there is one that is open source. At…
- Digital and analog pins On the RAMPS v1.4 board, it appears that all X, Y, and Z motors use at least one analog pin, while the extruder motors are fully digital. See only the upper left block...
- Add laser module for Reprap Guru Prusa i3 I have a Reprap Guru Prusa i3 v2 3D printer. Here is a link to the 192MB manual. And here is a link to the resource page for Guru Reprap. On page 58 of the manual,…
- How to lengthen a Marlin to support an additional axis of motion? 5 stepper motors can be installed on RAMP 1.4: stepper motors X , Y , Z are used for Cartesian movements, while E0 and E1 are provided for driving extruders.
Learn more