Acetone vapor 3d print
How To Easily Cold Acetone Vapor Smooth & Finish 3D Prints [Step by Step]
Acetone Polishing (Smoothing) of ABS and ASA – a step-by-step guide
FDM (FFF) 3D printers often produce a final object that while being mechanically sound, tends not to have that ‘professional look’ that you or a customer want to see. You need a reliable, easy method of 3D print finishing.
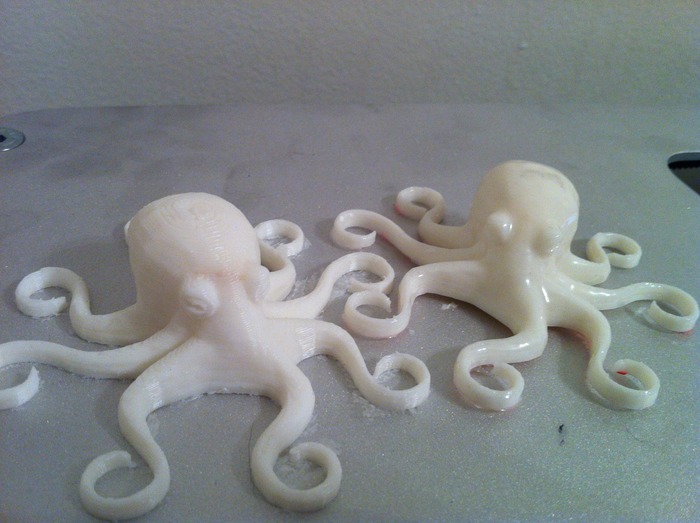
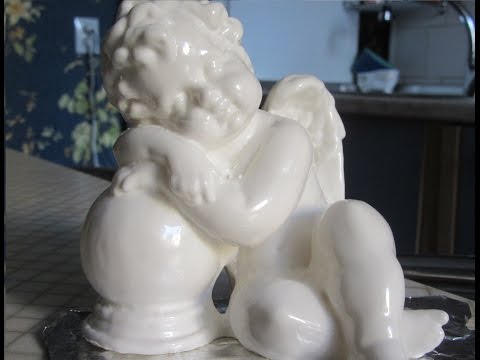
That’s where the Cold Acetone Vapor Bath process steps in. Finishing 3D printed parts the easy (safe) way. Yes, this was actually 3D printed…
Can I acetone vapor bath my 3D prints?
All ABS 3D prints can be acetone smoothed. Filaments that can be polished using this process are: ABS, ASA, PMMA, HIPS and Polycarbonate.
Other filament types are either unaffected by acetone or are damaged by it. If you’re looking for other 3D printing post-processing techniques, check out our PLA polishing article for details on smoothing out 3D prints that can’t be acetone smoothed.
The following photograph is of a shower tray system consisting of a frame and different color removable trays before ABS Acetone Vapour Smoothing. The frame is made of Black ABS, and all trays are made in ABS of varying colors.
The following photograph show the same system after the ABS Vapour smoothing process.
Not only do the finished parts look better, they now have a higher resistance to water ingress, and they can often be stronger than their non-polished earlier selves once fully hardened.
This is definitely our preferred method when we’re asked how to finish 3D prints – there’s just no better way to easily smooth ABS prints.
SAFETY WARNING!
Before continuing further, please make sure you acquaint yourself with the safety regulations pertaining to acetone (propan-2-one) and its use. It is your responsibility to use this solvent safely.
Obvious things to note for safety are:
- Only use in a well-ventilated area
- NO NAKED IGNITION SOURCES – acetone is extremely volatile and the vapors are Highly Flammable
- *NEVER EVER* heat the acetone!! [See above]
- Avoid breathing the fumes
- Avoid skin contact
- Keep away from animals and children
- Be careful that you do not spill any liquid onto surfaces that might be damaged by acetone – most common household plastics are susceptible to some kind of damage from liquid acetone
The principle behind Vapor Polishing
You can acetone smooth ABS filament & ASA filament, both with acetone liquid or as vapor.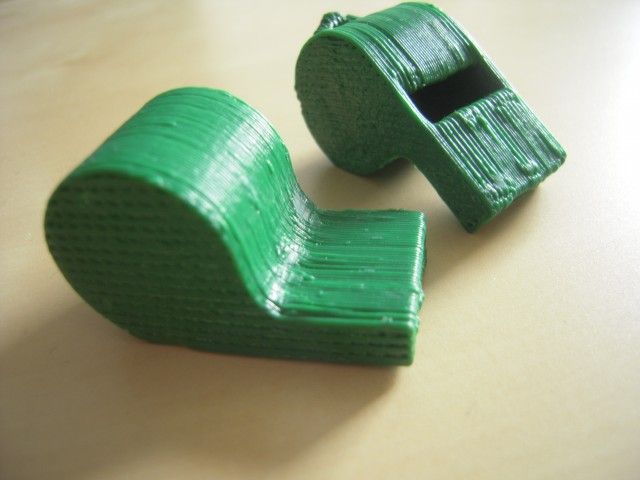
They dissolve readily in the liquid, and a concentrated atmosphere of the vapor will eventually have the same effect. It’s that ‘eventually’ part we are interested in (and not the acetone 3D print mess you’ll be left with if you leave it too long).
We want to melt the surface of the object just enough that the surface tension of the molten plastic smooths out any surface inconsistencies and then halt the process at that point before any structural damage occurs.
In some cases, it is possible to quickly dip an object into acetone liquid to get a polished surface, but this can be very messy and gives inconsistent results.
If you use the vapors instead you have much more control over the ABS smoothing and the final results. As the vapors can get to all exposed surfaces equally, there are fewer areas of uneven melting. There are also no run-off channels or drip marks induced into the surface of the object that direct exposure to acetone liquid may cause.This is our clear ABS filament, acetone smoothed.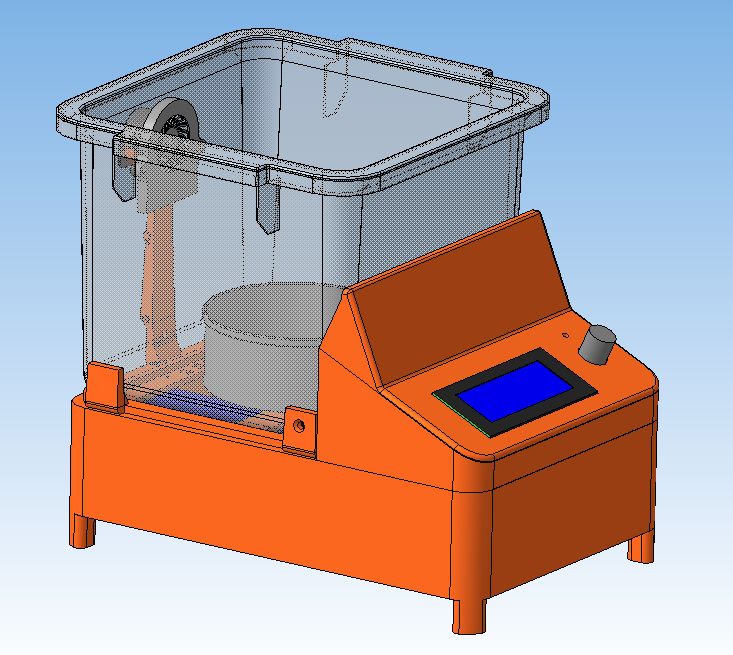
What you will need –
- A well-ventilated area to work that has no exposed ignition sources.
- Wear the appropriate PPE – Safety glasses/goggles, mask, gloves, etc…
- An acetone-proof container (a large glass vase or a tin) big enough to hold the parts you wish to polish – preferably with at least 30mm clearance in ALL directions around the object to be polished – top, bottom, and sides.
- A loose-fitting lid, also acetone-proof. If your lower container is not transparent, you may wish to use a sheet of glass as a lid – this removes the need to keep removing the lid in order to see how the polishing is progressing (and not letting the vapours escape or dust get in).
- A flat, non-porous plate such as glass or metal, to raise the object being polished above any liquid acetone in the bottom of the container – This really needs to be at least 10mm above the surface of any liquid acetone in the container and much larger than the object to be polished as this reduces the chances of liquid acetone creeping up the sides and onto the object itself.

- Some sheets of plastic-free kitchen roll to use as a ‘wick’ for the liquid acetone.
- Somewhere dust-free to allow the surface of the polished object(s) to harden.
- A TIMER! Seriously.
You will walk away, forget it, only to return later to find that amazing print that you were once so proud of has now turned into a hideous misshapen lump of plastic, or at worst some kind of acetone ABS mess.
It might not happen this time or the next, but it will.
Getting started
Make sure your container is free from contaminants (this will be your acetone bath), then place a few sheets of the kitchen roll up the side and along the bottom of the container. This will allow the liquid acetone to wick up the kitchen roll, helping to produce a strong concentration of vapor at all levels within the container.
Find somewhere to work that has surfaces and materials that will not be damaged by acetone or the fumes. Acetone is a superbly-powerful solvent – you don’t want it dissolving things that you’d rather keep. It is a low-density liquid that has very little surface tension, so it splashes and ‘wets’ surfaces very easily.
To hold the kitchen roll sheets in position, place your metal support (plinth) onto them. Make sure that you arrange the kitchen roll in such a way that when it gets wet with liquid acetone it cannot fall down onto your printed objects, as that will destroy any chances of achieving an acceptable finish.
The following photograph shows the setup used in the acetone bath ABS of the soap trays seen above.
The soap dish is sitting on top of a plinth made from a small piece of glass stood on three 22mm diameter copper plumbing joints – an arrangement that stops any chance of liquid acetone reaching the dish via capillary action (or surface-wetting).
Things to consider about the process of 3D printing acetone finishing itself
Not all filaments are the same, even from the same supplier. For instance, due to secondary effects from the pigments that go to make up the colors of ABS filaments, different colors polish at different rates. This means you will need to monitor the polishing of different colored objects so that you can remove them at the correct time.
The polishing process not only softens the surface of the object, the fumes also penetrate into the body of the object. Depending on the period of exposure, you will need to ‘air’ the object for a period of time that is commensurate with the time that the object was exposed to acetone vapour.
Usually, this takes a few days. However, in some cases, the full mechanical strength of the object may not be realized until a significant time has passed – for high-density objects, this can take weeks, or even longer!
The polishing process continues for a while after you remove the object from the container – usually for about ten minutes. So don’t be tempted to leave it in too long.
The following photograph shows what happens to a part when exposed to the fumes for an extended period.
The hole in the center at the bottom is supposed to be round, and the lower edges are all supposed to be straight.
The ambient temperature affects the speed of the process – you are evaporating a volatile liquid after all.
- Too cold and it can take ages.
- Too warm, and the process goes too fast.
- Too hot, and you may be looking for a new place to work/eyebrows, so NEVER apply heat.
Finally – you need to have somewhere totally dust-free to place the polished object while the surface hardens. If you don’t, any dust that falls onto the surface will become embedded in it. Permanently.
Polishing
This is the really easy part.
- Without getting any on your plinth, pour the acetone over the kitchen roll sheets you placed up the side of the container. You need to have enough acetone to cover the bottom of the polishing container to a depth of a millimeter or two.
- Ensure that there is no liquid acetone present on your plinth.

- Make sure that you have a fool-proof way of removing the object from the container after polishing without the need to touch it, or you will leave marks all over the surface where you make contact.
- Quickly place the object in the center of the plinth – try not to touch it again – you have just a few seconds to adjust the final position. The polishing process has already started – it is that quick! You don’t really want to leave fingerprint impressions on your work, do you?
- Place the lid on the container and start your countdown timer. I personally set the timer to 15-minute intervals for finely-detailed objects, and 30 for large solid objects.
Depending on how rough the surfaces of the object are, and how polished you want the object to be, the process can take from around 15 minutes to several hours.
There is ALWAYS a trade-off between the required surface finish and the loss of fine details. Only you can decide what is acceptable.
Once you are satisfied that the polishing is almost complete, carefully remove the object to a totally dust-free environment that has good ventilation. This stops most of the ever-present dust particles that are suspended in the air from falling onto the semi-molten surface of the object.
Note: The reason you remove the object from the container at the point just before you get the surface finish you require as the polishing process continues for a short while even after the object has been exposed to fresh air.
You can always put it back in the chamber later if you are not satisfied, but once the process has gone too far, the damage is irreversible.
After about 30 minutes, a ‘skin’ will have formed on the polished object that will stop dust particles from becoming embedded in the surface of the object.
Remove the object from your dust-free chamber without touching it, and put it somewhere that has good ventilation to allow the acetone to further leach out of the object. The object at this point has little to no structural integrity so be careful how you do this.
Depending on the solidity and size of the object, the process of removing the acetone can take from a few hours to many weeks before the full strength of the object has been regained.
Once you are certain that a good skin has formed on the object, you can speed up this process of solvent evaporation considerably by using a fan continuously blow air across the surface of the object – smoothing 3D printed parts effortlessly.
Summary
To recap, the filaments that can be polished using this process are: ABS, ASA, PMMA, HIPS and Polycarbonate.
Other filament types are either unaffected by acetone or are damaged by it.
How to Smooth ABS 3D Prints
- Author
- Recent Posts
Martin
Besides many test devices, Martin now has his fourth own 3D printer running and prints as a hobby for friends, family and himself. He is happy to share his experience with each new article.
Latest posts by Martin (see all)
Disclosure: Links marked with * are Affiliate Links. I earn from qualifying purchases if you decide to make a purchase through these links – at no additional cost for you!
It can often be necessary to smooth 3D prints made of ABS. Although the accuracy of 3D printers is constantly increasing, the steps of the layers can still disturb the optics even at low layer heights.
Fortunately, it is not too difficult to smooth 3D prints made of ABS later on. But what are the options for smoothing ABS prints?
Acetone is used to smooth 3D prints made of ABS. Acetone dissolves ABS – if it is applied correctly, only the corners of the individual print layers dissolve. This results in a smooth surface. The best variant for smoothing ABS is an acetone steam bath (‘vapor smoothing’).
What other variants there are and how exactly to set up and operate such an acetone steam bath, you will learn below.
Perfect Example for Vapor Smoothing ABS (source: reddit)Table of Contents:
- 1 ABS
- 2 Acetone
- 3 Smoothing ABS 3D Prints
- 3.1 Method #1: Apply Acetone with a Brush
- 3.2 Method #2: Acetone Bath
- 3.3 Method #3: Acetone Steam Bath / Vapor Smoothing
- 4 How Does Smoothing Work?
- 5 ABS Vapor Smoothing with Acetone Steam Bath
- 5.
 1 What You Need for Vapor Smoothing
 - 5.2 Safety First
- 5.3 Step 1: Placing the Object
- 5.4 Step 2: Wait
- 5.5 Step 3: Remove Object & Curing
- 5.6 Step 4: Examine the Result
- 5.
- 6 Tips & Tricks – ABS/Acetone Vapor Smoothing
- 6.1 Finding the Right Container
- 6.2 Fan Increases Effectiveness
- 6.3 Heating Pad Accelerates the Process
- 6.4 Metal Plate as an Ideal Base
- 7 Related Questions
- 7.1 What role does acetone play in smoothing ABS 3D prints?
- 7.2 What are the methods for smoothing ABS 3D prints?
- 7.3 What do I have to consider when vapor smoothing ABS 3D prints?
- 8 Conclusion
ABS
Before we can talk about methods for smoothing, we must of course clarify what material we are talking about in the first place. The abbreviation ABS stands for “Acrylonitrile butadiene styrene”.
It is an industrial plastic that makes up the second most common printing material in 3D – behind PLA (for an in-depth comparison of these two filaments, you can read this post).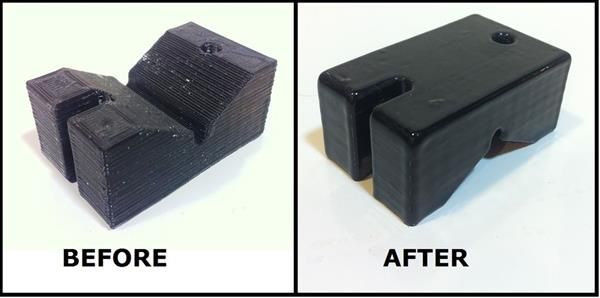
Although ABS is often quite tricky to work with, it has the great advantage that it can still be smoothed with acetone after 3D printing. This is comparable to post-production in the film industry – a lot can still be done!
Related Post:
ABS Filament Guide: 3D Printing Material Properties
Acetone
Acetone represents a colorless solvent that is actually mainly used for cleaning purposes.
Probably the best-known acetone product is nail polish remover.
In 3D printing, however, it has now found a new field of application. The advantage: ABS is enormously reactive to acetone and dissolves in it.
This effect can be utilized in steam smoothing, but also in other methods around smoothing ABS 3D prints.
The process completely and totally removes all visible layer lines, resulting in a smooth and clean surface. The 3D printed part then looks more like an injection molded object, not like it just came out of a 3D printer.
Acetone, by the way, can be purchased at a local hardware store. Alternatively, drugstores often offer the solvent, but not all.
Here* you can find acetone at Amazon – often times the easiest and cheapest way to get high-quality Acton.
Smoothing ABS 3D Prints
Creativity and the spirit of discovery play an overriding role in 3D printing. The industry is characterized by increasingly modern technologies and constant change. It is not surprising that there are also several options for smoothing ABS 3D prints that have developed over the years.
One of them, however, stands out.
Method #1: Apply Acetone with a Brush
There are a lot of different ways to apply solvent to a material. The simplest is to apply the acetone to the 3D print with a brush – after all, you only need acetone and a brush.
The problem is that a large proportion of the acetone is usually used up, and the desired effect is rarely achieved – the surface can never be as smooth and glossy as it is with a steam bath with acetone.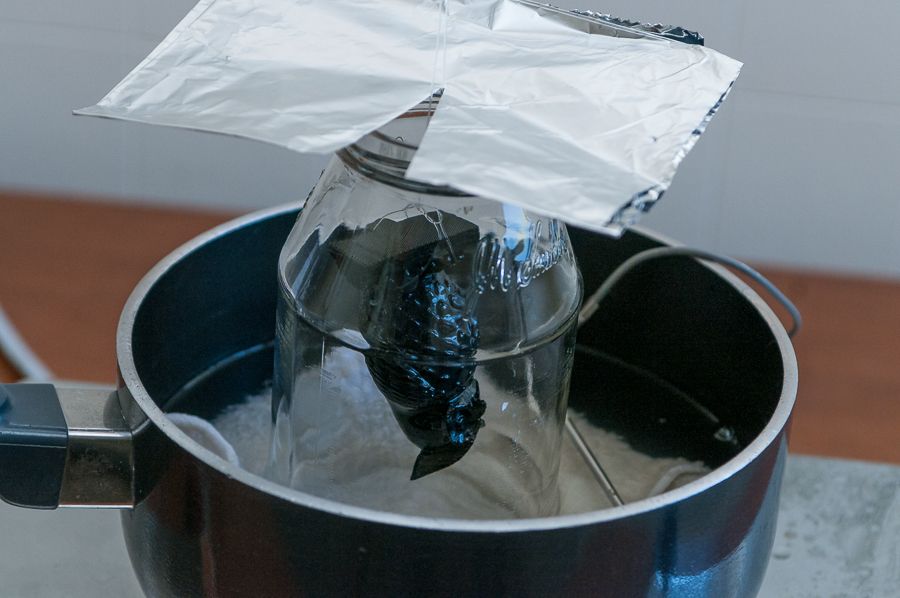
There is also a risk of white spots appearing and remaining on the surface.
Method #2: Acetone Bath
Another option is to immerse the 3D print in an acetone bath.
However, this variant is also not recommended – especially for beginners. After all, there may be various problems that arise when handling the object.
Firstly, the project is normally touched when it is removed from the bath. This can damage the surface.
What’s more, the solvent can escape inside the model, causing even more damage. Last but not least, it is enormously difficult to estimate the ideal immersion time.
If the object is bathed for too long, it will be contaminated by dissolved plastic. Objects which are to be smoothed in a bath of acetone often twist strongly.
In some cases, it is possible to quickly dip an object in acetone to get a polished surface. However, it can just be very messy and not give consistent results.
Method #3: Acetone Steam Bath / Vapor Smoothing
When smoothing ABS 3D prints, one option stands above all others: By far the best way to smooth a 3D print is to expose it to the fumes of the solvent.
The steam picks up the advantages of an acetone bath and at the same time does not have the same disadvantages. ABS acetone steam smoothing is relatively easy to perform, but some factors must also be taken into account.
The keyword here is control because you have a lot more of that here than with an acetone bath. Since the vapors can reach all exposed surfaces equally, there are fewer areas that are melted unevenly.
There are also no drainage channels or drip marks on the surface of the object, which in turn can be caused by direct contact with acetone liquid.
How Does Smoothing Work?
The basic principle of smoothing is that the surfaces of the respective ABS 3D print are melted.
However, this should only be the case to a very specific point: The surface tension of the molten plastic should compensate for any irregularities on the surfaces. It is precisely at this point that the process should be stopped before structural damage occurs.
Smoothing is therefore a process that requires a lot of sensitivity and also experience. With each attempt, the ABS 3D prints will become better and more extraordinary.
With the factors of time, patience and action, the ideal combination must be found over several attempts.
ABS Vapor Smoothing with Acetone Steam Bath
Steam smoothing with acetone is generally the most popular and also apparently the best way to smooth ABS 3D prints and give them the desired design.
From a technical point of view, the process is easy and fast. However, it can take a while to reach perfection. Below, we have summarized the process and also packed important tips in the guide.
What You Need for Vapor Smoothing
Before getting started, there is obviously the question of what is needed for steam smoothing with acetone. Below is a brief checklist of what is needed:
- Acetone (so far, so clear)
- An ABS 3D print (you guessed it)
- Metal container or glass container
- A whole load of tissues
- Magnets or clamps
- Aluminum foil
- Timer
- Safety tips
Safety First
And one more thing before you get started: Safety first – and therefore some safety rules should be followed.
The first thing you should definitely learn about is acetone (propan-2-one). How is it used and what effect can it have?
It is the responsibility of each person to be familiar with the solvents they use.
First, you’ll need high-quality acetone to get consistent results (e.g. this one on Amazon* – I’ve had good experiences with it).
After researching, you are then ready for steam smoothing ABS 3D prints if the following points are considered:
- It is essential that the room is well ventilated.
- Acetone is extremely volatile and the vapors are also highly flammable. Therefore: No naked and unprotected ignition sources, no flames or fireplaces, etc.!
- The acetone must not be heated under any circumstances. The reason should be clear.
- Inhalation of the vapors over a longer period of time should be prevented in any case. A mask is useful.
- Skin contact with acetone is also a no-go.
- When steam or vapor smoothing, make sure that neither children nor animals are in the same room.
- Do not pour liquids onto surfaces. The reason: There are a lot of surfaces that can be damaged by liquid acetone – this includes almost all common household plastics.
Step 1: Placing the Object
So now you can finally get started! However, steam smoothing should be carried out with a clear plan, a structure and four steps that are worked through one after the other.
The first thing to consider is how the ABS 3D print – our object to be smoothed – will be oriented. After all, the surface should be where it is needed.
It never hurts to place the object on its base first. However, it is also possible to place it on a side, which does not need to have a smooth surface finish.
The base of the object is finally placed on the aluminum foil, which should be folded three or four times beforehand.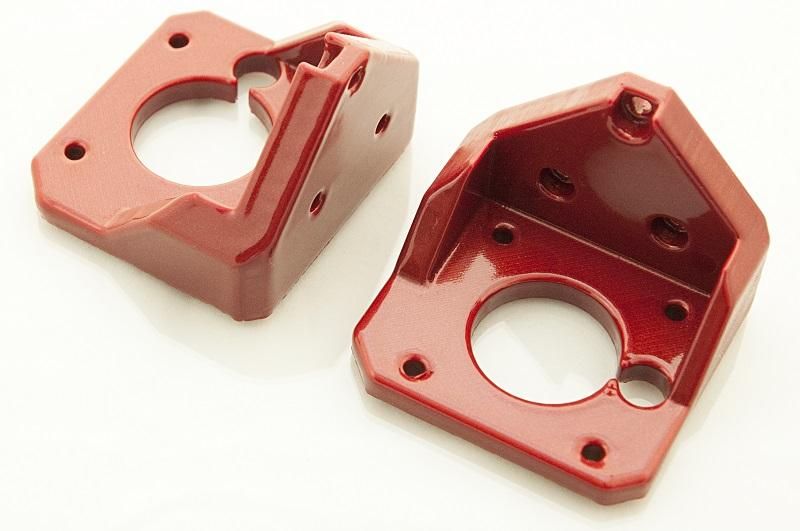 Alternatively, surfaces made of glass or metal can be used as a base.
Then the tissues come into play. They are soaked with acetone and placed on the walls of the glass or metal container used. A magnet can be used so that the tissues really stick.
Step 1 is completed by placing the container upside down over the ABS 3D print.
Very important: The tissues should not touch the object!
Step 2: Wait
This is a very relaxed step, because nothing really needs to be done here. The second step requires patience. Just sit back and watch – and set a timer for 15 minutes.
With each minute, the ABS 3D print becomes a bit shinier. After 15 minutes, the container can then be taken down again.
If you have a little experience and see that it can be made even shinier, you can wait for a little longer after the 15 minutes have passed – under strict observation, of course.
The reason: it is quite possible to overdo it with the steam bath.
After all, with time, 3D printing could lose just about all surface details. 15 minutes is therefore a good start. Over time, you’ll know how long different objects need to sit in the steam path.
Those who have performed the steam bath a few times should quickly discover differences and can accordingly adjust the time to achieve the desired result.
Once the container has been removed, the object should first be left alone for a while.
Step 3: Remove Object & Curing
If the container has been removed, then the ABS 3D print should not be touched under any circumstances. This way, the surface could be permanently destroyed and the whole project could fall into the water.
The reason for this is that shortly after the steam bath, the object is still in a deformed state, which only solidifies with time.
If you don’t want your own fingerprints to be immortalized, don’t touch it!
This motto applies for at least one hour, which is how long the object should rest without being touched.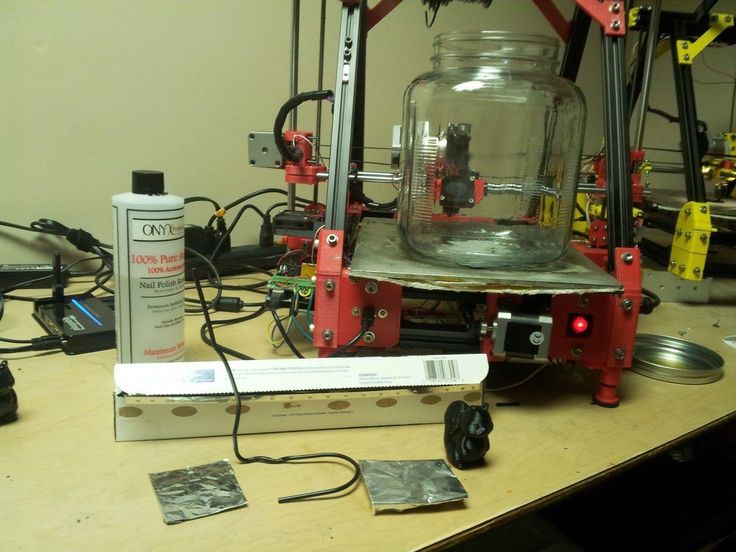 During this time, the ABS 3D print should be in an isolated room.
In the course of an hour, all the acetone should have evaporated from the surface of the object, if it was bathed for more than 15 minutes, then it should also rest for more than an hour.
In this hour it can be quite interesting to observe the object in its change. It looks shinier and thus more finished with each passing minute.
So here again patience is needed, only when the magic of acetone has ensured that the object looks absolutely finished, then it can be touched.
Step 4: Examine the Result
So there it is, an acetone-smoothed ABS 3D print that almost doesn’t look like a 3D print anymore. Anyone who tries the steam bath will be amazed at the result, that much is almost certain. Over time, you can see that each object gets even a little bit better.
Tips & Tricks – ABS/Acetone Vapor Smoothing
In order to make the steam smoothing of an ABS 3D print work even better, we have summarized some more tips and tricks below, which might simplify the process.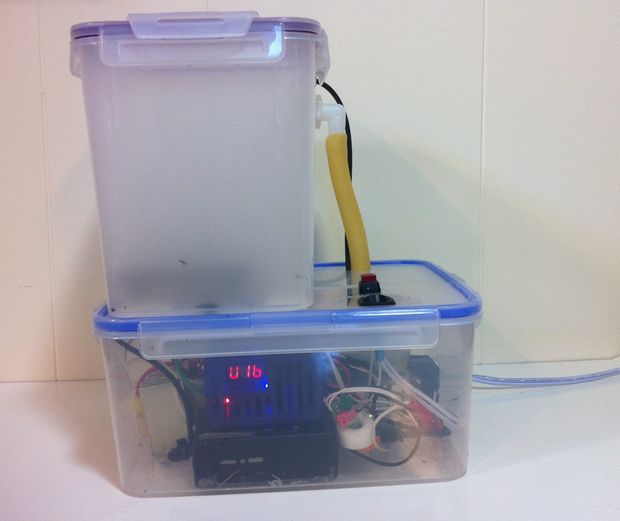
Finding the Right Container
Glass is very suitable for the steam bath, but it is often not easy to find a glass bell with the right dimensions.
There are some decorative glass bells on Amazon* that are perfect for this.
Alternatively, a metal box can give a similarly good effect, but the same problem exists. If a steam bath is often used with an ABS 3D print, then it may be worth purchasing a smoothing station.
This can be a Polymaker Polysher, for example. The devices work at low temperatures and distribute the solvent evenly, which results in a beautiful gloss. The device is now available in various stores, such as Amazon* and 3DJake*.
Polymaker Polysher*Check Price at:
Amazon*
3DJake*
Fan Increases Effectiveness
A nice feature for the container is a fan.
This is certainly not a must, but it can increase the effectiveness by improving air circulation.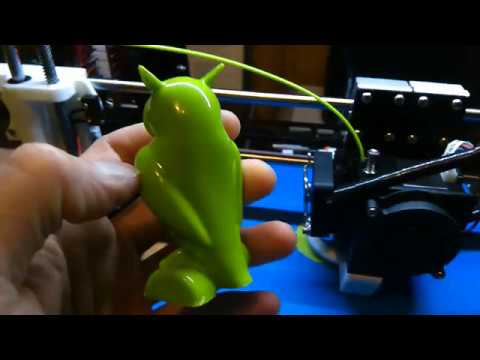 The fan should be attached to the underside of the lid so that the airflow is directly directed at the respective model.
Heating Pad Accelerates the Process
And one more optional feature, which can prove to be helpful. A heating pad will better saturate the air inside, speeding up the entire process.
Alternatively, the container can also be placed on a warm surface – but this must not be hot under any circumstances! Only warm.
Metal Plate as an Ideal Base
The base is an important factor in the steam bath. The ABS 3D print must have a good base and it can find it through a metal plate, which can be placed on cardboard.
It is important that it has a few centimeters from the surface. As a basis for smoothed models, an old printer steel sheet is very suitable. So you can work well without touching the model.
Related Questions
What role does acetone play in smoothing ABS 3D prints?
Acetone is normally used for cleaning purposes, but it is an ideal solvent for smoothing 3D prints. This is especially true for ABS printing, as ABS is very reactive to acetone and dissolves in it.
This effect can be used in several methods of smoothing ABS 3D prints. A glossy end product can be created that no longer really resembles a 3D print.
What are the methods for smoothing ABS 3D prints?
Three methods in particular are common. First, the acetone can be spread on the 3D print with a brush, but the result is often not smooth and glossy – and thus not satisfactory.
An acetone bath promises more success in some cases but has the problem that there is little control and the result can vary.
Therefore, the ideal method is vapor smoothing with an acetone steam bath, which is most likely to guarantee a smooth and shiny final product.
What do I have to consider when vapor smoothing ABS 3D prints?
The method requires good preparation, patience and a good strategy. However, the process itself is quite simple to implement.
Before getting started, safety guidelines should definitely be established.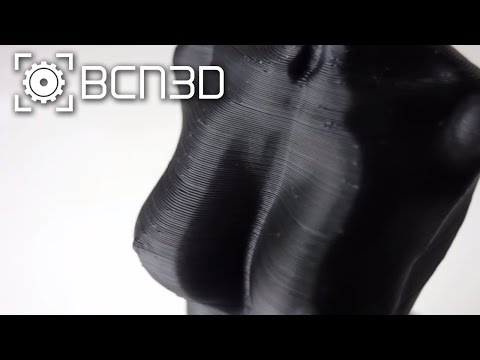 The most important is that there are no open sources of ignition (flames or similar) – because acetone is highly flammable.
For this reason, the solvent should not be heated under any circumstances.
Conclusion
Smoothing ABS 3D prints is extremely useful and can result in an impressive effect.
Some of the smoothed models hardly look like they really came out of a 3D printer anymore. Such smoothing is all the more attractive when you realize that it is quite easy to do.
Acetone* is almost ideal as a solvent. However, there are different methods of proceeding with the agent. The use of a brush is obvious, but not particularly promising.
An acetone bath is more suitable, but it also has some weaknesses. Vapor smoothing with a steam bath is the best method for smoothing an ABS 3D print, as it is a simple process that can have a great effect.
Before vapor smoothing through a steam bath should gather all the necessary utensils and follow safety guidelines.
The greatest danger is that acetone is highly flammable. When everything is ready, then you can start the process, which requires, above all, a little patience. Enthusiasm also can not hurt.
The result is a completely smooth object that really shines. By optimizing the process, progress can be made quickly if the shine is still somewhat weak at first.
If you’ve taken a liking to the steam bath, you can make your life even easier by getting better equipment – but that comes at a price*.
Disclosure: This website is the property of Martin Lütkemeyer and is operated by Martin Lütkemeyer. Martin Lütkemeyer is a member of the Amazon Services LLC and other Affiliate Programs. These are affiliate advertising programs designed to enable websites to earn advertising revenue through advertising and linking to Amazon.com and others. Links marked with * are affiliate links.
Acetone vapor treatment.
Acetone vapor treatment.
I decided to write a post, thereby answering the frequently asked questions of customers who purchased a “bath” from me, and for those who cannot decide on the volume of the “bath” container or want to make it on their own.
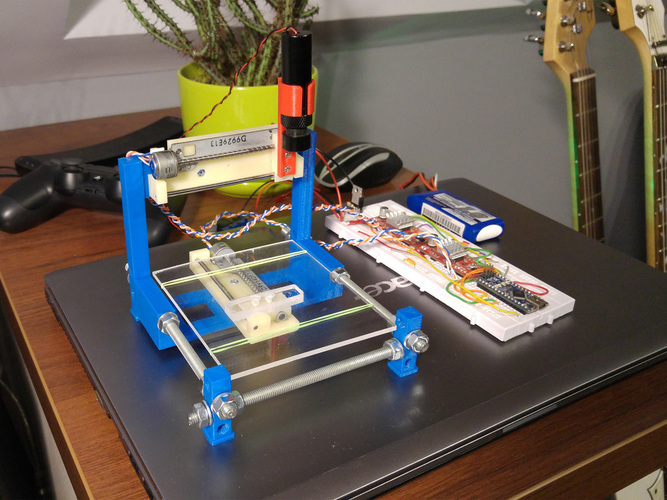
Bath construction.
"Bath" consists of a container, a system of forced mixing of acetone vapors and a bowl-heating element, a heating element for filling with acetone.
Which container to choose? I am using three different containers. 2 liter sealed for parts up to 90 mm high, 3 liter sealed for parts up to 220 mm long, 5 liter unsealed for parts up to 200 mm high. Most often I use a 2-liter - 90% of the total number of printed parts. The container must be made of polyethylene with transparent walls and airtight; an unsealed container can also be used, but with a tight-fitting lid. As practice has shown, for chemical processing, the use of containers with these dimensions covers approximately 99% of all parts printed by me in two years.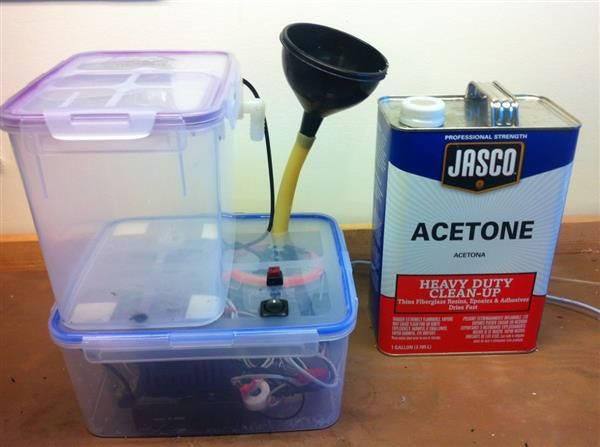
These are my three "baths" for 2, 3 and 5 liters.
This is a three liter bath.
Forced mixing system acetone vapor consists of a micromotor, bearing assembly and fan. All parts that come into contact with acetone vapor must be made from PLA. Anyone who has design skills can design this knot himself. If someone does not have such an opportunity or desire to make a “bath” himself, then you can buy from me both a finished product and a set of parts for self-assembly.
Heating element , heater. From my experience, the power of the heating element should be 2 - 3 watts, for containers of large capacity (10-15 liters) up to 5 watts is possible. If you use more power, the process will be less controllable. Using Ohm's law, you can calculate and manufacture the heating element yourself. The boiling point of acetone is 56.1 °C, and a heating element with a power of more than 5 watts in hot summer weather can exceed this temperature.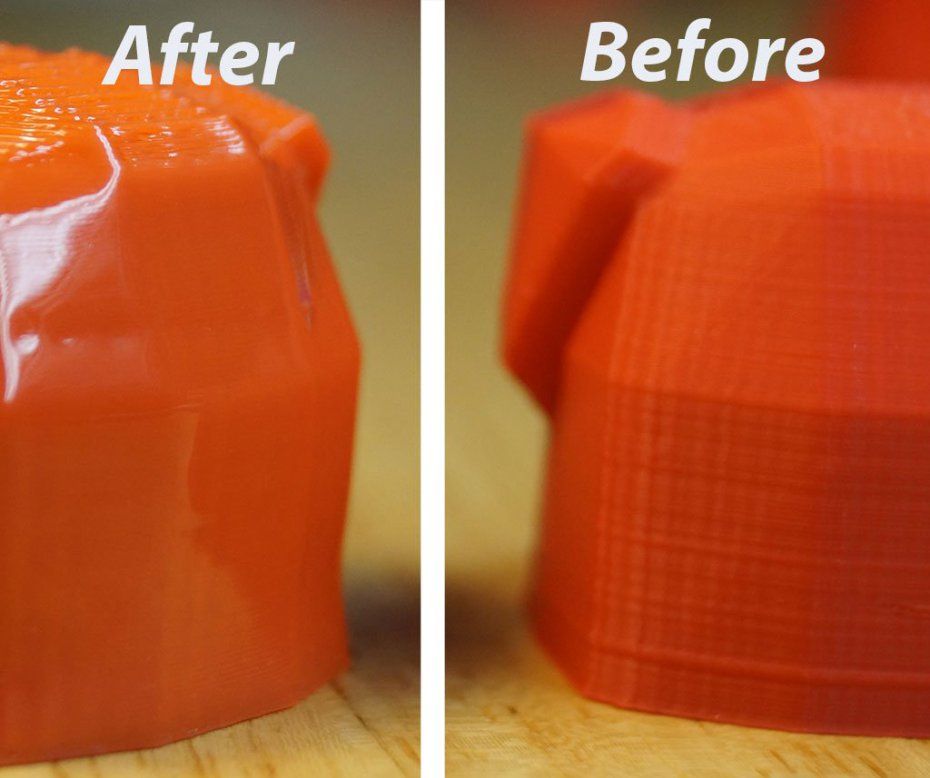 From the point of view of explosiveness, there is nothing terrible in this, but intensive vaporization in a closed volume creates fog and fogging of the container walls, which completely excludes the visualization of the process. Of course, with the acquisition of skills, visual observation is no longer required, and for experienced users, increasing the power of the heating element will speed up the process.
The amount of acetone depends not only on the surface area of the workpiece, but also on the volume of the container. For identical parts, the larger the volume of the container, the more acetone is needed, and for a large part, more acetone is needed than for a small part with the same container volume. How much acetone is needed - this parameter is selected empirically and depends on the area of the workpiece, on the ambient temperature, on the chemical composition of the ABS plastic (filament manufacturer), on the tightness of the container and on the grade, concentration of acetone.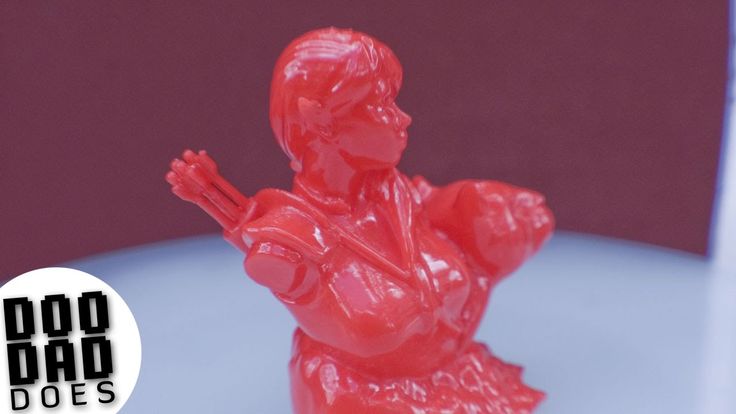 You also need to keep in mind that acetone is well diluted with water and an unscrupulous seller or manufacturer of acetone can easily take advantage of this. In order not to spoil the part, you must start with a small dose of acetone and if the treatment is insufficient, simply repeat the process one or two more times. It should be borne in mind that when refilling with acetone, all vapors from the first filling will evaporate, and additional acetone will be required for the required concentration of vapors in the container. If anyone does not understand the meaning of the last phrase, I explain that when a satisfactory result is obtained in several approaches and when moving to a single stage, the amount of acetone used in two or three approaches must be added up and taken 75% of the amount. It is clear that the figure of 75% is not an absolute value, but an approximate value and is a recommendation.
Processing time depends on the same parameters listed above in the paragraph "amount of acetone".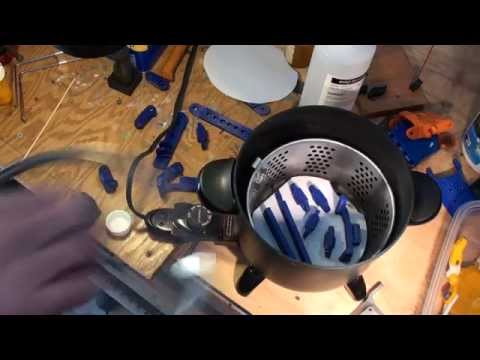 Visually, the process is monitored through the transparent walls of the box, but the main difficulty of visual control is that the end of the chemical treatment process will occur after the installation is ventilated, after some time. This is due to the fact that the surface of the part exposed to the vapor becomes viscous fluid, and this fluidity occurs as long as there are active elements in this layer, saturated ketones of acetone vapor. The neutralization of saturated ketones occurs by the quantitative absorption of these molecules by molecules of acrylonitrile butadiene styrene (ABS) and by ordinary ventilation, that is, if you guess with the amount of acetone filled into the device, the process of vapor exposure to plastic will stop itself and will not spoil the part. Otherwise, after a certain period of time, it is necessary, without turning off the device, to open the lid of the box, while the part will have an unfinished look and cannot be touched, and ventilate for 10-20 minutes.
 After this time, the part will take on an almost final form, the flow process will slow down significantly, and the part can be picked up. Finally, acetone vapor will “come out” of the part after 5 to 7 days. If the part is structural and must experience stress, it is advisable to use it after two to three days. To speed up the process of “exit” of vapors, the part can be heated to 50 ° C, but not earlier than after 1-2 hours of cold ventilation. It is advisable to carry out all work in a ventilated room, if work is carried out at home, then it is better to do this in bathrooms with forced exhaust or on the balcony. Acetone is a flammable liquid, and acetone vapor at a certain concentration explosive .
Appearance of processed products immediately after opening the container.
This is the product after airing for 30-40 minutes. These parts required 9-10 cm3 of acetone and 50-60 minutes of time at a room temperature of 25°C in a two-liter container. The outer surfaces of these products were not subjected to mechanical processing. The area of all surfaces exposed to vapors is -406 cm2. Dimensions of one part (LxWxH) -100x55x22 mm.
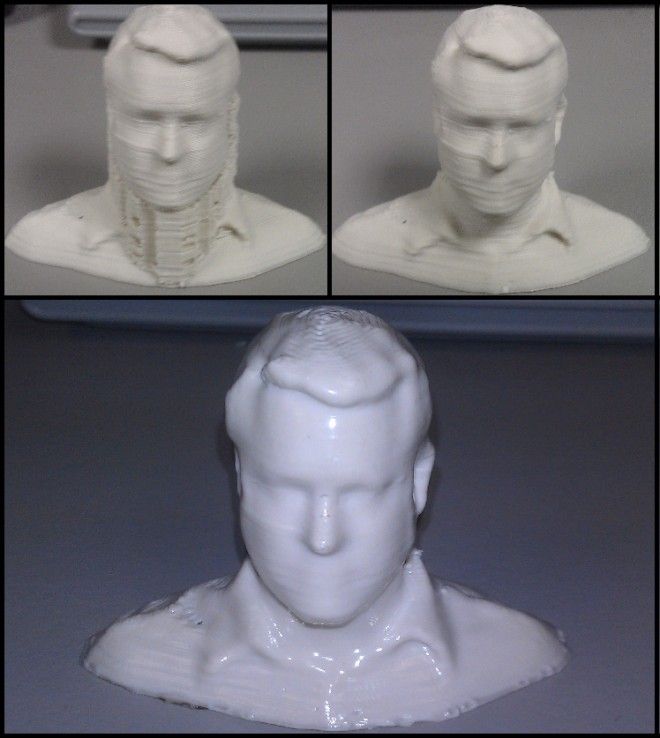
Next, I will show different products and processing modes.
Bust of Putin - 3 pieces, box - 5 liters, the total area of all treated surfaces of three busts - 1188 cm2. The amount of acetone is 18 cm3, the processing time is 80-90 minutes. The air temperature in the room is 25 ° C. The dimensions of one bust (LxWxH) are -75x65x132 mm.
Honeycomb with stand - 1 piece, box - 2 liters, surface area - 810 cm2, amount of acetone - 6 cm3, processing time - 40 minutes. Air temperature in the room - 22 ° C. Dimensions (LxWxH) - 79x79x80 mm.
Tower, box - 5 liters, surface area - 750 cm2, amount of acetone - 18 cm3, processing time - 110 minutes. The air temperature in the room is 18° C.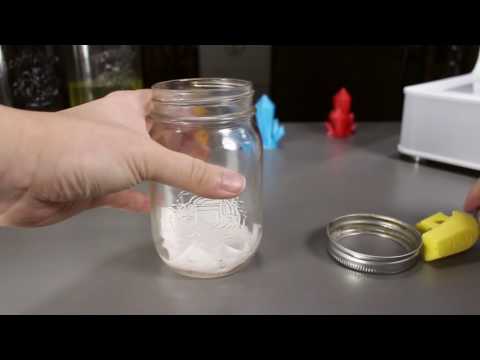 Dimensions (LxWxH) - 56x100x128 mm.
Porsche Cayenne headlight bracket, box - 2 liters, surface area - 151 cm2, amount of acetone - 6 cm3, processing time - 50 minutes. The air temperature in the room is 18° C. Dimensions (LxWxH) - 91x80x18 mm.
Body part, box - 3 liters, surface area - 690 cm2, amount of acetone - 12 cm3, processing time - 60 minutes. Air temperature in the room - 18 ° C. Dimensions (LxWxH) - 178x109x34 mm.
Professor Yoda, box - 2 liters, surface area - 140 cm2, amount of acetone - 6 cm3, processing time - 40 minutes. The air temperature in the room is 20° C. Dimensions (LxWxH) - 60x80x65 mm.
All parts shown above have been virtually unmachined.
Next, I will show the parts, the surface of which was completely machined - sanded.
Parts green, blue and red, processed 1 piece, box - 5 liters, surface area - 380 cm2, amount of acetone - 15 cm3, processing time - 90 minutes.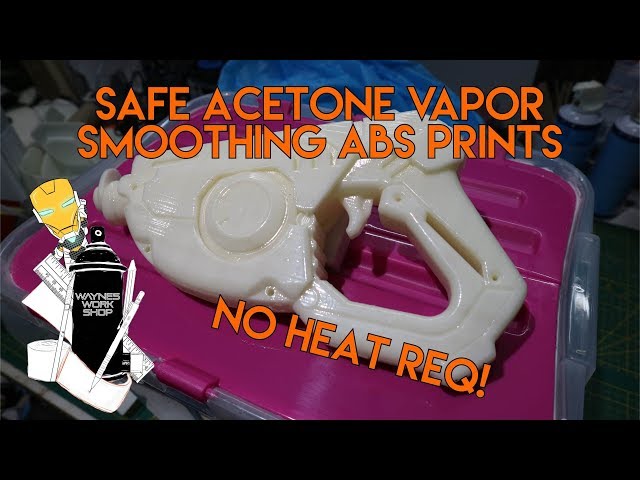 The air temperature in the room is 20° C. Dimensions (LxWxH) - 70x70x120 mm.
Blue part, box - 2 liters, surface area - 230 cm2, amount of acetone - 8 cm3, processing time - 50 minutes. The air temperature in the room is 20° C. Dimensions (LxWxH) - 70x70x50 mm.
What part should be? Design, printing layer thickness, machining.
Workpiece design . Not every detail can be processed in the "bath". If the part design has very thin walls or bridges less than 1 mm thick, then they will melt and lose their shape before the rest of the part surfaces are processed. The way out is either to increase the wall thickness, or to protect one side, let's say the inside, with masking tape or carry out light processing.
The thickness of the print layer affects the final quality, but not very much. Due to the penetration of acetone vapor into the microslits of the interlayer gaps, additional sintering and gluing of the layers occurs, which strengthens the part, making it more monolithic.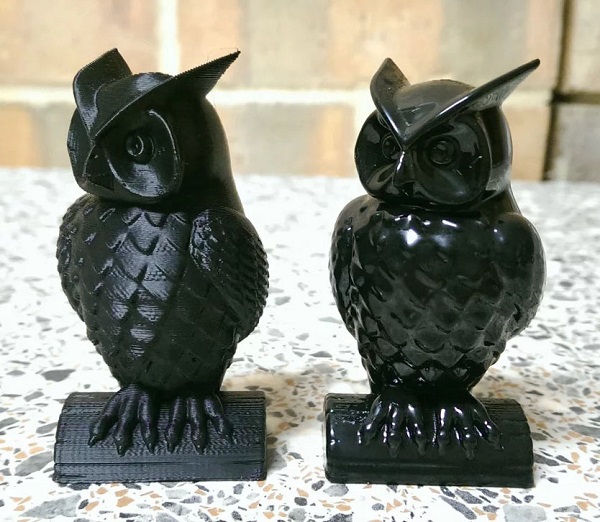 It is clear that with a layer thickness of 0.1 mm, there will be more microgaps than with a layer with a thickness of, for example, 0.2 mm. This means that a part with a layer of 0.2 mm should turn out to be more monolithic, so to speak, and a part with a layer of 0.1 mm more beautiful. Probably, a layer of 0.15 mm will be optimal for both solidity and appearance.
Machining parts . In most cases, printed parts require machining with needle files, sandpaper, or other tools such as Dremel engraver attachments. After machining, the surface is rough and visually lighter than the rest of the body. Before such parts are placed in an acetone bath, it is necessary to pre-treat with acetone the places that have been machined. To do this, take any non-fluffy cloth, moisten it in acetone and wipe these places with one or two movements. The movements must be quick so that the fabric does not stick to the part. If it is not possible to wipe the entire surface in one or two times, then you need to wait 20-30 seconds and repeat the procedure.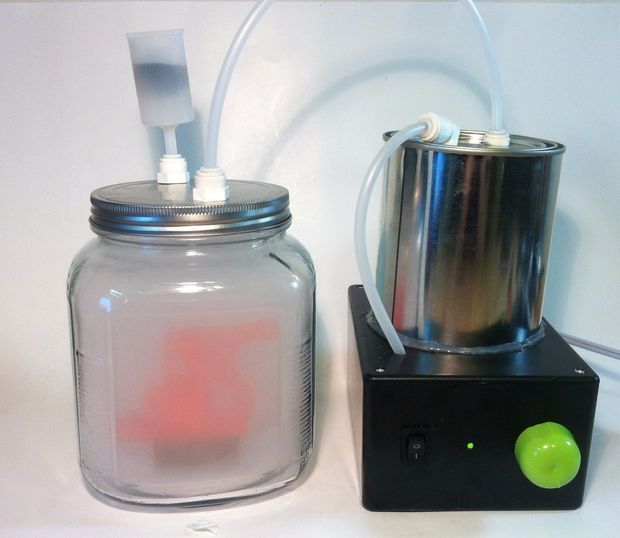 If this is not done or treated not with a cloth, but with a brush, then after processing the part in the “bath”, these places will be rough to the touch and visually not very shiny.
Thank you for your attention, write comments, criticism of the case is accepted, if something is not clear, ask.
Processing of 3D printed models
One of the problems that all fans of FDM 3D printing, without exception, encounter is the ribbing of external surfaces. Since the technology itself is based on the sequential application of layers of plastic, this effect cannot be avoided. You can, of course, make it less noticeable by increasing the vertical resolution of the printer (i.e. applying thinner layers), but you won’t be able to completely get rid of the ribbing.
PLA 3D model before and after torch treatment. The internal structure is visible under the sagging outer layer
Almost from the very first days of the RepRap project, the search began for methods of processing finished models in order to smooth surfaces. Emphasis was placed on two features of thermoplastics: the ability to melt when exposed to high temperatures and soften on contact with the appropriate chemicals.
As a rule, heat treatment does not give good results - it is difficult to control the heating of the surface, and this eventually leads to plastic boiling, sagging or simply releasing toxic fumes. However, this method can be tried on solid PLA models.
Chemical treatment is more promising, but it also comes with its own set of challenges. In addition to technological problems, the problem of reagents is relevant - different plastics react with different solvents. If acetone perfectly dissolves ABS plastic, then it has almost no effect on PLA plastic. With limonene, everything is exactly the opposite.
The main chemical smoothing techniques still revolve around ABS plastic due to its high popularity and low cost of suitable solvents.
A typical ABS solvent is acetone. Its good dissolving power allows it to be used as an adhesive for component parts of ABS models, although a homemade mixture is usually used for this, produced by dissolving ABS chips in acetone.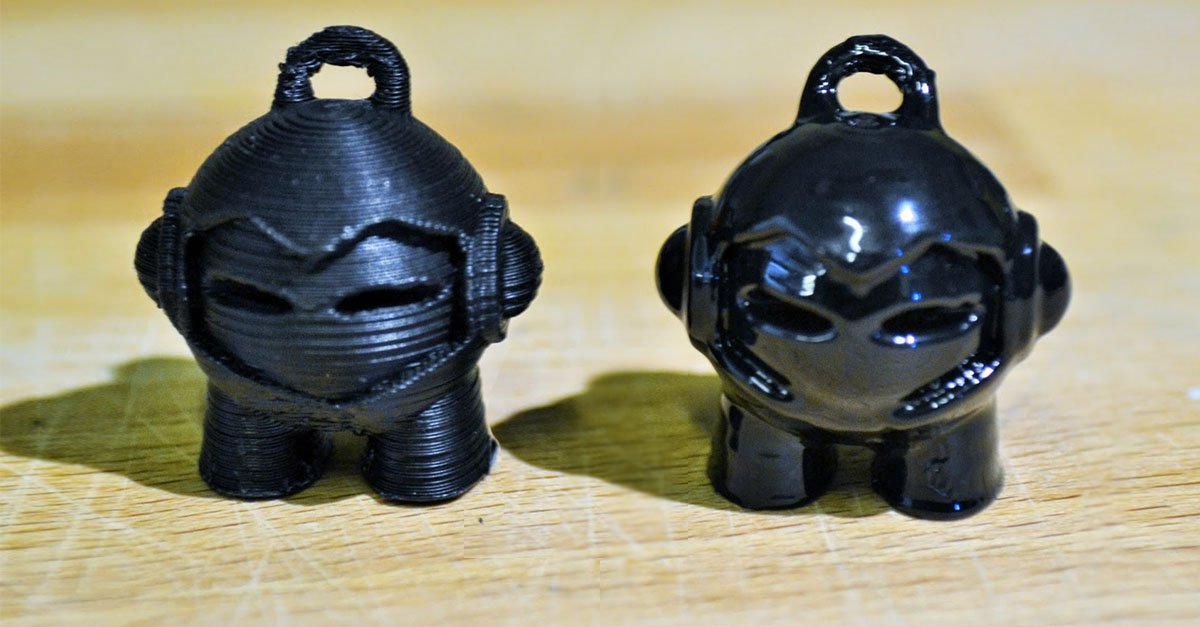 The same glue (only a thicker consistency) is often used to repair delaminations or cracks.
Along with increased aesthetics, an important factor in the development of smoothing methods is increased strength. The monolithic outer shell reinforces the models, preventing delamination and ensuring their tightness.
Hand shaping
Makeraser - a combination tool designed to also work on the outside of models models. However, processing with a brush is a laborious task, and even requiring a certain skill. After all, already softened plastic is easy to deform with the brush itself, that is, the hairs will leave a mark on the plastic, which may not even out before the acetone evaporates. It is possible to equalize pronounced irregularities with this method, but it is quite difficult to achieve a smooth surface.
The advantage of this treatment is the selective application of acetone, which avoids smoothing sharp corners. After all, a pyramid was built for Cheops, not a cone, right?
An attempt to create a special tool for manual processing was a device called Makeraser. Basically, it's a simple felt-tip pen with a reservoir filled with acetone or acetone glue and a built-in scraper to remove models from the platform. From a practical point of view, this tool is best suited for gluing parts of a model or applying ABS/Acetone glue to the build bed just before printing to combat underlayer curl.
Acetone dip
Failed dip leveling attempts
A more promising and simpler method is acetone dip. Exposure of the ABS model in undiluted acetone for about 10 seconds is sufficient to dissolve the outer layer of the model. The specific exposure time may vary depending on the quality of the original model and the concentration of acetone. Since the sale of pure acetone is regulated, a technical solvent can be used.
After exposure, the model must be exposed to air until the acetone has evaporated. The process may take about half an hour.
Although this method is quite fast, it is difficult to control the process. With excessive exposure, the model will simply begin to dissolve, quickly losing small features. In addition, contamination of acetone with plastic of the same color can lead to streaks on subsequent models dipped in the same solution. A more controlled process is acetone vapor treatment.
Probably the most efficient way to get glossy ABS models. This method requires placing the model in a container with a small amount of acetone at the bottom. The model itself should not come into contact with acetone, so the model should be placed on a platform or hung above the surface of the solvent. When installing on a platform, the material properties of the stand should be taken into account. Wood is not suitable for this task due to its porosity: the bottom surface of the model will stick to the wood, and it will be quite difficult to separate it. The best option is to use a metal stand.
It is advisable not to use wood as a platform
After placing the model, the container must be heated to increase the temperature of the acetone. Acetone also evaporates at room temperature, but too slowly. Keep in mind that boiling acetone is not recommended, as this will cause condensation to accumulate on the model, which in turn can cause streaks. Thus, for best results, do not exceed the temperature threshold of 56°C.
A safe, homemade steamer that uses boiling water in an external pot to heat the acetone in an internal one.
Holding time varies greatly depending on the temperature of the acetone. So, when boiling, only a few seconds can suffice, while experiments at room temperature required up to 40 minutes of exposure. Fortunately, using a transparent container, you can determine the readiness of the model "by eye".
As with dipping, the finished model must be aired out before the outer surface hardens, avoiding unnecessary physical contact.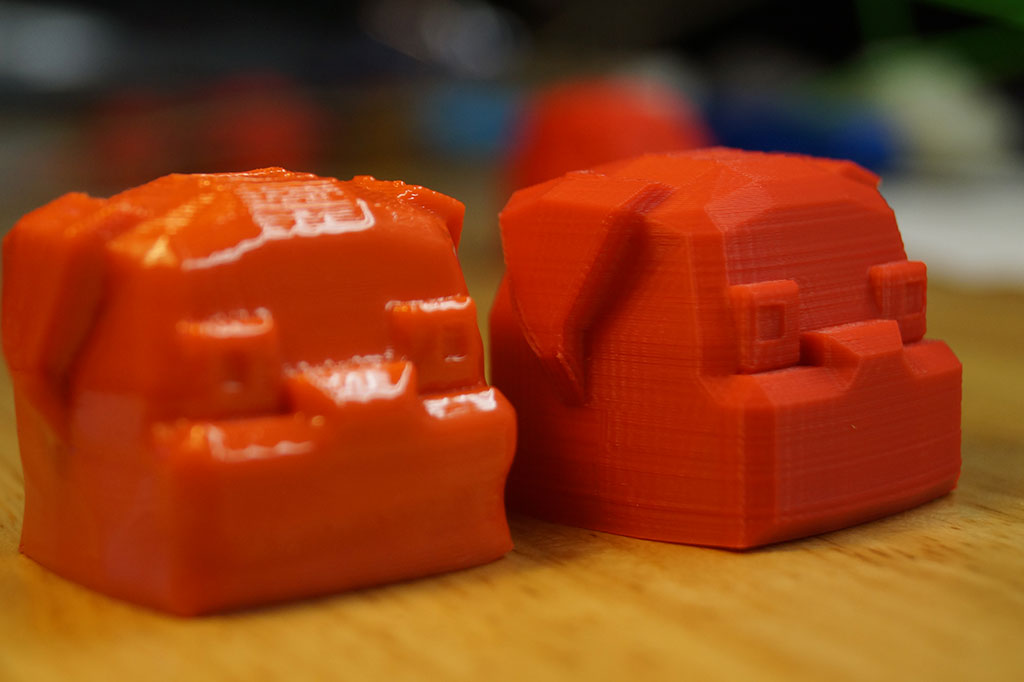
Both when immersing models in acetone and when working with steam, the wall thickness of the models must be taken into account. The shell must be thick enough to withstand the inevitable loss of the outer layer. In addition, especially subtle features may simply dissolve, and sharp corners will be smoothed out.
Safety Instructions
Successful Acetone Vaporizing of an ABS Model
Acetone is not considered to be highly toxic, but care must be taken nonetheless. Inhalation of vapors can lead to pulmonary edema and pneumonia. A sign of poisoning is a feeling of intoxication, accompanied by dizziness. In addition, acetone causes irritation of the mucous membranes. When working with acetone, do not neglect personal protective equipment - goggles and gloves.
Particular attention should be paid to the flammability of acetone. Air mixtures with an acetone concentration of up to 13% by volume are explosive - when processing with acetone vapors, it is strongly recommended to work in a well-ventilated room and, if possible, use an exhaust hood.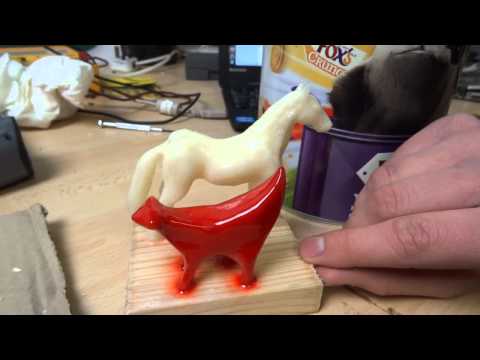 Do not use an open fire to heat acetone: since solvent vapors are heavier than air, they will displace air from the vessel, and once outside, they will cool and come into direct contact with the fire with all the ensuing consequences. It is also not recommended to tightly close the vessel, especially with strong heating, in order to avoid destruction under pressure.
Commercial options
Stratasys Finishing Touch Smoothing Station
In addition to the Makeraser described above, there are also commercially produced units for steaming both acetone and other solvents - dichloromethane, butanone, etc.
Stratasys manufactures a little-known but successful Finishing Touch that can process any variation of ABS plastic to a quality virtually indistinguishable from injection molded models. The process is facilitated by the presence of a recirculation system, which saves on solvent and prevents air pollution by potentially dangerous fumes.