3D printing for dummies
3D Printing For Dummies Cheat Sheet
By: Kalani Kirk Hausman and Richard Horne and
Updated: 03-08-2022
From The Book: 3D Printing For Dummies
3D Printing For Dummies
Explore Book Buy On Amazon
Unlike traditional manufacturing, which involves injecting material into a pre-formed mold or removing material from base material objects, 3D printing starts with a virtual 3D model that is transformed into solid form one layer at a time. Each layer is built on top of the layer before, creating a solid form representing the virtual 3D model in all of its complexity and detail without requiring additional forms of machining and treatment necessary in traditional forms of manufacturing.You can build your own 3D printer using the open-source self-REPlicating RAPid-prototyper (RepRap) family of designs. Check out these helpful articles to guide you toward selecting the right RepRap design for you.
Deciding on a RepRap of your own for 3D printing
When it comes to 3D printing, selecting a RepRap printer for personal use begins with an analysis of your particular need in terms of the type, size and other qualities such as turnkey off-the-shelf or build-it-yourself creation. Total cost is also a factor, along with source licensing preference such as the determination of open vs. closed source technologies.
Some of the RepRap designs include:
-
Mendel, Prusa Mendel, Mendel90, Prusa i3: One of the more common branches of Cartesian design, this printer has spawned many variations including the miniaturized Huxley.
-
Wallace and Printrbot: Common educational-sector alternatives for kit construction.
-
MendelMax: This is the derivative of the Prusa Mendel that’s an example of Cartesian RepRaps.
-
Ultimaker: A box-frame RepRap using Cartesian movement.
-
Tantillus: A miniature box-frame RepRap which has the most 3D printable parts of current RepRap variations.
Several RepRap options exist beyond the standard Cartesian format, including:
-
Rostock, RostockMax: A Delta-format RepRap printer that provides a tall build volume. The RostockMax is a laser-cut kit form that we will build here as an example of Delta RepRaps.
-
3DR: An alternative delta-style RepRap designed by Richard Horne, based on the Rostock format with inspiration from the Tantillus for self-replication.
After identifying the type of printer, you will need to select the proper type of plastic filament you wish to print with and the components that will be used in building the printer itself, including the framework, extruder, build plate, control electronics and software that will be used.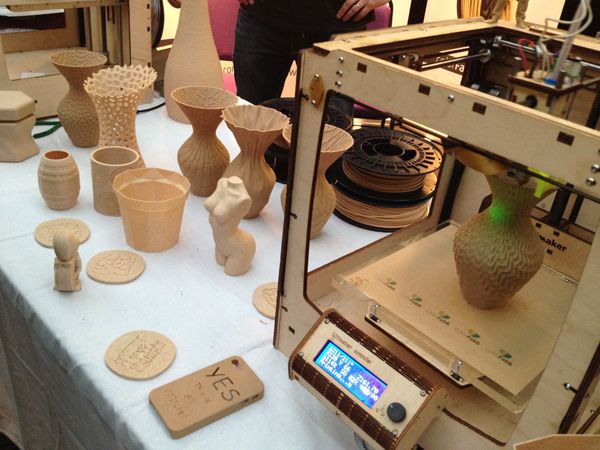
Understanding RepRap 3D printer control electronics
A RepRap 3D printer is an example of a purpose-built robot, using the popular open-source Arduino microcontroller at its heart together with stepper motor controllers, motors, and sensors to control its movements. Some custom 3D printer boards have been created to integrate an Arduino’s functions and the related items typically found on a 3D printing “shield” that attaches to the basic format. Some of these options include:
-
RAMPS: The original Arduino shield designed for multiple stepper motor control and management of the extruder and built plate heaters.
-
RAMBo: A modular all-in-one combination of the Arduino board and RAMPS shield.
-
Sanguinololu: A popular build-it-yourself all-in-one board integrating both microcontroller and stepper motor controllers
-
Minitronics: A reduced size variation of the Sanguinololu.
-
RUMBA: A modular integrated board with modules supporting LCD panels, external memory cards and other add-on capabilities.
-
ELEFU-RA: A developer integrated electronics set that can plug in standard ATX computer power supplies
-
Megatronics: The “big brother” of the Minitronics board, which allows the use of higher-temperature thermocouple thermal sensors in place of the more common thermistor type sensors.
Many components have multiple options such as the selection of contact switches or magnetic hall-type sensors for the end-stops or the use of different fans to meet the type of plastic you are using. Even the type of motor controllers and wire connections (soldered vs. crimped) will affect options available upon completion of your RepRap.
Assembling the RepRap extruder and RepRap upgrades on a 3D printer
Once the framework for a 3D printer has been assembled and the electronics selected, the final component needed is the extruder and hot-end that melt and deposit plastic to create your object.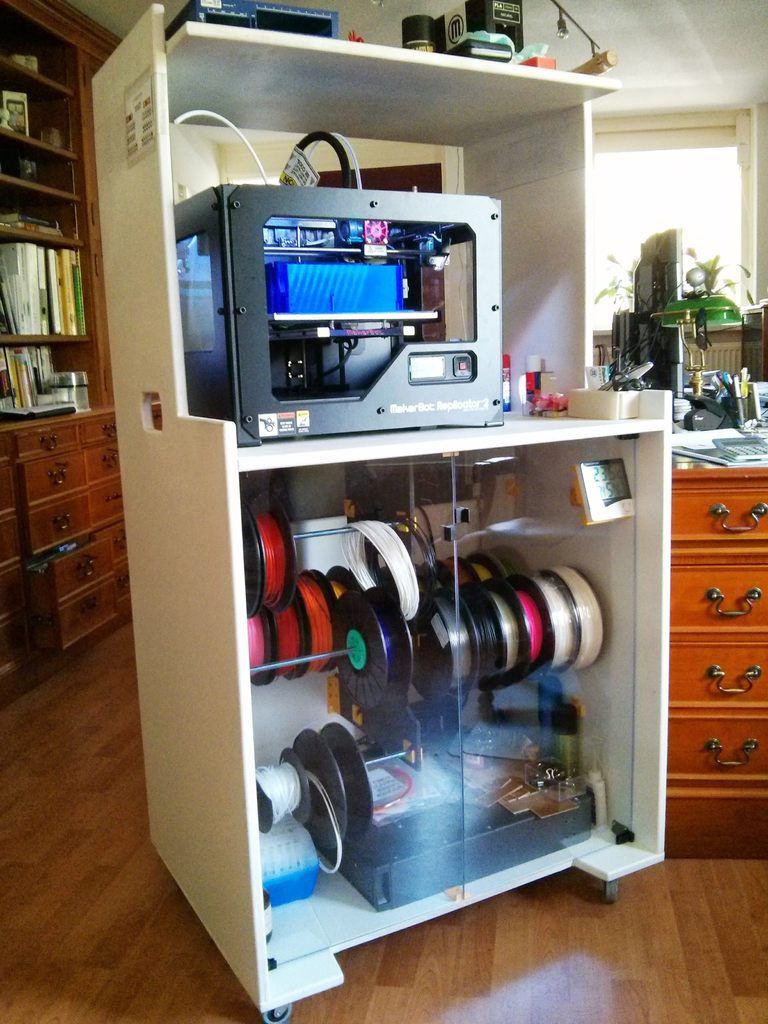 The extruder slides the plastic filament incrementally into the heated hot-end, where it pushes a small amount of the molten plastic out with each step. The extruder can be made in many ways, including:
-
Geared: Some extruders include additional gears to slow the advance of filament with each step to gain greater control, and to increase the force with which the filament can be advanced into the hot-end.
-
Hobbed: Smooth plastic filament can be held by the extruder using interlocking gears or a hobbed bolt (one with teeth cut along the axis around the bolt’s girth) to hold the filament against an idler wheel so its advance and retraction can be carefully controlled.
-
Bowden: This type of extruder forces the filament through a tube connecting the extruder and hot-end rather than forcing the filament directly into the hot-end, separating the two and allowing the hot-end to be lighter without the directly attached extruder motor for non-Cartesian formats.
-
Syringe: For designs like the [email protected] printer or RepRaps equipped with Richard’s Universal Paste Extruder, a syringe can be used with a constrained strap to incrementally extrude paste or gel materials instead of the usual melted plastic.
-
Multi-color: Advanced extruders include multiple gearboxes and motors to advance multiple filaments into the hot end at the same time. By varying the rate of each color using additional electronics, the end result is a multi-colored print that varies throughout.
-
Dual: A common variation with more limited color mixing involves a dual extruder, which is simply two extruders side by side. This is useful for prints that include PVA (polyvinyl alcohol) or other soluble support material integrated into the same print as the object filament material.
Identifying 3D printer software and machine calibration
The software chain for a RepRap 3D printer begins with the products used to create and prepare the virtual 3D model for printing. However, once an object model has been created or obtained, the model must be processed through several steps before the solid object is created by the RepRap printer:
-
Support: Unlike granular binding systems, fused plastic extruders cannot deposit plastic in mid-air and have it remain there. For overhangs and wide spans, support material must be added to the design and later removed after printing.
-
Raft: Depending on the type of material and build plate used, it may be useful to add a raft or flat printed layer that forms a base on the build plate for your model. As in the case of support, the raft is later removed in finishing the object.
-
Fill: Because additive systems like the RepRap are unaffected by complexity, it is possible to define any solid object as a solid outer shell and an interior space that can be completely solid (100% fill), empty (0% fill) or some midway point in which a regular pattern of thin walls provide support with voids interspersed.
 The amount of volume that includes plastic is defined as its “Fill” and allows you to produce the same object printout using far less plastic than solid equivalents.
 -
Slicing: The virtual model is calculated as a series of layers, with each slice then translated into codes that will direct the printer to move a particular distance while extruding or not and then again, until that layer is done and the z-axis can be moved to the next layer with the process begun again. This code is called “g-code” and many slicers can add support and raft elements automatically, along with an automatic “fill” pattern to reduce the amount of plastic needed for each print.
Once your model has been prepared and sliced, a few final details are handled by the printer control software. Settings for the hot-end and heated build plate will control the melted plastic viscosity and layer adhesion, while the movement rate of the extruder will control the thickness of the extruded material and the rate of the printer’s movement. Additional factors can be adjusted for finer control of each feature.
About This Article
This article is from the book:
- 3D Printing For Dummies ,
About the book authors:
Richard Horne (RichRap) has worked as an engineer, marketer, and product designer. He blogs and shares ideas on making 3D printing easier for everyone. Kalani Kirk Hausman has experience as an IT consultant, enterprise architect, auditor, and ISO. He conducts research on integrating 3D-printed materials into educational curricula.
This article can be found in the category:
- 3D Printing ,
3D Printing For Dummies, 2nd Edition
Introduction 1
About This Book 2
Foolish Assumptions 2
Icons Used in This Book 3
Beyond the Book 4
Where to Go from Here 4
Part 1: Getting Started with 3D Printing 5
Chapter 1: Seeing How 3D Printers Fit into Modern Manufacturing 7
Embracing Additive Manufacturing 8
Defining additive manufacturing 9
Contrasting with traditional manufacturing 10
Understanding the advantages of additive manufacturing 13
Exploring the Applications of 3D Printing 17
Working with RepRap 18
Chapter 2: Exploring the Types of 3D Printing 19
Exploring Basic Forms of Additive Manufacturing 19
Photopolymers 20
Granular powders 24
Laminates 27
Filament-based production 28
Understanding the Limitations of Current Technologies 29
Considering fabrication rates 29
Exploring size constraints 30
Identifying object design constraints 30
Understanding material restrictions 31
Chapter 3: Exploring Applications of 3D Printing 33
Looking at Current Uses of 3D Printing 34
Rapid prototyping 34
Direct digital fabrication 35
Restoration and repair 36
Designing for the Future with 3D Printing 39
Household goods 39
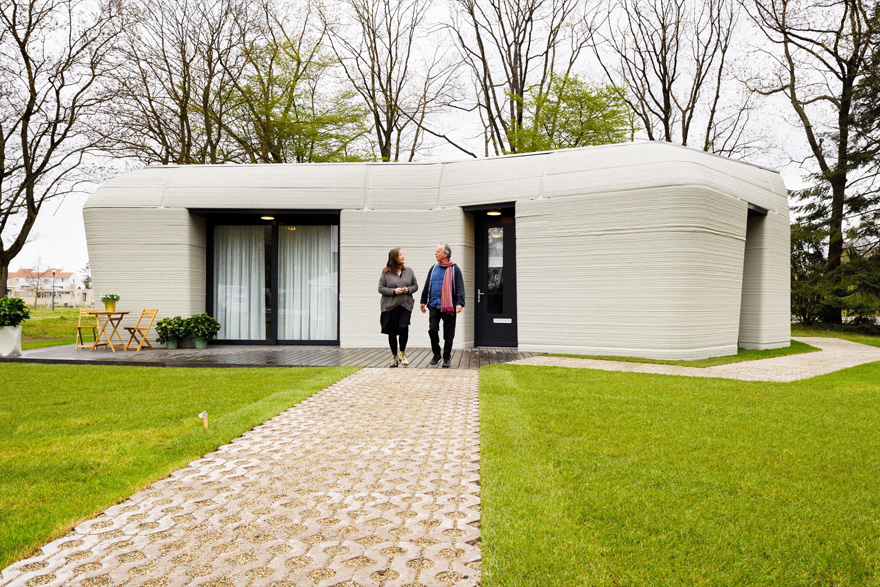
Buildings 40
Bridges 43
Examining Molding and Casting through 3D Printing 43
Lost-material casting 43
Sintered metal infusion 44
Applying Artistic Touches and Personalization 44
Medical implants 44
Biological implants (organs) 46
Item personalization 46
Clothing and textiles 46
Customizing Designs on the Fly 48
Military operations 48
Space 49
Part 2: Outlining 3D-Printing Resources 51
Chapter 4: Identifying Available Materials for 3D Printing 53
Exploring Extruded Materials 54
Thermoplastics 55
Experimental materials 59
Extruded alternatives 59
Identifying Granular Materials 61
Plastic powders 61
Sugar and salt 61
Metal powders 62
Sand and natural granular materials 63
Exploring Photo-Cured Resins 64
Understanding Bioprinting 65
Bioprinting food and animal products 66
Replacement tissues and organs 67
Identifying Other Uses for Materials 67
Recycling materials 68
Producing food 68
Caring for people 69
Chapter 5: Identifying Sources for 3D-Printable Objects 71
Exploring Object Repositories 72
Vendor repositories 72
Community repositories 74
Designing in the Computer 75
Scanning Objects 78
Capturing Structure from Photographs 82
Preparing Models for Printing 85
3D model viewers 86
Mesh modelers 86
Mesh repairers 86
Part 3: Exploring the Business Side of 3D Printing 87
Chapter 6: Commoditizing 3D Printing 89
Democratizing Manufacturing 89
Derived designs 90
Curated artifacts 90
Expanded opportunities 91
Establishing Personal Storefronts 94
Creating a unique design 94
Fabricating a unique product on demand 96
Creating “Impossible” Objects 98
Building New Tools 99
Moving beyond solid blocks 99
Creating the tool that will create the tool 100
Chapter 7: Understanding 3D Printing’s Effect on Traditional Lines of Business 103
Transforming Production 103
Displacing the production line 104
Abbreviating the manufacturing chain 105
Providing local fabrication 106
Eliminating traditional release cycles 107
Challenging Intellectual Property Laws 107
Threatening IP protections 108
Assigning legal liability 110
Leveraging Expired Patents 110
Working around patents 111
Protecting intellectual property rights 112
Imposing Ethical Controls 113
Chapter 8: Reviewing 3D-Printing Research 115
Building Fundamental Technologies 115
Crafting educational tools 116
Expanding 3D-printing options 118
Creating 3D-printed electronics 119
Creating Functional Designs 119
Drones, robots, and military applications 120
Von Neumann machines 121
Expanding Material Selection 122
Supporting Long Space Voyages 123
Creating Medical Opportunities 125
Part 4: Employing Personal 3D-Printing Devices 127
Chapter 9: Exploring 3D-Printed Artwork 129
Adorning the Body 129
Personalizing Your Environment 131
Incorporating Individualism in Design 132
Visualizing the Abstract 134
Sharing Art 136
Chapter 10: Considering Consumer-Level 3D Printers 139
Examining Cartesian 3D Printers 140
Exploring Delta Options 143
Understanding Polar Fabrication 146
Getting to Know SCARA and Robot Arm Motion 147
Building Emerging Alternatives 148
Open innovation and community designs 151
Examining Printers for Flexible Materials 152
Understanding Shore ratings 152
Printing with soft filaments 153
Sampling 3D Food Printers 154
Going beyond RepRap 159
Prusa i3 MK2 159
Sigma 160
Printrbot Simple Metal 161
LulzBot Taz 6 161
Ultimaker 3 162
MakerBot 163
Chapter 11: Deciding on a RepRap of Your Own 165
Evaluating Your 3D Printing Needs 166
Do you want a RepRap or another 3D printer? 166
Do you buy a ready-built 3D printer or use a kit? 167
Licensing and Attribution 168
Selecting a 3D Printer Design 171
RepRap designs 171
Home 3D printer kits and self-sourcing 176
Experimental designs 179
Choosing Print Media 181
Thermoplastic 181
PLA/PHA plastic 183
ABS 185
PET 185
Composite or filled materials 186
Paste 187
Identifying Components 189
Structural framework 189
Extruder 189
Build plate 193
Control electronics 194
Software 195
Simplify3D 197
Part 5: Creating a RepRap 3D Printer 201
Chapter 12: Assembling Structural Elements 203
Locating Materials 203
Kits 204
Self-sourcing 206
Printing your own 207
Ask the community 207
Online marketplaces 207
Obtaining Printed Parts for Machine Assembly 208
Understanding the Machine Motion 209
Z-axis motion 210
X and Y motion 212
Building the Frame Structure 214
Assembling the Prusa i3 Y-Axis Frame 219
Assembling the Moving Axis 220
Assembling the Prusa i3 moving Y axis 223
Assembling the Prusa i3 moving Z and X axes 224
Joining the Z, X, and Y axes 227
Sensing the Home Position 228
Chapter 13: Understanding RepRap Control Electronics 231
Understanding RepRap Electronics 231
RAMPS 232
RAMBo 232
Sanguinololu 234
Minitronics 234
RUMBA 235
Elefu-RA V3 235
Megatronics 236
Adding Electronics to Your RepRap 3D Printer 238
Preparing for electronics assembly 238
Fitting the positional sensors to the frame 239
Fitting the heated bed to the Y carriage 241
Preparing and fitting the main electronics 242
Preparing and connecting the power supply 243
Connecting the motor and position-sensing wiring 244
Adding Modular Components, Sensors, and Motors 246
Printing without a computer 246
Installing stepper-motor driver modules 246
Selecting position-sensing modules 249
Identifying power-supply requirements 250
Installing add-ons 253
Connecting RepRap Wiring 255
Configuring Firmware 256
Configuring Prusa i3 firmware 258
Uploading Marlin firmware to RAMPS electronics 263
Chapter 14: Assembling the RepRap Extruder 265
Thermoplastic Extrusion 265
Filament drive mechanism 266
Idler wheel 270
Prusa i3 Extruder and Hot-End Assembly 273
Fitting the filament drive to the motor shaft 273
Assembling the extruder idler pressure bearing 273
Fitting the J-head hot-end 274
Fitting the assembled extruder to the X carriage 274
Wiring the extruder to RAMPS 275
Multicolor Print Methods 279
Toothpaste effect 280
Three-way color mixing 280
Two-color printing 281
Layer-selective color printing 282
Cut-and-follow-on printing 283
Extruder Operation and Upgrades 286
Fixing a blocked hot-end or extruder 288
Acquiring an assortment of extruders 289
Cooling extruders with fans 291
Chapter 15: Identifying Software and Calibrating Your 3D Printer 295
Finding 3D Design Software and Models 295
Using design software 301
Verifying models with Netfabb 303
Working with Slic3r 305
Configuring Slic3r 305
Processing models with Slic3r 308
Calibrating Your 3D Printer 315
Leveling your print bed 316
Tuning your hot-end temperature control 318
Calibrating extruder distance 318
Printing Objects 322
Printing vases, pots, and cups 326
Printing large single-piece objects 328
Printing tiny or highly detailed objects 328
Printing many objects at the same time 329
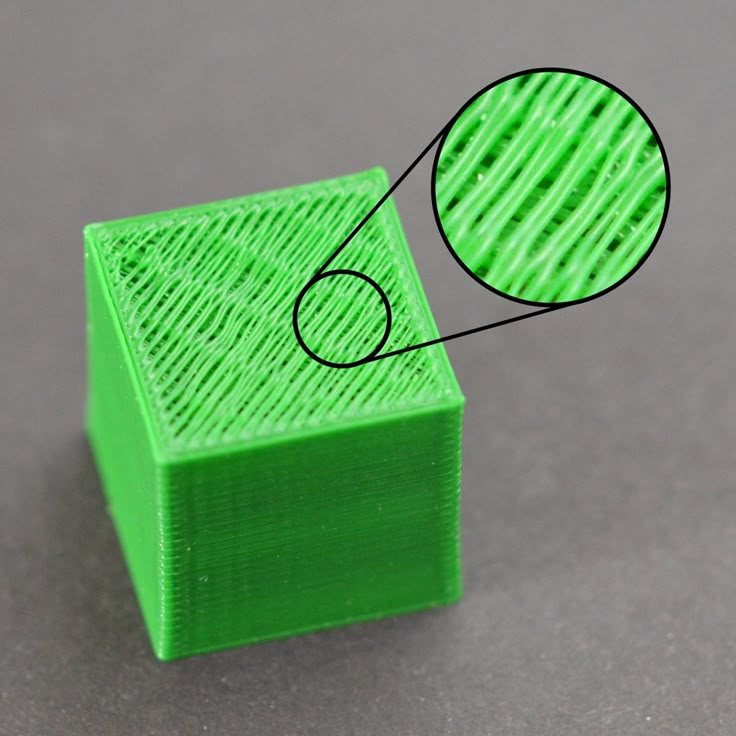
Improving print quality 330
Chapter 16: Refining the Design and 3D-Printing Process 331
Being Productive with 3D Printing 331
Refining Your Print Preparations 333
Examining a Design Example 336
Designing Parts for 3D Printing 340
Material 341
Orientation 342
Layer height 344
Nozzle size and perimeter outlines 344
Infill level 344
Postprocessing, Recycling, and Finishing an Object 346
Manual finishing 346
Assisted finishing 347
Coatings 348
Printing Big: Bonding and Joining Parts 349
Recycling 351
Using a Web-Based 3D-Printing Interface 354
OctoPrint 354
Duet 354
Part 6: The Part of Tens 355
Chapter 17: Ten Examples of Direct Digital Manufacturing and Personalization 357
Producing 3D-Printed Food 357
Printing Tissues and Organs 358
Fashioning Biological Replicas 358
Crafting Clothing and Footwear 359
Customizing Jewelry 360
Making Hollywood Spectacular 360
Creating Structures 361
Reaching beyond the Sky 361
Constructing Robots 362
Printing 3D Printers 363
Chapter 18: Ten Impossible Designs Created Using Additive Manufacturing 365
Personalized Objects 365
Medical Implants 367
Dental Repair 367
Self-Deploying Robots 368
Printed Drones and Aircraft Parts 368
On-Demand, On-Site Manufacturing 369
Custom Objects Created in Space 369
Art on Demand 370
Locally Fabricated Items 370
Body Parts 371
Index 373
3D printing for "dummies" or "what is a 3D printer?"
- 1 3D printing term
- 2 3D printing methods
- 2.
 1 Extrusion printing
 - 2.2 Melting, sintering or gluing
- 2.3 Stereolithography
- 2.4 Lamination
- 3 Fused Deposition Printing (FDM)
- 3.1 Consumables
- 3.2 Extruder
- 3.3 Working platform
- 3.4 Positioners
- 3.5 Control
- 3.6 Varieties of FDM printers
- 4 Laser stereolithography (SLA)
- 4.1 Lasers and projectors
- 4.2 Cuvette and resin
- 4.3 Types of stereolithographic printers
3D printing term
The term 3D printing has several synonyms, one of which quite briefly and accurately characterizes the essence of the process - "additive manufacturing", that is, production by adding material. The term was not coined by chance, because this is the main difference between multiple 3D printing technologies and the usual methods of industrial production, which in turn received the name "subtractive technologies", that is, "subtractive". If during milling, grinding, cutting and other similar procedures, excess material is removed from the workpiece, then in the case of additive manufacturing, material is gradually added until a solid model is obtained. nine0048
Soon 3D printing will even be tested on the International Space Station
Strictly speaking, many traditional methods could be classified as "additive" in the broad sense of the word - for example, casting or riveting. However, it should be borne in mind that in these cases, either the consumption of materials is required for the manufacture of specific tools used in the production of specific parts (as in the case of casting), or the whole process is reduced to joining ready-made parts (welding, riveting, etc.). In order for the technology to be classified as “3D printing”, the final product must be built from raw materials, not blanks, and the formation of objects must be arbitrary - that is, without the use of forms. The latter means that additive manufacturing requires a software component.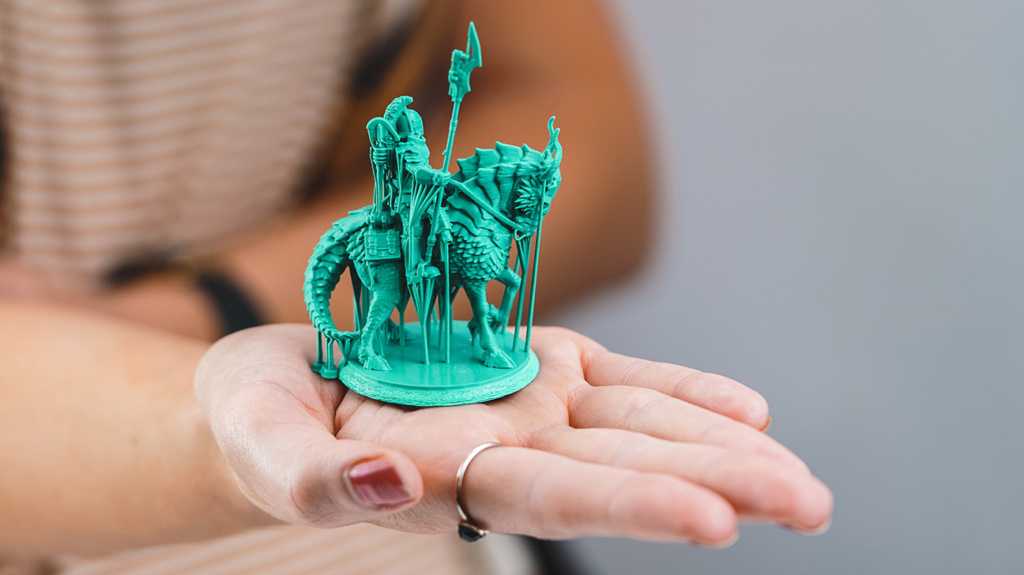 Roughly speaking, additive manufacturing requires computer control so that the shape of final products can be determined by building digital models. It was this factor that delayed the widespread adoption of 3D printing until the moment when numerical control and 3D design became widely available and highly productive. nine0048
3D printing techniques
3D printing technologies are numerous, and there are even more names for them due to patent restrictions. However, you can try to divide technologies into main areas:
Extrusion printing
This includes methods such as deposition deposition (FDM) and multi-jet printing (MJM). This method is based on the extrusion (extrusion) of consumables with the sequential formation of the finished product. As a rule, consumables consist of thermoplastics or composite materials based on them. nine0048
Melting, sintering or bonding
This approach is based on bonding powdered material together. Formation is done in different ways. The simplest is gluing, as is the case with 3D inkjet printing (3DP). Such printers deposit thin layers of powder onto the build platform, which are then selectively bonded with a binder. Powders can be made up of virtually any material that can be ground to a powder—plastic, wood, metal. nine0048
This model of James Bond's Aston Martin was successfully printed on Voxeljet's SLS printer and blown up just as successfully during the filming of Skyfall instead of the expensive original
sintering (SLS and DMLS) and smelting (SLM), which allow you to create all-metal parts. As with 3D inkjet printing, these devices apply thin layers of powder, but the material is not glued together, but sintered or melted using a laser. Laser sintering (SLS) is used to work with both plastic and metal powders, although metal pellets usually have a more fusible shell, and after printing they are additionally sintered in special ovens. DMLS is a variant of SLS installations with more powerful lasers that allow sintering metal powders directly without additives.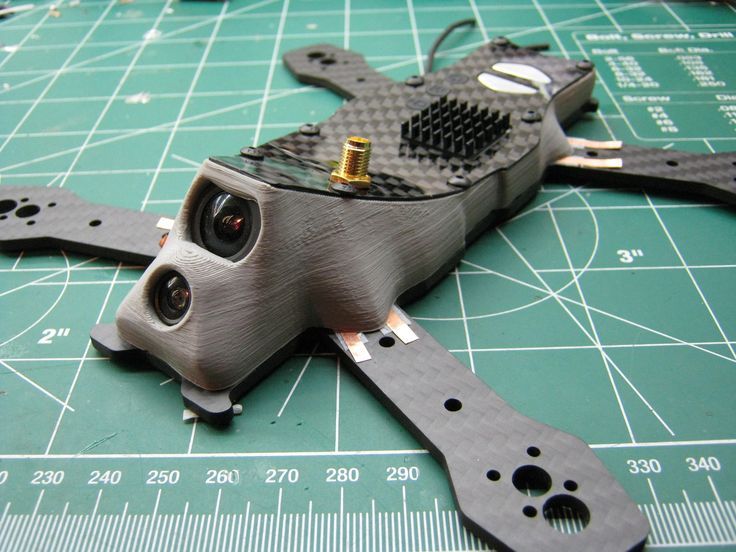 SLM printers provide not just sintering of particles, but their complete melting, which allows you to create monolithic models that do not suffer from the relative fragility caused by the porosity of the structure. As a rule, printers for working with metal powders are equipped with vacuum working chambers, or they replace air with inert gases. Such a complication of the design is caused by the need to work with metals and alloys subject to oxidation - for example, with titanium. nine0048
Stereolithography
How an SLA printer works
Stereolithography printers use special liquid materials called "photopolymer resins". The term "photopolymerization" refers to the ability of a material to harden when exposed to light. As a rule, such materials react to ultraviolet irradiation.
Resin is poured into a special container with a movable platform, which is installed in a position near the surface of the liquid. The layer of resin covering the platform corresponds to one layer of the digital model. Then a thin layer of resin is processed by a laser beam, hardening at the points of contact. At the end of illumination, the platform together with the finished layer is immersed to the thickness of the next layer, and illumination is performed again. nine0048
Lamination
Laminating (LOM) 3D printers workflow
Some 3D printers build models using sheet materials - paper, foil, plastic film.
Layers of material are glued on top of each other and cut to the contours of the digital model using a laser or a blade.
These machines are well suited for prototyping and can use very cheap consumables, including regular office paper. However, the complexity and noise of these printers, coupled with the limitations of the models they produce, limit their popularity. nine0048
Fused Deposition Modeling (FDM) and Laser Stereolithography (SLA) are the most popular 3D printing methods used in the home and office.
Let's take a closer look at these technologies.
Fused Deposition Printing (FDM)
FDM is perhaps the simplest and most affordable 3D construction method, which makes it very popular.
High demand for FDM printers is driving device and consumable prices down rapidly, along with technology advances towards ease of use and improved reliability. nine0048
Consumables
ABS filament spool and finished model
FDM printers are designed to print with thermoplastics, which are usually supplied as thin filaments wound on spools. The range of "clean" plastics is very wide. One of the most popular materials is polylactide or "PLA plastic". This material is made from corn or sugar cane, which makes it non-toxic and environmentally friendly, but makes it relatively short-lived. ABS plastic, on the other hand, is very durable and wear-resistant, although it is susceptible to direct sunlight and can release small amounts of harmful fumes when heated. Many plastic items that we use on a daily basis are made from this material: housings for household appliances, plumbing fixtures, plastic cards, toys, etc. nine0048
In addition to PLA and ABS, printing is possible with nylon, polycarbonate, polyethylene and many other thermoplastics that are widely used in modern industry. More exotic materials are also possible, such as polyvinyl alcohol, known as "PVA plastic". This material dissolves in water, which makes it very useful for printing complex geometric patterns. But more on that below.
Model made from Laywoo-D3. Changing the extrusion temperature allows you to achieve different shades and simulate annual rings
It is not necessary to print with homogeneous plastics. It is also possible to use composite materials imitating wood, metals, stone. Such materials use all the same thermoplastics, but with impurities of non-plastic materials.
So, Laywoo-D3 consists partly of natural wood dust, which allows you to print "wooden" products, including furniture.
The material called BronzeFill is filled with real bronze, and models made from it can be ground and polished, achieving a high similarity to products made from pure bronze. nine0048
One has only to remember that thermoplastics serve as a binding element in composite materials - they determine the thresholds of strength, thermal stability and other physical and chemical properties of finished models.
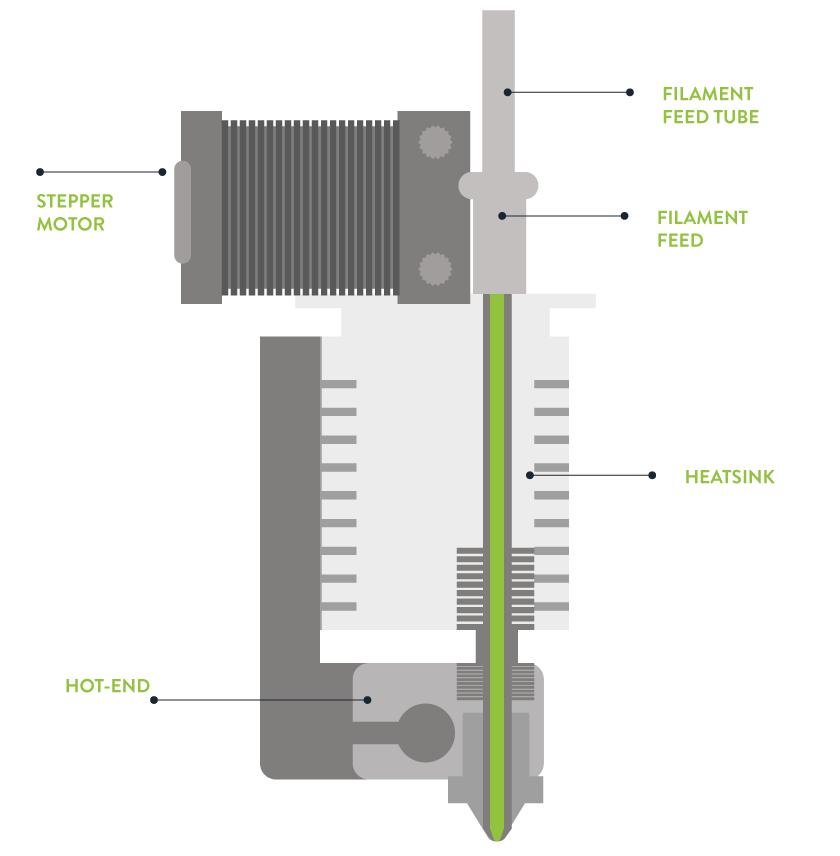
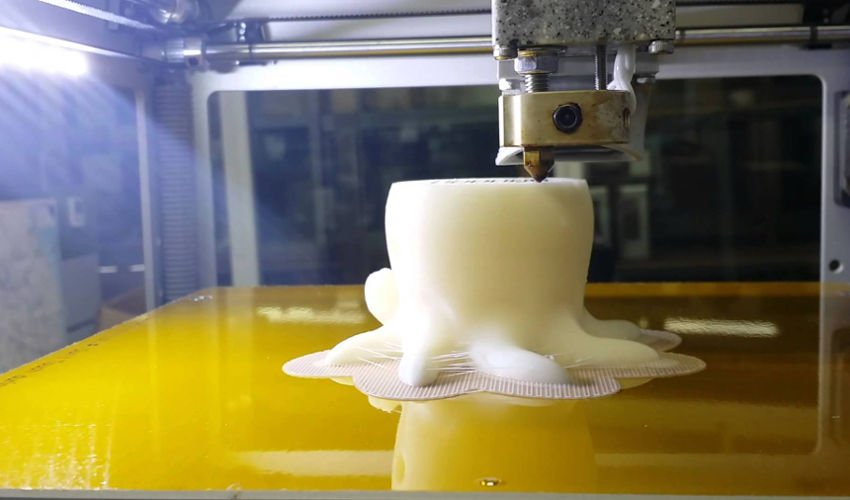
Extruder
Extruder - FDM print head. Strictly speaking, this is not entirely true, because the head consists of several parts, of which only the feed mechanism is directly "extruder". However, by tradition, the term "extruder" is commonly used as a synonym for the entire print assembly. nine0048
FDM extruder general design
The extruder is designed for melting and applying thermoplastic thread. The first component is the thread feed mechanism, which consists of rollers and gears driven by an electric motor.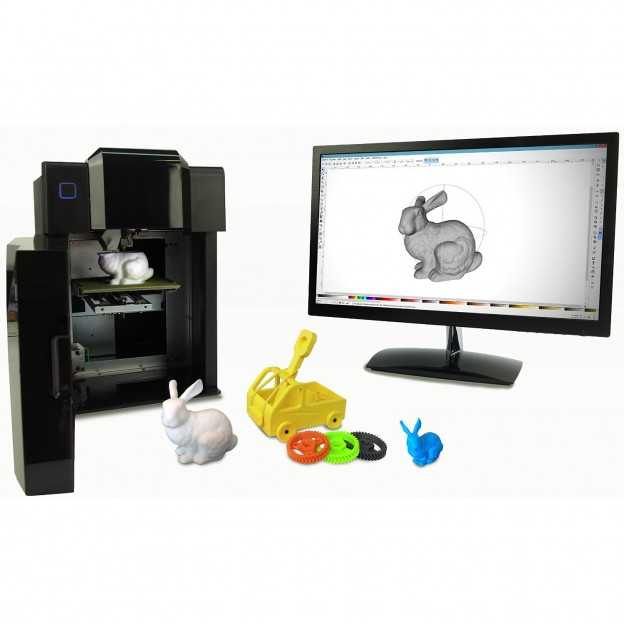 The mechanism feeds the thread into a special heated metal tube with a small diameter nozzle, called a "hot end" or simply a "nozzle". The same mechanism is used to remove the thread if a change of material is needed. nine0048
The hot end is used to heat and melt the thread fed by the puller. As a rule, nozzles are made from brass or aluminum, although more heat-resistant, but also more expensive materials can be used. For printing with the most popular plastics, a brass nozzle is quite enough. The “nozzle” itself is attached to the end of the tube with a threaded connection and can be replaced with a new one in case of wear or if a change in diameter is necessary. The nozzle diameter determines the thickness of the molten filament and, as a result, affects the print resolution. The heating of the hot end is controlled by a thermistor. Temperature control is very important, because when the material is overheated, pyrolysis can occur, that is, the decomposition of plastic, which contributes both to the loss of the properties of the material itself and to clogging of the nozzle. nine0048
PrintBox3D One FDM Printer Extruder
To prevent the filament from melting too early, the top of the hot end is cooled by heatsinks and fans. This point is of great importance, since thermoplastics that pass the glass transition temperature significantly expand in volume and increase the friction of the material with the walls of the hot end. If the length of such a section is too long, the pulling mechanism may not have enough strength to push the thread. nine0048
The number of extruders may vary depending on the purpose of the 3D printer. The simplest options use a single printhead. The dual extruder greatly expands the capabilities of the device, allowing you to print one model in two different colors, as well as using different materials. The last point is important when building complex models with overhanging structural elements: FDM printers cannot print “over the air”, since the applied layers require support. In the case of hinged elements, temporary support structures have to be printed, which are removed after printing is completed. The removal process is fraught with damage to the model itself and requires accuracy. In addition, if the model has a complex structure with internal cavities that are difficult to access, building conventional supports may not be practical due to the difficulty in removing excess material. nine0048
Finished model with PVA supports (white) before and after washing
In such cases, the same water-soluble polyvinyl alcohol (PVA) comes in handy. Using a dual extruder, you can build a model from waterproof thermoplastic using PVA to create supports.
After printing, PVA can be simply dissolved in water and a complex product of perfect quality can be obtained.
Some FDM printers can use three or even four extruders. nine0048
Working platform
Heated platform covered with removable glass work table
Models are built on a special platform, often equipped with heating elements. Preheating is required for a wide range of plastics, including the popular ABS, which are subject to a high degree of shrinkage when cooled. The rapid loss of volume by cold coats compared to freshly applied material can lead to model distortion or delamination. The heating of the platform makes it possible to significantly equalize the temperature gradient between the upper and lower layers. nine0048
Heating is not recommended for some materials. A typical example is PLA plastic, which requires a fairly long time to harden. Heating PLA can lead to deformation of the lower layers under the weight of the upper ones. When working with PLA, measures are usually taken not to heat up, but to cool the model. Such printers have characteristic open cases and additional fans blowing fresh layers of the model.
Calibration screw for work platform covered with blue masking tape
The platform needs to be calibrated before printing to ensure that the nozzle does not hit the applied layers and move too far causing air-to-air printing resulting in plastic vermicelli. The calibration process can be either manual or automatic. In manual mode, calibration is performed by positioning the nozzle at different points on the platform and adjusting the platform inclination using the support screws to achieve the optimal distance between the surface and the nozzle.
As a rule, platforms are equipped with an additional element - a removable table. This design simplifies the cleaning of the working surface and facilitates the removal of the finished model. Stages are made from various materials, including aluminum, acrylic, glass, etc. The choice of material for the manufacture of the stage depends on the presence of heating and consumables for which the printer is optimized.
For a better adhesion of the first layer of the model to the surface of the table, additional tools are often used, including polyimide film, glue and even hairspray! But the most popular tool is inexpensive, but effective masking tape. Some manufacturers make perforated tables that hold the model well but are difficult to clean. In general, the expediency of applying additional funds to the table depends on the consumable material and the material of the table itself. nine0048
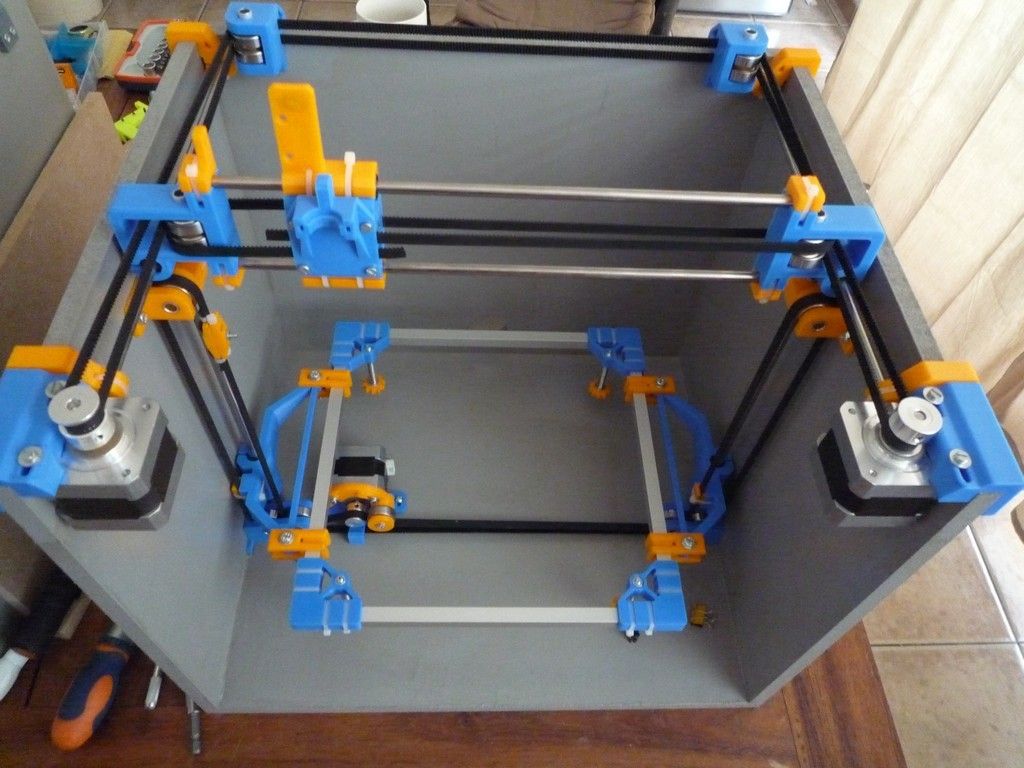
Positioning mechanisms
Scheme of operation of positioning mechanisms
Of course, the print head must move relative to the working platform, and unlike conventional office printers, positioning must be carried out not in two, but in three planes, including height adjustment.
Positioning pattern may vary. The simplest and most common option involves mounting the print head on perpendicular guides driven by stepper motors and providing positioning along the X and Y axes. nine0048
Vertical positioning is carried out by moving the working platform.
On the other hand, it is possible to move the extruder in one plane and the platforms in two.
SeemeCNC ORION Delta Printer
One option that is gaining popularity is the delta coordinate system.
Such devices are called "delta robots" in the industry.
In delta printers, the print head is suspended on three manipulators, each of which moves along a vertical rail.
The synchronous symmetrical movement of the manipulators allows you to change the height of the extruder above the platform, and the asymmetric movement causes the head to move in the horizontal plane.
A variant of this system is the reverse delta design, where the extruder is fixed to the ceiling of the working chamber, and the platform moves on three support arms. nine0048
Delta printers have a cylindrical build area, and their design makes it easy to increase the height of the working area with minimal design changes by extending the rails.
In the end, everything depends on the decision of the designers, but the fundamental principle does not change.
Control
Typical Arduino-based controller with add-on modules
The operation of the FDM printer, including nozzle and platform temperature, filament feed rate, and stepper motors for positioning the extruder, is controlled by fairly simple electronic controllers. Most controllers are based on the Arduino platform, which has an open architecture. nine0048
The programming language used by the printers is called G-code (G-Code) and consists of a list of commands executed in turn by the 3D printer systems. G-code is compiled by programs called "slicers" - standard 3D printer software that combines some of the features of graphics editors with the ability to set print options through a graphical interface. The choice of slicer depends on the printer model. RepRap printers use open source slicers such as Skeinforge, Replicator G and Repetier-Host. Some companies make printers that require proprietary software. nine0048
Program code for printing is generated using slicers
As an example, we can mention Cube printers from 3D Systems. There are companies that offer proprietary software but allow third-party software, as is the case with the latest generation of MakerBot 3D printers.
Slicers are not intended for 3D design per se. This task is done with CAD editors and requires some 3D design skills. Although beginners should not despair: digital models of a wide variety of designs are offered on many sites, often even for free. Finally, some companies and individuals offer 3D design services for custom printing. nine0048
Finally, 3D printers can be used in conjunction with 3D scanners to automate the process of digitizing objects. Many of these devices are designed specifically to work with 3D printers. Notable examples include the 3D Systems Sense handheld scanner and the MakerBot Digitizer handheld desktop scanner.
MakerBot Replicator 5th Generation FDM Printer with built-in control module on the top of the frame
The user interface of a 3D printer can consist of a simple USB port for connecting to a personal computer. In such cases, the device is actually controlled by the slicer. nine0048
The disadvantage of this simplification is a rather high probability of printing failure when the computer freezes or slows down.
A more advanced option includes an internal memory or memory card interface to make the process standalone.
These models are equipped with control modules that allow you to adjust many print parameters (such as print speed or extrusion temperature). The module may include a small LCD display or even a mini-tablet. nine0048
Varieties of FDM printers
Professional Stratasys Fortus 360mc FDM printer that allows printing with nylon
FDM printers are very, very diverse, ranging from the simplest homemade RepRap printers to industrial installations capable of printing large-sized objects.
Stratasys, founded by Scott Crump, the inventor of FDM technology, is a leader in the production of industrial installations. nine0048
You can build the simplest FDM printers yourself. Such devices are called RepRap, where "Rep" indicates the possibility of "replication", that is, self-reproduction.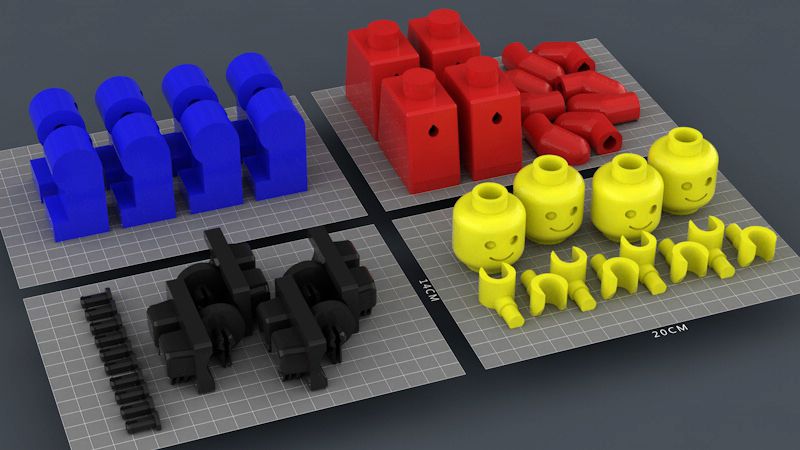
RepRap printers can be used to print custom built plastic parts.
Controller, rails, belts, motors and other components can be easily purchased separately.
Of course, assembling such a device on your own requires serious technical and even engineering skills. nine0048
Some manufacturers make it easy by selling DIY kits, but these kits still require a good understanding of the technology. RepRap Printers nine0048
And, despite their "homemade nature", RepRap printers are quite capable of producing models with quality at the level of expensive branded counterparts.
Ordinary users who do not want to delve into the intricacies of the process, but require only a convenient device for household use, can purchase a ready-made FDM printer.
Many companies are focusing on the development of the consumer market segment, offering 3D printers for sale that are ready to print “right out of the box” and do not require serious computer skills. nine0048
3D Systems Cube consumer 3D printer
The most famous example of a consumer 3D printer is the 3D Systems Cube.
While it doesn't boast a huge build area, ultra-fast print speeds, or superb build quality, it's easy to use, affordable, and safe: This printer has received the necessary certification to be used even by children.
Mankati FDM printer demonstration: http://youtu.be/51rypJIK4y0 nine0048
Laser Stereolithography (SLA)
Stereolithographic 3D printers are widely used in dental prosthetics
Stereolithographic printers are the second most popular and widespread after FDM printers.
These units deliver exceptional print quality.
The resolution of some SLA printers is measured in a matter of microns - it is not surprising that these devices quickly won the love of jewelers and dentists. nine0048
The software side of laser stereolithography is almost identical to FDM printing, so we will not repeat ourselves and will only touch on the distinctive features of the technology.![]()
Lasers and projectors
Projector illumination of a photopolymer model using Kudo3D Titan DLP printer as an example
The cost of stereolithography printers is rapidly declining due to growing competition due to high demand and the use of new technologies that reduce the cost of construction. nine0048
Although the technology is generically referred to as "laser" stereolithography, most recent developments use UV LED projectors for the most part.
Projectors are cheaper and more reliable than lasers, do not require the use of delicate mirrors to deflect the laser beam, and have higher performance. The latter is explained by the fact that the contour of the whole layer is illuminated as a whole, and not sequentially, point by point, as is the case with laser options. This variant of the technology is called projection stereolithography, "DLP-SLA" or simply "DLP". However, both options are currently common - both laser and projector versions. nine0048
Cuvette and resin
Photopolymer resin is poured into a cuvette
A photopolymer resin that looks like epoxy is used as consumables for stereolithographic printers. Resins can have a variety of characteristics, but they all share one key feature for 3D printing applications: these materials harden when exposed to ultraviolet light. Hence, in fact, the name "photopolymer".
When polymerized, resins can have a wide variety of physical characteristics. Some resins are like rubber, others are hard plastics like ABS. You can choose different colors and degrees of transparency. The main disadvantage of resins and SLA printing in general is the cost of consumables, which significantly exceeds the cost of thermoplastics. nine0048
On the other hand, stereolithography printers are mainly used by jewelers and dentists who do not need to build large parts but appreciate the savings from fast and accurate prototyping. Thus, SLA printers and consumables pay for themselves very quickly.
Example of a model printed on a laser stereolithographic 3D printer
Resin is poured into a cuvette, which can be equipped with a lowering platform. In this case, the printer uses a leveling device to flatten the thin layer of resin covering the platform just prior to irradiation. As the model is being made, the platform, together with the finished layers, is “embedded” in the resin. Upon completion of printing, the model is removed from the cuvette, treated with a special solution to remove liquid resin residues and placed in an ultraviolet oven, where the final illumination of the model is performed. nine0048
Some SLA and DLP printers work in an "inverted" scheme: the model is not immersed in the consumable, but "pulled" out of it, while the laser or projector is placed under the cuvette, and not above it. This approach eliminates the need to level the surface after each exposure, but requires the use of a cuvette made of a material transparent to ultraviolet light, such as quartz glass.
The accuracy of stereolithographic printers is extremely high. For comparison, the standard for vertical resolution for FDM printers is considered to be 100 microns, and some variants of SLA printers allow you to apply layers as thin as 15 microns. But this is not the limit. The problem, rather, is not so much in the accuracy of lasers, but in the speed of the process: the higher the resolution, the lower the print speed. The use of digital projectors allows you to significantly speed up the process, because each layer is illuminated entirely. As a result, some DLP printer manufacturers claim to be able to print with a vertical resolution of one micron! nine0048
Video from CES 2013 showing Formlabs Form1 stereolithography 3D printer in action: http://youtu.be/IjaUasw64VE
Stereolithography Printer Options
Formlabs Form1 Desktop Stereolithography Printer
As with FDM printers, SLA printers come in a wide range in terms of size, features and cost.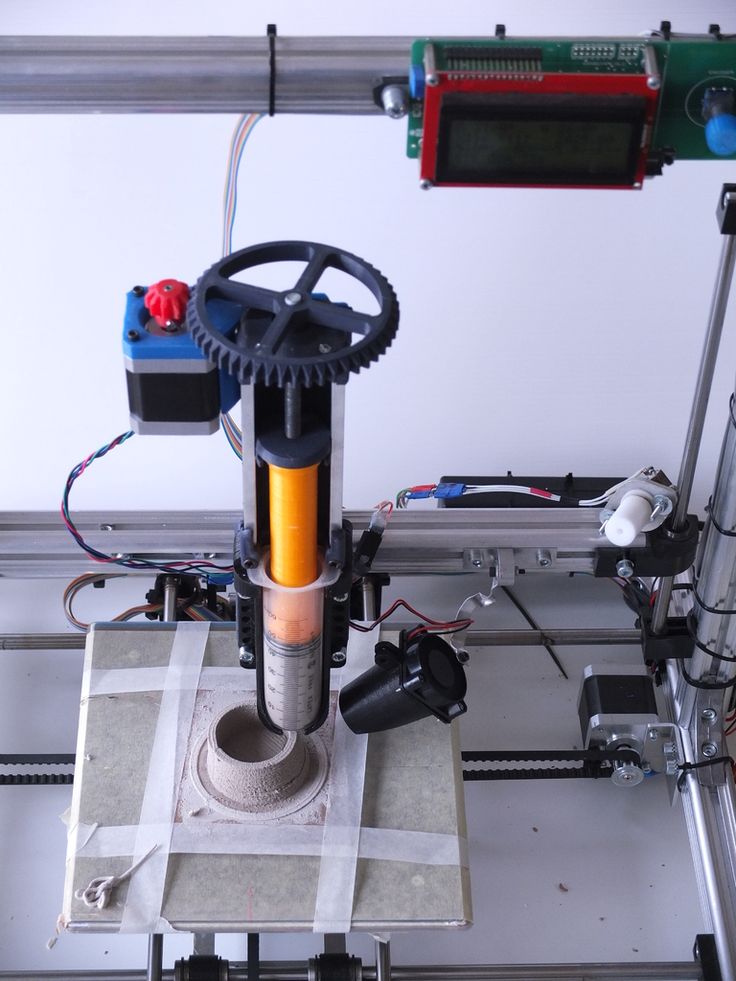 Professional installations can cost tens if not hundreds of thousands of dollars and weigh a couple of tons, but the rapid development of desktop SLA and DLP printers is gradually reducing the cost of equipment without compromising print quality. nine0048
Models such as the Titan 1 promise to make stereolithographic 3D printing affordable for small businesses and even home use at around $1,000. Formlabs' Form 1 is available now for a factory selling price of $3,299.
The developer of the DLP printer Peachy generally intends to overcome the lower price barrier of $100.
At the same time, the cost of photopolymer resins remains quite high, although the average price has fallen from $150 to $50 per liter over the past couple of years. nine0048
Of course, the growing demand for stereolithographic printers will stimulate the growth in the production of consumables, which will lead to further price reductions.
Go to the main page of the Encyclopedia of 3D printing
3D printing for "dummies" from the "teapot" - Personal experience on vc.
 ru
ru 1186 views
I recently became the owner of a 3D printer, before that I knew almost nothing about 3D printing, so I decided to share my experience with the same "dummies", people who are far from this technology. My article is intended precisely and only for such people. The advice of “3D printers” with experience for beginners may turn out to be useless, due to their complexity or certain specifics. I think that my post, based on personal experience (and personal mistakes), not overloaded with technical details, will be very useful to a wide audience. Also, my description is based on personal experience with the Creality Ender 3 Pro 3D printer. The information below may not be useful for models from other companies. Unfortunately, I am not aware of the current Russian realities, and therefore everything described below applies to 3D printer models that are popular in the United States. I also apologize in advance for some words and terms in English (I honestly tried, but could not always find an adequate term in Russian).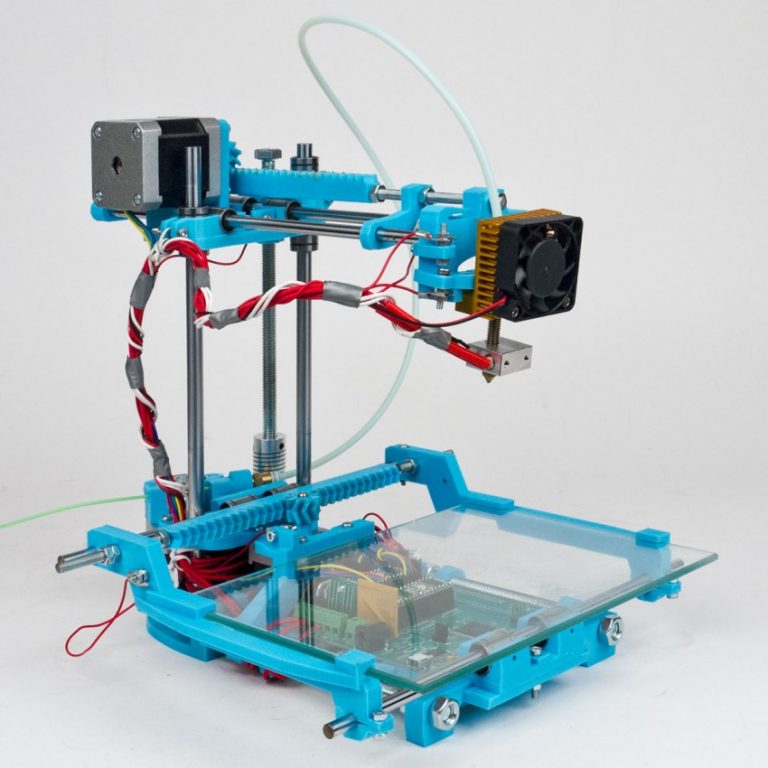 nine0048
First, I will give a few “maxims” and refuted stereotypes, perhaps only mine:
- “3D printing is a complex, expensive, and requires special knowledge” - it is absolutely not true! Perhaps this was once the case, but at the moment a 3D printer is a consumer device that is no more complicated (but rather, even much simpler!) TV, smartphone, computer. In addition, it is quite cheap, by modern standards, a hobby - one of the cheapest, probably. Special knowledge for 3D printing at home is not required, or rather, no more, which can be gleaned in a short time from the FAQ on the official website, as well as in user forms. nine0004
- “The 3D printer needs a special room because it stinks and makes a lot of noise” - this is also not true (or, more precisely, not quite true). There are plastics such as PLA and PETG that emit virtually no odor when printed, as well as printer models equipped with near-silent fans. However, the noise from the entry level models is not “fatal”, but, say, like from a gaming desktop / laptop in a “fancy” 3D game.
- “You can make good money in 3D printing by printing at home and selling fun crafts on eBay, well, or save a lot of money by printing things you need for the home, such as auto parts, etc.” – unfortunately, this is also not true. Yes, there are a lot of 3D prints for sale on eBay, but as you can imagine, the competition is up to par. The simplicity and affordability of this technology has now brought 3D printers to millions of homes; it is clear that a lot of people have made a "brilliant discovery" about the possibility of earning money by selling what they print. Consider 3D printing only as an interesting and low-cost hobby (set yourself an initial budget, for example, no higher than $200-250) that can please you, your family, as well as friends and acquaintances with original crafts and gifts. nine0004
- “3D printing requires knowledge of 3D modeling software or a CAD system – not necessary at all! There are a huge number of sites offering all kinds of 3D models for printing: scans of famous and not so famous sculptures, and busts of historical figures, and all kinds of figures of cartoon characters, films and computer games, and original witty crafts, like a sundial that shows time in digital form, and most of the models can be downloaded for free - at most, you will be asked to register for downloading! However, owning a CAD program is a very good skill (and, especially, for a DIYer - it was one of the “points” for buying a printer for me), but I haven’t gotten to that yet - but once I master it, I’ll definitely I will describe my experience0004
So, as I wrote above, I got an Ender 3 Pro printer from Creality. Entry level printers from this company are among the most popular in the United States, due to good quality, both manufacturing and printing, low prices, and wide community support. Well, and I will not hide it, a great "deal" in our local Microcenter-e (this is a computer store located in Cambridge, MA) played a significant role: they were sold for $99 at a promotion, plus a $10 off coupon for filament (a plastic thread for print), which I managed to use as many as three times 😊. For the printer itself, I also had to ride a couple of times to the store: they diverged, in the words of the classic, “like meat pies at a vegetarian lunch”! nine0048
The printer comes neatly packaged as a DIY kit.
However, assembly, greatly facilitated by the video (paper instructions are also useful, but the video is much more visual), attached to the micro SD-card that comes with the printer, will take you no more than an hour or two maximum, after which the printer is literally ready to work ! What you should pay attention to when assembling: this is the location of the "limit switch" of the vertical axis (Z) - he strives to stand in, as it were, the place allotted for him, but everything is not so simple. This sensor is very important (however, they are all important, so it is important to follow the assembly instructions punctually, and understanding what exactly you are doing), because it determines the distance of the print head nozzle (hot end) from the print bed (heated / print bed). nine0048
The main elements of the 3D printer
And this distance is very important: if it is large, you will not be able to correctly calibrate the position of the print head, and if it is too small, then the print head may damage the surface of the printing plate. As I did (however, this can be found in a bunch of online manuals, and, probably, on the official website in the FAQ - but I did not look): after assembling the printer, I set all four calibration "lambs" under the printing table to a "relaxed" state , and the “endstop switch” of the Z axis was fixed at a deliberately greater distance so that the print head (hot end) was guaranteed to be at a distance from the printing table.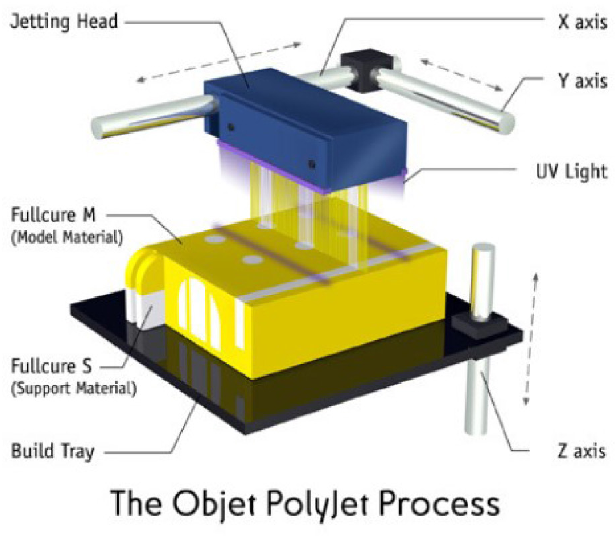 Then I turned on the printer, and chose the command from the “Auto Home” menu. After the printer set the head to the “home” position, I turned it off, and rotating the motor (stepper motor) of the Z axis by hand, as well as carefully moving the “limit switch”, I ensured that the “click” of the “limit switch” (and this means the sensor is triggered) was heard by touching the head of the table surface, after which he fixed the “limit switch” tightly with a key. Then, taking a sheet of ordinary paper, and rotating the “lambs” of the calibration screws, as well as moving the print head across the entire surface of the desktop, he ensured that it moved, slightly “scratching” the sheet. But, unfortunately, such a “cold” calibration will not be enough for a successful print, so I will recommend the “hot calibration” or “battle check” method. Here in this video you can see how the calibration process takes place, as well as download the necessary files (the link is in the video description). There is also a link to print profiles for Ender 3 Pro - I also recommend downloading them (and what they are for, I'll tell you later).
 nine0048
Once assembly and calibration is complete, your 3D printer is ready to go! If you stocked up with a kilogram coil with PLA plastic in advance (PLA filament, more about the plastics used for printing will be in the next part), then you can safely install it, and if not, then a small skein of plastic filament comes with the printer (but it’s better to buy a coil right away, because filament is also required for calibration!). On the micro SD card that came with the printer, there are several models ready for printing - these are files with the extension .gcode (G-code is a programming language for CNC devices, understood by most 3D printers. Don't worry, you won't need to learn features of this language - special programs called "slicers" (slicer) will take care of this for you, so that you load the filament (plastic thread from the spool) through the extruder (extruder, filament feeder into the print head) through a small hole in the extruder ( pressing the clamp with your hand and directing the thread through the feed tube, move the thread all the way into the print head), insert the micro SD card into the printer, and select the model in the form of a .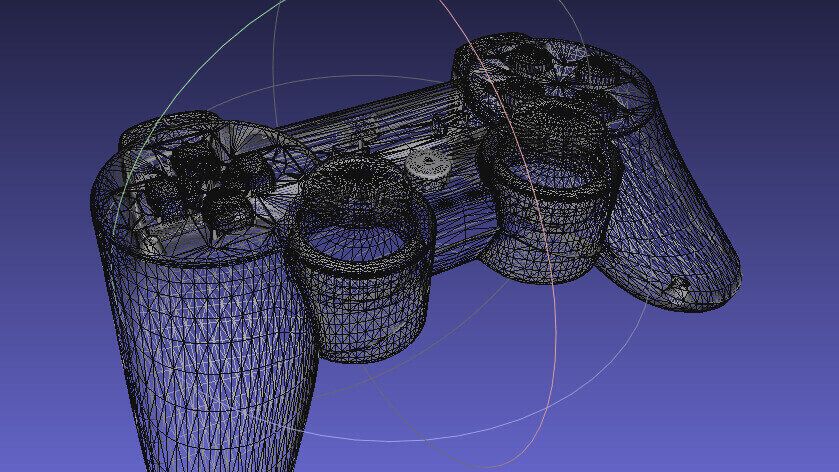 gcode file, you can safely start printing! nine0048
Models in gcode bundled with Ender 3D Pro
You can print anywhere - in the office, in the dining room, in the living room, in general, where you assembled the device. Later I will tell you where it is better to place the printer on a permanent basis, but any place is suitable for test printing - there will be no unpleasant smell or much noise.
But here's one thing you need to consider beforehand: 3D printing takes a hell of a lot of time! Even a small model can be printed for several hours (and a large one for several days!), Depending on the selected slicer settings, speed and printer settings. So, when starting to print, take this into account - the printing process, of course, can be paused (and then resumed), but for a start, I would recommend bringing the process without interruptions - well, to see a real good result, and feel confident in on their own, as well as the capabilities of the printer. nine0048
It should be noted that Creality uses the open source Marlin software as the firmware for its entry level 3D printers, but unfortunately pre-installs a very outdated version. If you are a programmer, or just “on you” with a computer for a long time, then it will not be difficult for you to assemble the latest version of Marlin yourself, for example, through VSCode, and then “flash” it via an SD-card (you just need to clear the card, and copy the release file with the .bin extension there). Otherwise, you can use my build - download, unzip, copy to a blank SD-card, turn off the printer, insert the card, turn on the printer. After a short time, the new firmware will be installed on your Ender 3 Pro (other printer models may require different builds). However, you can postpone this option for later - the printer is ready to work right out of the box. nine0048
Here I want to mention a few more useful printer improvements that will be useful for a beginner (however, these improvements are optional).
First, I recommend that you install and connect the open source OctoPrint software to your printer - you will need a Raspberry Pi with a camera for this. I used a cheap Raspberry Pi Zero W (with built-in WiFi) which, while not officially supported, works great. OctoPrint will add to your entry level printer far from entry level "features" - the ability to remotely control and manage the printer via a web interface, as well as from a great smartphone application. nine0048
This application is actively developed and well supported, has a very large and friendly community; many useful features are implemented either directly out of the box or using plugins; the documentation is also extensive and comprehensive. Installation, as well as connection to the printer, are extremely simple: download the sd-card image, edit the configuration file (specify the credentials of your WiFi access point), copy it to the card, connect it using a micro USB ↔ micro USB OTG cable to the printer - and profit! nine0048
My RPi Zero W with camera and temperature sensor connected to Ender 3D Pro
Secondly, I recommend that you immediately get spare surfaces for printing (build surface plate, this is a removable surface that is installed on a heated bed (heated bed), and on which, in fact, printing takes place). The printer comes with a "standard" flexible magnetic surface, and I assure you: you'll have to get a new one soon enough! So, it's better to take care in advance, because their cost is low, on Amazon they ask for $9.99 for a pack of two. You can also “upgrade” to a glass plate (it costs a little more), it has both its advantages and certain disadvantages, I will list them briefly. Advantages of the stock flexible magnetic plate: thanks to the magnet, it is easy to attach and remove from the heating bed for cleaning, thanks to the flexibility, it is very easy to remove finished models. Disadvantages: the plastic coating, on which, in fact, the printing takes place, is quite easily damaged and deformed both by the “regular” printing process itself and by the print head, in case of incorrect calibration, as well as by excessive heating of the heated plate - in general, a short-lived part. But, due to its low cost, it may well (and should!) be considered as a “consumable”. The advantages of glass plate include greater durability, cleanliness and "adhesive" properties of this surface.
 Disadvantages: slightly more difficult to attach to a heated bed (usually it is recommended to use ordinary office clamps for this, but personally I don’t recommend it because of their size; it’s much easier to buy special small clamps, they cost a penny on Amazon), and the difficulty of detaching printed models - you can't bend a glass plate. By the way, glass plates are also very inexpensive; nine0048
Thirdly (albeit looking ahead a bit), I would like to recommend this little "update", namely the glue for "sticking" models. Such glue is cheap (for 6 "sticks" they ask for $ 13), it is completely environmentally friendly, unlike popular home-grown products (there will be a story about them later), it is washed off with ordinary water, it does not smell. When using it, there are also a couple of “nuances”: you should not apply it to a cold surface, and you should not apply too little, because it will lose its adhesive properties when heated, and requires some practice in determining the optimal amount, but the ease of use of glue more than covers everything this is. nine0048
Now I want to share my thoughts on where is the best place to place your new 3D printer you just bought. 3D printing is actually a “heat-loving” process, so it is highly desirable to place the printer in a heated room with room temperature (at least 20 ° C - 3D printing traditionally uses temperatures in degrees Celsius - well, or 70 Fahrenheit). As I already wrote, at the very beginning, when printing with some types of filament, for example, PLA, there are no unpleasant odors, and the noise from the fans is comparable to the noise of the fans of a gaming desktop or laptop during a fancy 3D game. Those. in the absence of a special room (workshop in the basement or garage), it is quite possible to install a printer in the office, or even a children's playroom, or family room. What's more, there is a way, by purchasing a printer enclosure, to reduce or even eliminate both possible odors and likely noise. I will talk about this in more detail later. nine0048
I personally installed the printer in my "workshop" in the basement.