3D printing elephant foot
How to Get Rid of Elephant Foot 3D Printing?
ADVERTISEMENT
Table of Contents
There are times when you feel the first layer is slightly larger than the rest of the layers. Usually, this can be ignored as it does not affect the visual appearance a lot.
However, when it comes to practical applications, the problem can pose serious issues. What if you wish to fit your part with some other part and the larger first layer won’t adjust?
You would end up throwing your part, or in some cases, a few post-processing methods may help. But ultimately, it would ruin the finish of your part, forcing you to discard the model. This problem is known as a 3D printing elephant foot problem.
Among all the many limitations and challenges that users face when 3D printing, this one remains one of the easiest to resolve. Only if you dedicatedly work to find the reason for the problem.
It not only looks ugly and seems out of place, but it does also affect the models in many other ways. These parts aren’t useful for practical applications.
The reason this problem isn’t acceptable for practical applications is that it further decreases the tolerance of the parts and making them unusable.
Elephant foot is caused by the excess weight of the object on the first layer. As the object keeps growing with each layer, the weight increases even more.
If not cooled properly, the first layer tends to bulge and cause the elephant foot problem. That is why the problem is most common in large prints.
A lot of users face this issue every now and then. Hence, it is important to understand why these happen and how we can fix it.
Although the problem isn’t very scary, it would be, if not fixed. It would be frustrating to see parts getting wasted because of their incapability to fit your needs.
ADVERTISEMENT
What Causes 3D Printing Elephant Foot?
Termed as 3D print elephant foot is a common problem that many users face with their large prints. As you may perceive, the reason is quite simple.
The larger prints carry with itself heavier weight. When the models are being printers, the initial layer is created at first. And, in FDM 3D printers, each layer is cooled before the next layer is laid down.
The cooling is done to ensure that the molten plastic sets before meeting the next layer.
However, in some cases, the cooling isn’t proper or enough to set the plastic. Hence, the first layer isn’t able to sustain the weight of the object being printed.
Hence, the first layer bulge at the bottom as the object keeps growing. This is why the larger first layer deforms the entire print, especially, if the model is for a practical application.
The elephant foot problem leads to failed prints and can end up in a loss of money, time and effort. So, it must be checked before it keeps happening every other time.
How to Fix Elephant Foot?
There are many ways to fix the issue. And, it can be done by the users themselves. There is no need for technical help. You can manage to work with a few settings and the problem would certainly be resolved.
Here are a few ways to check the issue and completely get rid of it.
ADVERTISEMENT
Bed Leveling
Yes, it is true. The problem may happen because of improper bed leveling settings of your printer or the incorrect nozzle height. The reason could be as basic as this one.
Because of the said reason, the first layer is crushed too far down, further resulting in a bulged bottom layer. So, you must start with the fixing procedure by checking the bed leveling and ensuring that everything is set properly.
It is tiring to go with all the manual bed leveling processes once again along with the Z height adjustment to ensure the correct nozzle gap.
However, this could highly be helpful in solving the problem in the first shot itself. The good thing is that you would be able to understand the basic settings, helping you get the best at this skill.
Even if the 3D printer has automatic or semi-automatic bed leveling features instilled in it, manual leveling is a must to achieve an expected bottom layer. Hence, carry the steps below to adjust the settings.
- The first thing that you need here is the index card. This tool is very helpful and the most important one when adjusting the bed leveling of your 3D printer. You can choose the paper thickness of about 120-160 gsm.
- To start the adjustments, you would need some room around the build plate to work with the settings. Hence, turn each screw a couple of times to get more room between the build plate and the nozzle. You would find these screws either at the corners or along the side of the build plate. These are used for mounting the printer’s build plate.
- The next thing would be moving the build plate and getting the nozzle closer to it. To do so, you can either use your hands or you can even use the app to make the adjustments to the 3D printer.
- To calibrate the build plate, carry the print head to one of the corners and measure the resistance between the tip of the nozzle and your bed. This can be done by placing the index card between the nozzle tip and the build plate and dragging it back and forth.
- Turn around the closest screw to stiffen the gap. Make sure to carry the steps carefully without placing any external pressure on the bed. Or else, it would only increase the distance, further worsening the problem. Once you tighten the screw, check the resistance using the index card again. You must repeat the step until you start feeling a slight drag when moving the index card back and forth between the nozzle and the bed.
- Carry the same process for all the corners. Once that is completed, use the same process to adjust the print head to the center of the build plate.
 You may have to carry the steps a few times for all the five corners. This is because of the constant adjustments affecting other corners.
 - After the bed is leveled, you must check the nozzle height and adjust it accordingly. Bed leveling does affect the nozzle gap. Hence, it must be adjusted later. To do so, save the newly calculated value for the adjusted Z height to your printer’s settings. You can do this with the help of the index card again along with the printer’s control software. The precise height is gained when the drag is felt while leveling when moving the index card between the nozzle and the build plate.
- Completing the settings isn’t enough. You must test the same for ensuring everything is working as expected. Start with printing the first layer, first. This would help verify the settings. In case you find the first layer looking the same from all sides and is uniform, you have successfully completed the bed leveling. In case of perfect nozzle adjustment, the lines depositing would only touch and won’t overlap a lot to create a build-up over the bed or the nozzle.

After you have completed the settings and the prints are still not improving, there are other few things that you must verify to resolve the problem.
ADVERTISEMENT
Lower Down the Print Bed Temperature
There could be many other reasons for 3D printing elephant foot. The high print bed temperature is one of them. Hence, you must try lowering the print bed’s temperature to verify the same.
Do not rush when carrying this process. Never ever lower down the temperature with a huge difference. It is important to decrease the temperature with a constant difference and in an incremental fashion.
This would help understand the correct temperature suitable for printing models without an elephant foot problems.
It is recommended to lower the temperature by 5 °C incrementally each time until you start getting correct prints.
Keep lowering until you reach the minimum recommended temperature for the print bed. If the problem does not get any better and you keep getting the bulged foot, you must look at other options.
Add a Raft with your Model
What is a raft? Those who do not know, a raft is a horizontal mesh created with the deposition of filament on the build platform.
After the raft is printed on the build plate, the first layer is deposited. Although you may have to work a little bit later after the print completes to get the raft off, the solution does work and is very handy.
Think of this as an alternative for the first layer which can be separated later to get you the problem-free prints later.
As you know that the problem is with the layer that is deposited close to the build plate, you can shift that danger to the raft and keep your prints free from elephant foot issues.
ADVERTISEMENT
Use Chamfers for your Print
There are times when getting rid of elephant foot does not seem possible at all. All the resolutions seem incapable of getting the expected results.
The good news is that you can still make this happen and get things sorted by using chamfers. If you feel that changing the settings of your printer is a tedious job as compared to tinkering the model itself a little bit, you will find it rather easy to accomplish.
To do this, simply add a small 45° chamfer on the bottom edge of the print. This would highly be helpful in clearing the problem of a 3D printing elephant foot.
To add the chamfer to the model, you can add the 3D design software. The one that you use must contain the option for adding the chamfer.
If you are not sure how to do that, you can access various online guides for your particular 3D design software. It is easy to add and you would be able to do only after completing a few steps with your design software.
The Conclusion
3D printing has brought us to new heights. A lot of things seem simpler and easy when looked through the lens of this revolutionary technology.
However, the fact that the challenges to bring the best out of these 3D printers still remains questionable, a lot of users aren’t able to experience the real potential of the technology.
There are many users who are unable to work out the problems and print successful models.
Some even decide not to replace their existing work techniques because of the steep learning curve that is connected with 3D printing. All this is certainly making difficult to bring the technology to the forefront.
However, this is not impossible. With proper guidance and knowledge, companies and even individuals can realize the best side of the technology.
Problems like an elephant foot may hinder the motivation for a little while, but cannot stop those who are focused enough to achieve the expected results.
There are ways to fix the problem and with time, it would keep becoming easier to tackle. It is important to get the basic straight and fight the problem from its root.
The fixes discussed above may seem difficult for beginners. But these are easy to process if you keep working on it until you find the solution that best suits your problem.
3D printing elephant foot isn’t a very serious problem and can be taken care of with the right solution.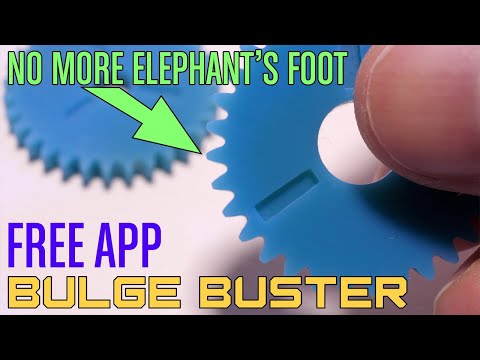
If you wish to uncover the hidden possibilities of 3D Printing, you must come out of these small issues on your own. Learn and grow as you go on printing amazing designs.
3D Printing Tips: How to Fix Elephant Foot?
It’s often said that you need to get your first layer perfect in 3d printing so that the rest of the project prints smoothly. Unfortunately, getting that ideal first layer is easier said than done.
Elephant Foot is one of the more common issues when printing in the first layer. This error is easy to spot but also relatively easy to address.
Contents(show)
What Is Elephant Foot?
Source:Chitubox
The term ‘Elephant Foot’ aptly describes how this 3D printing defect looks like – the first layer that flares outside. However, subtler than most other 3D printing problems, Elephant Foot can still be visually unappealing.
It is most problematic if you are 3D printing model needs very tight tolerance. This is often the case for objects that are functional or meant to be together.
Although Elephant Foot manifests on the first layer, it’s not always immediately apparent. In some cases, the added pressure from the upper layers’ weight causes the Elephant Foot. It is more problematic as you have already wasted a lot of filament by detecting the problem.
Compared to other 3D printer troubleshoot, 3d printing Elephant Foot is considered to be minor. It does not detract heavily from the base model in terms of appearance and can remedy in post-processing. This does not mean that you could leave unaddressed, especially if you’re a stickler for details.
What Causes 3D Printing Elephant Foot?
As opposed to most first layer problems, Elephant Foot has nothing to do with warping. It can happen even with traditionally “easy” material such as PLA or PETG filament.
In most cases, the elephant foot is caused by improper 3D printer settings.
Excess Filament at First Layer
In some cases, the first layer bulging is simply a case of the layer having too much material.
When the nozzle extruders more filament than is needed for the first layer, some of this excess filament will push out of the extruder’s side. This is enough to create the characteristic appearance of the elephant foot.
Excess Compression from Top Layers
The Elephant Foot defect’s delayed onset can come about as more and more layers are printed. This puts more pressure on the base layer, making it more prone to deforming by flaring outside.
Even under normal circumstances, it is inevitable for the base layer to bear the whole model’s weight. However, the elephant foot becomes prominent when the base layer is not strong enough to support this weight. Naturally, the effects of weight compression are more pronounced in bigger or taller prints.
In some cases, the effect becomes unavoidable – you have to compensate for it in your design.
Excess Compression from Nozzle
Sometimes, the excess compression does not come from the top layers.
If the base layer is flaring out at the early stages, it is a good chance that the nozzle will press down the material due to improper Z-offset setting or bed that has poorly leveled.
Insufficient Cooling
Another way for the base layer to lack strength is to overheat. It is possible either with excess heat from the print bed or with insufficient cooling.
If the base layer fails to develop rigidity, it will almost certainly deform once it needs to support the upper-layer weight. The uncooled first layer will progressively get wider and create a prominent Elephant’s Foot.
How to Fix Elephant Foot 3D Printing?
There are two strategies to avoid elephant foot: to make the base layer as strong as possible or anticipate an unavoidable Elephant’s Foot effect.
The choice of which option is more viable depends on several factors. Types of 3d filament you are using, the model you are printing, and the ability to edit 3D models are all considerations.
Bed Leveling
Source:cults3d
The most straightforward action to 3d printing elephant foot is to level your bed. Something that you should be doing anyway as part of regular 3D printing practice.
The goal of bed leveling is to ensure that the nozzle and print bed distance is uniform at all points. This makes it a lot easier to dial in the proper Z-offset settings for the nozzle. Not only does this solution help prevent elephant foot, but it also results in more consistent bed adhesion and layer cooling.
Some 3D printers come with an automatic bed leveling feature. If this is the case for you, then there should be no reason not to run it every time you start a new 3D printing project. This feature is available on many new 3D printers, whether it’s a professional 3D printers or a 3D printers for kids.
If your 3D printer has no such feature, then you can do the bed leveling manually. You will involve setting the bed height by adjusting each of the four adjustment screws on the bottom.
A piece of paper or cardboard can serve as a makeshift “feeler gauge” that you can stick between the print bed and nozzle. This feeler gauge is inserted between the nozzle and print bed at various points, adjusting screws as necessary. It is an easy process and should not take more than five minutes.
Reduce Heated Bed Temperature
Although heated bed massively helps with bed adhesion, it can also cause adverse effects if set improperly. It is a clear sign that the heated bed is set at too high temperature in the elephant foot.
If the bed is too hot for the filament, it prevents the material from becoming more rigid and developing strength. This makes it more prone to deforming into an elephant foot as soon as it needs to bear the model’s upper layer weight. You may even see the elephant foot getting worse as the 3D printing proceeds.
The first thing to do is check the recommended bed temperature for the filament. Make sure that you are working within this range. If there’s some wiggle room, then lower the bed temperature by 5 °C increments. Even small reductions in temperature should significantly improve if this is the root cause of the problem.
You can even try and go below the recommended temperature range for your filament, as long as you don’t run into any bed adhesion or warping issues. If this still does not solve your elephant foot problem, you might need to look into other solutions.
Add Raft to The Model
A more robust option to avoid elephant foot is to print with a raft. You can make it easily through slicer software.
Raft is another layer of filament printed right below the base layer of your model. It acts as a sacrificial layer, significantly reducing the chances of errors becoming visible in the actual first layer.
Among most 3d printing problems, printing with a raft is considered a last resort. Because raft can consume a significant amount of filament that goes to disposal after, it’s not very practical if you’re planning to 3D print many models.
Typically, the raft always uses to facilitate bed adhesion and avoid warping. In this case, the raft becomes a buffer to absorb a potential Elephant’s Foot error. After printing, you can remove the raft from the rest of the print. This preserves the appearance of the model’s base layer.
Printing with a raft does not precisely address the root cause of elephant foot defect. It is still a good option if you don’t have the time to tweak your printer’s settings. However, solutions that do not require printing with a raft are a lot more sustainable.
Use Chamfers for Your Print
Instead of printing the base layer of the model, you can consider adding a chamfer to it. It is one of the more unconventional solutions.
The chamfer is simply a 45-degree slope that you can add to the model’s first few layers. This effectively means that the base layer of the model becomes narrower. This strategy is that the base layer’s swelling will cause it to become the ideal size.
A 45-degree angle is particularly ideal for this technique as it prevents the print from collapsing even with narrower base layers. This is one of the most reliable methods used in printing overhanging features.
The advantage is that it does not consume any extra filament. Since you’re printing with smaller layers, you might even end up using less filament – although the savings are minimal.
However, it’s going to take a bit of trial and error to anticipate precisely how much the base layer will swell. The best practice is to limit the chamfer to a 1-millimeter height or about two to three layers.
Adjust Z-offset
Source:softsolder
Sometimes, elephant foot is simply the result of the filament material being compressed too tightly on the base layer. This could cause the filament to flare out and form the classic elephant foot appearance.
If reducing the bed temperature does not solve the problem, you may need to increase your nozzle Z-offset. The Z-offset determines the nozzle’s height relative to the print bed and plays a massive role in deciding bed adhesion and extrusion quality.
Although a low Z-offset aids bed adhesion by pressing down on the filament, too much of this pressure can cause the filament to deform excessively. Try to increase the Z-offset setting by about 0.1-millimeter increments until improvement can be observed.
Take note that increasing the Z-offset can cause other problems to pop up, the most likely of poor bed adhesion. This can cause the base layer to lift off or become warped.
If this happens, then you may need to solve the bed adhesion problem differently. Printing at higher temperatures, using a different adhesive, or printing with a skirt can be good options. Sometimes this happens in 3d printing – solving one problem leads to worsening another.
“Elephant Foot Compensation” Settings
Some 3D printers or slicers come with an automatic ‘elephant foot compensation’ setting. It is a convenient solution if the option is available.
When activated, this option reduces the size of the first layer of the model. Think of it like an automatic horizontal size compensation that only applies to the first layer. In this regard, this strategy is similar to the chamfer method but does not rely as much on guesswork.
As the following layers print, they press down on the first layer and compress the filament outwards. Ideally, this will result in perfect alignment of the first layer with the rest of the print. The size of the model determines precisely how large the compressive force on the first layer will be.
Even if your finished print comes out with a prominent elephant foot, all is not lost. If you’re not up to starting over with your project, then you can sand or deburr the imperfections in your finished print. This will take a lot of time but not as much as starting from scratch.
Summary
Compared to other 3D printing defects, elephant foot is not so bad. It’s not going to cause a catastrophic failure and might even be rendered unnoticeable with some sanding.
However, knowing exactly how to solve 3d printing elephant foot will be crucial in getting that base layer just right.
Need Any Services? Contact Us Now!
3d printing problem. Elephant foot
3DPrintStory 3D printing process 3d printing problem. elephant leg
Hello everyone. Today we will touch on a fairly common, but somehow too little mentioned topic. It's elephant leg . One way or another, everyone has come across this, but most people simply give up on this problem, because they don’t know how to solve it and simply cut this deformation with a knife. But this is clearly wrong, so today I will tell you how to fix this whole thing, since it is quite simple.
First, let's look at why this deformation occurs at all. There are two options:
The table temperature is too high. Because of it, the model simply melts and the lower layers spread a little. This is solved by lowering the temperature of the table.
The second one is trickier and not so obvious, so here are some funny pictures for you. Conventionally, the plastic tracks are flattened when printing at the most common settings. Namely, at a layer height equal to half of the nozzle diameter. If everything happens as in the picture, then everything is fine and the tracks touch each other a little, holding the model together. In this case, the geometry will be perfect. But let's see what happens if the distance from the nozzle is less than the thickness of the layer. There is the same amount of extruded plastic, but it has nowhere to go and the width of the tracks will increase. At the same time, neither the 3d printer nor the slicer knows about this and they will not correct the distance between the tracks, so the tracks will conflict with each other.
Here the intersection is shown in red. Naturally, this cannot be so, and the paths merge into a shapeless mess, mixing, spreading and forming ridges. Here I showed it very conditionally, but for understanding the processes it will do. If you look closely, you can see that these ridges and streaks go beyond the upper boundary of the layer and occupy part of the space under the next one. Naturally, he also cannot lay down as planned, as a result, the pattern repeats, albeit on a slightly smaller scale, again and again, until the ridge is no longer so small that their presence can be said not to affect the next layer and the model starts to print normally.
It also happens when the elephant leg ends with the layers of the bottom, which have one hundred percent filling. This case is the same eggs, side view, just the paths can spread as wide as they like and do not create ridges and, accordingly, do not affect the next layers.
So, when it is clear why this elephant's leg arises, we can safely offer three solutions.
- Increase the distance between the nozzle and the table on the first layer to match the one specified in the print settings.
- Decrease the feed on the first layer so that the tracks do not sprawl or conflict.
- Tell the slicer how wide the track actually turns out so that he builds them into an even model.
Of course, the first option is the most correct and it can be implemented either through table calibration, which is rather laborious, or through setting the z offset in the print settings. This is an extremely useful setting in all popular slicers. In Cura she is in section sticking to the table, in simplify 3d on the g-code tab. It works very simply - it adds its value to all z coordinates in the model, or subtracts it if it is written with a minus.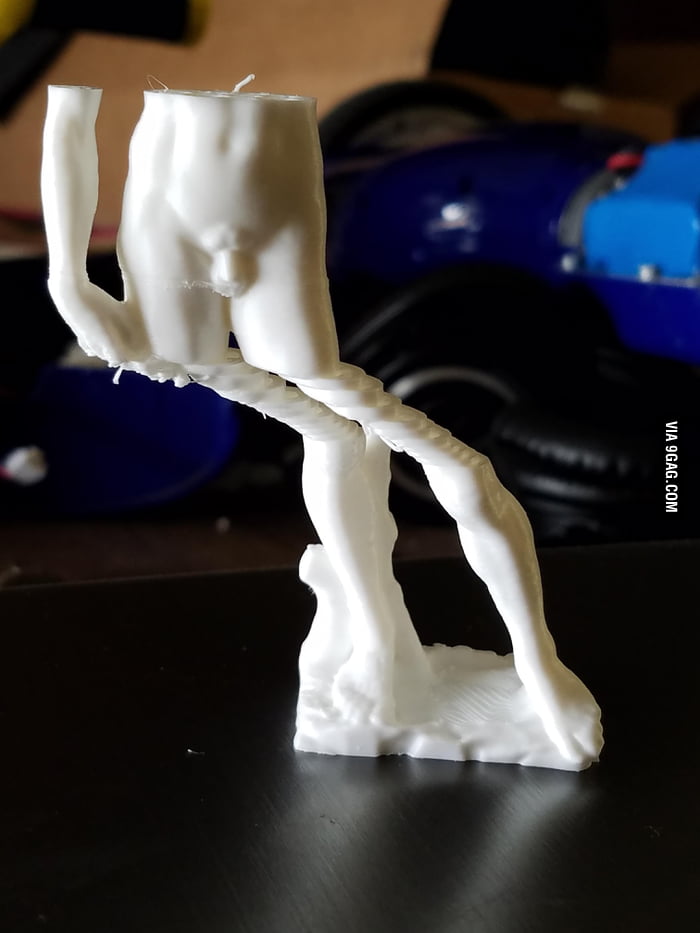 Therefore, if we have an elephant's leg, then we slightly increase this parameter until the moment when it does not pass.
I printed some calibration cubes to show how this setting works. In addition to him, nothing has changed not in the model, not in the settings. The first cube is printed with a z indent of 0, followed by 0.05 mm increments.
By the way, the same parameter can be used if the table is calibrated with too much clearance and the plastic does not stick. Just set it to a negative value.
The second method, I think, is not particularly correct, since with it the first layer is lower than necessary for the model. But in reality this can be neglected. The essence of the setup here will be - the creation of two different processes - one for the first layer with a lower feed, the other for the rest of the model. This is rather tedious compared to the indent setting, but nevertheless it has the right to exist in case for some reason it cannot be applied. I will explain using simply 3d as an example. First, we create a process for the first layer, reduce the flow value by, say, 20 percent, after which we go to the advanced tab and set it to stop printing at height equal to the layer thickness from the settings. In our case, 0.2. Next, we create another process with a normal flow and set the advanced tab to start printing at height, which is also equal to the layer height. That's it, there are two processes that together will cover the entire model, but have different settings. In our case, a different flow. Now we need to print some small test models and see. If there is an elephant leg, reduce it further, if not, stop or even slightly raise it in order to more accurately determine the ideal setting.
The third method unfortunately does not help if the elephant's leg is too big, but it works very well with a medium or small one. The point is to play around with the extrusion width settings of the first layer. By the way, many people think that if the value of this setting is reduced, then the tracks will become narrower, but in fact the opposite is true. In fact, this is not a control parameter, but a controlled parameter, that is, it is necessary to output to it what is actually obtained, and not what we want to receive. If we have a nozzle of 0.4 mm and the extrusion width is also 0.4 mm, and the tracks on the first layer of the clavicle are twice as wide, that is, 0.8, then we set the extrusion width of the first layer to 200 percent, that is, 0.8 divided by 0.4. As a result, the slicer itself will push the tracks apart so that, firstly, they line up on a flat surface along the outer perimeter, and secondly, they do not conflict with each other and, accordingly, do not bulge. In this case, the resolution of the first layer will be lower, as if printed with a nozzle with a larger diameter, but the plastic will be squeezed into the table, which in some situations can increase adhesion. Adjusting the height of the first layer, by the way, has almost no effect on the elephant's foot. The fact is that, like the offset along the z axis, it increases the gap between the nozzle and the table, but it also increases the flow.
 In principle, you can reduce this value and increase the z offset together, but it will be more difficult than just increasing the offset or than adjusting the feed on the first layer.
There are a couple more workarounds to fix elephant's foot. First, you can make a chamfer at the bottom of the model in order to compensate for the expansion of the first layers. Or set horizontally in the kur and the expansion of the first layer is negative. But these are obvious crutches, so I do not recommend it.
I hope you found this article helpful. Good luck with your 3d printing.
8 3D printing options to help you get rid of the elephant leg.
What is an elephant leg in 3D printing? 8 ways to get rid of an elephant leg in 3D printing.
1. 3D printer bed calibration. 2. Reducing the temperature of the printing platform. 3. Install the cooling of the first layer. 4. Increase the first layer print time. 5. Reduce the flow rate of the first layer. 6. Adding a raft to your model. 7. Use of chamfers in models. 8. Elephant leg compensation in the slicer.
Conclusion.
In the world of 3D printing, such a defect as an “elephant leg” is quite common, and in our opinion it is not given enough attention.
For most 3D printing applications, this disadvantage can be ignored, as it does not greatly affect the final result.
However, when it comes to practical applications, the elephant's foot can present serious problems. This defect sharply reduces tolerances, which makes it much more difficult to fit parts to each other.
For example, you want to fit one piece to another, but you run into a problem because the first layer is much larger than the next.
In the architectural field, engineers can use 3D printing to check and determine the accuracy of a design before it is manufactured on a significant and costly scale. If there is a defect in the print, it distorts the representation of the final product.
For example, if a civil engineer is designing a building and the printout is faulty, it will not display the structure of the building correctly.
We have been providing 3D printing services for several years, and the presence of an elephant leg for most of our clients' projects is an unacceptable defect.
We hope that with our preface we have convinced you that it is still worth getting rid of the elephant's foot. And in this post, we will introduce you to the basic ways to fix this problem.
Some of our recommendations may seem difficult for beginners. But it's actually much harder NOT to know what to do than it is to have a clear step-by-step guide.
What is an elephant leg in 3D printing?
Elephant foot is a deformation of a 3D model caused by the temperature and weight of the model.
The upper layers put pressure on the first layer, which has not yet cooled down, and under the influence of the mass of the object, the first layer is flattened, and its geometry is distorted. Accordingly, the higher your model, the more the effect of the elephant's foot is manifested.
In our blog, we have repeatedly mentioned that printing the first layer and calibrating the platform are critical to obtaining quality prints. And, describing the causes and ways to eliminate the elephant's foot, we are again forced to return to this topic.
8 ways to get rid of an elephant leg in 3D printing.
Among all the many limitations and problems that users face with 3D printing, the elephant foot remains one of the easiest to solve. You just need to run a few test operations to determine which factor in your case is causing this effect.
1. 3D printer bed calibration.
Fixing almost any 3D printing problem starts with platform calibration. And the elephant leg is no exception.
This effect may be caused by an incorrectly calibrated table or an incorrectly set nozzle height.
Positioning the nozzle too close to the 3D printer bed causes the first layer to be pushed too far into the bed and flatten out.
The principle of calibration is that the nozzle is at the same distance from the platform over the entire working area of the printer.
Also, as is often the case in 3D printing, properly leveling the platform can generally improve the print quality of your projects.
Calibration of the 3D printer bed is a key factor in 3D printing and can eliminate many 3D printing problems.
2. Reducing the temperature of the print bed.
High table temperature does not allow the layer to cool sufficiently.
The fusing of subsequent layers of the part on it leads to squeezing of the object and the appearance of an elephant's foot.
Normally the table temperature is set according to the plastic manufacturer's recommendations. Properly selected temperature ensures good adhesion of the layer to the platform.
If you are experiencing the elephant foot effect, try lowering the temperature of the platform.
Do not rush this process. It is recommended that you gradually reduce the temperature by 5°C until you start getting good quality prints.
If you have reached the minimum recommended temperature for the platform and the problem persists, there is likely another reason for your elephant foot and you should consider other options.
3. Install the first layer cooling.
Most slicers have cooling of the first layers disabled by default. Turning off the fans on the first layer ensures good adhesion of the part to the platform.
But we have already found out that the elephant's foot appears when the first layer does not have time to cool.
Increasing the initial fan speed to 5% or 10% will cool the filament faster and prevent flattening of the initial layer.
We recommend using a 3D printing varnish to improve adhesion.
4. Increase the time to print the first layer.
Increasing the initial layer print time is also a cooling solution, but instead of activating/increasing the fan speed or lowering the table temperature, we set the first layer print speed to be slow.
This will give it time to cool down before the printer starts printing the 2nd layer.
If the first layer has not had time to cool down, then applying the second layer compresses the first layer. This issue can also cause your part to be sized incorrectly not only horizontally but also vertically.
It is also clear that the use of quality 3D printer filament with the same diameter along the entire length ensures uniform extrusion and reduces the likelihood of elephant's foot.
5. Reduce the flow rate of the first layer.
Your printer may be set to over-extrusion and extrude too much plastic on the initial layers. Excessive extrusion may also be due to your nozzle being too close to the platform. We mentioned this in the first paragraph of our guide.
You can calibrate your printer using our guide to setting extruder pitches.
How to calibrate the extruder steps (E-steps).
Or you can simply reduce the flow rate of the first layer to 95%.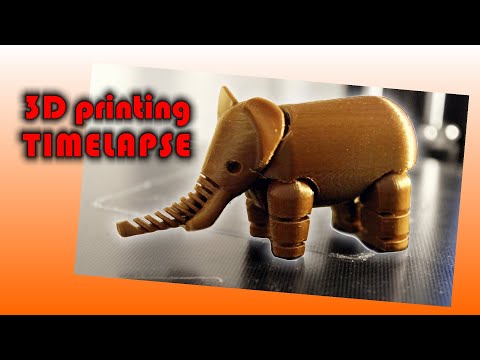 This will not have any effect on the adhesion of the first layer, but will affect the elephant's foot.
6. Adding a raft to your model.
A raft is a horizontal mesh created by placing strands of plastic on a platform.
Since the elephant's foot problem occurs between the working platform and the first layer, the raft will take the hit.
This will certainly get rid of your elephant's foot, but it's more of a workaround than a solution.
Using this option you will get a rough surface on your part and you will have to spend some time removing the raft. However, you can consider this as a useful alternative, especially in cases where you need to place one part inside another.
7. Use of chamfers in models.
There are times when getting rid of elephant legs is not possible at all. All options seem to be unable to provide the expected results.
If setting up and calibrating the printer is a tedious process for you, and a small change in the 3D model seems like an easier way, then choose this option.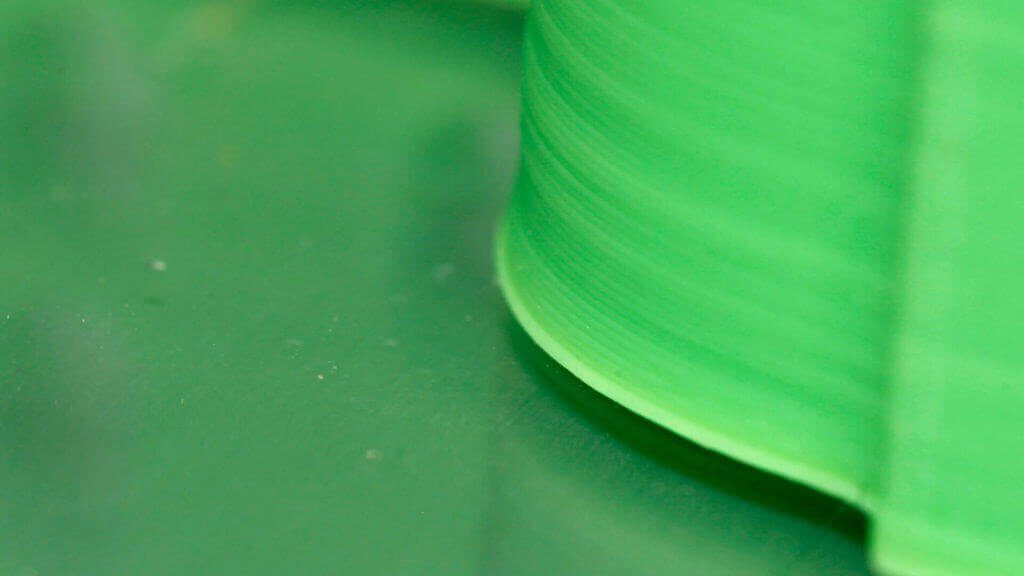
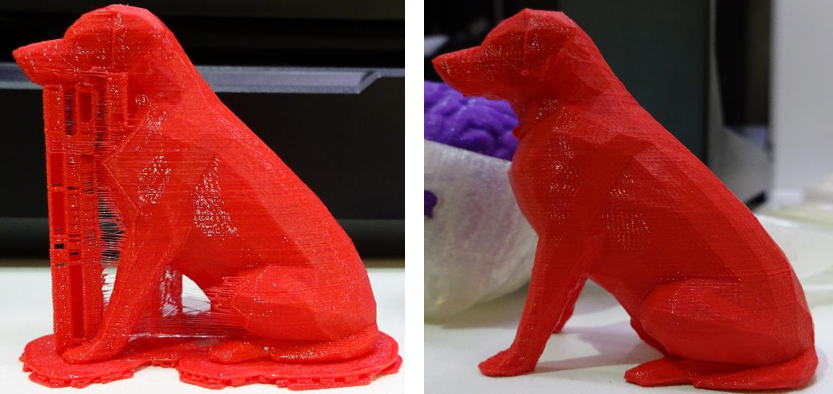
All you have to do is add a small 45° chamfer to the bottom of your model. The figure shows two identical parts. Left part with chamfer, right without.
Any modeling software has a set of functions for creating a bevel and usually it does not take much time.
The top layers will put their weight on the first layer, and the chamfer will compensate for the elephant's foot in your print.
8. Elephant leg compensation in slicer.
An even easier way to get rid of an elephant's foot is to compensate with a slicer. Cura, one of the most popular and widely used slicers, has incorporated this setting into its software.
This parameter is called initial layer horizontal expansion (horizontal expansion of the first layer), located in the section Shell (Walls).
You can also easily find it by entering the word elephant or elephant in the Russian version in the search bar.
In Slic3r and PrusaSlicer this parameter is called Elephant foot compensation.
In Slic3r you can find this setting here: Print Settings tab -> Advanced settings
In PrusaSlicer the setting is under Print settings - Advanced - Elephant foot compensation. PrusaSlicer must be in advanced or expert mode to access this setting.
Simplify3D has a "horizontal size compensation" setting. By default it applies to all layers, but you can limit it to only print the first layer.
To calculate the correct compensation value, we recommend that you print a test cube. After printing, measure the dimensions of your cube at the top and bottom.
Let's say the cube measures 20.02 mm at the top and 20.3 mm at the bottom (elephant's foot).
To calculate the compensation factor, plug these values into the following formula:
(20.02-20.3)/2=-0.14.
We got a negative value, and this is what we need to set in the slicer. In fact, this method creates a chamfer without changing the model itself, but with the help of a slicer.