3D printer skipping layers
How to Fix a 3D Printer Skipping or Missing Layers – 3D Printerly
With a 3D printer, different situations can occur which can lead to your printer skipping layers. This in return negatively affects the print quality and hence results in an unsuccessful print. This article is going to aim to tackle the problem of a 3D printer skipping layers. It will guide you through why it happens and how to fix it.
The rest of the article will go through the troubleshooting process of skipped layers, as well as some other issues that are linked to this problem. You are requested to read the complete article.
Why is My 3D Printer Skipping Layers?
Finding your final product with skipped layers is truly a very upsetting experience. Skipping layers or missing layers in your 3D prints is a common problem faced by many users of 3D printers.
There are many reasons why a 3D printer skips layers and hence, jeopardizes the quality of the print.
The first reason is the printer being temporarily under extrusion. The second reason is the misaligned or stuck bearings and rods. Another reason is the uneven print bed.
Being Under Extrusion Temporarily
When the appropriate amount of filament is not provided by the 3D printer to print a 3D model, it can cause problems. Until any sort of filament is detected, the printer will continue on and hence you might end up with skipped layers. This can also occur if your filament gets stuck by any means.
It comes down to flow rates and not being able to keep up with the physical demand of the extrusion. This could be down to some kind of blockage, low temperature, too much cooling, or a worn out nozzle.
Sometimes, a simple nozzle change to one of high quality can quickly fix these under extrusion issues and result in prints that don’t skip layers.
Misaligned or Stuck Bearings and Rods
3D printers experience friction in the moving parts, these parts include vertical rods and bearings that help in holding up the print bed. However, when these bearings and rods are worn out or get stuck, this results in skipped layers in the 3D model print.
You should do some troubleshooting and try to replace parts which have been operating for long periods of time without changes. Consumables like belts, bearings and fans can contribute to this.
Uneven Print Bed
The printing surface of a printer assumes a significant job in making the final look of the first layer of your model. If it is not levelled properly, your first layer could very easily be messed up to quite a huge extent.
When you think about the technology and movement of a 3D printer, it assumes that it is printing on a flat surface, unless there is some kind of auto-leveling feature which accounts for uneven level differences.
Your print bed can easily start to warp after being heated up, so you definitely want to check whether your print bed is experiencing this. Many people heat up their print beds then use a metal ruler across it to see if it’s flat the whole way through.
If not, you can actually place sticky notes underneath the lower areas, implement a BL-Touch or just replace your print bed altogether. This choice is really up to you, but if this is your cause the fix isn’t too troublesome.
How to Fix a 3D Printer Skipping Layers?
The best way to fix a 3D printer skipping layers is to inspect the bearings, timely belts, bearings and pulleys regularly. It would be great even if you go through this process before executing a print task. This process of inspection helps you in preventing not only this but many other common 3D printer problems as well.
Certain different measures can be taken in order to deal with these problems. It should be manually ensured that the rods of the 3D printer are seated well in the bearings. The clips should be adjusted and the screws should be tightened.
Other than that, check that the bearings of your 3D printer are in good condition. If they are broken or have been worn out, you shall replace them.![]()
You need to clean different moving parts of your printer and provide lubrication to them. The lubrication can be given with sewing machine oil which works pretty well since it’s a fairly light oil and you’ll only need a drop or two.
Furthermore, filament issues are realized, then these can easily be resolved. If your filament has run out or is nearing the end, that is not a problem and can be easily resolved.
The extrusion pathing might have more pressure on it due to the spool of filament being closer to the middle of the roll.
I remember when assembling my 3D printer, I placed the spool holder quite some way from the extruder, which added unnecessary pressure to my filament. When the filament got near the end of the spool, it would reduce my print quality due to bad pathing.
If the changes happened through using a different roll of filament, I would recheck your temperatures are correct, since each roll isn’t always made the same and have slight differences.
People decide to use a temperature tower each time they change filament spools to get a precise temperature level to operate at.
Fixing Layer Separation in PLA, ABS, PETG & More
Layer separation or delamination refers to the process of adjusting 3D printed layers so that they could firmly stick together.
This is done to ensure the good quality of the final print as it prevents layer separation. Several steps can be taken in the process of layer delamination. Some of these are listed down below.
Increase Printing Temperature
One of the steps towards the prevention of layer separation is to increase the temperature of the printer’s extruder. The layers stick to one another by combination at high temperatures.
Adjust Fan Cooling
Another step is the adjustment of print cooling. If you reduce the fan speed, it has almost the same effect as the increasing extruder temperature.
Increase Extrusion Flow Rate
If the extrusion flow rate is increased, the more molten filament will be allowed to flow out and hence there are better chances of sticking as more thread flows out of the nozzle. With this, if the correct nozzle size is used, it can also prevent layer separation.
Increase Printing Speed
Other than that, if the printing speed is adjusted, it can also contribute to the prevention of layer separation. Having a faster print speed gives your filament less time to be cooled by your fans, which means your filament doesn’t set very nicely for the next layer.
How to Fix Inconsistent Layers & Walls in 3D Prints
To fix this issue, flow rates can be adjusted to different levels. These depend upon the model of the printer and the type of print that you desire to get. Along with that, the optimal temperature should be set up.
Again, this temperature is to be adjusted according to the print model that you desire. A possible reason for the inconsistent layers could also be the overtightening of the wheels that hold the X gantry together. Swapping them out could solve the problem.
How to Fix Inconsistent Extrusion in 3D Printer
Inconsistent extrusion is a process where either too little or too much filament is extruded from the 3D printers hot end. It doesn’t happen frequently but when it happens, it’s in the form of blobs in filament or missed layers.
There are quite a lot of issues but with possible solutions as well. We will be discussing both of these down below.
The issue of partially clogged nozzles is one of the issues. This issue can be fixed in many ways. You can install a good filament filter and use a 3D printer cleaning filament.
Other than that, the nozzle can be replaced as well. The issue of extruder gears slipping can be fixed by cleaning the filament and making sure that the spring lever isn’t broken.
Rather than sticking with the plastic stock extruder, upgrading to an all-metal extruder has positively changed the printing experience of several 3D printer users out there. Many would recommend that this is one of the first things you change in your 3D printer.
Another common issue is filament binding. It can be fixed by making a clear path for the filament to flow in the hot end.
You should also ensure that there is no knot on the filament roll. Heat creep is also amongst the issues. It can be fixed by making sure that the cooling fan at the hot end is clean and is working properly.
9 Common Reasons Why Your 3D Printer Is Skipping Layers – Printing It 3D
3D printers are great for making prototypes, models, and customs parts. However, many issues may cause your 3D printer to print incorrectly, like skipping layers. If your 3D printer is skipping layers, it’s important to figure out why it’s doing that to determine whether or not you can easily fix the problem yourself.
9 common reasons your printer may be skipping layers:
- The filament diameter is incorrect.
- Your 3D printer has an incorrect filament type.
- Your 3D printer’s nozzle is dirty.
- The nozzle is too close to the print bed.
- There are bed leveling issues.
- The printing speed is too high or low.
- You’re using the wrong temperature.
- The print file type is incorrect.
- Your 3D printer’s retraction is too long or short.
Read on to learn these reasons in more detail.
1. The Filament Diameter Is Incorrect
The diameter of the filament can often be the cause of skipped layers. If the filament is too thick, it won’t fit through the nozzle correctly, and if it’s too thin, it may not have enough mass to produce a good print.
Using the correct filament diameter is crucial for a successful print. The diameter should be the appropriate size for your nozzle. Most printers use either a 1.75 mm (0.07 in) or 2.85 mm (0.11 in) diameter filament.
Always check your printer’s manual to ensure you’re using the correct filament diameter.
2. Your 3D Printer Has an Incorrect Filament Type
There are many different filament types available on the market, and each one has its own unique properties. For example, some filaments are better suited for printing large parts, while others are better for smaller prints.
Different filament types have different melting temperatures, and if they aren’t made of the same material or come from a reputable manufacturer, it may be incorrect. In addition, the material you use must be compatible with your printer, or you could experience issues.
Low-quality filaments may contain additives that can cause nozzle jams and skipped layers. Therefore, it’s crucial to use the correct type of filament for your project to ensure your print comes out correctly.
3. Your 3D Printer’s Nozzle Is Dirty
A 3D printer’s nozzle heats up and melts the filament for printing. The temperature of this component can reach upwards of 250°C (482°F), meaning it can quickly burn and create dirty filament residue. If the nozzle is dirty, it’ll produce bad prints and skip layers in your print because there’s too much friction between the filament and its surface.
When the nozzle becomes too hot during a print, there are deposits left behind on its surface that can cause several issues. If your nozzle is dirty with burnt plastic from previous models, you need to clean it before starting a new print. It will help the filament to flow correctly.
It would be best if you periodically cleaned out your nozzle with a small drill bit to keep it from becoming clogged or glazed over so your prints won’t skip layers.
4. The Nozzle Is Too Close to the Print Bed
If the nozzle is too close to the print bed, it’ll cause heat issues and may result in skipped layers. When the nozzle is too close, it can cause the filament to stick to the bed and not move correctly. It will create a poor print quality and may result in your printer skipping layers.
You must have the correct distance between your nozzle and the print bed for optimal printing results. The recommended distance for the nozzle is usually 0.06 mm (0.002 in) to 0.2 mm (0. 008 in) from the print bed.
5. There Are Bed Leveling Issues
If your printer’s bed isn’t leveled correctly, that can also be a reason for skipped layers. When the bed isn’t leveled, it can cause the nozzle to be too close or too far from the print bed. It will result in inconsistent prints and may cause your printer to skip layers.
Always check that all four corners have an even distance from the print bed before starting your print. You can do this with a simple calibration sheet or by using online tools.
There are many ways to level your printer’s bed. For example, you can try a leveling tool or some blue painter’s tape to help balance the bed correctly. Leveling the bed is essential in printing, so make sure you do it correctly.
If you’re unsure how to level your bed, refer to the user manual for specific instructions.
6. The Printing Speed Is Too High or Low
If the print speed is set too high, it may cause uneven layers. On the other hand, if you have a very low setting, that can also lead to skipped layers because of a lack of material in some parts of the model.
The ideal printing speed for most printers is between 30 mm/s (1.18 in/s) and 90 mm/s (3.54 in/s). If your printer’s settings are outside of this range, it may cause problems with the model. You can test out new speeds to see what works best for you, but always use caution when testing new speeds because too high or low could negatively affect your print.
7. You’re Using the Wrong Temperature
If the temperature of your printer isn’t set correctly, it can also lead to skipped layers. It’s because the filament needs to be heated to a specific temperature for it to print correctly. If the filament isn’t hot enough, it won’t melt properly and may cause skipped layers.
Likewise, if the temperature is too high, the filament may burn and leave residues that cause issues. Therefore, it’s crucial to use the correct temperature for your specific material to print successfully.
8. The Print File Type Is Incorrect
If you’re using an incorrect file type, that can also cause skipped layers or issues with your print’s surface finish. Make sure your settings match what is required for the material you’ll be printing. The most common file formats are .stl and .obj.
If you’re not sure what the correct file settings are, consult your printer’s user manual or search for the specific instructions online.
9. Your 3D Printer’s Retraction Is Too Long or Short
Retraction is the process of removing excess filament from your nozzle. It helps prevent drooping or oozing while moving between different parts of your model.
If this function is set too long, it’ll cause skipped layers by leaving gaps in your print and not providing enough material for each part of the model. Likewise, a setting that’s too short can leave excess material on your model.
You should adjust this function based on the filament you are using, so always refer to your printer’s manual for specific instructions or search online if you’re unsure how it works with your machine type.
Extrusion
FAQ Questions about extrusion mechanisms in different types of 3D printers or the extrusion process.
For questions about correct methods and troubleshooting for 3D printer extrusion settings, maintenance and types.
- Why does the 3D printer stop extruding PLA? I have an Ender 3 V2 that is about 6 months old. Recently the extrusion slowed down almost to a complete stop a few seconds before the print for no apparent reason. The extruder works great at…
- The end of the thread is expanding and getting stuck This is a continuation of this question, where the comments and answers were extremely helpful in diagnosing a problem that I still can't solve. I found that the problem shown in...
- Ender 3 Pro polycarbonate printing problem - what could be the cause? I did a polycarbonate modification on my Ender 3 Pro (heated chamber, external electronics, all-metal hotend, new thermistor, PID tuning, dry box, active motors…
- Inconsistent layer widths and uneven exterior walls I'm having issues with layer widths and uneven exterior walls in my 3D prints.
 Sometimes the layers are compressed, and sometimes they are pushed outward. I have noticed that these problems occur when on layers…
 - Why is my 3d printer extruding excessively when I set the flow rate to very low Hello, I use Cura to cut my prints, and despite the fact that the flow rate has been adjusted down to a minimum of 5%, my prints are still heavily overextruded. …
- Printing error: Partial Mess - possible causes? Can anyone help explain what could be wrong with this? I print a bunch of the same item.
- Are epoxy/resin FDM printers available? When I saw a question about FDM printing heat-resistant parts, high temperature 2-component epoxy came to mind. Are there (experimental or production) FDM stacking extruders...
- How to make layers stick together more and warp less? I have an Anycubic Chiron and have had some alignment issues in the last few weeks, however I believe I have sorted it out.
 Layers attached to a baseplate or raft…
 - Do printing problems (pull, blockage, etc.) decrease with more expensive printers? I have an Ender 3 that's about 3 years old and the problems I'm having with extrusion, leakage and plugging of the filaments are monstrous. Examples of such problems are thread flow problems,…
- Width of cut line compared to extrusion ratio for layer adhesion? My question would be to consider what would be better for adhesion, overall quality and possibly strength: either increase the shear line width or increase the shear extrusion ratio for… I'm in the process of fine-tuning my cheap CTC i3 clone. I am using Cura 3.1 for slicing. After calibrating the extruder stages, I wanted to optimize the width parameters...
- Understanding all the ways to avoid heat creep Printer configuration and many other parameters affect thermal creep. Thermal creep stopping extrusion doesn't necessarily involve melting the filament too high above.
 ..
.. - Can I manually 3D print on uneven surfaces? I chipped a bit off my otherwise perfectly usable laptop battery and would like to restore it. Consider the following picture: Now compare this with what is seen, for example, ...
- Extruder stops printing before first layer (Ender 3 v2 w/BIQU h3) Let me preface this by saying that I'm pretty new to 3D printing, however I'm an engineer and programmer so messing around with stuff like this is fine for me norm. Don't be afraid to get too technical...
- Ender 3 Pro: Flow rate drops over time I have to set the print flow setting very high (up to 180% or more) as otherwise I will get insufficient extrusion. I also noticed that from time to time I have to…
- Is there a difference in print quality when switching from a brass to a steel nozzle? Brass has better thermal conductivity than steel or hardened steel, but it also has much less wear resistance, especially compared to hardened steel, which… I didn't have any problems with the printer, but now all of a sudden my Prusa MK3 stopped squeezing out while printing.
 This is very strange since I can easily…
 - Ender 3 Pro extruder motor keeps failing I've had an Ender 3 Pro for about 2 years now and it works amazing! Since November, he has been struggling very hard at the press. I am quite sure that the problem lies in the extruder motor. About 1 in 5…
- What causes these round corners when 3d printed? Nozzle diameter = .4 extrusion multiplier = 1 Extrusion Width = .45 <-- I feel this can be reduced to fix this? Layer Height = .3 I am using Simplify3D.
- Jamming of the filament thread in Hotend. Why? This puzzles me. I was typing fine until this happened. Below is an abridged version of my two day headache. Some help would be appreciated. The printer introduces…
- Is 3D resin printing considered "additive"? Subtractive manufacturing has long been the norm in the world, but additive manufacturing, which is basically synonymous with 3D printing, has ruined it all.
 If extrusion printing is definitely...
 - Is the platen level and not warped, but is the print uneven? I have a Creality CR-10S. I replaced the glass it originally came with as it was mangled and I didn't get any material from 2 sides. I switched to PEI sheet and got the same...
- Thread spool stalls. Print Destroying Extruder Motor I have a frustrating problem where my extruder motor starts skipping steps and stops extruding simply because my filament is wound too tight. There are some parts of my…
- Removing Stubborn Partial Clogs After Printing Nylon My Prusa i3 MK3S was partially clogged the last time I printed with nylon. Although I've experienced clogs and partial clogs before, all the usual tricks I've tried don't work this time... 3D printer again. One thing that stands in my way is...
- Creality CR-10 printing extrusion problems I have an extrusion problem with my creality CR 10 3D printer while printing.
 I use a standard 0.4mm nozzle with 1.75mm PLA and use Cura as a slicer. …
 - Ender 5 Pro print quality problem I received my 3D printer from Creality 1 day ago. My dog from the SD card came out perfect, Benchy was printed almost flawlessly too. I have used the default Benchy settings on all of my…
- Why does FlashPrint have different (not 100%) default extrusion ratios for different filaments? FlashPrint has an extrusion ratio setting. It is set to 97% for the stock PLA profile and 107% for the stock PETG profile. I would have thought they would default to 100% (and then...
- Ender 3 layer skipping v2 I'm having some issues with my printer skipping/not extruding random layers of my prints. This happens in multiple layers and sometimes it doesn't even affect the entire layer.I…
- Increasing the volume flow with a longer nozzle I want to increase the print speed by increasing the volume flow, which is currently 5 mm3/s.
 Large quantities cause the feed mechanism to skip steps. I'm running at 190°C, which is...
 - What causes the new nozzle to clog before I can finish printing? I found that my Ender 3 often skipped extruder steps, mostly when printing infill (tri-hex at 30%), to the point where I saw multiple layers of infill with patchy extrusion or…
- Ender 3: extrusion not working properly I have a new hot end for my Ender 3. When I start 3D printing everything seems to be going well. After about 20 minutes or so, the extrusion stops and the motor...
- How to calculate the gear ratio of the extruder given the desired maximum print speed, filament diameter and nozzle diameter? I have a Printrbot LC with the following extruder gears: The stepper is on the right, inside is a gear wheel with filament, the same size as the small stepper. At…
- eSUN's new PETG spool makes a popping sound when extruded I just bought a new eSUN PETg filament.
 When I started to squeeze it out, I heard a popping sound, the same as if moisture was boiled out of it. I don't expect the new eSUN vaccum sealed filament...
 - The prints only have excessive extrusion during the diagonals. So I printed a few benches with different slicer settings. I also made sure my desk was well leveled. But no matter what I do, I get them through extrusion whenever my…
- Will 3D printing work upside down or in zero gravity? I'm assuming the SLA print only works on the ground and vertically. But will a fused filament printer (like the Prusa Mk3) work in zero gravity? What about inverted or sideways?…
- CR10 V2 when extruding and heating too fast The heater cartridge on my CR10 V2 broke so I ordered a new one (12V). After replacing it, the new one heats up very quickly past the target temperature and slowly drops to the target temperature. How…
- Ender 3 Extruder First Layer Fits Perfectly But Then Starts Clicking All of a sudden I seem to have a lot of problems with under extruding on my Ender 3.
 The bottom layer (0.1mm high) prints great. This is done at a speed of 15 mm/s. However, when...
 - Monoprice Select Mini v2 does not eject filament and it is not a nozzle My Monoprice Select does not eject filament. I'm using the filament that comes with the printer and I know it's not a nozzle. I tried to remove the metal part that comes from the connector ...
- What volumetric extrusion rates can the stock hotend Ender 3 achieve? With a fully stock Ender 3, the limiting factor is almost certainly the extruder, not the hotend, so I'm asking in terms of having an upgraded extruder (mine is direct drive),… lost through the extruded filament (or in other words, how many watts would I have to run an ideal heater that loses heat ONLY after…
- Ender 3: 3mm prints badly at first, then good I have an Ender 3 that I've been very happy with so far, but recently it has started to behave strangely and I can't figure out what's wrong with it.
 What happens is that the first ~3mm of the print comes out…
 - Incorrect internal dimensions of 3D prints with Ender 3 I have a problem with my Ender-3. Whenever I print, I have the correct outer dimensions (accuracy is usually better than 0.1 mm, sometimes a little worse), but every hole, hole or whatever…
- What causes a blob to appear when the layer area is reduced by 50%? This is a PETG extrusion print at 250°C, 1st layer layer at 80°C, then 60°C on other layers. Nozzle 0.4 mm; printer German Reprap X400. The all-metal extruder is clean and does not leak. …
- Top and bottom do not come out smooth I have an Ender 3 printer and can't figure out why the top and bottom of this print comes out the way it does every print. I tried increasing the initial layer height to 0.3mm and increasing…
- How to change the extrusion value (parameter E) in G-code? Before I ask you my question, I want to briefly state my problem.
 I'm trying to build my personal 3D printer and can only send integer numbers to my extruder (motor) controller... I can fix it myself. For more than 20 prints, I had the same problems: in the beginning everything goes well, but in…
 - Ender 3 Pro filament extrusion problems I run quite a lot of 3D prints on the Ender 3 Pro using the same slicer settings (Simplify3D) and just recently I noticed a very strange extrusion issue. I find that at about one...
- Printer overextrudes first few layers I've run into a strange problem where the printer only overextrudes the first 6-8 layers (0.2mm layer height). All of the above layers don't have this problem, which is my understanding...0010
- Print jam help Prusa i3 MK3 While printing a rack of ink from thingiverse I get jams all the time. Other prints (shorter) work fine. Can anyone give me a hint? Here is a video from work…
Problems, defects, 3D printing errors and solutions
Often during the operation of a 3D printer, problems may arise due to which defects appear on the finished model.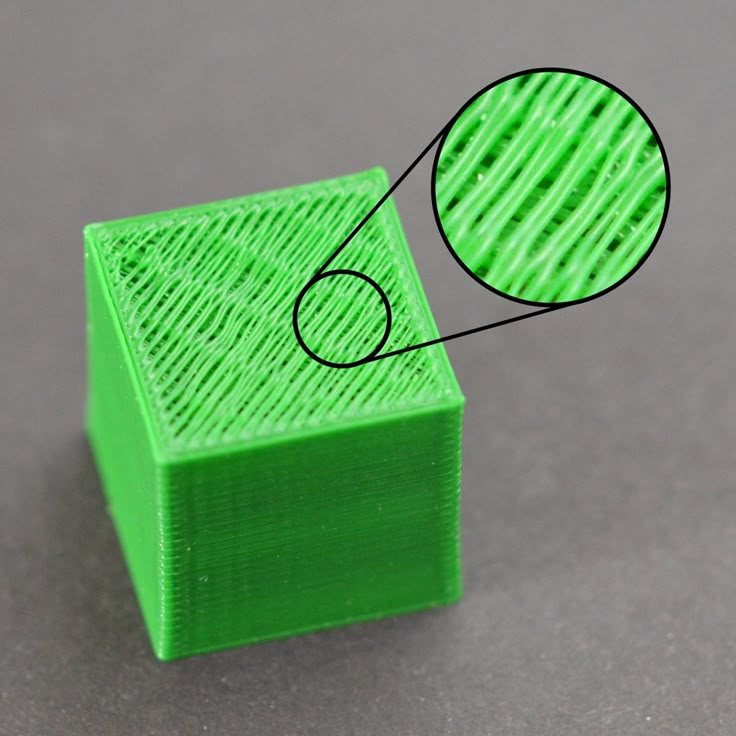 Or instead of a neat product, plastic noodles suddenly appear on the table.
In fact, the causes of defects can be conditionally divided into 2 types - these are physical and software.
Physical ones are those that arise due to problems with the mechanics or any other causes that can be eliminated physically. These include problems with printer mechanisms (belt tension, backlash), clogged or deformed nozzle, incorrect table geometry, etc.
Software - these are defects that occur due to incorrect slicer settings or, less often, errors in the printer firmware. For example, incorrectly selected print speed, retract settings, incorrectly selected temperature for plastic, etc.
Very rarely, the problem may lie in the wrong or “flying” printer firmware (although usually the printer simply will not start then), overheating of some boards during printing, etc. These are rather special cases, so we will not consider them.
Model peels off or does not stick to platen
This is the most common 3D printing problem. Every 3D printer has had a case when the first layer treacherously rolls, clinging to the extruder, or the most offensive - when it tears off a partially printed model from the table. The first layer must stick tightly otherwise nothing will be printed.
Gap between table and nozzle too large
This is the most common reason. You just need to set the correct gap between the table and the nozzle.
Modern printers often use an auto-calibration (auto-leveling) table system or an auxiliary table leveling program. To calibrate such printers, use the instructions. If there is no manual, it can be downloaded from the manufacturer's website.
If you have a simple printer without auto-calibration, a self-assembly or KIT kit, use a probe or a piece of paper folded in half to calibrate. The probe should be slightly pressed against the table by the nozzle. Before calibration, the table and extruder must be heated. Align the table surface over each adjustment screw (there may be 3 or 4) in turn, and only then check the center point.
If you're having trouble getting your table surface perfectly level, try raft printing. Raft is a thick substrate in several layers that is printed under the model. It will help smooth out the slight curvature of the table.
A small cheat sheet to determine the correct gap on the first layer
Plastic with poor adhesion
Some types of plastic, due to various reasons, such as large shrinkage, do not adhere well to the surface of the printing platform. In this case, try using stickers or special 3D adhesives to improve adhesion between the table and the first layer of plastic.
In the early days of 3D printing, there were experiments with different homemade 3D adhesive recipes. ABS diluted in acetone, BF glue, sugar syrup and even beer. Some experiments have been successful. Until now, some enthusiasts use some types of hairspray or glue sticks as 3D glue. But still they are inferior in their properties to industrial 3D adhesives.
Some types of high temperature plastics with a high percentage of shrinkage (ABS, Nylon, etc.) may peel off the table during printing. This is due to uneven cooling and “compression” of the model (the lower layers have already cooled down, but the upper ones have not yet). For such plastics, it is imperative to use a 3D printer with a heated table and a closed case.
Plastic temperature too low
The hotter the plastic is when it exits the nozzle, the better it will adhere to the print platform. It is better to print the first 5-10 layers at a higher temperature (+ 5-10 degrees) and turn off the blower fan.
Wrong first layer settings (speed and thickness)
A thicker layer sticks easier, so the standard first layer is 0.3mm thick. With an increase in print speed, the heating block may simply not have time to heat the plastic to the desired temperature and it will stick to the table worse. Before printing, check the speed and thickness settings of the first layer in the slicer.
A lot depends on how the 3D printer prints the first layer. Try to control the printing of the first layer and only then leave the printer to work alone.
Plastic does not choke from nozzle
The printer has already begun to print, but the print table remains empty. Or part of the model did not print.
Clogged nozzle
In 3D printing, a nozzle is a consumable. The nozzles are clogged or worn out (frequency depends on the type of plastic). The simplest thing is to replace the nozzle. But if there was no spare at hand, you can try to clean the old one. To do this, there is a whole set of thin needles. Or you can heat a clogged nozzle above the melting point of the plastic and “burn out” the blockage. But later it is still better to replace the nozzle.
Low temperature nozzle
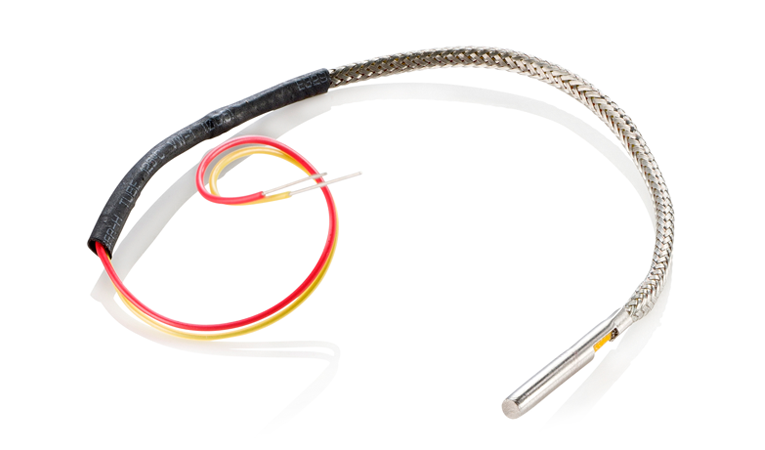
You need to increase the temperature of the extruder in the slicer settings or check the thermistor and heating block. Sometimes the thermistor may not read the temperature correctly due to a malfunction or incorrect 3D printer firmware settings.
If the problem occurs after replacing the thermistor - contact the manufacturer or read articles about PID tuning.
Empty extruder
As the extruder heats up, plastic begins to ooze out of the nozzle. Because of this, the extruder may start printing half empty. Because of this, part of the first layer is not printed. You can push the plastic manually by simply pushing the bar into the nozzle. Or solve this problem programmatically - in the slicer add a contour print around the model (one line).
Some manufacturers and 3D enthusiasts add a line print on the edge of the table at the beginning of each GCode. This is done so that there is plastic in the nozzle by the time the model is printed.
Feeder does not push through plastic
The plastic pushes the feed mechanism to the extruder - a motor with a special pulley put on the shaft. If for some reason the plastic is not pushed through (nozzle clogged, extruder temperature low, etc.), then the pulley “gnaws” through the bar. You need to push the plastic bar with your hands or cut off the damaged piece.
Elephant foot
The first layers of the model are wider and protrude beyond the boundaries of the model. This is due to the fact that the upper layers put pressure on the first ones that have not yet cooled down and flatten them.
High table temperature
Due to the too high temperature of the table, the lower layers remain soft for a long time. Try lowering the table temperature. It is better to reduce gradually (in increments of 5 degrees). You can try to turn on the blower when printing the first layers.
Small gap between nozzle and platen
If, when printing the first layer, the nozzle is too close to the table, then excess plastic will be forced out. After a few coats, this will not be as noticeable, but can lead to the effect of an “elephant's foot”.
Plastic re-extrusion
When too much material is squeezed out of the nozzle, the walls of the model are not smooth, but bumpy, with sagging.
The solution is software - in the settings of the slicer, you need to set the material feed rate (fluidity) to a lower value. The average value is 95-98%.
It is worth checking the diameter of the rod. If its size is greater than 1.75, then the plastic will be squeezed out more than necessary.
Plastic underextrusion
The plastic is squeezed out too little, because of this, gaps may appear between the layer. The finished model will be fragile and fragile.
Wrong thread diameter
Check the filament diameter in the slicer settings. Sometimes, instead of the popular 1.75, the default is 2.85.
Incorrect feed factor settings
Check the fluidity settings in the slicer. The average should be 95-98%.
Clogged nozzle
Something could get into the nozzle and partially block the exit of the plastic. Visually, the plastic will choke from the nozzle, but in a smaller amount than necessary for printing.
Hairiness or cobwebs on finished model
Thin threads of plastic protrude from the outer wall of the model (most often on one side). The defect appears due to the flow of plastic from the nozzle during idle movement.
Insufficient retract
A retract is a slight pull of a plastic filament from an extruder. Due to the retract when the extruder is idle (from layer to layer or from model to model), heated plastic does not drip from the nozzle. For some flowable plastics (eg PETG) the speed and amount of retraction must be increased.
"Hairiness" can be easily removed by grinding or cutting off the threads with a sharp scalpel.
High temperature extruder
The higher the extruder temperature, the more liquid the plastic becomes. It is important to find a balance so that the plastic is not too liquid and sticks well in layers.
In the selection of the optimal extruder temperature, a test model - a tower - helps a lot. It clearly shows how plastic behaves when printed at different temperatures.
.
Temperature test
Top "perforated" or uneven
The top of the model is bumpy or with holes. The problem may arise if the top of the model is flat. For example, like a cube.
Insufficient airflow
When printing the top plane (cover), the plastic does not have time to cool down and remains too liquid. Because of this, the threads are torn and holes are formed. Increase the fan speed on the last layers.
Few top layers
The top of the print may be too thin and deform as a result. Check slicer settings. The number of upper layers is not recommended to be set less than 6.
Low percentage of filling
If the infill percentage is too low, then the top layer will simply have nothing to rely on. Increase the fill percentage in the slicer settings.
Model deformation
Some parts of the model seem to have melted in some places or on one side. The problem most often occurs when printing with PLA plastic. The defect appears due to the fact that the plastic does not have time to cool and deforms.
Insufficient airflow model
Turn the fans on to maximum. If their power is not enough (in some printers, the fan is located only on one side), you can put a regular desktop fan and direct it to the 3D printer table.
Small model
Small models are difficult to blow well. Try to print small items alongside larger ones, or place several identical models in different corners of the table. So the plastic will have more time to cool.
Layer offset
Layers shift along the x or y axis during printing.
Print head jam
Turn off the printer and try to move the extruder along the x and y axes with your hands. The extruder must move freely. If there are jams, check the mechanics of the printer. Bearing wear or the curvature of the shafts may be to blame.
Electronics overheating
Sometimes electronics problems can be to blame for misaligned layers. The most common cause is overheating of the drivers or too low current exposed to them.
Table top is loose
This is most often seen in 3D printers with glass. During printing, the nozzle may hit the model and move the glass slightly. Before printing, check if the glass or other printing surface is well fixed on the heating table.
Skip layers
Small holes are visible on the print, or the shell of the model is not continuous.
Teflon tube deformed
There are 2 types of thermal barriers - all-metal and with a Teflon tube. If overheated, the Teflon tube may deform. Plastic will pass through it, but in a smaller amount.
Low extruder temperature or high print speed
If the extruder is not heated enough, then the plastic will not be liquid enough and simply will not have time to be forced through the nozzle. The higher the print speed, the higher the extruder temperature should be.
Sometimes the outer walls print well, but the infill is “torn”. In this case, slow down the infill print speed in the slicer.
Model bundle
Cracks form on the surface of the printout during or after printing. Cracks can be large or very small. Most often, this problem occurs with plastics with a high percentage of shrinkage - ABS or Nylon.
Sudden temperature difference (if model delaminates during printing)
With a sharp temperature difference (for example, a draft), part of the model cools down faster. This leads to uneven shrinkage and incorrect distribution of internal stress. For plastics with low shrinkage, this is not critical. But if the shrinkage percentage is more than a few percent, the model may burst in layers.
For printing with such plastics, it is recommended to use a printer with a closed housing. If this is not possible, try to avoid drafts and sudden temperature changes in the room where the 3D printer prints as much as possible.
Print temperature
Due to too low printing temperatures, the layers may not “stick” well to each other. Raise the print temperature in the slicer settings.
Hardening (if the model cracks after printing)
Sometimes cracks appear on the model a few days after printing. This is due to uneven distribution of internal stress after cooling. You can try to “harden” the finished product.
For hardening, the model is placed, for example, in an oven, and heated to the softening temperature of the plastic. After that, the heating is turned off and the oven is left to cool slowly with the model inside. Due to this, the stress inside the print is distributed more evenly. But accuracy is very important in this method - if you make a little mistake with the temperature, the finished product can “float”.
Ringing
In places where the extruder changed direction, ripples are visible. Most often it looks like a shadow around the “sharp” protruding elements of the model.
Mechanical problems
Sometimes the problem occurs due to extruder play. Check if the extruder mount to the rails is loose. Be sure to check the tension of all belts.
High print speed or high accelerations
Moving the extruder too fast can cause vibrations that cause ripples on the wall of the model. The lighter the weight of the extruder, the less noticeable the ripples will be. To get rid of ringing, simply reduce the print speed in the slicer settings.
Slits for thin-walled models (not solid shell)
The thin wall of the model is not solid, but consists of two thin walls with a narrow gap between them. This problem is often faced by fans of printing "cutting" for baking.
Left model with wall defect, right without
Wall thickness and nozzle diameter mismatch
If the wall thickness is 1 mm, and the nozzle diameter is 0.4, it turns out that for a solid wall, 2 nozzle passes are few, and 3 are already many. The result will depend on the slicer algorithm, but most often you will get 2 walls with a thin slot in the middle (the slicer cannot change the wall thickness). The solution to the problem may be a slight refinement of the 3D model or the use of a different slicer.
Algorithms for calculating 3D models are constantly being improved and refined, and now this problem is less common.
When modeling, take into account not only the thickness of the nozzle, but also the percentage of “overlapping” of lines on each other. If you have a nozzle with a diameter of 0.4 - make the wall in your model not 0.
8, but 0.7 - 0.75.
Wrong model geometry
When instead of a circle you get an oval, and instead of a square you get a semblance of a rhombus.
The main reason is malfunctions in the mechanics of the printer. Be sure to check:
Belts
Check belt tension in x and y. Belts stretch over time and may need to be tightened or replaced. Each 3D printer has its own way of tightening the belt. If the belts are slightly stretched, you can tighten them with the help of a "spring".
Loose pulleys, etc.
Check if all bolts and nuts are tight. Are there backlashes. Pay special attention to tightening the pulleys located on the motors along the x and y axes.
Sagging of some parts of the model
Some parts are not printed, broken, or instead of a neat surface, a swollen plastic snot is obtained.
No support for overhangs
A 3D printer cannot print in the air, so if there are overhanging elements in the model, you need to set supports - supports. The slicer can set the necessary support itself, you need to check the appropriate box in the settings.
When printing with soluble support, you can set the gap between the model and support - 0. This will make the surface smoother. If the support material and the model are the same, you need to add a small gap. Otherwise, it will be difficult to separate the support from the model.
Split model
Sometimes the supports can take more plastic than the model. In this case, to save material and time, it will be more convenient to cut the model. If you have more than one 3D printer, then the model will print several times faster.
When cutting the model, you can leave grooves or mortgages so that the pieces of the model are connected without displacement.
Totals
In this article, we talked about the most popular 3D printing defects and how to solve them. Don't be intimidated by such a long list.