3D printer pick and place
Convert a 3D Printer to a Pick and Place Machine
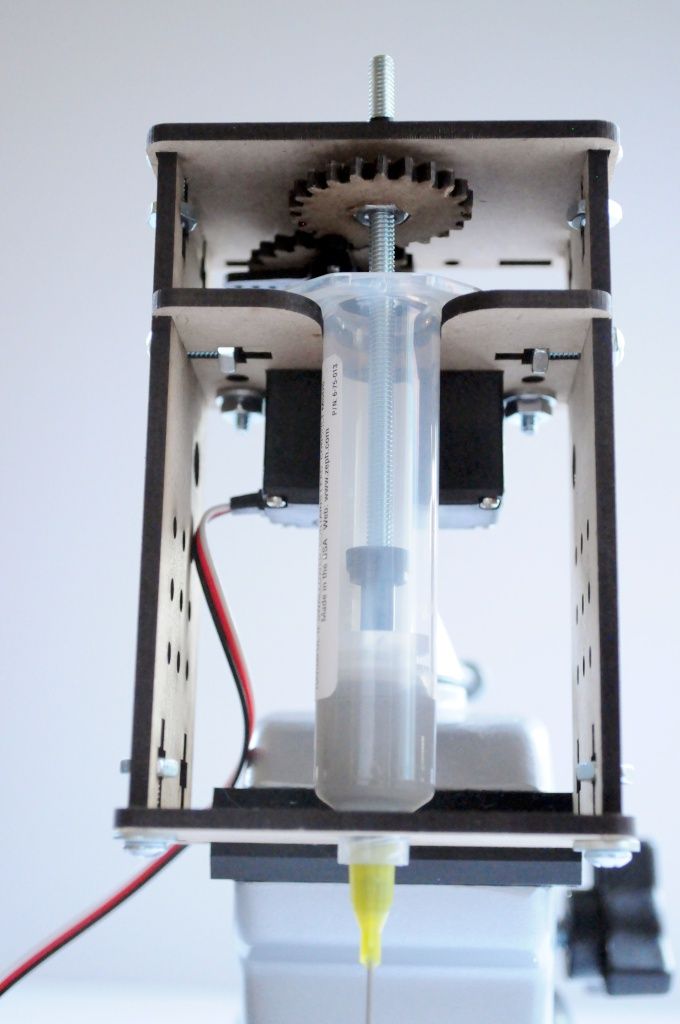
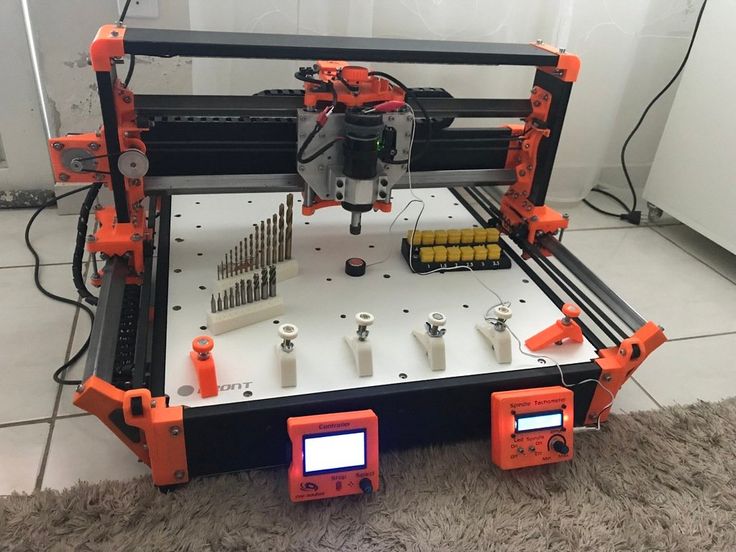
I share the relatively painless process of turning a junky 3D printer into a tool to help you place tricky components or to automate your PCB assembly. The minimum feature size of most electronic packages is 0.1mm. Align to that point and surface tension will pull it down to a perfect placement. This is a big deal for when you've got a BGA-style chip where joint inspection is gonna be a hassle. The modern 3D printers are putting out 10 micron positioning precision and old junk can still put in 0.1mm or better! That's precision and not accuracy, so I'll also be using a cheap usb microscope to do optical position alignment. With the unused extruder stepper motor, I simply route that to the platform and have a component rotator for 45 or 90 degree parts. The goal is manual placement of tiny components that I can't trust my zoomer hands with.
-
Getting Started
Sina Roughani • 01/24/2021 at 09:33 • 1 commentThe printer you use for this has a single requirement.
If it's good at printing, let it do that and don't bother it. There's no point not letting a 3D printer do what it's good at. In my case, my 4 year old Monoprice Select Mini V2 decided to stop printing reliably, probably due to the bed heater being shorted as a result of the zip-ties used for strain "relief" and cable "management". Regardless, my monkey brain couldn't figure that out in the middle of classes and so I just YOLO'ed it and got another one. To all you who read Hackaday- seriously don't take too many classes or schedule too many things or work too much. As soon as you have free time, your mind is able to do great things. Something about stress and sleep, etc.
The first step is to remove the coating on the bed. In my case, Monoprice uses an adhesive to bond the plastic print surface to the aluminum bed. I used a scraper to peel the bed off, but then the adhesive remained. Being primarily an organic goo with the gumminess of a butyl compound, I used isopropyl on the glue to cause it to swell.
 I don't know what the glue is though. After it swelled, I was able to use a scraper razor blade to peel it clean. DO NOT use these things lightly. They are sharpened and their edges are kept pristine and it took me many milliliters of my blood, sweat and tears to learn that lesson.
After your bed is clean, you can rest assured that your bed isn't dirty.
Now, you need to find a way to route an air-pump from a heavy mass portion of your printer up to the Bowden tube or filament feed-point. In my case, the base of the unit is chunky, so the vibrations of the motor will be distributed across a larger mass and avoid any components dislodging. You can also disconnect heater and fan cables from your control board. You'll use one of the heaters to turn on and off your pump, and since they'll probably be using PID control with a thermistor as feedback, you'll need to keep the thermistor wire connected. I chose the bed to free up the nozzle.
Depending on your printer's design, you may have a column, or some cable management system which leads to the extruder assembly.
 You should hijack this for your air pump's tube. I was able to feed mine through the column that the Z-axis leadscrew is in. While you have access, lube up your leadscrews because why not. The silicone and oil based lubes will probably kill each other, but YOLO.
Now, you can spruce up your old extruder assembly for its new life. The thing that really kills me is printer nozzles are usually 0.5mm or 0.4mm. That's the prefect size to handle the most common annoyingly small component, the 0402. Let's not speak of the excruciatingly small 01005, but I do have a solution for that too, actually. You'll want to clean your nozzle the best you can since any remaining organic residues will result in a chemical process called "gumming" where radicalization events from oxygen and cosmic neutrinos causes double bonds and subsequent cross-linking (seriously, cosmic neutrinos are the reason we need fat soluble vitamins D and E in our cellular membranes to keep those radicals out of our nucleii.
 Eat some carrots! I used the scraper to get the kapton and ceramic insulation off of the heater block and undid the set screw for the heater element.
With everything apart and after repeatedly sticking a nozzle cleaning pin through the nozzle hole, I was ready to toss in the pump.
I ended up going for a different, smaller pump since this one was way too noisy. Notice however the rubber band technique. Mounting the rubber bands between the contact interface of the housing (at the vent holes) creates a lossy medium that effectively prevents "impedance matching" of the vibration source to the printer body load. An alternative is to suspend it to avoid any contact so it "sees a high impedance" and just vibrates at itself, but that would have been too much effort. The new motor simply used a clamp with threaded inserts, modeled in ImNotARealEngineerCAD and...
Read more »
View project log
Enjoy this project?
ShareSTL file Mini Pick and Place 3D printable machine・3D printer design to download・Cults
LO LA59 STL
€1
CADIC Philippe
€2
Skateboard lamp
€1
Opensource 3D printer files
€1
Small enclosure for RPI PI ZERO
€1
CNC arduino shield enclosure
€1
CNC Chassis
€10
DIY Foam Cutter - 3D printable parts
€5
Best 3D printer files of the Tools category
Pegboard holder for digital thickness gauge
Free
Filament Spool Spray Paint Turntable!
Free
Modular Raspberry Pi 2 3 3B+
Free
small quad
Free
Mechanical Counter
Free
Simple face shiled
Free
Deactivated
GoPro bike mount
Free
Best sellers of the category Tools
phone ring holder
€0. 90
90
Chill Buddy Lighter Case
€0.93
SUPERBOX
€1.50
ARTEMIS -> Magazine for Alligator 2 || 6.5" Arrows || Repeating crossbow
€6.25
INDICATOR FOR BEST BED LEVELING FOR ENDER 3 V2
€2.82
Fast-Print Stackable Parts Bins / Storage Boxes
€2.84
FLSUN v400 display holder
€9.99 -50% €4.99
'ELEGANCE' set for Bambu lab and generic 3d printers
€5
The Business Card Embosser System
€3
Shrek pooping toothpaste topper
€2. 83
83
Cut-Man - PET bottle cutter with handle!
€3.49
3D Printed Strain Wave Gear (Harmonic Drive)
€4.99
Phone holder
€2.44
PRECISION DIAL INDICATOR 3D PRINTING DIY
€1.91
Ender 3 S1 pro fan duct 5015 4020
€1.30
Spartan 4mm Hex tool bit holder
€1.80
Would you like to support Cults?
You like Cults and you want to help us continue the adventure independently? Please note that we are a small team of 3 people, therefore it is very simple to support us to maintain the activity and create future developments. Here are 4 solutions accessible to all:
ADVERTISING: Disable your AdBlock banner blocker and click on our banner ads.
AFFILIATION: Make your purchases online by clicking on our affiliate links here Amazon.
DONATE: If you want, you can make a donation via PayPal.
WORD OF MOUTH: Invite your friends to come, discover the platform and the magnificent 3D files shared by the community!
Free STL file Marblevator, Pick & Place・3D printing plan for download・Cults
Share Add to ?Quality of creation: 5.0/5 (2 votevotes)
Ratings of participants on printability, usefulness, level of detail, etc.
- 👁 4.4k views
- ♥ 28 i like s nine0015 121 downloads
- 0 comments
- 1 make
3D Model Description
https://youtu.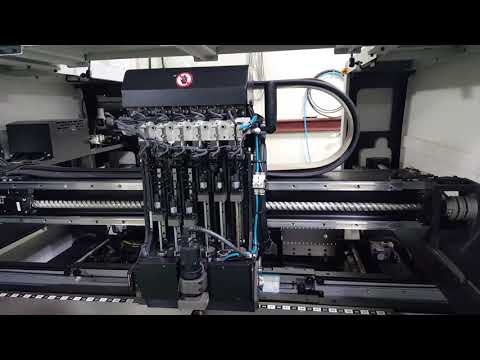 be/At5PaPEwrbE
https://youtu.be/f5EW1sDJN_c
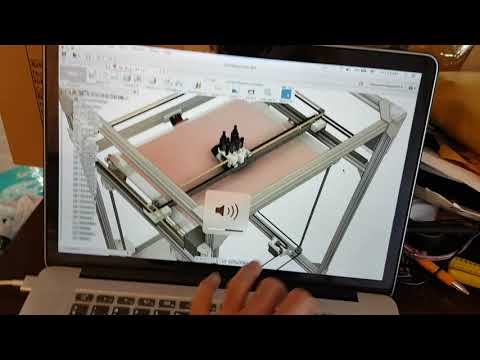
"Marblevator, Pick and Place" is the latest in my series of Marblevator mechanisms. This Marblevator includes a pick-and-place mechanism to move the marble (ball bearing) from the end of the lane to the beginning of the lane. nine0007
Pick and place mechanisms were more common before the introduction of robotics on assembly lines. This mechanism uses a diamond that rotates, expands and contracts using control links. The orange and purple links form a diamond, while the blue, yellow, green and silver links are the control links that rotate, expand and contract the diamond. The design is based on the "Arglin Kampling [Third Gen]" and "thang010146" concept models, albeit with numerous changes. nine0007
As usual, I probably forgot a file or two or who knows what else, so if you have any questions please feel free to ask as I make a lot of mistakes.
Designed with Autodesk Fusion 360, sliced with Cura 4.12.1 and 3D printed in PLA on Ultimaker S5s.
3D printing settings
Spare parts.
I purchased the following parts:
-
One N20 30rpm 6VDC geared motor.
nine0044 -
Four AAA batteries.
-
Three neodymium disc magnets, 6 mm in diameter and 2.75 mm thick.
-
One 4mm x 4mm x 4mm neodymium cube magnet.
-
Two 10 mm diameter ball bearings.
Four-cell AAA battery pack with on/off switch.
I printed the following parts at .15 mm layer height, 20% infill and no supports:
-
One "Axle, Link, Long.stl".
-
One "Axle, Link, Medium.stl".
-
Ten "Axle, link, short.stl".
-
One "Base.stl".
-
Six "Bolt.stl".
-
One "Gear, drive.stl".
-
One "Gear, Idler.stl".
-
One "Gear, Motor.stl".
-
One "Holder, magnet.stl".
-
One "Link 1.
 stl". nine0007
 -
One "Link 2.stl".
-
One "Link 3.stl".
-
Two "Link 4.stl" (the second is the fifth link, but identical).
-
Two "Link 6.stl" (second - seventh, but identical).
-
One "Link 8.stl".
-
One "Link 9.stl".
-
One "Mount, Motor.stl".
-
One "Track.stl".
This is a high precision model for printing and assembling with sometimes very small parts and in very limited space. Check fit and fit, file, sand, etc. before assembly. all details as needed for smooth movement of movable surfaces and snug fit of non-moving surfaces. Depending on the printer, printer settings, and colors chosen, more or less trimming, filing, and/or sanding may be required. Carefully file all the edges that were in contact with the build plate to make sure that all build plate "burrs" are removed and all edges are smooth. For this step, I used small nail files and a lot of patience. nine0007
This model also uses a threaded assembly, so a 1.125 M8 tap and die will help clean threads if necessary.
Base assembly.
To assemble the base, I did the following:
-
Attach "Link 1.stl" to "Base.stl" using "Gear, Drive.stl", a threaded standoff cup from the base.
-
Attach "Link 2.stl" to link 1 with one "Axle, link, short.stl".
-
Attach "Link 3.stl" to the base assembly with one "Axle, Link, Short.stl". nine0007
-
Attach "Gear, Idler.stl" to the base assembly with one "Axle, Link, Short.stl", marking the position of the driven gear in relation to the link 3 gear.
-
Attach "Link 3.stl" and two "Link 6.stl" to link 2 with one "Axle, Link, Long.stl" folded as shown.
-
Attach two "Link 4".stl" to the base assembly with one "Axle, Link, Medium.stl" folded as shown.
-
Attach the loose end of the top link 6 to the top link 4 with one "Axle, Link, Short.
 stl".
stl". -
Attach the free end of the lower link 6 to the lower link 4 using one "Axle, Link, Short.stl" file.
-
Attach "Link 8.stl" to top link 6 with one "Axle, Link, Short.stl".
-
Press a cubic neodymium magnet into the end of "Link 9.stl" about 3mm below the curved surface (final depth to be adjusted later). nine0007
-
Attach link 9 to bottom link 6 with one "Axle, Link, Short.stl".
-
Attach link 8 to link 9 with one "Axle, Link, Short.stl".
-
Insert three neodymium disk magnets into "Holder, Magnet.stl", observing the polarity of the magnet in link 9 (for example, the flat surface of the magnet holder should be attracted to the curved surface of link 9).
-
Install the magnet holder assembly into the base assembly, marking the alignment as shown (final alignment will be adjusted later). nine0007
-
Turn the drive gear to check the smoothness of the mechanism.

Motor holder assembly.
To assemble the motor holder, I did the following:
-
Insert four AAA batteries into the battery pack and make sure the switch is turned off.
-
Solder the battery pack wires to the motor terminals so that when power is applied, the motor shaft rotates clockwise as viewed from the motor shaft side. nine0007
-
Push the motor into "Mount, Motor.stl".
-
Fit "Gear, Motor.stl" onto the motor shaft.
-
Attach the engine mount to the base with two "Bolt.stl". This mount needs to stay tight, so I added a few drops of cyanoacrylate glue to help keep it in place.
-
Attach the battery pack to the base using double-sided tape.
Final assembly and testing.
For final assembly I did the following step:
-
Fasten "Track.stl" to the base assembly with four "Bolt.stl".
After assembling the model, I turned it on, placed one ball bearing at the end of the track, and verified that the link 9 cube magnet was able to capture the ball bearing.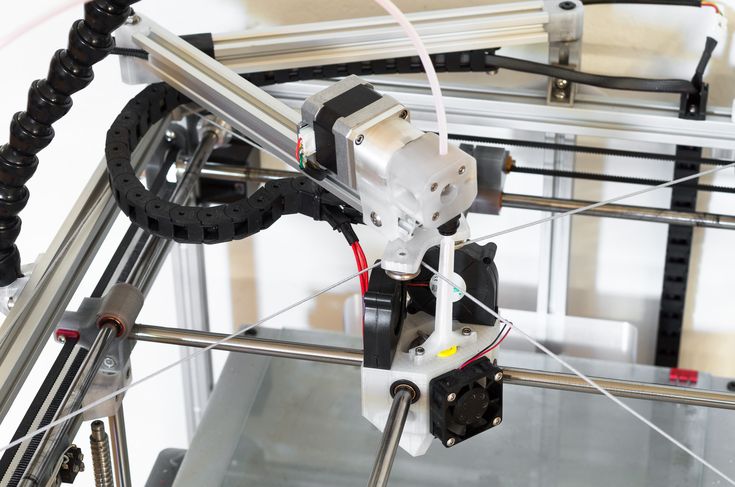 If not, I pressed the magnet a little closer to the bent end of link 9 and checked again.
Next, I checked the ball bearing retraction at the beginning of the journey. Two adjustments must be made to successfully remove the ball joint. The first is the link 9 magnetif it is too close to the ball joint, then the tension force will overcome the shear force of the magnet holder magnets. The second adjustment is the height of the magnet holder, which is adjusted by moving the magnet holder up or down one tooth of its rack and pinion. When both adjustments were completed, the model was ready!
This is how I printed and put together Marblevator, Pick and Place.
Hope you enjoyed it!
3D Printer File Information nine0023
- 3D Design Format : STL Folder details close
- Axle, Link, Long.stl
- Axle, Link, Medium.
 stl
stl - Axle, Link, Short.stl
- Base.stl
- Bolt.stl nine0012
- Gear, Drive.stl
- Gear, Idler.stl
- Gear, Motor.stl
- Holder, Magnet.stl
- Link 1.stl
- Link 2.stl
- Link 3.stl nine0012
- Link 4.stl
- Link 6.stl
- Link 8.stl
- Link 9.stl
- Mount, Motor.
 stl
stl - track.stl
Learn more about formats
nine0012 - Publication date : 2022-05-11 23:41
License
CC BY-NC-SA - Attribution - Noncommercial - PreservationTerms
Tags
Author
designs 295
Downloads 38.8k
Sales transactions €2.73
Liked designs 7 Subscribers 614 nine0007
Contact
The more mistakes I make, the more knowledge I gain.
Barrel
0.93 €
Medal 1
5.61 €
Angel Tea Light
Free
"Pencil" Puzzler
Free
nine0335 Animated Heart Valentine.
Free
Hummingbird
Free
Designing a Parametric "Print in Place" Hinged Container Using Autodesk Fusion 360
Free
Geared Heart, Hand Crank Edition
Free
Best 3D Printer Files in the Gadget Category nine0023
Take off, landing by hand with DJI Mavic Pro
0,94 €
phone holder sci-fi style
3 €
SD & Micro SD Card Holder
0,50 €
Mini Tripods
Free
Heineken Coaster
Free
Keychain with magnet "Thor's Hammer" Mjolner
1,08 €
Numbers 0-9
Free
Coin tin "Pot with bear"
1. 18 €
18 €
Bestsellers in the Gadget category
Bambu AMS Color 2 tier rack (for 2 AMS units 1 top 1 bottom)
2.27 €
FLEXI GIRAFFE
0,93 €
glasses new year 2023
1.23 €
AR-15 LOWER MULTI-CAL. REINFORCED DESIGN
8,50 €
Inner fenders Trx4m Bronco
7.54 €
Stock ALLIGATOR 2 AR15
€2.50
Application for cutting cookies
3,50 €
ENGINE BLOCK - WALL KEY HANGER
1,80 €
Program for creating Christmas balls and other lithophany
3,50 €
Pringles box
1,50 €
nine0335 Spear Draupnir with several greaves and a ring | Spear of Kratos | By CC3D 10. 22 €
22 €
Seal of the V8 engine in place
1.76 €
Keyfob application
€3.50
JEEP WRANGLER PEN HOLDER - 3-IN-1
1,80 €
The Thing - Charging Cradle for Airpod and Apple Watch
€14.15
Brush conditioner
2.29 €
Do you want to support Cults?
Do you like Cults and want to help us continue our journey on our own ? Please note that we are a small team of 3 people, so supporting us in maintaining activities and creating future developments is very easy. Here are 4 solutions available to everyone:
-
AD: Disable the AdBlock banner blocker and click on our banner ads.
-
AFFILIATION: Shop online with our affiliate links here Amazon.
-
DONATIONS: If you want, you can donate via PayPal here.
-
* INVITE FRIENDS: * Invite your friends, discover the platform and great 3D files shared by the community! nine0007
8 nuances worth paying attention to
Sooner or later, everyone will learn about 3D printing. And only a few lucky people, imbued with the opportunities that 3D printing opens up, catch themselves thinking that they want to purchase a 3D printer. The desire gradually develops into a serious decision and the search for the right option begins. And here the potential buyer is faced with the fact that he does not fully understand what to choose among the whole variety of 3D printers. We will try to answer this question in as much detail as possible. What to look for, and how to make a choice? We want to offer a small checklist of the nuances that you need to pay attention to when choosing a 3D printer. You need to decide for yourself for what tasks you will use this technique? What features should a 3D printer have to solve your problems? nine0007
Tip 1 : Decide on 3D printing technology
The first step is to decide on the technology of 3D printing. There are two main paths here. If you are faced with the task of manufacturing high-precision and miniature products, such as jewelry, then 3D printers using SLA or DLP technology are suitable for you. Such printers are specially designed for the manufacture of high-precision models. 3D printing in these printers occurs using a laser beam that illuminates the photopolymer resin. Hence the accuracy of the models. Prominent representatives of this segment: Form 2 3D printer or B9 3D printercreator If you are faced with a wider range of tasks, and functionality, part size, and low manufacturing cost are more important, then an FDM printer will suit you. 3D printing on this equipment involves layer-by-layer melting of plastic. If according to SLA printers everything is clear. The scope of their application is jewelry, dentistry, high-precision prototypes of small parts. Then we will dwell on FDM printers in more detail. There is a lot more variety of different options for implementing printers. nine0007
Nuance 2: Assess your needs soberly
Of course, you always want to get all the best and with maximum opportunities. Do you need all this to solve your current problems? What can be cited as an example? For example, the size of the working area of the FDM 3D printer. There are printers on the market with a large print area (1m x 1m x 1m), and with a very small one (100mm x 100mm x100mm). But for most tasks, a certain standard has already developed. This is the printable area within 200 x 200 x 200 mm. With slight fluctuations in size in one direction or another. Most 3D printers have exactly this size of the working area. This volume is enough to solve 95% of any tasks. But options are possible ... If you plan to manufacture small parts, then a smaller size will probably be enough for you. But if your work will be related to manufacturing, for example, a master model for casting, or large prototypes, then only then it makes sense to pay attention to a printer with a large print area. In other cases, the size of the print area larger than the standard is nothing more than a nice bonus. But as they say, you have to pay for everything. Therefore, most often it makes sense to focus on the “standard” print area. And even if the part you need to print is larger than the working area of your 3D printer, you can always cut it in a special editor, and then print 2 parts of the model and glue them together. nine0007
Nuance 3 : Decide on the complexity of the products
You should decide for yourself how complex models you will print on a 3D printer. If you plan to manufacture complex prototypes, or complex art models, then you need a 3D printer that can print with two materials.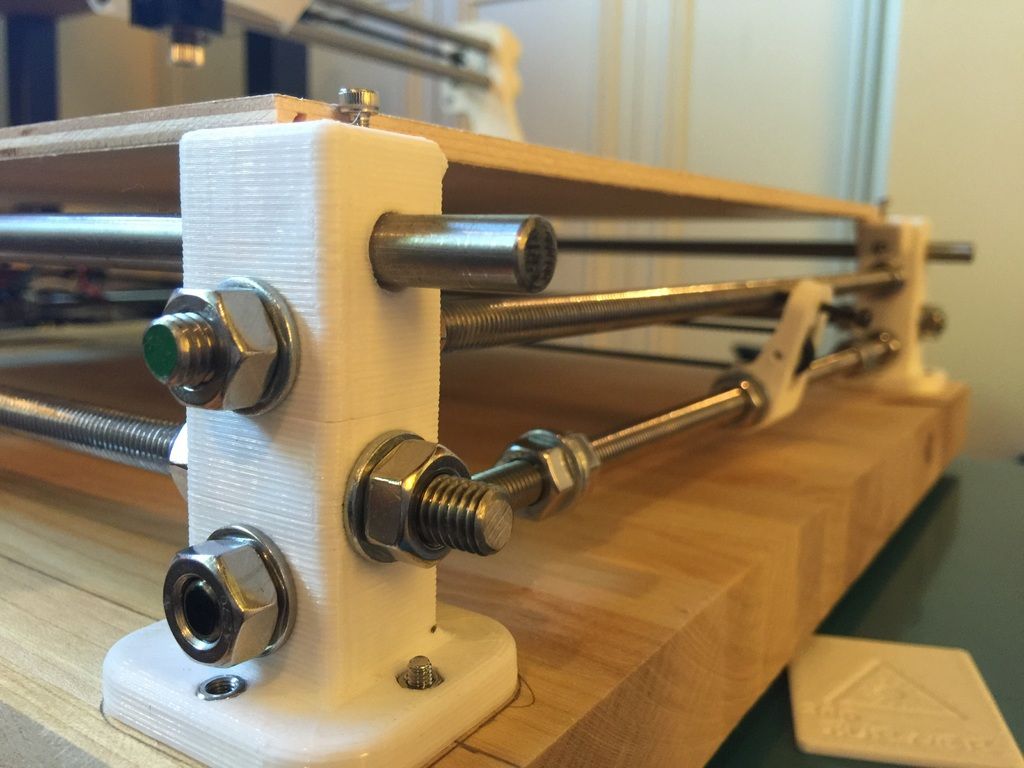 This is necessary so that your printer can print supports from soluble material. If the models are not the most complex, then you can get by with one extruder and save the budget. A complex model is a model with a large number of elements suspended in the air, or a model whose elements have angles of more than 30 degrees. nine0007
Point 4: Decide on the list of materials to be used.
Another important point. You must immediately determine for yourself a list of possible materials with which you are going to print. This primarily applies to materials with a high degree of shrinkage, such as ABS and Nylon. In order to print with such materials, a heated table is clearly required in a 3D printer. And it is very desirable to have a closed case to provide a thermal circuit around the model. If you plan to print only with PLA plastic. You don't need a heated table. But still it is better that the printer has a heated table.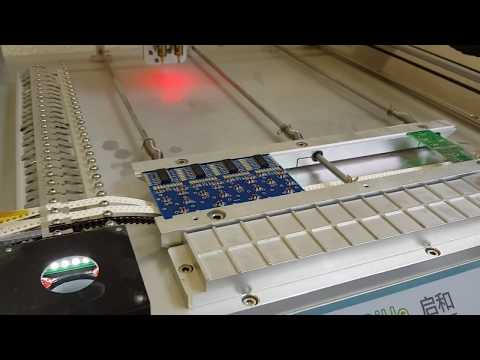 Now the difference in the cost of printers with a heated table is practically the same as the cost without it. But you get a universal solution with which you can perform the full range of tasks facing a 3D printer. One more moment. Ability to print with flexible materials Quite a number of 3D printers face the problem of printing with flexible materials. Of course, printing with various Flexes and Rubbers is very interesting at first glance. But the use of these materials in life is not very common. Usually, for most people, this happens like this: A couple of models are printed, and the understanding comes that this is not a fast and rather complicated process. And this is where the acquaintance with flexible materials ends. Therefore, it makes sense to demand such an opportunity from the printer if printing with such materials is very necessary. nine0007
Nuance 5: Structure and kinematics
Next, you need to pay attention to the design of the 3D printer.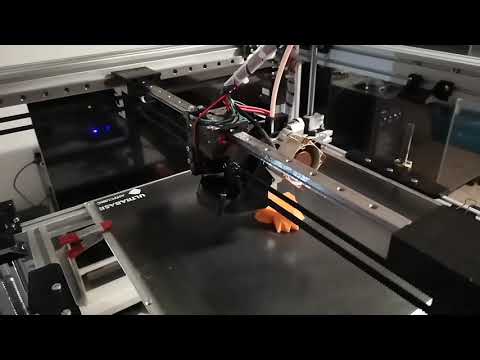 Even if you are not a great specialist in technology, you can immediately see that some printers have an open design. And others are closed. As they like to be called in the Russian-speaking community "cubes". What does the appearance say? Printers with an open design, usually have kinematics with a horizontally moving table (based on Prusa 3D printers). This kinematics has some inherent flaws. Such as, not the highest print speed and possible print quality problems associated with the complexity of the settings. First of all, this is the so-called wobble. Also, the lack of a closed case can cause print quality problems with high shrinkage plastics (ABS, Nylon). The main advantage of printers of this design is their price. It is usually lower. But as you know, you have to pay for everything. In this case, the worst performance. The so-called "cubes" today, is the main design, which is represented by leading manufacturers on the market. Such printers are built according to the lifting table scheme.
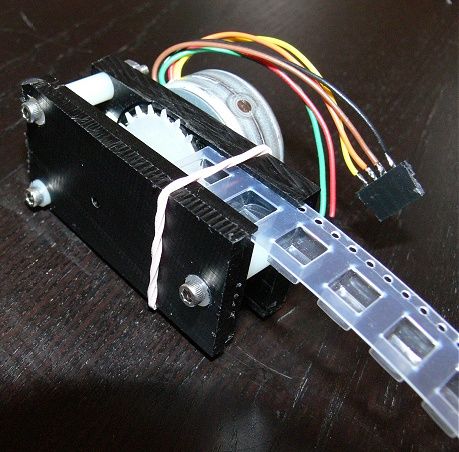 And they lack most of the shortcomings that are inherent in printers from the previous group. “Cubes” usually have a closed body, which allows the highest quality printing with plastics with a high degree of shrinkage. Closed case printers are more rigid. This results in better quality printing. The kinematics of moving the print head is represented by various designs. They have their pros and cons. But most of them have advantages over moving table printer circuits. nine0007
Nuance 6: Diameter and interchangeable nozzle
Most 3D printers on the market come with 0.3-0.4mm nozzles. This is enough to solve the vast majority of tasks facing a 3D printer. Some of the printers have the ability to install a nozzle of a different diameter, others do not. As we wrote above, the need to print with nozzles with a diameter other than 0.3-0.4 mm arises very infrequently. This mainly concerns, or personal experiments, or some very specific tasks.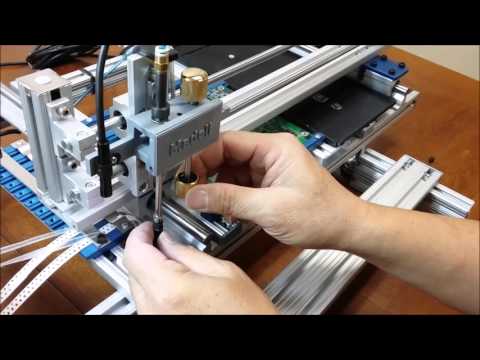 If you do not plan to do this, then this opportunity is not so necessary. What do we mean by specific tasks? This is especially true for printing large items, where it is very important to reduce the printing time. This can be achieved by using large diameter nozzles. For example, with a diameter of 0.6-0.8 mm, or even a diameter of 1 mm. For printers with a large printable area, the ability to change nozzles is already a vital necessity. Therefore, here, as in the case of a heated table, the ability to change nozzles is a good bonus. It is not mandatory, but very useful if you do not have to pay extra for it. nine0007
Nuance 7: Print thickness
It is important to understand that most models on a 3D printer are printed with a layer of 0.1-0.2 mm. These are the optimal values that allow you to achieve quality and acceptable print speed. There are a certain number of printers that allow you to print with a layer of less than 0. 05 mm, and get very high quality prints. But then there is the problem of a sharp increase in print time. And if such print quality is important to you, then it probably makes sense to turn your attention to 3D printers, which we talked about at the very beginning of the article. These are 3D printers using SLA or DLP technology. nine0007
Nuance 8: Extruder type
Today there are two main types of extruder. This is a direct extruder in which the bar feed motor is located in the printhead itself. And the so-called Bowden extruder, where the plastic feed motor is located on the body. And the plastic itself is fed to the extruder through a fluoroplastic tube. What are the advantages and disadvantages of each type of extruder? Bowden extruder, due to the lack of a motor on the print head, has less weight. And therefore, it has greater positioning accuracy, which affects the print quality. And a higher speed of movement, which, accordingly, has a positive effect on the speed of printing. But it has one drawback. It is usually difficult to print with flexible plastics on a Bowden extruder. Such as Rubber or Flex. All its positive features, this extruder reveals when using plastic with a diameter of 2.85-3.00 mm. But this type of plastic is less common than the now standard plastic with a diameter of 1.75 mm. And therefore, users of printers with such plastic are often deprived of the opportunity to use new types of materials. Which are primarily produced in the most common form factor of 1.75mm. The direct extruder usually doesn't have such big problems with flexible plastics. Easier to set up, but due to the greater mass of the print head, it is inferior to the Bowden extruder in terms of speed and positioning accuracy. What to prefer? This is the user's choice. We just wanted to talk about the pros and cons of these extruder types. Of course, there are many more nuances when choosing a 3D printer. But we think that even our small list will force you to look and study some points that you may not have thought about more closely.