3D printer petg settings
Adjusting temperature, speed & retraction to improve printing
PET or polyethylene terephthalate is one the world’s most widely used plastics. Found in synthetic textiles, bottles, and packaging, PET has many desirable characteristics, such as strength, transparency, and lightness.[1]
Because of these characteristics and others, PET has become a go-to material in FDM 3D printing. In filament form, PETG (glycol modified PET) offers some notable advantages over PLA, such as excellent layer adhesion, good impact resistance, and a low level of shrinkage. It’s affordable too: a spool of cheap PETG filament only costs about $5 more per kilogram than PLA from an equivalent filament brand.
Printing good PETG parts can be tricky, however. When melted, the plastic has a low level of viscosity, which — while great for fast extrusion — can cause issues like oozing and stringing. Furthermore, its excellent bed adhesion can be both a blessing and a curse, with parts sometimes remaining stuck to the print bed after printing.
With that in mind, it is essential to properly prepare your 3D printer when printing PETG. And while many slicers provide default settings for individual materials like PETG, it is beneficial to understand what these settings are achieving so that fine-tuning can be carried out to achieve even better prints. This article gives a rundown of the correct PETG printer settings for most situations — though different printers have their own unique requirements — in addition to general advice such as print bed preparation.
PET is used to make plastic bottles
Compared to ABS and other low-adhesion materials, printing PETG can be a breeze. PETG will stick to most surfaces without too much trouble — in fact, steps should be taken to stop the material adhering too well and becoming stuck to the build plate.
Choosing the right build surface is important when dealing with PETG. Very smooth surfaces like a glass bed can lead to over-adhesion, and such surfaces should be coated with glue stick or hairspray — which can function as a separator rather than an adhesive — to prevent damage to the build and the print bed. [2] Blue painter’s tape is a suitable surface for most PETG prints. However, a better solution is to use a textured build surface such as a powder-coated PEI sheet. Bear in mind that a textured print surface will leave a shallow patterned imprint on the bottom of the part, but this is a small price to pay for easy part removal.
PETG prints best onto a heated print bed with a temperature of 65–90 °C. As a rule, if good first-layer adhesion can be achieved at the lower end of that range, then stick with that temperature.
PETG usually prints best in the temperature range of 220–260 °C. 3D printer company Prusa suggests a printing temperature of 230 °C for the first layer and a slightly higher temperature of 240 °C for the rest of the build.[3] Filament company MatterHackers recommends 245 °C throughout.[4] If good results can be achieved at a lower temperature, stick with it, as a high temperature can lead to issues with bridging and overhangs.
Bed leveling and nozzle calibration is another important step when adjusting PETG print settings. The distance between nozzle and print bed should be greater than it is with PLA, ideally around 0.1 mm. This is due to the low viscosity of PETG: as the material flows freely, it can “drop” from the nozzle onto the bed without having to be forced vigorously.
Print speed is one of the simpler PETG print settings to configure. In general, the material is best printed at a slow speed, ideally around 60 mm/s. This leads to improved bonding and cooling, and consequently better print quality. Some users report good results with faster speeds for the first layers.
Perhaps more important, however, is the travel speed: the speed at which the printhead moves along the X and Y axes when it isn’t depositing material. Travel speed should be fast — around double the print speed, i.e. 120 mm/s — in order to mitigate the potentially damaging effects of oozing and stringing: if the hot end moves slowly across the print area, it has more time to drip excess material onto the part, causing imperfections and potentially leading to print failure.
Adjusting retraction settings can prevent PETG stringing
Most PETG users would agree that the single biggest disadvantage of the printing material is its tendency toward oozing (when material seeps from the nozzle) and stringing (when the seeping material forms a weblike mess across the part) — undesirable phenomena caused by the low viscosity of the plastic.
The best way to counter oozing and stringing is to adjust retraction settings. Retraction is a feature of FDM extruders wherein the nozzle pulls back a small amount of filament before it travels along the X and Y axes. By doing so, the printer can prevent unwanted leakage of the material and improve print quality. If stringing occurs during PETG printing, the following retraction print settings should be adjusted:
Set retraction distance to 3–7 mm, increasing it in increments of 1 mm until the stringing stops. The distance should be slightly higher for Bowden extruders than direct drive extruders.
Set retraction speed to around 20 mm/s, increasing it in increments of 5 mm/s if necessary.
Reduce or remove the minimum travel distance for retraction.
Disable any vertical lift feature (such Z-Hop in Cura, a popular slicer).
When adjusting PETG print settings, the 3D printer’s fan should be taken into account. In general, cooling a part during printing — bringing the temperature down to below the material’s glass transition temperature — can reduce issues like warping and sinking, leading to better parts.
Overall, using PETG can be advantageous because it exhibits a very low level of shrinkage as it cools, which means that parts — even very large ones — tend to maintain their shape as they are being printed. This means the plastic is less dependent on the printer’s cooling fan than a material like PLA; some users choose not to use their fan at all when using PETG 3D printing filament, though this might be considered risky.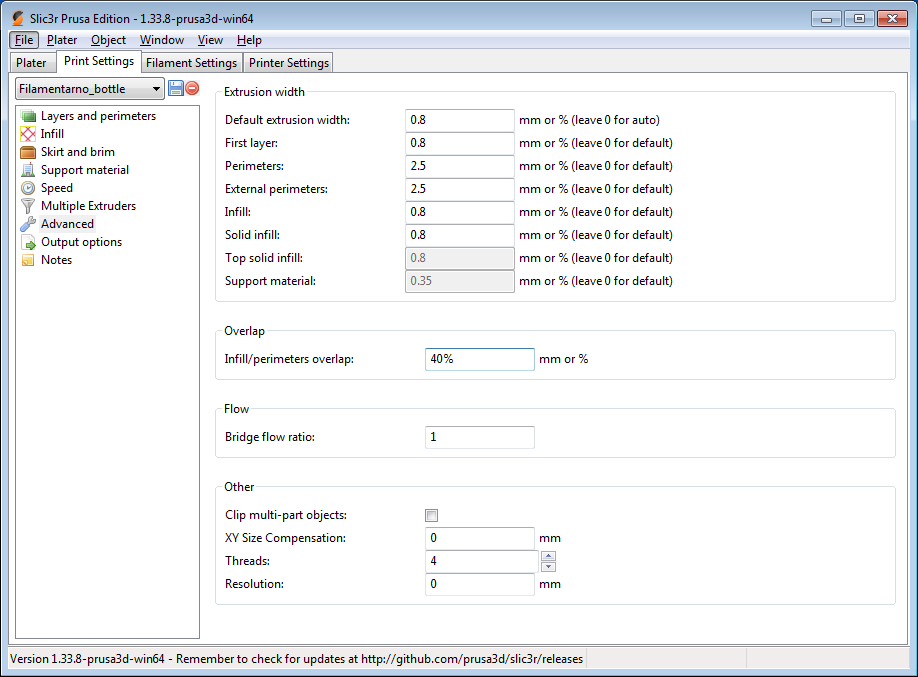
For most prints, using a fan speed of 30–60% should suffice to prevent issues like oozing and stringing. However, only use the fan after the first few layers of the printing, as this will help to prevent warping, and remember that too high a fan speed will prevent interlayer bonding and result in a weaker PETG part.
PETG is a valuable 3D printing material due to its strength, impact resistance, affordability, and resilience against shrinkage and warping. With careful consideration of build surface, retraction settings, and other printing parameters, it is possible to achieve high-quality PETG prints on most FDM printers.
3D printer users should stick closely to the following PETG print settings:
Use a textured build surface
Use a heated bed with a temperature of 65–90 °C
Use a printing temperature of 220–260 °C
Keep nozzle height at around 0.
1 mm
Print slowly at around 60 mm/s
Use a fast travel speed of around 120 mm/s
Increase retraction distance and speed
Use a moderate fan speed
By doing so, printed PETG parts should have good layer adhesion and a good surface finish while exhibiting minimal oozing or stringing.
[1] The Science Behind PET [Internet]. PET Resin Association. 2015 [cited 2022Mar14]. Available from: http://www.petresin.org/science_behindpet.asp
[2] How to Get Perfect PETG Prints on Ender-3: Correct Settings [Internet]. Creality. 2020 [cited 2022Mar14]. Available from: https://www.creality.com/blog-detail/how-to-get-perfect-petg-prints-on-creality-ender-3
[3] PETG [Internet]. Prusa Knowledge Base. 2020 [cited 2022Mar14]. Available from: https://help.prusa3d.com/en/article/petg_2059
[4] Black MH Build Series PETG Filament [Internet]. MatterHackers. 2016 [cited 2022Mar14]. Available from: https://www.matterhackers.com/store/l/petg-black-high-strength-filament-1.75mm/sk/M3MY2VQG
Choosing the Best Slicer Settings
PETG is becoming more and more popular for home 3D printing. It is relatively easy to print with, doesn’t release the same level of toxic chemicals as materials like ABS, and is far more durable than PLA. But what are the best settings to choose when you are 3D printing with PETG? Let’s find out.
It’s almost impossible to get exactly the right slicer settings the first time. This makes it worth experimenting with the settings you choose, slowly changing them and tuning the options until your prints look as good as possible.
What is PETG Plastic?
PETG, or polyethylene terephthalate glycol, is a common thermoplastic with unique properties. It is an adaptation of PET, the material used to make soda bottles, with glycol added to the mix to improve PETG’s strength and durability.
This material has gained a lot of popularity in the 3D printing space in recent years, as it is easy to print with while offering many of the benefits of more challenging materials. For example, PETG is less brittle than ABS and offers similar strength, while also being easier to print.
PETG is rapidly becoming one of the most popular 3D printing materials in the world, but it does come with some challenges. It’s always worth learning about 3D printing filament types to ensure you use the right ones for each of your prints.
PETG 3D Printing Challenges
Like any 3D printing material, PETG filament can be tricky to get right. There are a number of challenges to overcome when you first start using this type of plastic for your 3D prints.
- Stringing/Over-Extrusion: PETG is stretchier and more flexible than PLA and ABS. This means that it has a tendency to ooze out of the nozzle when it isn’t being extruded, while also creating strings between parts of your print when the extruder moves around.
This is solved using retraction and z-offset settings.
- Over-Adhesion: Poor layer adhesion can be very challenging with materials like PLA and ABS, but PETG often has the opposite problem: layers adhere too strongly. This can make it extremely hard to remove supports and other additions, and it can even cause the model to stick to the build surface. Letting your model cool once it is printed is a good way to help with this.
Nozzle & Bed Temperature
PETG benefits from a hot nozzle and a warm build plate to get the best results. Keep your heated bed between 70°C and 80°C when printing with PETG, and avoid going above 100°C if you plan to experiment with your build plate temperature.
PETG has a higher melting point than PLA. Sticking between 210°C and 250°C is a good place to start with your PETG, though some manufacturers offer filament that prints at 260°C+. Always read the recommendations from the filament manufacturer when you first start with a new material.
Layer Height
3D printing layer height is one of the key differences between PETG and materials like PLA. A 0.2mm layer height with an initial layer height of 0.12mm will produce fine prints with PETG, though you will struggle if you go much lower. PETG also works well with relatively thick layers, and you can push up to around 0.3mm with a 0.4mm nozzle.
Movement/Print Speed
PETG is more sensitive to print speed than other 3D printer filament materials. Moving too fast will cause under-extrusion and poor layer adhesion while moving too slowly causes over-extrusion and blobs.
Sitting between 30mm/s and 60mm/s for most of your layers and using a slower speed, such as 25mm/s, for the initial layers is a good approach to take. You may have to experiment with your print speeds to get the best results.
Retraction Speed & Distance
Thanks to its stretchiness, PETG needs faster and longer retraction settings than PLA to print well.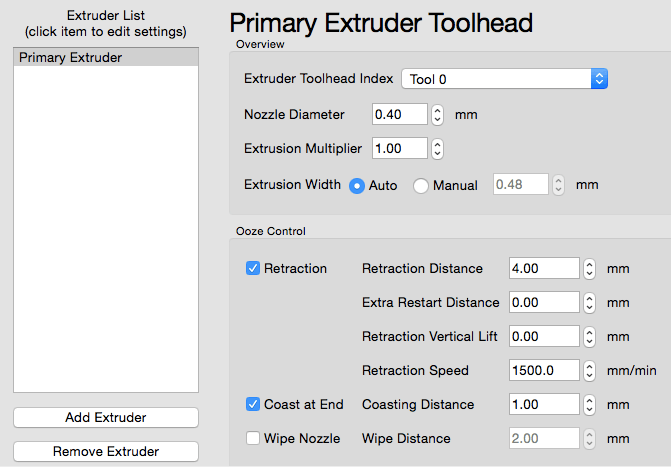 A retraction speed between 40mm/s and 80mm/s is a good place to start. Alongside this, a retraction distance of 4mm to 6mm works well for Bowden set-ups, while 1mm to 3mm works best for direct drive 3D printers.
Support Type & Material
PETG is a great material, but it doesn’t do so well with supports. Thanks to the sticky nature of PETG, the great layer adhesion it provides can become a curse when you want to use supports. Printing at lower temperatures will make it easier to remove supports, but it can also pay to use a water-soluble material like PVA.
Most slicers provide control over the overhang angle and support type. An overhang angle of 0 degrees will support all overhangs, while 90 degrees will support nothing. This makes 50 to 55 degrees a good place to start.
PETG 3D Print Additions
PETG doesn’t have major warping problems like ABS, and it usually adheres to the build plate no matter the surface material you are using. This means that additions are usually not needed when working with PETG.
Brims and rafts adhere very well when using PETG, and this can make it extremely difficult to remove them. Wipe towers and other nozzle-clearing additions can be worthwhile to prevent stringing and blobs.
3D Printer & Part Cooling
Unlike many other 3D printing materials, PETG filament does best without any part cooling. This ensures that the layers adhere well and prevents what little warping would occur with strong cooling. You don’t need a hot enclosure to print PETG and can leave your enclosure fans at full power if you want to.
General 3D Printer Structure (Beds & Enclosures)
3D printing with PLA and ABS comes with relatively strict machine requirements, but PETG is far more forgiving. While you need a heated bed to work with this material, you don’t need to worry about having an enclosure for your PETG 3D printing.
Most modern build surfaces work well with PETG, thanks to its strong layer adhesion. Glass works particularly well with this type of filament, though, providing smooth-bottomed prints and easy removal at the end of each project.
3D Print With PETG
PETG is a great 3D printer filament option. Not only is it just as affordable as PLA and ABS, but it is also strong, semi-flexible, and chemical resistant. This makes it ideal for use indoors and outdoors, and it can even be useful for items that have to come into contact with food. It’s always worth taking the time to learn about 3D printer filaments before you use them at home.
5 Easy Tips for PETG 3D Printing and 3D Printer Setup
How to Succeed in PETG 3D Printing? Here are our five simple tips and best settings for PETG.
Overview
PETG, or polyethylene terephthalate glycol, is a tough, heat-resistant, impact-resistant plastic widely used in FDM 3D printing.
In this article, we'll show you how to successfully print PETG and help you solve the most common problems. PETG printing is definitely not as painful as ABS printing, but there are some nuances here.
Important note:
- Nozzle temperature
- Working platform temperature
- Sticking to the platform - adhesion
- Retraction settings
- Fan speed
- Support settings
- Moisture absorption
Fine-tune print settings
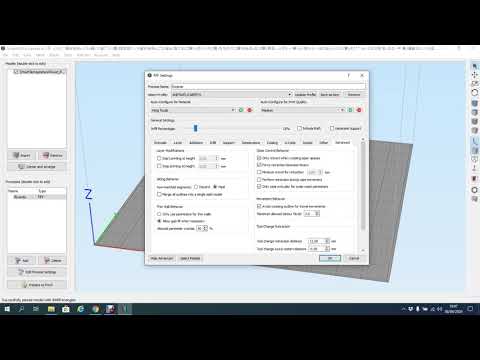
Set the settings to optimal performance (Youtube Thomas Sanladerer)
To get to the print settings, start the slicer software. You must set it to the optimal mode for working with PETG.
Initial settings
If your slicer already has profiles for PETG, you're in luck. If not, you can take the initial settings for PLA and change something in them:
- Let's increase the nozzle temperature to the manufacturer's recommended one (usually from 220 to 260 ºC).
- Increase the print platform heater temperature to the manufacturer's recommended temperature (typically 50 to 85 ºC).
- Reduce the fan speed to 20...50%.
Fine tuning
Once everything is set up as described, you can start the test printout. You will notice that PETG tends to create filaments and excessive cooling can cause the layers to split.
Look at the test printout and correct the settings. If the layers do not stick together, reduce the fan speed or increase the print temperature. If the threads look menacing, increase the retraction speed or distance. If the object is deformed, twisted, lower the print temperature.
Continue tuning until you are satisfied with the result. If the problems do not want to be solved, then we will now give some tips that may come in handy.
Tip #1 Use glue stick or hairspray
PETG sticks too well to glass. (Youtube Thomas Sanladerer)
Usually a glue stick is used when the part doesn't adhere well to the print bed, so that it sticks better.
The opposite is true for PETG. It adheres so well itself that the part can sometimes be separated from the working platform only in parts.
It is therefore always recommended to have a glue stick or hairspray on hand to act as an intermediate release agent. Do not print PETG directly on Fixpads, PEI, or glass. If these agents are used, then the part will separate with them and neither it nor the precision printing platform will be affected.
Tip #2: Adjust the retraction
PETG loves to filament (Youtube Thomas Sanladerer)
As already mentioned, PETG loves to filament and drip. And the strength of the material makes these threads strong, as a result of which cobwebs and thickets can form on the printout, which are difficult to get rid of.
But they can be nipped in the bud if you set the print settings correctly, as mentioned above. In particular, try to increase the retraction distance, the retraction speed, the movement speed - within reasonable limits, of course.
Finally, if all else fails, a hot air gun can be of some help in the fight against hairiness.
Tip #3 Avoid Cracking
Layers in PETG Prints Can Crack (Youtube Thomas Sanladerer)
If you switched to PETG from PLA, you will find that PETG cracks much more easily. PLA from abundant cooling only gets better, but PETG can suffer from this.
If print layers begin to separate or crack, reduce fan speed. PETG retains its shape at much higher temperatures than PLA, so overhangs and intricate shapes remain crisp. By reducing the cooling, the newly extruded plastic has more time to fully bond with the rest of the model.
Tip #4: Give space to the support structures
There needs to be more space for props in PETG (3DHubs)
As is often the case with FDM, some PETG models require support structures. However, if we set the bonding of the layers correctly, the PETG will adhere too well and will not let go of the props.
This is where the advanced slicer settings will help us, in which we need to increase the gaps between the support structures and the model itself (“Support Z Gap” or something like that).
Tip #5 Keep PETG dry
Store PETG dry (Youtube Thomas Sanladerer)
began to deteriorate.
This is because PETG is hygroscopic, i.e. easily absorbs moisture from the air. Moisture destroys the material on the coil, which could be used for a long time.
Therefore, keep your filament in a dry place, you can put it in a sealed bag or box with desiccant. This should save him by not allowing too much moisture to be absorbed.
If the filament is already damp, it can be dried in the oven at +60 °C. Just put a coil in it and forget it for a couple of hours.
Print!
Benchy PETG (Youtube Thomas Sanladerer)
With just a little effort, you get incredibly durable, high quality PETG printouts. We hope this article has helped you get started with this amazingly diverse material.
PETG plastic - optimal 3D printer settings
3DPrintStory 3D printing process PETG plastic - optimal 3D printer settings
One of the positive things about FDM 3D printing is the huge variety of materials you can work with. There are flexible materials, those that mimic the finish of wood, and some even have some degree of electrical conductivity.
The downside of having all of these filament options is that each of them requires some specific usage. In this article, we will look at how to get good quality 3D prints using PETG plastic, which, judging by the trends, will soon become one of the most popular. What 3D printer settings are best for PETG? What problems can you face when printing PETG plastic?
What is PETG?
PETG is a derivative of the extremely popular polyethylene terephthalate (PET). The "G" in PETG stands for "high glycol". The addition of a glycol group makes PETG slightly stronger and less brittle. It also has better optical properties and is easier to work with than PET. It has excellent chemical resistance and is a good moisture barrier.
In the world of 3D printing, PETG is often touted as the best of the two most popular materials, PLA and ABS. It prints at high temperatures, which provides good heat resistance. However, it does not have a high shrinkage ratio and has better adhesion between layers, which means that it does not have major warping problems. It also does not emit harmful gases during printing, which is one of the worst aspects of printing with ABS.
So PETG gives you almost all of the mechanical and chemical benefits of ABS with the same ease of processing as PLA. It is a good choice for functional parts that must withstand constant movement or pressure. Using PETG plastic, you can get almost completely transparent products, which makes it an excellent material for decorative elements.
Set up the 3D printer table
If you've ever printed with ABS, you know how difficult it is to get the first layer of an ABS model to grip the table. PETG also has some problems, but the reverse is that it sticks too well. If you do not take the necessary measures, you may end up with a finished model that cannot be removed from the table without damage.
Because of the high printing temperatures of PETG, you still need a heated bed. A sudden drop in temperature will almost certainly cause warping if your 3D printing table is too cold. For PETG plastic, it is recommended to set the table temperature between 70° and 80° C. If you still have problems with adhesion to the layer at these settings, you can gradually increase the temperature up to 100° C.
To ensure that the 3D printed model comes off easily enough, it is recommended to use an adhesive that will come off with the model, such as glue stick or hairspray. Do not print directly on the glass to avoid scratching the table surface. Don't use BuildTak as every time you work with PETG you will almost certainly damage the BuildTak surface (which can be quite expensive).
Since PETG has no adhesion problems, it is not necessary to set the nozzle too low for the base coat. This is a technique used to "press" the first layer onto the table and improve the adhesion of the base layer. If you already have a run-in nozzle height setting for ABS or PLA, you can safely set a value that is two or three times higher for PETG. To improve aesthetics, it is worth using as high values as possible, so you can start with the maximum values and gradually lower them if you have any problems with adhesion.
If you want to accurately calibrate the nozzle height, a setting of 0. 02-0.05 mm nozzle to table is a good starting point. You can set this to both the initial height of the nozzle and the height for the rest of the 3D model.
3D printing temperature, speed and retract
The main reason PETG is compared to ABS is that it prints at relatively high temperatures. A range of 220° to 265° C is commonly used, but your plastic manufacturer's recommendations may vary slightly. While PETG virtually eliminates any kink issues, you still run into other issues.
The first thing you need to do is determine if your 3D printer is capable of reaching the required temperatures. Some 3D printers provide 250°C, especially those that use PTFE tubing inside the extruder assembly. If you try to print with the wrong equipment, you will end up ruining not only your model, but also your extruder.
Setting the 3D print speed is a matter of getting the balance right, which should also consider the 3D print temperature. Printing at high speed, if your temperature is too low, can cause "overshoot" in the extruder because the material is not soft enough to come out of the nozzle. However, fast printing at very high temperatures can cause material residue to form between the voids in the model.
Start with a relatively moderate speed of 25 mm/s. If there are no problems with this setting, then you increase the speed to 50 mm/s. This should be enough to get a good PETG model without spending too much time. You can see information about printing PETG at 60 mm/s, but this is probably the absolute maximum if you do not want to have problems with material residue between the walls of the model.
Dealing with plastic residue between the walls of model
One of the most common problems when using high temperature materials is the aforementioned plastic residue, cobwebs between the walls. This occurs when molten material seeps out of the nozzle as the print head moves. These plastic residues are particularly troublesome when using PETG, as the material is strong and difficult to remove.
Unfortunately, the material that melts at high temperatures also has a low viscosity, which makes it even more prone to web formation. If you're having this problem when 3D printing PETG plastic, the first step is to lower the temperature and print speed a bit, although this will definitely reduce the overall time it takes to print any model.
Another option is to enable retract on your 3D printer, if possible. The retract allows the extruder mechanism to "pull in" a small amount of material to relieve pressure on the molten material that is right at the tip of the nozzle. You can refine some parameters, such as retraction distance or speed, until there are no signs of plastic residue.
Decreasing the cooling fan speed
PETG prints great and maintains a good level of detail without a cooling fan. Lack of cooling will also lead to better adhesion between coats. Printing PETG with the cooling fan turned off is perfectly normal.
Some users find it not worth using the fan only for the first two layers and then printing with the fan at 100%. This can be a good case if your 3D model has a lot of bridges and protrusions, or if you want your product to be as detailed as possible. In any case, watch out for any signs of cracks or layers peeling off during 3D printing, as PETG prints at high temperatures and doesn't like sudden changes in temperature.
The key to success is experimentation
PETG may be easier to work with than ABS, but if you're just getting started with it, it's worth learning about its features. Different grades of PETG materials can also behave differently and unpredictably. It may take some time to properly adjust the 3D print temperature, bed temperature, print speed, and retract settings. But once you find that sweet spot, you can enjoy all the benefits of PETG without the many problems that other plastics have.
When buying, you should choose polyethylene terephthalate filament from a reliable manufacturer and work only with it without changing the manufacturer. Before you can get the optimal settings, you will probably have to print a few unsuccessful models. But don't despair, keep optimizing your settings and after a while working with PETG will become easier.