3D printer enclosure prusa
Original Prusa Enclosure | Original Prusa 3D printers directly from Josef Prusa
Original Prusa Enclosure is an accessory for your 3D printer that houses your Original Prusa i3 MK3S+ and provides a stable printing environment. The Enclosure helps to reduce odors from certain materials, lowers noise, can be equipped with useful addons for increased safety and/or the possibility to run the printer in public spaces and helps with printing advanced materials due to the passive heat coming from the heatbed (prevents warping). There is enough headroom above the printer inside the enclosure to mount the MMU2S unit.
Everything is included in the package including plastic parts, you don’t need to print anything on your own. The only exception is the handles (seen in some photos) – these are optional and not included in the package because most users won’t need to move the enclosure around. Assembly instructions are included. A 3D printer is not a part of the package.
Main Features
High-Quality Components
The frame along with the top and bottom panels are made from metal, the side panels are made from PETG plastic. The solid robust design allows several enclosures to be stacked on top of each other and secured using screws. The frame features mounting elements for the installation of various add-ons and tidy cable management.
Print Advanced Materials
The enclosure creates a stable printing environment with increased temperatures, shields the printer from drafts and blasts of cold air and reduces the build-up of dust on moving parts. This is perfect for printing demanding high-temperature materials which are otherwise prone to warping - such as PC CF, Nylon, PP and more.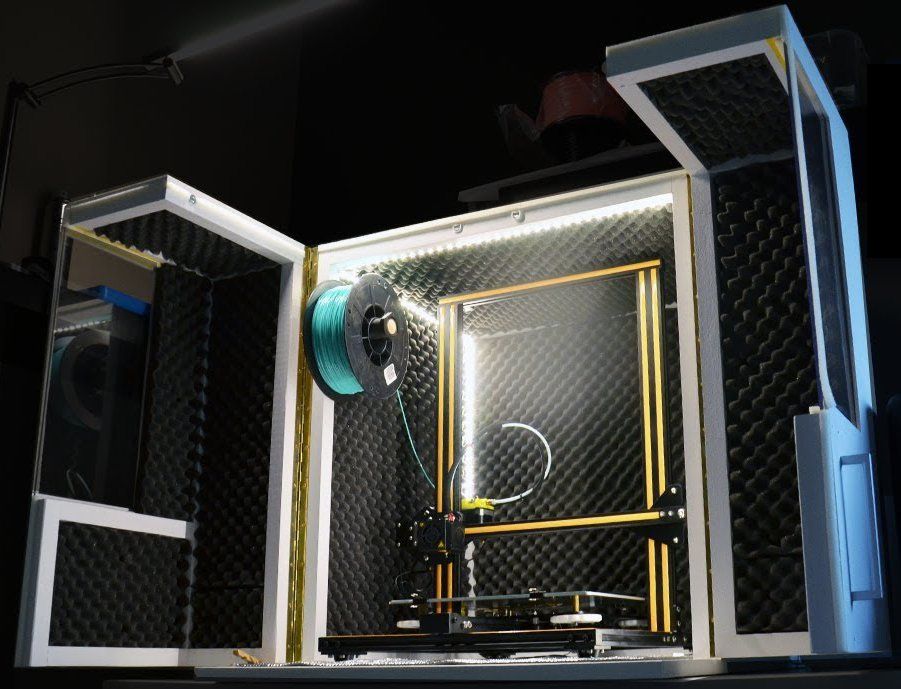
Safety Features
Install an optional lock to prevent unauthorized access to your 3D printer - ideal solution for schools, hackerspaces and other public places. An optional filtration system (HEPA filter, 99.9% efficiency) prevents the spread of ultra-fine particles (UFPS).
Upgradable and Expandable
The enclosure can be further upgraded and expanded with official add-ons (both paid and free) and it is also ready for your DIY projects. You can design your own brackets, holders and other accessories to tailor the enclosure exactly for your needs. A dedicated section will be available at Printables.com after release.
LEARN MORE IN THE ANNOUNCEMENT ARTICLE
Technical Parameters
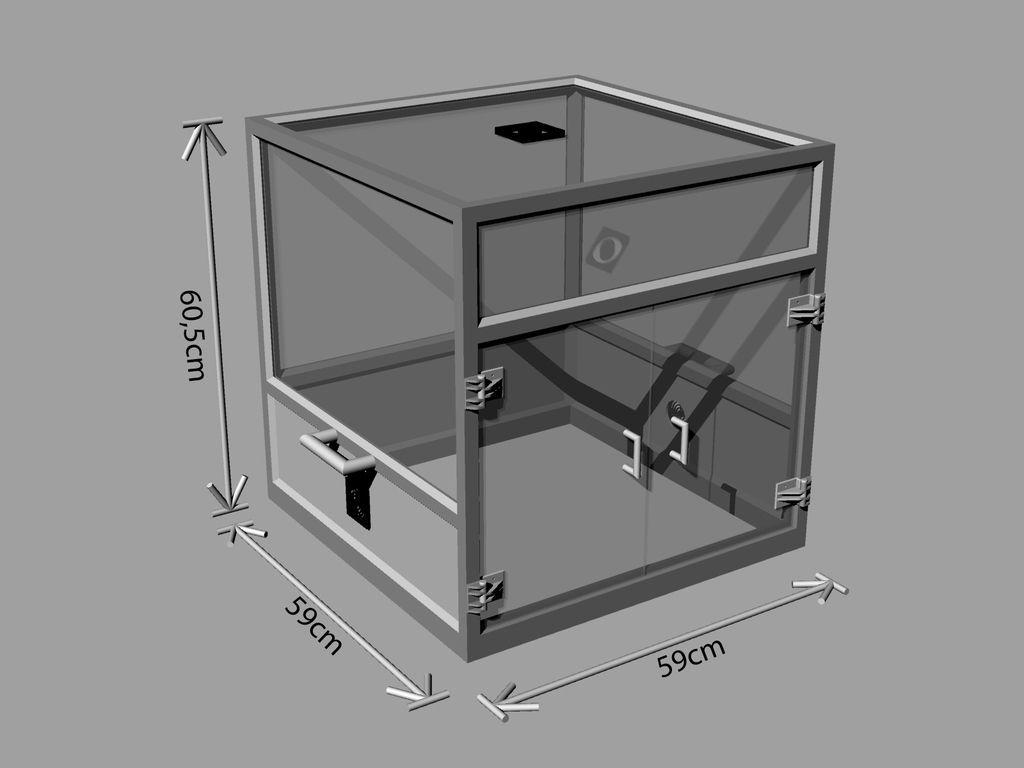
- Dimensions with the LCD mounted outside: 530 mm (w) × 545 mm (h) × 715 mm (d)
- Dimensions with the LCD inside: 530 mm (w) × 545 mm (h) × 640 mm (d) At least 250 mm is required in front of the enclosure for the doors to fully open
- Enclosure type: Passive, heating provided only by the 3D printer’s heatbed
- Weight: 10,6 kg (23.
 4 lbs)
 - Max stackable units: up to 5 (with more than 3 enclosures, anchoring to a wall is recommended)
- The basic package contains: All components required to build the enclosure (frame parts, transparent side panels, top and bottom panels, mounting material, printer frame brace), temperature sensor, and documentation. Handles and optional 3D-printed accessories seen in some photos are not included in the package.
ADD-ONS (Currently offered)
Advanced Filtration System
The filtration system is useful when you print materials such as PC Blend Carbon Fiber and other materials that produce particles during printing. The filtration system will be also compatible with the “Smart Box” electronics, one of the future add-ons. Please note that enclosures with the Filtration System have extended lead times!
White LED Strip
You can install an optional white LED strip into the enclosure to light up your 3D printer.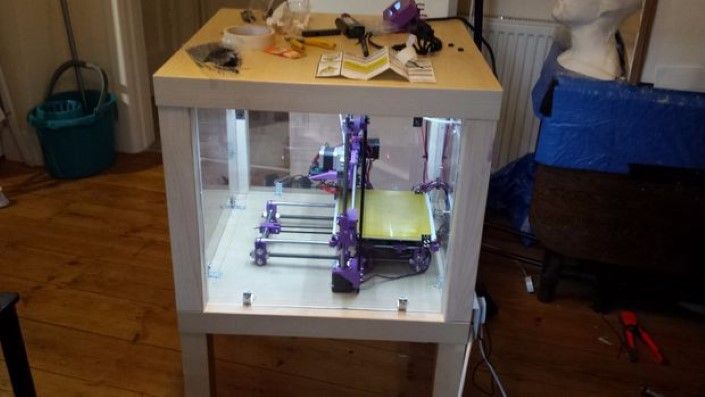 The strip is powered by a separate PSU which will be added to your order automatically. The LED strip is programmable, however, this functionality will become available only after the release of the Smart Box add-on.
Mechanical Lock
A standard mechanical lock that fits in the door of the enclosure, so you can keep your 3D printer safely locked. A perfect option for schools, universities, hackerspaces and other institutions and businesses. This lock uses a standard key. However, we're also working on an electrical lock paired with an RFID reader.
BlazeCut Fire Suppression System
A self-contained tube-style fire suppression system. The system is manufactured in Europe and uses an extremely effective, clean, and safe extinguishing medium. The system operates automatically and independently of any power supply by detecting higher temperatures. Please note, that due to the shipping restrictions and costs, delivery from Prusa is available only to addresses within the EU. For the US customers it's recommended to order from our partner Printed Solid. Other countries please find your dealer here.
PSU Cable Quick-release
The enclosure is designed to allow easy removal of the printer together with the PSU. However, if you plan to remove the printer more often, you can purchase this cable quick-release connector and remove only the printer. Please note that only black PSUs from Delta are supported. If you have the silver PSU, you have to upgrade it first.
Free ADD-ONS
The enclosure is designed to be further extended with additional printed parts, electronics, cameras and more. We are preparing a number of useful 3D printed accessories for the enclosure - there will be a dedicated collection of prints at Printables.com (coming soon).
Future ADD-ONS
The following addons will be released later this year. We will share more details once they are closer to release.
Smart Box
Optional electronics that serve as an interface between the MK3S+ and various add-ons, mainly the advanced filtration system. The Smart Box will allow communication with various additional equipment, such as advanced thermal sensors, RGB LEDs, humidity meters, a microparticle sensor and also an electronic lock. All the devices can work together, so, for example, when the printer finishes a job, the RGB LEDs will signal the print is done. However, the door will remain locked and the advanced filtration system will increase the power to maximum RPM to clean the air in the chamber quickly. Once the sensors detect the conditions are optimal, the electronic lock is automatically released.
We’re currently preparing the following add-ons:
- Smart RGB LEDs
- Electronic lock
- RFID reader
- Advanced temperature sensors
- Humidity sensor
- Microparticle sensor
How to build a simple, cheap enclosure for your 3D printer
Maybe you have already seen some of those fancy enclosures people build for their printers.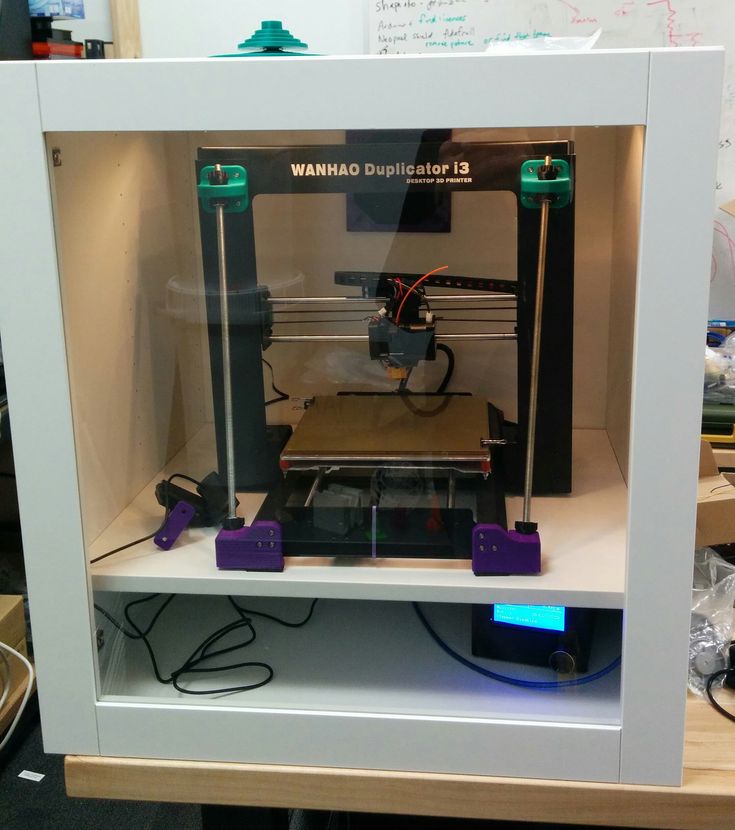 How do they work? And do they work? Today, we will shed some light on this matter! Plus, we are going to dive into patent wars and explain why not all printers come with an enclosure. To top things off, we will even give you a full guide with information on how to build an enclosure for your own printer. But first, let’s start with the fundamental question: what is it good for?
- Stable printing environment – Drafts can negatively impact your print. An enclosure will keep the temperature stable and high. Big differences in ambient and printing temperatures can lead to warping and shrinking of the printed object, especially when printing with ABS. Layer adhesion may also improve with higher ambient temps.
- Reduce and contain smell – Some filaments (looking at you, ABS!) can release unpleasant fumes during printing. An enclosure will contain these fumes, and you can quickly vent them outside through an open window when the print finishes.

- Noise reduction – As if you needed the MK3 to be any quieter 🙂 But another level of sound isolation can’t hurt, especially if you place the enclosure next to your work desk or in a living room.
- Dust collection – The bearings and smooth rods will appreciate the reduced amount of dust that settles on your printer.
- It’s fun to build 🙂
However, if you’re not printing with ABS or other high-temperature filaments that suffer from warping, you won’t see much of a difference. You might actually want to keep the enclosure open with, for example, PLA to ensure there’s enough cool air around the printer for the part cooling fan.
Enclosure for the MMU2S
If you own the MMU2S, we created a modified version of the enclosure – check it out here.
Why aren’t all the printers on the market enclosed by default?
There are two factors here – price and patents. There is no doubt that the rise of consumer 3D printers was delayed by patents. Companies like Stratasys, Zcorp or 3D Systems have patented nearly every 3D printing technology you can think of. It’s pretty crazy when you look at the sketches from 1980s-1990s and realize just how much some of the current 3D printers are similar to them.
It was only after these key patents expired in 2009 (20 years after application) that the RepRap movement started. And cheap, easy-to-build 3D printers quickly started to be developed. Even though most of these basic patents have already expired, some of them (most importantly the ones owned by Stratasys) are either still active, or have just recently expired. For example, Stratasys’s (still active) patent describes an apparatus “That builds up three-dimensional objects in a heated build chamber” (…) “The motion control components of the apparatus are external to and thermally isolated from the build chamber.” That means if you put the stepper motors outside of an enclosure, you can’t sell the product, as it would violate the patent.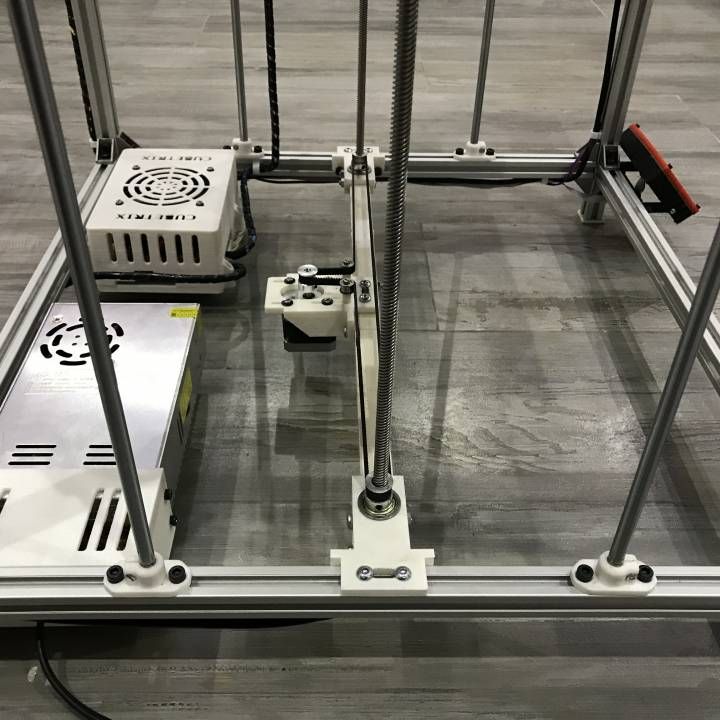
Another obstacle is the price. We have considered and even developed a Prusa enclosure quite a while ago. It was made mostly of Plexiglass. Our target was $90 price tag and considering the packing, shipping and material cost, we just couldn’t make it work. It makes much more sense to build the enclosure yourself from locally sourced materials.
How hot should the enclosure be and can the PSU stay inside?
Let’s get something straight, we are not targeting really high temperatures inside the enclosure. You don’t need an extra heater. The printer itself produces a lot of heat and all you have to do is to not let it escape.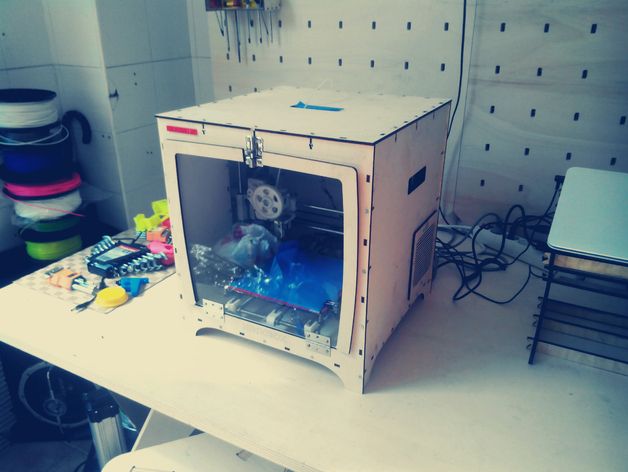 The goal is to achieve stable temperatures without any sudden changes from wind or draught. Even just 35°C inside the enclosure will make a massive difference, increase layer adhesion and may prevent ABS from warping.
The PSU is not made to work in extremely hot environments. By keeping the PSU in temperatures above 40-50°C can significantly shorten its lifespan. Ideally, you’d place the PSU outside the enclosure. You can even place the LCD outside to be able to control the printer without letting the hot air out.
2 simple enclosures
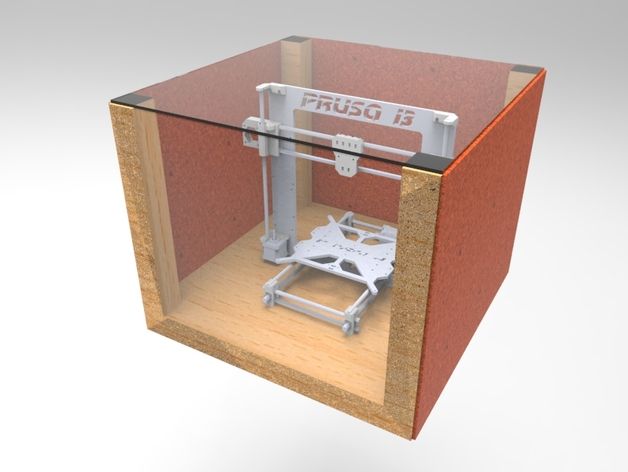
Photo studio tent – no work required at all
An enclosure can often be created from an object originally made for a completely different purpose. This photo (80×80) tent can be bought on eBay or Aliexpress for about $15-20. And all you have to do is place the printer inside the tent. It’s made of textile material, which means it’s porous. A textile enclosure won’t let you reach crazy high temperatures, so you can even keep the PSU inside.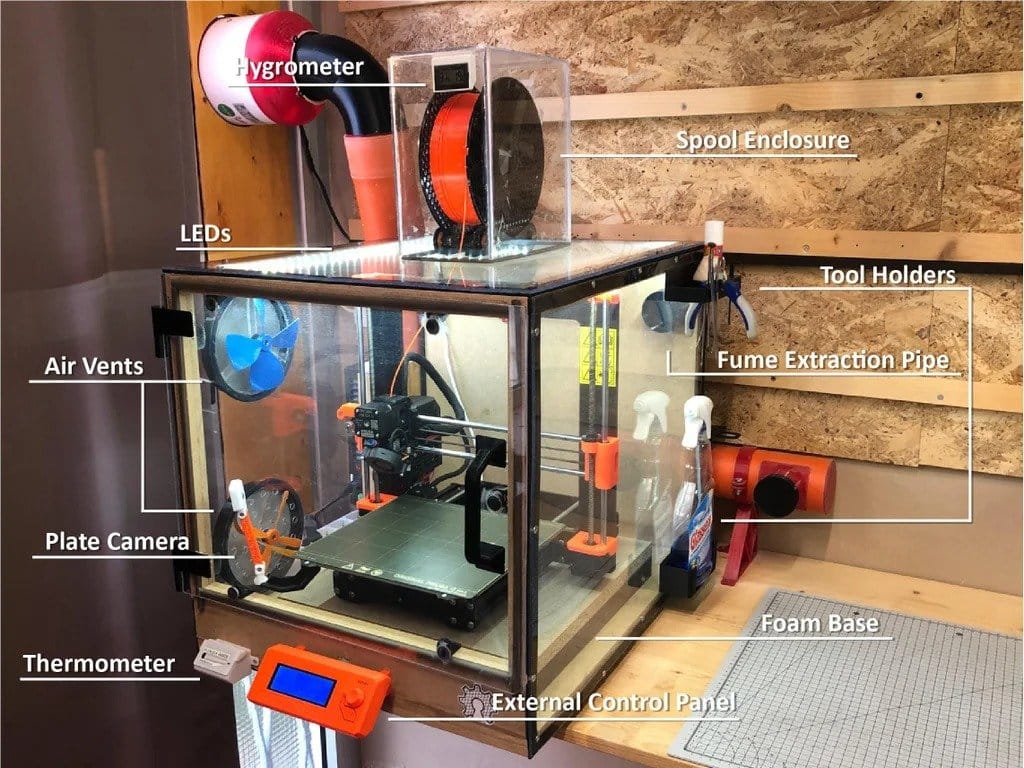 We reached temperatures around 38°C after 10 minutes of printing inside a room with the ambient temp. of 26°C – that’s a significant improvement. And as a bonus, you have a photo tent for your prints 🙂
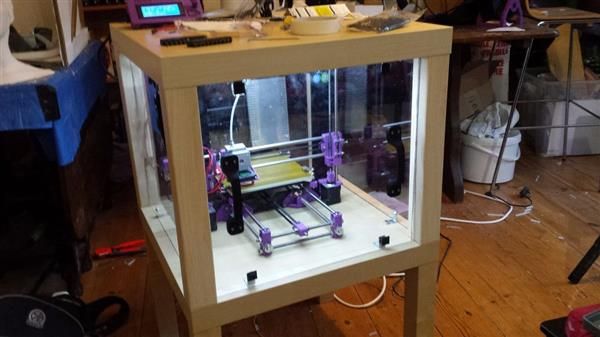
Ikea Lack – when you care about looks as well
Using Ikea Lack as an enclosure is the most popular choice among the 3D printing community. If you search online, you’ll find dozens of Ikea Lack enclosure designs. The table can be bought for under $10 and has almost the perfect size for Prusa printers. You can stack the tables on top of each other to create bays for multiple printers, or use one as filament and tools storage. Even though some of the existing enclosure designs are pretty good, we wanted to give it our own spin.
Advantages of our enclosure
- PSU placed outside in a clip-on holder, but easily placed back if you need to move the printer
- LED lighting connected to the printer’s PSU
- Hinges built into corner extensions
- Double-door opening
- Individual tables can be lifted at any time
What you’ll need
Printable parts
Ikea Lack enclosure main parts
Frame brace replacing the PSU for the MK3 (silver PSU)
Frame brace replacing the PSU for the MK3 (black PSU)
Frame brace replacing the PSU for the MK2/S (remix by Martin Schnur)
60 degree heatbed cable cover for the MK3
45 degree heatbed cable cover for the MK2/S
Construction
- 2x or 3x Ikea LACK table
- 4x Neodymium magnets 20mm x 6mm x 2mm
- 3x Plexi 440 x 440 mm, 3mm thick (if you’re in the US, try Queen City Polymers)
- 2x Plexi 220 x 440 mm, 3mm thick
Electronics
- Fire/smoke detector
- Indoor/Outdoor Thermometer
- LED stripe 24V, 30 cm
- 24V for MK3, 12V for MK2/S
- If you want to use a 12V LED strip with the MK3, use a separate power supply.
- Twin cable, 100 cm
- 2x WAGO 221 or similar compact lever connector
Screws
- 12x 6×20 mm (12 x 3/4″)
- 4x 6×50 mm (12 x 2″)
Printed parts
- Upper table (enclosure box)
- Lower table (support table)
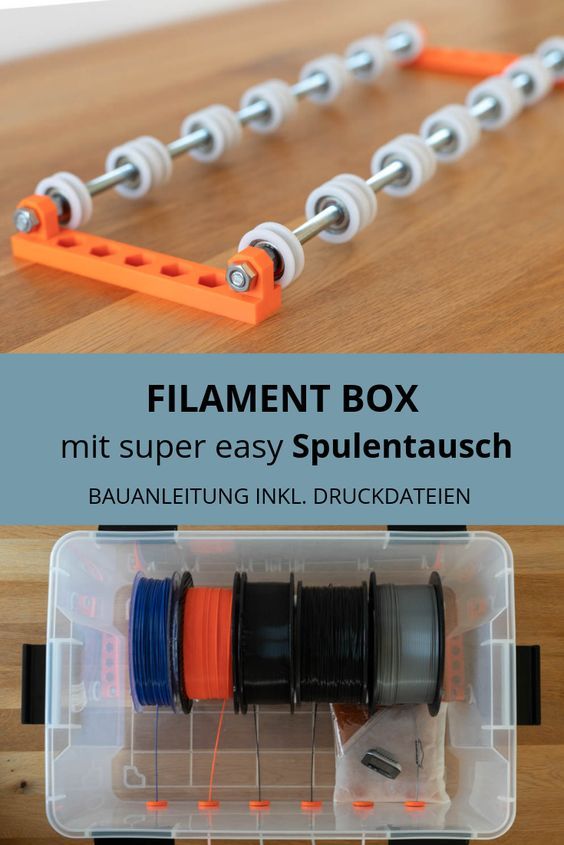
- Spool holders
Tools
- Philips screwdriver
- Allen keys
- Super Glue
- Drill + 3 mm wood drill + 10 mm wood drill
- Measuring tape
- Marker
Enclosure (upper table) assembly
Upper corner standoffs installation
Attaching the legs
LED stripe
For about $12, you can buy an LED strip with a power supply, like this one. However, if you’re feeling a bit adventurous and have some experience with wiring up electronics, you can power the LEDs directly from the printers power supply. Remember, that the MK3 runs on 24V, whereas MK2/S runs on 12V, so make sure you buy the correct LEDs.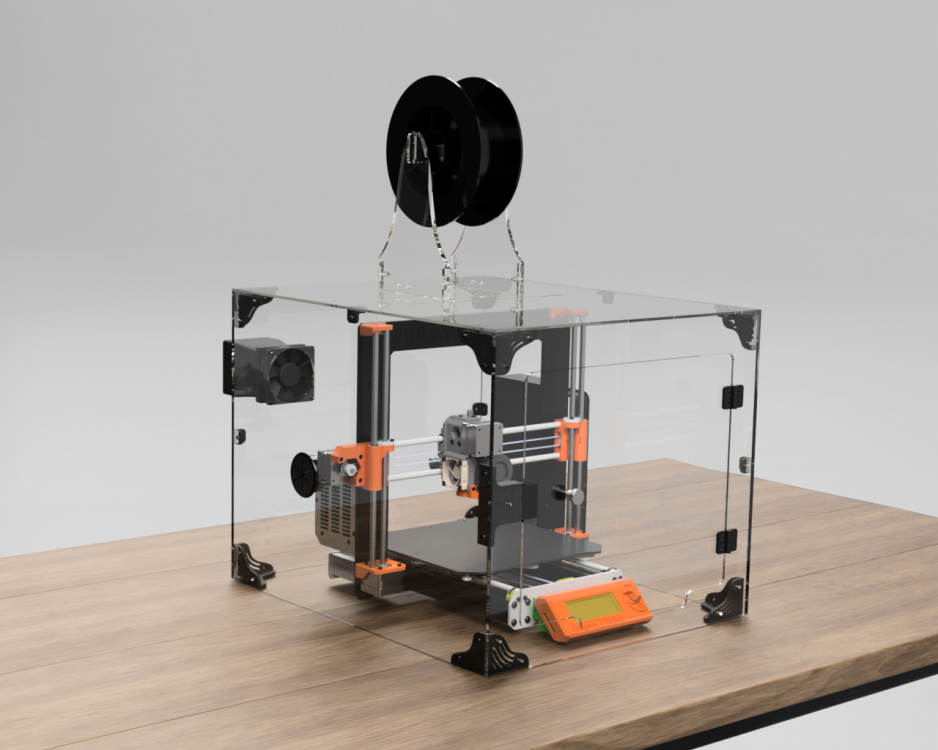
Spool holders
Smoke detector installation
Place the smoke detector in the rear part of the table so it will not obstruct filament insertion or won’t get in the way when you’re taking the printer out from the box.
Bottom corner standoffs installation
Before you start screwing the bottom standoffs, make sure you place the Plexiglass in first. As soon as you tighten the standoffs, the Plexiglass will be fixed in place, and you won’t be able to remove it. This means you can easily lift this section of the enclosure without worrying that the glass would fall out. Note, that one of the four standoffs has a hole for cable pass-through. Make sure you place this standoff on the left side so that the cables can be routed directly to the EINSY board.
Support table (lower table) assembly
PSU holder
Electronics do not thrive in higher temperatures inside the enclosure.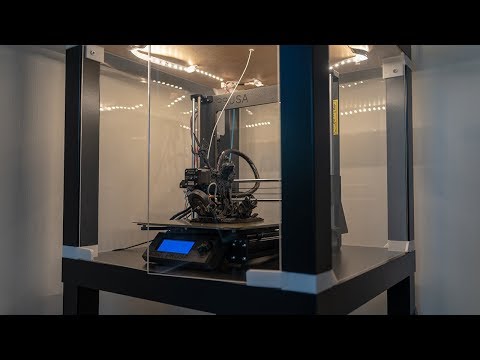 To preserve PSU in good condition, it’s better to place it out of the box. It is even safer!
- Unplug the printer from the power socket. Remove zip ties on the frame to release PSU cables. (Tighten the rest of the cables with new zip ties.)
- Disconnect the cables from the EINSY board. Do not forget to unplug the Power panic sensor as well.
- Unscrew the PSU form the frame.
- Hold the PSU next to the rear left leg (the one with the cable pass-through). Tighten the PSU holder printed part with two screws and then install PSU catcher printed part.
- PSU is now fixed, but it is possible to slide it out when you need it.
- You can replace the PSU on the frame with this printed part to ensure the rigidity of the frame.
Frame brace and right-angle cable cover
After removing the power supply from the frame, it’s possible to replace it with a printed part and ensure frame stiffness. The heatbed cables may hit the plexiglass in the back of the enclosure.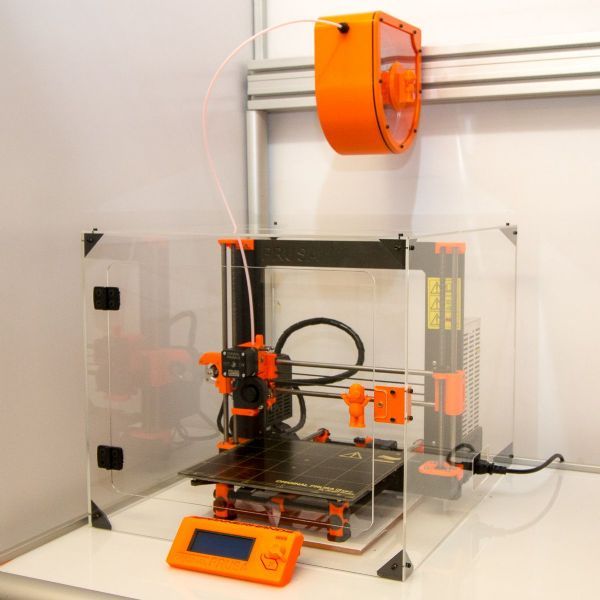 To prevent this from happening, print an alternative 60 degree heatbed cable cover. (EDIT: Users reported several problems with the right angle one shown in the video and on the pictures below, so we switched the suggestion to the 60 degree one).
Plugs fixing and magnetic handles
Fix the four bottom plugs. One of them has a hole for cable pass-through. Place it in the rear left corner of the enclosure. Glue two magnets to the door stopper and screw it to the front of the table. Leave enough space for the plexiglass and the handles (1 cm).
Finished enclosure
Now just stack the two tables on top of each other and the enclosure is complete. Optionally, you can add another Ikea Lack table to the bottom to raise the printer to a more comfortable height.
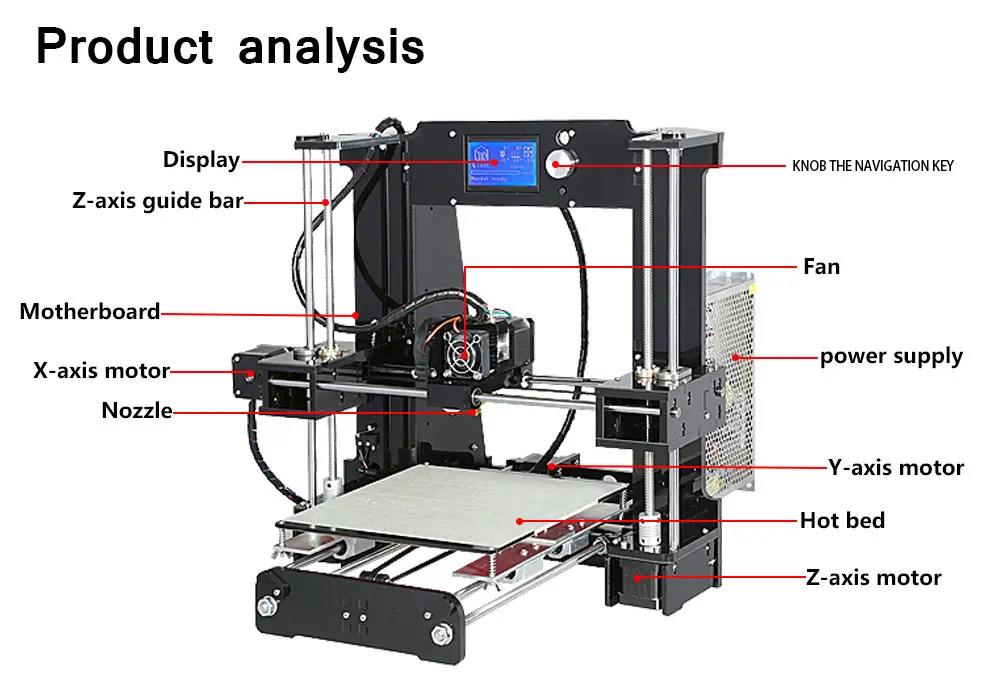
3D printer Prusa i3 Steel - DIY from the manufacturer 3DiY FDM/FFF)
Construction area, mm: 200x200x220
Printing material: ABS plastic, PLA plastic, PVA plastic, hips, filaflex,
All specifications
Description of the 3D printer "Prusa i3 Steel - DIY"
Prusa i3 Steel DIY is a kit for building a Prusa i3 Steel 3D printer.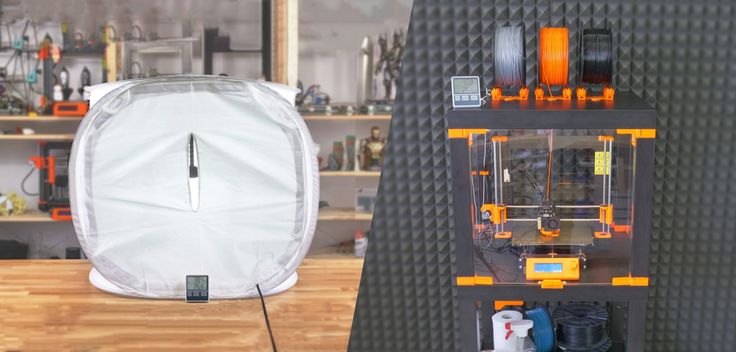 This 3D printer differs from its predecessors from the Prusa family by a RIGID STEEL BODY, an increased print area, the ability to print with various materials - ABS, PLA, HIPS, FLEX, PVA. Inexpensive 3D printer Prusa i3 Steel has small dimensions (410 x 480 x 450 mm), at the same time, a sufficient build area (200 x 200 x 220 mm), which makes it the best option for personal use. The design does not use any studs or plastic parts - everything is made of steel. This model provides reliability, quality and high speed of the press.
About Prusa i3 Steel - DIY printer
Package contents
Electronics:
- Arduino Mega 2560 R3 controller board (1 pc)
- Ramps 1.4 expansion board (1 pc)
- LCD display (1pc)
- USB cable (1 pc)
- stepper motor driver A4988 (5 pcs)
- Nema 17 stepper motor (4 pcs)
- extruder assembly (1 pc)
- mechanical limit switch (3 pcs)
- power supply (1 pc)
- heating table MK2 (1 pc)
- NTC thermistor 100 kOhm 3950 for heating table (1 pc)
- fan (Hot-End 30x30 airflow, PCB airflow 40x40) (2 pcs)
- male-female wires for extension-connection of engines, thermistors, limit switches with RAMPS 1.
 4 board (40 pcs)
 - power cable 220V (1 pc)
- power connector with button (1 pc)
Mechanics:
- body kit (3mm steel, black painted)
- set of polished shafts with a diameter of 8 mm
- gear screw-nut M5 (Z-axis movement) (2 pcs)
- set of nuts, screws, washers, springs
- coupling 5x5 mm (2 pcs)
- lm8uu linear bearing (11 pcs)
- bearing 608ZZ (2 pcs)
- Timing belt GT-2 (2 pcs)
- toothed pulley GT-2 (2 pcs)
- braid for wires (2 pcs)
- heating table mirror (1 pc)
All parts included in the kit are neatly packed in a box (dimensions: 500x500x10 mm). The kit includes detailed instructions for assembling a 3D printer.
Printed Models
Show More
Prusa i3 Steel - DIY 3D Printer Owner Articles
Show More
Popular 3D Printers
Anet A8
1462 articles 1719 owners
Anet A8 3D printer is a budget 3D printer from China.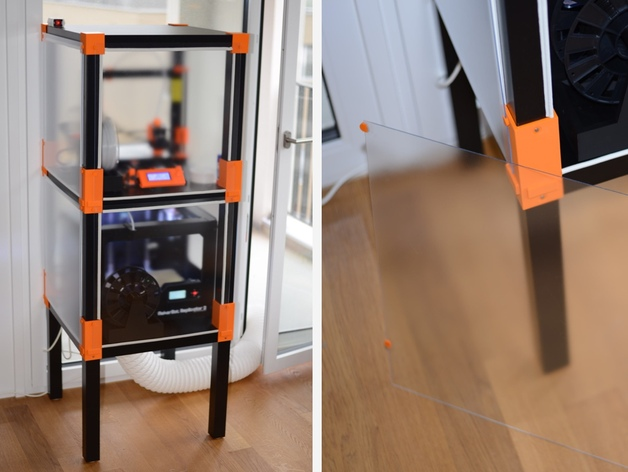 Region...
3 offers from 12000 ₽
Anet A6
1126 articles 1608 owners
Anet A6 3D printer - Chinese version of RepRap project P...
3 offers at the contractual price
Ender 3
1161 articles 1000 owners
Creality Ender 3 is a budget 3D printer from China...
6 offers from 14500 ₽
Show more
What is a 3D printer?
Welcome to NIOZ.RU
Sort by
Item Name +/-
Item Price
Featured Items
Item Availability
Displaying 1 - 60 of 625
153060150
400 ml
RUB 1940.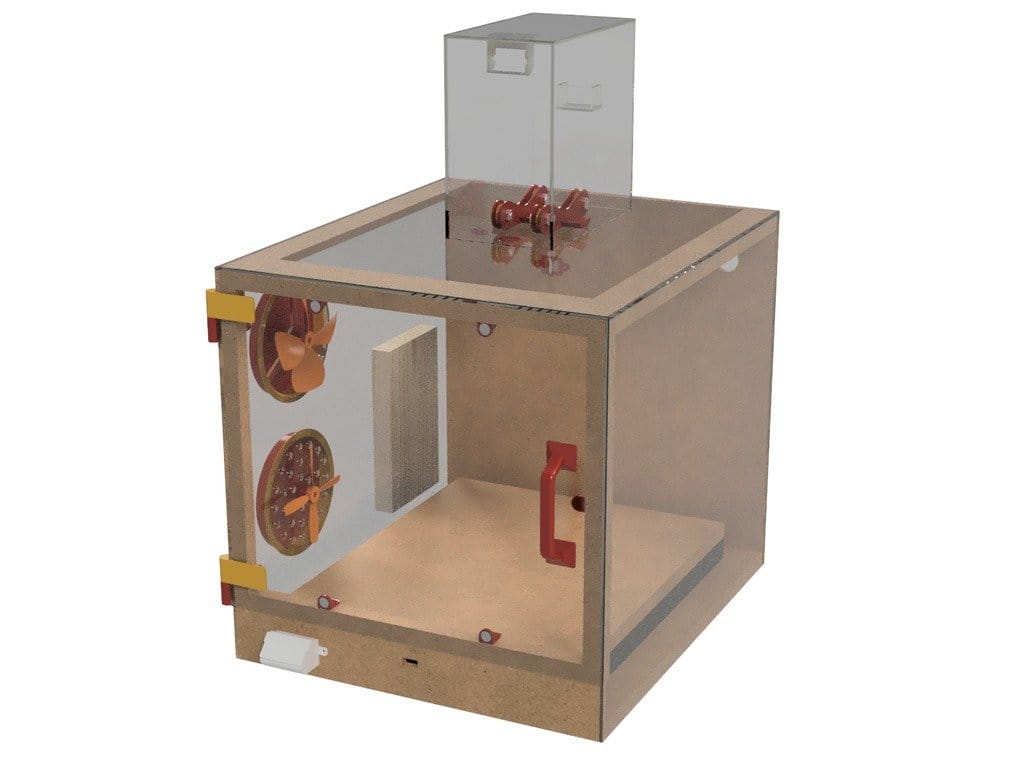 00
00
Product description
RUB 390.00
Product description
350 ml
RUB 850.00
Product description
Ready to print
RUB 23700.00
Item description
Ready to print out of the box
RUB 14500.00
Notify me when available
Item description
Ready to print
RUB 19900.00
Item description
Print Ready
RUB 20900.00
Notify me when available
Item description
Ready to print
RUB 23900.00
Item description
Ready to print out of the box
RUB 43500.00
Item description
Ready to print
RUB 39000.00
Item description
LCD 0.7/1.75 mm
RUB 1550.00
Notify me when available
Item description
RUB 650.00
Product description
Wiznet W5100 Arduino Shield
RUB 650.00
Notify me when available
Item description
RUB 550.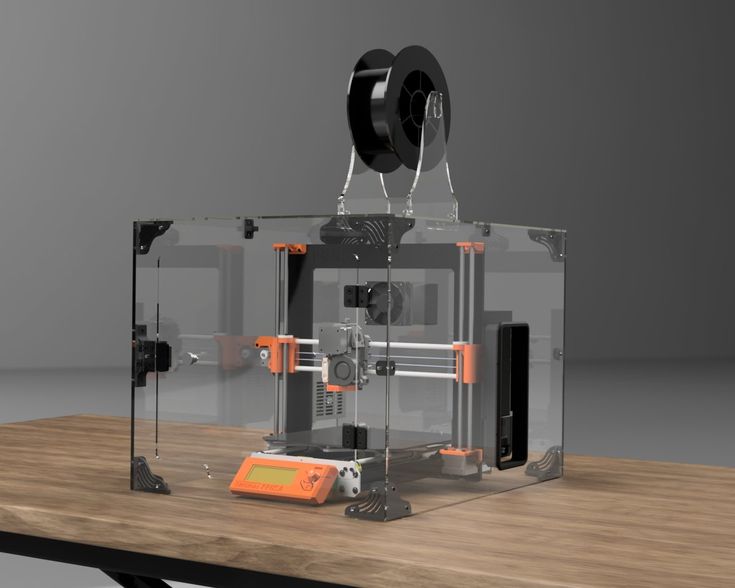 00
00
Product description
Assembly kit
2500.00 RUB
Report Admission
Item description
Volume: 1 l.
RUB 3100.00
Product description
Boscam 200mW, 5.8GHz
Chimera, e3d
RUB 1700.00
Product description
Print head 1.75mm 0.4mm
1100.00 RUB
Item description
Dual print head 1.75mm 0.4mm
RUB 2500.00
Notify me when available
Item description
Long
RUB 750.00
Item description
Short
RUB 700.00
Item description
RUB 1900.00
Notify me when available
Item description
APM2.6 mavlink
RUB 1350.00
Item description
ESP8266 is a highly integrated chip
RUB 250.00
Product description
11.1V, 20C
RUB 1900.00
Item description
11.1V, 25C
RUB 1250.00
Notify me when available
Item description
11. 1V, 25C
RUB 2100.00
Item description
Heat block v6
RUB 150.00
Item description
cartridge type thermistor
190.00 RUB
Item description
Heat block Volcano
48V 12A
RUB 2700.00
Report Admission
Item description
12V 20A
RUB 1550.00
Product description
12V 30A
RUB 1950.00
Notify me when available
Item description
12V 5A
RUB 450.00
Notify me when available
Item description
24V 15A
RUB 2100.00
Notify me when available
Item description
RUB 250.00
Product description
Hobbed bolt
$150.00
Item description
Price per 10mm (free cutting)
RUB 13.00
Product description
Price per 10mm (free cutting)
RUB 17.00
Item description
Section 400mm
RUB 650. 00
00
Description of item
Price per 10mm (free cutting)
RUB 25.00
Item description
10mm (cut to size)
RUB 70.00
Item description
10mm (cut to size)
RUB 90.00
Item description
Price per 10mm (free cutting)
RUB 7.00
Item description
Price for 10mm (free cutting)
RUB 10.00
Item description
Section 400mm
RUB 400.00
Description of item
2x400mm, 2x350mm, 2x325mm
RUB 2100.00
Product description
2x420mm, 2x405mm, 2x350mm, 1x20mm
RUB 2200.00
Product description
25x25x10mm
RUB 150.00
Product description
25x25x10mm
RUB 150.00
Product description
30x30x10mm
RUB 150.00
Product description
30x30x10mm
RUB 150.00
Product description
40x40x10mm
RUB 150.00
Notify me when available
Item description
40x40x10mm
RUB 150.