3D printer belt tightening
How to Properly Tension Belts on Your 3D Printer – Ender 3 & More – 3D Printerly
There are several factors that affect 3D print quality, one of those things being your belt tension. If you aren’t sure about how to properly tension the belts on your 3D printer, this article will guide you through that process.
The best way to ensure you properly tension your 3D printer belts is to tighten it so it hasn’t got any slack and has some resistance to being pushed down. It should be around the same tension as a stretched out rubber band, but don’t tension your belts too tight because it can increase the wear on the belt.
The rest of this article will detail the best process to figure out how tight your belt tension should be, as well as other useful information regarding this topic.
A Guide on How To Properly Tension/Tighten Your 3D Printer Belts
The proper technique to adjusting your printer belt tension does vary across printer brands and styles, since many 3D printers are built differently, but there are similarities.
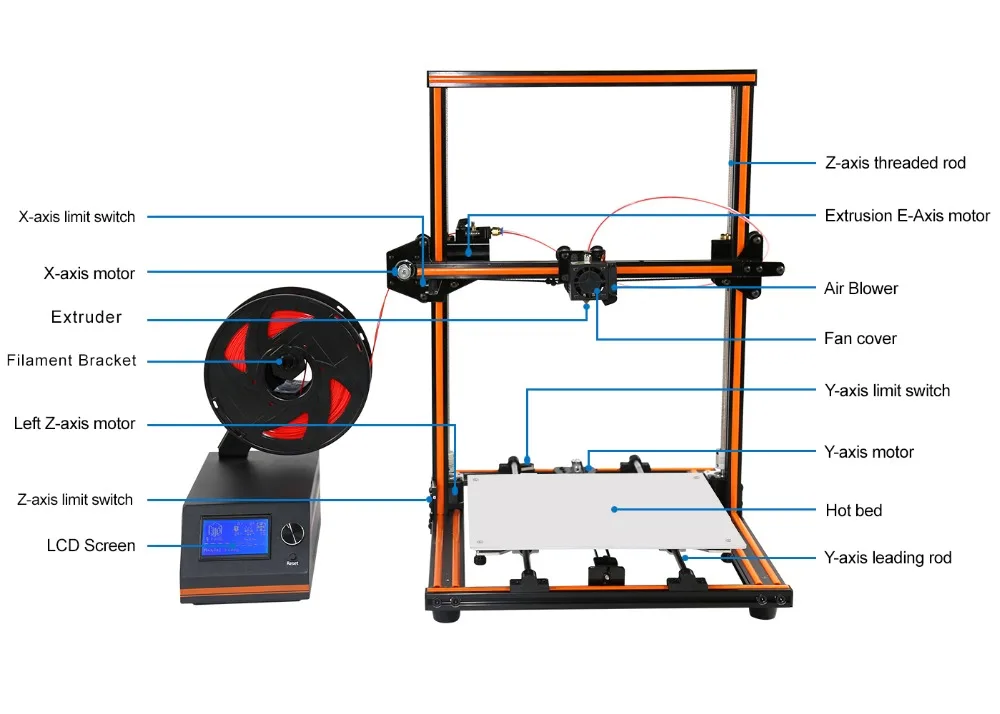
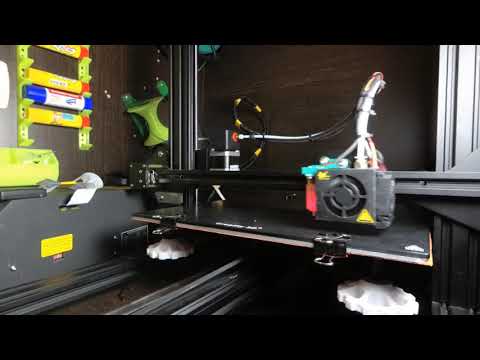
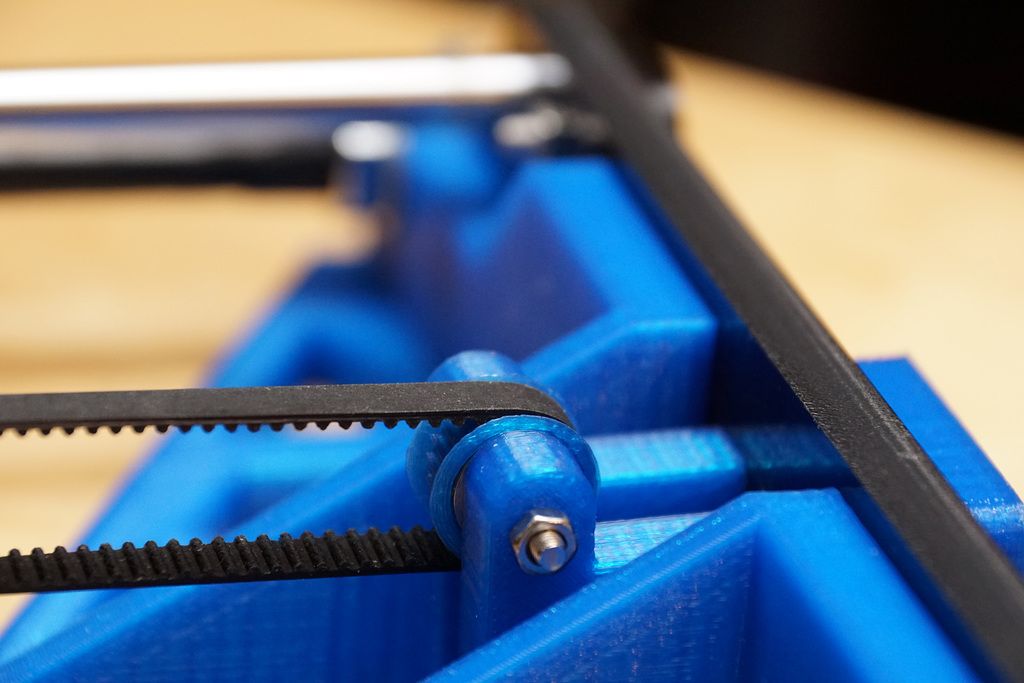
It’s a good idea to first figure out how your 3D printer works and how the belts are joined on the X & Y axes. For this article, I’ll be talking about how you tighten an Ender 3 belt.
The X-axis belt runs directly through the extruder, and the extruder is attached to a motor that allows it to move back and forth across the X-axis belt. Some methods which can be followed are explained below to adjust the tension of the printer belt.
Tighten Screws on X-axis: In most printers, the belt is attached to X-axis and a pulley that is further attached to a motor shaft to maintain tension in the belt.
If you look closely, you will find screws on both sides of the X-axis. Tighten these screws as it helps you in getting the right tension in the belt of the printer.
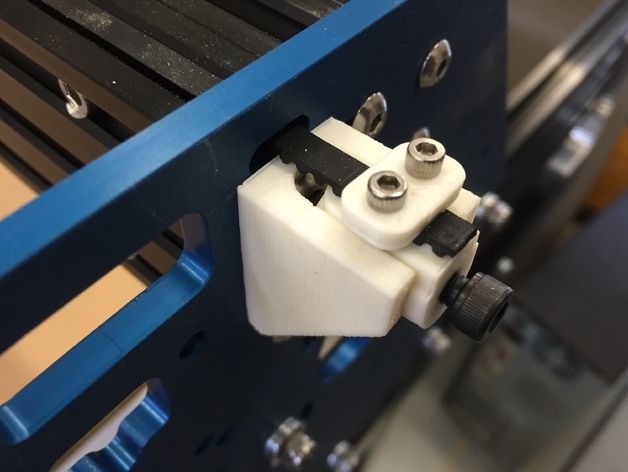
Adjust the Tensioner: To adjust the tension, you will require a hex key that comes with the printer. The remaining process is given below.
How Do You Tighten an Ender 3 Belt
- Loosen the two nuts that hold the tensioner in place
- Use the larger hex key and slide it down between the tensioner and the x-axis extrusion rail.

- You can now use this as a lever to apply force on the tensioner and keep it as far out as possible to keep the belt tight.
- At that moment, tighten the bolts back up on the tensioner
- Once it is done, you can repeat the same process on the Y-axis.
Adjusting the Belt Tension at Y-Axis
Adjust the belt tension on your Y-axis works the same way as on the X-axis, but usually it doesn’t require as much tension adjustment.
Your printer belt is moved through stepper motors from one side to the other, and they don’t usually need replacing if treated right, unless it’s been years. Over time, they can stretch and break, especially if used constantly.
The video below shows a nice visual on tensioning an Ender 3 belt, which you can do for the Y-axis.
If you would rather choose an option that allows you to tension your belts with ease, I’d consider getting yourself the UniTak3D X-Axis Belt Tensioner from Amazon.
It fits around the end of your 3D printer on the 2020 aluminum extrusion, but instead, it has a wheel tensioner to make the job easier. It’s very easy to install and requires no assembly!
You can also get the BCZAMD Y-Axis Synchronous Belt Tensioner from Amazon to have the same functionality on the Y-axis.
How Tight Should My 3D Printer Belt Tension Be?
Your 3D printed belt should be relatively tight, so there is a good amount of resistance, but not so tight that you can barely push it down.
You don’t want to over-tighten your 3D printer belt because it can cause the belt to wear out a lot quicker than it would have otherwise. The belts on your 3D printer can be pretty tight, to the point where getting underneath it with an object is fairly difficult.
Below is a little visual on how tight the Y-axis belt is on my Ender 3. Getting the belt to this position takes a decent amount of push and that is really stretching it, so you can look towards having your belt around the same tightness.
You can gauge belt tension pretty well by watching a video and seeing how tight it looks and springs.
A loose belt can result in skipped layers and is very likely to decrease your print quality, so I’d advise making sure you have it at a good resistance level.
Make sure to move the X and Y axis slowly from one end to the other to make sure the belt is in good working order and not rubbing hard on the aluminum extrusion.
How Do You Know If Your 3D Printer Belt is Tight Enough?
Setting the proper tension in the belt is all about trial and error. However, there are many manual ways to find the belt’s tension and tighten it until you feel satisfied.
Some methods that are commonly followed to check the tension of the belt:
- By touching the belt to check the tension
- Listen to the sound of a plucked belt
This is one of the easiest ways to test the printer belt’s tension as it would only require fingers and sense to feel.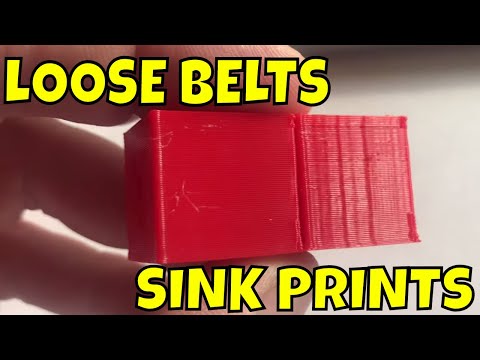 If the belt is pressed with the fingers, they should be tight enough to move very little; if not, the belt must be tightened then.
Listening to the Sound of a Plucked Belt
The sound that emits from your belt after plucking it should sound like a twang, similar to a low-note guitar string. If you don’t hear any note or a lot of slack, it’s likely that your belt isn’t tight enough.
How to Fix A 3D Printer Belt Rubbing (Ender 3)
You can sometimes experience your 3D printer belt rubbing against the railing, which isn’t ideal. It can create plenty of vibrations throughout the axis, resulting in poorer surface finishes on your models.
Luckily, there are a few ways to fix this.
A solution that you can try is having the belt tightener at a downward angle, allowing the belt to get low enough to get space on the metal. This works because there is still some up and down motion after tensioning your belts.
So basically tilt your belt tensioner downwards so it runs below the lip of the railing.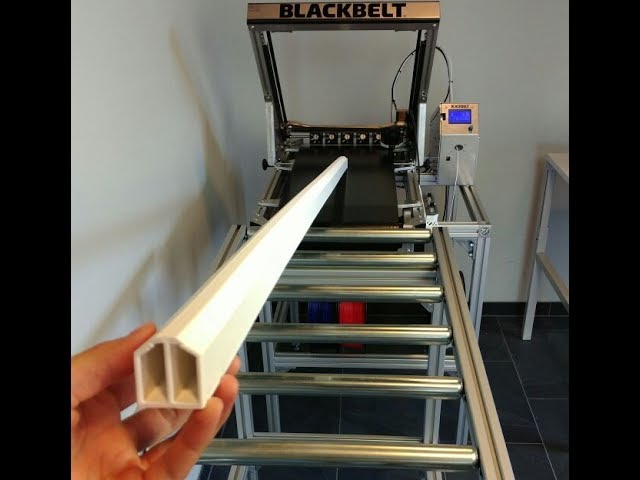
Once your belt is below the part of the rail which it rubs against, you can fully tighten the two T-nut screws that hold the pulley in place.
Something that has worked for many users is using either a spacer or installing a 3D printed Belt Tensioner from Thingiverse for their 3D printers.
Another user who had the same issue of their 3D printer belt rubbing on an Ender 3 was to turn the bolt itself a quarter of a turn at a time, then testing whether it ran smoothly until the belt ran center.
One guy had some luck by replacing the thin nut on the left with two M8 washers and an M8 sprung washer. After implementing this, their belt ran perfectly fine.
Ender 3 x axis fix
Best Ender 3 Belt Upgrade/Replacement
A good Ender 3 belt replacement that you can get yourself is the Eewolf 6mm Wide GT2 Timing Belt from Amazon for a pretty good price. Many reviews talk highly of this belt for good reason.
The rubber material is a high strength synthetic rubber called Neoprene, along with glass fiber throughout. It can comfortably be used for your X-axis and Y-axis and you’re getting 5 meters of belt so you can replace it easily when needed.
Belt Frequency And Tensioning - 3D Distributed
SolidCore CoreXY Belt SystemWhat is the proper frequency to tune the belts?
There are many opinions on the proper belt tension of a 3d printer belt system. The belt frequency may differ from one machine to another. Maintaining optimal tension is important for overall performance and frequency can effect speed and print quality. Mechanical and 3d printing issues can appear when belt tension is either too high, too low, or unbalanced. Common problems in print quality can be annoying but easily solved. Belt Frequency is based on belt tension and other things like:
- Belt Material
- Density
- Wear
- Temperature
- Belt Length
How tight should a 3D printer belt be?
Tighten the belt system until there is some resistance when pushed. Any slack should be removed. Belt tension should be similar to a rubber band stretching but over tensioning can increased belt wear.
CoreXY printers are known for their “belt stretch” issue that results in increased belt length and continuous maintenance. Repeated use may bring up issues such as:
- Inconsistent layers
- jagged or low quality prints
- Belt Ripple
- Decreased Quality
Loose belts are a common problem for users and cause a variety of issues. It may or may not be obvious that your 3d printer is experiencing issues. Belt tensioning defects can occur in finished prints as:
- Misaligned Layers
- Leaning or Lopsided Prints
- Holes And Misprinted Segments
Measuring Belt Frequency
A loose belt can result in layer shifts and other issues but measuring belt frequency and tuning can be done phone apps like Smart Tension or Gates. Gates is a popular belt manufacture of the GT2 belts. They also offer an app for measuring frequency. Other apps such as “Smart Tension.” calculate proper tension for your belt based on the design and length of the belt.
Calibrating Belt Frequency
Calibrating the frequency of a timing belt is similar to tuning a guitar. Pluck the belts as you would strum a guitar string until you match the tone to an appropriate frequency. It may not be the most accurate but It’s worth the time. Due to the range of belt materials and temperature it may be challenging to find that “sweet spot” frequency.
While quality belts like Gates can be pricey. Most people use the most common and available belts they can find on Amazon or Aliexpress. These belts may not have any specs on material, tolerances and tensile strength. Although it may be challenging to find the proper frequency to tune to, it can be a good starting point to document a measurement.
Belt position and location may make different sounds and tones. The top belt may ring out more that the bottom side or vice versa. It may be better to move the carriage and gantry to the middle of the printer when taking measurements. Pluck each belt one at a time as you tighten your belts until they resonate to a desired frequency.
Outer wall layers look slightly uneven and slight irregularities across the surface. Loose or unevenly tightened belt. It may not be immediately visible but becomes apparent once completed. Watch closely as the print progresses through different stages.
Misprinted SegmentsLoose belts can result in misprinted segments or holes in in printed parts. Check your machines bolts and screws to make sure that pulley’s are tight and unobstructed. As they loosen over time they can cause the belt to lose tension. Print layers may not be uniform which results in misprinted areas and holes in a section.
Mechanical Belt Tension CausesA variety of reasons why belts become misaligned or lopsided. The belt is connected to other components that could contribute to defects and faulty prints
- Belt Friction
- Damaged Belt Drive Teeth
- Belt Slip
- Belt Rub
- Debris
An improperly tightened belt can rub against the side of the belt track causing friction which leads to increased wear over time. Misalignment can result in terrible print quality.
Belt Slip3D printers operate along X and Y axes that allow them to print in multiple dimensions. Each axis has a belt that moves along. Over time nuts and bolts loosen and causing belt slack. If the tension on the belt is not tight enough it will slip out of position misaligning layers.
Pulley TeethLoose or missing pulley teeth can cause the jerky movements. You’ll find misprinted segments or incomplete features in the finished print. Belt Rub belt misaligned or tightened it can rub against the track.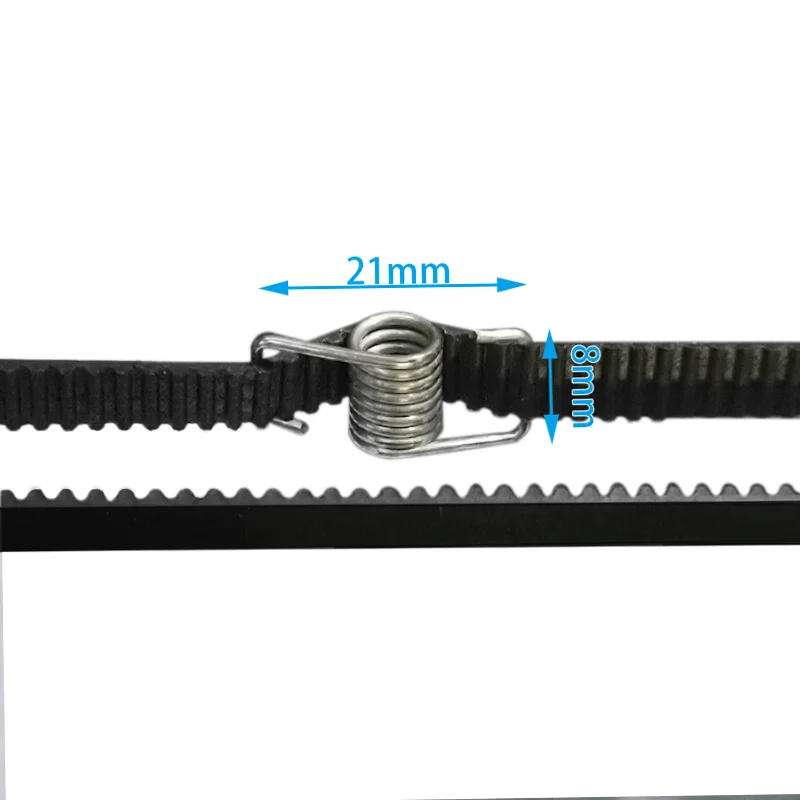 The friction caused by repeated rubbing will wear the belt out quickly and result in defects. The friction can snap the belt over time.
Dirt and debris can build up in the track of the pulley and belt itself. Extreme build up could even interfere with the motion. Check the belt system and pulleys to eliminate any debris.
Belt SlipBelts loop around pulleys and one side could slip off out of place, causing it to tighten more on one side. This will result in misaligned layers and your print will likely come out lopsided.
Measuring DeflectionYou can measure deflection from the resting position of your printers belt with a ruler or scale. Check the exact length of the deflection distance to get a measured number tension.
- By Feel
- By Sound
- Use a Ruler to measure Tension and Deflection
- Phone app
- By prints
Adjusting
Belt TensionAdjusting belt tension may be different on every machine.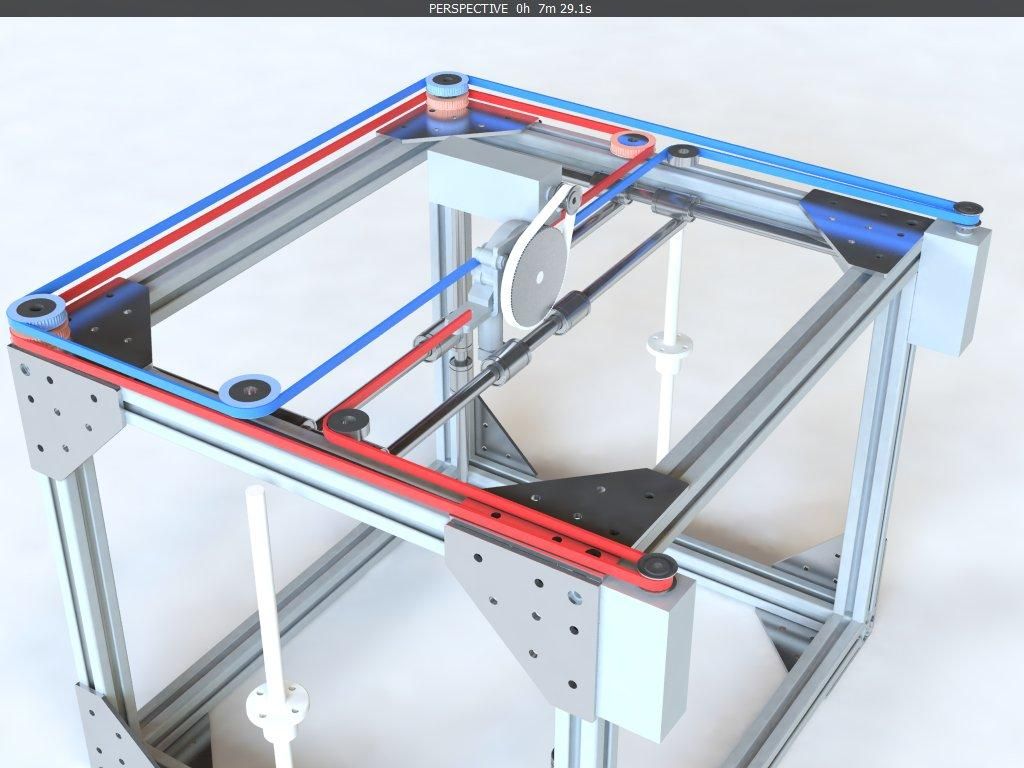 Methods may vary depending on size and mechanical configuration. This may be as simple as tightening a few screws or minor adjustments. A common method is to press down on the belt and tighten until you feel the slop decrease. The belt should vibrate back and forth when plucked. It’s not fool proof but a decent starting point. Experience will get you closer to that “sweet spot” over time.
- Press the belt until you feel resistance.
- Measure the distance between the belt’s resting height and the pressed down position.
- Adjust the tension as needed.
- Re-test the deflection number to find a repeatable distance.
Most belts are made from rubber or neoprene and reinforced with fiberglass. the rubber will stretch over time so you’ll have to adjust tension. steel core polyurethane, which will resist stretching but not quite as flexible as rubber belts making them more likely to snap.
Belt PitchBelt designs can vary in style and pitch.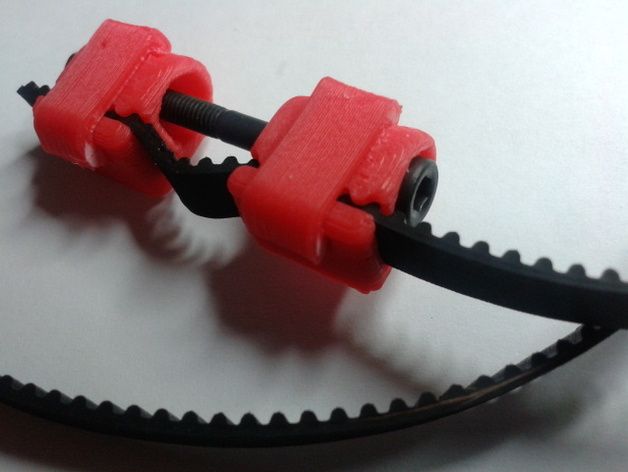 Pitch is the distance between the teeth. Most 3d printer belts have a 2mm pitch. Any distance above 2mm or 3mm could result in jerky movement and decrease precision. More high end belts are designed with curved teeth to minimize noise and resonance while reducing backlash to get smoother and accurate motion.
Shop 3D Printer Parts
CoreXY Belt Routing One of the most important parts for corexy movement is belt routing. Here’s a guide to the mechanics of corexy belt routing pulley layout in order to get accuracy and constant belt tension. Belt Routing Methods There are two main ways to implement the corexy belt path. Either a stacked pulley arrangement
by Shane Hooper
CoreXY Kinematics Explained? The corexy kinematics mechanical arrangement includes a unique motor movement where the X or Y motor move together or opposite of each other to move the carriage from left to right or towards or away . If you were to move just one motor you would see the print head move diagonal.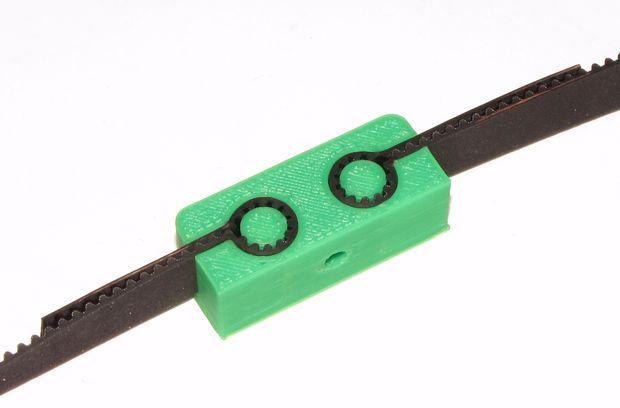 .
.
by Shane Hooper
There are a few different types of 3d printer kinematics to choose from, with cartesian kinematics being the most common. Recently the corexy architecture has become more popular. In this guide, we will compare corexy vs cartesian kinematics in terms of their speed and print quality so that you can understand the difference in each
by Shane Hooper
CoreXY Scalability The scalability of a core-xy printer can be an issue when it comes to hardware design and implementation. An increased belt path can also introduce problems resulting in artifacts in 3d printed parts. A rigid gantry setup is needed and proper binding is a must. 9mm and 12mm belts are available to account
by Shane Hooper
Modular
Scalable
Linear Rails
Balanced Carriage Pull
Enclosure
BOM utilizes most available parts
All Metal Parts or 3D Printed
Z-Axis: Independent Driven or Shared Belt Routing
by Shane Hooper
SolidCore CoreXY Z-Axis Bed Leveling We recently started working on the SolidCore 3d printer‘s bed leveling and mounting system. The z-axis uses a 3-point kinematic bed mounting with magnetic pivot spheres on each mount This properly constrains the bed at 3 points of contact. The original SolidCore Z-axis design was somewhat primitive because we only
by Shane Hooper
While this write up is still a work in progress as I continue to research kinematic mounting and the math used to find the angle that properly constrains the bed to allow for thermal expansion. This is the documented details of how the SolidCore kinematic mounting system should work. So comment or correct me if
by Shane Hooper
The CoreXY motion system is a good solution if you’re looking to print faster. The 3d printer kinematics has become more popular in the last couple of years as users and DIY builders agree on an increase in print quality. The motion system is more lightweight compared to other 3d printer kinematics such as cartesian
by Shane Hooper
The latest design update uses three Z-axis stepper motors.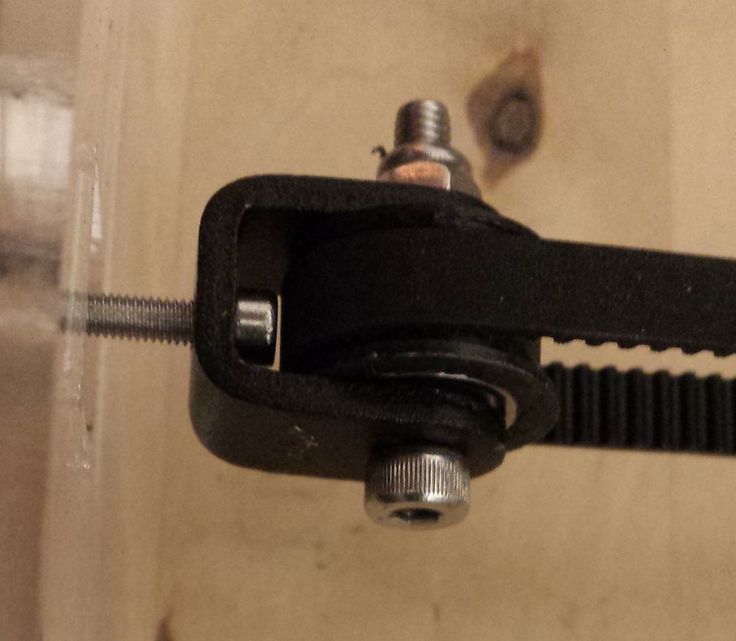 In this arrangement the belt routing to the stepper motor drive the lead screw. Each lead screw will be constrained by an MGN12 linear rail. This should also minimize vibrations that might be transferred from the motors to the z-axis. The belt to pulley ratio gives
by Shane Hooper
Are linear rails better? Linear rails produce a high degree of accuracy and stability compared to round rods with linear bearings. They have better mounting, and smoother motion which improves print quality and machine reliability. What are linear rails used for? Linear rails are used in different applications in industrial machine and motion system design.
by Shane Hooper
What Size Stepper Motor Should You Use? While the size of a stepper motor is just the footprint it’s the winding that determines torque. There are Nema 17’s with as much torque as a Nema 23. Most 3d printers use stepper motors to drive z-axis motion lead screws to raise or lower the bed or
by Shane Hooper
Stepper Motor Color Coding of Wires For any stepper motor to be wired up properly, we’ll need to determine which wires are “pairs” or connected to the ends of each coil. These are usually referred to as coil “A” and coil “B”. The exact order of the pairs Black/Green or Green/Black of pins does not
by Shane Hooper
Midwest Reprap Festival 2019 was wven more than the year before. There were so many more people attending and exhibiting. The venue was packed to seams with the coolest 3d printer builds you ever seen.
by Shane Hooper
Carl from NAK3DDesigns Have you ever needed to print an object but you were limited to the size of your 3d printer print area? If only…. you could print with an unlimited range….. an unlimited Z…….. Out of all of the awesome 3d printers at Midwest Reprap Festival…. I have to say that the White
by Shane Hooper
With so many 3d printer kits and open source build plans available, it can be a challenge to choose an option for your 3d printing needs. Every 3d printer design has different design goals for different needs as well as different compromises. Whether you’re building a new printer or just in need of a new
by Shane Hooper
Recommended Print Settings PLA PLA / Polylactic acid is a biodegradable thermoplastic most commonly used in most FDM 3d printers. Easy to Print Durable and Relatively Strong Non-Toxic 3d printed parts from PLA are the most common and widely used in prototyping and product development or proof of concept parts. Parts printed from PLA are
by Shane Hooper
3D scanner – A device used to analyze physical objects to create a solid model from the cloud of points. 3D Printing – The additive manufacturing process of creating a physical object layer by layer. Also known as Additive Manufacturing. 3d Printer – A machine that creates a physical object one layer at a time
by Shane Hooper
How can you calculate the wire gauge and length for 3d printer wiring? Most 3D printers use either 12V or 24V. The hotend of a 3D printer may draw up to 4A, while a heated bed draws nearly 12A. If the wire is not large enough or longer than needed, it will have more resistance
by Shane Hooper
Layer Adhesion Layer and surface adhesion is a critical component of 3d printing. 3d printing issues increase as object size increases. Large 3d printers can be more difficult when it comes to bed leveling. As the extruded layers bond together they are fused with heat. Proper surface adhesion decreases warping that can decrease part quality.
by Shane Hooper
Like this:
Like Loading...
How the belt tension of the Ender-3 (Pro/V2) 3D printer affects print quality. How to properly tighten them.
In this article, we're going to look at some pretty important and useful information about the straps on Ender 3 (Pro/V2) 3D printers and how tight they should be.
We will also look at the results of 3D printing in three ways: one with loose belts, one with tight belts, and one with optimal belt tension.
This will give you a visual and understanding of the importance of keeping the printer belts tight and the impact they can have on your print quality. Looking ahead, let's say that in one of these cases, printing a part turned out to be an impossible task.
Of course, we will also tell you how to properly tension the belts, as well as where to find convenient tensioners for Ender 3 and Ender 3 Pro (Ender 3 V2 already comes with tensioners) to make the whole process easier.
How tight should the straps be on the Ender 3?
Only trial and error will help determine the correct belt tension.
First check the belt to make sure it is tight and not slipping off the pulleys. You should feel some resistance as you squeeze the top and bottom of the belt.
You must pull the belts as tight as possible to prevent slack, otherwise your belt will slip and the printer will skip.
After tensioning the belts, be sure to carry out a test. To do this, print some simple model, a small test cube is best for this. If you still see ripples, layering, or some other negative effect on the surface, it might be worth checking the tension again.
If your belt is too tight, it can cause you to skip steps, overheat the engine and prematurely wear out the mechanics. An overtightened belt will cause unusual deformations on your part.
Also note that belts that are too tight are subject to faster wear and in some cases may even break.
Some signs that you need to check the belts on your 3D printer:
- Loud sounds coming from the printer.
- Your belt appears to be loose when you look at it.
- Parts are rippled and/or deformed
- Your printer stops for no apparent reason.
Inspecting the printer will allow you to locate the problem. Similar effects can be caused by other reasons, however, do not forget to check the degree of tension of the belts.
Difference in print quality between loose and tight straps.
We have loosened the belts enough to show you the quality of the 3D printer with the X and Y belts loosened.
3D printed results.
Cube 1: The belts are too loose, the efficiency of the transmission chain is reduced, as a result the entire cube has shifted to the left.
This phenomenon is quite common when 3D printing with a loose X-axis belt, but it can be easily diagnosed and corrected because you can clearly see what is happening.
For Cube 2, we tightened the straps, but not tight enough. Layers and waves are clearly visible on the model.
Cube 3 printed with optimally tensioned straps. The print quality has improved a lot, there are no visible waves, layer lines are also less visible.
With cubes 2 and 3, you can clearly see how belt tension affects 3D print quality.
Loosely tensioned belts can also cause your prints to show more visible layer lines, detracting from the appearance of your model.
This problem can be caused not only by weak belts, but also by uneven extrusion. However, in this situation, most people do not think that the reason is in the belts and forget to check the degree of their tension.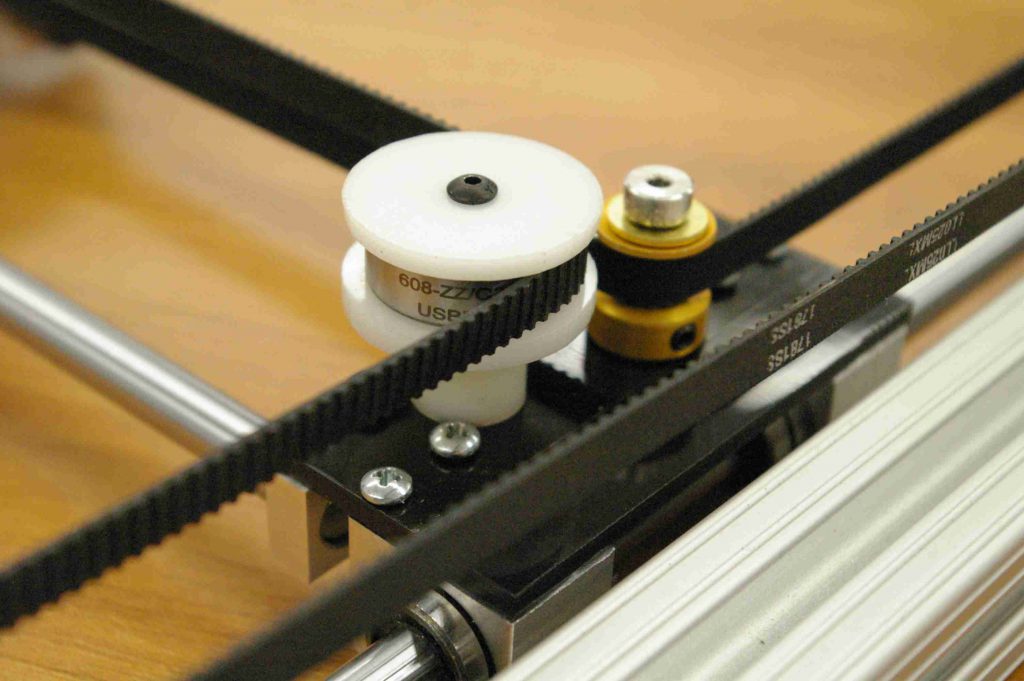
Another example of the difference in 3D printing quality between weak and tight belts.
Can the belts on the Ender 3 be too tight?
For best 3D printing quality, 3D printer belts should be pulled as tight as possible without stretching or breaking.
Under-tensioned belts create a stepped effect on your part, and in the worst case completely distort its geometry.
However, it is worth noting that you can damage the straps when overtightening. So while you should do your best to tighten them as tight as possible, do so carefully.
In the next section, we'll show you how to adjust the tension on both belts on the Ender 3 using the provided tools, which is quite simple but won't allow you to tighten them as much as you could with the special belt tensioners.
How to adjust belt tension on Ender 3 (Pro).
The Y-axis belt is often tensioned at the factory by the manufacturer and is usually well adjusted. We had to loosen it on purpose to show you the print quality on loose belts.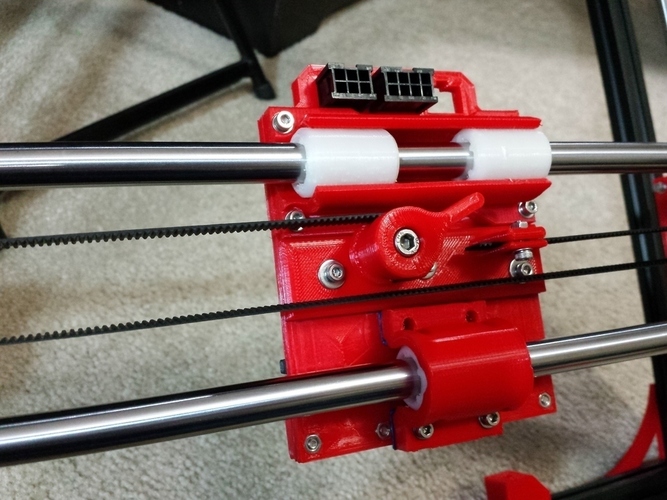
You install the X-axis belt yourself, so something can go wrong here.
How to adjust the X-Axis Belt on the Ender 3.
You only need one tool for this, the second largest hex wrench that comes with the printer.
Loosen the two screws on the idler on the far right side of the X-axis.
Use a larger hex wrench and insert it between the tensioner and the X-axis guide.0002 You can now use it as a lever to apply force to the tensioner and hold it as far as possible to keep the belt tight.
Tighten the strap and, holding it with one hand, tighten the screws again.
How to adjust the Y-Axis strap on the Ender 3.
The Y-Axis strap is a little trickier to tighten because there are more screws holding the entire bracket in place, and if you're doing it by hand, you'll need to put in some effort to tighten it tight enough.
However, you will need the same hex key as before.
Loosen all four screws on both sides of the bracket using the included hex wrench.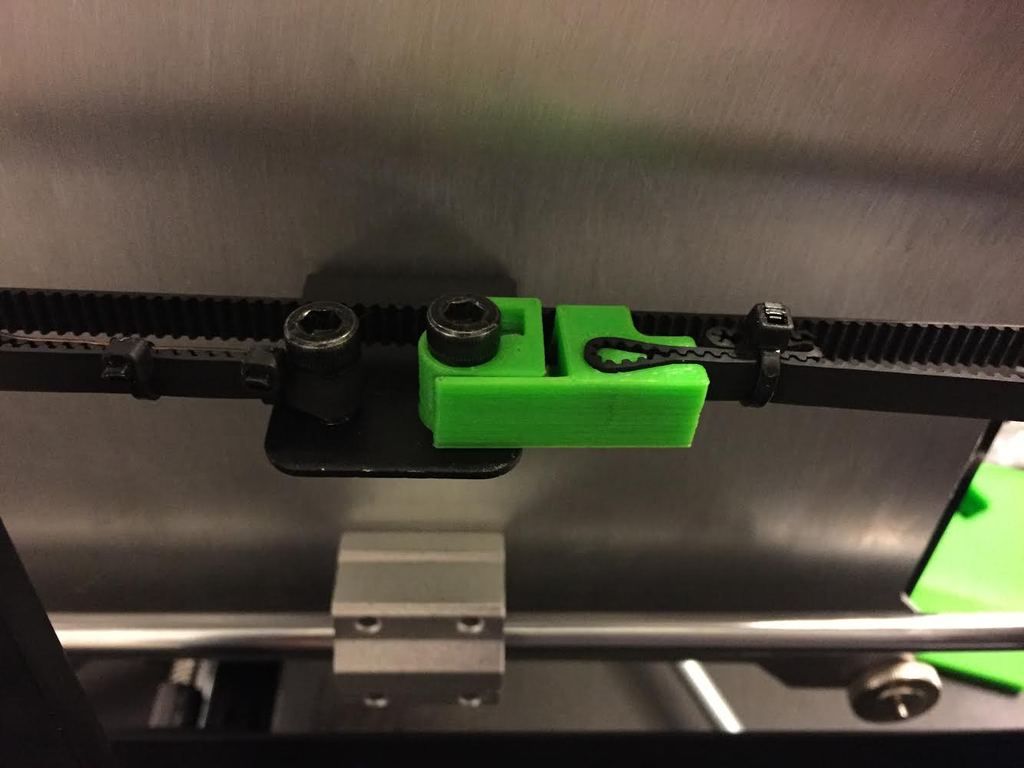
Pull the tensioner to tension the belt.
Tighten the four screws while holding the belt so that it does not loosen.
After adjusting the tension of the belts, make sure that the carriage moves smoothly along the X and Y axes from one end to the other, and the belt does not rub against the guides.
Installation of adjustable belt tensioners.
Adjusting the tension of the belts on the Ender 3 or Pro is a little trickier because, unlike the Ender 3 V2, earlier Ender 3s don't come pre-installed with adjustable belt tensioners.
Instead, Creality uses fixed belt pulleys that are at the ends of the X and Y axes and cannot be moved easily.
Fortunately, the Ender 3 development community, Creality and others have developed adjustable belt tensioners that allow you to change the belt tension on the axle by simply turning a knob. In this section, we'll look at how to upgrade your Ender 3 or Pro with an adjustable belt tensioner.
Belt tensioners are an efficient way to adjust belt tension without having to manually move the pulley on the axle.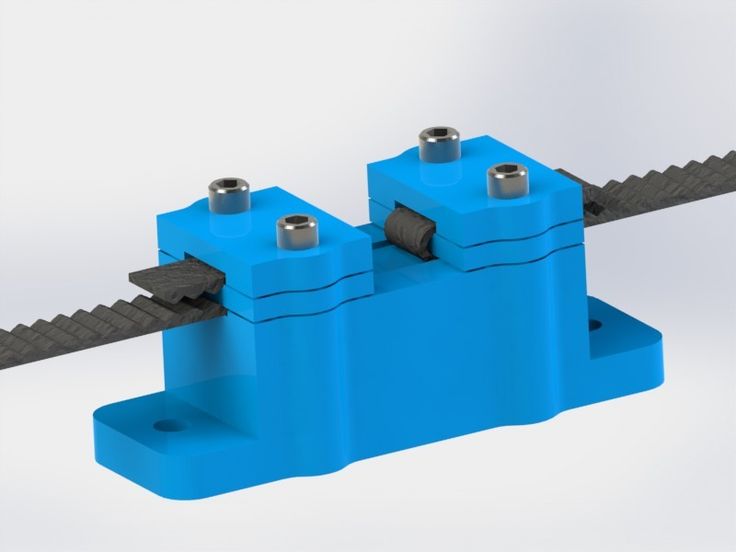
Ender 3 and Ender 3 Pro are very similar and the X-axis belt tensioner will work on both printers. However, since the Pro version has 40x40 Y-rails, while the original Ender 3 uses 20x40 rails, the Y-axis tensioner for the two printers is different.
Ender 3 Y-Axis Tensioner
Ender 3 Pro 9 Y-Axis Tensioner0003
X-Axis Tensioner for Ender 3 and Ender 3 Pro
It is important to note that in order to 3D print belt tensioners for Ender 3 or Pro, you must use print settings that will produce a strong and durable part. The belt tension will depend on the structural integrity and strength of the belt tensioner, so give it due consideration as you don't want it to break in the middle of the process.
Free STL file Anti-slip belt buckle pad・3D printer design to download・Cults
Angled glass washer fitting Mersedes_Volkswagen_AUDI_ Seat_ Skoda (1J0955665E)
0.62 €
Cutter for 4 and 6 mm PTFE tube
0. 62 €
62 €
Simple protractor
Free
Folding stand for smartphones and tablets
Free
Completely disassembled set of probes and connectors for multimeter
Free
Curved Headphone Case (Remix)
Free
Lockable Weekly Pill Dispenser
Free
Electronic Screwdriver or My Wowstick
Free
Best 3D Printer Files in the Miscellaneous Category
Conan Thulsa Dagger of Fate
4 €
Honey Bee foundation (worker and drone)
Free
Stylized Mandalorian STL
15. 13 €
13 €
B-17 Flying Fortress
Free
Tweedledee and Tweedledum
Free
Cessna 210
32.50 €
Lock for geocache / geocache lock
Free
plug&play marble track
Free
Bestsellers in Miscellaneous category
ItsLitho "Creamy" personalized lithophane Christmas ball
1,90 €
World Cup chopper - picador copa del mundo
5.81 €
ItsLitho "Pure" personalized lithophane Christmas ball
1,90 €
Christmas House
€6. 97
97
Chainsaw Man - Denji
€18.25 -fifty% 9.13 €
Embroidering a biting star for the Christmas tree
1.74 €
ItsLitho "Drop" Personalized Lithophane Christmas Ball
€1.90
hinged shenron
3 €
Mickey Christmas night light Litophane
3,50 €
Charizard - pokemon with flexible articulation (seal in place, without supports)
3 €
Gengar - pokemon with flexible articulation (seal in place, without supports)
2 €
4th planet Fighting pre-Olympic god
12 €
Bunch of Christmas balls ItsLitho
€7. -thirty% 5.32 €  60
60
Personalized Christmas ball made of lithophane ItsLitho "Swirl"
1,90 €
Wolf - Flexi Articulated Animal (printed in place, without supports)
2 €
Gnome Yes (No support)
€2.49 -twenty% 1.99 €
Do you want to support Cults?
Do you like Cults and want to help us continue our journey on our own ? Please note that we are is a small team of 3 people, so supporting us in maintaining the activities of and creating future developments of is very easy. Here are 4 solutions available to everyone:
-
AD: Disable your AdBlock banner blocker and click on our banner ads.
Learn more