3D printer shop near me
3D Printing | 3D Print Services
Find a 3D Printing Location
Print Functional Prototypes
You can use 3D printing for prototypes or one-of-a-kind items. Let The UPS Store® bring your ideas to life. We can even use your 3D CAD file.
Construct Manufacturing Jigs and Fixtures
We understand when you do your own manufacturing, jigs and fixtures are critical for insuring high-quality and efficiency during assembly and testing. Our 3D printer can create complex parts so you are not dependent on a CNC machine.
Create Custom Accessories
Want to design your own smartphone case or money clip? Most items that are smaller than a breadbox and can be made out of single color of plastic are perfect for 3D printing.
Build Architectural Models
You can work in just about any 3D architectural design program and then export to common 3D CAD file types. The finished product is ready to show off or you can sand and paint your building to give it just the right look.
3D Printing Services Expanded Across Nation
The UPS Store continues to expand 3D printing services nationwide to meet the growing demands of its small business customers. 3D printing now available at approximately 20 The UPS Store locations. Use the interactive map below to find a participating location near you, or check out the full list of all The UPS Store locations offering 3D printing services.
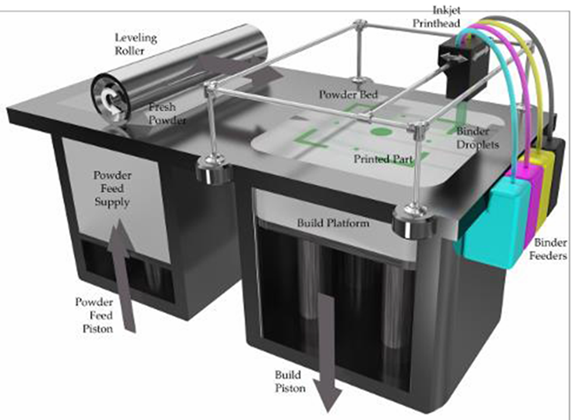
3D CAD and 3D Scanning Services
The UPS Store 3D print locations can now also offer you 3D CAD and 3D scanning services through HoneyPoint3D. Getting a custom 3D print has never been easier - you dream it, HoneyPoint3D designs it, The UPS Store prints it. Enjoy the HoneyPoint3D benefits of an easy quoting process, affordable and quality engineering, online viewing of your 3D files, and efficient turn-around times. Get your 3D CAD or scan quote today!
Netfabb® at The UPS Store®
Participating The UPS Store 3D print locations are utilizing Netfabb software for 3D print file preparation and customization.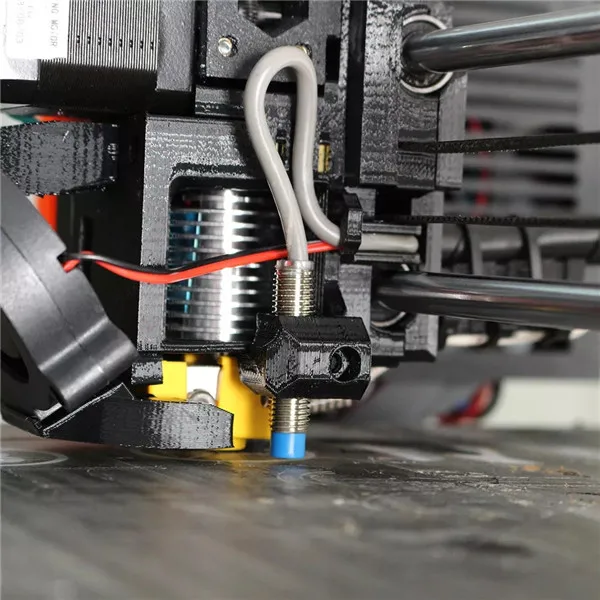 Services available at these locations include:
- File fixing
- Text labeling
- Logo labeling
- Cutting
Contact or visit these Netfabb locations to learn more about their advanced 3D offerings.
3D Printing Frequently Asked Questions
Here a few questions we frequently hear about 3D Printing.
Please feel free to contact your local The UPS Store for any other questions you may have
-
What is 3D printing?
-
3D Printing is a manufacturing process that uses a digital file to create three-dimensional objects one layer at a time. We run a system that uses ABS plastic and soluble supports to create realistic prototypes and marketing models.
-
What kinds of things can I 3D print?
-
Small business owners and aspiring entrepreneurs will have the opportunity to print prototypes as part of the new product development process. With this printer, The UPS Store locations will be equipped to produce items like engineering parts, functional prototypes, acting props, architectural models, fixtures for cameras, lights and cables.

-
How long does it take to print?
-
The time it takes to print an object will depend on the complexity of the design. A simple object may take 4-5 hours, while a complex object may take 24 hours.
-
Which UPS Store locations are offering 3D printing?
-
The UPS Store is in the process of rolling out nearly 100 3D printing locations across the country. Visit /print/3d-printing/locations for more information.
Staples® Official Online Store
End of the year deals are here
End the year with a bang and prep for the new year with awesome deals from Staples. Start with Staples Black Friday deals on everything from computers and tech to gaming chairs, printers, and more! The savings continue with a week of Cyber Monday deals you don't want to miss! Use this time to stock up on essentials, update your office, and find gifts they'll love receiving.
With the new year right around the corner, it's the perfect time to refresh your office and replenish your supplies.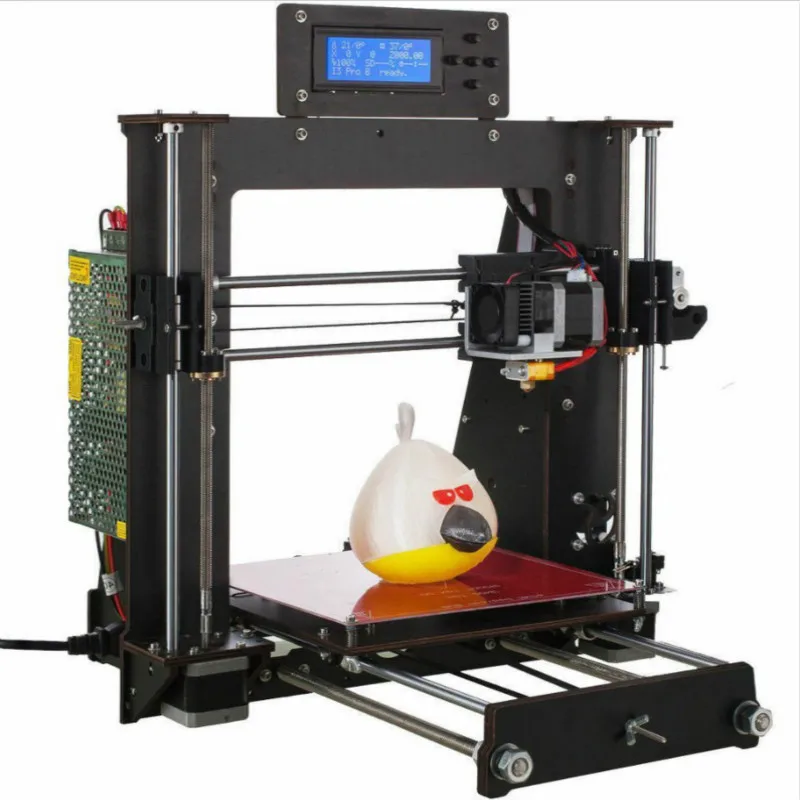 Get back to work and take advantage of savings on ink and toner, office furniture, packing and shipping supplies, and more. Stock up and save on all kinds of supplies for the office. Get deeper discounts on supplies like copy paper, file folders, and writing supplies when you set up a business account with Staples Business Advantage or order using the Staples AutoRestock feature.
Make sure you're prepared for the upcoming tax season
As the year comes to an end, it's time to get your financial documents in order and prepare for the upcoming tax season. Keep your financial records up to date throughout the year with the right financial software for your personal or company needs. As well as making sure that your office is well stocked with the necessary tax forms and envelopes to get your employees or contract workers their paperwork as soon as possible. See how Staples can help you prepare for your taxes:
- Starting with the right financial software can help keep you ahead of the game before the next tax season.
 With recognized financial brands such as Quicken Finance Software. Take the hassle out of staying financially organized.
 - Getting your employees and contract workers' tax forms out to them on time is as simple as just pressing print when you have the appropriate tax forms on hand. From W2, 1099, 1095, and even the envelopes to mail it out, we have your tax form need in mind.
- When it comes time to file your taxes, we can even help you find the right tax software that fits your filing requirements. From software for personal taxes, business taxes, or both, we offer top brands such as Turbo Tax and H&R Block. With the ability to e-file or print and mail both your federal and state taxes.
From employees' tax forms to software to keep your finance in order, or software to get your taxes done, Staples has you covered this upcoming tax season!
Rest assured it arrives safely & securely Whether you are sending business documents or customer products, shipping and mailroom supplies from Staples make the process seamless.
Keep packing supplies ready for easy shipping. Padded envelopes and bubble mailers are perfect for shipping small, non-fragile items. Pack larger items in shipping boxes that are slightly larger than the item and use packing peanuts, bubble roll, or other packing materials to keep objects from moving in the box during transport. Choose the right packing tape to seal shipping boxes and keep them sealed. Staples carries clear acrylic packing tape for everyday shipping and reinforced packing tape, or water activated tape for packages that require a heavier duty seal.
Manage the day-to-day office correspondence smoothly with a wide selection of business envelopes, inter-office envelopes, and catalog envelopes in the mailroom. Have finger pads and envelope moisteners on hand for speedy document collation and a quick seal. Choose security envelopes for confidential office correspondence and inter-office communications. If your office or organization sends out large mailings, consider a paper folding machine and self-sealing envelopes to increase efficiency.
Whether you work in a traditional office, from home, or anywhere in between, the right supplies and technology will keep you working efficiently no matter where you are. Update your tech with a new laptop computer or 2-in-1 tablet for work on the go. Keep important files accessible wherever you are with portable hardrives and USB flash drives that fit easily into a laptop bag. Choose a headset for virtual meetings or noise-cancelling headphones to block out unwanted sounds when working in public.
In your home office, make sure to have a comfortable set up that's built with you in mind. Select an ergonomic office chair or gaming chair, and browse our selection of sit and stand desks for a convertible work area. Add an extra computer monitor to your set up, and choose from our wide selection of mice and keyboards. And don't forget to stock up on office supplies. From notebooks and copy paper, to pens and highlighters, Staples offers flexible AutoRestock options on all the basics, so you can get supplies shipped to your door without having to remember to order.
When it comes to selecting the right ink or toner cartridges for your printer, the choices can be confusing. Let Staples Ink and Toner Finder take the guess work out of choosing the right refills for your printer. You can search by model or browse by brand, including top brands like HP, Brother, Canon, and Xerox ink and toner. With cartridges available for over 30 brands, you'll be sure to find what you need to keep printing. When your cartridge is empty, take it to any Staples store for free tech & ink and toner recycling every day!
90,000 The Unseen Cheapest 3D Printer! Applause? Tronxy X1#competitionCreality
The Tronxy X1 printer is the cheapest machine I could find on Ali (less than $100). This is my first and only printer (so to speak, a child of the crisis). I wanted a printer for a long time, but finances did not allow.
Initially presented as a training printer, ie. for kids. Is it worth buying for kids? Is it worth buying at all? Let's figure it out.
Briefly.
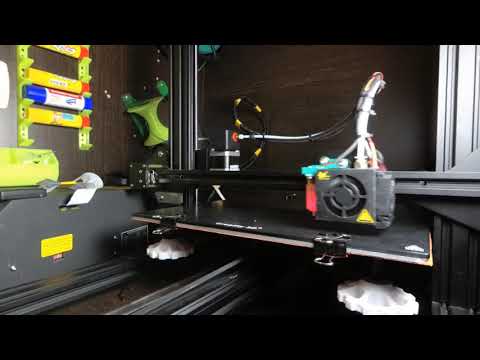
Tronxie is a plush-like open-table printer, or, as they say, a “jump table”. Print area 150x150x150 mm. The control unit of the printer is made in a separate housing, into which the wires are connected. Powers the printer from an external power supply connected to the connector of the control unit. There is no table heating, although Ali indicated otherwise.
This type of printer has a number of limitations in terms of printing speed and materials, but, theoretically, for informational purposes it should fit.
(photo in current condition)
Assembly.
The printer comes to the happy owner in a box in which the complete set is placed in two boxes made of polyethylene foam. The only pre-assembled part is the hot-end mounted on the bottom bracket.
The printer is assembled on a base made of black Plexiglas (or polycarbonate), on which frame elements made of aluminum profiles are screwed. In general, this profile not only has the function of a power element, but also guides (plastic wheels roll along its grooves).
The assembly instructions are quite understandable, although they did not put them in paper form, only the electronic version is available on a flash drive from the printer kit. The whole spore took me about 4 hours. All tools for assembly are included except for wrenches, although the quality of this tool is poor (better to have your own).
Complete set for assembly was enough. Hardware was poured with a margin (although one screw was too long and had to be sawn).
The main difficulty during assembly was to find the right screw, because hardware of all types and sizes are covered in two bags.
A locksmith's square is needed to assemble the frame, otherwise everything will not come together very straight. The guide surfaces are too small to position the parts perpendicularly, and the fixing elements (metal angles and plexiglass brackets) are made with gaps.
The surfaces of the Plexiglas elements are protected with shipping paper.
The wires are not marked, so it is better to mark them to avoid confusion during the assembly process.
Z-axis screw and nut not lubricated and no lubricants included.
Particularly inconvenient is the assembly of the control box housing. Not only that, before assembling it, all the wires must already be connected, but it is also assembled on screws with nuts that are inserted into the grooves and strive to fall out of there. Assembled using a magnet to hold the nuts.
The wires are assembled into bundles with a braid (a tube cut in a spiral), but this solution seemed unsuccessful to me already at the first removal of the braid. The wiring will have to be disassembled during operation, so I put everything in a plastic corrugation (automobile) and fixed it with electrical tape.
The guide carriages do not have a clearance adjustment mechanism, so it was necessary to unscrew and tighten several times to get the minimum free play.
There is no mechanism for tensioning the belts either, and it is not possible to construct simple springs, so we pull with our hands.
Motors marked "Tronxy"
First run.
We connect the power supply to the freshly assembled printer, plug the power supply into the socket and ... Oh, miracle! He works! The name of the printer and firmware “Repetier v0.9” appears on the screen.one". And all because the control unit and the power supply do not have a toggle switch, i.e. to turn it off, you will have to pull the cord out of the socket or get a surge protector.
Next joy. A flash drive prepared in advance (micro-SD and card reader supplied with the printer) with g-codes must be inserted into the printer control unit from the rear wall. Not very comfortable.
And it is clear that it will not be possible to permanently place the control unit without modifications. It will have to be rotated with each print. "Print over the wire!" - at first I thought, but immediately passed, because. a 1 m cable was included in the kit.
Further tedious navigation through the menu using the buttons on the front panel. Pleasure is doubtful, because. the button travel is very large, and they are quite rigid, as a result, they do not always work. In principle, the menu is understandable, but one thing still pisses me off! Why was it necessary to hide the print stop so far in the menu, because it is extremely needed on this printer in quick access.
The table is calibrated with 4 screws with wing nuts (it is better to change immediately), which is very inconvenient due to the small size of the printer.
The table itself is made of 4 mm thick plexiglass, on which 1 mm thick plexiglass is fastened with clamps. During the calibration process, this whole thing bends as it wants, and besides, the table carriage, standing on a 20 mm wide profile, allows the table to swing up to 1 mm in amplitude. As I already said, there is nothing to tighten, and even 0.1 mm of clearance in the carriage will give 0.75 mm on such a shoulder at the edge of the table. So it is better to print always in the center.
Time to print! Plastic - PLA (and the other is not recommended by the printer manufacturer), parameters from online tutorials. Plastic is lying around, because there is no regular place for its placement. Go.
Without additional calibration, the printer prints in normal sizes in all axes. There are all sorts of defects on the surface caused by weak belt tension and insufficient experience in the slicer.
Of course, nothing stuck to the standard plate, but smearing it with a glue stick gave an excellent result. Due to the lack of heating of the table, the glue does not dry out, and the liquid plastic practically bakes into it and dries. The first times I smeared too thickly, so the details came off with great effort.
What can be summarized?. .
.
The printer, after being assembled from the box, prints quite well for a user inexperienced with the quality of parts.
Tensioners were found and printed on the Internet to bring the belts back to normal. They significantly improved the surface quality and geometry.
The first printed samples were small and light, and when printed, it was impossible to detect problems in the mechanical part of the printer. Underextrusion was visible, but there could be many reasons, and I decided to eliminate them as they worsened.
On larger models, the extruder motor was clearly audible, so the conventional drive with gear wheel and pressure roller was replaced with a geared one. The number of steps changes in the control unit, there are no difficulties.
Nozzle blockage began to appear after long printing. At first I thought it was dust. I made a foam filter for the filament.
Did not help. The cleaning didn't help much either.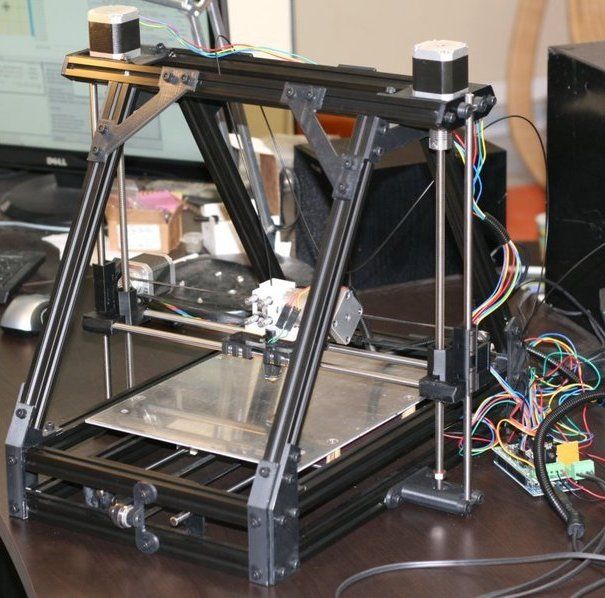 When the hot end was completely disassembled, it turned out that the plastic was melting far beyond the heating block, which clogs the exit. To begin with, I replaced the regular radiator airflow, which, it should be noted, is made of a cooler (40x40x10 mm) in a metal case.
I installed a computer heatsink (40x40x18 mm) that I had on a printed case. Didn't solve the problem completely.
I will not describe all kinds of replacement nozzles, installation of a sock, thermal paste, etc.
It should be noted that during the experiments, the fittings for fixing the Teflon tube collapsed and were replaced (the standard one was very dead).
The hot end has a throat that includes a Teflon tube. Considering that melting also occurred in the tube, after which it looked bad and deformed, I decided to change the throat. The new throat was steel with a 2mm hole, theoretically reducing the heat bridge between the heating block and the radiator.
Printing has become much more stable. Blockage occurs on long seals with a large number of retracts, but as without retracts, because this is a bowden. I decided that the main reason was overheating of the throat due to inefficient heat removal through an unsuccessful radiator (its design is really not very good). I ordered a hot-end analogue of E3D V6, I'm waiting ...
Necessary improvements.
Of those already carried out - blowing the part. The thing is indispensable for bridges and overhangs. The model was downloaded from the Internet, there was already a cooler from a computer 40x40x18 mm (powered to blow the hot end).
When turned on, I encountered a power problem (the speed dropped when the heating was turned on). It seems that the standard power supply was chosen at the limit of its capabilities, so now everything is powered from the power supply from the computer (400 W), besides, it has a power switch.
The next important improvement was the replacement of the table cover. Regular plastic threw out and put the usual glass 165x165 mm 5 mm thick. The plans are to make a mount on magnets, but for now it is installed on 3M adhesive tape. Details are separated with a clerical knife blade.
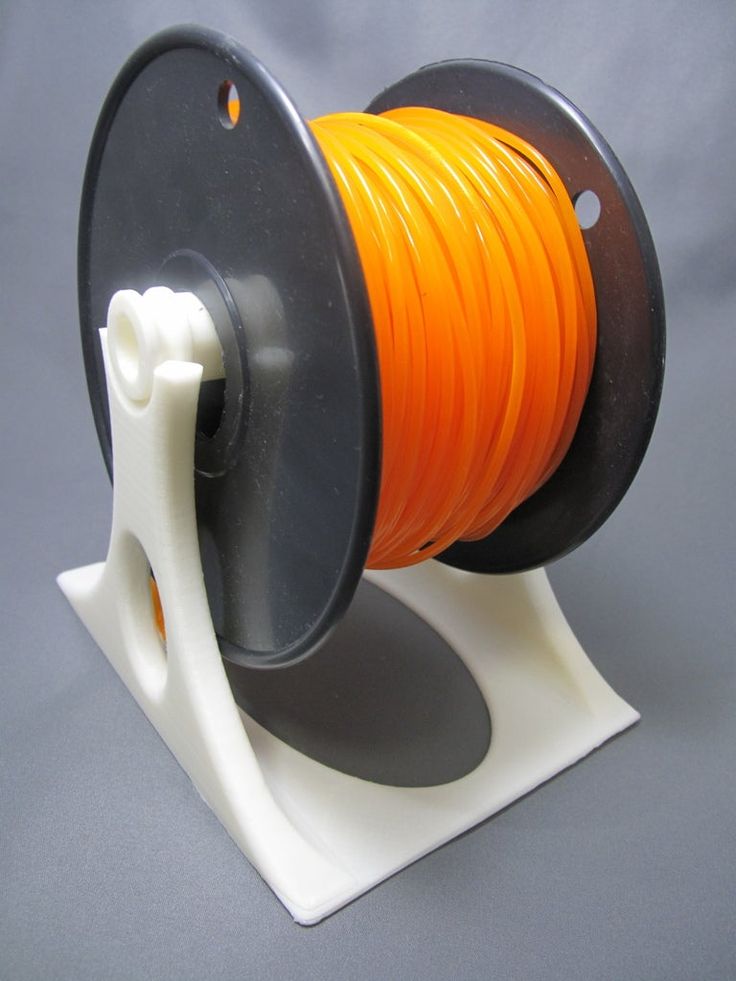
A necessary trifle was the stand (bracket) for the reel. I mounted it on top of the printer stand instead of a carrying handle (why was it invented at all).
Model from the Internet, but not very successful. You need to change it to your design model, but so far it's a pity for plastic.
Main features.
The reader will reasonably ask: “Why are the characteristics indicated at the end of the story?”. Everything is simple. These characteristics are achievable only after the ordeals described above.
Print area - 150x150x150 mm (if you really want, then 160x160x150 mm).
The temperature of the heating block is up to 240 degrees (it does not rise above, and if you press the plastic, then this will not happen either).
Used plastics – only PLA has been mastered so far.
Print speed - up to 40 mm / s (if you want quality, then 25).
Minimum layer height 0.1...0.3 mm.
Table heating - no!
Plans.
At first I wanted to replace the frame of this printer, build something rigid (like a cube) with a heated table and a larger printable area, but it turned out to be quite expensive. Therefore, at the current stage, I ordered one aluminum profile for the table rails in order to increase the width of the wheel support from 20 to 40 mm. Next, I want to put eccentrics to sample the gaps in the carriage assembly.
The printer is very noisy, and the motor drivers are soldered on the board, which does not allow you to get rid of the screech of a crazy cat. I decided to make a box for the printer, throw out the control unit case and mount everything in the box, incl. and power supply.
In addition, the mechanics of the printer has a number of disadvantages that need to be addressed:
- the attachment points of the belts on the carriages are made far from the profile groove, as a result of which the belts rub against the profile, they can even jam;
- the “sloths” of the belt are made of bearings of a larger diameter than necessary, as a result, the belt goes skewed, again, rubs against the profile.
New sloths have now been ordered. I'm still in the process of figuring out the belt mounts.
Printing examples.
Boat that blew everything
(transparent PLA, layer 0.2, tested at 220 degrees without blowing the model)
Test cube
(transparent PLA, layer 0.2, tested at 220 degrees without blowing the model)
Microphone holder (broke, and a new one costs 500 rubles)
(transparent PLA, layer 0.2, temperature 190 degrees without blowing the model, layers with gaps are visible)
Sleeve for headrest guides (slicer test)
(transparent PLA (2 coils), layer 0.2, temperature 190 degrees without blowing the model)
There are defects on the surface of the right part, more or less clean on the left. The main difference is that different slicers are used. For the left - Pryusha Slicer, for the right - Kura. In a detailed analysis of the trajectory in the slicer, it was found that Kura 4.5, when printing walls, presses the plastic in the same place 2 times, due to which defects appear on the surface of the part.
Mixer couplings
Printed 4 pcs. I checked one for strength, the second I installed in the mixer, and these remained spare.
(transparent PLA, 0.2 layer, temperature 190 degrees without blowing the model)
Screwdriver battery case.
When replacing the battery cells in the battery of the screwdriver, it was necessary to increase the housing. Drawn, printed. In the photo there is a print marriage. When reaching the layers with retracts, the nozzle was clogged.
(transparent PLA, layer 0.2, temperature 190 degrees without blowing the model)
Mini hood fan wheel.
This is a prototype. To save money, it was printed from leftover plastic. Here's a rainbow. The plastic was tucked in on the move, so retracts were not carried out.
(various PLA, 0.2 layer, 190°C without model airflow)
Car sun visor holder (prototype)
(Black PLA, 0.1 layer, 195°C with model airflow)
Logo Dodge (enamelled).

This is a marriage. During the printing process, blockages occurred, as a result, the part turned out to be fragile and there are visible defects. I decided to check how the enamel from a spray can lays down without a primer.
(black PLA, layer 0.2, temperature 195 gr. with model blower)
End cap for Bowens mount monobloc.
(black PLA, layer 0.2, temperature 195 degrees with model blowing)
Conclusions.
The printer is certainly suitable for training, but it will mostly consist of the basics of printer operation and troubleshooting, and not the basics of modeling, slicing and printing.
In principle, depending on the tasks, the printer may well come in handy. I printed on it the holders of sun visors in the car, which used cost 1.5 tr. per piece + shipping. For me, the printer has already worked out its money, but I can only say this at the current stage, when a lot has been fixed.
Still, there is a lack of a hot table, which limits the choice of material. But one PLA will not be full!
In general, when you scatter the printer package by price, you understand that it will not be cheaper and better to assemble, but still the product must remain at the level of performance with the declared characteristics. What to add here? Thank God it's not a "delta" for $120.
It should be said that having rummaged through the Internet in search of information on the printer, I noticed that it comes to people in a slightly different configuration. Especially noticeable on hardware. Yes, the wires of the lucky ones are marked. Either there is no stability, or they are working on bugs. I am amazed by the positive feedback from bloggers who have been "sent" to this printer. I think they would treat it differently if it was a financially significant purchase for them.
Home - Canon UK
Home - Canon UKEOS R SYSTEM
Equipped with intelligent autofocus technology and compatible with a wide range of RF lenses, the award-winning EOS R System offers an intuitive approach to photography and video that helps you focus on your subject and creative process.
NEVER BREAK YOUR FLOW
POCKET PRINTER
Canon Zoemini 2
Instantly print images from your smartphone anytime, anywhere with the battery-powered Zoemini 2 Pocket Printer.
Camera
Canon EOS R10
A versatile camera for capturing anything and everything. The ideal travel companion. The perfect hybrid content creation tool. Your arsenal of creative expression.
Camera
Canon EOS R3
Get ahead. Exceed. Introducing the EOS mirrorless camera, which brings a whole new level of action photography to life. Capture even extremely fast subjects at 30 fps.
Camera
Canon EOS R6
Create creative projects you never dreamed of.
MONOCULAR, STYLISH, COMPACT
Canon PowerShot ZOOM
PowerShot ZOOM is a pocket-sized super zoom monocular camera that captures Full HD photos and videos at the touch of a button.
RF VR LENS
Canon RF 5.2mm F2.8L DUAL FISHEYE
Virtual reality lens for easy creation and processing of professional 180° VR footage.
2 IN 1 MINI CAMERA WITH PHOTO PRINTER FUNCTION
Canon Zoemini S2
Take better selfies with this pocket-sized camera printer with mirror and ring flash, remote shutter release and preview.
LENSES RF
Canon RF 16mm F2.8 STM
Wide angle of view, high aperture and superb self-portraits.
Camera
Canon EOS R5
Full-frame camera for high-resolution photos and 8K video.
PRODUCT RELEASE
Canon PIXMA TR4650 Series
This easy-to-use ADF 4-in-1 is ideal for working from home, offering connectivity and high productivity.
PRINTER INK
Ink Selection Guide
Not sure which ink is compatible with your Canon home printer? More.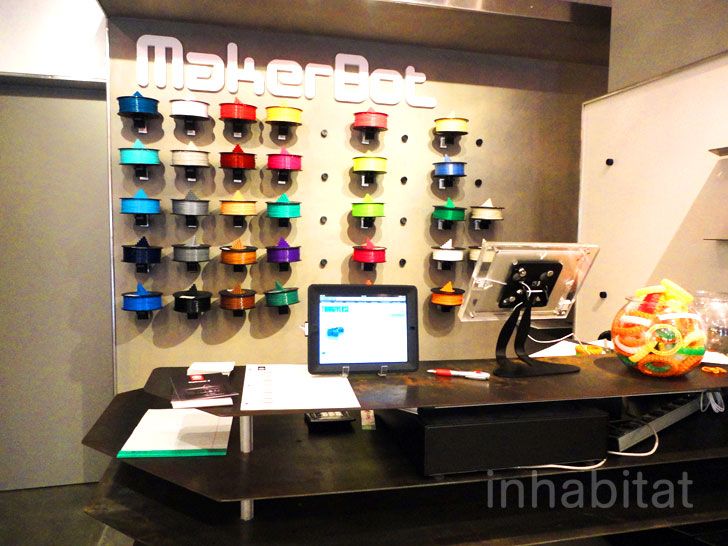
PRODUCTS
New
Introducing new Canon products to help you create memorable stories.
PARTICIPATE
Canon Student Education Program
Applications for 2022 are now closed, but you can register to view this year's 100 finalists
Future Focus
Future Focus
A program that helps students become professionals.
STREAMING
Live with Canon
Stay connected with our USB and HDMI streaming kits.
CREATE WITH CANON
Crew Create
Four creative personalities. Various Canon equipment. One joint project.
SPECIAL OFFERS
Cashback Offer
Find out how to take advantage of special discounts on Canon Cinema lenses.
Tips and secrets
Autumn
Seal the changing colors of autumn
Competition Redline Challenge
Competition RedLine Challenge: Presenting the winner
Learn what the image won and find out the procedure for judges.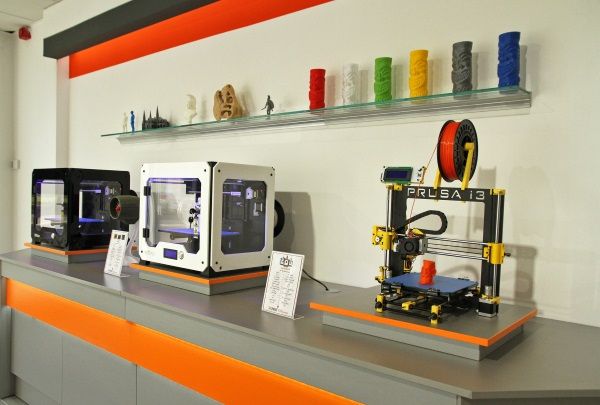
MAKE YOUR CREATIVE IDEAS
Creative Park
Use hundreds of free craft templates for your family.
CALLING ALL CREATORS
#FreeYourStory
Your creativity is our source of inspiration. Tell your story.
READY TO HELP
Help & Support
We're here to answer your questions, help with problems and tell you where the nearest service is if you need a repair service.
Support Contact us Repair New ads
Sending
are inspired - Register
Get special proposals, studying materials, as well as news and invitations to your Canon in your city.
If you see this message, you are browsing the Canon website using a search engine that blocks non-essential cookies. Only essential (functional) cookies will be used on your device.