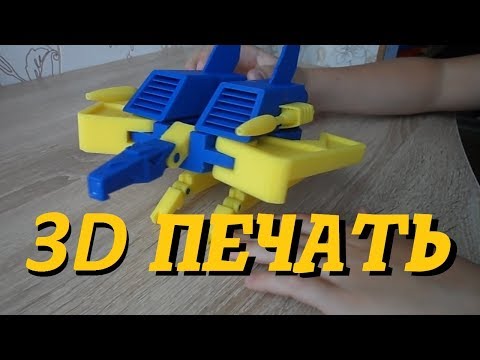
Galton board 3d print
Free STL file Configurable Galton Board・3D printing design to download・Cults
Add to ?Creation quality: 5.0/5 (1 votevotes)
Evaluation of members on the printability, utility, level of detail, etc.
- 👁 4.1k views
- ♥ 4 likes
- 70 downloads
- 0 comments
- 0 makes
3D model description
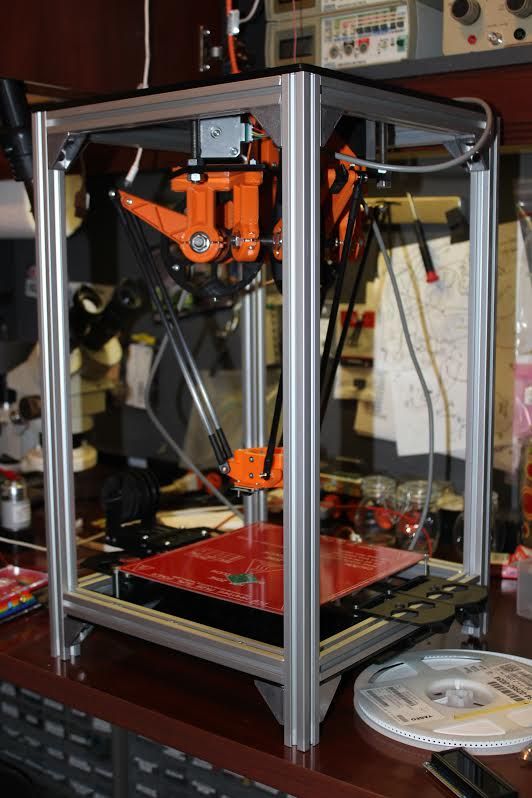
This is a device for performing statistical experiments.
Here's a video of the operation: http://youtu.be/0tp26ChmDxA
Have fun while learning about combinatorics, Pascal's triangle, probability, and the binomial distribution.
Balls are poured into the funnel and allowed to fall and collide into pegs along their journey. Ideally when a ball hits a peg head-on it has a 1/2 chance of going left or right until it finally falls into one of the bins.
The number of paths to each bin is given by C( N, x ).
N is number of rows of pegs (including the top edge of the bins) and x takes values from 0 to N (say 0 is the leftmost bin and N is the rightmost).
There is a triangle overlay that shows all of these numbers and the number of paths through each intermediate peg. This also happens to be Pascal's triangle. You can lay the overlay right over the pegs but take it off when performing experiments.
This particular Galton board will allow you to adjust N anywhere from 1 to 8 and so you can run experiments with as little as 2 bins or up to 9 bins.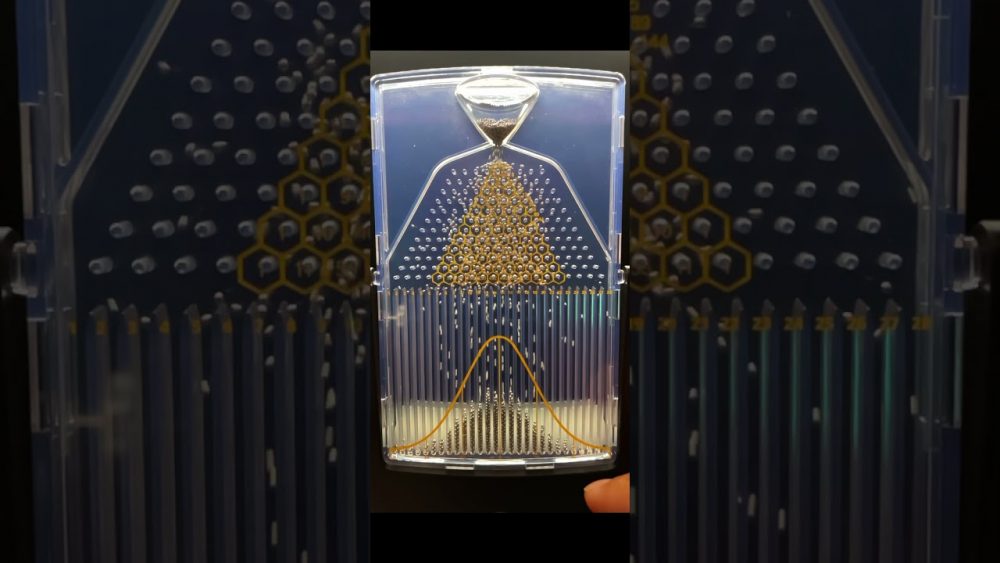 This is done by plugging the funnel into the corresponding holes aligned above the triangle of pegs.
Ideally and over the long run the number of balls in each bin will follow the binomial distribution.
3D printing settings
This device was printed on a MakerBot Replicator 2 using PLA.
No extra parts or gluing are required.
I scaled the parts by a factor of %800. That is about a large as you can go and still fit within the print volume.
If you go smaller, you probably want to find some ball bearings instead of printing the plastic balls which are so light they tend to speed up and bounce a little to much.
In fact the device will work better with heavier balls even at full size.
Build instructions:
1) Board: Print the board using rafts to try to minimize warping. Standard 0.20 mm resolution is fine (and you won't want to wait any longer).
2) Pegs: Rotate the pegs so that they lie with the flat portion on the build plate.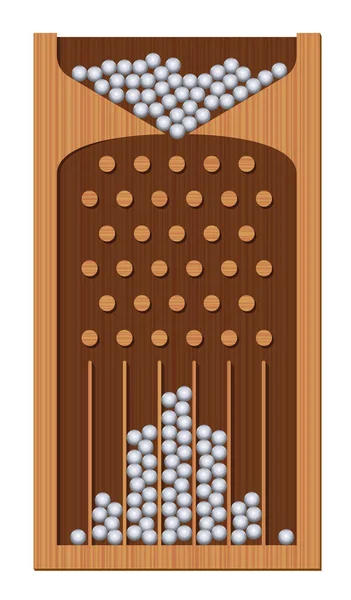 You will need to print 28 of them. I used 0.10 mm resolution.
3) Funnel: Print the funnel upside down with the mouth of the cone on the build platform. 0.20 mm will work. No rafts, no supports required.
4) Balls: Print as many as you can! You will need to use rafts but no supports are required. Print at 0.10 resolution. IMPORTANT: make them as dense as possible. I used an infill of 75% but I would recommend 100% if you can.
5) Triangle Overlay: I printed this using rafts and at 0.15 mm resolution.
Assembly:
Assembling the board is easy. Simply insert the 28 pegs into the 28 square holes that form the triangle. Leave the upper two pairs of holes empty. Those are for positioning the funnel for different experiments. The pegs actually have a slightly rounded side. Try to face that side forward.
Important tip: Make sure the holes for the funnel tabs are not too tight so you don't break the tabs as you are putting the funnel in or out. You may want to sand down the funnel tabs slightly.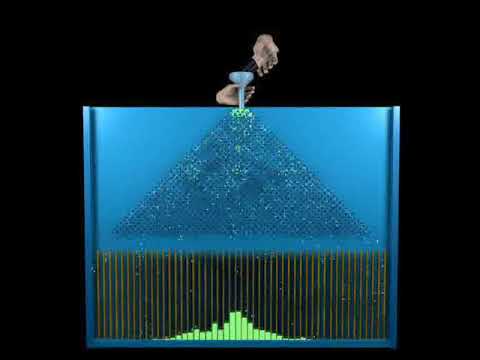
Usage:
Plug in your funnel and drop (or pour) the balls in and what them fall into the bins making some turns along the way.
The board is already tilted but you may have to play with the tilt of the board some more. I find that tilting it up another 10 degrees or so makes it work quite well.
The leftmost and lowest position of the funnel corresponds to N = 1 and the balls should only fall in the two bins below. The very top position corresponds to N = 8.
When not running experiments, you can leave the triangle overlay on the board to remind people of the combinations.
Enjoy!
3D printer file information
- 3D design format: STL Folder details Close
- ball.stl
- board.stl
- funnel.
 stl
stl - peg.stl
- triangle_overlay.stl
Learn more about the formats
- Publication date: 2018-12-04 at 15:19
License
CCBYSA
Tags
Creator
Designs 50
Downloads 8.8k
Followers 69
Contact
The Classic Batmobile
Free
Jupiter 2 from Lost in Space
Free
Stormtrooper Valve Cap
Free
Metropolis Robot (Maria) with Rings
Free
Spiral Sphere Ornament - Customizer enabled
Free
Metropolis Robot (Maria)
Free
B9 from Lost in Space
Free
1959 Cadillac
Free
Best 3D printer files of the Various category
MATE PELOTA DE FUTBOL
Free
Information signs - informační cedule COVID-19
Free
Rock Climbing/ Bouldering Holds
Free
Vary Form Garment Ruler
Free
EPIC 3D Printed RC Race Car
Free
Deactivated
Golf Ball - Full & Sliced
Free
Flexi Amblypygi print in place.
€2.20
Best sellers of the category Various
Gnome Yeah ( Supportless )
€2.49 -20% €1.99
CHRISTMAS TREE v2
€1.50
ItsLitho "Swirl" personalized lithophane Christmas ball
€1.90
Gyarados - Articulated Seasnake
€1.50
THING Addams
€8.65
Middle Finger Keyholder
€1
flexi snail
€2
RS-X-Bow "Government - 1911" style
€6.25
The Predator Inspired Movable Mask
€6. 20
20
Christmas Stitch
€1.25
Christmas Park
€4.64
ItsLitho "Pure" personalized lithophane Christmas ball
€1.90
Gengar - Flexi Articulated Pokémon (print in place, no supports)
€2
Christmas House
€6.97
MMPR Dragon Dagger
€4.80
ItsLitho "Creamy" personalized lithophane Christmas ball
€1.90
Would you like to support Cults?
You like Cults and you want to help us continue the adventure independently? Please note that we are a small team of 3 people, therefore it is very simple to support us to maintain the activity and create future developments.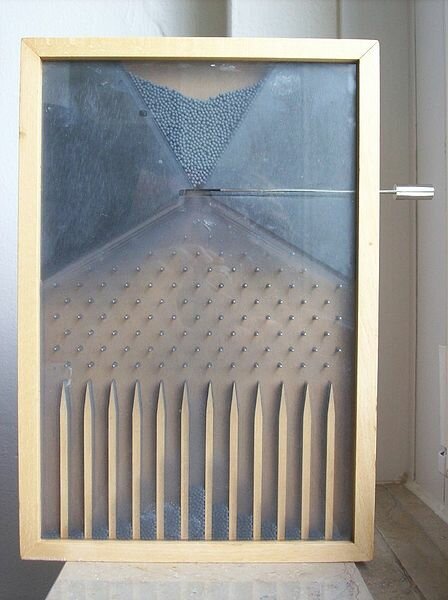 Here are 4 solutions accessible to all:
ADVERTISING: Disable your AdBlock banner blocker and click on our banner ads.
AFFILIATION: Make your purchases online by clicking on our affiliate links here Amazon.
DONATE: If you want, you can make a donation via PayPal.
WORD OF MOUTH: Invite your friends to come, discover the platform and the magnificent 3D files shared by the community!
▷ galton board 3d models 【 STLFinder 】
Galton Board
grabcad
My 1st work at Inventor, Galton Board
GALTON BOARD
grabcad
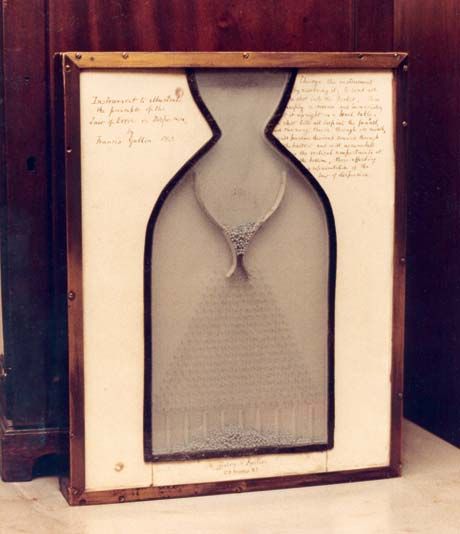
Design proposal of a Galton Board for 3D printing. It was invented by F. ...Galton (1822-1911) to demostrate the central limit theorem.
Galton Board
prusaprinters
The Galton board, also known as the Galton box or quincunx or bean machine, is a device invented by Sir Francis Galton. The Galton board consists of a vertical board with interleaved rows of pegs. Beads are dropped from the top and, when the...
galton board double 2018
grabcad
galton board for wetropolis. ...steel balls drop along the random path and pass through breakbeam sensor.
Accessible Galton Board
thingiverse
Galton board accessible to visually impaired students.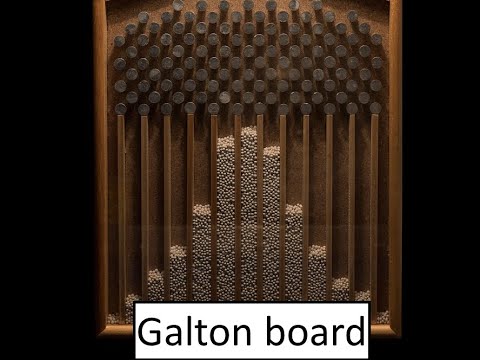 Demonstrates binomial and normal distributions. ...
galton board nov 2016
grabcad
This repo contains the 3D models for building the galton board.More info: O.Bokhove, univ of Leeds, http://www1.maths.leeds.ac.uk/~obokhove/more info also on github: code, bill of materials, wiki, description...
Quincunx or Galton board
thingiverse
Quincunx or Galton board ==================== This is the adaption of a [Galton Board](https://en.wikipedia.org/wiki/Bean_machine), in order to show how a normal distribution works in reality with a simple lab exercise. ### Build it In order to...
Configurable Galton Board
cults3d
This particular Galton board will allow you to adjust N anywhere from 1 to 8 and so you can run experiments with as little as 2 bins or up to 9 bins. This is done by plugging the funnel into the corresponding holes aligned above the triangle of...
Configurable Galton Board
thingiverse
This particular Galton board will allow you to adjust N anywhere from 1 to 8 and so you can run experiments with as little as 2 bins or up to 9 bins. This is done by plugging the funnel into the corresponding holes aligned above the triangle of...
Galton Board - Planche de Galton
thingiverse
Liste du matériel : - planche de bois mdf ou autre, 3mm - planche de plastique acrylique - billes de métal 0.5mm - 3 pinces à linge Plus d'informations sur l'expérience de la Planche de Galton : https://fr. wikipedia.org/wiki/Planche_de_Galton...
Galton board bean machine
thingiverse
The bean machine, also known as the quincunx or Galton box, is a device invented by Sir Francis Galton to demonstrate the central limit theorem, in particular that the normal distribution is approximate to the binomial distribution. The machine...
Braided Galton Board - Bell Curve Demonstration
thingiverse
... I made previously, which should be much easier for people to put together. ... Details here: tinkerings.org/2018/11/01/improved-braided-galton-board/ and assembly instructions here: http://tinkerings. org/2018/11/01/making-the-braided-galton-board/
Plinko (Galton Board, Binomial Distribution, Bernoulli Trials)
cults3d
Plinko (Galton Board, Binomial Distribution, Bernoulli Trials) The Plinko Game, also known as a Galton Board, is a fascinating tool for students to experience and think about the laws of probability. For example, if you toss four fair coins, what...
Braided Galton Board - Probabilities with String
thingiverse
The Galton board is a standard way to show this with falling balls. However instead we use string, and have each possible path represented with one thread, and we can see at a glance which locations are probable.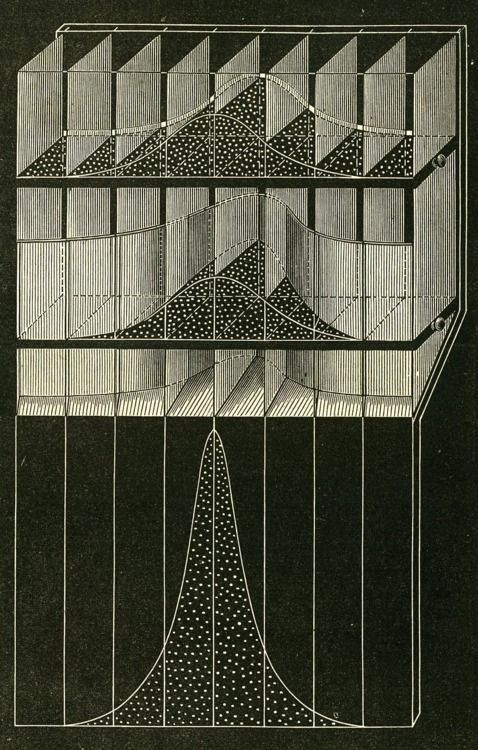 The dowels are 12.5mm. I just...
Plinko (Galton Board, Binomial Distribution, Bernoulli Trials)
thingiverse
####Plinko (Galton Board, Binomial Distribution, Bernoulli Trials, Bean Machine) ##### Update: Added a new version with bigger and stronger pins (dia = 6 mm). The Plinko Game, also known as a Galton Board, is a fascinating tool for students to...
Mini and Medium Plinko (Galton Board, Binomial Distribution, Bernoulli Trials)
thingiverse
Mini and Medium-Sized Plinko Boards, Using Marbles of up to 16mm in diameter.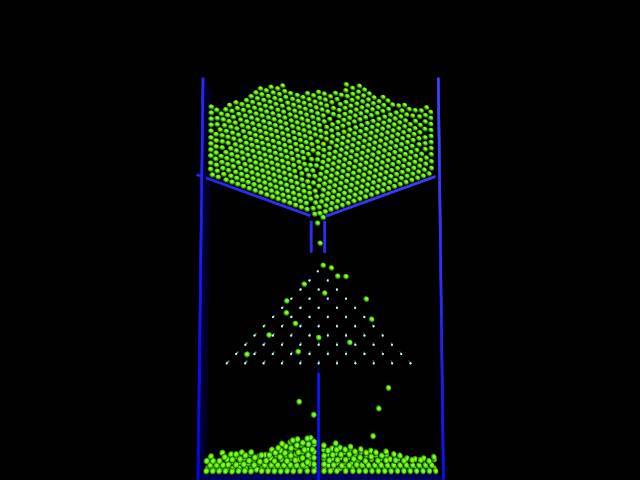 Two layers and three layers, designed for students to develop insight into the plinko binomial distribution in a differentiated way.
In the case of a two-layer...
Two layers and three layers, designed for students to develop insight into the plinko binomial distribution in a differentiated way.
In the case of a two-layer...
Plinko with Replaceable Pins/Pegs (Galton Board, Binomial Distribution, Bean Machinese)
cults3d
####Plinko Board with Replaceable Pins/Pegs (Galton Board, Binomial Distribution, Bean Machinese) This is an extended version of my previous Plinko Board design. The pins/pegs are now replaceable. Please use marbles less than 16 mm in diameter.
Plinko with Replaceable Pins/Pegs (Galton Board, Binomial Distribution, Bean Machinese)
thingiverse
####Plinko Board with Replaceable Pins/Pegs (Galton Board, Binomial Distribution, Bean Machinese) This is an extended version of my previous Plinko Board design. The pins/pegs are now replaceable. Please use marbles less than 16 mm in diameter.
Galton Bord
prusaprinters
Especially developed to teach Scientific Methodology in our University. To show the concept of the Galton Board, in the sense of the order generated by a big sample, I recommend this one: FOUR PINES PUBLISHING, INC. ...Galton Board...
MAQUINA DE GALTON 1
thingiverse
Esta es la primera parte de maquina de Galton.
Galton Peelmesh3
sketchfab
No description provided.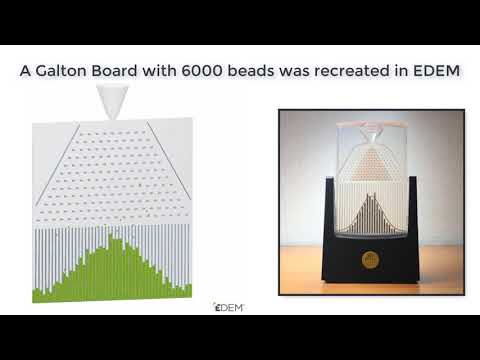
Board
grabcad
Board
board
grabcad
board
board
grabcad
board
Board
sketchfab
Board 8k
Board
grabcad
Board something like a electonic board
Board
grabcad
Board by AutoCAD
board
grabcad
board for office etc
Board
grabcad
Triho controller board
Board
sketchfab
Board 3D model.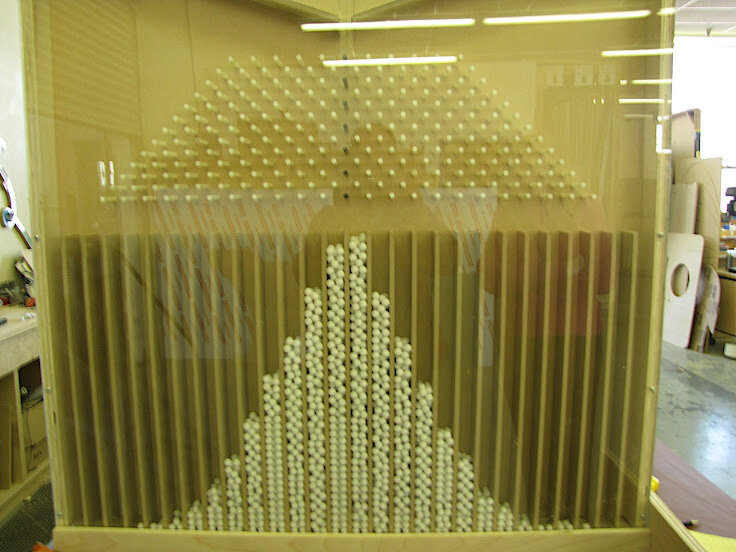 ...Poly: 6 Vertex: 8 in subdivision level 0 2480x2480 JPGTexture Include Diffuse and Normal
3D printing of wax rings on an FDM printer for subsequent casting from metal
There was a need to print a wax ring to demonstrate to jewelers that it is generally possible to do it qualitatively on an FDM printer.
The only Russian-made Wax3D wax known to us from Filamentarno was chosen for printing!
A fairly complex 3D model of the ring was found on Thingiverse.com by MakeALot. You can download it here https://www.thingiverse.com/thing:7354
In general, this is a bracelet that turns into a ring if the model is reduced to the desired size.
By the way, there is a source file in OpenScad format that you can edit and make your own original ring if you want to deal with the code.
Here you can see the code that generates this 3D model. By changing the parameters, you can change the shape or remake the model in your own way, adding new commands.
Immediately to the question - is it possible to print large wax products on an FDM printer? Yes, we have already posted some results here:
https://3dtoday.ru/we-print/bolt-iz-voska
https://3dtoday.ru/we-print/patrubok-iz-voska
While printing small wax products, we have encountered various problems and share with readers interesting notes on how to solve them, as well as some important settings that can fit any 3D printer.
We reduced the bracelet/ring model itself to a diameter of 21 mm - just like a regular ring. Therefore, the vertical elements turned out to be very small with a minimum thickness of only 0.9mm!
It was necessary to accurately select the wax printing temperature with an accuracy of +-2 degrees.
It is possible to print from a temperature of 95°C, but in this case the wax coming out of the nozzle will be thick and small vertical elements will sway during printing, being carried along by the nozzle, because they are also soft, which will lead to a sharp deterioration in print quality.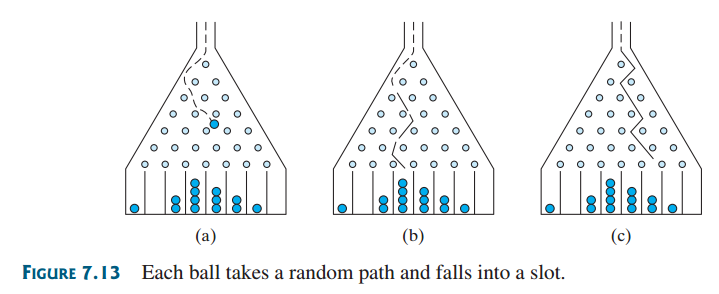
Our ring just had a lot of vertical elements that should be printed perfectly. Therefore, we have chosen the optimal temperature of 105°C, when the melted wax comes out easily, but not so much that it leaks from the nozzle. If you raise the temperature above - up to 110 ° C, then thin hairs of wax will begin to appear on the part, which will worsen its appearance and require additional time for its processing.
Another problem was that a lot of vertical elements had to be printed with feed back (retract). It turned out that the usual retract with raising the nozzle to a certain height of this ring is contraindicated, because drastically degrades print quality. Therefore, we left only the rollback of the bar itself to a minimum length of 0.1 mm to 0.5 mm without raising the nozzle.
Some settings in Cura 3D preparation software.
Printed with 0.5mm nozzle, 0.1 and 0.04mm layer.
As you know, in FDM printing, the optimal layer thickness is 2/3 of the nozzle diameter, which means that a layer of about 0. 3 mm should be used. If you make the layer thinner, then various artifacts may appear.
If you want a thin layer to improve print quality, it is usually recommended to change the nozzle to another, smaller diameter. Naturally, this also increases the printing time. We had such a nozzle with a diameter of 0.25 mm. But, since we wanted to print faster, we decided to start printing from a diameter of 0.5 mm, and at the same time see what the quality would be.
So, the results of printing the ring with wax.
Printing with 0.5 mm nozzle, 0.1 mm layer.
The result is far from perfect.
Decrease the height of the layer. Printing with a nozzle with a diameter of 0.5 mm, a layer of 0.04 mm.
The surface quality has improved, but there are artifacts that spoil the whole result.
Artifacts appear due to too thin a layer for this nozzle diameter. Please note that the entire ring consists of many inclined elements. The slopes are the most problematic.
Change to a smaller diameter nozzle 0.25 mm, layer 0.1 mm.
Surface quality improved, but small artifacts still present. In places where the nozzle moves from place to place, a small influx remains, which turns into a vertical seam. There are a huge number of such transitions, and by changing the settings for the seams, you can improve the quality of the print.
Changing the settings for seams in the slicer.
Nozzle Ø 0.25 mm, layer 0.1 mm.
Excellent result!
Yes, wax with complex geometries can be printed with a 0.25 mm nozzle, 0.1 mm layer with very good quality.
Unfortunately, with a further decrease in the layer height to 0.04 mm, the number of artifacts increases sharply for this complex model.
Therefore, we took another simpler model of the ring, where there are no separate and strongly inclined elements.
Model from the Printables resource of the author 3D_CNC. You can download it here https://www. printables.com/model/133544-knurl-ring-multiple-sizes-f3d-file
Printing nozzle 0.25 mm, layer 0.04 mm.
This is the result!
Such a thin layer of 0.04 mm gives maximum surface quality.
It is almost impossible to see the layers by eye.
Of course, FDM wax 3D printing will not replace photoresin printers for jewelers, but there are sure to be many not too complex shapes that can be printed in the way we have demonstrated.
If it seemed to you that printing with wax on an FDM 3D printer is easy, then this is not entirely true. It took a lot of rings to be printed until the ideal printing parameters were selected. But now, these parameters can be applied to all rings of any configuration, getting the same quality.
Also, if your printer can't print with soft materials, it won't work with wax either.
We used a Faberant Cube 3D printer for wax printing.
P.S.
Let's immediately answer the question that often arises - we know nothing about the use of this wax for making candles.
The purpose of this wax is 3D printing of master models for the subsequent manufacture of metal products by casting metals on lost wax models. You can look how it looks on the Filamentarno wax manufacturer's website!
Free STL file Configurable Galton Board・3D printing design to download・Cults
The Classic Batmobile
Free
Jupiter 2 from Lost in Space
Free
Stormtrooper Valve Cap
Free
Metropolis Robot (Maria) with Rings
Free
Spiral Sphere Ornament - Customizer enabled
Free
Metropolis Robot (Maria)
Free
B9 from Lost in Space
Free
1959 Cadillac
Free
Best 3D Printer Files in the Miscellaneous Category
Cateye composite water bottle cage offset mounts
Free
12mm and 15mm MAXLE thru-axle holder
Free
Coronavirus, optimized HI-RES (COVID-19)
Free
Thick dog collar
1,25 €
My little shiba
Free
BA-3/6 Armored Car 1:16 RC Tank WPL
Free
Plane
Free
Bestsellers in Miscellaneous category
Giarados - articulated sea serpent
1,50 €
Chainsaw Man - Denji
€18. -fifty% 9.03 €  06
06
Gnome Yes (No support)
€2.49 -twenty% 1.99 €
ItsLitho "Creamy" personalized Lithophane Christmas ball
1,90 €
World Cup chopper - picador copa del mundo
5.67 €
3 €
Christmas stitch
1.25 €
Predator-inspired movable mask
6,20 €
Christmas Park
4.65 €
Gengar - pokemon with flexible articulation (seal in place, without supports)
2 €
Mickey Christmas night light Litophane
3,50 €
Adderini - 3D printed repeating slingbow / crossbow pistol
12. 50 €
50 €
4th planet Fighting pre-Olympic god
12 €
Embroidering a biting star for a Christmas tree
1,70 €
ItsLitho "Drop" personalized lithophane Christmas ball
1,90 €
Key holder for middle finger
1 €
Do you want to support Cults?
Do you like Cults and want to help us continue our journey on our own ? Please note that we are a small team of 3 people, so supporting us in maintaining activities and creating future developments is very easy. Here are 4 solutions available to everyone:
-
AD: Disable your AdBlock banner blocker and click on our banner ads.
-
AFFILIATION: Shop online with our affiliate links here Amazon.
Learn more