3D printed air intake
Printing an intake for my car - Materials - Talk Manufacturing
juanmedina
#1
I been playing with the idea of making a 3d printed intake for my car. So far I finished with the design and printed a test fit piece in PLA. Now is time to pick a material that can take the under hood temperatures. Under hood temperature under heavy load will be around 210-220F. What do you guys suggest to print the final intake? Someone suggested Nylon. I did some research and Nylon 66 or PE 66 is used extensively in intake manifolds but I do t think is the same exact material that we can 3d print.
2 Likes
SOC3D
#2
Polycarbonate or high temp nylon. Are you sure that temp range is correct for under the hood on the intake? I have no idea it just seems high to me.
1 Like
Enza3D
#3
Polycarbonate is probably the most heat-resistant filament that can be printed on consumer printers; it prints at a little more than 300degC, but it may start getting soft at lower temps and I don’t think it would last as long as you’d like it to.
You could consider making a mold with the PLA print, and just casting the manifold with a resin specifically designed for this application (or any high temperature resin really). It’s more work on your end, but the end result will be very nice. This may not be the best option if you have no experience with casting though; it’s not hard but will take a bit of learning to get to work nicely.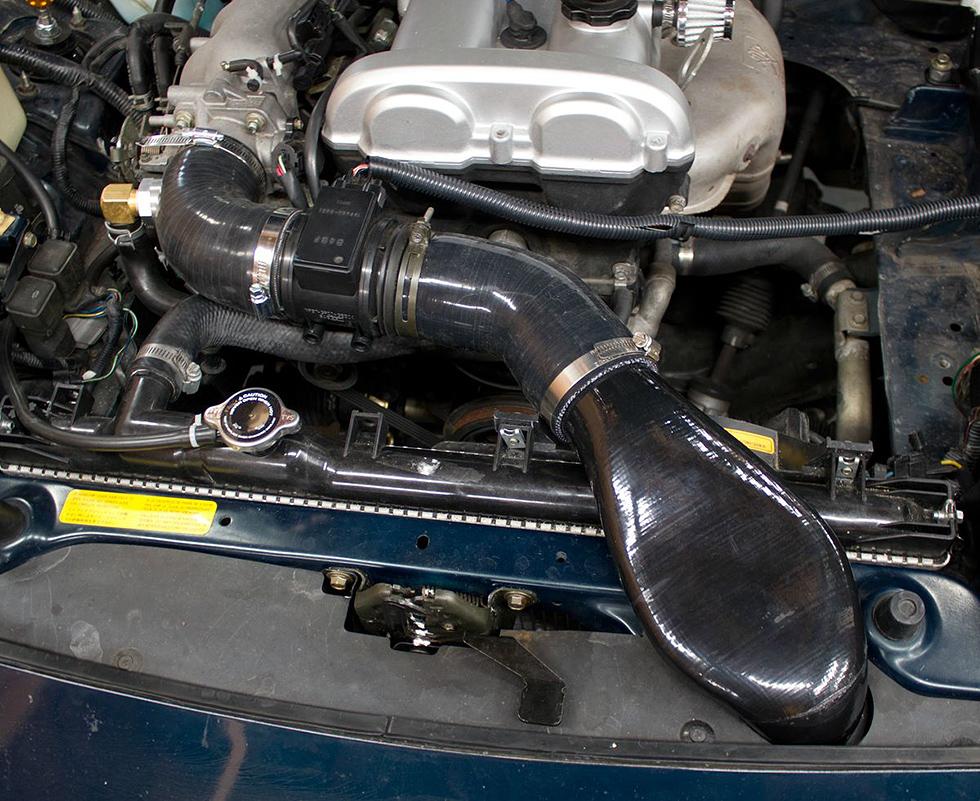
juanmedina
#4
Sorry I put Celsius by mistake. The temperature range is 210-220 Fahrenheit. Which high temp nylon are you suggesting?
ColorFabb
#5
Nice looking part! Our HT material might just be enough for your application, with a temperature resistance of about 100/110C. We’ve helped a guy 3D print inlet manifolds which he has used on a Mini Cooper.
best,
Gijs
1 Like
juanmedina
#6
Thanks! I been looking at your filament and I am wondering how food is at taking vibration and repeated heat cycles?
3DPrintingBeast
#7
You could you matterhackers PC or Polycarbonate.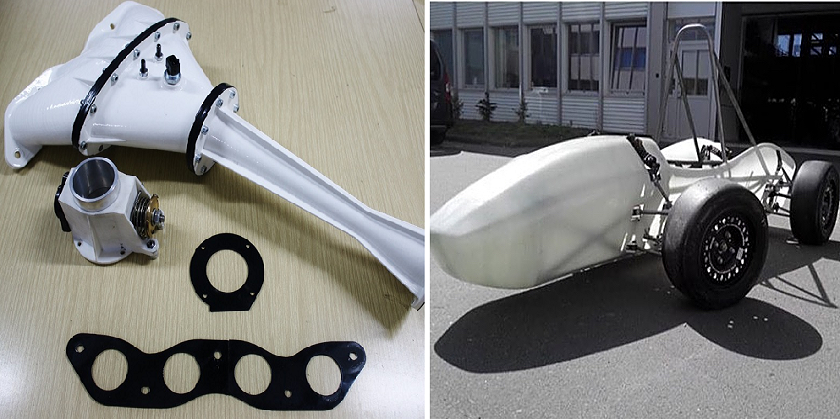 You put Fahrenheit.
peakadditive
#8
There are not too many Thermoset resins that can take that kind of heat. Thermoplastics are the way to go.
peakadditive
#9
Honestly, PC or Nylon are your best bet for a prosumer machine. If you want something that will last spend the money and get your part made out of ULTEM 1010. I know a few guys that use this under their Corvette and it works like a charm.
-Peak Additive
ColorFabb
#10
How big is this part? We might have some time for a test print…
juanmedina
#11
The elbow is not that big.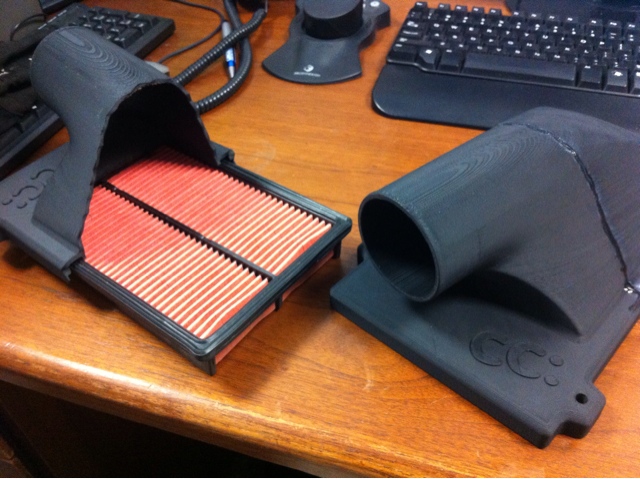 I don’t have the model with me right now but if I remember correctly It is about 11" on the long side, on the short side is about 6" and the diameter is 3.25" OD. I will verify the dimensions when I get home. Let me know if you want me send you the STL file.
Thanks
juanmedina
#12
The dimension are actually 9" x 5" with a 3.25" OD.
ColorFabb
#13
STL file would be great!
best,
Gijs
juanmedina
#14
…
juanmedina
#15
Here is the STL file.
Thanks
Elbow for ColorFabb.STL (34.5 MB)
ColorFabb
#16
Thanks! It’s a little tall for the standard UM2, so I’ve split the part. Let you know how it progresses.
best,
Gijs
juanmedina
#17
Awesome thanks for the update. I am going to Atlanta Motorsports Park on August the 27th. Maybe the part can see some real world testing :).
HongNorrRacing
#18
Hi Juan,
Stumbled on this thread. FYI, we have a garage at AMP, 3D printer, and Solid Works. Please email me at [email protected] if we can help in any way, or swing by the garage next time you’re at the track (HONG NORR - a couple doors down from Discovery)
Mike
This is how I made my 3D printed cold air intake (CAI) – Karture
How did I make my own custom 3D printed cold air intake? It’s one of the many questions I still get on Instagram. I’ve written this blog post in order to answer your questions. It will tell you all about the process I went through and also give some background info on my thoughts and ideas.
To start at the beginning: why use a 3D printer? Well, I have always been fascinated by 3D printers. In my work field, we’ve used quite a lot of 3D printing, mainly for prototypes. As I wanted to learn more about 3D printing myself, I eventually bought my own 3D printer. It was a cheap, Chinese 3D printer, which I’ve modified to meet my personal needs. After a lot of fiddling, I started to produce really nice prints. It was interesting to do the whole process myself, instead of just ordering 3D prints for different prototypes. So to everyone who wants to get involved into 3D printing: I would recommend to buy your own.
The next step: find a part to 3D print and use as a functional part within the car. As I have an mx5 and I’ve also never liked the intakes on an mx5 from a visual point of view, my choice was easy. Also, the previous owner of my car badly attached an aftermarket air filter. This sucked a lot of hot air inside the engine. Not the prettiest/best solution, so I decided to design my own intake and move it to the cold side of the engine bay. I didn’t care much about losing or gaining some performance.
The first thing I did, was finding my old Xbox Kinekt 3D scanner to scan the area in the engine bay. These 3D scans are really rough but good enough to check the packaging. I used Geomagic to convert the scan data to surfaces and loaded it into Solidworks, where I started designing the intake. I incorporated the temperature sensor and the oil breather hose connection.
The fun part starts: I printed the first prototype. The material I used, was NylonX. This is a nylon filament with added micro-carbon fibers. At the time, it was a filament with the highest temperature resistance, which could cope with oil and petrol.
It came out quite nicely. The only thing I don’t like about FDM (Fused Deposition Modeling) printing are the supports. It takes a lot of time to remove them nicely and clean the surface. However, after a lot of cleaning and sanding the parts did look OK.
Quickly, I came to the conclusion that the intake couldn’t withstand the forces needed to clamp the tubing. I’ve redesigned the intake and made a small pocket on every end. In the small pocket, I added a piece of aluminium tubing, which I turned down in the lathe. This way, I didn’t have any problems with the clamping force. I glued the inserts with Plexus MA 310, a methacrylate glue that – as they say – will glue aluminium and nylon together. This solved the problem; clamping the tubing was no issue anymore.
The second problem I had was that I’d noticed that the intake was shrinking over time. I knew the nylon filament is known for attracting moisture. This is the reason why I always store the filament dry and closed, and bake the filament before usage. I adjusted the printing process and tried a couple of more prototypes.
The next redesign: better…. but what was wrong?The next prototypes that came out of the printer looked great but over time, they started to shrink again. This also started to become a problem with the aluminium insert, because as you can imagine, the aluminium insert doesn’t shrink over time. This resulted in delamination of the printed intake.
At the same time, I started to make use of SLS (selective laser sintering) printing at work.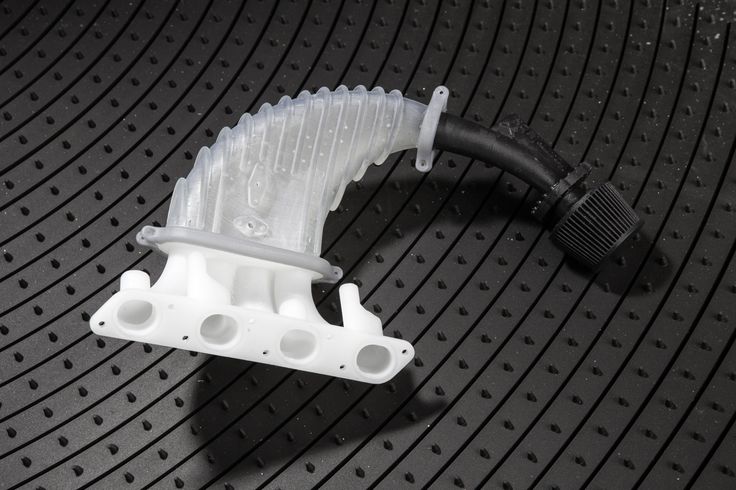 The parts that came out here were amazing, especially the surface finish element. Moreover, the work I’d put into every FDM prototype – to clean up the supports – started to get annoying.
So I realized that SLS printing has some other advantages as well in comparison to FDM printing. For instance, the dimension control is a lot better and SLS printing works with a laser. This means there can’t be any moisture trapped in the 3D printed part. As a result, I ordered an SLS printed intake, glued the aluminium inserts in place, painted it black and put the intake on the car again. The results were amazing.
In the picture below, you’ll see two FDM prototypes (left) and the SLS printed part (right). You can clearly see the size difference due to shrinkage of the FDM printed parts over time.
The result.I’m really happy with the SLS printed intake. It’s on my car now for more than 2 years, without any problems: no shrinkage, no delamination and it looks a lot better than any FDM print I have ever seen.
Performance wise, I don’t feel there’s any difference compared to stock. It only sounds and looks a lot better. As I’m not the first one who moved the intake to the other side, there are some opinions. Some guys say they’ve lost some performance in the low RPM range and gained some in the high RPM range. It looks like this is the case, but maybe I was biased already by reading the experience of others. The difference is marginal.
But let’s be honest: that’s not the point of designing my own 3D printed intake. I just wanted to look if it was possible to print it myself and learn from the process. If I would gain some extra power, that’s nice. If I would lose some power, I’ve learned a lot during the process.
I hope this will clarify most of the questions about my project. Do let me know if you enjoyed reading my first real blog post and also, if you have any questions left: please send a message below or on Instagram.
Jules
STL file Hood air intake・3D printer design download・Cults
Engine scale model stand
4. 61 €
Grille Chevrolet c10 1962
4.61 €
3d printed turbocharger for scale models
4.61 €
Carburettor replacement for monogram 9 kits0004
3.69 €
Prairie wagon STL for 3d printing on resin
7.37 €
Chevy small-block with Hilborn and standard intake manifold
9.22 €
Classic air cleaners for building models
3.69 €
Ford 60s Radiator 3D Printing with Cap and Fan
5.53 €
Best 3D Printer Files in the Miscellaneous Category
trash can piggy bank
Free
Benoît Hamon
Free
SpaceX Falcon Heavy Multi Parts/Colors
Free
Label holder - Panneau d'Affichage
Free
Ford Mustang GT500 1967 (RC CAR)
15 €
Roof for bird house
Free
Female Valentines Duck
Free
Save Ears
Free
Bestsellers in Miscellaneous category nine0037
Adderini - 3D printed repeating slingbow / crossbow pistol
12. 50 €
Gengar pen holder
1,50 €
5 gnomes (without support)
2.49 €
Haslab Ghostbusters Proton Pack Ion Arm Box
5.69 €
nine0003 Airsoft electronic speed loader2.02 €
Articulated Gyarados
1.99 €
Charizard - pokemon with flexible articulation (seal in place, without supports)
3 €
Articulated Onyx
1,50 €
TRX4M Flex Blades
1.15 €
STREET BUGGY COMPLETE SET 1/24
14.74 €
Wednesday Addams - Merlina Addams - Funko Pop
2. 47 €
flexible volute
2 €
Grabis - caricature of the Czech prime minister
€5.41 -50% 2.70€
Polestar 2 cup holder
5.56 €
PS5 Horizontal stand
2 €
SlingHAMMER - repeating crossbow pistol for steel balls 6mm 8mm 10mm or 12mm
12.50 €
Do you want to support Cults?
Do you like Cults and want to help us continue our journey on our own ? Please note that we are a small team of 3 people, so it is very easy to support us in maintaining activities and creating future developments. Here are 4 solutions available to everyone:
-
ADVERTISING: Disable the AdBlock banner blocker and click on our banner ads.
-
AFFILIATION: Shop online with our affiliate links here Amazon. nine0006
-
DONATIONS: If you want, you can donate via PayPal here.
-
* INVITE FRIENDS: * Invite your friends, discover the platform and great 3D files shared by the community!
ABS 3D Printer - D600 series - CreatBot
Add to Favorites
Add to Compare
More information on the CreatBot 9 website0184
Features
- Printing Materials
- ABS, PLA, Nylon®, PETG, TPU, HIPS, CFRP, PC, Wood
- Technology
- FDM
- Application
- Aerospace, Aerospace, Aerospace,
-
- prototyping
- Other features
- high performance, high speed
- Stroke X
-
600 mm (24 in)
- Stroke Y
-
600 mm (24 in)
- Stroke Z
-
600 mm (24 in)
Description
MOST ADVANCED BIG-SCALE INDUSTRIAL 3D PRINTER D600 has been established since 2016, its fully enclosed printing volume of 600*600*600mm is able to make the industrial prototype of large size objects as easy as possible. We update it twice a year with the most advanced CreatBot technology. If you want to print large models with PLA, ABS, PETG, carbon fiber, the D600 will be fine. The D600 Pro version was deeply developed in 2018, it is able to 3D print large-sized objects with high-performance material directly for industrial applications. In addition to D600 materials, the mixing capabilities of carbon fibers, nylon, PC, etc. have been expanded. If you are looking for a very professional large format industrial 3D printer, the D600 Pro will be your best choice. The D600/Pro excels in the automotive or aerospace industry, as well as in art design, product design, cultural relic reproduction or concept modeling. It enables large-scale production of additives at a more affordable level for prototyping or engineering. CreatBot D600 Pro 3D printed high temperature air intake. Alloy nylon Bruce Warren apparently wasn't happy to set a world record one day, so today he broke his own record in his Cadillac CTS-V.