
3D print woodworking
3D Printing for Digital Woodworkers
We may receive a commission when you use our affiliate links. However, this does not impact our recommendations.
Custom 3D printed sanding blocks and clamping cauls. While teaching a class building his Greene and Greene themed game table, furniture maker Darrell Peart’s student, Kevin Harris, printed out these custom profile blocks to make sanding and clamping the ogee shape easier.
Digital woodworkers who use CNCs may not be aware that there are other digital tools they can use. Maybe even some you haven’t considered before. This is because digital tools all need CAD drawings. It’s another bonus you get for learning CAD. Often, these are the same or similar to the CAD drawings you create for woodworking projects. Laser cutters, digital metal cutting tools like plasma cutters and water jet cutters, use 2D CAD or drawing files. 3D printers use 3D CAD drawings to print three-dimensional objects. These are the same 3D files CNCs use for three-dimensional carving.
I agree. 3D printers and woodworking seem like an odd combination. Starting with the obvious, woodworkers make things out of wood and 3D printers make things out of plastic but as I’ve found out, you can make useful things with a printer. For example, after only a short time, I now regularly create CNC clamps, jig and fixture parts, new router templates and design, create and/or prototype new shop, CNC and equipment upgrades using 3D printers. A surprising use for me is that I’m now prototyping many of my wood and GFRC concrete sculpture projects with 3D printers. And, recently I’ve begun to experiment with 3D printed furniture joinery components.
3D printers are different
3D printing is quite different than the processes we use in a woodworking shop. All woodworking in a subtractive process. That is, we take wood off. Woodworkers remove wood by cutting, carving, routing, bending and shaping. 3D printing is an additive process in that to make something, material is added.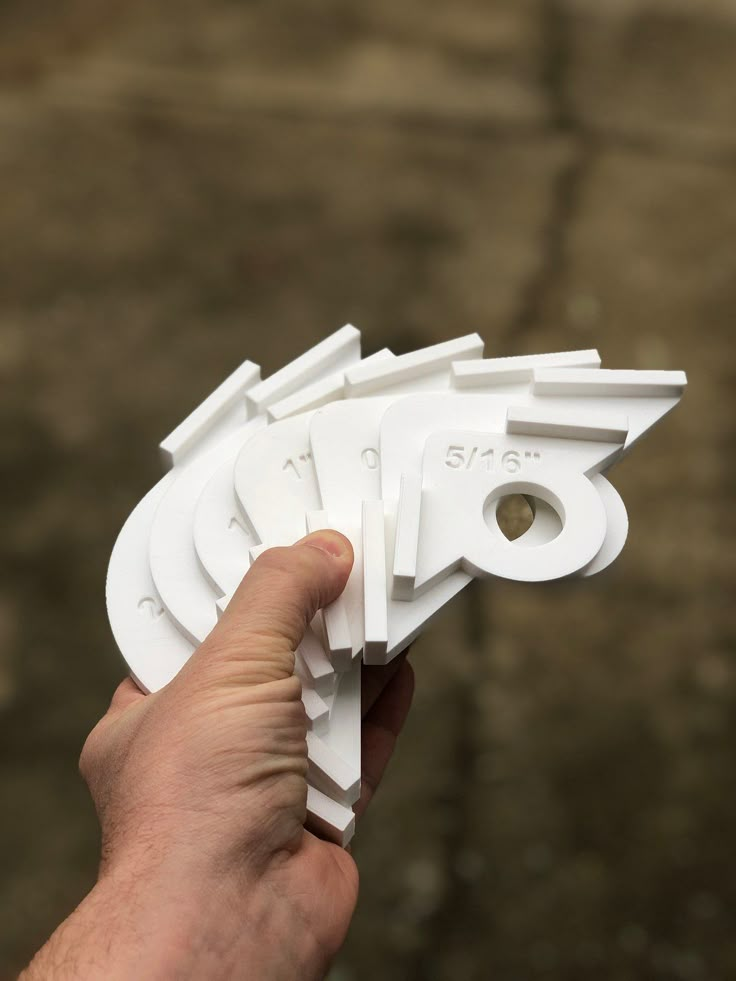 The most common 3D printing process is called Fusion Deposition Modeling (FDM). Polymers in the form of wire-like filament rolled onto spools is melted and deposited in layers until the 3D object is complete.
Where woodworking processes work great is for making relatively large things: furniture, cabinetry, etc. 3D printing excels in ways woodworking can’t: small-scale, detailed, highly accurate objects made out of a consistent material. This difference makes 3D printing a complementary process for making things that can’t easily be made out of wood. Small objects and components with a utility or functional use around the shop are a good example. And, because the printing process is “hands-off” rather than “hands-on” like woodworking, it comes with a special advantage. You can start a print, leave the room and come back hours later for a completed result.
Simply put, 3D printers manufacture things. Woodworkers build things by making one part at a time and assemble them into a final result.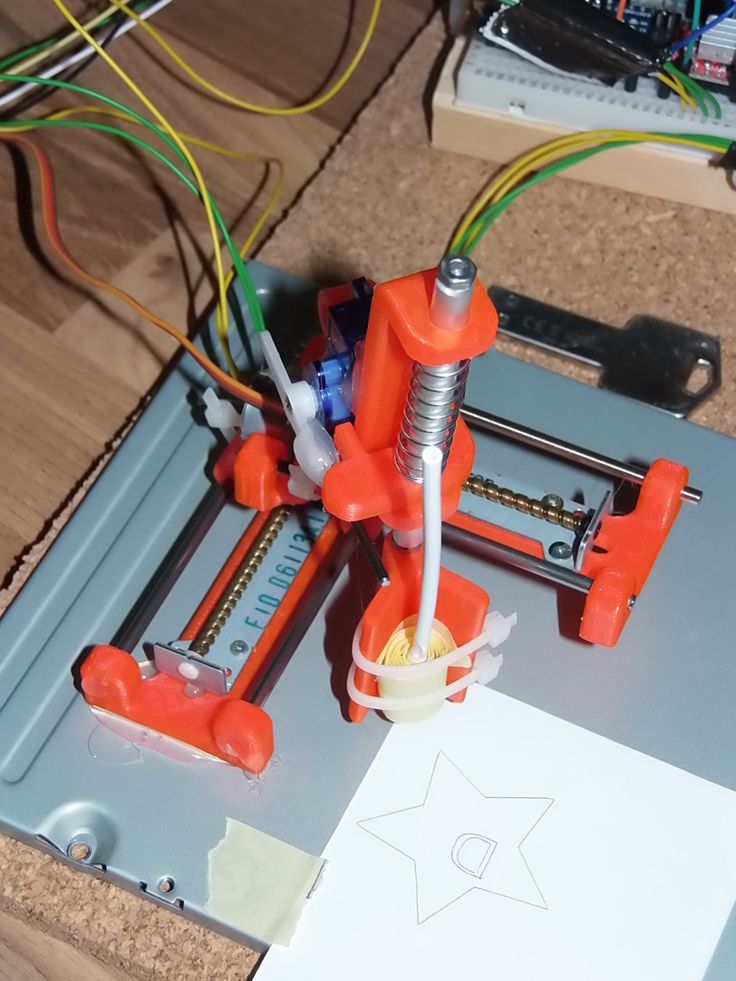 Because the processes are so different, printers’ advantages are not what woodworkers are used to. For some, a 3D printer might be a tool to produce small, detailed, useful things that help or support us in the pursuit of our chosen hands-on craft.
3D Printed corner round over templates being made on the very capable Dremel 3D45 printer.
Creating with a 3D Printer
To make anything with a 3D printer you start with a 3D drawing of the thing you want to make. You can create your own using 3D CAD software, such as Fusion360, Rhino3D (what I use) or other online or free CAD programs like TinkerCAD or FreeCAD. But, if you’re not yet comfortable using CAD software to create your own designs, you can download ready-to-go, printable files online. And, there are a lot of them. One of the biggest reasons 3D printers are so popular is the availability of literally millions of free 3D designs at websites such as thingiverse.com or myminifactory.com. On these sites, you’ll find things to print of every conceivable description from the practical (replacement parts for microwave ovens and refrigerators, T-track components, even toothpaste tube squeezers) to the impractical (toys, robots, cosplay character costume parts). Even if you expect to never even consider buying a 3D printer, I suggest you look around online to see what’s possible. It’s quite entertaining. You’ll be amazed at what you can find.
3D printers can make many useful things for woodworkers. In the photo above are several CNC hold down clamps designs made with different materials I’m testing for strength and flexibiliy. One advantage of using a 3D printer is you can quickly test things or make a tool for a specific situation. And, the cost of prints is usually very low. The clamps above cost about $.10 each in plastic and $.03 in electricity to make.
Hold down clamp 3D printing in action.
What’s it like to use a 3D printer?
At some point, I may do a more complete how-to, but for now here’s a quick version of the process of getting something 3D printed.
- Find a file online or create a 3D printable file on your computer. This usually comes in the form of a STL file.
- Open up the file in the program that comes with the printer that prepares yor files for printing.
 These are referred to as “slicer” programs.
 - Apply the printer’s default settings for the kind of filament you’ll be using (PLA for example) for your print.
- Export the machine-ready file (this is a G-code file just like on a CNC) to a SD card or USB flash drive that the printer accepts.
- Load the filament of your choice onto the printer.
- Choose the file you wish to print and begin.
- Come back hours later to see the results.
This little 3D printer is my first printer. It’s very small. The print area is just 5″ x 5″ x 5″. This little gem is called the Snapmaker and it has some rather interesting capabilites. A key feature is that it’s modular. The 3D print head can be swapped out with a Laser Cutter/Burner head or a minature CNC head in a few minutes. Now that’s a small CNC.
Is 3D printing difficult?
Generally, the answer is no. Most 3D printers have simple one-button controllers and an LCD screen. It’s on your computer where you set up your files to print.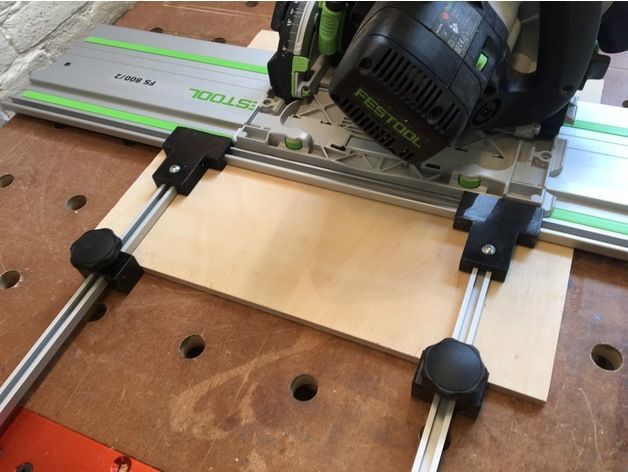 Compared to programming and setting up a CNC, 3D printers are far easier to use. Though, there’s quite a bit of magic going on under the hood, for the user 3D printing is not a particularly technical thing to engage in. You make a few setting choices and let the machine do its thing.
Essentially your key choices are to select the kind of filament you’re using and the quality level of your print. However, some people struggle a bit learning how to solve basic printer issues. Though 3D printers have far fewer variables than CNCs, users still need to understand causes and solutions to printing problems as they crop up. Most have to do with finding the right temperature settings for the extrusion nozzle and the bed and getting the first print layer to stick. I’ve found that most of the time, the default print settings for different kinds of filaments work fine. The good news is once you get things dialed in you just can print almost anything. To make the entire process simpler yet, 3D printer companies like Dremel are working hard to make printing even easier by automating many of the choices.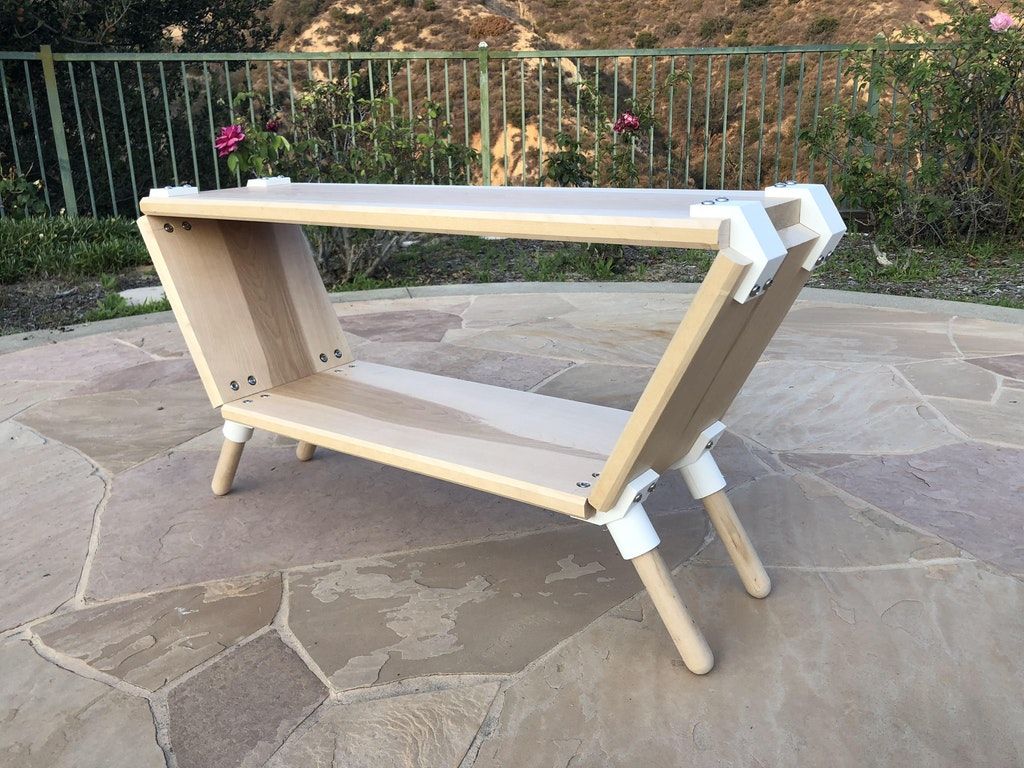
Yes, that really is an adjustable Crescent Wrench made out of ABS plastic. No, you can’t use it to over tighten or loosen snug bolts, but it does work and it was printed in one piece. The other items shown are CNC clamp designs I’m testing.
Knife Hinges out of plastic? These are tests made for a friend, furniture maker Bob Spangler to check the fit before he machined the final hinges out of brass for his beautiful custom Tansu cabinets.
What can a woodworker make with a 3D printer?
- Jig parts
- Fixtures
- Patterns
- Custom clamping cauls
- Shop upgrades
- Model projects
- Joinery components
- Lots more…
Testing designs on 3D printers
One thing I use a regularly use a 3D printer for is to preview and test sculpture designs and work out details before committing the time and materials to build a full-scale sculpture. Much better to solve design and construction issues before running into a problem halfway through the building and carving a 4′ tall version out of wood.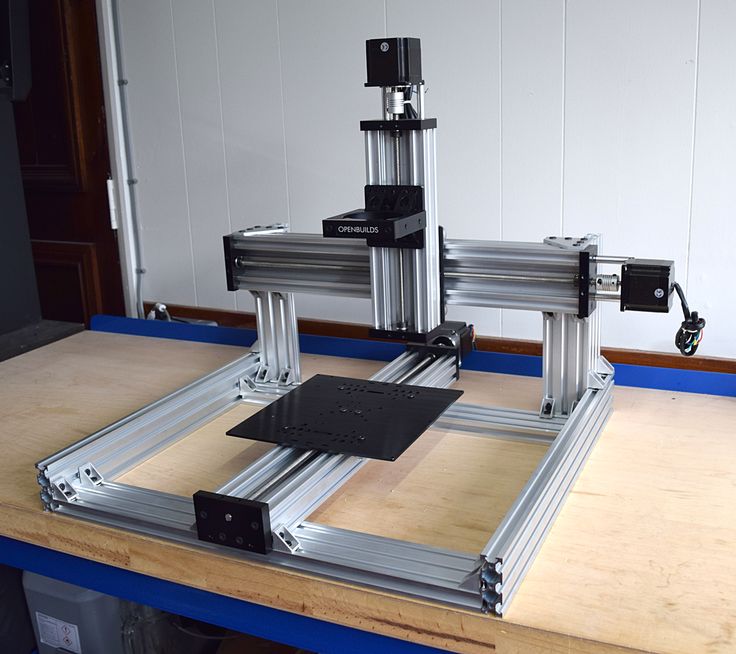 The printer shown is one of my favorites: the superb Prusa I3 MK3
This is a 3D printed test of a 12″ model for a planned 7′ sculpture to be made with stack wood lamination. The model is printed on the excellent Ultimaker 3 Plus. It took 23 hours to print.
A sample of the many 3D printed sculpture tests I make before committing to making full-size pieces out of wood.
Despite the fact that 3D printers work in plastic, they can make things we can use in the pursuit of our craft. As with CNCs and other digital tools, the secret in getting the best out of 3D printing is to learning how to use CAD software. Digital tools use CAD. That’s pretty much a given. No matter what kind of woodworking you choose to do, I can’t encourage readers enough to invest your time and $ in learning how to use quality CAD software. Don’t be cheap with either. We all have limited amounts of each. So, invest wisely.
Even if you’ll never use a CNC, 3D printer or any digital woodworking tool for that matter, at the very least becoming fluent in CAD will help make you a better designer.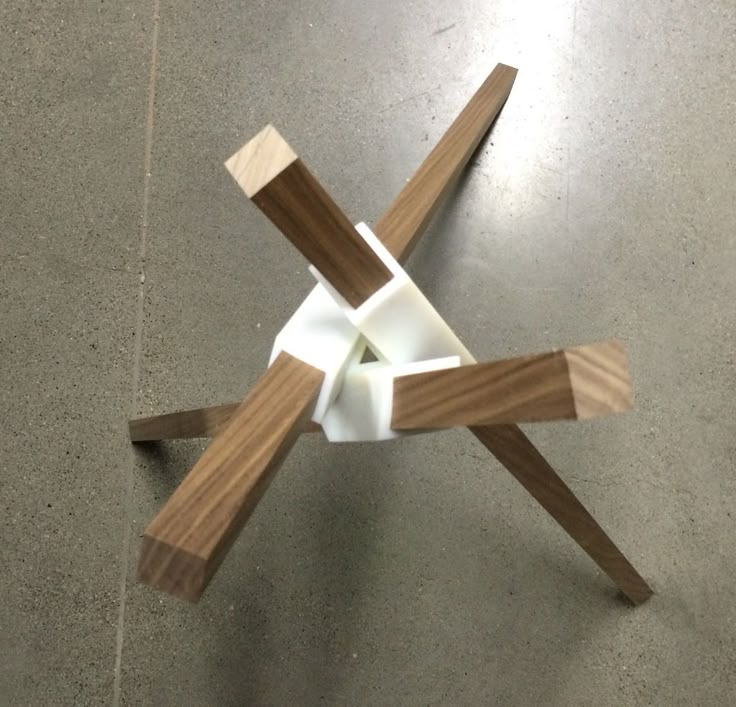 Skill and craftsmanship are critical components for better woodworking. They also drive the very passion behind everything we all strive for in woodworking. But, learning to be a better designer is all too often an after thought. Yet, getting better at design is the best long term investment you can make in woodworking. Instinct and personal taste will get you 10% of the way there. The other 90% are about design skills. In the end, it’s design that separates the merely good from the great. CAD just happens to be a great tool for exploring new directions and exploring design possiblities. It’s not that hard to learn CAD basics if you’re willing to try. And, if you regularly use it, you’ll progressively get better at design just by trying variations and testing out ideas. Nice bonus!
With printers starting at $200, 3D printers have become very affordable. At the other end of the equation, serious printers close to the capabilities of expensive industrial/engineering prototyping machines that use tougher, bendable and flexible materials are also becoming more reasonably priced. This class of machines is well suited for useful tasks in a woodworking shop. I’ll have a review of one and a new video in my next post. I’ll review the Dremel 3D45 Digilab 3D printer.
— Tim Celeski
Related Posts
- Digital Tools Have a Lot in Common
Additional Resources
- Digital Woodworking on Instagram
- Personal Work on Instagram
- Digital Woodworking YouTube Channel
Product Recommendations
Here are some supplies and tools we find essential in our everyday work around the shop. We may receive a commission from sales referred by our links; however, we have carefully selected these products for their usefulness and quality.
-
Titebond Molding Glue
-
Kreg Pocket-Hole Jig
-
Double-Sided Tape
3D Printers, CAD, CAM, CNC, Digital Woodworking
Recommended Posts
In-depth with Shaper Origin
Does adding a CNC to your shop make you less of a woodworker?
Feeds & Speeds for CNC Routers
3D Printing and Woodworking – A Perfect Combination
3D Insider is ad supported and earns money from clicks, commissions from sales, and other ways.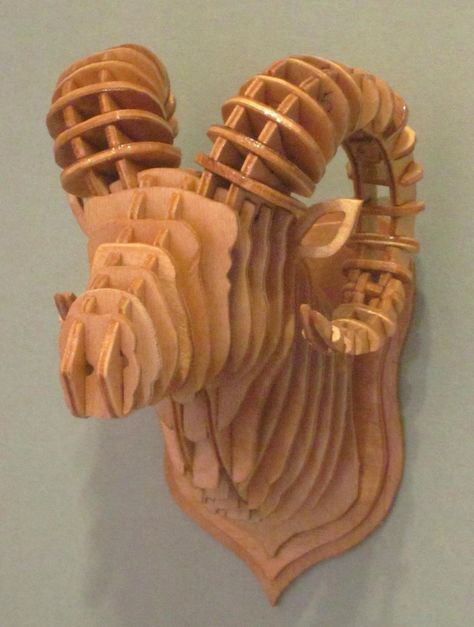
Before 3D printing, there was woodworking.
Woodworking has been one of the favorite hobbies of those who like to work with their hands. There was a certain fulfilling – perhaps even meditative – value to creating beautiful and useful things from planks of wood.
Some would describe 3D printing as the more modern version of woodworking. Although 3D printing demands different technical skills, the end goal is still to come up with something valuable out of raw materials.
If you’re interested in both, then there’s no need to pick just one. Woodworking and 3D printing are crafts that work incredibly well together.
3D printing vs. woodworking – key differences
Woodworking and 3D printing can be described as the two sides of the same coin. They are both manufacturing methods but go about using vastly different approaches.
Additive vs. subtractive
Woodworking is a classic example of subtractive manufacturing. This means that the final product is derived from a slab of raw material by chipping or cutting away the material that is not needed. This method inevitably generates more waste but produces finished parts that are mechanically stronger.
3D printing is the very defining example of additive manufacturing. Instead of cutting away from a large block of material, a 3D printer product is built layer by layer. This method generates less waste but is also usually slower. An unfortunate consequence of 3D printing is that it is almost impossible to achieve the same mechanical integrity as a piece made via subtractive manufacturing.
Cost
In terms of the equipment, woodworking would likely require much greater capital. Between the various types of power tools and hand tools you will need, you will probably have to spend between $500 to $1000. It will be even more expensive if you’re getting a CNC machine like a lathe or mill.
In contrast, 3D printing can be done with just a single 3D printer and a few basic hand tools. If you stick to entry-level 3D printers, you should not need to spend more than $500. 3D printers have gotten a lot less expensive in the last years, paving the way to the widespread use by hobbyists.
Skill level
Woodworking is an old-fashioned craft. This means that it requires substantial training or experience, especially if you’re working with lots of power tools. Someone who has never worked with these tools before isn’t likely to be able to create a good wooden desk over a single weekend.
3D printers are much more beginner-friendly. Although there are complex algorithms involves in running a 3D printer, most of these happen behind the scenes and do not need to be bothered with by average users. Most desktop-scale 3D printers are designed specifically so that even pure beginners can start printing in just a few minutes.
Those who do CNC woodworking can adjust much easier to 3D printing. CNC technology, after all, is also based on digital 3D models. As we shall see later on, 3D printing can have a unique case for those who use CNC machines for manufacturing.
3D printed woodworking accessories
3D printing truly shines as a complementary craft to another hobby. This characteristic also applies to woodworking. You might have all the power tools set up, but there are so many ideas out there of “ad hoc” tools that are similarly useful. Here are some of the most popular:
Sanding sticks
Sanding tight spots in a wooden project can be challenging. You typically just wrap sandpaper around some arbitrary tool or just get your finger in there. This works eventually but is not very efficient.
These sanding sticks are designed to hold a strip of sandpaper in place with its clamps and thumbscrews. The sticks are available in various shapes and sizes, so you should not have a problem finding the one that you need. Although very simple, these sanding sticks can reduce the time and effort it takes to sand very small spaces.
Corner radius rounded corner template
Drawing the outline of a rounded corner on a wooden slab is easy.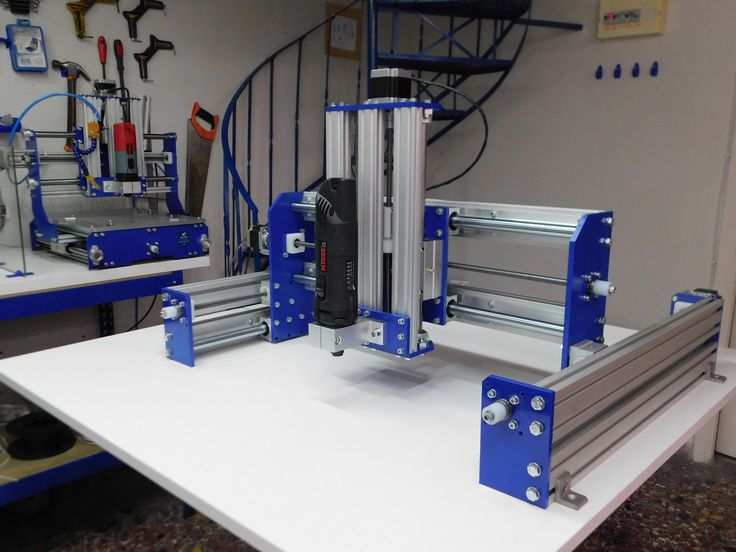 However, cutting away that rounded corner using a router takes considerably more skill.
This rounder corner template is designed to fit into any sharp corner and serve as the template for the router. The STL file contains nine different templates with varying corner radius values. The corner template will very briefly come in contact with the router, so it’s best printed with a thermally stable plastic like ABS or Nylon.
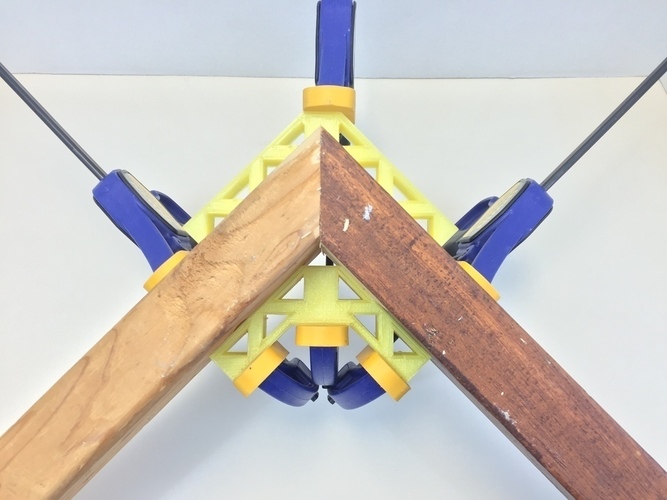
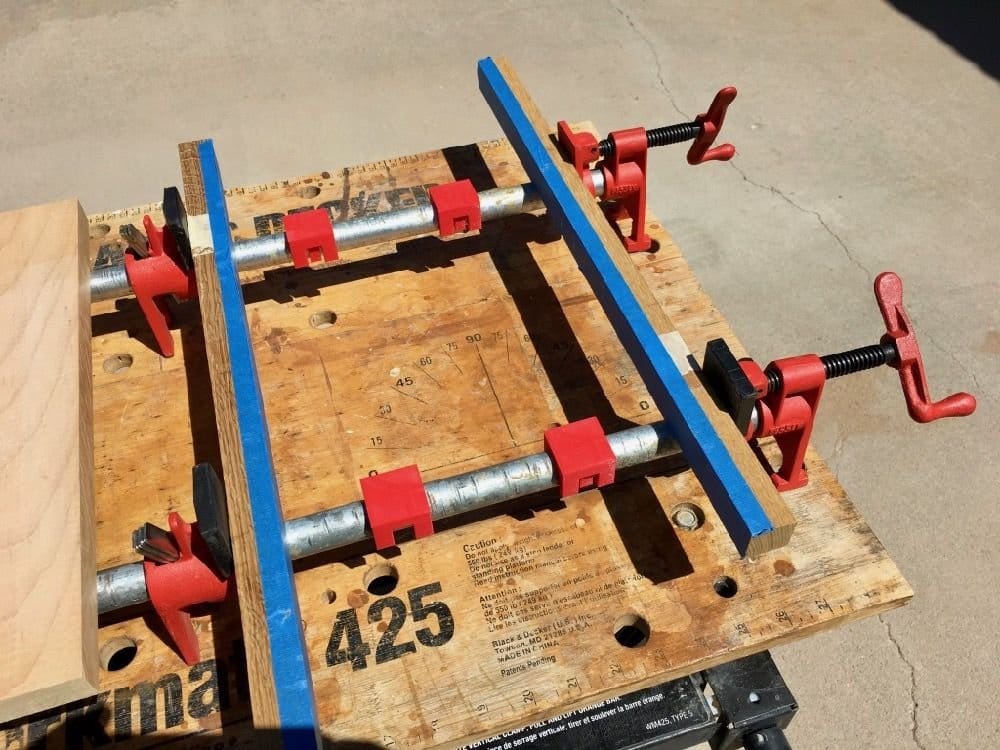
Universal clamping blocks
Putting together corners whether they are mitered or have wider or narrower angles is hard because they cannot simply be clamped together. The common solution to this problem is to glue temporary clamping blocks to the pieces that form the corner. This takes so much time and adds unnecessary work.
With these 3D-printed universal clamping blocks, you can say goodbye to all those creative solutions. These clamping blocks have circular levers that can be clamped tight, regardless of angle. It’s a very simple contraption that you might be left wondering why you did not have such a tool in the first place.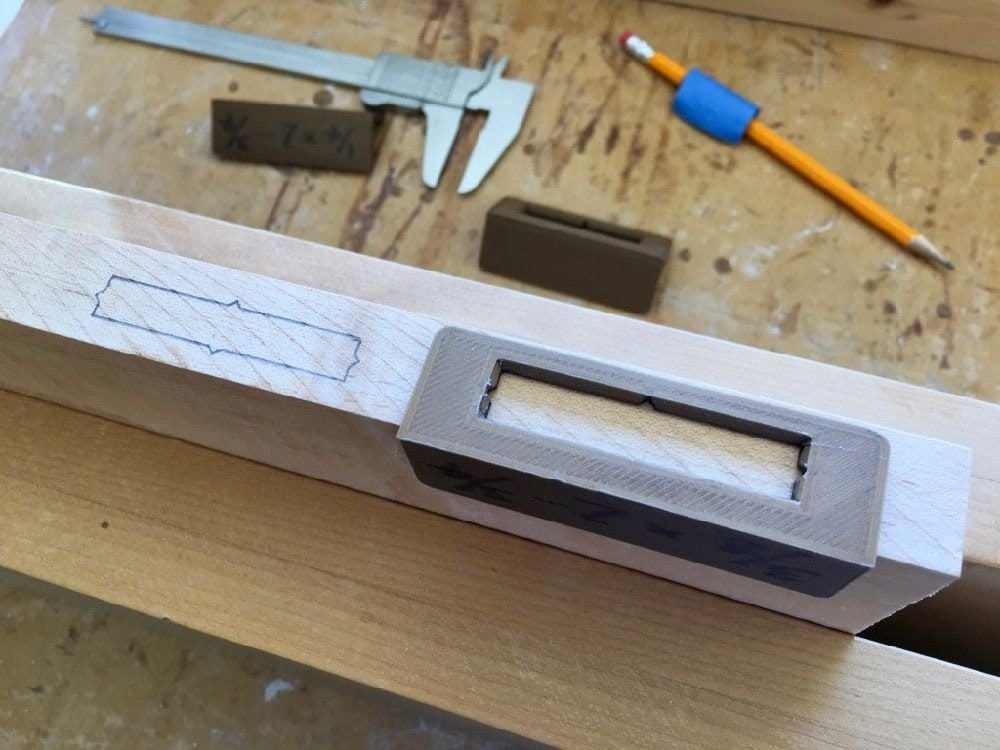
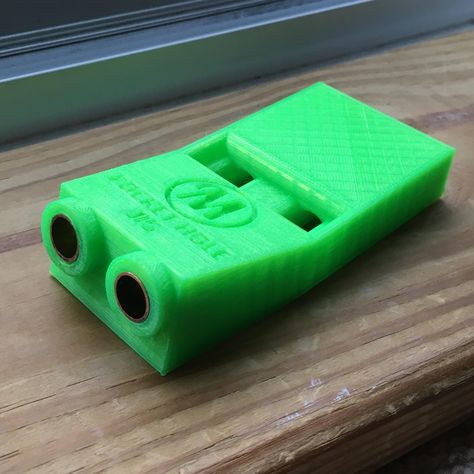
Vice jaws
This is another simple but useful idea – plastic jaws that you can affix to your vice so that it does not damage more fragile materials. This is best 3D printed with a plastic that is moderately flexible such as PLA. The vice jaws also work wonderfully with hard materials like wood as they can more effectively clamp the piece.
The vice jaws have small indentations on the bottom side. These are meant to house small magnets so that they can be attached and detached from your vice easily. They can also be glued onto the vice. There is really no disadvantage to just affixing these jaws to your vice permanently.
Universal center finder
Woodworking experts are also experts in finding the centerline of everything. A rectangular plank of wood is no problem, but those that have rounded corners require a bit more imagination. In any case, finding the centerline using old-fashioned methods takes a lot of time.
This universal center finder is a handy tool that you can 3D print quickly.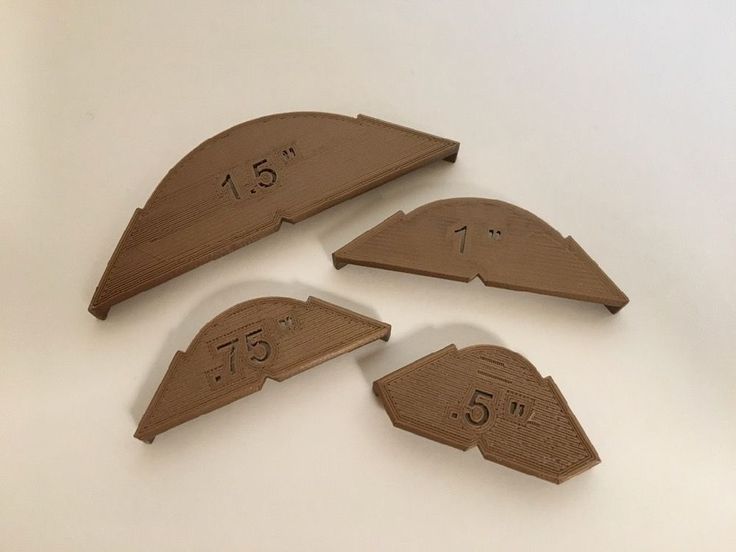 The fence of the tool is specifically designed to fit both round and rectangular corners. There is also a small relief on the fence so that it can fit any piece that has burrs. A thin channel runs right down the middle so that you can mark the centerline with a pencil.
Dust collection adapters
Dust collection is a crucial part of woodworking. Not only does wood dust get into your respiratory system, but it can also very easily cause a fire or dust explosion. Unfortunately, getting your dust collection hoses to fit with your vacuum units is an impossible task without adapters.
There is a whole slew of 3D printable dust collection adapters out there with different shapes and sizes. The model we are linking to here allows a Makita RT0070CX2J dust shroud to connect with smaller 36-mm hoses. If there’s a mismatch between any of your dust collection equipment, just do a quick search and you might just find the exact adapter you are looking for.
Parametric knobs
By far, this set of parametric knobs will likely be the most useful to any woodworking enthusiast. You can choose to integrate nut knobs for your finished product or use them as adjusters for jigs or create makeshift screwdrivers.
This STL file contains an array of nut knobs, wing nuts, and mini bits for hex and star screwdrivers. Yes, just about all of these parts can be purchased in your local hardware. However, that can get expensive after a while because these plastic nuts can break apart fairly easily. It’s much more prudent to 3D print a bunch of them so you can have one ready when you need it.
These plastic knobs can be made to fit snugly to any fixture by just heating them momentarily. You can also apply some glue for extra bond strength.
Cordless tool wall mount
When you start accumulating lots of power tools, getting them organized becomes more challenging. You will want to put them away but in a manner that still makes them accessible. How about wall mounting them?
This 3D printable bracket fits most of the Dewalt and Makita cordless tools.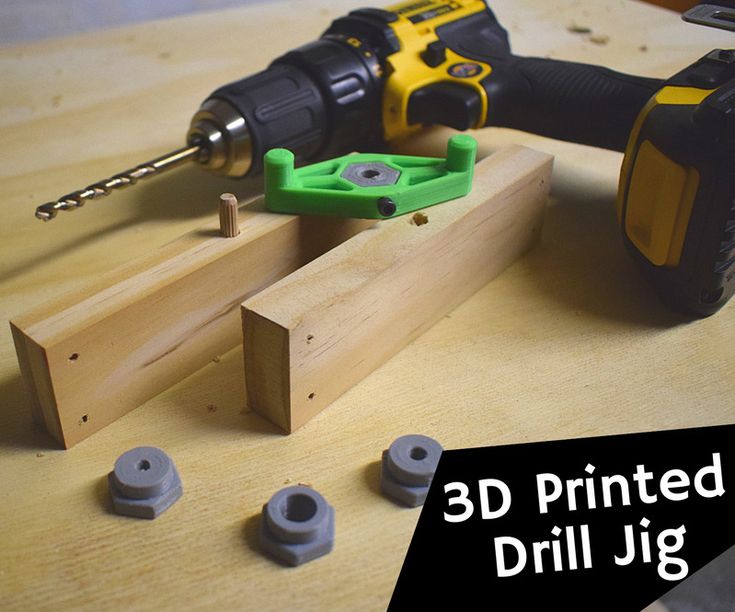 They can be screwed onto a wall or tacked into a secure pegboard. With a simple and elegant design, this wall mount can help you reclaim horizontal space in your workshop.
3D printed prototypes
A subset of woodworking involves the use of CNC machines. These are typically mills or lathes that can run automatically based on an established algorithm. CNC woodworking is ideal for creating high-precision parts that require detailed etching.
A key characteristic of the CNC process is that it starts with a 3D model. This 3D model is processed in a CNC software platform to generate the code that the CNC machine will follow. This code or algorithm determines the exact movement of the machine’s cutting tools and other moving parts. Some in the industry call this “digital woodworking” and this technology has given way to some of the most impressive woodworking projects.
The beauty of combining CNC machining and 3D printing is that they can both be done using the same 3D model.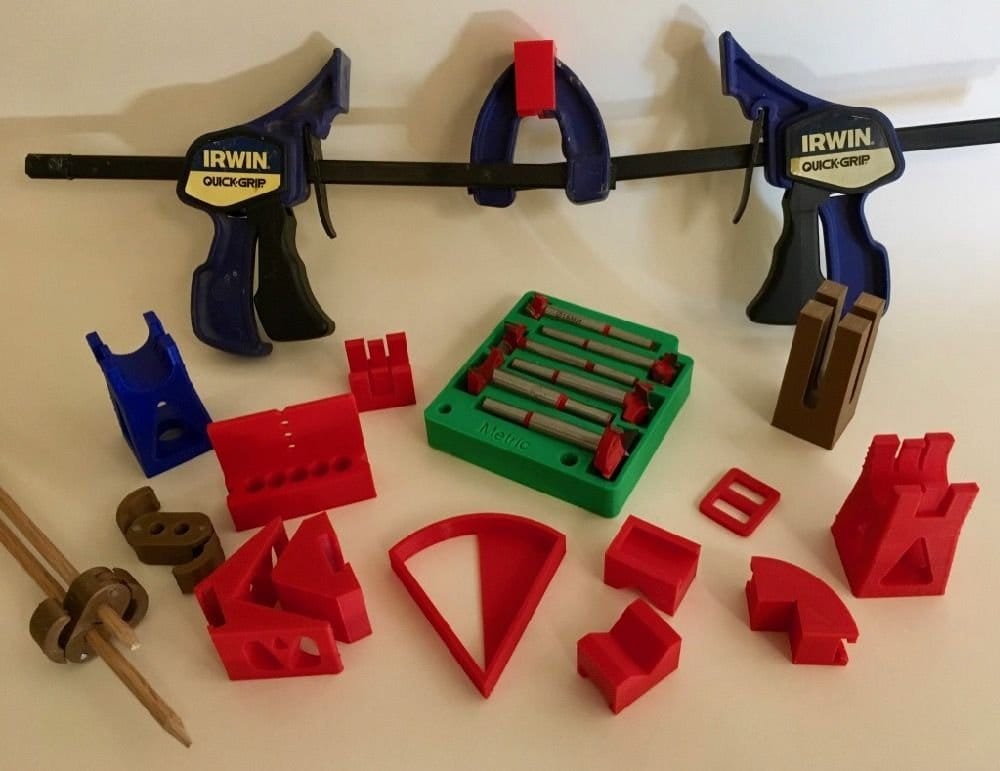 For those who plan their builds in CAD platforms, 3D printing provides a way to quickly come up with prototypes. Do you want to test how a 4-foot sculpture will look before fully committing to it with wooden parts? Then print a small-scale replica of it over one afternoon.
Those who offer professional woodworking services can greatly benefit from 3D printed prototypes. A 3D printed copy is a great way to review a model with a client for approval or possible revision. Looking at a 3D model is a computer screen simply cannot compare to holding a physical copy in your hands.
More innovative woodworking enthusiasts have been trying to integrate 3D printing and woodworking in different ways. As 3D printers become more sophisticated, it’s not hard to imagine 3D printed projects going hand-in-hand with wood not just as prototypes but as finished parts. This seems to be the direction that the manufacturing industry is headed. Until then, 3D printing could remain the perfect complement to woodworking.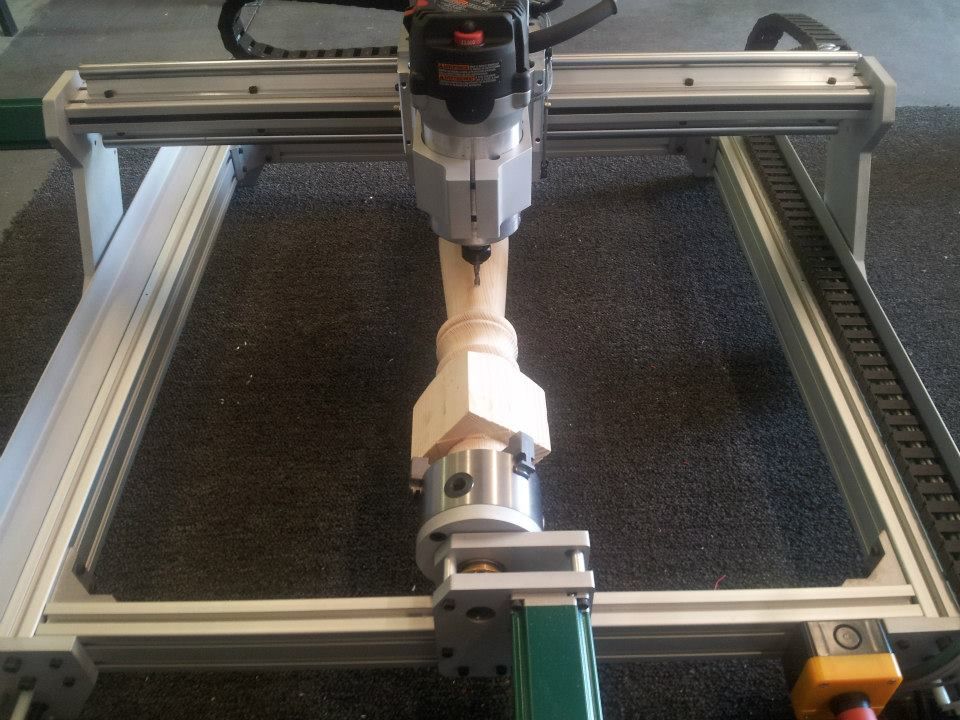
Final thoughts
Woodworking is a respectable craft. It has been around for centuries and has only been made better by modern equipment. Nowadays, wood craftsmen are capable of designs and products that would not have existed ten years ago.
With 3D printing on the rise, there is again an opportunity to advance the possibilities of woodworking. 3D printing is not a competitor or alternative to woodworking. In many cases, 3D printed parts can be very useful in creating new possibilities for woodworking. Combining both may just give way to a brand new craft.
Warning; 3D printers should never be left unattended. They can pose a firesafety hazard.
One example of a successful application of 3D printing in retail - Furniture production - Articles
No counters and warehouses, instant access to goods without long queues, the ability to personally change the characteristics and appearance of the goods literally at the checkout. This is exactly the future that was predicted for retail a couple of years ago, when the world was struck by 3D printing technology.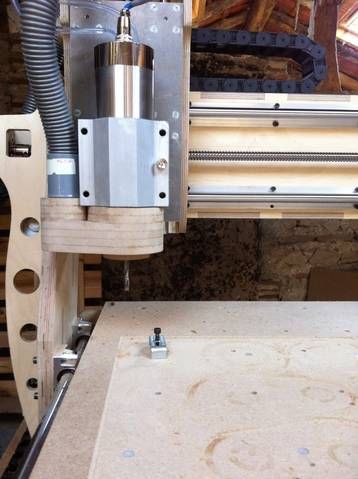 Years go by, traditional store formats practically do not change, but in some places the future still breaks through the thickness of everyday life. Today we will give just one of the examples where 3D printing has been successfully applied in retail.
IKEA personalized chairs
In June 2018, global retail giant IKEA announced the development of Ubik 3D printed gaming chairs. While Ubik doesn't look like classic gaming chairs at all, as the company claims, they'll be as ergonomic as the competition. To do this, IKEA teamed up with the Swedish manufacturer of medical prostheses UNYQ.
Maximum seating comfort will be achieved through complete personalization. The client scans the body in the UNYQ department, after which the prosthesis manufacturer develops the most suitable 3D model of the chair for the buyer, based on his physique, weight and other physical parameters. And in two weeks, the client will receive a personalized chair, printed personally for him.
The upholstery of the chair consists of a plastic mesh that instantly adapts to the user's body and is easily designed on a 3D printer.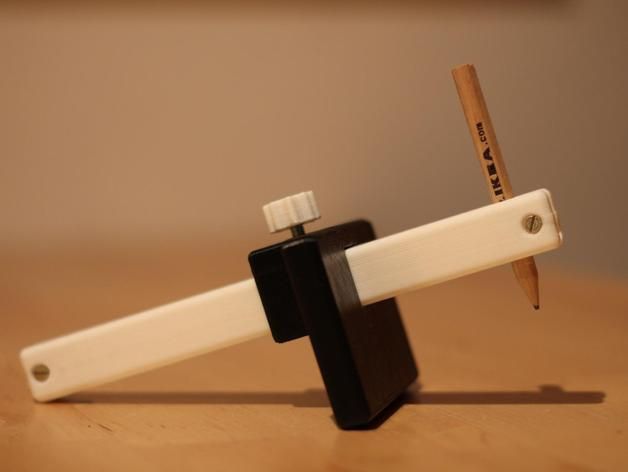 The first Ubik chairs will go on sale in 2020.
3D printing applications
3D printing is the construction of a real object from a computer-generated 3D model. Then the digital three-dimensional model is saved in the STL file format, after which the 3D printer, to which the file is output for printing, forms a real product.
The process of creating an object is very simple: layers of consumables are continuously applied one after another until the product is completely finished. This automated mechanical manufacturing method provides an alternative to traditional prototyping and small-scale production methods.
Benefits of 3D printing
- Accessible and understandable object design
All design takes place on the computer when working with 3D models, which does not require significant skills from users.
- Production speed
Most products are produced in a few hours. Even time-consuming products do not require any participation in production, which also speeds up the process.
- Economy
First, 3D printing mostly uses inexpensive plastic. Secondly, 3D printing is often used for short runs to minimize risks, thus optimizing the warehouse capacity and resource management scheme of the store.
- Wide range of customization
3D printing quickly meets the needs of customers, allowing you to instantly change the design, shape, material of the manufactured product.
Disadvantages of 3D printing
- 3D printers use too much electricity
3D printers use 50 to 100 times more energy than conventional plastic injection molding. This makes it impossible to use a 3D printer on an industrial scale.
- Damage to food plastics
Despite the fact that special non-toxic plastic threads are already being produced today for "printing" kitchen utensils, this material is not yet widely used. The use of standard plastic in 3D printing kitchen utensils can harm human health.
- Low performance
The speed of 3D printing is much slower than traditional casting and stamping, which makes 3D printers not competitive in mass production.
- Strength
The quality and durability of 3D printed products is still inferior to milling and molding from plastic.
retail.ru
3D printing is now done at low temperatures
85
Researchers MIT Laboln Laboratory Developed an innovative 3D printing method of low temperatures and High operational characteristics of , resulting in material with unique electrical, optical and chemicals properties.
Temperature reduction
This is not the first time glass has been 3D printed, but the system developed by Lincoln's scientists involves a clear reduction in the temperature required for the process.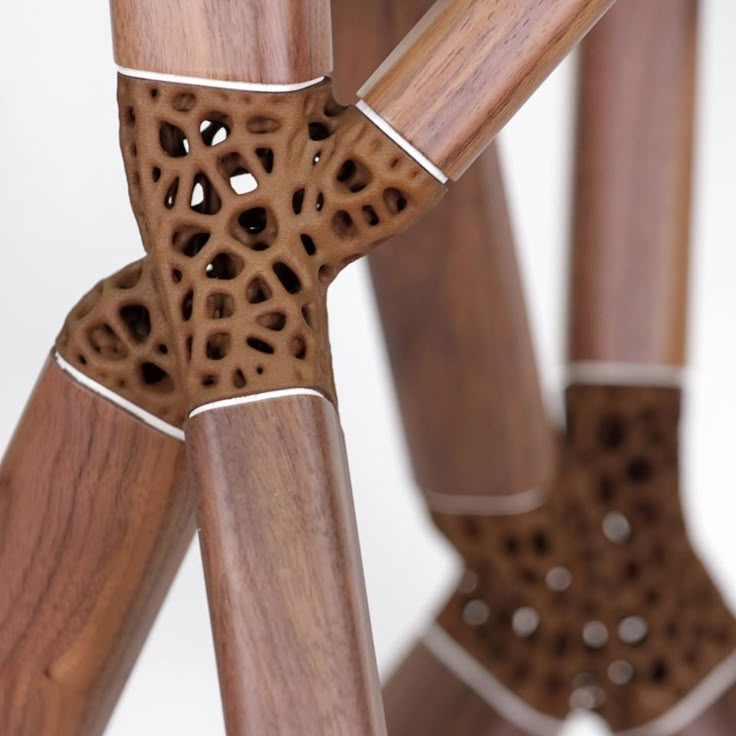
Glass post-processing typically involves exposure to temperatures close to 1000 °C to produce inorganic material. On the other hand, the MIT method involves applying a special ink that cures at 250°C .
Benefits of 3D printing
In the article "Low-Temperature Additive Glass Manufacturing", the team emphasized that new methods for additively creating inorganic structures could revolutionize the ceramic and glass industry. In fact, thanks to 3D printing, glass provides important advantages such as better biocompatibility and more t tightness .
Focus on the nanomaterial
The system developed by the researchers eliminates the problem of high temperatures. Conclusion in the nanomaterial used: Sodium Silicate Solution included in Functional Nanoparticles and Nanoparticle Smoked Silica to improve solubility. The combination of these three elements makes it possible to mold at low temperatures and obtain a variety of materials with multiple characteristics. The material also showed greater stability and strength by adding a mineral oil bath to the polymerization process.
Unlimited solutions and applications
Scientists have proposed a modular system that can be customized to print a wide range of inorganic glasses with embedded functional nanomaterials (dielectrics, metals and optical). This versatile materials platform, combined with multi-material additive manufacturing, will enable the production of a wide range of robust microsystems.
This is a simple technique that streamlines the glass 3D printing process, giving it many uses. The possibilities are almost endless: in fact, it will be possible to create high-performance glass surfaces or even glass capable of reacting to its environment using shape memory materials.


.jpg)

