3D print top layer rough
5 Ways How To Fix Pillowing in 3D Prints (Rough Top Layer Issues) – 3D Printerly
You’ve set up your printer, had many successful prints but for some reason the top layer of your prints aren’t looking their best. This is an issue many 3D printer users have dealt with.
It can be annoying to have a print go perfect, until the very end where you experience pillowing, which results in a rough surface at the top of your prints.
To help users out I’ve put together an easy ‘how-to guide’ on fixing top layer issues (pillowing) with a few easy methods for you to try out now.
If you are interested in seeing some of the best tools and accessories for your 3D printers, you can find them easily by clicking here (Amazon).
What is Pillowing Exactly?Pillowing is simply a phenomenon that occurs which leaves the top layers of your prints rough, unclosed, uneven and bumpy. Just an all-round pain to experience, especially after a long print.
Unfortunately, there isn’t a type of filament or printer which is completely immune to pillowing, but some are less likely to be affected than others.
The effects of pillowing is very similar to warping but it occurs at the end of a print rather than at the start. It produces a pillow-shaped pattern at the top, hence the well-fitting name. It usually effects prints that have a large, flat top surface.
The top of a print will have a type of rough and bumpy pattern that represents the infill directly below the top layers.
Why Does Pillowing Happen in the First Place?There are two main reasons for this happening:
- Insufficient cooling – causing the filament to warp away from the infill up towards the nozzle then it cools there and causes this effect. This is because the material gets tight and sticks over the infill but warps over the voids below.Your layer cooling fans might also play a part where they aren’t strong enough to get the material to the correct temperature to avoid this.
 If you are printing too fast, your materials may not have enough time to cool properly and produces the same results.
 - Not enough supporting material – at the top of a print to complete the print and close it. On top of this, if you don’t have enough solid top layers to your prints, pillowing can occur easier.
Simply put, this issue of pillowing mainly appears because of incorrect print settings and improper cooling. If you want a quick solution to improve your print quality, get yourself the widely-popular Noctua NF-A4 fan.
Prints that are set up with small layer heights are affected more so because materials warp easier when there is less support underneath each layer.
Another thing to know here is that 1.75mm filaments (printer standard) are more likely to be affected than the 2.85mm filament counterparts.
Softer filaments such as TPU, and higher temperature filaments such as ABS and polycarbonate do have more pillowing issues than harder filaments, but these are problems which can be solved with a few different methods.
How to Fix Pillowing Issues in 3D Prints
1. Increase Top Layer ThicknessEven though pillowing is a result of imperfect cooling, the issue comes about from the addition of a thin top surface.
Top layers of a print is what influences the pillowing effect. The more top layers that you have, the more chances for your printer to cover over the gaps.
There is an easy fix for this problem.
The first thing you should try to prevent pillowing/rough top layers is adding more top layers to your prints. This is done quite easily from your slicer settings by increasing the ‘top thickness’.
Each extra layer that you have on your print, it means that there are more opportunities for the layer to melt away the possible pillowing effect that you may have encountered underneath.
I’d recommend having a top layer thickness which is six to eight times the layer height, which should be more than enough to alleviate any pillowing issues that you have been experiencing.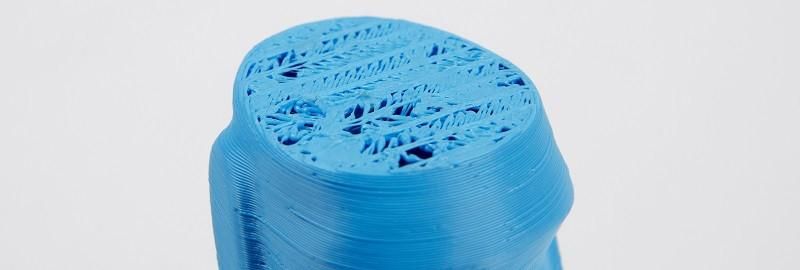
So if you are printing an object using a 0.1mm layer height, you would want a top/bottom thickness of 0.6-0.8mm so that the top surface of your print can close and prevent the sagging/pillowing effect.
Keep in mind though, if you have really thin layers, your print is more susceptible to warping and curling because the layers become more fragile. In this case, you’ll need more layers at the top to close the print properly.
Some people say to keep your top layer height total to roughly 1mm, so:
- Layer height of 0.1mm – print 9 top layers
- Layer height of 0.2mm – print 4 top layers
- Layer height of 0.3mm – print 3 top layers
This isn’t required but if you want to be on the safe side, it’s a good rule of thumb to go by.
2. Increase Infill Density PercentageIncreasing your infill density percentage does a similar thing with increasing the number of top layers.
This method helps by giving the top layers more surface area to be supported by, making it fuller and smoother rather than rough and low-quality.
Pillowing happens because of the gaps between the infill, for example, if something was printed at a 100% infill density, there would be no chance of pillowing because there aren’t any gaps in the middle of the print.
So reducing these gaps by increasing the infill below the top layer it reduces the chance of it happening.
When you are printing at lower infill levels such as 0%, 5%, 10% you are more likely to notice pillowing effects. It really does depend on the design of your print, if you have a delicate product and need a lower infill, you want to compensate by using a stronger material.
Some printers are more prone to pillowing than others but as time goes on, printers are developing at a high rate in terms of quality.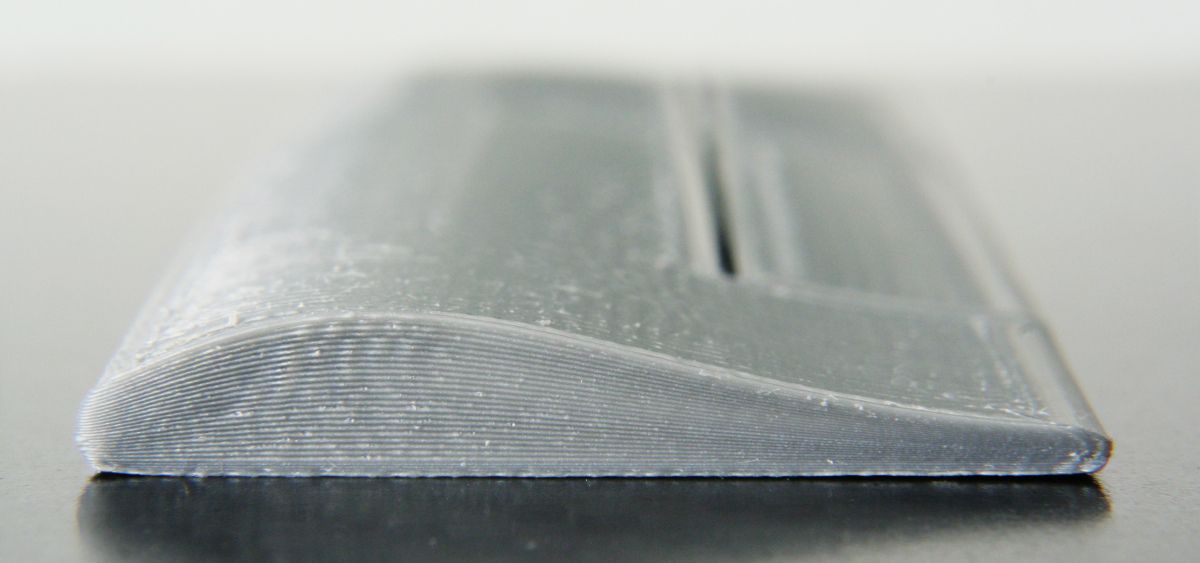
Some prints will print just fine at 5% infill, others may struggle.
Comparing the two methods above, the top layer method does usually use more filament, but depending on what functionality you have with your part it could be a better idea to use the infill method.
Some 3D printer users have reported having a minimum infill percentage of 12% should hold up and reduce pillowing.
The video below shows just how easy these two methods are.
3. Decrease Printer SpeedAnother method you can use is to lower the print speed for your top solid layers. What this does is give your top layers more time to cool off before they start peeling away. When your layers have more time to cool off it gives the material time to harden, giving it more support and strength.
It doesn’t necessarily reduce your layer adhesion, but it does prevent your prints warping away which forms the pillow on top.
This may take a bit of trial and error but once you get the right settings down, you’ll be printing objects successfully.
When it comes to print quality, typically you have to balance overall printing times with lower or higher quality. It’s a necessary trade-off but it does show its benefits when your prints are finished.
There are methods out there where you can decrease print times and keep that high quality you desire, which leads us into the next method.
4. Improve Your Cooling FansOne method requires the modification of your printer and is using a cooling fan.
Some printers already come with a layer cooling fan, but they may not work efficiently enough to correct the pillowing issues you are having. Many times, a 3D printer is equipped with cheaper parts to keep costs down.
One thing you can do if you already have a cooling fan is to print a more efficient layer cooling duct, where the airflow is direct all the way around the nozzle or directed specifically at the part, rather than at the heater block.
If this doesn’t work or you don’t have one, getting a new layer cooling fan is the best idea.
There are many premium parts that you can make use of that get the job done much more efficiently than the standard part.
When it comes to cooling fans, the Noctua NF-A4 is one of the best out there. The advantages for this high-rated premium fan is its superior quiet cooling performance and great efficiency.
It’s a cooling fan that has saved 3D printer users countless hours on failed prints.With this fan, your cooling issues should be eliminated.
It’s aerodynamic design offers superb running smoothness and amazing long-term durability.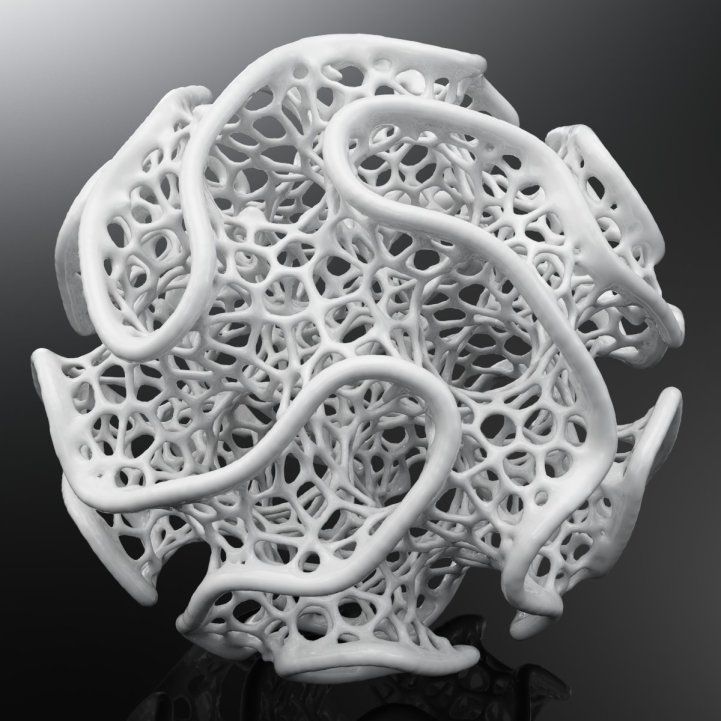
Turning your fan on is the first obvious step, which can sometimes be done in some slicer programs. If you can’t set your fan in your slicer, it is possible to manually edit the G-code using the M106 command. You shouldn’t have to do this in most cases, but it isn’t too difficult to do with a guide.
Something as simple as a desk fan could help if you aren’t comfortable installing a cooling fan onto your 3D printer. However, cooling fans may just blow the cool air towards specific parts of your prints and not all over, which is where you might see pillowing.
Keep in mind, depending on what fan you have you might not want to run it at maximum speed. Some materials are more sensitive to warping and pillowing so when you have the fan’s air pressure blowing at a print, it increases the chances of warping.
There is such thing as rapid cooling, and it can have a negative effect on the quality of your prints.
With materials such as Nylon, ABS and HIPS you ideally want a low fan speed.
If the plastic doesn’t cool enough, it causes the material to either hang down or curl up in the areas where the infill lines are. It creates an uneven surface which is a problem for the next layer that goes on top of it. That’s when you get your rough, bumpy top surface.
5. Lower Your Printing TemperatureIn some cases, lowering your printing temperature could help due to the nature of the issue. This can cause more issues than it solves though, so it isn’t a solution to jump straight into. It could make your prints start under extruding.
I’d definitely try the previous methods before pulling this one out the bag. Materials usually have a temperature range to print at the best quality, so once you’ve found a perfect temperature for your setup, you don’t usually want to be changing it around.
Depending on what material you are using to print, some have cooling issues such as the high temperature filaments out there. You can avoid having to play with temperature settings to prevent pillowing if you implement the other methods with more intensity.
This method works the best with the high temperature materials because they take a longer time to cool down and get to a firmer state.
Big changes in the temperature of these materials as they are extruded onto the build surface make them more likely to warp.
When you lower the temperature of the nozzle’s hot end for the top layers, you effectively prevent pillowing as you are combating the issue directly. Having your cooling fan running at a high power to assist the cooling is recommended with these materials.
You want to aim to cool down the extruded filament as quick as you can so it can set into it’s intended place properly and doesn’t sag into the spaces between the infill.
If you’ve followed these solutions, the problem of pillowing should be a thing of the past. The best solution is a combination of them so once you’ve done these, you can look forward to smooth top layers and high-quality prints.
How to Get a Smooth Top Layer in 3D Prints
The best way to get a smooth top layer in 3D prints is to enable ironing in your Slicer, a setting which commands your nozzle to run over the top layer of your print and smooth out the top layer, following a path that you can input within the settings.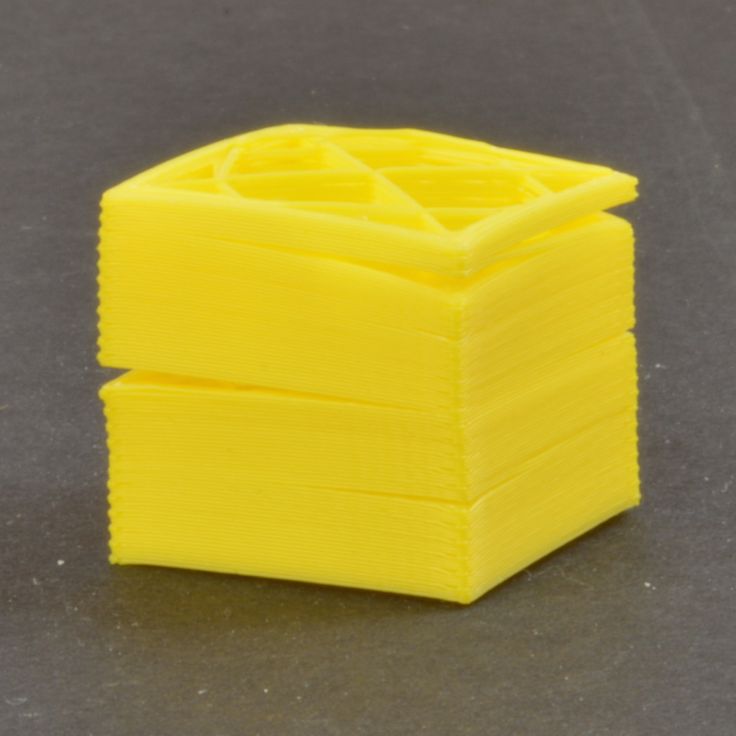
Check out the video below by The 3D Print General who goes over ironing settings. They work really great for 3D prints with flat top surfaces, but not for objects that are round like figurines.
Best Cura Ironing Settings for Top Layers
Ironing Flow
The default setting in Cura for Ironing Flow is set to 10% in Cura but you want to bump this up to 15% for better quality. You may have to do some trial and error with some of these values to get the top layers as you desire, so you want to balance out the Ironing Flow with Ironing Speed.
Ironing Speed
The default setting in Cura for Ironing Speed is 16.6667mm/s in Cura but you want to bump this up to 90mm/s or above 70. This will depend on what Ironing Pattern you are using though, since using this speed for a pattern like Concentric won’t bring the best results, but for Zig Zag, it works well.
The Concentric pattern did better using an Ironing Speed of around 30mm/s.
Ironing Line Spacing
The default setting in Cura for Ironing Line Spacing is 0.1mm, but you can get better results by doing some testing with this. A value of 0.2mm while adjusting or increasing the Ironing Flow & Ironing Speed can bring amazing results.
If you are using a thicker Iron Line Spacing, you usually get better results by having a higher Ironing Flow & Ironing Speed.
If you love great quality 3D prints, you’ll love the AMX3d Pro Grade 3D Printer Tool Kit from Amazon. It is a staple set of 3D printing tools that gives you everything you need to remove, clean & finish your 3D prints.
It gives you the ability to:
- Easily clean your 3D prints – 25-piece kit with 13 knife blades and 3 handles, long tweezers, needle nose pliers, and glue stick.
- Simply remove 3D prints – stop damaging your 3D prints by using one of the 3 specialized removal tools.
- Perfectly finish your 3D prints – the 3-piece, 6-tool precision scraper/pick/knife blade combo can get into small crevices to get a great finish.
- Become a 3D printing pro!
A Practical Guide – 3D Solved
Most people in the 3d printing community constantly want to find ways to improve the overall quality of their objects. One of the most common issues that can make or break a print is the quality of the top surface. It may come as no surprise that we’ll want to fix these issues. In this article, I’ll go through these issues and describe the most easy solutions.
In order to improve the surface quality of the top layer, it is necessary to get rid of pillowing and holes that may appear due to improperly set parameters in the slicer. The easiest way to solve both issues is by increasing the infill density and/or increasing the top layer thickness. To further improve the aesthetics of the top layers, it is also recommended to enable ironing.
Table Of Contents
- Common top layer problems and their solutions
- Holes and gaps in the top layer
- Pillowing
- Improving the quality of top layers with Ironing
- What is ironing in 3d printing?
- How to enable ironing in Cura?
- Ironing settings
Common top layer problems and their solutions
In a nutshell, the two most common problem related to the top layers of a 3d printed object are holes (or gaps), and an undesired effect called pillowing. Let’s go through each one of these and see how we can also solve the issue.
Holes and gaps in the top layer
A Benchy that, among other issues, displays holes on the top layer.Increase top layer thickness
This is the most common solution to this problem because in most cases we are printing our solid top layer over a partially hollow infill which can result in the top layer sagging into the air spaces. Typically you want to have at least a 0.5mm thick solid section at the top of your 3d objects meaning that if you are printing with a 0.3mm layer height you will need two layers or five layers if you are printing with a 0.1mm layer height.
It is worth noting that increasing your top layers won’t change the object size because you are adding them within your object dimension.
Increase infill density
A low infill density means that there’s going to be bigger air gaps in your infill thus less support for your top layer which can result in holes and gaps. It is recommended to have at least a 12% infill in any project. Try increasing your infill density by 10% to see if it improves. If no improvements are noticeable, you can repeat the process by further increasing the infill percentage until you solve the issue.
Check for under-extrusion
If the issue persists you may be experiencing under-extrusion. This happens when your printer’s firmware thinks it is extruding more plastic than it actually is resulting in poor printing quality. Thus, we get those gaps and holes.
A simple way to check if our printer is extruding the correct amount of plastic is to make a 20mm tall cube and give it at least 3 solid layers at the top and bottom. If there are any gaps between those 3 layers then we know our printer is not extruding enough plastic. To fix under-extrusion try the following solutions:
- Check the nozzle condition, you might need to replace it if it’s worn out or just clean it. It is also possible that you have leftovers from previous prints jamming the nozzle.
- Make sure the filament diameter that you are using matches the one in your slicer’s settings.
- Increase extrusion multiplier: This is also known as flow rate and lets you determine how much filament goes into the extruder. Increasing it allows a bigger flow of filament into the extruder. PLA usually prints with a 0.9 multiplier while ABS goes by 1.0. Try increasing the extrusion multiplier by 5%. As a rule of thumb, you should stay within a 0.
 9 and 1.1 multiplier.
 - Use the correct printing temperature for your filament: If the temperature is too low the filament won’t melt properly and will eventually jam the extruder and if the temperature is too high you can end up with modeling problems as it needs more time to solidify. Check your filament spool for the proper temperature.
Pillowing
A closer look at the top layer of a print that features pillowingThe pillowing effect is another undesirable consequence of bad settings and is a very common issue in 3D printing. It refers to uneven, bumpy, and rough top layers. To fix pillowing try the following solutions:
- Increase top layer thickness, for a smooth top layer, it is recommended to have at least 0.5mm thick solid section at the top as a thinner layer will always be more prone to pillowing. To achieve this, look at the layer height you are using and print as many layers as necessary. For example, for a 0.25mm layer height, you will need to print at least 2 layers.
- Increase infill density: A bigger infill density means fewer air spaces below our top layers, making it less likely to produce the pillowing effect since the infill works as the foundation for top layers to print. Try increasing it by 10% at a time.
- Take it slow: Decreasing printing temperature and printing speed will help you avoid the pillowing effect as it gives the plastic more time to cool off and harden, making it stronger and less likely to curl.
- Check your cooling system: Make sure the layer fan is working at maximum speed while printing the top layers. The surface won’t have time to cool off if it is not working at full speed. If they are working, your fans might not be strong enough to rapidly cool the surface and avoid the pillowing effect. There are some awesome mods that you can get online to improve your cooling system. You could even try with a desk fan aiming towards your printer.
Improving the quality of top layers with Ironing
A flat surface with ironing enabled (left) vs a similar object without ironing (right).What is ironing in 3d printing?
Ironing is a function that was first introduced on Cura but is nowadays implemented in all of the most popular slicers in the market. When the topmost layer of each part of an object has finished printing, the printer will keep the nozzle hot and travel all over the top layer, heating and melting it again. It can also be set to extrude a small amount of filament to fill any possible holes. This effect will flatten any layer lines, resulting in a much smoother top layer.
You can use ironing any time you have a flat top surface parallel to the print bed that you want to smooth out. It can also be used when in cases where you want to maximize the contact surface of 2 pieces for better gluing them together. Ironing does not have any noticeable positive effects in figures other than flat top surfaces parallel to the print bed.
When ironing large surfaces, some printers can get filament jammed due to the slow and small extrusion that occurs during ironing. In most cases, ironing will not produce any significant negative effects on our 3D projects, but one thing to take into consideration is that it will take longer to finish the printing. Depending on your project it can take 10-50% extra time to finish printing.
How to enable ironing in Cura?
Ironing is not visible in Cura when you first install it, so in order to make it visible follow these steps:
- Open the print settings panel.
- Click the hamburger menu and go to “Manage Settings Visibility“.
- There type “ironing” in the search bar and check “enable ironing”, and close that window. There you can also enable the ironing settings if you want to try different options.
- Now you will see “Enable Ironing” in the settings menu under the “Shell” submenu. Go ahead and check that box.
That’s it, ironing is enabled now!
Ironing settings
- “Iron Only Highest Layer”: This option lets you decide whether you want to iron out only the topmost layer for when you have a flat surface that’s lower than the top layer.
 Leave this unchecked if you want to iron every top layer.
 - “Ironing Pattern”: This feature lets you control the way the nozzle will move across the top layers. There are 2 options, “Zigzag” is the default one and it moves the nozzle back and forth in a zigzag pattern, and “Concentric”, which will print from the outside to the center.
- “Ironing Line Spacing”: This manages the distance between the ironing lines. A spacing of 0.1mm is the default and it yields a very smooth finish. On the downside, it will take longer to finish, so depending on how smooth you want the top layers to be you can adjust this setting. More space between the lines will speed up the process.
- “Ironing Flow”: This controls how much filament is being extruded while ironing. A flow of 10% is the default value, but you can decrease this if the surface is still rough as it is possible that it is over extruding while ironing.
- “Ironing Inset”: This option lets you decide how far away from the edges you want the nozzle to be.
 Because ironing extrudes a little bit of filament you don’t want it to go all the way to the edges as it could give you kind of a rim on your top part.
 - “Ironing Speed, Acceleration, and Jerk”: These 3 options will let you fine-tune the speed at which the nozzle will move while the ironing process is running. If you want to dig deeper into acceleration and jerk settings, check out the article I recently wrote on the topic.
We created a recommended products section that will allow you to remove the guesswork and reduce the time spent researching what printer, filament, or upgrades to get, since we know that this can be a very daunting task and which generally leads to a lot of confusion.
We have selected just a handful of 3D printers that we consider to be good for beginners as well as intermediates, and even experts, making the decision easier, and the filaments, as well as the upgrades listed, were all tested by us and carefully selected, so you know that whichever one you choose will work as intended.
(There is a solution) 3D Printable Sphere, How to remove roughness
troubleshooting prusa-i3 prusaslicer
I have an eye model that I made to order in blender 2.83 , which when printed only creates a roughness on the printed object near where I had the supports. The supports are not the cause of the roughness of (at least not completely), since the supports do not even touch the parts of the print where most of the roughness and unevenness ( see my photos print)
The roughness is only near the bottom of the sphere when it is printed upwards (see photos)
What I am looking for is a technique or any suggestions to print this without the roughness so that it was smooth like the rest of the print. I'm also wondering about , that causes roughness.
Eye Model in Blender
Blender Scale Factor: 0.001
BLOLS BLOKS: mm
Eye model in the PRUSA SKRUSER
layer GIF
The main settings of PRUSA SLICER (higher resolution)
Change for smoothness
9000
9000 9000 9000 9000 Eye Model Prints Photos
Eye Model Small 3D print version (please note it is smooth over print)
Eye Model Small version 3D print problem area
Model Small Eye & Large version with support (note roughness in the field)
Used on fine font 9000 9000 9000
Invite
printing
- - - - - - - - - - - - - - - - - - - - - - - - - - - - -
Printer: Prusa i3 MK3s
NECTURE LECAL: Pla Galaxy Silver (Prusa Resirach)
SLICER software: PRUSA SLICER
Press temperature of the first layer : 205 degrees
Press temperature of other layers 9000: 190 degrees
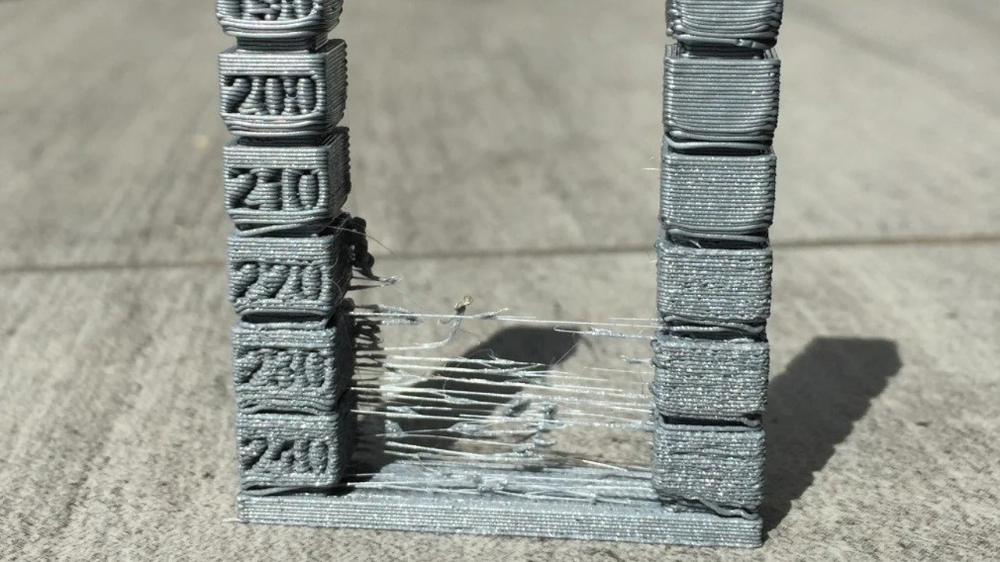
The suggested temperature for the filament is 205-215, I adjusted after careful calibration considering my environment to a lower temperature to reduce the tension. I created a tower at different temperatures and found that 190 is the ideal setting for reducing tension in my case with this material. See my screenshot below. I don't think the temperature has anything to do with this as the print is smooth inside and near the top without any issues with .
Temperature Tower Test For Photo Filament - - - - - - - - - - - - - - - - -
Settings of the Philiment
Settings of the extruder
Support Support
@joseph Astrahan, ♥2
3 Reply quite right that the roughness cannot be completely eliminated (you can't print a perfect spherical surface with discrete layers), the situation can be greatly improved. The most revealing photo in your question is one of the removed support structure.
The part of your sphere that is seriously rough is the entire hard canopy. In this region, the outer wall of layer N+1 barely overlaps the outer wall of layer N, if at all, and without support, would be printed mostly or completely over thin air, not attaching to anything and sagging/rolling randomly according to the stresses in the extruded material, air currents, etc.
Now, with support material, this is not entirely true. From time to time (looks like a 2 mm grid) reference lines appear under the overhanging outer wall. They will pin it down from time to time and keep it from twisting or sagging too much, but they don't really restrict it to where the slicer wanted the wall to go, and they don't provide a surface for the extruded material to snuggle up to obtain the desired (eg, 0.4 mm wide and 0.1 mm thick) extrusion cross section; instead, the cross section will generally be circular as a result of stresses in the molten material.
In order to get a decent surface over the support material, you need what slicers call "Support Interface" or "Support Roof" (these are the names Cura uses; I suspect it's similar to the Prusa Slicer). This function creates a top surface as part of the reference material itself, on which the reference part of the model rests and presses. Of course this can make the support harder (potentially much harder) to remove and depends on the Z distance setting between the model and the support as a compromise between quality and removal difficulty, but it should give you much better results.
, @ R.. GitHub STOP HELPING ICE
▲ 4
Short answer: With FDM, you can't create curves that go in the Z direction. A better question is why?
Let's see why it is rough: the roughness depends on the height of the layer and the thickness of the perimeters (walls). At some point, perimeters of a given thickness must be positioned in such a way that they no longer completely cover. Let's look at this styling example. First, what does a sphere look like near the equator? Well, the setup is pretty easy. Imagine that each printed wall is a rectangular cross-section and you end up with this pattern:
As you move up the print, the overlap between each subsequent layer gets smaller and smaller. Somewhere in between we are in this situation:
Until this happens at the top of the dome: The footsteps seem to get rougher and rougher and eventually create a very visible and tangible pattern of footsteps. Also, the top layer is skipped because it's not the full height of the layer.
But there are ways to mitigate the sphere problem to some extent.
- significantly reduce the layer height in areas that are strongly curved, although this directly affects print time and may affect quality.
- Do not use an FDM printer but an SLS printer with a layer height that is a fraction of the layer height possible with FDM
- Cut your sphere. An example of cutting is here, but there are other options. If print orientation isn't a must, you can even cut the sphere and reorient it to achieve this, mitigating both the layer issue and the use of 0:9 support0188
The only sure way to get rid of layer lines is in post-processing. In this case, I highly recommend using filler and then sanding off the excess material.
, @ Trish
▲ 0
I've noticed that the best way to make it smooth without support is to have the printer print the insides of the model first.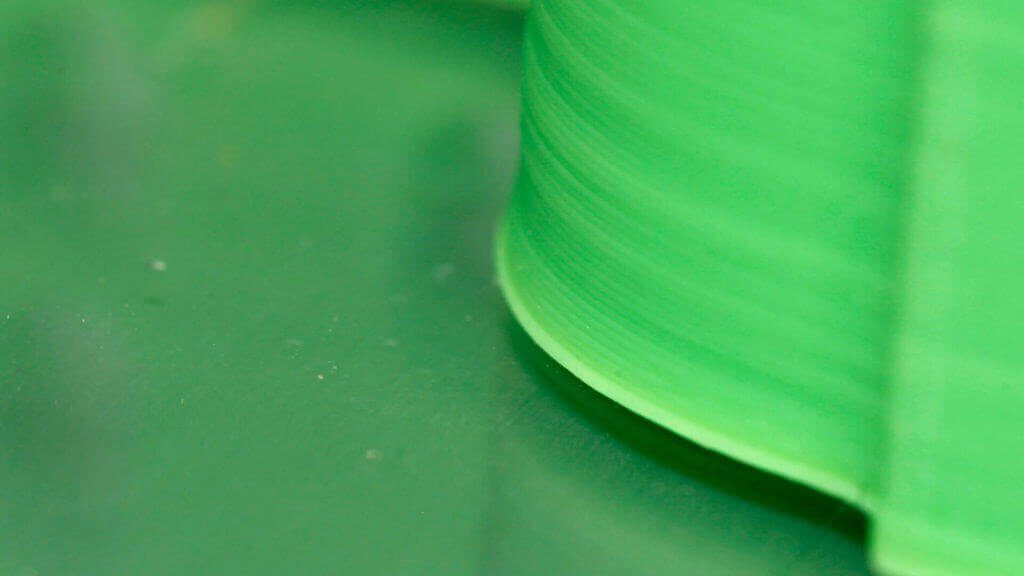 So it gives the hanging layer something to hold on to. I turn my AC window unit so it's facing the printer so it cools the filament quickly. Then you'll want to fiddle with the heat of the extruder. Try to keep it as low as possible, but keep an eye on the good sticky bad sticky range. If the first overhanging layer is close to the table, turn off the table heat. Then fiddle with the flow try to make it low but not super low I go down to 70
, @ Marcus
How to get a smooth surface on a 3d model using Cura Ironing
3DPrintStory 3D printing process How to achieve a smooth surface of a 3d model using Cura Ironing (smoothing)
Hello everyone. In this article, I will review the slicer function Cura - Ironing , which in English means Smoothing .
Reasons for the roughness of the top layer
With each new layer, the 3d printer nozzle rises to a predetermined height. As you know, we choose the layer height based on the quality requirements of the finished product and the nozzle diameter. So, the layer height is always less than the nozzle diameter, which is necessary for good interlayer adhesion. If we take into account that the height of the layer is 1-2 tens, and the diameter of the extruded rod for the nozzle is 4 tens, it is from 0.42 to 0.48 millimeters, which is related. with the so-called end effect, then with an increase in the diameter of the extruded profile at the outlet of the forming tool, in our case, the nozzle, it becomes clear that the filament thread after fusing onto the previous layer is no longer a circle, but a rectangle or an oval. This leads to the fact that adjacent lines at the junction with each other form irregularities and roughness on the surface of the finished product. To avoid this unpleasant effect, the function of smoothing the top layer, called ironing, will help.
It works as follows. On the top layer, the nozzle almost completely stops feeding the material and instead, acting like a hot iron, melts and smoothes the surface of the product, as a result of which the top layer of the model should turn out to be smooth. Naturally, this function can only work on models with a flat top layer.
In order to activate this function, we must go to the tab preferences, configure Cura, then go to settings and in wall section enable all functions with the word ironing. We click close and we see that all the parameters we activated appeared in the wall settings tab.
Cura's main parameters for smoothing the top layer
Let's figure out which parameter affects what. First of all, we activate the smoothing function. Next, you should choose whether the nozzle will smooth only the last layer, or all the upper layers of the part. There are two types of smoothing here - either zigzag or concentric. Choose what you like best. There is no significant difference between these types of smoothing.
Next is a function of the distance between nozzle passes. The standard value - 0.1 mm - provides the best surface quality, but at a small loss of time. The optimal value for a 0.4 mm nozzle that I found is 0.3 mm. With it, the quality does not deteriorate, and compared to a distance of 0.1 mm, we save a little on 3d printing time. If you set the value to 0.5 mm, then gaps between nozzle passes are visible.
Next comes the flow. The default value is 10 percent at nozzle idle. The extruder still feeds some material to fill the voids. I ran tests. The results are in the figure below. The results show that the best surface quality is achieved with a flow rate of 20 percent. If the material flow is completely turned off, this will lead to a gap between the nozzle passes, and if the feed value is increased by 30 percent, then there is an overflow of plastic and sagging on the top layer.