
3D print holes in top layer
Gaps in Top Layers
Gaps in Top Layers
To save plastic, most 3D printed parts are created to have a solid shell that surrounds a porous, partially hollow interior. For example, the interior of the part may use a 30% infill percentage, which means that only 30% of the interior is solid plastic, while the rest is air. While the interior of the part may be partially hollow, we want the exterior to remain solid. To do this, Simplify3D allows you to specify how many solid layers you want on the top and bottom of your part. For example, if you were printing a simple cube with 5 top and bottom solid layers, the software would print 5 completely solid layers at the top and bottom of the print, but everything else in the middle would be printed as a partially hollow layer. This technique can save a tremendous amount of plastic and time, while still creating very strong parts thanks to Simplify3D’s great infill options. However, depending on what settings you are using, you may notice that the top solid layers of your print are not completely solid. You may see gaps or holes between the extrusions that make up these solid layers. If you have encountered this issue, here are several simple settings that you can adjust to fix it.
Common Solutions
Not enough top solid layers
The first setting to adjust is the number of top solid layers that are used. When you try to print a 100% solid layer on top of your partially hollow infill, the solid layer has to span across the hollow air pockets of your infill. When this happens, the extrusions for the solid layer have a tendency to droop or sag down into the air pocket. Because of this, you generally want to print several solid layers at the top of your print to ensure a nice flat, completely solid surface. As a good rule of thumb, you want the solid section at the top of your print to be at least 0.5mm thick. So if you are using a 0.25mm layer height, you would need at least 2 top solid layers. If you are printing at a lower layer height such as 0.1mm, you may need 5 solid layers at the top of your print to achieve the same effect. If you are noticing gaps between the extrusions in your top surface, the first thing you should try is increasing the number of top solid layers. For example, if you noticed the problem using only 3 top solid layers, try printing with 5 top solid layers to see if the problem is improved. Note that additional solid layers will occur within your part dimension and do not add size to the exterior of your part. You can adjust the solid layer settings by clicking “Edit Process Settings” and selecting the Layer tab.
Infill percentage is too low
The infill on the inside of your part will act as the foundation for the layers above it. The solid layers at the top of your part will need to print on top of this foundation. If your infill percentage is very low, there will be large air gaps in your infill. For example, if you are using an infill percentage of only 10%, the remaining 90% of the interior of your part would be hollow, and this would create some very large air gaps that the solid layers would need to print on top of. If you have tried increasing the number of top solid layers and you are still seeings gaps in the top of your print, you may want to try increasing your infill percentage to see if the gaps go away. For example, if your infill percentage was previously 30%, try using a 50% infill percentage, as this would provide a much better foundation for the solid layers at the top of your print.
Under-Extrusion
If you have tried increasing the infill percentage and the number of top solid layers, yet you are still seeing gaps in the tops of your print, then you likely have an under-extrusion issue. This means that your nozzle is not extruding as much plastic as the software expects. For a full description of this issue and how to correct it, please read the Under-extrusion section.
Related Topics
9 Ways How to Fix Holes & Gaps in Top Layers of 3D Prints – 3D Printerly
Having gaps in the top layers of your 3D prints aren’t ideal in any circumstance, but there are solutions which you can try to solve this problem.
The best way to fix gaps in your top layers is to increase the number of top layers in your slicer settings, increase infill percentage, use a denser infill pattern, or look towards fixing under extrusion issues. Sometimes using a default slicer profile works perfectly to fix gaps in top layers.
This article will attempt to guide you through fixing this problem, so keep reading for a detailed solution.
Why Do I Have Holes & Gaps in the Top Layers of my Prints?
Gaps in prints can be a result of several errors related to the printer or the print bed. To identify the origin of the main issue you should consider overviewing some of the main parts of the 3D printer.
Below we have mentioned a few reasons which might be a reason for gaps in your 3D prints as well.
Reasons for gaps in 3D prints may include:
- Adjusting number of top layers
- Increase infill density
- Under-extrusion, over-extrusion and extruder skipping
- Fast or slow printing speed
- Filament quality and diameter
- Mechanical issues with a 3D printer
- Clogged or worn out nozzle
- Unsteady surface
- Unexpected or immediate temperature changes
How to Fix Gaps in the Top Layers of my 3D Prints?
The video explains one side of having gaps in top layers, which is also known as pillowing.
To improve your printer’s performance and the output’s quality, there are several ways you can practice to do so.
Sometimes just using a default profile for your 3D printer works a treat, so definitely try that beforehand. You can also find custom profiles that other people have created online.
Now let’s get into the other solutions that have worked for other 3D printer users.
1. Adjusting Number of Top Layers
This is one effective method of getting rid of gaps in print layers. The solid layer’s extrusions tend to drop and drool in the air pocket because of your partially hollow infill.
The fix is simply changing a setting in your slicer software:
- Try adding more top solid layers in your slicer
- A good rule is to go by is to have at least 0.
 5mm of top layers in your 3D prints.
 - If you have a layer height of 0.1mm, then you should try to have at least 5 top layers to satisfy this guideline
- Another example would be if you have a layer height of 0.3mm, then use 2 top layers which would be 0.6mm and satisfy the 0.5mm rule.
This is probably the easiest fix in the problem of holes or gaps in your 3D prints since it’s a simple setting change, and it’s very effective in tackling this problem.
If you can see infill through your top layer, then this should help significantly.
2. Increase Infill Density
Another common reason behind having holes and gaps in your 3D prints is using an infill percentage which is too low.
The reason this happens is that your infill kind of acts as supports for the higher parts of your 3D prints.
A low infill percentage would mean less support, or foundation for your material to adhere to, so it can lead to melted plastic drooping which causes those holes or gaps.
- The simple fix here would be to increase your infill percentage for a better foundation on your 3D prints
- If you use an infill density of around 20%, I’d try out 35-40% and see how things work out.
- A setting in Cura called “Gradual Infill Steps” allows you to enable a low infill density at the bottom of your print, while increasing it for the top of the print. Each step you use means that the infill will be halved, so 40% infill with 2 steps goes from at the top 40% to 20% to 10% at the bottom.
3. Under-Extrusion and Extruder Skipping
If you are still experiencing holes or 3D printing gaps between layers or in your top layers, then you probably have under-extrusion issues, which can be caused by a few different issues.
Extrusion issues may include under-extrusion or your extruder clicking which effects the printing badly, and signals some weakness in your extrusion system.
When the amount of filament that your 3D printer thinks is going to be extruded is actually less, this under-extrusion can easily result in missing layers, small layers, gaps within your 3D print, as well as little dots or holes between your layers.
The most common fixes for under-extrusion are:
- Increase printing temperature
- Clean nozzle to clear any jams
- Check that your nozzle isn’t worn out from several hours of 3D printing
- Use better quality filament with good tolerances
- Make sure your filament diameter in slicer matches actual diameter
- Check flow rate and increase your extrusion multiplier (2.5% increments)
- Check if the extruder motor is working properly and is provided with enough power or not.
- Adjust and optimize layer heights for your stepper motor, also called ‘Magic Numbers‘
Check out my article on How to Fix 3D Printer Under-Extrusion – Not Extruding Enough.
Other fixes that could help out in this instance are to make sure your filament feed and extrusion path is smooth and clear. Sometimes having a low quality hotend or nozzle just doesn’t do the best job at melting the filament adequately.
When you upgrade and replace your nozzle, the changes that you can see in 3D print quality can be quite significant, which many people have attested to.
I would also implement Capricorn PTFE tubing for a smoother filament feed into your nozzle.
4. Adjust Printing Speed to be Faster or Slower
Gaps can also occur if your print speed is too high. Due to this, your printer might find it hard to extrude filament in less time.
If your 3D printer is extruding and accelerating at the same time, it can extrude thinner layers, then as it decelerates, extruder normal layers.
To fix this issue, do try the following:
- Adjust speed by increasing or decreasing the speed by 10mm/s, which can be done specifically just for top layers.
- Check print speed setting for different factors like walls or infill etc.
- Check for acceleration settings along with the jerk settings to avoid vibration, then decrease these also
- 50mm/s is considered a normal speed for your 3D printer
It allows for more cooling which lets your filament harden to form a better foundation for the next layer. You can also print a fan duct to direct cool air straight to your 3D prints.
Check out my article What is the Best Print Speed for 3D Printing? Perfect Settings.
5. Check Filament Quality and Diameter
Incorrect filament diameter can cause printing complications bringing gaps in layers. Ensure your slicer has the ideal filament diameter.
Another reliable method of ensuring this is by measuring the diameter yourself with the help of calipers that you have the correct diameter specified in the software. The most commonly found diameters are 1.75mm and 2.85mm.
The stainless-steel Kynup Digital Calipers is one of the highest rated calipers on Amazon, and for good reason. They are very accurate, up to an accuracy of 0.01mm and very user-friendly.
- To keep your filament perfect for a long time, read the guide properly.
- Get a filament from the best manufacturers to avoid headaches of the future.
6. Correct Mechanical Issues with the 3D printer
When it comes to machines, small or big issues may arise. However, the thing is to be aware of how to fix them. Your 3D printer may experience mechanical issues that can bring gaps in the printing. To fix it, try out the following things:
- Machine oiling is necessary for smoother movements and general maintenance
- Check if all parts are working properly or not
- Make sure screws are not loose
- Z-axis threaded rod should be placed accurately
- The print bed should be stable
- Check printer machine connections
- The nozzle should be tightened correctly
- Avoid using floating feet
7. Fix or Replace Clogged/Worn Out Nozzle
The clogged and contaminated nozzle can also significantly bring gaps in 3D Printing. So, check your nozzle and if need be, clean it for better print results.
- If the nozzle of your printer is worn out, then purchase nozzle from a trusted manufacturer
- Keep cleaning nozzle with proper instructions as mentioned in the guide.
8.
 Put Your 3D Printer on Steady Surface
An unstable or vibrating surface cannot bring the perfect print out. This surely can bring gaps in printing if the machine vibrates or is likely to get unstable because of its vibrating surface.
- Fix this issue by placing the printing machine at a smooth and stable place.
9. Unexpected or Immediate Temperature Changes
Temperature fluctuations can be a great reason for your print to get gaps while printing. This is the most important issue which should be fixed immediately because it decides the flow of plastic as well.
- Use a brass nozzle as it works best when it comes to thermal conductivity
- Check if the PID controller is tuned or not
- Keep checking that temperature should not fluctuate immediately
Check out this video by CHEP for some more helpful tips to fix gaps in your prints.
Conclusion
Gaps between the top layers of 3D print can be a result of various printer’s shortcomings we have mentioned above. There can be more reasons for these gaps, but we have mentioned the major one.
If you figure out the likely root cause, it’ll be easier to solve the error. The main thing is to read the guide thoroughly when you are going to use any printing machine if you want to bring perfection to your work.
3D printing defects - Let's try to introduce classification
Good afternoon, dear visitors of the portal.
Today I decided not to go into the artistic part of our work, but again into the scientific one.
By coincidence, I graduated from the university with a degree in foundry engineering. Why am I mentioning this: firstly, for the last 10 years, the foundry has been threatened that it will die due to stamping and 3D printing.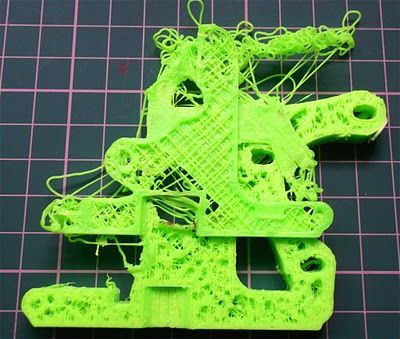 Secondly, foundry uses a lot of its own terminology. Today I want to try to describe the main defects in 3D printing, possible names and ways to deal with them (defects, not names). Of course, within the framework of one article on one portal, we will not introduce our own terminology, but at least there will be something to discuss. I invite you to read and adequately comment.
Defect : Warp
Commonly used description: Peel off platform, bend
Description : Geometry distortion. Due to the transition of plastic from one state to another (liquid - solid-liquid - solid) and temperature changes, the plastic begins to decrease in volume. This process is uneven - first the edges cool down, and then only the central part. Because of this, internal stresses arise that tear off the edges or break the part.
Now some physics and explanation. It is IMPOSSIBLE to get rid of thermal shrinkage or shrinkage. This is a physical process - you can only compensate for it. In addition, remember - shrinkage of 0.5 -0.9% is mentioned everywhere. But this is only linear, which means you will have more volume.
How to fight:
- Reduce fill - less plastic, less to shrink - less tear force.
- Use a hot table - you heat up the lower layers, which gives an even distribution of stresses inside the part.
- Outline - You can print an outer layer around the part. This creates a kind of thermal barrier around the part, thereby maintaining the temperature throughout the volume, resulting in an even distribution of stresses throughout the part. An alternative is a closed build chamber, serving in the same way
- Use structural elements - First, check that your part is lying well on the table - if your flat side of the part is not flat at all (in art it's easy - to move a couple of polygons or vertices to the wrong place on a couple of mm), then it will easily come off.
 Secondly, if you understand the physics of the process, you can either add material somewhere, or make a hole in the part, etc. In this way, you will artificially cause stress redistribution in the part, however, this method is extremely complicated.
 - Increase grip strength - you don't have to fight stress, just provide the required grip strength. However, this option does not seem very good to me - these stresses will remain and your part can then be easily broken in this place.
Defect : Skewed
Frequently used description: Layers floated, the vertical is not respected, the layers do not lie exactly on top of each other
Description: Several variants of this defect are possible. Either the layers just lie unevenly, or the model is printed somehow in pieces, or just a slight skew. This defect is usually associated with the mechanical part of the printer. Due to friction, the actual path of the print head does not match the one that was loaded into the machine.
How to fight:
- Check the belts. Since there are many designs, it is difficult to give a universal answer here. Check that they lie normally at the points of contact and are not frayed anywhere. Look at the printer's instructions or some tips on the Internet - it is quite possible that the problem has already been sorted out before you.
- If the printer simply shifts the layers relative to each other, then it is possible that the pulleys are not fixed properly. With a black marker, you can mark the position, and after printing, compare and tweak this place if necessary.
- Move the print head without power - it should move without significant problems. If this is not so, then maybe it is worth finally lubricating the shafts?
- Squareness not ensured - again, due to poor mounting, the X and Y axes may not be perpendicular. This can lead to this defect, which means it's time to climb into the printer again and twist.
- Check the print platform - the glass may start to slide on your printer.
 And just like that, in the same direction. In this case, it is necessary to ensure its fixation in some way.
 - Electronic problem. Rare case, but possible.
Defect : Boiling, Puffiness (?)
Common Description: Holes in top layer, problem with outer layer.
Description : Protrusions on the upper layer of the part - can be either open or closed. In fact, this is due to the sagging of the plastic, which does not have time to cool when printed in the air without supports. Considering that there can be several such layers and all of them are of poor quality, we get this defect.
How to fight:
- Provide cooling - your plastic should cool well on the top layer. According to the recommendations, at this stage, cooling should go as much as possible.
- Ensure sufficient layer and wall thickness - In addition to sufficient cooling, you must have the required number of layers.
 Again, according to the recommendations, your wall should consist of at least 6 layers of your thickness. Thus, when printing with a layer of 0.1 mm, you want your wall to be at least 0.6 mm. But remember - too thin base layers will not work either - they simply will not hold themselves and other layers.
 - Try changing the occupancy - some slicers change the occupancy configuration at a certain percentage of infill, so the difference can be even between 24% and 25%. In addition, with a larger fill, the distance that is printed in the air is smaller, which can also remove this defect.
Defect : Lack of layers (?)
Commonly used description: Round things do not come out round, parallel straight things do not come out parallel
Description : Sometimes the geometry of the layers is not observed - this can manifest itself in circles, when the circle is not perfect, as well as in parallel lines. For example, parallel lines first diverge a little, and then, on the contrary, slightly overlap. This is due to the belts going to the stepper motors - most likely they are not fastened tightly enough.
How to deal:
- Tighten the straps near the print head - how to do this is best to look at the 3dtoday portal or ask your 3d printer supplier.
- Check that all fasteners are tight - use the tool that most likely came with your kit to do this
- Lubricate the guides - literally add one drop of light lubricant to your guides.
Defect : Elephant Leg
Commonly Used Description: Thick bottom layers, uneven layers at base.
Description : The effect when the bottom layers of your part are larger in area than they should be. Due to the fact that the nozzle at the beginning of printing is firmly pressed against the printing table at the beginning of printing, the layer begins to smear a little, thereby decreasing in thickness, but increasing in area. Then the print is evened out, because there is no longer a tight pressure
How to fight:
- Adjust the table - your nozzle should not rest against the print platform - there should be a slight, but still gap.
- Reduce the table temperature - a slight decrease in the table temperature can also reduce this defect. Do not get carried away with these methods too much - this may degrade the overall print quality.
- Structural model improvements - add small chamfers or fillets. You will have to play around with the settings a bit, but thanks to such a design improvement in the model, your model will be smooth and beautiful. However, it is impossible to say for sure which chamfer to make. Start with a 0.5 x 45 bevel, and then empirically find the best option.
Defect : External slack (?)
Common description: Snot, plastic between two parts part to another, a long, thin layer of plastic is created that spoils the outer shape of the part(s). This is due to the fact that the plastic that remains at the tip of the nozzle under the influence of gravity and friction is caught on one part and begins to drag through the air. Depending on the fluidity parameter and the hardening time, different plastics exhibit this defect in different ways.
How to fight:
- Use the retract function - thanks to it, the print head will slightly return the plastic, thus removing it from the tip of the nozzle. This setting is activated directly in the slicer (if it supports it). In the Cura slicer, the retract is drawn with thin blue lines and you can check this moment at the level of the finished task.
- Increase your print speed - the physics is simple - by increasing your print speed, you reduce the amount of time the plastic can catch on your part. However, increasing the print speed is not always possible and may cause other defects.
- Change the print temperature - print temperature has a direct effect on fluidity, especially with PLA.
 Reducing the temperature even by 10 degrees significantly reduces the effect of external sagging.
Defect : Waviness
Commonly used description: Discoloration at the edges of the part, defects along the edges
Description : This defect appears as darkening and slight waviness around the sharp ends. If you start typing the text, it will look like a slight shadow effect on it. This is due to the inertia that is imparted to the liquid plastic during printing. Regarding plastic, the print head has a large mass and during a sharp change in direction, liquid plastic is not able to sharply repeat the trajectory, which causes slight waviness in the corners.
How to deal with:
- Decrease print speed - Decreases print speed, reduces sharpness at corners, thereby smoothing the effect.
- Decrease print head acceleration - these settings are not available in all slicers, however, this will eliminate the defect without reducing the print speed.
- Change the print temperature - as we mentioned earlier, temperature affects fluidity, so lowering the print temperature can help get rid of the defect.
Defect : Looseness, Sagging (?)
Frequently used description: Snot on the part, sagging plastic on the part
Description: One of the most common and basic defects in plastic is due to printing in the air sags instead of getting a flat horizontal surface. This is due to the fact that the plastic does not have time to cool down and is printed without support where they are needed. Sagging can occur for many reasons, although the physical nature of the defect is practically unchanged. Because of this, the elimination of this defect may not be obvious.
How to fight:
- Cooling - Depending on the plastic, you may or may not need cooling. If it is necessary - provide it as much as possible.
- Print more than one part - for small parts, printing more than one part will help a lot.
 This will remove the heat source and give your part time to cool.
 - Work with the thickness of the layer - it is not possible to make a recommendation whether it is better to increase the layer or reduce it. Each situation must be decided, however, changing the thickness of the layer can improve or worsen the effect of sagging.
- Reduce print speed - very often reducing print speed can improve the quality of your part.
- Reduce temperature - if you decrease the temperature, the plastic will cool faster to a solid state. However, do not lower the temperature too low, otherwise the print quality may drop.
- Reposition the part - if possible without loss of quality, try to position the part differently. Stop, think, or use auto-positioning (like Meshmixer). Instead of fighting a defect, you can often simply eliminate it.
Defect : Layering of the bottom layer
Commonly used description: Clearly defined bottom layer, thick lines of the bottom layer
Description : Printing the bottom layer is one of the most important moments in printing. If we print too close, we will get an elephant leg defect. In the case of a large gap, we can get excessive layering of the lower layer.
How to deal with:
- Decrease the thickness of the first layer - many slicers have the ability to change the first layers of printing. Try to make it smaller to achieve a result that suits you.
- Recalibration - many problems with the bottom layers can be solved by recalibrating the table. Set the distance a little less and you might get the desired result.
Defect : Underextrusion
Common Description: Holes in Print, Layer Problems, Surface Defects
Description : Underextrusion is a defect worthy of its own article with a description. It can occur as a result of a huge number of factors, both related to the printer and plastic. It is very easy to observe it - the surface of the part comes out not even, but with all sorts of inclusions, or vice versa, the absence of plastic where it is needed.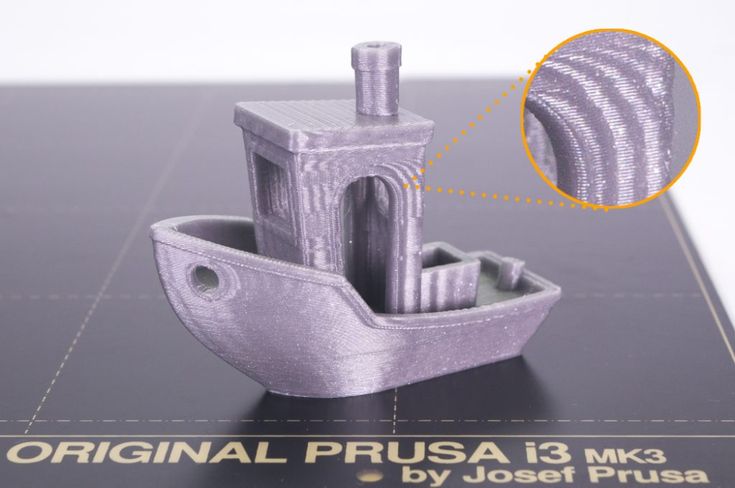 To eliminate this defect, an integrated approach may be required.
How to deal with:
- Change the speed - your printer may not technically be able to print at this speed. You may need to lubricate it or change the plastic, but first try printing at a slower speed. In addition, not all parts and not all plastics, the printer can print at maximum speed
- Change the temperature - all plastics have recommended temperatures for printing. If you print at the wrong temperature, then you do not provide the required fluidity parameters for working with this plastic and you will not print correctly with it.
- Check plastic - plastic may be damp, dirty or of poor quality. All this can lead to under extrusion, or that you will not print at all. In addition, plastic can break due to the feed mechanism and its strength properties. You may not be able to print with this plastic. Or maybe his diameter is walking .. As you understand, changing the plastic to another will allow you to quickly understand the problem in the printer or consumable.

- Check the paper feed mechanism - if you are working with soft plastic, the plastic may creased too much, which will prevent you from printing properly. Then, most likely, it will be necessary to loosen the grip of the bar, however, this should be done only after contacting those. support if you are doing this for the first time.
- Check the bar - during printing, sometimes your bar may become knotted or something is preventing it from entering the extruder. Be sure to check it out right now.
- Change or clean the nozzle - your nozzle will not last forever. In the course of work, it will become dirty - both from the soot of plastic, and from the dust that you allowed. Always have a pair of replacement nozzles available to help you understand this problem. In addition, when you refill plastic with a lower printing temperature, print at a high temperature so that the remnants of the old plastic completely come out and do not interfere with work.
- Check slicer settings - some slicers may use nozzle retraction and nozzle cleaning to get rid of external slack.
 Because of this, when you return the print head, you do not immediately start feeding plastic. This can lead to underextrusion in some parts of the model.
 - Check the Teflon tube - due to dirt allowed in the printing area, the Teflon tube may become contaminated. Because of this, the rod will experience friction, which will lead to underextrusion.
- Check the gears - if the gears that grip the bar do not work properly, then it will be problematic to exit the nozzle. If simpler measures do not suit you, check that this mechanism works correctly.
Defect : Notches (?)
Common description: Walls do not fuse together. Hollows in the walls.
Description: Mechanical problem. Due to the limited path of the printing part, there are voids and inconsistencies between the walls. Contact may be partial or absent entirely.
How to deal:
- Tighten the straps near the print head - how to do this is best to look at the 3dtoday portal or ask your 3d printer supplier.
 This option is best used in case of partial contact.
 - Reduce the print speed - plastic may not fit well at this speed. A slight increase in temperature may also help.
- Change the wall settings - this problem may arise due to the principle of laying this very wall. If you have a 0.3 nozzle, then it is impossible to lay a 1 mm wall in ideal layers of 0.3 mm. So the program can either represent the wall as 0.9mm and lay 3 layers, or somehow compensate for this. Try changing the wall thickness and maybe you can get rid of the defect.
Defect : Scratches
Commonly used description: Surface scratches and color unevenness
Description : During the movement of the surface, the print head leaves a mark on the plastic due to close contact with the plastic. This can be either grazing old plastic or smearing new plastic that flows out of the nozzle due to contact.
How to deal with:
- Increasing speed and decreasing temperature - as in other similar defects, when plastic leaves a mark, increasing speed and decreasing temperature can reduce the effect of this problem.

- Slicer setting change - To a large extent, this defect can be controlled by the slicer. Using Cura as an example, you can use the z-hop function (raises the nozzle). In addition, you can work on the retract.
- Change in geometry - this defect can still appear on complex surfaces. Try adding an even layer to your model or simplifying the geometry altogether if you're having this problem and it's making your life worse.
Defect : Underfill
Common Description: Part prints strangely. Incorrect entry of the part. Print supports where they shouldn't be
Description : The type of defects associated with the electronic model - can be associated with many things. If the polygons have incorrectly directed normals, if the model is not fully stitched (there are holes) or consists of several elements - all this can lead to this type of defects, when the slicer will misunderstand what they want from it.
How to fight:
- Check the model in Netfabb/Meshmixer - with the help of specialized products you can check the model and see what errors it has. These programs eliminate many of the problems that were made before printing. However, these programs may distort your geometry.
- Fix the electronic model - if you have the skills and the ability to use the functionality of 3d programs to fix the mesh. Sew the meshes, close the gaps, reverse the normals, then check the resulting g-code. In it you will see how your model will be printed and whether everything suits you.
Defect : Fluffiness
Commonly used description: Model as in hair. Snot. Sagging.
Description : Reduced external sag. Small hairs stick out on the model, which remain from the printing nozzle. The physics of the phenomenon is the same, but the amount of plastic is much less. However, this defect can occur even if the nozzle does not move from one object to another.
How to fight:
- Check the plastic - your plastic may be dirty or poorly made. Try a different plastic and you may be able to get rid of the
- Check the nozzle - this fluffiness may be the first sign that something is wrong with the nozzle. Check the outside of the nozzle to make sure nothing is sticking out or try a different nozzle
- Remove the defect after work - this is the rare type of defect that is quite easy to get rid of by post-processing. Use a sandpaper, needle file or other handy tool.
Defect: Skipped layer
Common description: The layer is different from the other layers in the model. The model is flaking into pieces
Description: The case when one or more layers differ from the others. Then comes stable printing and the defect may recur. May be due to underextrusion or machine problems.
How to deal with:
- Familiarize yourself with underextrusion - it is possible that you will see more similar defects and you will know how to proceed.
- Lubricate the Z-track - since the table moves in the Z direction, it is possible that in some areas you have accumulated dirt or lack of lubrication. Lubricate the guide as recommended by the manufacturer and check operation.
- Bearing problem - it is possible that the problem is not in the guide, but in another element of the lifting mechanism. In this case, you need to check the bearing adjustment or return the printer for service. Look for more information on the portal 3dtoday
- Too much lubrication - too much lubricant - does not mean better. It can start to easily accumulate dirt and again begin to cause this effect. Wipe the shafts and lubricate with the necessary amount of material.
- Electronic problem - it is possible that the problem is not with the mechanical, but with the electronic part of the movement. If other methods do not help, then most likely the printer may need to be returned for repair.
- Defective parts - unfortunately this happens.
 It is possible that everything is done well, but some part of the mechanism is out of order. Again, this cannot be solved without disassembling the printer.
Defect: Misalignment of axes
Commonly used description: No right angle.
Description: Cases where the mating parts of the mechanism do not fit into the grooves due to misalignment. Another way to identify a problem is that the printer head moves with force.
How to fight:
- Editing axes - the defect is eliminated only mechanically. Ask the supplier or manufacturer for information on how to correct the axes and then reconfigure the printer.
I do not claim to be the final authority. For my part, I would like an adequate discussion and proposals in order to supplement and develop this article and formulate it into a finished version. Icons? mean that I still do not consider this name final and I expect other proposals for names from you. Only the names should be sensible so that a person imagines what it is and uses a short word to define it. It is better to mark grammatical and lexical errors in my personal - I hope we will agree with the editors so that they give the opportunity to correct the article. The material is based on this source. I did not specifically add some defects that are not related to the plastic, the printer and the printing mechanism (such as the detachment of the part from the table and the poor performance of the electronics), although you may say that it is more logical to add. In short, ready for discussion.
Sincerely, Sergey Panin
Problems, defects, 3D printing errors and solutions
Often during the operation of a 3D printer, problems may arise due to which defects appear on the finished model. Or instead of a neat product, plastic noodles suddenly appear on the table.
In fact, the causes of defects can be conditionally divided into 2 types - these are physical and software.
Physical ones are those that arise due to problems with the mechanics or any other causes that can be eliminated physically. These include problems with printer mechanisms (belt tension, backlash), clogged or deformed nozzle, incorrect table geometry, etc.
Software - these are defects that occur due to incorrect slicer settings or, less often, errors in the printer firmware. For example, incorrectly selected print speed, retract settings, incorrectly selected temperature for plastic, etc.
Very rarely, the problem may lie in the wrong or “flying” printer firmware (although usually the printer simply will not start then), overheating of some boards during printing, etc. These are rather special cases, so we will not consider them.
Model peels off or does not stick to platen
This is the most common 3D printing problem. Every 3D printer has had a case when the first layer treacherously rolls, clinging to the extruder, or the most offensive - when it tears off a partially printed model from the table. The first layer must stick tightly otherwise nothing will be printed.
Gap between table and nozzle 9 too large0010
This is the most common reason. You just need to set the correct gap between the table and the nozzle.
Modern printers often use an auto-calibration (auto-leveling) table system or an auxiliary table leveling program. To calibrate such printers, use the instructions. If there is no manual, it can be downloaded from the manufacturer's website.
If you have a simple printer without auto-calibration, a self-assembly or KIT kit, use a probe or a piece of paper folded in half to calibrate. The probe should be slightly pressed against the table by the nozzle. Before calibration, the table and extruder must be heated. Align the table surface over each adjustment screw (there may be 3 or 4) in turn, and only then check the center point.
If you're having trouble getting your table surface perfectly level, try raft printing.
Raft is a thick substrate in several layers that is printed under the model. It will help smooth out the slight curvature of the table.
A small cheat sheet to determine the correct gap on the first layer
Plastic with poor adhesion
Some types of plastic, due to various reasons, such as large shrinkage, do not adhere well to the surface of the printing platform. In this case, try using stickers or special 3D adhesives to improve adhesion between the table and the first layer of plastic.
In the early days of 3D printing, there were experiments with different homemade 3D adhesive recipes. ABS diluted in acetone, BF glue, sugar syrup and even beer. Some experiments have been successful. Until now, some enthusiasts use some types of hairspray or glue sticks as 3D glue. But still they are inferior in their properties to industrial 3D adhesives.
Some types of high temperature plastics with a high percentage of shrinkage (ABS, Nylon, etc. ) may peel off the table during printing. This is due to uneven cooling and “compression” of the model (the lower layers have already cooled down, but the upper ones have not yet). For such plastics, it is imperative to use a 3D printer with a heated table and a closed case.
Plastic temperature too low
The hotter the plastic is when it exits the nozzle, the better it will adhere to the print platform. It is better to print the first 5-10 layers at a higher temperature (+ 5-10 degrees) and turn off the blower fan.
Wrong first layer settings (speed and thickness)
A thicker layer sticks easier, so the standard first layer is 0.3mm thick. With an increase in print speed, the heating block may simply not have time to heat the plastic to the desired temperature and it will stick to the table worse. Before printing, check the speed and thickness settings of the first layer in the slicer.
A lot depends on how the 3D printer prints the first layer.
Try to control the printing of the first layer and only then leave the printer to work alone.
Plastic does not choke from nozzle
The printer has already begun to print, but the print table remains empty. Or part of the model did not print.
Clogged nozzle
In 3D printing, a nozzle is a consumable. The nozzles are clogged or worn out (frequency depends on the type of plastic). The simplest thing is to replace the nozzle. But if there was no spare at hand, you can try to clean the old one. To do this, there is a whole set of thin needles. Or you can heat a clogged nozzle above the melting point of the plastic and “burn out” the blockage. But later it is still better to replace the nozzle.
Low temperature nozzle
You need to increase the temperature of the extruder in the slicer settings or check the thermistor and heating block. Sometimes the thermistor may not read the temperature correctly due to a malfunction or incorrect 3D printer firmware settings.
If the problem occurs after replacing the thermistor - contact the manufacturer or read articles about PID tuning.
Empty extruder
As the extruder heats up, plastic begins to ooze out of the nozzle. Because of this, the extruder may start printing half empty. Because of this, part of the first layer is not printed. You can push the plastic manually by simply pushing the bar into the nozzle. Or solve this problem programmatically - in the slicer, add a contour print around the model (one line).
Some manufacturers and 3D enthusiasts add a line print on the edge of the table at the beginning of each GCode. This is done so that there is plastic in the nozzle by the time the model is printed.
Feed mechanism does not push through plastic
The plastic pushes the feed mechanism to the extruder - a motor with a special pulley put on the shaft. If for some reason the plastic is not pushed through (nozzle clogged, extruder temperature low, etc. ), then the pulley “gnaws” through the bar. You need to push the plastic bar with your hands or cut off the damaged piece.
Elephant foot
The first layers of the model are wider and protrude beyond the boundaries of the model. This is due to the fact that the upper layers put pressure on the first ones that have not yet cooled down and flatten them.
High table temperature
Due to the too high temperature of the table, the lower layers remain soft for a long time. Try lowering the table temperature. It is better to reduce gradually (in increments of 5 degrees). You can try to turn on the blower when printing the first layers.
Small gap between nozzle and platen
If, when printing the first layer, the nozzle is too close to the table, then excess plastic will be forced out. After a few coats, this will not be as noticeable, but can lead to the effect of an “elephant's foot”.
Plastic re-extrusion
When too much material is squeezed out of the nozzle, the walls of the model are not smooth, but bumpy, with sagging.
The solution is software - in the settings of the slicer, you need to set the material feed rate (fluidity) to a lower value. The average value is 95-98%.
It is worth checking the diameter of the rod. If its size is greater than 1.75, then the plastic will be squeezed out more than necessary.
Plastic underextrusion
The plastic is squeezed out too little, because of this, gaps may appear between the layer. The finished model will be fragile and fragile.
Wrong thread diameter
Check the filament diameter in the slicer settings. Sometimes, instead of the popular 1.75, the default is 2.85.
Incorrect feed rate settings
Check the fluidity settings in the slicer. The average should be 95-98%.
Clogged nozzle
Something could get into the nozzle and partially block the exit of the plastic. Visually, the plastic will choke from the nozzle, but in a smaller amount than necessary for printing.
Hairiness or cobwebs on finished model
Thin threads of plastic protrude from the outer wall of the model (most often on one side). The defect appears due to the flow of plastic from the nozzle during idle movement.
Insufficient retract
A retract is a slight pull of a plastic filament from an extruder. Due to the retract when the extruder is idle (from layer to layer or from model to model), heated plastic does not drip from the nozzle. For some flowable plastics (eg PETG) the speed and amount of retraction must be increased.
"Hairiness" can be easily removed by grinding or cutting off the threads with a sharp scalpel.
High temperature extruder
The higher the extruder temperature, the more fluid the plastic becomes. It is important to find a balance so that the plastic is not too liquid and sticks well in layers.
In the selection of the optimal extruder temperature, a test model - a tower - helps a lot. It clearly shows how plastic behaves when printed at different temperatures.
.
Temperature test
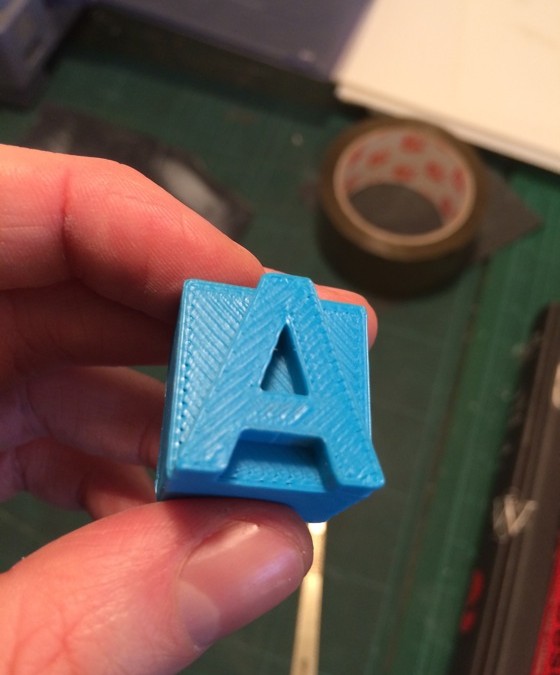
Perforated or uneven top
The top of the model is bumpy or with holes. The problem may arise if the top of the model is flat. For example, like a cube.
Insufficient airflow
When printing the top plane (cover), the plastic does not have time to cool down and remains too liquid. Because of this, the threads are torn and holes are formed. Increase the fan speed on the last layers.
Few top layers
The top of the print may be too thin and deform as a result. Check slicer settings. The number of upper layers is not recommended to be set less than 6.
Fill percentage low
If the infill percentage is too low, then the top layer will simply have nothing to rely on. Increase the fill percentage in the slicer settings.
Model deformation
Some parts of the model seem to have melted in some places or on one side. The problem most often occurs when printing with PLA plastic. The defect appears due to the fact that the plastic does not have time to cool and deforms.
Insufficient airflow model
Turn the fans on to maximum. If their power is not enough (in some printers, the fan is located only on one side), you can put a regular desktop fan and direct it to the 3D printer table.
Small model
Small models are difficult to blow well. Try to print small items alongside larger ones, or place several identical models in different corners of the table. So the plastic will have more time to cool.
Layer offset
Layers shift along the x or y axis during printing.
Print head jam
Turn off the printer and try to move the extruder along the x and y axes with your hands. The extruder must move freely. If there are jams, check the mechanics of the printer. Bearing wear or the curvature of the shafts may be to blame.
Electronics overheating
Sometimes electronics problems can be to blame for misaligned layers. The most common cause is overheating of the drivers or too low current exposed to them.
Table top is loose
This is most often seen in 3D printers with glass. During printing, the nozzle may hit the model and move the glass slightly. Before printing, check if the glass or other printing surface is well fixed on the heating table.
Skip layers
Small holes are visible on the print, or the shell of the model is not continuous.
Teflon tube deformed
There are 2 types of thermal barriers - all-metal and with a Teflon tube. If overheated, the Teflon tube may deform. Plastic will pass through it, but in a smaller amount.
Low extruder temperature or high print speed
If the extruder is not heated enough, then the plastic will not be liquid enough and simply will not have time to be forced through the nozzle.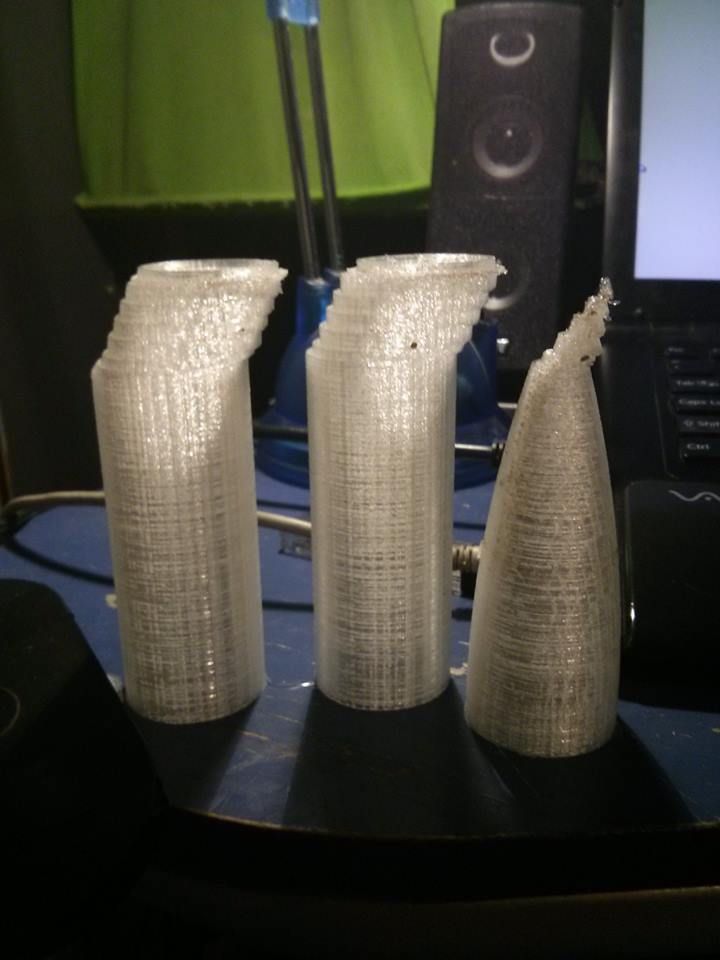 The higher the print speed, the higher the extruder temperature should be.
Sometimes the outer walls print well, but the infill is “torn”. In this case, slow down the infill print speed in the slicer.
Model bundle
Cracks form on the surface of the printout during or after printing. Cracks can be large or very small. Most often, this problem occurs with plastics with a high percentage of shrinkage - ABS or Nylon.
Sudden temperature difference (if model delaminates during printing)
With a sharp temperature difference (for example, a draft), part of the model cools down faster. This leads to uneven shrinkage and incorrect distribution of internal stress. For plastics with low shrinkage, this is not critical. But if the shrinkage percentage is more than a few percent, the model may burst in layers.
For printing with such plastics, it is recommended to use a printer with a closed housing. If this is not possible, try to avoid drafts and sudden temperature changes in the room where the 3D printer prints as much as possible.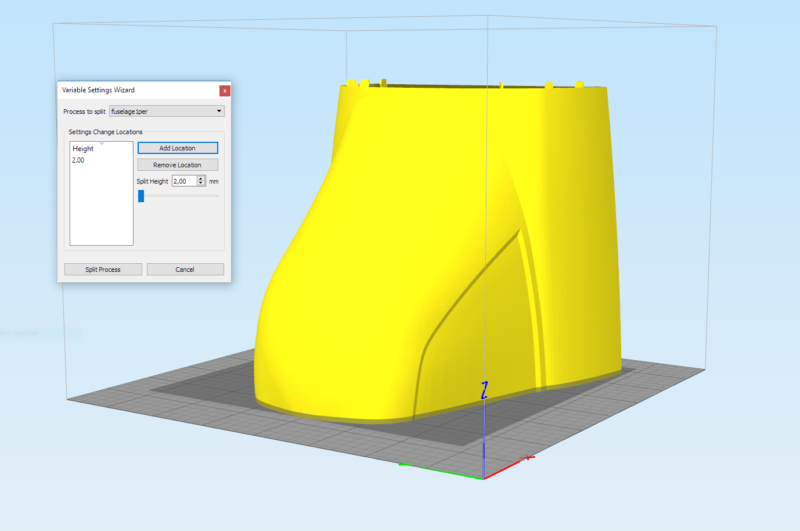
Print temperature
Due to too low printing temperatures, the layers may not “stick” well to each other. Raise the print temperature in the slicer settings.
Hardening (if the model cracks after printing)
Sometimes cracks appear on the model a few days after printing. This is due to uneven distribution of internal stress after cooling. You can try to “harden” the finished product.
For hardening, the model is placed, for example, in an oven, and heated to the softening temperature of the plastic. After that, the heating is turned off and the oven is left to cool slowly with the model inside. Due to this, the stress inside the print is distributed more evenly. But accuracy is very important in this method - if you make a little mistake with the temperature, the finished product can “float”.
Ringing
In places where the extruder changed direction, ripples are visible. Most often it looks like a shadow around the “sharp” protruding elements of the model.
Mechanical problems
Sometimes the problem occurs due to extruder play. Check if the extruder mount to the rails is loose. Be sure to check the tension of all belts.
High print speed or high accelerations
Moving the extruder too fast can cause vibrations that cause ripples on the wall of the model. The lighter the weight of the extruder, the less noticeable the ripples will be. To get rid of ringing, simply reduce the print speed in the slicer settings.
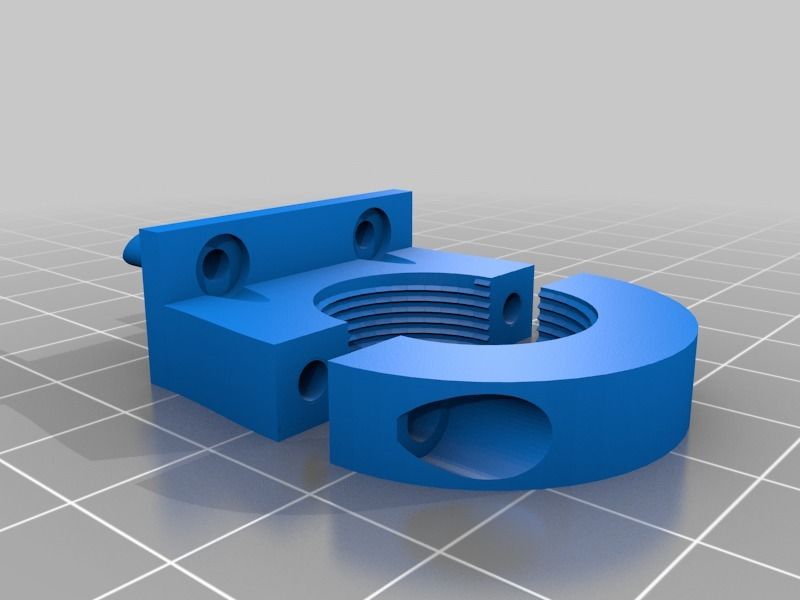
Slits for thin-walled models (not solid shell)
The thin wall of the model is not solid, but consists of two thin walls with a narrow gap between them. This problem is often faced by fans of printing "cutting" for baking.
Left model with wall defect, right without
Wall thickness and nozzle diameter mismatch
If the wall thickness is 1 mm, and the nozzle diameter is 0.4, it turns out that for a solid wall, 2 nozzle passes are few, and 3 are already many. The result will depend on the slicer algorithm, but most often you will get 2 walls with a thin slot in the middle (the slicer cannot change the wall thickness). The solution to the problem may be a slight refinement of the 3D model or the use of a different slicer.
Algorithms for calculating 3D models are constantly being improved and refined, and now this problem is less common.
When modeling, take into account not only the thickness of the nozzle, but also the percentage of “overlapping” of lines on each other. If you have a nozzle with a diameter of 0.4 - make the wall in your model not 0.8, but 0.7 - 0.75.
Wrong model geometry
When instead of a circle you get an oval, and instead of a square you get a semblance of a rhombus.
The main reason is malfunctions in the mechanics of the printer. Be sure to check:
Belts
Check belt tension in x and y. Belts stretch over time and may need to be tightened or replaced. Each 3D printer has its own way of tightening the belt. If the belts are slightly stretched, you can tighten them with the help of a "spring".
Loose pulleys, etc.
Check if all bolts and nuts are tight. Are there backlashes. Pay special attention to tightening the pulleys located on the motors along the x and y axes.
Sagging of some parts of the model
Some parts are not printed, broken, or instead of a neat surface, a swollen plastic snot is obtained.
No support for overhangs
A 3D printer cannot print in the air, so if there are overhanging elements in the model, you need to set supports - supports. The slicer can set the necessary support itself, you need to check the appropriate box in the settings.
When printing with soluble support, you can set the gap between the model and support - 0.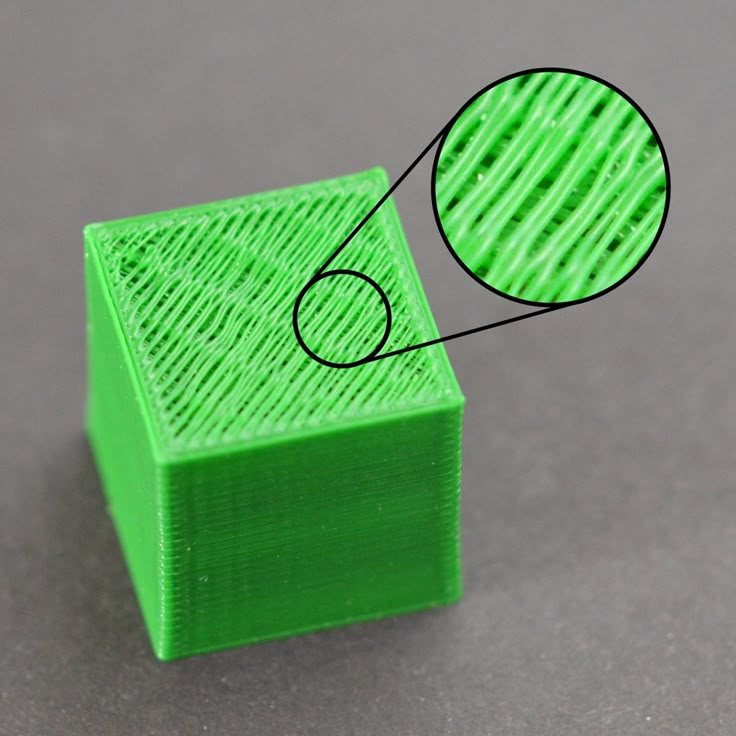 This will make the surface smoother. If the support material and the model are the same, you need to add a small gap. Otherwise, it will be difficult to separate the support from the model.
Divide model
Sometimes the supports can take more plastic than the model. In this case, to save material and time, it will be more convenient to cut the model. If you have more than one 3D printer, then the model will print several times faster.
When cutting the model, you can leave grooves or mortgages so that the pieces of the model are connected without displacement.
Totals
In this article, we talked about the most popular 3D printing defects and how to solve them. Don't be intimidated by such a long list. Some problems are rare and you are unlikely to encounter them.
There is a list of problems that arise due to the design features of a 3D printer, so try to choose a printer that suits your needs. To do this, you need to understand what products and what material you need.


