3D print combing
Cura Combing - What is it for and should I use it?
- Author
- Recent Posts
Martin
Martin has a M.Sc. in physics and has gained many years of experience in industry as a lab manager and quality assurance manager. He has now tested dozens of 3D printers and is happy to share the collected experience with each new article.
Latest posts by Martin (see all)
Disclosure: Links marked with * are Affiliate Links. I earn from qualifying purchases if you decide to make a purchase through these links – at no additional cost for you!
The free slicer software Cura is one of the most popular programs for 3D printing. However, its Combing function is highly controversial among the slicer’s many users, as it is not always necessarily helpful.
Therefore, in the following, more detailed information about the Cura Combing function and its use will be presented and it will be analyzed whether, and if so, in which work steps and processes the activation of the Combing mode is useful.
Table of Contents:
- 1 What is Cura Combing?
- 2 The Settings of Cura Combing
- 3 Use of Cura Combing for Traces on the Surface
- 4 Is the Use of Cura Combing Useful?
- 5 Alternatives to Combing in Cura
- 6 Further Information
- 7 Related Questions
- 7.1 With which 3D printers can the Slicer Cura with the Combing function be used?
- 7.2 For which operating systems is Cura available?
- 7.3 Does Cura Combing cost anything?
- 8 Conclusion: What is Cura Combing recommended for?
What is Cura Combing?
The free software Cura from the printer manufacturer Ultimaker is one of the most popular programs for slicing 3D objects. With this, you can prepare designs for your 3D printer yourself on the PC.
Cura Combing is a special function of Cura that protects the filament without retraction.
The Settings of Cura Combing
The so-called Combing mode of the Cura slicer software has four different setting options.![]() These include “Off”, “All”, “Not in Skin” and “Within Infill”.
These include “Off”, “All”, “Not in Skin” and “Within Infill”.
In general, you can think of it as the Combing mode telling the slicers the way to print, telling them to hold the nozzle where it tells them to, and also telling them to print only in those specific areas of the object.
By default, “All” is activated in Cura Combing. However, the function can also be changed to “Not in skin” and even switched off completely so that the printer retracts before each empty run. It is usually most useful to set the Combing Mode setting to Within Infill.
This reduces the number of retractions required and protects the filament. In this mode, the nozzle of your 3D printer remains within the filling areas of the object to be printed and does not move back and forth if it is not absolutely necessary. The print time may be a little longer, but you protect your filament.
Depending on the settings and the print object, unsightly threads may form on the model during 3D printing. These occur in particular if the printing temperature, the movement speed and the feed length are set incorrectly.
The calibration of the extender must also match the material used and the printing temperature. But even if these settings are all correct, the wrong combining mode can lead to stringing, i.e. so-called thread formation. Especially with the first layers of a 3D object and also with horizontal planes and ceilings, which is often called outer skin, stringing is often necessary and thus combining is not advantageous. That’s why you should set combing to “Not in Skin” in these steps and enter a combing distance of more than 0.
Use of Cura Combing for Traces on the Surface
Another common problem of many 3D printers are unwanted marks on the surface of the 3D object. They are also called scars, which are only in the top layer of the printed model and then appear when the printer’s nozzle moves to a new position, tracing already melted filament.
You can prevent these scars on the Cura slicer by reducing the flow rate to 100% and activating the Z-Hop function, or by reducing the print temperature. With the Combing mode, you can also prevent these unsightly marks on the surface of your 3D model. When you activate the mode, the print head of your printer moves along the contour and no longer crosses it so that no scratches occur on the surface.
Is the Use of Cura Combing Useful?
The Combing function is set to “All” by default in the Cura software, as already mentioned. However, this is not always necessarily useful. Especially when printing the outer skin, it is usually not helpful to leave Combing switched on, as this can cause strong thread formation in the outer layers of the printed object.
While you want to determine the correct values for the feed of your 3D printer, you should also turn off the combining to really get the correct values displayed.
As a general principle, you can remember the following regarding combining in Cura: The longer the distance of the empty run, the less sense it makes to have the combining switched on.
Simply set a “Max combing distance” with a few mm, because if the distance of the empty run is further than the combing distance, the printer will still make a feed, even if combing is activated. This is usually the best way to use combining.
Alternatives to Combing in Cura
Besides Cura from the printer manufacturer Ultimaker, there are numerous other slicers for 3D printers on the market. These include Simplify3D, for example. However, this software does not have a special combining mode like Cura itself.
In this slicer, to achieve the same effect as when combing in Cura, you have to activate the “Retraction over open areas only”, deactivate the “Forced retraction” and then activate the “Avoid crossing the contour”. If necessary you have to define a “Minimum path for the retraction”. This way you get the same result as with Cura, but the way to get there is a bit more cumbersome. The same applies to the slicer software Slic3r, which is also a free open source program. Here, too, you have to make the settings separately to achieve similar results as with Cura’s combining mode.
Further Information
The slicer software Cura is one of the most popular softwares for the 3D printer due to its high usability and clarity and is used by millions of people worldwide.
With just a few clicks, you can prepare your printer in the software, create objects and print them out with your own custom settings and control the process exactly. Cura is completely free to use and has a very large open source community that can be contacted at any time with questions and problems regarding 3D printing.
In addition to the slicing function, which includes the combing mode, Cura also offers CAD plug-in integration as well as numerous different quality and speed settings for easy and high-quality printing. Self-developed material profiles and plugins can be downloaded from the Marketplace.
Related Questions
With which 3D printers can the Slicer Cura with the Combing function be used?
Cura belongs to the manufacturer Ultimaker, but also supports other 3D printers and many file formats such as STL, OBJ, 3MF and X3D.
For which operating systems is Cura available?
The slicer software Cura is available for Windows, Mac and also Ubuntu.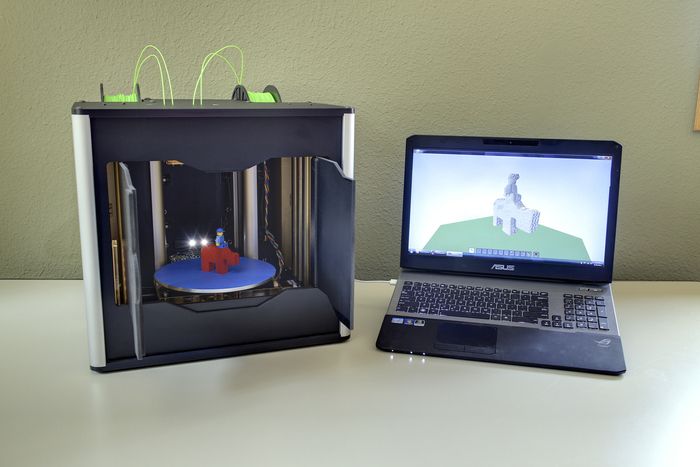 Prerequisite are current versions of the operating systems and 64bit.
Does Cura Combing cost anything?
The 3D slicer Cura with its function Cura Combing belongs to the open-source community of the printer manufacturer Ultimaker and is therefore free of charge.
Conclusion: What is Cura Combing recommended for?
The combing function of the open-source slicer Cura can be very helpful and useful in some cases. However, it is not always the right choice to have combing turned on during 3D printing.
If you often have problems with annoying scars and marks on the top layer of your printed objects, Cura Combing can be a good way to prevent this. However, you should turn off Combing while printing the outer skin of a model, otherwise stringing may occur. And you should also disable combining when setting the correct retraction values. Accordingly, it always depends on your current work whether combining is useful or not.
So it’s probably best to always set the combing for the inside of the print object by default and then adjust the settings regarding the combing depending on the work step. This way you will always get an optimal print result.
Disclosure: This website is the property of Martin Lütkemeyer and is operated by Martin Lütkemeyer. Martin Lütkemeyer is a member of the Amazon Services LLC and other Affiliate Programs. These are affiliate advertising programs designed to enable websites to earn advertising revenue through advertising and linking to Amazon.com and others. Links marked with * are affiliate links.
Comb best STL files for 3D printing・Cults
Brush/Comb
€0.56
Beard Comb - Remix
Free
Hummingbird
€5
Barber Shop
€0.50
Stylist Comb
€0.86
curve beard and hair comb
€7.15
all hair textures comb
€8. 08
08
Wax comb - Wax comb
Free
hair twist
€2.80
Comb for all hair styles and textures
€7.15
Tangle free hose or cord/cable reel comb
€0.83
Comb
€0.93
Wide Tooth Comb
€0.69
honey comb cup
€0.64
christmas bauble hairdresser
€0.50
EC CARD COMB W/O LETTERING - CHRISTMAS GIFT
€1
PEIGNE
Free
Fine Comb
€1.32
Mustache Comb Keychain
€2. 56
56
mustache comb logo
Free
Shallow Cut Beard Shaping Tool
Free
COMB SET
€4
Electrophoresis Comb
Free
COMBS BRUSHES COMBS
€1.47
Hair clipper comb PHILIPS QC5115
€1.59
Double honey comb lamp shade
€2
Honey comb handles
€9.34
credit card comb
Free
Phoenix comb
Free
Barber shop logo ornament
€1
Yoru's Stylish Butterfly Comb
€1
Beard comb
€2. 76
76
CAT6 Cable Comb Organizer
€2.65
Toilet paper roll fixture
Free
comb E 2 and comb Cat
€8
Comb xps
€8
comb xp
€8
Two Combs Floral vintage and Bison 3D model
€8
DIADEMA GOLDEN / DIADEM / CROWN / CORONA / CORONA
€3.36
Comb with ethnic floral motif 3D model
€8
Butterfly knife - Comb
€1
Batarang Comb
€0.61
Key Hanger Honeycomb
€0.51
Comb
Free
jiraiya vs akatsuki
€25
Berry picker, berry comb, blueberry
€5
Surfboard Wax Comb & Scrapper
€0. 56
56
Butterfly comb
€0.55
Gone・Cults
Unfortunately, the job you are looking for has disappeared...
But don't panic!
Yes, this work is no more, it's sad... but you can always check the profile of the Klaudius3D author who made this model, or even send him a direct message.
Otherwise, at Cults, we always have something to please your 3D printer. For example, look at these little hooligans:
01 nine0011 Mini Tetris GameBoy - retro console and container
4.66 €
02Card Fountain
3.63 €
03Snap Fit Mini Crossbow V3 (easy to assemble version)
Free
04Birdhouse
Free
05 nine0011 The Shining - The Torrance Family Retro Style Action Figure Kenner Reaction 3. 75
75 42.05 €
06Hinge seal (without supports)
Free
07Space display base plate
Free
08watch stand - Watch stand
Free
09Dragon Ball Krilin Kid / Unsupported
2.79 €
10VELOCIRAPTOR PLUMADO, DINOSAUR
6.18 €
elevenBrush and shovel
€2.42 -23% 1.86€
Black Sea dragon
2. 50 €
50 €
Lovely flower pot with a heart
Free
fourteenCandlestick FROSTY
1 €
fifteen2023 cups
Free
16Stegosaurus + Kentrosaurus Flexi
€3.47 -43% 1.98 €
NIKE Air Terraforma x OFF-White
3,50 €
eighteen nine0011 Nice wooden flower pot €1.25 -thirty% 0. 87 €
87 €
Jellyfish Swamp Mobile
Free
twentySkylander Crusher's father's hammer
Free
Having got bumps/warts on the surface, Cura doesn't want to brush them? nine0001
Following Toon's answer, here is a summary of the excellent Thomas Sunladerer's video: 3D Printing Guides: Calibration and Reasons You Might Be Doing It Wrong.
However, this may not be the definitive answer to the actual question about warts and bumps... new territory, it was considered that is feasible technology, no restrictions imposed by patents. New printers created and developed included Darwin, Sells Mendel and Prusa Mendel. They often produced unusable parts.
However, impromptu decisions or folds have resulted in poor quality corrections producing poor quality prints by today's standards. However, people (today) believe this because they worked then. that they must still be valid solutions today. However, this is not necessarily the case. nine0003
A common misconception is that it is necessary to calibrate the espagnolettes per mm for all axes except the extruder - by adjusting the x, y and z estapes per mm until the 10mm cube measures exactly 10x10x10mm, even if that means squeezing the calipers.
1:25 - Car analogy
You find that your car is moving to the left when you are driving in a straight line. level out so you can adjust the steering. However, then in difficult turns and in the rain, the car does not handle well. nine0003
Upon closer inspection, it turns out that the car has a flat tire. You wouldn't compensate for a flat tire by adjusting steering, right?
To get this 10mm cube accurate, it's usually calibrated for filament diameter and extrusion multiplier (the easiest option), but some printers aren't even that accurate in the first place.
Mechanical, rippling, slack, black streak, may confuse you by 0.1mm. Compensation for these 0.1 mm is certainly possible and achievable. However, then for a larger print, say 100 mm, this the overcompensation of will become more obvious and you will be a whole millimeter further from the desired dimensions.
So, use the ideal calculated values per millimeter. Timing belts and threaded rods are manufactured to tight tolerances. therefore, the worst case of an ideal pitch per millimeter is an error of 0.5%.
So, to find the perfect calculated steps, use the Prusa calculator, which is really very good.
If you are not using belts or a very large printer, then it is worth calibrating the steps per mm for x and y, as 0.5% will make a noticeable difference for large parts. nine0003
Use the files and instructions for these calibration sticks on Youmagine to properly recalibrate without any results caused by a slight off extrusion multiplier.
3:45 - So what should I do?
What do you need to empirically calibrate your printer? In fact, not so much:
- extruder steps per installation mm
-
extrusion multiplier (see video link - Extruder calibration)
-
print speed, speed and acceleration settings - it all depends on what quality you want to sacrifice to increase speed.
Pro Tip: Slow Printing . For example, try printing at half speed. The quality of can be improved on , and even if it isn't, you'll be able to more clearly see what's going on and what's going wrong. (see video link - Super Quick Tuning Guide: Speed Tuning)
4:30 - Other than that?
Basically nothing else needs to be calibrated.
As far as the Slicer software is concerned, only a certain range of settings makes sense, but this is not printer calibration. You're just learning about the Slicer software, and once you're familiar with it, you'll see how far you can go.