3D hexaflexagon print out
The Flexagon Portal - The Flexagon Portal
-
+Read More
This is the classic 3 faced hexaflexagon. This template is created to be easy to cut out, glue and fold up. This fresh design has been nicely labeled to best show off the mathematical properties of the flexagon. Everyone should make one of these!
Read More
-
+Read More
This flexagon is not nearly as widely known and folded, but it is almost as easy to cut out and fold up as the classic. The four faces provide opportunity for design creativity. A well folded model will flex very smoothly with well formed faces.
Read More
-
+Read More
Read More
-
+Read More
Be sure to check this one out - It is a celebration of all 6 hexaflexagons with 6 or less faces.
Read More
-
+Read More
Read More
-
+Read More
Read More
-
+Read More
Read More
-
+Read More
Template for the B and C variations of the 7 faced heptahexaflexagon. Both variations are folded from the same template. Within each folded variation, you can see the faces of the other variation. Be sure to check out the "G" and Sunday face on both variations. Challenge - Can you V-flex from one variation to the other? This is the hexaflexagon with the smallest number of faces that will fold up into two flexagons with different Tuckerman state diagrams.

Read More
-
+Read More
Click here for the larger 5 inch template or click above for the 3 inch template. Template for the D and last variation of the 7 faced heptahexaflexagons. This is the hexaflexagon with the smallest number of faces where the template curls on top of itself. In fact the template has three spirals in it. This flexagon is a bit more challenging than the others on this page to make due to the more complex template. One of many interesting things about this flexagon is that if you start with the E face on top and the F face on…
Read More
-
+Read More
This is a cyclic 4 face square flexagon.
Read More
-
+Read More
TriHexaflexagon with Sangaku Japanese Temple Geometric problems for faces.
 For details on problems see 2008 book by Fukagawa Hidetoshi and Tony Rothman, Sacred Mathematics .
Read More
-
+Read More
Here is a Trihexaflexagon with a color pattern. Fold as for other Trihexaflexagons.
Read More
Dodecahexaflexagon DIagrams
-
Dodecahexaflexagon Guide
Here are some wonderfull dodecahexaflexagon diagrams sent to me that are intended for someone completely unfamiliar with flexagons, and also utilize an independent color organizing system (alpha, beta, and gamma.) -
Dodecahexa Guide Page 1
Read More -
Dodecahexa Guide Page 2
Read More
Copyright © 2007 - 2022 Great Lakes IT, Inc.
To Top
Hexaflexagon: How To Make An Infinity Loop
A hexaflexagon is one of the coolest things my kids have ever learned how to make!
These amazing geometric origami shapes fold in the same direction infinitely to make a repeating pattern that can be used for all sorts of fun things!
They’re also a really great STEM activity, helping kids learn about geometry, engineering, patterns, and art!
Links in this post may be affiliate links, which means I may earn a commission if you make a purchase from any of them. You can read my full disclaimer HERE.
We’ve made optical illusions, greeting cards, explosion boxes and even cartoons with them! The possibilities are endless with these awesome shapes!
It does takes a little bit of patience to learn when you’re getting started, but once you master the concept, a hexaflexagon can be made in a matter of a few minutes.
Hexaflexagon: What You’ll Need
Making a hexaflexagon takes the most basic supplies, and it’s all stuff you probably have around your house already.
It’s also perfect for almost any age kids, but particularly older elementary and middle school students since it really emphasizes the use of geometry and angles.
To start making a basic hexaflexagon, you’ll need the following items:
- 8.5 x 11 inch sheet of paper
- a ruler
- a pencil
- scissors
- a glue stick (tape or regular glue can be used in a pinch, but we MUCH prefer using a glue stick)
Once you’ve gathered these items up, it’s very easy to get started!
Hexaflexagons can be made in just about any size, as long as you get your measurements right.
I’ve found that for a standard size piece of copy paper (8.5 x 11 inches), that the width of 1.5 inches is the perfect size.
Measuring and Cutting
You’ll want to measure and cut a strip of paper that is 1. 5 inches wide and 11 inches long (the length of the longest side of the paper).
I can get five 1.5 x 11 inch strips of paper from one regular size piece of copy paper, with a small strip left over.
After you have your strip of paper, on the longer side of the paper, you’ll want to measure 3/4 inch from the top and make a mark. then draw a line from the opposite corner of the paper to your mark.
Once you’ve marked your strip, you need to cut along the line, trimming your strip at an angle. See the picture below to get an idea of what I’m talking about.
If you are using a different size other than a 1.5 x 11 inch strip, you’ll want to measure half the distance of the shortest side of the paper. For example, if your strips are 2 inches wide, you should measure down one inch to get your mark.
Folding the Triangles
Now comes the fun part of the hexaflexagon, the origami!
Start with the end of the strip that you just cut so that it’s angled.
Fold that side so that the angled side you just cut is even with the straight side of the strip, forming a triangle. Press down hard on your fold so it is nice and crisp.
Flip the strip over and do this again, making sure the sides line up as perfectly as you can get them. Flip the strip over and repeat the fold. The video below should help you understand what we’re going for here.
The goal of the folding is to create a “stack” of equilateral triangles. It should have kind of an accordion effect when you are finished. (see the next video if you need a reference)
Once you have a nice little stack of triangles, you’ll need to trim off the excess.
This is very important: Make sure you have a chain of ten complete triangles and trim off the rest. The video below should make it clear exactly where you need to cut.
Connecting the Loop
You’ve done all the hard work now! We’re almost done. Now you just need to connect your hexaflexagon to make the infinity loop!
This part can be a little tricky, so take it slow. Once you get the hang of it, it will all come together naturally!.
Take the end of the strip and leave two triangles open. Let the third and fourth triangles lay against each other, in the direction you folded them.
Leave the fifth triangle open. Let the sixth and seventh triangles lay against each other, just like you did with the third and fourth.
Leave the eighth triangle open. The ninth triangle will tuck under the first triangle, and the tenth triangle will be hanging out of the loop.
Put a little bit of glue on the tenth triangle, and fold it over, connecting it to you first triangle. Now you’ve made your loop!
To test out if you folded your loop correctly, pinch the loop into three “wings” where the paper folds back against itself. You should be able to open the loop from the middle outward.
Once it’s open, you should be able to pinch the wings again and open from the middle, exactly like the last time you opened it.
I know all of this is confusing, but the video below should clarify it all somewhat.
Awesome! You did it! You made a hexaflexagon!
Now you can decorate each side in any way you like. We love experimenting with patterns and color on ours! We even sometimes write little messages to give people on them. (You probably saw all that in the video at the top!)
You can use any type of crayons or marker on them that you like.
We really like to use these amazing Prismacolor markers. They’re a bit more expensive, but they give you such a smooth, uniform color when they’re on the paper. We used them on all the examples in the videos.
If you like to draw or color at all, and wonder how the professionals get such solid colors on their artwork, then these are the markers for you!
Once you get really experienced in making hexaflexagons, try using card stock for a more sturdy version. Or try other types of paper, like scrapbooking pages that have beautiful prints on them. They can be glued together, back to back to create really beautiful pieces!
Now you’ll want to make a million of them!
Wanna learn how to make really cool 3D photo cards? Check out the tutorial HERE!
Make your own bleach stencil t-shirts with these easy instructions by clicking HERE!
Have you made any hexaflexagons? Tell us about your experience in the comments!
Hexaflexagon: How To Make An Infinity Loop
How to print flexible materials on a conventional FDM printer? Likbez from the company REK.

Along with beautiful photos and interesting videos, where someone prints high-quality models with flexible material on a regular FDM printer without any problems, there are many questions and messages on the Internet, such as “How to print with flex?”, “I generally have flex doesn’t work, what should I do?” etc.
In short, the average picture looks something like this:
Time to end this. Likbez from the company "REK".
Foreword.
For flex printing, it is important to observe some points. Alas, not all 3D printer manufacturers create their product with the ability to print with flexible materials. But after all, you already have such a powerful tool as a 3D printer, on which you can print any desired part, so it's time to put the old joke “buy a 3D printer - print a 3D printer” into practice. The entire printer will most likely not need to be printed, but a quick and easy tuning will be needed. 9).
9).
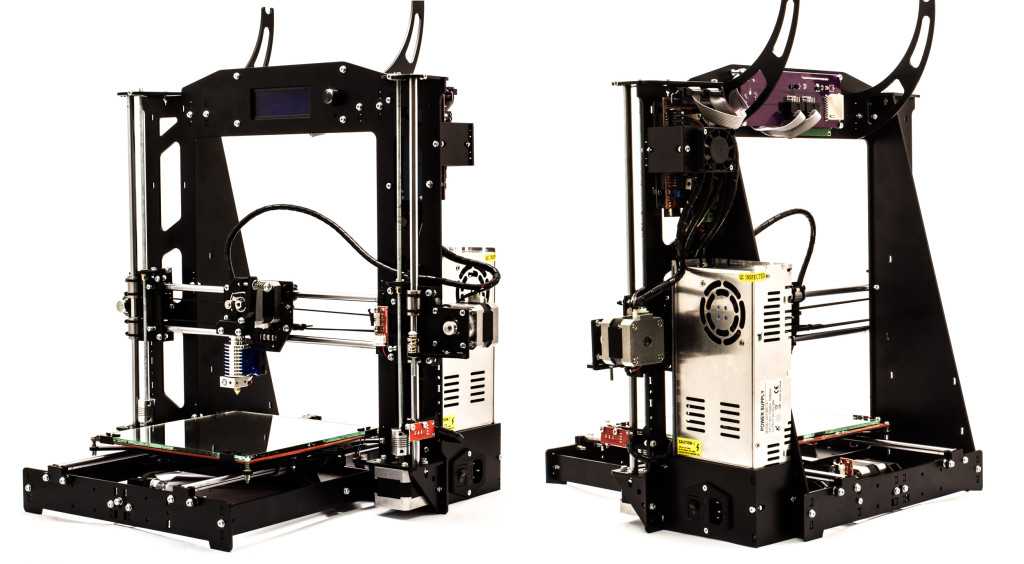
Hardware. extruder. The most common problem is that the extruder chews up the rod and it looks something like this (the problem area is circled):
No matter how carefully and accurately you push the flex into the extruder, after 5 seconds or after 5 minutes, it still chews up. This happens because there is a gap between the feed rollers and the entrance to the hot end or tube (bowden) channel in which the flexible rod will jam (YES, even if it is a very small gap. YES, even if there is only a couple of mm).
Familiar ABS and PLA are quite hard, they are difficult to crumple even in a centimeter gap. Flexible plastic should not be left even the slightest opportunity to go somewhere “not there”, so this gap in the extruder must be removed. For RepRap owners, this will not be difficult at all, because. they probably already have tuning experience; in free catalogs of 3D models (such as thingiverse or youmagine or myminifactory) everything has already been invented before us and there are already ready-made models of modified extruders or parts for tuning existing ones. In general, the new extruder will be different in this:
Here are some examples of tuning extruders for different printers:
http://www.thingiverse.com/thing:247024 - Solid Dulls and analogues
http://www.thingiverse.com/thing:191503 - Printbots (masterkits)
http://www.thingiverse.com/thing:16319 - MK9 Extruders
http://www.thingiverse.com/thing:231310 - Replicator 1, Duplicator 4
http://www.thingiverse.com /thing:18875 - Makerbot variant
http://www.thingiverse.com/thing:553917 - DaVinci
http://www.thingiverse.com/thing:391803 - 3DRag
http://www.thingiverse.com/thing:550788 - Robo3D
https://www.youmagine.com/designs /um2-feeder-sp3d-version - Ultimeker 2
http://www.thingiverse.com/thing:99395 - Orca 0.43
Add to the list in the comments :) Hardware #2. Hot end. (Let's come up with a normal Russian name for this thing). Not all “hot ends” (hot ends) are equally useful and this needs to be corrected.
This moment, by the way, concerns not only flexible rods, but also often causes difficulties when printing PLA.
The essence of the problem lies in the fact that the bar, getting into the hot end, begins to melt even before it reaches the nozzle, and a so-called “plug” from the material melt appears, which is not easy to push through. If a rigid PLA rod can still push through the melt due to the power of the extruder, then such a trick will not work with a flexible material - it will wrinkle, bend and curl even in those places where it seemed impossible. Very often, owners of 3D printers in frustration call such a situation “nozzle clogged”, although this is not entirely true.
The picture below shows a schematic of a hot end. Where the color indicates the normal state of the bar during the printing process. (blue indicates where the rod is still hard, red indicates where it begins to melt)
In this state, the plastic will exit the nozzle quite calmly without any difficulty, but if the heat goes higher, the rod will begin to melt earlier (in the cold zone) and will create additional resistance for the extruder. Solution: cool the top of the hot end by any means. Put the fan on the hot end, smear the heatsink (if any) with thermal paste at the junction with the hot parts, make the air flow directed (to the hot end), etc. etc.
Once you've got a sharp enough transition from cold to hot, you won't have any problems with hot-end 'plugs' anymore.
For lovers of a thorough approach, I can recommend the article http://3dtoday.ru/blogs/akdzg/struggling-with-obstruction-of-steel-channel-gotanda/ as an addition to the above recommendations.
Software.
In addition to the “iron” nuances of working with flexible materials, there are also software ones. All printers are different and the “slicer” programs are also different, but the general principles work the same everywhere, the main thing is to understand them.
So, after successfully tuning your 3D printer, you need to choose the optimal print speed settings, and there is only one method - trial and error. From experience, you can designate the operating range of print speeds for flexible materials:
REC RUBBER - from 5 to 20 mm / s
REC FLEX - from 10 to 40 mm / s
If you get it faster - you are a real Jedi! 8)
As for temperature settings, here they are:
REC RUBBER
Nozzle temperature 210 - 240°C
Table temperature 100 - 120°C
Requires an adhesive film or varnish on the table.
REC FLEX
Nozzle temperature 220 - 240°C
Table temperature 80 - 110°C
Printed on glass, any film will be permanently welded to the model.
If you are not confident in your abilities, but you really want to try flexible materials, welcome to the office of the REK company - we will give you a free material sample.
Paper cut man template
Home » Miscellaneous » Paper cut man template
Man template Coloring pages to print for free.
template, stencil, outline of a man for paper cutting
Views: 29715
Free coloring template of a man.
 Print coloring pages for free and download coloring pages online.
 You are in the category of coloring man pattern. Coloring page you are looking at is described by our visitors as follows "" Here you will find a lot of coloring pages online. You can download the man template coloring pages and also print them for free. As you know, creative activities play a huge role in the development of the child. They activate mental activity, form an aesthetic taste and instill a love of art. The process of coloring pictures on the theme of a human template develops fine motor skills, perseverance and accuracy, helps to learn more about the world around us, introduces you to all the variety of colors and shades. Every day we add new free coloring pages for boys and girls to our website, which you can color online or download and print. A convenient catalog compiled by categories will make it easier to find the right picture, and a large selection of coloring pages will allow you to find a new interesting topic for coloring every day.
Paper garland of little men | Doodle
In this article we will tell you how to make different paper garlands from people: simple, complex and very complex. Simple garlands can be cut by preschoolers if they are confident with scissors. Complex garlands - for children 9-10 years old. And very complex garlands, where the little men have folds on their clothes and shoes on their legs, are rather entertainment for mothers and grandmothers. Keep in mind that the smaller the figures of men, the more difficult it is to cut through them. It is also difficult to cut through many layers of paper or thick paper. The equipment for this craft is the simplest: all you need is paper and scissors (or a paper cutter for a very complex garland).
Simple paper man garland.
Fold a piece of paper like an accordion.
Take the height of the paper about 2 cm more than you are going to get the garland. Place the template on paper. The size of the template should be the same as the accordion segment. Peel off all layers of paper (including the template) with a stapler from the top and bottom.
In this case, you can not use a template, but draw a little man yourself, by hand. But the paper is still better to chop off. So the paper does not “ride”, does not move, and it is more convenient to cut, and the result is more accurate.
Cut out the figure. First, it is better to cut the side triangle, then the top, and then the legs. Got a garland.
Do not try to fold the paper in too many layers. It will be difficult for a child to cut them. If you want a long garland, it's better to cut out a few short pieces and then glue them together.
Intricate paper man garland.
The principle is the same as for cutting with a simple garland. Here, too, you need to cut with scissors, but already manicure. Yes, and without a template-pattern can not do. Heat the figurine with a stapler not only from above and below, but also between the figurines of the prince and princess.
Very intricate paper garland made of people.
This garland cannot be cut with scissors alone - you need a paper cutter to cut through the folds and other "internal" details.
man template Coloring pages to print for free.
Free coloring template of a man. Print coloring pages for free and download coloring pages online.
You are in the category of coloring man pattern. The coloring page you are looking at is described by our visitors as "template, stencil, outline of a man for paper cutting" Here you will find a lot of coloring pages online. You can download the man template coloring pages and also print them for free. As you know, creative activities play a huge role in the development of the child. They activate mental activity, form an aesthetic taste and instill a love of art. The process of coloring pictures on the theme of a human template develops fine motor skills, perseverance and accuracy, helps to learn more about the world around us, introduces you to all the variety of colors and shades. Every day we add new free coloring pages for boys and girls to our website, which you can color online or download and print. A convenient catalog compiled by categories will make it easier to find the right picture, and a large selection of coloring pages will allow you to find a new interesting topic for coloring every day.
Stencils for windows for the New Year 2021 (templates for cutting out)
One of the original ways to decorate a house for the New Year is to paint windows. These drawings create a festive mood and remind you of the upcoming celebration. Our grandparents also cut out snowflakes from album sheets and glued them.
It is not necessary to be able to draw beautifully for this. There are many ready-made templates in the form of snowflakes, Santa Claus, houses, balls, etc. You need to print the one you like on a white sheet, carefully cut it along the contour with scissors, glue it to the glass with soapy water. And you can tie them to a thread, hanging them on a nail on the wall.
There is another way - using a can of artificial snow. The cut-out stencil must be glued to the glass with soap, and snow is sprayed around the workpiece. When you remove the paper form, you will see the resulting pattern on the glass. You can also trace the template along the outline, and then color it inside. Artificial snow can be replaced with a solution of toothpaste and water.
This is how easy and inexpensive you can create a real fairy tale at home. Children will especially like this activity. Print them ready-made stencils on A4 paper - they will be happy to decorate windows for the New Year holidays.
Have you already chosen an outfit for your festive feast? I offer you an inspiring selection of beautiful clothes for the New Year according to the sign of the zodiac.
New Year 2021 Ox window stencils to cut out
The symbol of the coming year is always very popular. In 2021 it is the Metal Ox. I suggest downloading some beautiful pictures.
I want to remind you about the technique of applying patterns to glass. To do this, you will need a handy stationery knife, thick paper, double-sided tape, a can of artificial liquid snow. As a material for cutting, you can use a plastic folder - the template from it will not tear or get wet, it can be used next year. To avoid damaging the surface of the table, place a cutting board on it.
- Print your favorite Bull stencil. Place it on top of a thick sheet or plastic. To prevent the picture from shifting, glue the sheets with a piece of adhesive tape. With a stationery knife, carefully circle the pattern along the contour.
- Attach the resulting blank to the window. Shake the can of liquid snow well (about 2 minutes). Spray the glass with the part, tinting the empty space inside.
- Remove the paper from the glass - the New Year's Ox is ready. After the holidays, artificial snow is easily removed from the glass.
See the following video for an example of decorating windows using pictures:
If you cannot print the image on a printer, you can use a little trick. Attach a sheet of A4 paper to the monitor and carefully transfer the contours. It is very easy to do this. First you need to open the template, choose the optimal size. You can increase the contrast if necessary. Attach paper to the image on the monitor and draw a pattern along the contour.
Santa Claus and Snow Maiden to print from paper
These are classic characters in winter holidays. They are always relevant and perfect for any New Year's composition. They can be combined with other characters - for example, with the patron of 2021, the Ox, or with a faithful partner, the Snowman.
Complete the picture with falling snowflakes, Christmas trees and angel figurines.
Ready -made snowflakes for liquid snow
Snowflakes from the snowflakes are considered a classic option for decoration of the interior. They can be applied to windows, mirrors, doors, hung on a thread above the windowsill, or on a Christmas tree. The artificial snow makes them very realistic and textured. The patterns on the glass look really frosty, shimmering under the rays of winter light.
New Year's Christmas balls (balls) on the windows from paper
In addition to symbolic images, the theme of Christmas toys is very popular. They will successfully complement any of your compositions with spruce branches. Each ball depicts a separate winter landscape that will look beautiful on glass. Attach the stencil to the window, toned with liquid snow.
Templates with smoke and pipe for cutting
If you want to create a fabulous miniature on the glass, you can’t do without such a hut. This is a more difficult drawing to color due to the abundance of details. It will be easier to cut holes and a contour in it, in finished form, glue the workpiece with adhesive tape. Below you will find both complex and simple template options.
New Year's Ealleys and cones on the A4
Window Method "Peretynanka" also allows the decoration of window and desshors. This is a common paper cutting technique. In this case, cutting occurs on whole patterns. And it's very beautiful and interesting.
New Year's "vytynankas" are very popular. When interesting patterns create an incredible fairy tale. The New Year's scenario is cut out and attached to the adhesive tape in small pieces on the glass.
Snowman on Salts (Ski)
Another classic character is one of the symbols of snow frosty winter. They will make any picture lively and funny. Print the figure you like and apply the pattern on the glass - it will definitely create a fabulous mood.
Christmas wreaths and paper bells for window decoration
Christmas wreath with four candles associated with the globe and the four cardinal points. The circle symbolizes eternal life, greenery is the color of life. Candles are the light that will light up the world at Christmas.
Wreaths are often decorated with bells. They symbolize the passage of time. Their ringing marks good events, brings happiness, good luck and hope for the best.
Nutcracker and mouse King for cutting
The famous fairy tale reminding us of the miracle of Christmas. Invite the main characters to visit you - you can easily create your favorite cartoon on your window. Below are figures for creating a fairy tale plot.
Angel stencils for painting on glass
This is one of the main attributes of Christmas. Their figurines are usually placed on Christmas trees, a festive table, in garlands. It's a good idea to draw some figures on the window. An angel in the house is a very strong amulet that will bring happiness and also protect housing. model0115
Share:
Hello!
I would like to share with you a template for creating an articulated paper man.
This model is very helpful for children to draw a person in motion.
I make these mannequins with the guys in the classroom, and then they use them for a long time for classroom and homework.
For work we need:
1. A4 cardboard
2. A sheet of paper for printing the template on an A4 printer
3. Scissors
4. 15 bolts no more than 1 cm long and no more than 3 mm in diameter
5. 15 nuts for bolts
6. An awl or compass for making holes
7. A simple pencil for widening holes
8. Glue stick, for gluing parts and cardboard
The work is very simple.
First, print out the template...
And the template for cutting out the details.
Glue the cutting template onto cardboard using a glue stick. Then we cut out the pieces and lay them out in the correct order.
Then we start assembling the little man.
We pierce holes (points) with a compass or an awl or a button and expand it with a simple pencil to the width of our bolt. We insert the bolt into the hole, fasten with a nut. the bolt can be smeared at the base with nail polish so that the nut does not unwind. Washers can also be used to strengthen the structure, but this is not necessary.
The main thing to remember in assembly The head (1) and chest (4) are attached over the neck (6). The arms and legs are attached in the order: chest (4) then the details of the arms in the following order 2 then 3 then 7. Similarly, the legs are attached first to part 5, then we fasten part 8 and only then part 9and detail 10.
Our little man is ready!
You can experiment with poses!
Here he comes...
Here he is catching a ball or holding something in his hands...
Here he lies down on the sofa to watch his favorite movie...
Here is an example of usage. The work was done by a 5th grade student in class.
I hope this master class is useful to someone.
By the way, I saw how such articulated men are used in scrapbooking. But then this person is not made faceless, but as it should be with a face, in clothes and his character.
Good luck in your work!
Learning to cut with scissors - print out cutouts for kids
Reading 5 min. Views 13.5k. Posted by Updated by
Cutouts - templates for kids "Learning to cut with scissors" is a great practice for cutting and writing skills. Print out the cutouts and get started!
You can increase the effectiveness of these templates for the development of fine motor skills for children:
- first have the children trace the lines with a pencil to practice graphomotor skills,
- and then cut the sheets along these lines.
Several cutouts available - with frogs and ladybugs, planes and farm, lines and shapes, each including several sheets of "Learning to cut with scissors".
Immediately explain safety precautions when working with scissors, even if you do not plan to leave your child alone with this tool.
How to teach a child to use scissors?
Although scissors may seem terribly dangerous for parents, they are very useful for developing fine motor skills. And now we can find a wide variety of scissors for different ages that are safe to use in the first place.
When it comes to scissors, the first question most often asked is when can a child start using scissors. The answer varies from child to child. Various authors state that a 2-year-old child is ready to hold and use scissors.
For a child to know how to hold scissors correctly, it is enough to draw a smiley face on the thumbnail or stick a sticker. We will tell the child that the emoji should always face him when cutting. This prevents the child from turning their hand upside down when trying to cut the paper.
When we are just learning to cut with scissors, the original purpose of is for the child to learn to place the hand holding the scissors (try the trick above) and also to have the other hand hold the paper instead of lying around.
First help the child by holding paper . When the child masters scissors, gradually complicate the task.
We're going from simple to complex, so first there will be straight lines, then broken lines, and then rounded and curved ones.
Learning to cut with scissors according to patterns
Learning to cut with scissors: the very first and easiest tasks for children. You can print templates for cutting or repeat them by drawing similar shapes yourself.
Plane cutting templates
The easiest tasks to learn how to carve.
Farm
Ladybug Cutters
Don't forget the main principle when learning any new skill for a child - move from simple to complex. These simple templates are perfect for your first carving lessons.
Frog cutters
Fruit tree cutters
Learn to cut with scissors, glue and recognize various geometric shapes.
Spiral template
Very nice and effective cutting template for kids.
Patch Cutouts
Geometric Shapes to Cut Out
Farmhouse Challenge
Interesting Templates - A Complete Fake to Cut, Color and Glue.
- Color in the template details.
- Cut out the shapes point by point.
- Glue the shapes onto the sheet, lining up the corresponding numbers.

Applications for children from geometric shapes
Simple applications-cutouts from geometric shapes: circle, oval, triangle, rectangle, square, rhombus, semicircle - help to develop attention, memory and imaginative thinking, fix the names of colors and geometric shapes. Below you can see sample applications for children.
- Look at the pictures with your child.
- Select geometric shapes for appliqué — name the shapes, colors and sizes you need.
- Cut out the figures - a child over 4 years old can cut out the simplest figures himself.
Even though children love new things, they also love repetition. Therefore, during classes, they should not be avoided, even if at first glance the child has learned how the picture is formed. You can, for example, fold a flower in several lessons in a row or return to this application after a while, complicating the picture.
Creative cutouts
If regular cutout tasks can be difficult, cutouts "with meaning" - in fact, role-playing games - will appeal to every child.
We offer a game of hairdresser or manicurist!
Cutout cutouts for kids
If you want to get a cutout or cutout guide for kids, check out paper quality (thick enough to cut more easily than tear) and complexity of scissors (such manuals often sin with too complex elements with an underestimated age marking)
My personal recommendation is : series with square elements. The books are colorful, the child makes up a whole story, and the work is simple, guaranteeing success. For example:
- cut-out books Appliqués for the little ones from Phoenix-Premier is a budget and beautiful series for learning how to cut with scissors. Marking 1+!
- Series "My First Appliqués" by Dragonfly: a very high quality manual with effective simple appliqués. Here and here.
Application templates can be downloaded and printed for free here: boat, robots, collages, castle, fish and octopus, monsters (very cool creative application), little animals.

Sharpening your paper cutting skills
Use these simple paper cutters to sharpen paper cutting skills for kids. It is better if you print them on colored paper and pre-cut them into strips along the dotted line yourself.
Practice cutting with scissors
You can learn to cut not only paper, but also cocktail tubes, thread, old magazines, plant stems, soft plasticine, ribbons, EVA sheets … Children over 4 years old can be offered curly scissors - learning to cut will become even more interesting!
Why is this needed?
To learn how to cut with scissors, the child will have to work hard. After all, this skill uses every finger
Fresh content
Type of image
All images
Photo
Vectors
Illustrations
Orientation
All Orientations
horizontally
vertically
color.
paper cutting guide for beginners | HubPages
Creative Paper Cutting and Kirigami Projects
Hello and welcome to my paper cutting page!
For paper cutting, scissors or a craft knife cuts shapes out of paper and turns it into art. There are several different paper cutting techniques including Chinese, kirigami, and origami architecture that sound intimidating, but they all range from very simple designs for beginners to amazing sculptures and decorative artwork.
This page contains links to paper cutting tutorials, craft projects, free patterns and patterns, and many inspiring examples of what can be achieved.
This craft certainly requires patience, but the end result can look absolutely phenomenal.
I hope you find the following information helpful and inspiring :-)
Best Paper Cutting Books
If you want a complete collection of expert tips, inspiring project examples, templates and instructions, these books are the best source:
Various paper cutting methods
Paper cutting is done with a knife or scissors. Where an intricate pattern is cut from a flat sheet of paper, a craft knife is usually used; but where the paper is folded, small sharp scissors are used instead.
Paper cutting most likely originated in China, and Chinese paper cuts are flat (i.e., not folded) and are often done on red paper.
Japanese paper cutting is called kiri-e, and kirigami is the application of kiri-e in origami; it combines folding with paper cutting. In kirigami, the cuts are made on the folded base and the result is often a symmetrical pattern. This is pretty much the same technique kids use to make paper snowflakes in school. Kirigami can also create more complex results, including creating a 3D scene or sculpture from a single sheet of paper.
In Germany paper cut is called Scherenschnitte, so it's worth google it too :-)
Safety : I know it's obvious, but be careful when using sharp knives and remember to only pull the knife, not push him on paper.
Papercutting Tutorial
The following tutorials will get you started in the world of papercutting, although honestly it's best to just get started. The technique of this craft is limited (i.e. cutting and all), so it's best to practice, practice, practice :)0003
Be sure to change your knife blades often enough to keep them sharp, otherwise you'll be pulling on the paper instead of cutting it straight, and this can lead to tears (in many ways!).
Here is a free template for the Valentine design above.
This is a simple exercise sheet that you can print out if you are new to paper cutting. This will teach you how to cut lines and curves, and you can print more sheets if you want to again. Simply follow the lines as closely as possible with the craft blade while the paper rests on the cutting mat.
The "splat" shape and circles are more difficult. Remember to flip the paper, not the blade, to follow the lines. Your blade needs to be constantly pulling towards you, so to create a round cut, you will need to smoothly rotate the paper as you pull the blade to get a neat, curved cut. You'll master this!
Kirigami Templates and Mats
Kirigami Templates provide instructions and cutting guides for creating impressive symmetrical designs on folded paper (like paper snowflakes, but more detailed).
Cutting mats are required to provide a work surface for cutting paper and to protect the table/or table underneath.
Free Paper Cut Patterns and Patterns
There are many patterns available that you can find in books or for sale online. You can also search for silhouette pictures online or create your own drawings by drawing them or using shapes or profiles. in photographs or in magazines.
The following patterns are free and specially designed for paper cutting.
Here is another exercise sheet that you can print out and use. Just use a knife (and a cutting board) to follow the lines as accurately and smoothly as possible. See tips above.
.
Paper Craft Cutout Man Template
Paper Craft Cutout Man Template - Paper Craft Cutout Man Template - DIY paper doll project for everyone. Would you like to learn how to make a paper or cardboard doll cutout? It's an instant download with shapes that are easy to cut. Cut out doll templates from Easy man paper. Paper project.
This vector clipart is perfect for your own project or design. Use this clip art for making paper. You can use this for commercial and personal purposes.
_________________________________________________________________________
Art is available for INSTANT DOWNLOAD. You will receive a zip file with the purchased artwork and a royalty-free license. EPS, AI, JPG and PDF files included.
__________________________________________________________________________
Please visit our Policy page for more information.
.
Cutting / folding templates for paper mechanisms
no. 01
Flexagon
Repeating 4-frame rectangular animation construct
Flexing the card according to its tangible memory transports the recipient through a 4-frame story. Read more here.
Your browser does not support the video tag.
no. 02
Hexaflexagon
4 repeated frames
Hexaflexagon is a paper toy, advertising display device, "narrative device" and interactive geometry demonstration that requires physical activation to "read". open up sequential, looped shots - providing an immersive format for telling stories and anecdotes, revealing nested information, creating art, or simply providing a satisfying outlet for nerve energy. Read more in the article for magazine How Magazine .
Your browser does not support the video tag.
no. 03
5-sided folding tube
Auxetic metamaterial
Source: provided by Erana Kratounis during the Code-Paper-Scissors talk at SFPC.
no. 04
Spring behavior
Auxetic metamaterial
Source: Johannes Overvelde, James Weaver, Chuck Hoberman and Katja Bertholdi, Rational design of reconfigurable prismatic architectural materials, Nature 541, 347-352, 19January 2017
Your browser does not support the video tag.
no. 05
Miura-ori Fold
"Programmed" by deforming parts of the template
Try changing the corners
Miura Fold (ミ ウ ラ 折 Miura-ori) is a method of folding a flat surface such as a sheet of paper into a smaller area. named after its inventor, Japanese astrophysicist Korio Miura. [1] Miura's fold patterns form a surface mosaic of parallelograms. In one direction, the folds lie along straight lines, with each parallelogram forming a mirror image of its neighbor through each fold. In the other direction, the folds are zigzag, and each parallelogram is a displacement of its neighbor along the fold. Each of the zigzag paths of the folds consists solely of mountain folds or valley folds, with mountains alternating with valleys from one zigzag path to the next. Each of the straight sections of the folds alternates between mountain and valley folds. [2] The Miura fold is a form of rigid origami, which means that the folding can be done in a continuous motion, with each parallelogram being completely flat at each step. This property allows it to be used for folding surfaces made of rigid materials. For example, large arrays of solar panels for space satellites in the Japanese space program were folded by Miura before launch and then unfolded in space. [3] [4] The folded Miura fold can be packed into a compact shape, with its thickness reflecting only the thickness of the folded material. The folded material can be unpacked in one motion by pulling its opposite ends, and similarly folded by sliding the two ends together. When applied to a solar array, this property reduces the number of motors required to deploy this shape, reducing weight and complexity. (Wikipedia)
Your browser does not support the video tag.
no. 06
Bistable mechanism
Try different sizes to adjust the strength of the bistable "click"
Source: Itai Cohen Group, Cornell University. This is a single element of a square twisted pattern. From a mathematical point of view, this folding pattern adds up. The result is a bistable mechanism - a kind of paper switch.
Your browser does not support the video tag.
no. 07
Hexagonal origami flasher
Flashers are collapsible folding structures. This design was designed by Jeremy Schafer. Read more about the mathematics of how flashers work here.
Your browser does not support the video tag.
no. 08
Rotary cam with lever
This structure shows how mechanical engineering ideas can be adapted to paper engineering. The user turns the wheel to engage the elongated cam. Due to the unequal cam geometry, the installed lever is animated exaggeratedly and unexpectedly. Adapted from David Carter "Popup elements".
Your browser does not support the video tag.
no. 09
Double Blind Detection
Dissolve
This shape simplifies the traditional blind structure into a simple two-layer design. Adapted from David Carter's book Popup Elements.
Your browser does not support the video tag.
no. 10
Linear rotary motion
This tongue design can be operated by hand or by opening and closing a book. It is robust and provides rotational motion up to 80 degrees. Adapted from David Carter's book Popup Elements.
Your browser does not support the video tag.
no. 11
Impact object
Noise generator
The serrated edges passing through the shutters produce an impact force at different speeds. It is durable and provides rotational motion up to 80 degrees. Adapted from David Carter "Popup elements".
no. 12
Modified Water Bomb
The classic water bomb fold pattern, divided in half, is one of the most commonly used basic patterns in origami. The rise and fall geometry (and contraction and expansion) of a water bomb is being investigated as an alternative method for tuning different types of antennas. In these tests, dipole and square conductive elements are printed on paper, which are used to tune antennas, sensors, and reflectors as the paper moves. This fold pattern proved to be an effective structure, offering a way to sensitively control the resonant tuning of such components. This modified version flips all other diamonds.
no. 13
Sequential fold patterns
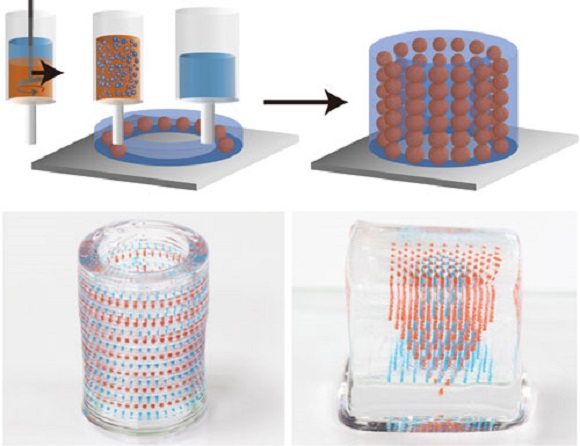
Fold patterns that produce very different types (and directions) of movement can be sequentially combined on the same sheet. This combination of templates makes it possible to nest secondary functions within the function of the primary template. In this example, the miura-ori pivot action raises and lowers a row of cubes. In turn, the non-collapsible cubes act as a spacer, stopping the path of the miura-ori fold to a fully folded state. The width of the cube determines both the time and the distance of that interval.
Your browser does not support the video tag.
no. 14
14
Square twist
The square twist fold pattern consists of the intersection of two perpendicular folds. When deployed (by pulling left/right or up/down), the design expands in all directions as the folds rise and rotate their square vertices. The modular unit that includes this mosaic is a square paper "switch" - a bistable structure that opens or closes. It is very difficult to fold a square twist. The discovery and development of this drawing was captured in Ron Resh's book Paper and Stick Film.
Your browser does not support the video tag.
no.15
360° swivel
Dissolve
This document shows a structure that functions like a shutter in a camera lens and moves between two different images. Template modified from original source: Mechanical Card Making: 25 Paper Designs Sheila Sturrock
Your browser does not support the video tag.
no. 16
Opposite loops
Activated when the card is opened and closed. This shape probably originated with Josef Alber's students at the Bauhaus.
Your browser does not support the video tag.
no. 17
Paper Rotorelief
Inert when stationary, an illusion of rotation, this tongue-operated two-layer Tor Lokvig construction is reminiscent of Duchamp's Rotoreliefs .
Your browser does not support the video tag.
no.18
Multi-directional, hinged illusion
This form probably originated with Josef Alber's students at the Bauhaus.
Your browser does not support the video tag.
no. 19
Flasher
Animated, folding, auxetic structure
In 2012, this flasher design was used by the Compatible Mechanisms Laboratory at Brigham Young University (which develops origami-inspired mechanisms) to develop a solar-powered satellite for JPL-NASA. Simulating it rotation around the earth can be shown in documentary Origami revolution. Look here. The Jet Propulsion Laboratory uses the same design to block incoming starlight from a source located there: “The BYU/JPL-NASA team has put forward this as a concept, but it hasn't been finalized for spaceflight yet. we are working on it! "The most recent prototype is here.
Your browser does not support the video tag.
no.20
Infinity Shape
Optical Illusion
We believe that this shape originated with Josef Alber's students at the Bauhaus.
no. 21
360° shape
Optical illusion
We believe that this shape originated with Josef Alber's students at the Bauhaus.
no. 22
Rotary Hidden Picture Reveal
This pattern often appears on Victorian greeting cards. Template modified from original source: Mechanical Card Making: 25 Paper Designs Sheila Sturrock
Your browser does not support the video tag.
no. 23
Troublewit Pleated Toy
This transforming shape-shifting structure was popularized in paper performances called "Troublewit" (which often appeared as a small segment in a large magic show). The pattern was adapted from "Folding Techniques for Designers " by Paul Jackson.
Your browser does not support the video tag.
no. 24
Diagonal Venetian blind Reveal
Dissolve effect
This design uses four "blinds" to reveal a hidden image with a pull tab. Template modified from original source: Mechanical Card Making: 25 Paper Designs Sheila Sturrock
Your browser does not support the video tag.
no.25
Square Bellows Bellows
The only shape that is both opaque and foldable! The first review cameras used bellows to allow the operator to adjust the focal length. Pattern modified from This book is a camera by Kelly Anderson.
no. 26
Paper Net
Dissolve effect
This structure is often found on Victorian greeting cards and requires a string to lift up the "grid" of paper to reveal the photograph below. Sheila Sturrock
no. 27
27
Traditional Blinds
Dissolve Effect
When the user pulls the tab, the four blinds move back to reveal the hidden image. This format is believed to have originated with Lothar Meggendorfer. Template adapted from the original: Mechanical Card Making: 25 Paper Designs Sheila Sturrock
Your browser does not support the video tag.
no. 28
Shape 90°
Optical illusion
We believe that this shape originated with Josef Alber's students at the Bauhaus.
no. 29
Shape 90°
Optical illusion
We believe that this shape originated with Josef Alber's students at the Bauhaus.
no. 30
Mold 180°
Mold
We believe that this shape originated with Josef Alber's students at the Bauhaus.
no. 31
Freestanding mold
This is a hexaflexagon glued to a base that shows the oloid trajectory of its inversion.
Read more about assembling a hexaflexagon here - in the article for How Magazine
Your browser does not support the video tag.
.
Paper Cut Man PNG Images | Vector and PSD Files
Torn edges of paper Torn paper Vector
5000 * 5000
DECIPE uses a mask when driving
3333 * 3333
5000 * 5000
Element Striped paper Vector von
1200 * 1200
Beige granular folded paper texture patch
1200 * 1200
Black and White photobumag
brown note paper 3d element
1200*1200
masked man halloween costume party with knife in hand
5000 * 5000
European section Stereo Round white frame
1200 * 1200
Ravated paper Black von
9000 3000 * 3000 9000POLAROoid
2500 * 2500 * 2500 9000 9000 9000 9000 9000 9000 9000 9000 9000 9000 9000 9000 9000 9000. 2500 * polaroid elements
1200*1200
paper-cut clouds cartoon decorations
1200*1200
Stone paper Empty Vector Collection of white torn paper torn edges with a shadow of
5000 * 5000
Old paper old paper
2500 * 2500 9000
Torn paper vomitable over
834 * 8334
Halloween mask man with pumpkin and candy
5000 * 5000
Happy birthday stereo cut out of paper
1200 * 1200
Less paper * 1200
Wear a suit a handsome man Mature 9 0004 2000 * 2000
creative torn paper scroll
1200*1200
torn paper sticker collection
1200 * 1200
1200 * 1200
Drawn design Page with shadow effect
1200 * 1200
1200 * 1200
sticky paper sticky sticky note
2000 * 2000
Fast a deliveryer
1200 * 1200 9000
Creative paper break 9000 von Vector
1200
Stone Vector Torn Frequestion with space for the text broken pages for web-and-free promoted presentations of damaged damaged presented. torn design paper
5000 * 5000
blue dream paper cut
1200 * 1200
Photo paper on a rope
1200 * 1200
The deliveryer uses a mask
1200 * 1200
Clean design vector design ribbon
1200 * 1200
paper infographic
1200 * 1200
paper cut torn folded paper
1200 * 1200
people operating at the computer
1200 * 1200
Smerge in the mask and beautiful train
1200 * 1200
handwriting continuous one line drawing of a person write on paper ink pen minimalism design
3967 * 3
Fresh materials
Type of image
All images
Photo
Vectors
Illustrations
Orientation
All Orientations
horizontally
vertically
color.