3D printer shells
What are the optimal shell and infill parameters for FDM 3D printing?
How do shell and infill properties impact the performance and cost of FDM 3D printing? It turns out these parameters have more of an effect than you may realize, so learning to optimize these features will improve the performance of your FDM custom parts while reducing manufacturing costs.
The majority of FDM 3D-printed parts are not printed solid. Printing solid parts requires high amounts of material and longer print times, resulting in high costs. To optimize the printing process most parts are printed with solid shells and filled with infill. Shells and infill play an important role on the quality, appearance and function of FDM printed parts.
This article will discuss the difference between shells and infill and how shells and infill can be employed to optimize a design. To level up your design skills for 3D printing, check out this comprehensive one-pager with all of Hubs' top design rules .
What are the major components of an FDM 3D print?
A standard FDM print can be broken down into 4 sections: shells, bottom layers, top layers and infill.
-
Shells: The walls of the print that are exposed to the outside of the model
-
Bottom layers (a type of shell): The part of the print that is exposed to the outside of the model, facing the build plate
-
Top layers (a type of shell): The parts of the print that is exposed to the outside of the model, facing upwards, towards the nozzle. Typically this surface will have the best surface finish
-
Infill: The internal structure of the print
The parameters of these sections can each be altered to optimize a design.
These are the four sections of an FDM print that designers can alter if need be.What are shells in FDM 3D printing?
Shells are the number of layers on the outside of a print.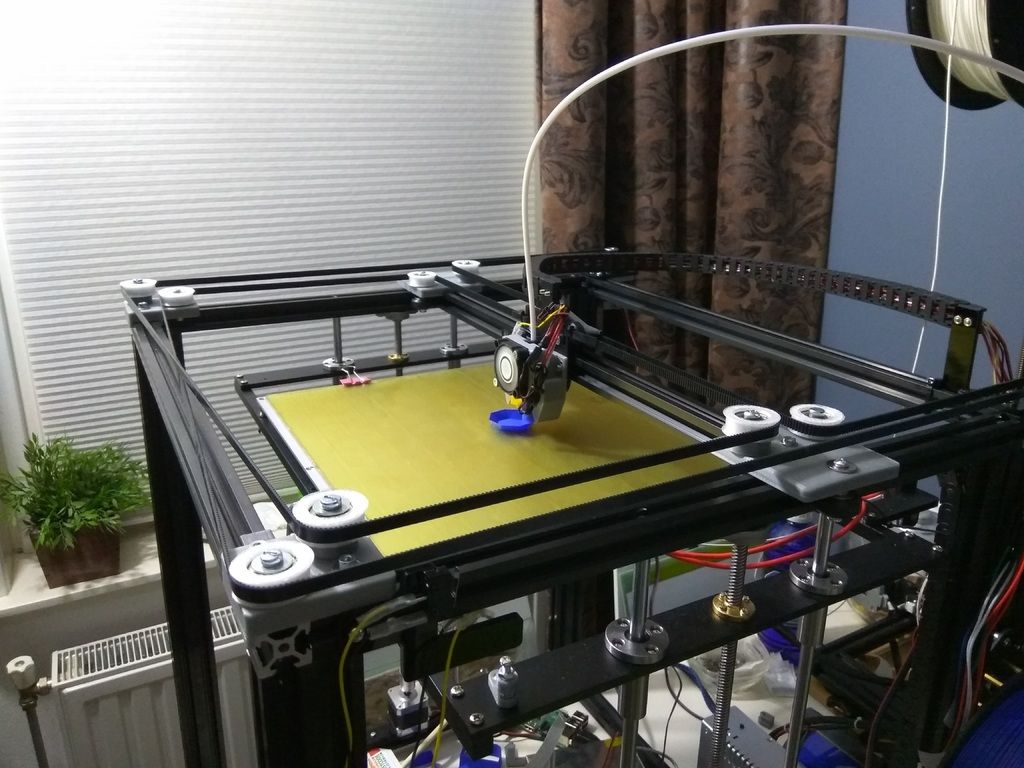 For FDM printing, shells are always the first areas to be printed per layer. Let’s unpack several key design considerations for optimizing shells.
-
Strength can be added by increasing the shell thickness. This allows for a slightly more robust print without having to increase the amount of material used for infill. Most slicer programs allow shell thickness to be adjusted even allowing areas of high stress to be customized with a high shell density offering localized areas of high strength.
-
If you plan on finishing a print by using sanding or chemical smoothing, increasing shell thickness is often necessary. This is because post-processing methods reduce the thickness of the surface of the model.
-
Any increase in the number of shells also increases the amount of time and material required to print the model. This will augment the overall cost of your custom parts.

Shells typically consist of a specified number of nozzle diameters. It’s always good to design shells with multiple nozzle diameters to prevent forming voids in the print. Most shells are printed with a thickness of 2 nozzle diameters (usually this corresponds to 0.8 mm).
Designing walls with multiple nozzle diameters eliminate spacing in wall features, which makes your custom parts stronger.
What is infill for FDM 3D printing?
Objects printed with prototyping FDM technology are rarely completely solid. Typically, the inside of an FDM print is composed of infill, which have varying structures and shapes that can affect the print time, weight, strength and flexibility of 3D-printed components.
By default, most FDM slicer programs will produce parts with 18% to 20% infill, which is perfectly adequate for most 3D printing applications (using FDM). This infill percentage generally allows for faster and more affordable print runs.
Infill percentage
The strength of a design is directly related to a 3D-printed part’s infill percentage. A part with 50% infill compared to 25% is typically 25% stronger while a shift from 50% to 75% increases part strength by around 10%.
Infill percentages for FDM 3D printing can range from 18% and 20% (left) to 50% (middle) and 75% (right).Understanding the application of a final printed part allows a designer to specify the optimal infill percentage. A prototype where the form is important can be printed with very low infill, which results in significant cost and time savings, whereas a bracket that will experience loading will need a higher infill percentage.
As mentioned above, the standard 18% to 20% that most FDM printers use as a default should be acceptable for most applications, though feel free to speak with a Hubs engineer for other potentially more robust infill options.
Feature strength
Infill also plays a critical role in how extended/protruding features are connected to a model. Snap-fit connections are a good example of this. The base of a snap-fit connection is often a weak point.
With a low infill density (20%), the cantilever is much more likely to break as the short extruded clip is only connected to the body of the print by a small cross-sectional area. Increasing the infill percentage means that more of the body of the print is connected to the cantilever, thereby increasing the strength of this connection.
Inspect these two broken snap-fit connectors. The white one has 20% infill and the grey one has 100% infill. The higher infill percentage results in a much stronger connection to the body of the print.Screwing, tapping or bolting
An important factor to remember when choosing the infill percentage of your 3D-printed parts is whether you’ll need to drill holes or place screws into the component.
Consider a print with low infill that is going to be drilled and then screwed to another surface. Often the drill holes will go through the top and bottom layers of the print and miss the infill of the model, creating a very weak connection. For these applications, a higher infill is desirable (50% minimum).
Connections that utilize clearance holes and bolts are better suited to parts with a low infill percentage. The shells, walls, and infill offer good compressive strength providing better anchoring of the part.
Compare these three illustrations. A represents poor anchoring for a screw. B shows that increased infill allows for better anchoring. C shows that increasing the outer shell is a cheaper solution and offers improved anchoring.Infill geometry
For a standard FDM print, the machine will add the infill structure as an angled hatch or a honeycomb shape. Let's look at the four most common infill geometries and their optimal uses.
Rectangular - This is the standard infill pattern for FDM 3D prints. It's strong in all directions and is reasonably fast to print, and requires the printer to do the least amount of bridging across the infill pattern.
Triangular or diagonal - This geometry is used when strength is needed in the direction of the walls. Triangles take a little longer to print.
Wiggle - This geometry allows the model to twist or compress, as well as be softer. It can be a good choice, particularly with a soft rubbery material or softer nylon.
Honeycomb - This is one of the more popular infills. It's quick to print and is very strong, providing strength in all directions.
New to 3D printing or need a comprehensive refresher?
Get our guide to 3D printing
What are the best practices for setting shell and infill parameters?
Designing parts for FDM 3D printing involves a lot of steps, and it's easy to forget certain factors and features. Choosing the right infill percentages and geometries, and optimizing the use of shells, will definitely improve how your custom parts turn out.
-
Remember to take into account the application of the parts you're sourcing. This will affect the shell thickness and infill percentage you need to set. Increases in shell thickness and infill percentages lead to higher strength but also longer print times and augmented costs.
-
Design shells with multiple nozzle diameters.
-
If you need to place screws in a part, increase the shell thickness or infill percentage to improve anchoring. If this isn't feasible (or possible), consider using clearance holes and bolting with washers.
-
For cheaper rapid prints, rectangular infill is optimal thanks to its swifter print speed. Honeycomb or triangular infills boost part strength compared to rectangular geometries, so use either of these two if higher strength is critical to your part's functionality.

Curious about the cost of FDM 3D printing?
Our online FDM 3D printing service Upload a CAD file for a free, instant quote
Ready to transform your CAD file into a custom part? Upload your designs for a free, instant quote.
Get an instant quoteHow to Get the Perfect Wall/Shell Thickness Setting – 3D Printing – 3D Printerly
There are many terms when it comes to 3D printing, but shell thickness is one you may have come across recently. It definitely has its importance in the results of your prints. In this post, I will detail how to get the perfect shell thickness settings for your prints.
How do I get the perfect Shell Thickness settings? The default wall thickness in Cura is 0.8mm which provides a minimal amount of strength for standard 3D prints. For prints that need durability, a good wall/shell thickness would be around 1.6mm and above. Use at least 3 walls for more strength.
This is the basic answer on how to get the perfect shell thickness, but there are some useful details that you can learn in the rest of this post. Keep reading to brush up on your knowledge of shell thickness settings.
What Is Wall/Shell Thickness?
Wall & shell means the same thing in 3D printing, also known as perimeters so you’ll see these used interchangeably. Cura refers to is as walls so that is the more standard term.
Put simply, shells are the walls of your prints that are exposed to the outside of your model, or just the exterior of your object.
Bottom layers and top layers are also known to be a type of wall because it’s on the exterior or outside of the object.
The main settings you’ll come across is the number of walls and the wall thickness. They both work together to create a certain sized wall around your print. Shell or wall thickness is a combination of your wall width in mm and the number of walls.
If you have a low wall thickness and several walls, it will basically be the same as having a high shell thickness and fewer walls.
How Does Wall Thickness Benefit My Parts?
The main benefit of increasing wall thickness is to add to the strength and durability of a part. These are necessary for prints that serve some kind of functionality, such as a mount, holder or handle.
Adding to your wall thickness is a good alternative to adding tons of material for a higher percentage of infill as found in the video below by CNC Kitchen.
One of the key features you can do for wall thickness is to adjust your prints to have more wall thickness or walls in weaker areas where parts are likely to break.
You do need to keep in mind, adding a large wall thickness for parts that require precision can alter its shape enough to make it unfit for purpose.
It’s not the end of the world because parts can be sanded down to accurate dimensions but this will take extra work, and depending on the part design and complexity, might not be possible.
Larger wall/shell thicknesses creates a sturdy, durable model and also decreases the chance of any leaks. On the other hand, a lower wall thickness can significantly reduce filament used and print times.
How is Wall/Shell Thickness Calculated?
The usual practice for shell thickness is to have a value which is a multiple of your nozzle diameter.
For example, if you have a nozzle diameter of 0.4mm, you want your shell thickness to be 0.4mm, 0.8mm, 1.2mm and so on. This is done because it avoids print imperfections and gaps occurring.
In terms of figuring out shell thickness, it’s usually calculated to be a value of two nozzle diameters, being 0.8mm for a standard 0.4mm nozzle.
In Cura, the wall thickness is already calculated for you and overridden by line width so when you change your line width input, wall thickness will automatically change to be line width * 2.
When you’re printing with a weaker, brittle material, overall shell thickness can make or break you (excuse the pun), so make sure you’re clued-up on these settings.
To adjust overall shell thickness, you’ll have to change the wall line count setting. Having a shell thickness of 0.8mm means a wall line count of 4 would give you a 3.2mm wall.
How to Get the Perfect Wall/Shell Thickness
Now on to getting the perfect wall thickness.
Honestly speaking, there is not one particular perfect wall thickness that will work the best for your prints, but you usually want to be in a 0.8mm-2mm range.
The first thing you should know is that every print has its purpose and functionality. Some are printed simply for looks and aesthetics, while some are printed to under a load or physical bearing.
You need to determine the use of your part before you can identify what the perfect shell thickness would be for you.
If you’re printing a vase, you wouldn’t need such a wide thickness because durability isn’t a necessary characteristic for its use, although you don’t want it to break, so you’ll need a minimum.
On the other hand, if you are printing a wall mount bracket, you’ll need the right material, infill and plenty of walls to make the part as strong as possible.
An example is if you print a part with 0% infill and just a 0.4mm wall it will be very weak and easy to break, but add a few walls to it, and it will make it a lot stronger.
So, this will be trial and error from gaining experience with different shell thicknesses. Once you get the hang of it and understand how it works and looks, you’ll be able to determine the perfect shell thickness with ease.
What is the Minimum Wall Thickness for 3D Printing?
You rarely want a wall thickness that is below 0.8mm. For models that need durability, I’d recommend 1.2mm and above because according to IMaterialise who deliver custom 3D prints, these are most likely to break during transit. There isn’t really a maximum but you don’t really see above 3-4mm in normal cases.
If your model has fragile parts and thin structures such as the limbs on a figurine, shell thickness would help out a lot.
Having a 3D print wall too thick can also cause issues so watch out for that. This happens with more detailed designs where parts of the print are close to others. At a certain shell thickness, there will be overlap between parts so try to balance it out at a level where you see fit.
If you want your prints to have some flexibility, a thick shell won’t work too well for that as it makes your prints more rigid. Another thing you should know is an overly large wall thickness creates internal stress that can actually result in warping and print failure.
Some slicers have an in-built function to stop people adding too large of a wall to their models.
There is a minimum thickness that a 3D printed part needs to have to be able to hold up at all.
When it comes to how thick 3D printed parts should be, Fictiv found that 0.6mm is the absolute minimum and also the thinner your part’s shell thickness, the higher the chance that something goes wrong during the process.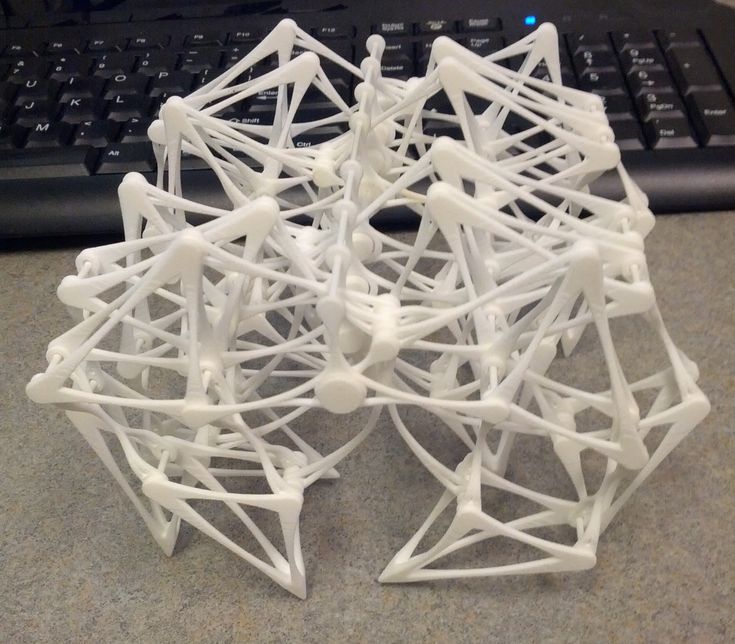
The reason this happens is because of the nature of 3D printing and its layer by layer process. If melted material doesn’t have a good foundation underneath, it can have trouble building up.
Models with thin walls are more prone to warping and gaps in the print.
What is a Good Wall Thickness for PLA?
For PLA 3D prints, the best wall thickness is around 1.2mm. I’d recommend using a wall thickness of 0.8mm for standard prints that are for looks and aesthetics. For 3D prints that require strength and durability, try using a wall thickness of 1.2-2mm. Walls are the best method to improve strength for PLA 3D prints.
For the top/bottom thickness, you can use the same measurements whether you have a 3D printed like the Ender 3 V2 or Anycubic Vyper.
3D Printing Wall Thickness Vs Infill
Wall thickness and infill are two factors in 3D printing to increase the strength of your 3D prints. When it comes to wall thickness vs infill, it’s better to use wall thickness for strength.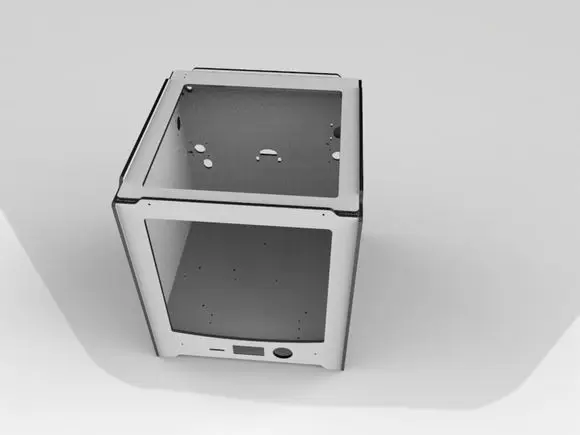 A model with 0% infill and a 3mm wall will be very strong, while a model with a 0.8mm wall and 100% infill won’t be as strong.
The level of strength by increasing infill percentage decrease as you go up in infill percentage.
Hubs measured that a part that has 50% infill vs 25% is around 25% stronger, while using an infill of 75% vs 50% might increase the part strength by around 10%.
3D prints will be more durable and less prone to breakage when you have a strong wall thickness, but using a combination of wall thickness and a high infill percentage is the best.
You’ll have an increase in material and weight with both of these factors, but wall thickness uses less material in comparison to how much strength it adds.
Check out the video below for a great illustration of this.
Part orientation is also important with strength. Check out my article Best Orientation of Parts for 3D Printing.
Thermal cabinet (box) for 3D printers
In the world of rapid development of 3D printers, all kinds of applications for them are also rapidly gaining momentum, one of these is thermal box. The main difficulty of FDM printing on 3D printers that do not have a closed or semi-closed housing is the preservation of thermal climate. Thus, many enterprising users resort to the use of thermal cabinets.
Shakf is any structural shell for a 3D printer that allows you to maintain temperature conditions. Simply put, it is a box to store heat and prevent external factors from changing the printing conditions. The shell helps the 3D printer stabilize the printable area, neutralize external factors and prevent warping. Such chambers are especially important for printing ABS plastic.
There are many ways and different materials used for cabinets. They may have one or more doors, some models are acrylic, others are metal. And there are also models designed for a specific 3D printer. Although this makes them more reliable, it also increases the price, often provided by the companies themselves as optional accessories for a 3D printer.
They are available from online stores such as Amazon and Ebay. But it is possible to find this device in the form of printable files, on sites such as thingiverse. While some are kits, others may require users to print additional latches or locks. Some kits are as easy as using a hex driver to tighten screws, while others have to be glued or drilled.
Simple DIY 3D Printer
This is the cheapest option. A simple DIY case will certainly help, but it has to be done right. For example, the picture above uses acrylic boxes. It consists of 2 boxes fastened together and reconfigured with a cutting wheel.
When making this box, remember that you need to run wires, and it is also important to provide enough space for the 3D printer to move in all 3 axes. The shape should also allow for easy loading and unloading of the filament. In addition, consideration must be given to how best to set up the 3D printer to correct values such as table alignment and jamming in case of printing errors.
Complex DIY 3D Devices
The figure above shows a relatively complex system. It uses a metal frame with various printed parts. It has a complex anatomy and is carefully positioned according to the 3D printer. This particular sample costs just under $400. This may sound expensive, but it is a very complex system with a heat sensor and very specific materials.
The advantage of a DIY shell is that it can fit your 3D printer. The system shown above also appears to be more robust, and the configuration makes it easier to calibrate the 3D printer.
Other examples of simple products:
Instructables has many examples, but one of the best is Schlem. It consists of a series of plexiglass panels connected by hinged corners and ABS.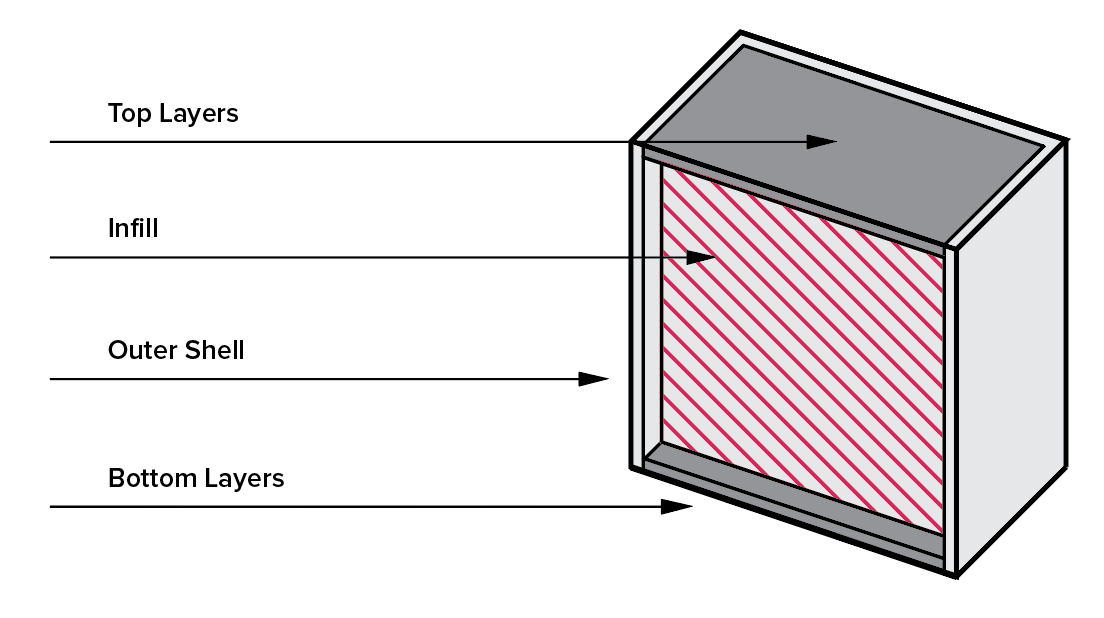 Connecting parts are made of ABS.
Robert Soyak created a great cabinet using a simple frame with a bunch of ingredients, including 10x10mm slats, small hinges, a couple of screw latches, a handful of small corner brackets, and 6 meters of window duct tape. It consists of acrylic panels, hinges, lock nuts and screw latches, as well as room for a fan and additional electronics.
If wood is your preference, GrabCad has a tutorial on how to build this device. Originally built by a user named Jonathan, the hotbox is a sleek and functional device. It's like the LeapFrog Bolt front panel is warped in the middle.
Hotbox is suitable for any 3D printer that does not exceed 26x26x24. It has a removable hood, LEDs for lighting - space for a cooling fan. An internal 72W power supply is required to power the fan and LEDs. It takes quite a bit of work to create a hotbox, but it's certainly one of the most impressive skins out there.
Of course, if you save on buying the 3D printer itself, but want to get
high-quality printing you will need such a miracle cabinet, but maybe you should immediately buy a 3D printer, with a closed or semi-closed case and don’t think about it anymore, especially since the price is not much different.
Top 20 Free 3D Printing and 3D Printing Software
Looking for a 3D printing software? We've rounded up the top 20 software tools for beginners and professionals alike. Most slicers are free.
What is a slicer? This is a program for preparing a digital model for printing. Models for 3D printing are usually distributed in STL files. To turn an STL file into G-code (a language that a 3D printer understands), a slicer program is required. It is called a slicer because it cuts (to slice - English) a 3D model into many flat two-dimensional layers, from which a 3D printer will add a physical object.
Which slicer should I choose? In this article, we will tell you which slicer is the best choice for 3D printing for each stage of your work. Which one is better for preparing a 3D model for printing? But what if you need to create a 3D model from scratch? And if you are only taking the first steps in 3D?
Don't be afraid, we've answered all of these questions, including the required skill level for each program and where you can download it. The great thing is that most of these programs are completely free and open source.
- Cura
- CraftWare
- 123D Catch
- 3D Slash
- TinkerCAD
- 3DTin
- Sculptris
- ViewSTL
- Netfabb Basic
- Repetier
- FreeCAD
- SketchUp
- 3D Tool
- Meshfix
- Simplify3D
- Slic3r
- Blender
- MeshLab
- Meshmixer
- OctoPrint
#1: Cura
For beginners who need a slicer to prepare STL files for 3D printing
Cura is the default slicer software for all Ultimaker 3D printers, but can be used with most others , including RepRap, Makerbot, Printrbot, Lulzbot and Witbox. The program is completely open source, its capabilities can be extended using plugins.
This program is very easy to use and allows you to manage the most important 3D printing settings through a clear interface. Start in Basic mode to quickly get up to speed and change print quality settings. If finer control is required, switch to Expert mode.
Cura can also be used to directly control the printer, but then the printer and computer must be connected to each other.
Download: Cura
Price: Free
Systems: PC, Mac, Linux
#2: CraftWare
For beginners to prepare STL files for 3D printing its crowdfunding device CraftBot. However, the program works with other printers.
Like Cura, CraftWare allows you to switch from "Easy" to "Expert" mode, depending on how confident you feel. It's a colorful app that features a visual G-code visualization with each function represented by a different color. But the most outstanding feature is the individual support service. As far as we know, only the paid program Simplify3D has this.
Please note, however, that this program is still in beta, so bugs may occur.
Download: CraftWare
Price: Free
Systems: PC, Mac
#3: 123D Catch
-systems, smartphones and tablets, which allows you to convert images of objects into a 3D model. Pictures can be taken with a smartphone/tablet or digital camera.
You need a lot of photos of the object from different angles - the more the better - after which a 3D model will be compiled from them.
123D Catch is more of a fun app than a professional 3D printing tool, but after some tambourine dancing, you can get good results, especially when paired with an STL editor like MeshLab or Meshmixer.
Price: Free
Systems: PC, Android, iOS, Windows Phone
#4: 3D Slash
For beginners who want to create 3D printable models
This is a 3D printing program that is both amazingly simple and refreshingly new. With 3D Slash, you can design 3D models using your dice skills.
You can start with a large block and, like a virtual sculptor, remove small cups from it with tools such as a hammer or drill, or start from empty space and build a model out of cubes and other shapes. You can paint with flowers or use template pictures.
Other features worth mentioning are tools for creating logos and 3D text. The Logo Wizard imports an image and creates a 3D model, while the Text Wizard allows you to enter and format text, and then turn it into 3D.
Recommended!
Download: 3dslash.net
Price: Free
Systems: PC, Mac, Linux, Browser
#5: TinkerCAD
For beginners who want to create printable 3D models
TinkerCAD is an online 3D printing computer-aided design (CAD) system that is a good starting point for beginners. Since its capabilities are limited compared to Blender, FreeCAD and SketchUp, many users switch to more powerful tools after some time.
As in 3D Slash, here you can build models from basic shapes. At the same time, unlike 3D Slash, TinkerCAD allows you to create vector shapes in 2D and convert them into three-dimensional models.
Come in: Autodesk TinkerCAD
Price: Free
Systems: Browser
#6: 3DTin
For beginners who want to create 3D printable models
another simple, intuitive tool online choice for beginners in 3D modeling. All you need is a Chrome or Firefox browser with WebGL enabled.
Choose from a huge library of 3D shapes and add them to your sketch. All sketches are stored in the cloud, access to them is free if you honor the Creative Commons license. Everything can be exported to STL or OBJ formats.
Enter: 3DTin
Price: Free
Systems: Browser
#7: Sculptris
For beginners who want to create 3D printable models
clay. This is a fantastic 3D modeling program if figurines are your main task. For example, you can make a bust of your favorite video game or comic book character. Sculptris is completely free and bills itself as a stepping stone to the more complex (and expensive) ZBrush tool.
Download: Pixologic Sculptris
Price: Free
Systems: PC, Mac
#8: ViewSTL
For beginners who want to view STL files
ViewSTL is the easiest way to view STL files . Simply open a web page and drag the STL onto the dotted box.
The STL online viewer allows you to display the model in one of three views: flat shading (for a quick view), smooth shading (for a high-quality image), and wireframe.
Enter: ViewSTL
Price: Free
Systems: Browser
#9: Netfabb Basic
some nice features that allow you to analyze, "repair" and edit STL files before moving on to the model cutting stage.
A good choice if you need more than just a slicer and want to be able to quickly fix STL files without having to learn programs like MeshLab or Meshmixer.
Don't let the 'Basic' in the name fool you, Netfabb Basic is actually a very powerful 3D printing tool. It's "basic" only in the sense that it doesn't cost €1,500 like Netfabb Professional!
Download: netfabb.de
Price: Free
Systems: PC, Mac, Linux
No. 10: Repetier
For advanced to prepare STL files for 3D printing
9002 the next level of 3D printer slicer software, but if you want to stay open source, you should look into Repetier. It is the great grandfather of 3D printing software and a favorite of the RepRap community.
 Today the program is moving by leaps and bounds from the level for beginners to advanced users. Packaged in an all-in-one configuration, it supports up to 16 extruders, multi-slicing via plug-ins, and virtually every fusing 3D printer on the market. Get ready to tinker!
What's more, Repetier Host works remotely via Repetier Server, so that the 3D printer can be controlled via a browser, tablet or smartphone.
Download: Repetier
Price: Free
Systems: PC, Mac, Linux
#11: FreeCAD
The program is a great option for developing your design skills. More technically, this parametric 3D modeling program allows you to easily change the project by rolling back through the history of the model and editing the parameters.
Download: freecadweb.org
Price: Free
Systems: PC, Mac, Linux
#12: SketchUp
For beginners who want to create 3D printable models
SketchUp is the perfect combination of simplicity and the perfect combination functionality, with a user-friendly interface and a relatively flat learning curve (i. e., as experience grows with the time spent), the ideal program for developing three-dimensional models.
The Make SketchUp version is free and will have everything you need for 3D modeling if you also download and install the free STL exporter. There is also a professional edition for architects, interior designers and engineers.
Download: sketchup.com
Price: Free (SketchUp Make), $695 (SketchUp Pro)
Systems: PC, Mac, Linux
#13: 3D-Tool Free Viewer
view and check STL files
3D-Tool Free Viewer is a sophisticated tool that, among other things, allows you to check the structural integrity and printability of your file. With the Cross-Section function, for example, you can look at the model from the inside and check the wall thickness. Very useful if you want to check your STL file for killer errors before printing.
Download: 3D-Tool
Price: Free
Systems: PC
#14: Meshfix
your model for errors.
Price: Free
Systems: Browser
#15: Simplify3D
For professionals to prepare STL files for 3D printing print. A flexible algorithm checks the model for problems, fixes them, shows a preview of the printing process (ideal for identifying potential problems), and then slices it.
This slicer offers the best infill pattern options in the competition. For models that require supports, Simplify3D will create the appropriate structures on its own and give you full control over their placement. For printers with a dual extruder, when printing with different materials, the Dual Extrusion wizard will help, as a result of which, for example, it will be easier to remove the dissolving filament.
Simplify3D supports 90% of today's commercially available desktop 3D printers and is compatible with Marlin, Sprinter, Repetier, XYZprinting, FlashForge, Sailfish and MakerBot firmware. Simplify3D can also be used to directly control the printer, but then the printer and computer must be connected to each other.
Download: simplify3d.com
Price: $149
Systems: PC, Mac, Linux
#16: Slic3r
source code, which has a reputation as a carrier of super new functionality, which you will not find anywhere else. The current version of the program is able to show the model from multiple angles, so that the user gets a better preview experience.
There's also an incredible 3D honeycomb infill, the first of its kind that can extend over multiple layers rather than repeating itself like a stamp. This significantly increases the strength of the internal filling of the model and the final printout.
Another option is direct integration with Octoprint. Once the files on the user's desktop are sliced, they can be directly uploaded to Octoprint with one click.
Download: Slic3r
Price: Free
Systems: PC, Mac, Linux
#17: Blender
For professionals who want to create 3D printable models
Blender is a popular computer-aided design (CAD) system with a steep learning curve. Not at all the best choice for beginners, but what you need if you are quite experienced and need something more complex for modeling and printing.
In short, Blender is one of the most powerful tools in existence. Its community is always ready to help, there are a lot of educational materials. It's also open source, so enthusiasts often write extensions to make it even better and more powerful.
Download: blender.org
Price: Free
Systems: PC, Mac, Linux
#18: MeshLab
For professionals to prepare STL files for 3D printing
MeshLab - advanced editor. It allows you to remove parts of a 3D model, merge two models into one, patch holes. If you need a program to modify models for 3D printing or some kind of "repair" work, MeshLab is the right choice.
Price: Free
Systems: PC, Mac, Linux
#19: Meshmixer
For professionals to prepare STL files for 3D printing files. It's especially good for identifying potential problems and fixing them automatically.